LED Remote, System Controller, Mini Remote (depending on version)
Connectivity
Bluetooth Low Energy 5.0, eBike Flow app
Lighting
Integrated, controlled via remote control
Walk assistance
Yes, activation via dedicated button
Brakes
Hydraulic disc brakes (not specified, but standard on this model)
Drivetrain
Derailleur (not specified, typically Shimano or SRAM)
Maximum rack load
20 kg (rear battery) or 25 kg (downtube battery)
Maintenance
Clean with a soft, damp cloth, no high-pressure jet. Annual service by an authorized dealer
Battery storage
Temperature 10-20°C, charge at 30-60% for long periods
Safety
Helmet recommended, respect regulations, be aware of higher speed than conventional bikes
Warranty
Limited lifetime warranty on frame (subject to conditions)
Spare parts
Use only original Bosch parts, repair by an authorized dealer
Frequently Asked Questions - Powerfly 5 Gen 4 TREK
How to turn on my Trek Powerfly 5 Gen 4 electric bike?
Briefly press the On/Off button on the battery or the remote control (depending on configuration). The eBike system starts up and the indicator lights show the charge level and assistance mode.
How to change the assistance level while riding?
Use the + and - buttons on the remote control (LED Remote, System Controller or Mini Remote) to increase or decrease the assistance level. Changes are visible on the display and LEDs.
How to recharge the battery of my Powerfly 5?
Turn off the battery, plug the Bosch 4A charger into a mains socket, then connect the charging connector to the battery charging port. Charging can be done on or off the bike. LEDs indicate progress. Once full, the lights turn off.
What to do if the display shows an error?
Identify the error code. For non-critical errors (orange flashing), press the selection button to acknowledge. For critical errors (red flashing), stop using the bike and contact an authorized dealer. Check the eBike Flow app for more information.
How to use walk assistance?
Press the walk assistance button (usually the - button) for more than one second, then push the bike forward or backward. The motor helps up to 4 km/h. Release the button to pause; press again within 10 seconds to reactivate.
What assistance modes are available?
Modes vary according to dealer configuration. They may include OFF, ECO (economy), TOUR (balanced), eMTB (all-terrain), TURBO (maximum), AUTO (adaptive), RACE (performance), and CARGO (transport). You can customize them via the eBike Flow app.
How to maintain the battery to extend its lifespan?
Store the battery in a dry place between 10°C and 20°C, with a charge level of 30 to 60% if unused for more than 3 months. Do not let the battery fully discharge. Clean the contacts with a soft cloth and avoid pressurized water.
Can I install a rack on my Powerfly 5?
Yes, but respect the maximum load: 20 kg if the battery is at the rear, 25 kg if it is on the downtube. Do not exceed these limits to avoid damaging the frame or electrical system.
How to connect my smartphone to the bike?
Download the eBike Flow app on your smartphone. Enable Bluetooth and turn on the eBike system. Press and hold (more than 3s) the On/Off button on the remote control until the LED flashes blue, then follow the instructions in the app.
What to do if my bike no longer turns on?
First check that the battery is properly installed and sufficiently charged. Try pressing the battery On/Off button. If nothing happens, inspect connections and fuses. If the problem persists, contact an authorized Bosch dealer.
User questions about Powerfly 5 Gen 4 TREK
1 question about this device. Answer the ones you know or ask your own.
Ask a new question about this device
How do I turn on the lighting of my TREK Powerfly 5 Gen 4?
Frequently Asked Questions -4 j
Response Notice-Facile
The lighting of your TREK Powerfly 5 Gen 4 is controlled via your remote control or remote command. Always check the lighting functionality before each departure.
With the LED Remote (BRC3600): Press the button (9) for more than 1 second to turn the lighting on or off. You can then use buttons (11) and (10) to adjust the brightness of the LEDs to your liking.
With the Mini Remote (BRC3300): Press the button (4) labeled “Increase Assistance/Bike Lighting” for more than 1 second to turn the lighting on or off. This is the same button that increases the assistance level.
With the System Controller (BRC3100): Use the button (4) “Increase Assistance/Bike Lighting” in the same way as the Mini Remote: press for more than 1 second to activate or deactivate the lighting.
To turn off the lighting: Press the same button again to turn off the lights. The brightness of your screen automatically adjusts based on ambient light thanks to a built-in sensor, but you can also adjust it manually using the buttons available on your remote control.
Respond (be the first)
Download the instructions for your Bike in PDF format for free! Find your manual Powerfly 5 Gen 4 -
TREK and take your electronic device back in hand. On this page are published all the documents necessary for the use of your device. Powerfly 5 Gen 4 by TREK.
USER MANUAL Powerfly 5 Gen 4 TREK
OWNER'S MANUAL BENUTZERHANDBUCH GEBRUIKERSHANDLEIDING LE MANUEL DU PROPRIÉTAIRE
ELECTRIC BICYCLE
DE
N
FBN
powered by
BOSCH
The Smart System (25 km/h)
TREK
Diamant
Electra
IT IS IMPORTANT TO READ THE WARNINGS AND INSTRUCTIONS IN THIS MANUAL BEFORE RIDING YOUR NEW BICYCLE.
LESEN SIE SÄMTLICHE WARNINGNHEISE UND ANWEISUNGEN IN DIESER BEDIENUNGSANLEITUNG VOR DER ERSTEN FAHRT MIT IHREM NEUEN BIKE GRUNDLICH DURCH.
HET IS BELANGRIJK DE WAARSCHUWINGEN EN INSTRUCTIONS IN DEZE HANDLEIDING TE LEZEN VOOR U MET UW NIEUWE FIETS RIJDT.
IL EST IMPORTATI LIRE LES MISES EN GARDE ET INSTRUCTIONS CONTENUES DANS CE MANUEL AVANT D'UTILISER VOTRE NOUVEAU VÉLO.
Welcome to our bike family
Thank you for purchasing your new bike.
We believe in bikes. We make high quality bikes that are built to last. That is why each bike we make comes with a limited lifetime warranty.
We wish you many carefree and enjoyable cycling kilometers with your new bike!
However, if you experience any problems with your bike, do not hesitate to contact your local retailer.
If the problem persists, please call our customer service for a solution.
Even if you have ridden a bicycle for years, it is important for every person to read the general "Bike Owner's manual" and the specific "Electric Bicycle Owner's manual" carefully before you ride on the new e-bicycle.
Both manuals contains detailed information and useful suggestions about your new bicycle.
Make sure that you understand the proper use, maintenance, and disposal of the components of the electrical system of your new e-bicycle.
Think about safety. Your safety and that of other road users is very important.
Do not ride the electric bike without the battery pack. The battery pack must be on the bike while riding, else the bike has no lights when needed.
Do not misuse the electric bike by riding it without a saddle. Some bikes have a quick release on the seat post. If the saddle gets stolen, it may lead to hazardous situations when still riding on the electric bike without a saddle.
Check your bike for normal operation, loose parts and defects before riding. If you find any problem, visit your bike dealer for repairs before riding.
Be aware that other road users do not expect that an electric bike can ride faster than a normal bike. Riding faster also increases the risk of accidents.
Do not ride abusively. Only ride in the use conditions specified for your bike. Condition 1 (paved roads with tires, staying on the ground) is valid for electric City/Trekking bikes, condition 3 (rougher surfaces, tires momentarily NOT on the ground) is valid for electric Mountain bikes. Please refer to the general Bicycle Owner's manual for more detailed information.
Do not over load the rear rack. The maximum allowable weight for the rear rack on electric bikes is 20kg for bikes with a rear rack battery pack and 25kg for bikes with a down tube battery. On bicycles with a luggage rack at both sides of the rear fender only, without a top deck, the maximum allowed load on the rack is 15kg in total.
The electric system of your new bicycle needs special attention.
Do not clean your electric bicycle with a high pressure washer. Any electric system is sensitive for moisture. High pressure water might ingress in connectors or other parts of the electric system.
Handle your battery pack with care. Do not drop or impact the battery pack. Mishandling of the battery pack could lead to severe damage or over-heating. In an extremely rare case, a battery pack that has been severely impacted or otherwise mishandled could potentially catch fire. If you suspect damage to your battery pack, visit your dealer immediately for inspection.
Maintain the battery pack as instructed in this Electric Bicycle Owner's manual.
Failure to follow these instructions may result in damage to your battery pack and may require battery pack replacement.
Only charge the battery pack with the included Bosch charger.
When not using the battery pack for a longer period, charge it to approx. 60% (3 to 4 LEDs lit on the charge-control indicator). Check the charge condition after 6 months. When only one LED of the charge-control indicator lights up, recharge the battery pack again to approx. 60% .
It is not recommended to have the battery pack connected permanently to the charger.
When the battery pack is stored discharged (empty) for longer periods, it can become damaged despite the low selfdischarging and the battery-pack capacity may be strongly reduced.
Store the battery pack in a dry, well-ventilated location. Protect the battery pack against moisture and water.
Under unfavorable weather conditions, it is recommended e.g. to remove the battery pack from the bike and store it in an enclosed location until being used again.
Store the battery packs in the following locations: in a room with a smoke alarm, away from combustible or easily flammable objects and away from heat sources.
The battery pack can be stored at temperatures between -10^ and +60^ . For a long battery pack life, however, storing the battery pack at room temperature of approx. 20^ is of advantage.
Take care that the maximal storage temperature is not exceeded. As an example, do not leave the battery pack in a vehicle in summer and store it out of direct sunlight.
It is recommended to not store the battery pack on the bike.
5. Be careful when transporting an electric bicycle.
An e-bike is heavier than a normal bike. If transporting on a vehicle, be aware of the maximum load capacity of the vehicle's roof, towing hook and/or of the applied bike carrier. Refer to the manual of the vehicle and bike carrier for details.
Remove the controller, battery pack and, if present, panniers from the bicycle and store them elsewhere in the vehicle during the drive.
Always respect local laws about transportation of a(n electric) bicycle.
Because Li-1on battery packs of this size and power are considered 'Dangerous goods, class 9' when transporting, regulations may restrict the transport of separate Li-1on batteries in some places. The restrictions apply to most airlines and some trucking companies. But, if you intend to ship or travel with your complete e-bike (with installed battery pack), the regulations are less strict. Make sure to check ahead with your airline or carrier, before booking your trip, if it is allowed to travel with your complete e-bike.
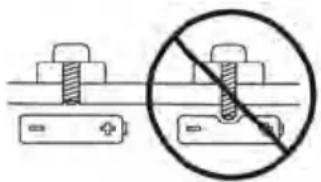
6. Mounting accessories on an e-bike.
An electric bike has hidden wiring through frame and has other critical e-bike parts like the drive unit and battery pack. When mounting accessories (e.g. a bottle cage), be sure not to impact the wiring or battery pack, e.g. by using too long or pointed bolts. This might cause a short circuit to the electric system and/or damage to the battery.
WARNING. A short circuit in the electric system and/or damage to the battery might lead to over-heating. In an extremely rare case, a battery pack that has been severely impacted could potentially catch fire.
7. Visit your dealer on a regular basis for maintenance of your new e-bike.
To guarantee the safe and proper functioning of the bike, the bike must be maintained on a regular basis, at least once a year, by an authorized electric bicycle dealer.
Your dealer has the right knowledge and equipment to maintain your e-bike and to mount accessories safely.
If you have questions about your new electric bicycle, ask your dealer!
Compliance
Your bicycle has been designed, tested, and produced in accordance with the applicable European Directives and Harmonised Standards. Therefore, all electric bicycles are in compliance with CE. For more detailed compliance information, please refer to the Declaration of Conformity (DoC) which was included along with your bicycle. If you have misplaced your DoC, a new one can be furnished upon request, by the bicycle shop at which you purchased your electric bicycle.
Limited warranty
Your bicycle is covered by a Lifetime Limited Warranty. Please visit our web site for details.
Read all the safety information and instructions. Failure to observe the safety information and follow instructions may result in electric shock, fire and/or serious injury.
Save all safety warnings and instructions for future reference.
The term battery is used in these instructions to mean all original Bosch eBike rechargeable battery packs.
Read and observe the safety warnings and directions contained in all the eBike system operating instructions and in the operating instructions of your eBike.
Do not attempt to secure the display or operating unit while riding.
Do not allow yourself to be distracted by the on-board computer's display. If you do not focus exclusively on the traffic, you risk being involved in an accident. If you want to make entries in your on-board computer other than switching the assistance level, stop and enter the appropriate data.
Do not use your smartphone while riding. If you do not focus exclusively on the traffic, you risk being involved in an accident. Only enter the relevant data having stopped first.
Set the display brightness so that you can adequately see important information such as speed and warning symbols. Incorrectly set display brightness may lead to dangerous situations.
Do not open the on-board computer. Opening the onboard computer may damage it beyond repair and void any warranty claims.
Do not use the on-board computer as a handle. Lifting the eBike up by the on-board computer can cause irreparable damage to the on-board computer.
Do not stand your bicycle upside down on its saddle and handlebars if the on-board computer or its holder protrude from the handlebars. This may irreparably damage the on-board computer or the holder. Also remove the on-board computer before placing the bicycle on a wall mount to ensure that the on-board computer does not fall off or become damaged.
- Caution! When using the on-board computer with Bluetooth® and/or WiFi, interference can occur with other devices and equipment, aircraft and medical devices (e.g. pacemakers, hearing aids). Likewise, injury to people and animals in the immediate vicinity cannot be excluded entirely. Do not use the on-board computer with Bluetooth® in the vicinity of medical devices, petrol stations, chemical plants, areas with a potentially explosive atmosphere or on blast sites. Do not use the on-board computer with Bluetooth® in aeroplanes. Avoid using the on-board computer near your body for extended periods.
The Bluetooth® word mark and logos are registered trademarks owned by Bluetooth SIG, Inc. and any use of such marks by Bosch eBike Systems is under licence.
The on-board computer is equipped with a wireless interface. Local operating restrictions, e.g. in aeroplanes or hospitals, must be observed.
Safety instructions for coin cells
Only for Australia
WARNING! Ensure that the coin cell is kept out of the reach of children. Coin cells are dangerous.
- Coin cells must never be swallowed or inserted into any other part of the body. If you suspect that someone has swallowed a coin cell or that a coin cell has entered the body in another way, seek medical attention immediately. Swallowing coin cells can result in severe internal burns and death within two hours.
Ensure that coin cell replacement is carried out properly. There is a risk of explosion.
Only use the coin cells listed in this operating manual. Do not use any other coin cells or other forms of electrical power supply.
Do not attempt to recharge the coin cell and do not short circuit the coin cell. The coin cell may leak, explode, catch fire and cause personal injury.
- Remove and dispose of drained coin cells correctly. Drained coin cells may leak and cause personal injury or damage the product.
Do not overheat the coin cell or throw it into fire. The coin cell may leak, explode, catch fire and cause personal injury.
Do not damage the coin cell and or take the coin cell apart. The coin cell may leak, explode, catch fire and cause personal injury.
- Do not allow damaged coin cells to come into contact with water. Leaking lithium may mix with water to create hydrogen, which could cause a fire, an explosion, or personal injury.
Caution! Battery is hazardous and is to be kept away from children (whether the battery is new or used). Battery can cause severe or fatal injuries in 2 hours or less if it is swallowed or placed inside any part of the body. Medical attention should be sought immediately if it is suspected the battery has been swallowed or placed inside any part of the body.
Privacy notice
If the on-board computer is sent to Bosch Service because it requires servicing, the data stored on the on-board computer may be transmitted to Bosch.
Product Description and Specifications
Intended Use
The Intuvia 100 on-board computer is designed to display cycling data.
To access the full functionality of the eBike system and Intuvia 100 on-board computer, you will need a compatible smartphone installed with the eBike Flow app (available from the Apple App Store or the Google Play Store), e.g. for .
Product Features
The numbering of the components shown refers to the illustrations on the graphics pages at the beginning of the manual.
(a) Battery charge indicator
(b) Bike lights display
(c) Assistance level indicator
(d) Drive unit assistance indicator
(e) Unit indicator
(f) Text indicator
(g) Navigation bar
(h) Value indicator
(i) Speedometer
Technical Data
On-board computer Intuvia 100
Product code BHU3200
Operating temperaturea)
°C -5 to +40
Storage temperature °C +10 to +40
Battery 1× CR2450
On-board computer Intuvia 100
Protection rating IP54
Weight, approx. g 63
Bluetooth® Low Energy 5.0
Frequency MHz 2400-2480
Transmission power mW ≤ 1
A) Temperatures outside of this range may cause faults in the display.
The licence information for the product can be accessed at the following Internet address: http://www.bosch-ebike.com/ licences.
Declaration of Conformity
Robert Bosch GmbH, Bosch eBike Systems, hereby declares that the Intuvia 100 radio communication unit complies with Directive 2014/53/EU. The full text of the EU Declaration of Conformity is available to view at the following website: https://www.bosch-ebike.com/conformity.
Robert Bosch GmbH, Bosch eBike Systems, hereby declares that the Intuvia 100 radio communication unit complies with the Radio Equipment Regulations 2017 (SI 2917/1206). The full text of the UK Declaration of Conformity can be accessed at the following Internet address: https://www.bosch-ebike.com/conformity.
Assembly
Inserting and removing the on-board computer (see figure A)
To insert the on-board computer, insert the lugs of the battery compartment (13) into the cradle (8) of the holder, and press the on-board computer gently down. To lock, turn the on-board computer clockwise until it engages.
To remove the on-board computer (9), turn it anticlockwise and remove the on-board computer from the cradle (8).
Remove the on-board computer when you park the eBike.
Inserting the locking screw (see figure B)
The on-board computer can be secured in place to prevent it from being removed from the holder. The on-board computer must be in the holder for this. Undo the fastening screw (14) of the clamp with a hex key until the holder (7) can be moved. Turn the holder (7) until the bottom side of the on-board computer is accessible. Insert the locking screw (6) and bolt it with the on-board computer. Align the holder (7) correctly with the on-board computer and tighten the fastening screw (14) again with a hex key.
Please note: The locking screw is not designed to prevent theft.
Operation
Connection of the On-Board Computer with the eBike System (Pairing)
Your on-board computer is generally already connected with the eBike system. If this is not the case, proceed as follows:
Install the eBike Flow app.
- Activate Bluetooth® on your smartphone and open the eBike Flow app.
- Briefly press the Bluetooth® button.
- The device identification is shown on the display.
- Select the required tool with the same identification in the eBike Flow app.
You can find further information at the following link: https://www.bosch-ebike.com/de/help-center/intuvia-100.
Depending on the smartphone's operating system, the eBike Flow app can be downloaded free of charge from the Apple App Store and the Google Play store.
Use your smartphone to scan the code in order to download the eBike Flow app.
Switching the on-board computer on/off
Switch on the eBike system.
To switch on the on-board computer, gently move the eBike or tap the display.
The following options are available for switching off the onboard computer:
Press the ON/OFF button on the operating unit to switch off the eBike system.
The on-board computer is also switched off.
Remove the on-board computer from its holder. The on-board computer switches off automatically after 60 seconds.
Power supply for the on-board computer
The on-board computer is provided with energy by the CR2450 coin cell.
Changing the non-rechargeable battery (see figure C)
When the non-rechargeable battery of the on-board computer is nearly drained, you're shown a corresponding message on the display. Open the battery compartment cover (2) with a slotted screwdriver (12), remove the used non-rechargeable battery and insert a new non-rechargeable battery of type CR2450. You can obtain the non-rechargeable batteries recommended by Bosch from your bicycle dealer.
When inserting the non-rechargeable battery, ensure that the rubber seal (10) is correctly positioned.
Seal the battery compartment and slide the on-board computer onto the holder.
Battery charge indicator
The on-board computer shows the state of charge of the eBike rechargeable battery in per cent. A notification is displayed once when the battery's state of charge falls below 30% , and again when it falls below 10% . The notification can be confirmed, or it simply disappears after 5 s.
Operation
The Bluetooth® (1) button has various functions. If the onboard computer was connected with an operating unit and has been removed from the holder, the displays can be switched within 60 s. To do so, briefly press the Bluetooth® (1) button.
Note: If you are not going to be using your eBike for several weeks, remove the on-board computer from its holder and set the on-board computer to storage mode. To do so, press the Bluetooth® (1) button for 8-11 s.
The reset button (5) serves to reset the on-board computer to factory settings and delete all connections.
The on-board computer can be operated and the indicators can be controlled via one of the depicted operating units. The meaning of the buttons on the operating units for the display indicators can be found in the following overview.
Depending on how long it is pressed for, the select button has 2 functions.
LED Remote
Mini Remote
Scroll left (only for LED Remote)
English - 4
Scroll right (only for LED Remote)
Increase assistance level
Decrease assistance level
Select button (press briefly)
Select button (press and hold >1 s)
Please note: All screenshots showing the display and text on the following pages are from the approved software version. The display and/or text may change slightly following a software update.
Note: Depending on the lighting conditions, there is background lighting that is only activated by pressing a button. The lighting duration can be adjusted.
Displays and settings of the onboard computer
Speed and distance indicators
The speedometer always displays the current speed. You can choose from the following functions in the function display (combination of text indicator and value indicator):
: Distance travelled since the last reset
: Journey time since the last reset
-
: Estimated range of the available battery charge (at constant conditions such as assistance level, route profile, etc.)
: Average speed achieved since the last reset
: Maximum speed achieved since the last reset
: Total distance travelled with the eBike (cannot be reset)
Note: The on-board computer automatically displays a gear change recommendation when riding the eBike. The display of the gear change recommendation is superimposed over the text display (f) of the on-board computer, and can be deactivated manually via the basic settings.
Switching Between Display Functions
Press the or button until the required function is displayed.
Press the select button until the required function is displayed.
Certain settings cannot be assumed on the on-board computer, but only in the eBike Flow app, e.g.:
-Wheel circum.>
-Rangereset>
-
In addition, you receive an overview of the operating hours and the installed components in the eBike Flow app.
Displaying/adjusting basic settings
Note: The settings menu cannot be called up while riding.
To get to the basic settings menu, press the 品 select button on the operating unit until Settings> appears in the text display.
Switching/Leaving Basic Settings
Press the or button until the required basic setting is displayed.
Press the select button until the required basic setting is displayed.
Note: The changed setting is automatically saved upon leaving the respective basic setting.
Changing Basic Settings
To scroll down, briefly press the select button until the required value is displayed.
To scroll down, press the select button >1 s until the required value is displayed.
Note: Pressing and holding the relevant button switches automatically to the next value in the basic settings. You can choose between the following basic settings:
: You can select your preferred system language here.
: Displaying the speed and distance in either kilometres or miles.
: You can choose whether or not to have a prompt displayed when it is recommended that you change gears.
: You can set the duration of the background lighting here.
: The brightness can be adjusted in steps of 5% from 5-100%.
: You can reset the settings by pressing and holding the select button here.
: You can leave the settings menu with this function.
Leaving the Basic Settings Menu
You leave the basic settings menu automatically if you are inactive for 60 s or start riding the eBike, or by using the
function.
Briefly press the select button to leave the basic settings menu using the function.
Press the elect button >1 s to leave the basic settings menu using thefunction.
Maintenance and servicing
Maintenance and cleaning
Do not clean any of the components with pressurised water. Keep the screen of your on-board computer clean. Dirt can cause faulty brightness detection.
Clean your on-board computer using a soft cloth dampened only with water. Do not use cleaning products of any kind. Have your eBike system checked by an expert at least once a year (including mechanical parts, up-to-dateness of system software).
In addition, the bicycle dealer may base the service date on the distance travelled and/or on a period of time. In this case, the on-board computer displays a message telling you when the service date is due each time it is switched on. Please have your eBike serviced and repaired by an authorised bicycle dealer.
Have all repairs performed only by an authorised bike dealer.
Note: If you are handing in your eBike to a bicycle dealer for maintenance, it is recommended that you temporarily deactivate the and to prevent false alarms.
After-sales service and advice on using products
If you have any questions about the eBike system and its components, contact an authorised bicycle dealer.
For contact details of authorised bike dealerships, please visit www.bosch-ebike.com.
Transport
If you transport your eBike attached to the outside of your car, e.g. on a bike rack, remove the on-board computer and the eBike battery to avoid damaging them.
Disposal
The drive unit, on-board computer incl. operating unit, battery, speed sensor, accessories and packaging should be disposed of in an environmentally correct manner.
Check that your personal data has been deleted from the device.
Do not dispose of eBikes and their components with household waste.
In accordance with Directive 2012/19/EU and Directive 2006/66/EC respectively, electronic devices that are no longer usable and defective/drained batteries must be collected separately and recycled in an environmentally friendly manner.
Please return Bosch eBike components that are no longer usable free of charge to an authorised bicycle dealer or to a recycling facility.
Subject to change without notice.
Sicherheitshinweise
Bluetooth® Low Energy 5.0
Frequentie MHz 2400-2480
Zendvermogen mW ≤ 1
A) Buiten dit temperatuurbereik können sich storingen in de weergave voordoen.
Read all the safety information and instructions. Failure to observe the safety information and follow instructions may result in electric shock, fire and/or serious injury.
Save all safety warnings and instructions for future reference.
The term battery is used in these instructions to mean all original Bosch eBike rechargeable battery packs.
Read and observe the safety warnings and directions contained in all the eBike system operating instructions and in the operating instructions of your eBike.
Do not attempt to secure the display or operating unit while riding.
Do not allow yourself to be distracted by the on-board computer's display. If you do not focus exclusively on the traffic, you risk being involved in an accident. If you want to make entries in your on-board computer other than switching the assistance level, stop and enter the appropriate data.
Do not use your smartphone while riding. If you do not focus exclusively on the traffic, you risk being involved in an accident. Only enter the relevant data having stopped first.
Set the display brightness so that you can adequately see important information such as speed and warning symbols. Incorrectly set display brightness may lead to dangerous situations.
Do not open the on-board computer. Opening the onboard computer may damage it beyond repair and void any warranty claims.
Do not use the on-board computer as a handle. Lifting the eBike up by the on-board computer can cause irreparable damage to the on-board computer.
Do not stand your bicycle upside down on its saddle and handlebars if the on-board computer or its holder protrude from the handlebars. This may irreparably damage the on-board computer or the holder. Also remove the on-board computer before placing the bicycle on a wall mount to ensure that the on-board computer does not fall off or become damaged.
Privacy notice
If the on-board computer is sent to Bosch Service because it requires servicing, the data stored on the on-board computer may be transmitted to Bosch.
Product description and specifications
Intended use
The Kiox 300 on-board computer is designed to display cycling data.
To access the full functionality of the Kiox 300 on-board computer, you will need a compatible smartphone installed with the eBike Flow app (available from the Apple App Store or the Google Play Store).
Product features
The numbering of the components shown refers to the illustrations on the graphics pages at the beginning of the manual.
a) The retaining strap is not included in the scope of delivery.
Technical data
On-board computer Kiox 300
Product code BHU3600
Operating temperaturea)
°C -5 to +40
Storage temperature °C +10 to +40
Protection rating IP54
Weight, approx. g 32
A) Temperatures outside of this range may cause faults in the display.
The licence information for the product can be accessed at the following Internet address: https://www.bosch-ebike.com/ licences
Assembly
Fitting and Removing the Display (see figure A)
To fit the display (1), attach the display (1) to the front edge of the display mount (8) in the direction of travel, on the snap-in hook (4) 0 and press the rear side of the display (1) on the display mount (8) 2.
To remove the display (1), pull the display (1) towards you ① until you are able to lift off the display (1) ②.
A retaining strap can be secured to the bridge (10).
Note: The eBike system will switch off if you are riding at under 3km / h and remove the on-board computer from its holder. This does not apply to eBikes with assistance up to 45km / h .
Inserting the Removal Blocker (see figure B)
Note: Depending on the design/mounting of the display mount, it may not be possible to insert the removal blocker. The display must be mounted.
Insert the removal blocker (3) into the adapter tray (5) from below until you hear the removal blocker (3) click into place.
From this point onwards, you can no longer lift off the display (1) from the display fixture (8) without removing the display mount (8) from the adapter tray (5) by loosening the two fastening screws (9).
Note: The removal blocker (3) is not an anti-theft device.
Operation
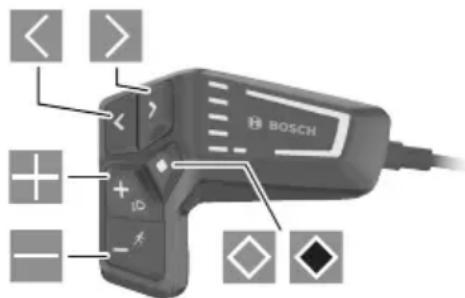
The displays are operated and the indicators are controlled via a control unit.
The meaning of the buttons on the operating unit for the display indicators can be found in the following overview. Depending on how long it is pressed for, the select button has two functions.
K Scroll to the left
Scroll to the right
Scroll up
Scroll down
Change to the second page level (press briefly) Open the settings menu on the status page (press briefly)
Open page-related options e.g. (press and hold >1 s)
Please note: All screenshots showing the display and text on the following pages are from the approved software version. The display and/or text may change slightly following a software update.
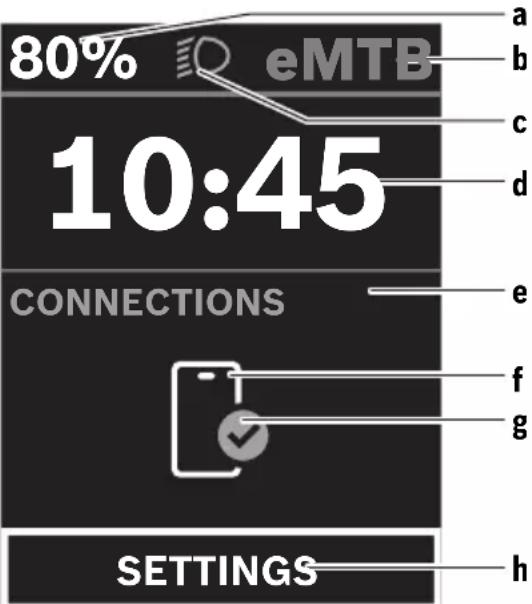
Status page
From the start page, you can access the status page by pressing the button.
a Battery charge
b Assistance level
C Bicycle lights
d Time
e Connection indicator
f Smartphone connection
g Connection status
h Settings Menu
You can access the settings menu from this page by pressing the button.
Note: The settings menu cannot be called up while riding.
The < SETTINGS> settings menu contains the following menu items:
-
You can find the following menu items here.
The value for the range can be reset here.
The settings for automatic reset can be adjusted here.
The value of the wheel circumference can be adjusted or reset to the standard setting here.
The next service date is shown here, provided that it has been set by the bicycle dealer.
The components used with their version numbers are displayed here.
You can find the following menu items here.
You can choose between the ,
You can select your preferred system language here.
You can choose between metric or imperial measurements here.
You can set the time here.
You can select one of the two time formats here.
You can set the display brightness here.
You can reset all of the system settings to the default values here.
Under the menu item, you will find the contact details () and certificates ().
You can leave the settings menu by pressing the button on the button.
Press the button to access the start page.
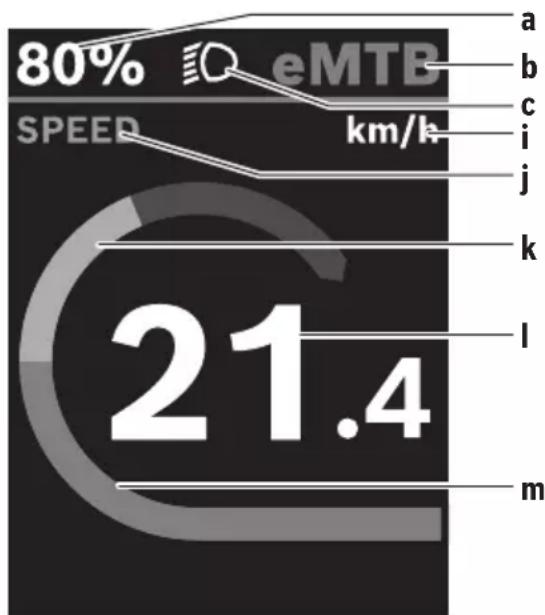
Start page
If you did not select another page before the last time you switched off, you will be shown this page.
a Battery charge
b Assistance level
C Bicycle lights
i Unit of speed indicator
j Indicator name
k Your performance
I Speed
m Motor output
The a ... c indicators form the status bar and are shown on every page.
You can use the × button to change from this page to the status page or press the button × to access additional pages. The statistical data, battery range and average values are displayed on these pages.
From each of these pages, you can access the second level of data by pressing the button.
If the user is on a different page to the start page when they switch off, the most recently displayed page will appear again when the eBike is switched on.
Pressing and holding the select button enables you to reset the statistical data for your journey or excursion (not on the < SETTINGS> page).
Maintenance and servicing
Maintenance and cleaning
Do not clean any of the components with pressurised water. Keep the screen of your on-board computer clean. Dirt can cause faulty brightness detection.
Clean your on-board computer using a soft cloth dampened only with water. Do not use cleaning products of any kind.
Have your eBike system checked by an expert at least once a year (including mechanical parts, up-to-dateness of system software).
In addition, the bicycle dealer may base the service date on the distance travelled and/or on a period of time. In this case, the on-board computer displays a message telling you when the service date is due each time it is switched on.
Please have your eBike serviced and repaired by an authorised bicycle dealer.
Have all repairs performed only by an authorised bike dealer.
Note: If you are handing in your eBike to a bicycle dealer for maintenance, it is recommended that you temporarily deactivate the and to prevent false alarms.
After-sales service and advice on using products
If you have any questions about the eBike system and its components, contact an authorised bicycle dealer.
For contact details of authorised bike dealerships, please visit www.bosch-ebike.com
Transport
If you transport your eBike attached to the outside of your car, e.g. on a bike rack, remove the on-board computer and the eBike battery to avoid damaging them.
Disposal
The drive unit, on-board computer incl. operating unit, battery, speed sensor, accessories
English - 4
and packaging should be disposed of in an environmentally correct manner.
Check that your personal data has been deleted from the device.
Do not dispose of eBikes and their components with household waste.
In accordance with Directive 2012/19/EU and Directive 2006/66/EC respectively, electronic devices that are no longer usable and defective/drained batteries must be collected separately and recycled in an environmentally friendly manner.
Please return Bosch eBike components that are no longer usable free of charge to an authorised bicycle dealer or to a recycling facility.
Subject to change without notice.
Sicherheitshinweise
Read all the safety information and instructions. Failure to observe the safety information and follow instructions may result in electric shock, fire and/or serious injury.
Save all safety warnings and instructions for future reference.
The term battery is used in these instructions to mean all original Bosch eBike rechargeable battery packs.
Read and observe the safety warnings and directions contained in all the eBike system operating instructions and in the operating instructions of your eBike.
Do not attempt to secure the display or operating unit while riding.
The push assistance function must only be used when pushing the eBike. There is a risk of injury if the wheels of the eBike are not in contact with the ground while using the push assistance.
- When the push assistance is activated, the pedals may turn at the same time. When the push assistance function is activated, make sure that there is enough space between your legs and the turning pedals to avoid the risk of injury.
- When using the walk assistance, make sure that you can control the eBike and that you can hold it securely at all times. Under certain circumstances, the walk assistance may stop (e.g. if the pedals hit an obstacle or if you accidentally let go of the button on the operating unit). The eBike may suddenly move backwards onto you or tip up. This presents a risk for the user particularly if there is additional load on the eBike. When using the walk assistance, do not bring the eBike into situations in which you cannot hold the eBike using your own strength.
Do not stand your bicycle upside down on its handlebars and saddle if the operating unit or its holder protrude from the handlebars. This may irreparably damage the operating unit or the holder.
Do not connect a charger to the eBike system if the eBike system displays a critical error. This may result in damage to your battery. The battery may catch fire, thereby resulting in serious burns and other injuries.
The operating unit features a wireless interface. Local operating restrictions, e.g. in aeroplanes or hospitals, must be observed.
- Caution! When using the operating unit with Bluetooth® this may cause interference that affects other devices and systems, aeroplanes and medical devices (e.g. pacemakers, hearing aids). Likewise, injury to people and animals in the immediate vicinity cannot be excluded entirely. Do not use the operating unit with Bluetooth® in the vicinity of medical devices, petrol stations, chemical plants, areas with a potentially explosive atmosphere or on blast sites. Do not use the operating unit with Bluetooth® in aeroplanes. Avoid operation near your body for extended periods.
The Bluetooth® word mark and logos are registered trademarks owned by Bluetooth SIG, Inc. and any use of such marks by Bosch eBike Systems is under licence.
Observe all national regulations which set out the approved use of eBikes.
Privacy notice
When you connect the eBike to the Bosch DiagnosticsTool 3, data about Bosch drive unit (e.g. energy consumption, temperature, etc.) is transferred to Bosch eBike Systems (Robert Bosch GmbH) for the purposes of product improvement. You can find more information about this on the Bosch eBike website at www.bosch-ebike.com.
Product description and specifications
Intended use
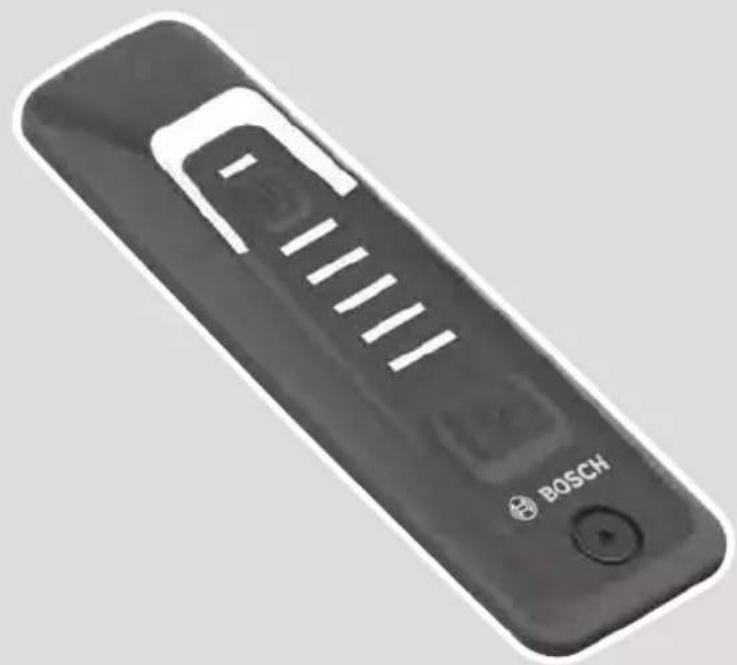
The LED Remote operating unit is designed to control a Bosch eBike system and control an on-board computer. You can also use it to change the assistance level in the eBike Flow app.
So as to be able to use the operating unit fully, a compatible smartphone with the eBike Flow app is required.
The eBike Flow app can be accessed via Bluetooth®.
Depending on the smartphone's operating system, the eBike Flow app can be downloaded free of charge from the Apple App Store and the Google Play store.
Use your smartphone to scan the code in order to download the eBike Flow app.
Product features
The numbering of the components shown refers to the illustrations on the graphics pages at the beginning of the manual.
All illustrations of bike parts except for the drive unit, onboard computer (including operating unit), speed sensor and the corresponding holders are a schematic representation and may differ on your eBike.
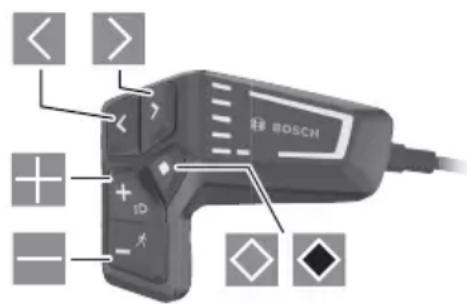
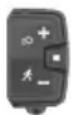
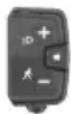
(1) On/off button
(2) Select button
(3) LEDs for battery charge indicator
(4) ABS LED (optional)
(5) Assistance level LED
(6) Holder
(7) Diagnostics connection (for servicing purposes only)
(8) Button for decreasing support level -/ walk assistance
(9) Button for increasing support level + bike lights
(10) Button to reduce brightness/ go back
(11) Button to increase brightness/ go forward
(12) Ambient light sensor
Technical data
Operating unit LED Remote
Product code BRC3600
Max. charging current of USB portA)
mA 600
USB port charging voltageA)
V
5
USB charging cableB)
USB Type-C®C)
Charging temperature °C 0 to +45
Operating temperature °C -5 to +40
Storage temperature °C +10 to +40
Diagnostic interface USB Type-C®
C)
Internal lithium-ion battery V
mAh
3.7
75
Protection rating IP54
Dimensions (without fastening) mm 74 × 53 × 35
Weight g 30
Bluetooth® Low Energy 5.0
- Frequency
MHz
2400-2480
- Transmission power
mW 1
A) Specification for charging the LED Remote; external devices cannot be charged.
B) Not included as part of standard delivery
C) USB Type-C® and USB-C® are trademarks of USB Implementers Forum.
The licence information for the product can be accessed at the following Internet address: https://www.bosch ebike.com/ licences
Declaration of Conformity
Robert Bosch GmbH, Bosch eBike Systems, hereby declares that the LED Remote radio communication unit complies with Directive 2014/53/EU. The full text of the EU Declaration of Conformity is available to view at the following website: https://www.bosch-ebike.com/conformity.
Robert Bosch GmbH, Bosch eBike Systems, hereby declares that the LED Remote radio communication unit complies with the Radio Equipment Regulations 2017 (SI 2917/1206). The full text of the UK Declaration of Conformity can be accessed at the following Internet address: https://www.bosch-ebike.com/conformity.
Operation
Prerequisites
The eBike system can only be activated when the following requirements are met:
A sufficiently charged battery is inserted (see battery operating instructions).
The speed sensor is connected properly (see drive unit operating instructions).
Operating unit power supply
If a sufficiently charged eBike battery is inserted into the eBike and the eBike system is switched on, then the operating unit battery is powered and charged by the eBike battery.
If the state of charge of the internal battery is very low, you can charge the internal battery via the diagnostics connection (7) with a USB Type C cable using a power bank or another suitable power source (charging voltage 5 V; charging current max. 600 mA).
Always close the flap of the diagnostics connection (7) so that no dust or moisture can enter.
Switching the eBike system on/off
To switch on the eBike system, briefly press the on/off button (1). After the starting animation, the state of charge of the battery is displayed in colour with the battery charge indicator (3) and the set assistance level with the (5) display. The eBike is ready to ride.
The display brightness is controlled by the ambient light sensor (12). Therefore, do not cover the ambient light sensor (12).
The drive is activated as soon as you start pedalling (except at assistance level OFF). The motor output depends on the settings of the assistance level.
As soon as you stop pedalling when in normal operation, or as soon as you have reached a speed of 25 / 45km / h the eBike drive switches off the assistance. The drive is automatically reactivated as soon you start pedalling again and the speed is below 25 / 45km / h .
To switch off the eBike system, press the on/off button (1) briefly (< 3 s). The battery charge indicator (3) and the assistance level LED (5) go out.
If no power is drawn from the eBike drive for about 10 minutes (e.g. because the eBike is not moving) and no button is pressed on the on-board computer or the control unit of the eBike, the eBike system will switch off automatically.
Battery charge indicator
The battery charge indicator (3) displays the eBike battery's state of charge. The state of charge of the eBike battery can also be checked on the LEDs of the battery itself.
In the (3) display, each ice-blue bar represents 20% capacity and each white bar represents 10% capacity. The top-most bar shows the maximum capacity.
Example: Four ice-blue bars and one white bar are displayed. The state of charge is between 81% and 90% . If capacity is low, both of the lower displays change colour:
Bar Capacity
2 × orange 30 % to 21 %
1 × orange 20 % to 11 %
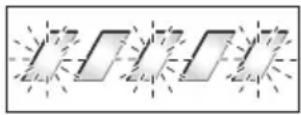
1 × red 10 % to reserve
1 × red flashing Reserve to empty
If the eBike battery is being charged, the topmost bar on the battery charge indicator (3) flashes.
Setting the assistance level
You can set how much the eBike drive assists you while pedalling on the operating unit using the (8) and (9) buttons. The assistance level can be changed at any time, even while cycling, and is displayed in colour.
Level Notes
OFF
Motor support is switched off. The eBike can just be moved by pedalling, as with a normal bicycle.
ECO
Effective support with maximum efficiency, for maximum range
TOUR
Steady support, long range for touring
TOUR+
Dynamic assistance for natural, sporty cycling
eMTB/ SPORT
Optimal support whatever the terrain, rapid acceleration when starting from a standstill, improved dynamics and top performance
TURBO
Maximum support even at a high cadence, for sport cycling
AUTO
The support is dynamically adapted to the rid- ing situation.
RACE
Maximum support on the eMTB racetrack; very direct response and maximum “Extended Boost” for the best possible performance in competitive situations
CARGO(A)
Steady, powerful support, so as to be able to safely transport heavy weights
A) The CARGO assistance level can have an additional description. The designations and configuration of the assistance levels can be preconfigured by the manufacturer and selected by the bicycle retailer.
Adapting the Assistance Level
The assistance level can be adapted within certain limits using the eBike Flow app. This gives you the option of adjusting your eBike to your personal requirements.
It is not possible to create a completely new mode. You can only adjust the modes that have been enabled by the manufacturer or dealer on your system. This may be fewer than 4 modes.
Due to technical limitations, you cannot adjust the eMTB and TOUR+ modes. In addition, restrictions in your country may mean that it is not possible to adjust a particular mode.
The following parameters are available for making adjustments:
Assistance in relation to the base value of the mode (within the legal requirements)
Drive response
Top limit speed (within the legal requirements)
Maximum torque (within the limits of the drive)
The parameters are dependent on each other and influence each other. For example, it is not fundamentally possible to simultaneously set a low torque value and high assistance.
Note: Please ensure that your modified mode retains the position, name and colour on all on-board computers and controls.
Interaction between the eBike system and gear-shifting
The gear shifting should be used with an eBike drive in the same way as with a normal bicycle (observe the operating instructions of your eBike on this point).
Irrespective of the type of gear shifting, it is advisable that you briefly reduce the pressure on the pedals when changing gear. This will aid gear shifting and reduce wear on the powertrain.
By selecting the correct gear, you can increase your speed and range while applying the same amount of force.
Switching bike lights on/off
Check that your bike lights are working correctly before every use.
To switch on the bike lights, press the (9) button for more than 1 s.
You can use the (11) and (10) buttons to control the brightness of the LEDs on the operating unit.
Switching the push assistance on/off
The walk assistance makes it easier to push your eBike. The speed in this function depends on the selected gear and can reach a maximum of 4km / h
The push assistance function must only be used when pushing the eBike. There is a risk of injury if the wheels of the eBike are not in contact with the ground while using the push assistance.
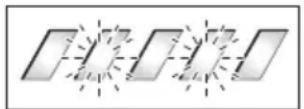
To start walk assistance, press the (8) button for more than 1 s and keep it pressed. The battery charge indicator (3) goes out and a white moving light in the direction of travel shows that it is ready.
To activate walk assistance, one of the following actions must occur within the next 10 s:
Push the eBike forwards.
Push the eBike backwards.
Perform a sideways tilting movement with the eBike.
After activation, the motor begins to push and the continuously filling white bars change colour to ice-blue.
If you release the (8) button, walk assistance is stopped. You can reactivate walk assistance within 10 s by pressing the (8) button.
If you do not reactivate walk assistance within 10 s, walk assistance automatically switches off.
Walk assistance is always ended if:
the rear wheel jams,
the bicycle cannot move over ridges,
a body part is blocking the bike crank,
an obstacle continues to turn the crank,
you start pedalling,
the (9) button or on/off button (1) is pressed.
Walk assistance has a roll-away lock, i.e. even after walk assistance has been used, rolling backwards is actively curbed by the drive system for a few seconds, and you cannot push the eBike backwards or can only do so with difficulty.
The push assistance function is subject to local regulations; the way it works may therefore differ from the description above, or the function may even be deactivated completely.
ABS - anti-lock braking system (optional)
If the bicycle is equipped with a Bosch eBike ABS, the ABS LED (4) lights up when the eBike system starts.
After moving off, the ABS internally checks its functionality and the ABS LED goes off.
In the event of a fault, the ABS LED (4) lights up, together with the orange flashing assistance level LED (5). You can acknowledge the error with the select button (2); the flashing assistance level LED (5) goes out. While the ABS LED (4) is lit up, the ABS is not in operation.
For details on the ABS and how it works, please refer to the ABS operating instructions.
Establishing a smartphone connection
In order to be able to use the following eBike functions, a smartphone with the eBike Flow app is required.
Connection to the app occurs via a Bluetooth® connection.
Switch on the eBike system and do not start riding the eBike.
Begin Bluetooth® pairing by pressing and holding (>3s) the on/off button (1). Release the on/off button (1) as soon as the topmost bar on the battery charge indicator shows the pairing process by flashing blue.
Confirm the connection request in the app.
Activity tracking
In order to record activities, it is necessary to register and log into the eBike Flow app.
To record activities, you must consent to the storage of your location data in the app. Without this, your activities cannot be recorded in the app. For location data to be recorded, you must be logged in as the user.
The can be activated for each user via the eBike Flow app. In the process, a key for unlocking the eBike is saved on the smartphone.
The is automatically enabled in the following cases:
Switching off the eBike system via the control unit
Automatically switching off the eBike system
Removing the on-board computer
If the eBike system is switched on and the smartphone is connected to the eBike via Bluetooth® the eBike will be unlocked.
is linked to your user account.
If you lose your smartphone, you can log in to your user account on the eBike Flow app using another smartphone and unlock then the eBike.
Warning! If you select a setting in the app that could have negative consequences in combination with the <eBike
Lock> (e.g. deleting your eBike or user account), you will be shown warning messages beforehand. Please read through these thoroughly and adhere to the warnings that are issued (e.g. before deleting your eBike or user account).
Setting Up the
In order to be able to set up the , the following conditions must be fulfilled:
The eBike Flow app is installed.
-A user account has been created.
The eBike is not currently updating.
The eBike is connected to the smartphone via Bluetooth®.
The eBike is stationary.
The smartphone is connected to the Internet.
The eBike battery is sufficiently charged and the charging cable is not connected.
You can set up the in the eBike Flow app in the Settings menu item.
From now on, you can deactivate the assistance from your drive unit by switching on in the eBike Flow app. This deactivation can only be can only be overridden if your smartphone is in the vicinity of the eBike system when the system is switched on. To do this, your smartphone must have Bluetooth® switched on and the eBike Flow app must be active in the background. The eBike Flow app does not need to be open. When the is activated, you can continue to use your eBike without assistance from the drive unit.
Compatibility
The is compatible with these Bosch eBike product lines:
Drive unit Product line
BDU374x Performance Line CX
BDU33xx Performance Line
How it works
In combination with the , the smartphone functions similarly to a key for the drive unit. The <eBike
Lock> is activated by switching off the eBike system. As long as the is active after the function is switched on, this will be indicated by the operating unit LED Remote flashing white and by a padlock symbol on the display.
Note: The alone does not provide adequate theft protection; it is simply a supplement to a mechanical lock. The does not provide any form of mechanical lock for the eBike. Only the assistance from the drive unit is deactivated. The drive unit will be unlocked for as long as the smartphone is connected to the eBike via Bluetooth®.
If you wish to give other users temporary or permanent access to your eBike or you want to take your eBike to servicing, you will need to deactivate the in the eBike Flow app in the Settings menu item. If you wish to sell your eBike, you will also need to delete the eBike from your user account in the eBike Flow app in the Settings menu item.
When the eBike system is switched off, the drive unit will emit a "Lock" sound (i.e. an audio signal that is played once) to indicate that the assistance from the drive unit is switched off.
Note: The audio signal will only be played if the system is switched on.
When the eBike system is switched on, the drive unit will emit two "Unlock" sounds (i.e. an audio signal that is played twice) to indicate that the assistance from the drive unit is enabled again.
The "Lock" sound will help you determine whether or not the on your eBike is active. The audio signal is activated by default, but it can be deactivated in the eBike Flow app in the Settings menu item by selecting the lock symbol below your eBike.
Note: If you can no longer set up or switch off the , please contact your bicycle dealer.
Replacing eBike Components and the Replacing the Smartphone
Install the eBike Flow app on the new smartphone.
Log in with the same account that was used to activate the .
The is displayed as set up in the eBike Flow app.
Replacing the drive unit
The is displayed as deactivated in the eBike Flow app.
Activate the by pushing the controller to the right.
If you are handing in your eBike to a bicycle dealer for maintenance, it is recommended that you temporarily deactivate the to prevent false alarms.
Software updates
Software updates must be manually started in the eBike Flow app.
Software updates are transferred to the operating unit in the background of the app as soon as it is connected to the app. During the update process, a green flashing on the battery charge indicator (3) shows the progress. The system is then restarted.
You can control the software updates via the eBike Flow app.
Error messages
The operating unit shows whether critical errors or less critical errors occur in the eBike system.
The error messages generated by the eBike system can be read via the eBike Flow app or by your bicycle retailer.
Via a link in the eBike Flow app, information about the error and support for rectifying the error can be displayed.
Less critical errors
Less critical errors are shown by the assistance level LED (5) flashing orange. Pressing the select button (2) confirms the error and the assistance level LED (5) once again continuously shows the colour of the set assistance level.
You can use the following table to rectify the errors yourself if necessary. Otherwise, please contact your bicycle retailer.
Number Troubleshooting
523005
The indicated error numbers show that there is interference when the sensors detect the magnetic field. See whether you have lost the magnet while riding.
514001
514002
514003
If you are using a magnet sensor, check that the sensor and magnet have been properly installed. Make sure too that the cable to the sensor is not damaged.
514006
If you are using a rim magnet, make sure that you do not have any magnetic field interference in the vicinity of the drive unit.
Critical errors
Critical errors are shown by the assistance level LED (5) and the battery charge indicator (3) flashing red. Follow the instructions in the table below if a critical error occurs.
Number Instructions
660001
Do not charge the battery and do not continue to use it. Please contact your Bosch eBike dealer.
660002
890000
- Acknowledge the error code. - Restart the system. If the problem persists: - Acknowledge the error code. - Perform software update. - Restart the system. If the problem persists: - Please contact your Bosch eBike dealer.
Maintenance and servicing
Maintenance and cleaning
The operating unit must not be cleaned with pressurised water.
Keep the operating unit clean. Dirt can cause faulty brightness detection.
Clean your operating unit using a soft cloth dampened only with water. Do not use cleaning products of any kind.
Have all repairs performed only by an authorised bike dealer.
After-sales service and advice on using products
If you have any questions about the eBike system and its components, contact an authorised bicycle dealer.
For contact details of authorised bike dealerships, please visit www.bosch-ebike.com.
Disposal
The drive unit, on-board computer incl. operating unit, battery, speed sensor, accessories and packaging should be disposed of in an environmentally correct manner.
Check that your personal data has been deleted from the device.
Do not dispose of eBikes and their components with household waste.
In accordance with Directive 2012/19/EU and Directive 2006/66/EC respectively, electronic devices that are no longer usable and defective/drained batteries must be collected separately and recycled in an environmentally friendly manner.
Please return Bosch eBike components that are no longer usable free of charge to an authorised bicycle dealer or to a recycling facility.
Subject to change without notice.
Sicherheitshinweise
2 × orange 30% ... 21%
1 × orange 20% ... 11%
1 × rot 10%... Reserve
1 × rot blinkend Reserve ... leer
System Controller | Mini Remote
BRC3100|BRC3300
Read all the safety information and instructions. Failure to observe the safety information and follow instructions may result in electric shock, fire and/or serious injury.
Save all safety warnings and instructions for future reference.
The term battery is used in these instructions to mean all original Bosch eBike rechargeable battery packs.
Read and observe the safety warnings and directions contained in all the eBike system operating instructions and in the operating instructions of your eBike.
Do not attempt to secure the display or operating unit while riding.
The push assistance function must only be used when pushing the eBike. There is a risk of injury if the wheels of the eBike are not in contact with the ground while using the push assistance.
- When the push assistance is activated, the pedals may turn at the same time. When the push assistance function is activated, make sure that there is enough space between your legs and the turning pedals to avoid the risk of injury.
- When using the walk assistance, make sure that you can control the eBike and that you can hold it securely at all times. Under certain circumstances, the walk assistance may stop (e.g. if the pedals hit an obstacle or if you accidentally let go of the button on the operating unit). The eBike may suddenly move backwards onto you or tip up. This presents a risk for the user particularly if there is additional load on the eBike. When using the walk assistance, do not bring the eBike into situations in which you cannot hold the eBike using your own strength.
Do not stand your bicycle upside down on its handlebars and saddle if the operating unit or its holder protrude from the handlebars. This may irreparably damage the operating unit or the holder.
Do not connect a charger to the eBike system if the eBike system displays a critical error. This may result in damage to your battery. The battery may catch fire, thereby resulting in serious burns and other injuries.
The operating unit features a wireless interface. Local operating restrictions, e.g. in aeroplanes or hospitals, must be observed.
- Caution! When using the operating unit with Bluetooth®, this may cause interference that affects other devices and systems, aeroplanes and medical devices (e.g. pacemakers, hearing aids). Likewise, injury to people and animals in the immediate vicinity cannot be excluded entirely. Do not use the operating unit with Bluetooth® in the vicinity of medical devices, petrol stations, chemical plants, areas with a potentially explosive atmosphere or on blast sites. Do not use the operating unit with Bluetooth® in aeroplanes. Avoid operation near your body for extended periods.
The Bluetooth® word mark and logos are registered trademarks owned by Bluetooth SIG, Inc. and any use of such marks by Bosch eBike Systems is under licence.
Observe all national regulations which set out the approved use of eBikes.
Safety instructions for coin cells
WARNING! Ensure that the coin cell is kept out of the reach of children. Coin cells are dangerous.
- Coin cells must never be swallowed or inserted into any other part of the body. If you suspect that someone has swallowed a coin cell or that a coin cell has entered the body in another way, seek medical attention immediately. Swallowing coin cells can result in severe internal burns and death within two hours.
Ensure that coin cell replacement is carried out properly. There is a risk of explosion.
Only use the coin cells listed in this operating manual. Do not use any other coin cells or other forms of electrical power supply.
Do not attempt to recharge the coin cell and do not short circuit the coin cell. The coin cell may leak, explode, catch fire and cause personal injury.
- Remove and dispose of drained coin cells correctly. Drained coin cells may leak and cause personal injury or damage the product.
- Do not overheat the coin cell or throw it into fire. The coin cell may leak, explode, catch fire and cause personal injury.
- Do not damage the coin cell and or take the coin cell apart. The coin cell may leak, explode, catch fire and cause personal injury.
- Do not allow damaged coin cells to come into contact with water. Leaking lithium may mix with water to create hydrogen, which could cause a fire, an explosion, or personal injury.
Only for Australia
Caution! Battery is hazardous and is to be kept away from children (whether the battery is new or used). Battery can cause severe or fatal injuries in 2 hours or less if it is swallowed or placed inside any part of the body. Medical attention should be sought immediately if it is suspected the battery has been swallowed or placed inside any part of the body.
Privacy notice
When you connect the eBike to the Bosch DiagnosticsTool 3, data about Bosch drive unit (e.g. energy consumption, temperature, etc.) is transferred to Bosch eBike Systems (Robert Bosch GmbH) for the purposes of product improvement. You can find more information about this on the Bosch eBike website at www.bosch-ebike.com.
Product Description and Specifications
Intended Use
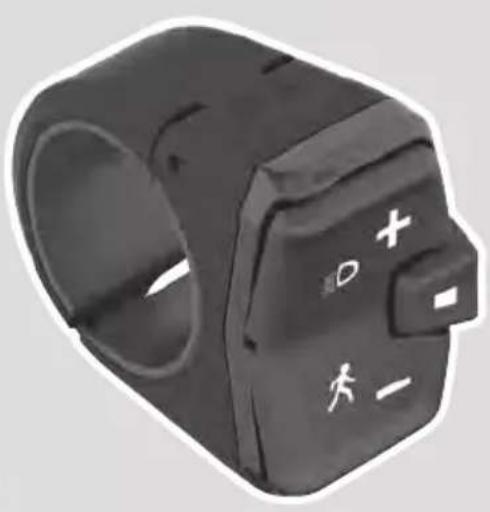
The System Controller and Mini Remote operating units are designed to control a Bosch eBike system and to control an on-board computer. You can also use them to change the assistance level in the eBike Flow app.
So as to be able to use the operating unit fully, a compatible smartphone with the eBike Flow app is required.
Using the eBike Flow app, a Bluetooth® connection can be established between the smartphone and the eBike system, between the smartphone and System Controller, and between System Controller and Mini Remote.
Depending on the smartphone's operating system, the eBike Flow app can be downloaded free of charge from the Apple App Store and the Google Play store.
Use your smartphone to scan the code in order to download the eBike Flow app.
Product Features
All illustrations of bike parts except for the drive unit, onboard computer (including operating unit), speed sensor and the corresponding holders are a schematic representation and may differ on your eBike.
The numbering of the components shown refers to the illustrations on the graphics pages at the beginning of the manual.
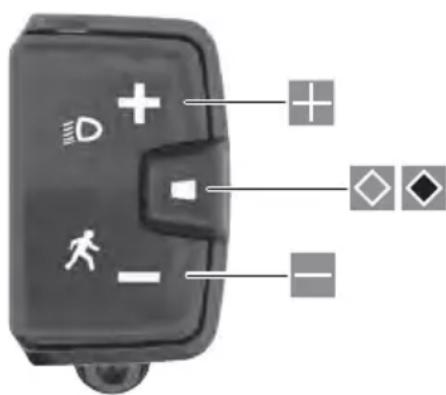
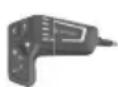
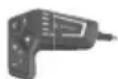
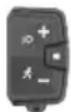
(1) Mini Remote operating unit (optional)
(2) Operating unit System Controller
(3) LED indicator lamp
(4) Button for increasing assistance level + bike lights
(5) Select button
(6) Button for decreasing assistance level -/ walk assistance
(7) Fastening screw for holder
(8) Holder
(9) Rubber insert/battery holder
(10) Assistance level LED
(11) ABS LED (optional)/ambient light sensor
(12) On/off button
(13) LEDs for battery charge indicator
(14) Mode button
Technical Data
Operating unit System Controller
Product code BRC3100
Operating temperature ^ C - 5 to +40
Storage temperature ^ C + 10 to +40
Operating unit System Controller
Protection rating IP54
Dimensions mm 88 × 28 × 27
Weight g 35
Bluetooth® Low Energy 5.0
- Frequency MHz 2400–2480
- Transmission power mW ≤ 1
Operating unit
Mini Remote
Product code BRC3300
Operating temperature °C -5 to +40
Storage temperature °C +10 to +40
Battery
1 × CR1620
Protection rating IP54
Dimensions mm 40 × 39 × 22
Weight g 16
Bluetooth® Low Energy 5.0
- Frequency MHz 2400–2480
- Transmission power mW ≤ 1
The licence information for the product can be accessed at the following Internet address: https://www.bosch ebike.com/ licences
Declaration of Conformity
Robert Bosch GmbH, Bosch eBike Systems, hereby declares that the System Controller/Mini Remote radio communication unit complies with Directive 2014/53/EU. The full text of the EU Declaration of Conformity is available to view at the following website:
https://www.bosch-ebike.com/conformity.
Robert Bosch GmbH, Bosch eBike Systems, hereby declares that the System Controller/Mini Remote radio communication unit complies with the Radio Equipment Regulations 2017 (SI 2917/1206). The full text of the UK Declaration of Conformity can be accessed at the following Internet address: https://www.bosch-ebike.com/conformity.
Operation
Requirements
The eBike system can only be activated when the following requirements are met:
A sufficiently charged battery is inserted (see battery operating instructions).
The speed sensor is connected properly (see drive unit operating instructions).
Operating unit power supply (System Controller)
If a sufficiently charged eBike battery is inserted into the eBike and the eBike system is switched on, then the operat
ing unit battery is powered and charged by the eBike battery.
Please contact your bicycle dealer if the operating unit battery is defective.
Operating unit (Mini Remote) power supply
The Mini Remote operating unit is supplied with voltage by a CR1620 coin cell.
Replacing the battery (Mini Remote)
If the battery in the Mini Remote (1) operating unit is low, the LED indicator lamp (3) lights up orange.
To replace the battery, unscrew the Mini Remote (1) operating unit from the handlebars. Remove the rubber insert (9). This also functions as the battery holder. Remove the used battery and insert a new CR1620 battery in the rubber insert (9). Push the battery and the rubber insert (9) into the Mini Remote (1) operating unit. If the battery is seated correctly, the LED indicator lamp (3) flashes green for 10 s. Then secure the Mini Remote (1) operating unit back onto the handlebars.
Note: The connection to the System Controller is not interrupted when the battery is replaced.
You can obtain the batteries recommended by Bosch from your bicycle dealer.
Switching the eBike system on/off
To switch on the eBike system, briefly press the on/off button (12). After the starting animation, the state of charge of the battery is displayed in colour with the battery charge indicator (13) and the set assistance level with the (10) display. The eBike is ready to ride.
The display brightness is controlled by the ambient light sensor (11). Therefore, do not cover the ambient light sensor (11).
The drive is activated as soon as you start pedalling (except at assistance level OFF). The motor output depends on the settings of the assistance level.
As soon as you stop pedalling when in normal operation, or as soon as you have reached a speed of 25 / 45km / h the eBike drive switches off the assistance. The drive is automatically reactivated as soon you start pedalling again and the speed is below 25 / 45km / h .
To switch off the eBike system, press the on/off button (12) briefly (< 3s) . The battery charge indicator (13) and the assistance level LED (10) go out.
If no power is drawn from the eBike drive for about 10 minutes (e.g. because the eBike is not moving) and no button is pressed on the on-board computer or the control unit of the eBike, the eBike system will switch off automatically.
Battery charge indicator
The battery charge indicator (13) displays the eBike battery's state of charge. The state of charge of the eBike battery can also be checked on the LEDs of the battery itself.
In the (13) display, each ice-blue bar represents 20% capacity and each white bar represents 10% capacity. The top-most bar shows the maximum capacity.
Example: Four ice-blue bars and one white bar are displayed. The state of charge is between 81% and 90% . If capacity is low, both of the lower displays change colour:
Bar Capacity
2 × orange 30 % to 21 %
1 × orange 20 % to 11 %
1 × red 10 % to reserve
1 × red flashing Reserve to empty
If the eBike battery is being charged, the topmost bar on the battery charge indicator (13) flashes.
Setting the assistance level
On the operating unit, you can set the level of assistance you want the eBike drive to provide you with while pedalling.
Mini Remote: Briefly press (< 1s) the buttons to increase assistance + (4) or decrease assistance - (6) in order to increase or decrease the assistance level accordingly.
System Controller: Briefly press (< 1s) the mode button (14) to increase assistance.
Press the mode button (14) for longer than 1 s to decrease the assistance.
The assistance level can be changed at any time, even while cycling, and is displayed in colour.
Level Notes
OFF
Motor support is switched off. The eBike can just be moved by pedalling, as with a normal bicycle.
ECO
Effective support with maximum efficiency, for maximum range
TOUR
Steady support, long range for touring
TOUR+
Dynamic assistance for natural, sporty cycling
eMTB/ SPORT
Optimal support whatever the terrain, rapid acceleration when starting from a standstill, improved dynamics and top performance
TURBO
Maximum support even at a high cadence, for sport cycling
AUTO
The support is dynamically adapted to the riding situation.
RACE
Maximum support on the eMTB racetrack; very direct response and maximum “Extended Boost” for the best possible performance in competitive situations
CARGO^A)
Steady, powerful support, so as to be able to safely transport heavy weights
A) The CARGO assistance level can have an additional description. The designations and configuration of the assistance levels can be preconfigured by the manufacturer and selected by the bicycle retailer.
Adapting the Assistance Level
The assistance level can be adapted within certain limits using the eBike Flow app. This gives you the option of adjusting your eBike to your personal requirements.
It is not possible to create a completely new mode. You can only adjust the modes that have been enabled by the manufacturer or dealer on your system. This may be fewer than 4 modes.
Due to technical limitations, you cannot adjust the eMTB and TOUR+ modes. In addition, restrictions in your country may mean that it is not possible to adjust a particular mode. The following parameters are available for making adjustments:
Assistance in relation to the base value of the mode (within the legal requirements)
Drive response
Top limit speed (within the legal requirements)
Maximum torque (within the limits of the drive)
The parameters are dependent on each other and influence each other. For example, it is not fundamentally possible to simultaneously set a low torque value and high assistance.
Note: Please ensure that your modified mode retains the position, name and colour on all on-board computers and controls.
Interaction between the eBike system and gear-shifting
The gear shifting should be used with an eBike drive in the same way as with a normal bicycle (observe the operating instructions of your eBike on this point).
Irrespective of the type of gear shifting, it is advisable that you briefly reduce the pressure on the pedals when changing gear. This will aid gear shifting and reduce wear on the powertrain.
By selecting the correct gear, you can increase your speed and range while applying the same amount of force.
Check that your bike lights are working correctly before every use.
To switch the bicycle lights on and off, press the button to increase the assistance level/bicycle lights (4) for longer than 1 s.
ABS - anti-lock braking system (optional)
If the bicycle is equipped with a Bosch eBike ABS, the ABS LED (11) lights up when the eBike system starts.
After moving off, the ABS internally checks its functionality and the ABS LED (11) goes off.
In the event of a fault, the ABS LED (11) lights up, together with the orange flashing assistance level LED (10). You can acknowledge the fault using the select button (5) on the
Mini Remote (1) operating unit or with the mode button (14) on the System Controller (2) operating unit. The flash
ing assistance level LED (10) goes out. While the ABS LED (11) is lit up, the ABS is not in operation.
For details on the ABS and how it works, please refer to the ABS operating instructions.
Switching the push-assistance function on/off
The walk assistance makes it easier to push your eBike. The speed in this function depends on the selected gear and can reach a maximum of 4km / h
The push assistance function must only be used when pushing the eBike. There is a risk of injury if the wheels of the eBike are not in contact with the ground while using the push assistance.
To start walk assistance, press the (6) button for more than 1 s and keep it pressed. The battery charge indicator (13) goes out and a white moving light in the direction of travel shows that it is ready.
To activate walk assistance, one of the following actions must occur within the next 10 s:
Push the eBike forwards.
Push the eBike backwards.
Perform a sideways tilting movement with the eBike.
After activation, the motor begins to push and the continuously filling white bars change colour to ice-blue.
If you release the (6) button, walk assistance is stopped. You can reactivate walk assistance within 10 s by pressing the (6) button.
If you do not reactivate walk assistance within 10 s, walk assistance automatically switches off.
Walk assistance is always ended if:
the rear wheel jams,
the bicycle cannot move over ridges,
a body part is blocking the bike crank,
an obstacle continues to turn the crank,
you start pedalling,
the (4) button or on/off button (12) is pressed.
Walk assistance has a roll-away lock, i.e. even after walk assistance has been used, rolling backwards is actively curbed by the drive system for a few seconds, and you cannot push the eBike backwards or can only do so with difficulty.
The push assistance function is subject to local regulations; the way it works may therefore differ from the description above, or the function may even be deactivated completely.
Establishing a smartphone connection
In order to be able to use the following eBike functions, a smartphone with the eBike Flow app is required.
Connection to the app occurs via a Bluetooth® connection.
Switch on the eBike system and do not start riding the eBike.
Begin Bluetooth® pairing by pressing and holding (>3 s) the on/off button (12). Release the on/off button (12) as soon as the lowest bar on the battery charge indicator (13) shows the pairing process by flashing blue.
Confirm the connection request in the eBike Flow app.
Activity tracking
In order to record activities, it is necessary to register and log into the eBike Flow app.
To record activities, you must consent to the storage of your location data in the app. Without this, your activities cannot be recorded in the app. For location data to be recorded, you must be logged in as the user.
The can be activated for each user via the eBike Flow app. In the process, a key for unlocking the eBike is saved on the smartphone.
The is automatically enabled in the following cases:
Switching off the eBike system via the control unit
Automatically switching off the eBike system
Removing the on-board computer
If the eBike system is switched on and the smartphone is connected to the eBike via Bluetooth®, the eBike will be unlocked.
is linked to your user account.
If you lose your smartphone, you can log in to your user account on the eBike Flow app using another smartphone and unlock then the eBike.
Warning! If you select a setting in the app that could have negative consequences in combination with the (e.g. deleting your eBike or user account), you will be shown warning messages beforehand. Please read through these thoroughly and adhere to the warnings that are issued (e.g. before deleting your eBike or user account).
Setting Up the
In order to be able to set up the , the following conditions must be fulfilled:
The eBike Flow app is installed.
-A user account has been created.
The eBike is not currently updating.
The eBike is connected to the smartphone via Bluetooth®.
The eBike is stationary.
The smartphone is connected to the Internet.
The eBike battery is sufficiently charged and the charging cable is not connected.
You can set up the in the eBike Flow app in the Settings menu item.
From now on, you can deactivate the assistance from your drive unit by switching on in the eBike Flow app. This deactivation can only be can only be overridden if your smartphone is in the vicinity of the eBike system when the system is switched on. To do this, your smartphone must have Bluetooth® switched on and the eBike Flow app must be active in the background. The eBike Flow app does not need to be open. When the is activated, you can continue to use your eBike without assistance from the drive unit.
Compatibility
The is compatible with these Bosch eBike product lines:
Drive unit Product line
BDU374x Performance Line CX
BDU33xx Performance Line
How it works
In combination with the , the smartphone functions similarly to a key for the drive unit. The <eBike
Lock> is activated by switching off the eBike system. As long as the is active after the function is switched on, this will be indicated by the operating unit System Controller flashing white and by a padlock symbol on the display.
Note: The alone does not provide adequate theft protection; it is simply a supplement to a mechanical lock. The does not provide any form of mechanical lock for the eBike. Only the assistance from the drive unit is deactivated. The drive unit will be unlocked for as long as the smartphone is connected to the eBike via Bluetooth®. If you wish to give other users temporary or permanent access to your eBike or you want to take your eBike to servicing, you will need to deactivate the in the eBike Flow app in the Settings menu item. If you wish to sell your eBike, you will also need to delete the eBike from your user account in the eBike Flow app in the Settings menu item.
When the eBike system is switched off, the drive unit will emit a "Lock" sound (i.e. an audio signal that is played once) to indicate that the assistance from the drive unit is switched off.
Note: The audio signal will only be played if the system is switched on.
When the eBike system is switched on, the drive unit will emit two "Unlock" sounds (i.e. an audio signal that is played twice) to indicate that the assistance from the drive unit is enabled again.
The "Lock" sound will help you determine whether or not the on your eBike is active. The audio signal is activated by default, but it can be deactivated in the eBike Flow app in the Settings menu item by selecting the lock symbol below your eBike.
Note: If you can no longer set up or switch off the , please contact your bicycle dealer.
Replacing eBike Components and the Replacing the Smartphone
Install the eBike Flow app on the new smartphone.
Log in with the same account that was used to activate the .
The is displayed as set up in the eBike Flow app.
Replacing the drive unit
The is displayed as deactivated in the eBike Flow app.
Activate the by pushing the controller to the right.
If you are handing in your eBike to a bicycle dealer for maintenance, it is recommended that you temporarily deactivate the to prevent false alarms.
Software updates
Software updates must be manually started in the eBike Flow app.
Software updates are transferred to the operating unit in the background of the app as soon as it is connected to the app. During the update process, a green flashing on the battery charge indicator (13) shows the progress. The system is then restarted.
You can control the software updates via the eBike Flow app.
Connecting the System Controller to the Mini Remote
The System Controller and Mini Remote operating units are connected via Bluetooth®.
Switch on the eBike system and do not start riding the eBike.
If the Mini Remote operating unit has not already been connected to the System Controller operating unit by the bicycle dealer, proceed as follows:
First connect your smartphone to the System Controller operating unit via the eBike Flow app (see Establishing a smartphone connection).
In the eBike Flow app, select . You will be asked to switch the System Controller and Mini Remote to pairing mode.
System Controller: Start the pairing process by pressing and holding (3 s) the on/off button (12) until the lower bar on battery charge indicator (13) shows the pairing process by flashing blue.
Mini Remote: Start the pairing process by pressing any button until the pairing process is shown by the LED indicator light (3) flashing blue.
Follow the instructions in the eBike Flow app.
If pairing is successful, this is shown within 30 s on the Mini Remote operating unit by the LED indicator light (3) flashing green three times.
If the connection cannot be established, this is shown by the LED indicator lamp (3) flashing red three times. Repeat the connection process.
If you want to connect the Mini Remote operating unit to a System Controller on another eBike, the following steps must be carried out:
Mini Remote: Remove the battery on the Mini Remote operating unit and reinsert it.
Within the next 10 s, press and hold the decrease assistance -/walk assistance (6) button for 5 s. The pairing process is shown by the LED indicator light (3) flashing blue for 30 s.
System Controller: Start the pairing process by pressing and holding (3 s) the on/off button (12) until the
lower bar on battery charge indicator (13) shows the pairing process by flashing blue.
If pairing is successful, this is shown within 30 s on the Mini Remote operating unit by the LED indicator light (3) flashing green three times.
If the connection cannot be established, this is shown by the LED indicator lamp (3) flashing red three times. Repeat the connection process.
Error messages
The operating unit shows whether critical errors or less critical errors occur in the eBike system.
The error messages generated by the eBike system can be read via the eBike Flow app or by your bicycle retailer.
Via a link in the eBike Flow app, information about the error and support for rectifying the error can be displayed.
Less critical errors
Less critical errors are shown by the assistance level LED (10) flashing orange. Press the select button (5) on the Mini Remote (1) operating unit or the mode button (14) on the System Controller (2) operating unit to confirm the error.
The assistance level LED (10) once again continuously shows the colour of the set assistance level.
You can use the following table to rectify the errors yourself if necessary. Otherwise, please contact your bicycle retailer.
Number Troubleshooting
523005
The indicated error numbers show that there is interference when the sensors detect the magnetic field. See whether you have lost the magnet while riding.
514001
514002
514003
If you are using a magnet sensor, check that the sensor and magnet have been properly installed. Make sure too that the cable to the sensor is not damaged.
514006
If you are using a rim magnet, make sure that you do not have any magnetic field interference in the vicinity of the drive unit.
Critical errors
Critical errors are shown by the assistance level LED (10) and the battery charge indicator (13) flashing red. Follow the instructions in the table below if a critical error occurs.
Number Instructions
660001
Do not charge the battery and do not continue to use it. Please contact your Bosch eBike dealer.
660002
890000
- Acknowledge the error code. - Restart the system. If the problem persists: - Acknowledge the error code. - Perform software update. - Restart the system.
Number Instructions
If the problem persists:
Please contact your Bosch eBike dealer.
Maintenance and servicing
Maintenance and Cleaning
The operating unit must not be cleaned with pressurised water.
Keep the operating unit clean. Dirt can cause faulty brightness detection.
Clean your operating unit using a soft cloth dampened only with water. Do not use cleaning products of any kind.
Have all repairs performed only by an authorised bike dealer.
After-sales service and advice on using products
If you have any questions about the eBike system and its components, contact an authorised bicycle dealer.
For contact details of authorised bike dealerships, please visit www.bosch-ebike.com.
Disposal
The drive unit, on-board computer incl. operating unit, battery, speed sensor, accessories and packaging should be disposed of in an environmentally correct manner.
Check that your personal data has been deleted from the device.
Do not dispose of eBikes and their components with household waste.
In accordance with Directive 2012/19/EU and Directive 2006/66/EC respectively, electronic devices that are no longer usable and defective/drained batteries must be collected separately and recycled in an environmentally friendly manner.
Please return Bosch eBike components that are no longer usable free of charge to an authorised bicycle dealer or to a recycling facility.
Subject to change without notice.
Sicherheitshinweise
Bluetooth® Low Energy 5.0
Frequentie MHz 2400-2480
Zendvermogen mW ≤ 1
Bedieningseenheid
Mini Remote
Productnumber BRC3300
Bluetooth® Low Energy 5.0
Frequentie MHz 2400-2480
Zendvermogen mW ≤ 1
https://www.bosch-ebike.com/conformity.
Gebruik
Voorwaarden
https://www.bosch-ebike.com/conformity.
Fonctionnement
1 orange 20% ... 11%
Read all the safety information and instructions. Failure to observe the safety information and follow instructions may result in electric shock, fire and/or serious injury.
Save all safety warnings and instructions for future reference.
The contact surfaces of the display holder may become very hot (>60^) . Allow the contact surfaces to adjust to the ambient temperature before you touch them. This is particularly important when using a SmartphoneGrip.
- Keep swallowable small parts away from small children. There is a risk of serious injury.
Never short-circuit the pins. The display holder may be irreparably damaged and must then be replaced.
Ensure that the contacts are free of dirt. By doing this, you prevent malfunctions or damage.
After a fall, check the display holder for sharp edges. Replace it if required.
Do not stand your bicycle upside down on its saddle and handlebars if the on-board computer or its holder protrude from the handlebars. This may irreparably damage the on-board computer or the holder. Also remove the on-board computer before placing the bicycle on a wall mount to ensure that the on-board computer does not fall off or become damaged.
Observe all national regulations which set out the approved use of eBikes.
Read and observe the safety warnings and directions contained in all the eBike system operating instructions and in the operating instructions of your eBike.
Product description and specifications
Intended use
The display holder is intended to establish the mechanical and electrical connection to a display or on-board computer. Only original Bosch eBike components can be connected to the display holder.
A display holder is not required for an eBike system to function.
Product features
The numbering of the components shown refers to the illustrations on the graphics pages at the beginning of the manual.
(1) Display mount
(2) Adapter tray
(3) Clamp for holder
(4) Clamp screw
(5) Round rubber spacer
(6) 1-arm socket
(7) Screw for adjusting tilt
(8) Removal blocker
(9) Snap-in hook
10) Connection cables
11) Fastening screws for display mount
The display mount (1) can also be embedded in the bicycle design.
Technical data
Display holder
Product code BDS3210
BDS3250
BDS3620
BDS3630
Output voltage V 4.75 to 5.4
Output current, max. A 1.5
Operating temperature °C -5 to +40
Storage temperature °C +10 to +40
Protection rating IP54
UK CA
Fitting
Installation positions (see figure A)
The 1-arm socket can be mounted at three different positions on the handlebars:
-In front of the handlebars ①
-Over the stem ②
In the triangle between the stem and handlebar ③
Note: In order to ensure clean cable routing, the appropriate display mount must be used for each of the three different positions: The BDS3210 display mount for in front of the handlebars (electrical connections at the rear); the BDS3250 display mount for over the stem or in the triangle between the stem and handlebar (electrical connections at the front).
If you want to change the installation position and you have the correct display mount (1), you must first remove the 1-arm socket (6) and re-mount it afterwards.
Note: Please be aware that there are two different handlebar diameters (31.8 mm and 35 mm). Your bicycle retailer will help you to select the correct components.
Mounting the display mount (see figure B)
Insert the display mount (1) into the adapter tray (2). Ensure that it is in the required installation position. Secure the display mount (1) from below using the screws (11). When
doing so, be aware of the torque specified on the adapter tray (2).
Connect the connection cables that come out of the drive unit and the control unit. It does not matter which cable is connected to which connection for the functions to work. When connecting the cables, ensure that the markings on the connector and on the cable match.
Securing on the handlebars (see figure C)
Note: The display holder must only be secured in the cylindrical area of the handlebars and not in the tapered area. To clamp a display in the centre, the handlebars must have a cylindrical area of at least 90mm in width.
Open the clamp and bring the 1-arm socket (6), together with the round rubber spacer (5), into the required position. Gently tighten the clamp screw (4) so that the 1-arm socket (6) can still move.
Adjust the tilt for the display mount by loosening and tightening the screw (7). Preferably adjust the tilt without the display or on-board computer.
In the connection between the 1-arm socket (6) and the adapter tray, there are interlocking teeth, which means that it is only possible to align the adapter tray in predefined positions. Before tightening the screw (7), make sure that the teeth engage in one another correctly. In addition, be aware of the torque specified on the 1-arm socket (6).
Bring the 1-arm socket (6) into its final position and tighten the clamp screw (4). Be aware of the torque specified on the 1-arm socket (6) here too.
Thanks to the round rubber spacer (5), it is possible to move the 1-arm socket (6) in all directions.
Removal blocker
A device attached to the display holder can be secured using the removal blocker (8). Usage is described in the operating instructions for the respective device.
Maintenance and servicing
Maintenance and cleaning
The display holder must not be cleaned with pressurised water.
Use a soft cloth dampened only with water for cleaning. Do not use cleaning products of any kind.
Have all repairs performed only by an authorised bike dealer.
After-sales service and advice on using products
If you have any questions about the eBike system and its components, contact an authorised bicycle dealer.
For contact details of authorised bike dealerships, please visit www.bosch-ebike.com.
Disposal
The drive unit, on-board computer incl. operating unit, battery, speed sensor, accessories and packaging should be disposed of in an environmentally correct manner.
Do not dispose of eBikes and their components with household waste.
In accordance with Directive 2012/19/EU and Directive 2006/66/EC respectively, electronic devices that are no longer usable and defective/drained batteries must be collected separately and recycled in an environmentally friendly manner.
Please return Bosch eBike components that are no longer usable to an authorised bicycle dealer.
Subject to change without notice.
Sicherheitshinweise
Read all the safety information and instructions. Failure to observe the safety information and follow instructions may result in electric shock, fire and/or serious injury.
Save all safety warnings and instructions for future reference.
Read and observe the safety warnings and directions contained in all the eBike system operating instructions and in the operating instructions of your eBike.
Do not allow your attention to be diverted from surrounding traffic when using Bosch eBike components and always ride with both hands on the handlebars. Always observe the applicable legal provisions in your country for the permitted use of your bicycle in road traffic. In particular, note that it is prohibited to pick up or hold your smartphone in your hand in road traffic.
Set the display brightness so that you can adequately see important information such as speed and warning symbols. Incorrectly set display brightness may lead to dangerous situations.
The contact surfaces of the display holder may become very hot (>60^) . Allow the contact surfaces to adjust to the ambient temperature before you touch them. This is particularly important when using a SmartphoneGrip.
Consult a doctor before using fitness app programs. Fitness apps may cause people to overexert themselves physically.
Always observe local restrictions for using electronic devices.
Avoid operation near your body for extended periods.
Do not stand your bicycle upside down on its saddle and handlebars if the SmartphoneGrip or its holder protrude from the handlebars. This may irreparably damage the SmartphoneGrip or the holder.
Do not use the SmartphoneGrip as a handle. Lifting the eBike up by the SmartphoneGrip can cause irreparable damage to the SmartphoneGrip.
- Do not open the SmartphoneGrip. Opening the SmartphoneGrip may damage it beyond repair and void any warranty claims.
- Caution! When using the SmartphoneGrip with Bluetooth® and/or Wi-Fi, interference can occur with other devices and equipment, aircraft and medical devices (e.g. pacemakers, hearing aids). Likewise, injury to people and animals in the immediate vicinity cannot be excluded entirely. Do not use the SmartphoneGrip with Bluetooth® in the vicinity of medical devices, petrol stations, chemical plants, areas with a potentially explosive atmosphere or on blast sites. Do not use the SmartphoneGrip with Bluetooth® in aeroplanes. Avoid operation near your body for extended periods.
Product Description and Specifications
Intended Use
The Bosch SmartphoneGrip is designed to hold and charge a smartphone on the handlebars of a Bosch eBike system. In addition to the functions shown here, changes to software relating to troubleshooting and functional modifications may be introduced at any time.
The SmartphoneGrip is suitable for cycling on reinforced paths without jumps and with few ledges (< 15cm) at average speeds of between 15 and 25km / h for example on asphalt roads, country paths, paths reinforced with gravel or sand, and reinforced woodland paths.
In case of improper use, there is a risk of the smartphone coming loose from the holder, falling down and becoming damaged as a result. There is also a considerable risk of an accident if the smartphone falls out.
Product Features
The numbering of the components shown refers to the illustrations on the graphics pages at the beginning of the manual.
All illustrations of bike parts except for the drive unit, SmartphoneGrip (including operating unit), speed sensor and the corresponding holders are a schematic representation and may differ on your eBike.
(1) Front retraining bracket, movable
(2) Rear retaining bracket, fixed
(3) USB port with USB cap
(4) Release mechanism
(5) SmartphoneGrip mount
(6) Snap-in hook
(7) Socket contacts
(8) SmartphoneGrip contacts
(9) Status LED
(10) Inductive charging coil
(11) Display mount fastening screw
(12) Removal blocker
(13) Keypad lock
(14) Hex key
(15) Smartphone ^a)
(16) Adapter tray
a) Not included in the scope of delivery
Technical Data
SmartphoneGrip
Product code BSP3200
Charging capacity via USB port
W 5 W (1 A at 5 V)
SmartphoneGrip
Inductive charging capacity W 7.5 W (1.5 A at 5 V)
Efficiency > 67 %
Operating temperature °C -5 to 40
Storage temperature °C 10 to 40
Protection rating IP54
Weight, approx. g 75
Assembly
SmartphoneGrip Assembly (see figure A)
Press and hold the release mechanism (4) to position the SmartphoneGrip. Place the upper edge of the SmartphoneGrip next to the snap-in hook (6) of the display holder (5). Pull the SmartphoneGrip towards you and push the SmartphoneGrip onto the display holder ②. Let go of the release mechanism (4).
Press the release mechanism (4) while pulling it towards you ① to remove the SmartphoneGrip. Remove the SmartphoneGrip and let go of the release mechanism (4) ②.
Inserting the Removal Blocker (see figure B)
Insert the removal blocker (12) into the adapter tray (16) from below until you hear the removal blocker (12) click into place.
Together with the keypad lock (13), this prevents the SmartphoneGrip from being quickly and easily removed.
Note: The removal blocker (12) is not an anti-theft device.
To remove the removal blocker (12), loosen the two fastening screws (11).
Smartphone Assembly (see figure C)
The SmartphoneGrip can hold smartphones in the following sizes:
The specified dimensions include any phone cases. Smartphones with folio and carrying cases must not be used.
The total weight must not exceed 276g
Insert your smartphone (15) with the long side of the phone positioned at the centre against the movable retaining bracket (1). Press the smartphone (15) against the movable retaining bracket (1) with both hands ① and place your smartphone (15) in the SmartphoneGrip ②.
Be careful not to pinch your fingers between the movable retaining bracket and the SmartphoneGrip when inserting your smartphone.
Once you have inserted your smartphone, check that the smartphone cannot come into contact with any hard parts on the bike even in case of vibrations, as this could cause lasting damage to the smartphone.
Keypad Lock Assembly (see figure D)
The keypad lock (13) supplied, together with the removal blocker (12), prevents the SmartphoneGrip from being quickly and easily removed by blocking the release mechanism (4).
To insert the keypad lock (13), slide the keypad lock (13) into the provided opening ① and carefully screw it into place with a hex key (1.5 mm) (14) ②.
Note: The keypad lock is not an anti-theft device. The keypad lock prevents the SmartphoneGrip from being quickly removed from the holder. The keypad lock does not affect the smartphone in any way.
Note: Never leave your smartphone unattended in the SmartphoneGrip.
To remove the keypad lock (13), unscrew the securing screw with a hex key (1.5mm) (14) and remove the keypad lock (13).
Operation
Starting Operation
Place your smartphone in the SmartphoneGrip.
Start the eBike Flow app to have riding data displayed.
Depending on the smartphone's operating system, the eBike Flow app can be downloaded free of charge from the Apple App Store and the Google Play store.
Use your smartphone to scan the code in order to download the eBike Flow app.
Charging your Smartphone
While the smartphone is in the SmartphoneGrip, it can be charged at the same time as displaying riding data. If your smartphone has an inductive charging function, you can charge the smartphone without needing a cable.
Inductive Charging
The charging process starts automatically when you place a smartphone with an inductive charging function in the SmartphoneGrip. The status LED (9) lights up yellow. When the smartphone is fully charged, the status LED (9) will light up green permanently.
The charging voltage is switched off when you remove the smartphone from the holder.
Charging via USB
If your smartphone does not have an inductive charging function, you can charge your smartphone via the USB port (3). To do so, open the USB cap and connect a separate USB cable (not included in the scope of delivery) to the Micro-A/B USB port.
Pay attention to the type of plug required for your smartphone when purchasing the USB cable.
Status Indicators
The status LED (9) indicates the following statuses with different colours and lighting patterns.
Status Behaviour
Charging via USB LED lights up blue.
Inductive charging starts LED flashes yellow 3 times.
Inductive charging LED lights up yellow.
Fully charged LED lights up green.
Error message LED flashes red.
The following alarm states are detected and will lead to the inductive charging process being interrupted:
Detection of foreign objects, e.g. coins, keys and other metallic objects
Temperature alarm
If the SmartphoneGrip is outside of the operating temperature range, the status LED (9) will light up red and the charging process is interrupted. The charging process will resume as soon as the SmartphoneGrip is back within the operating temperature range.
-Overvoltage alarm at voltages above 6 V
Undervoltage alarm at voltages below 4.2V
Maintenance and servicing
Maintenance and cleaning
Use a soft cloth dampened only with water for cleaning. Do not use cleaning products of any kind.
Have all repairs performed only by an authorised bike dealer.
Do not clean any of the components with pressurised water.
Transport
If you transport your eBike attached to the outside of your car, e.g. on a bike rack, remove the SmartphoneGrip and the eBike battery to avoid damaging them.
After-sales service and advice on using products
If you have any questions about the eBike system and its components, contact an authorised bicycle dealer.
For contact details of authorised bike dealerships, please visit www.bosch-ebike.com.
Disposal
The drive unit, on-board computer incl. operating unit, battery, speed sensor, accessories and packaging should be disposed of in an environmentally correct manner.
Check that your personal data has been deleted from the device.
Do not dispose of eBikes and their components with household waste.
In accordance with Directive 2012/19/EU and Directive 2006/66/EC respectively, electronic devices that are no longer usable and defective/drained batteries must be collected separately and recycled in an environmentally friendly manner.
Please return Bosch eBike components that are no longer usable free of charge to an authorised bicycle dealer or to a recycling facility.
Subject to change without notice.
Sicherheitshinweise
Foutmelding LED knippert rood.
Read all the safety and general instructions.
Failure to observe the safety and general instructions may result in electric shock, fire and/or serious injury.
Read and observe the safety warnings and directions contained in all the eBike system operating instructions and in the operating instructions of your eBike.
Have installation and all repairs to the ConnectModule performed only by an authorised specialist dealer.
Specialist knowledge is required here. Incorrect installation may mean that the ConnectModule or eBike can no longer be operated in a legally compliant manner.
The ConnectModule is equipped with a wireless interface. There may therefore be local operating restrictions, e.g. in aircraft or hospitals. In this instance, follow the instructions below under (see "Transport", page English - 2).
Product Description and Specifications
Intended Use
The ConnectModule is exclusively for use with the related features from the eBike Flow app. Therefore, a mobile device is required, on which the eBike Flow app is downloaded and installed.
The ConnectModule is exclusively for use in combination with an eBike, particularly for tracking eBikes in the event of theft.
Technical Data
ConnectModule
Product code BCM3100
Internal battery V
4.35 mAh
650
External battery connection V 12
Frequency band LTE Cat-M1 MHz B1 (2100 MHz)
B2 (1900 MHz)
B3 (1800 MHz)
B4 (1700 MHz)
B5 (850 MHz)
B8 (900 MHz)
B12 (700 MHz)
B13 (700 MHz)
B20 (800 MHz)
B28 (700 MHz)
Transmission power dBm 20
Weight, approx. g 40
Operating temperature °C -5 to +40
Storage temperature °C +10 to +40
Protection rating IP54
Declaration of Conformity
Robert Bosch GmbH, Bosch eBike Systems, hereby declares that the ConnectModule radio communication unit complies with Directive 2014/53/EU. The full text of the EU Declaration of Conformity is available to view at the following website: https://www.bosch-ebike.com/conformity.
Robert Bosch GmbH, Bosch eBike Systems, hereby declares that the ConnectModule radio communication unit complies with the Radio Equipment Regulations 2017 (SI 2917/1206). The full text of the UK Declaration of Conformity can be accessed at the following Internet address: https://www.bosch-ebike.com/conformity.
Operation
For the ConnectModule to function, a functioning GPS and mobile connection are prerequisites.
The ConnectModule has motion sensors, a global navigation satellite system and mobile communications. This means the ConnectModule can identify suspicious movements of the eBike, determine the local position of the eBike and generate a local alarm.
Positions and movement data are displayed to the owner of the eBike in the eBike Flow app.
The ConnectModule thereby also facilitates other services, such as , which is provided for the end customer in the eBike Flow app. Additional information regarding the individual services of the eBike Flow app are provided in the app.
Costs may be incurred for use of these services. Details are displayed in the eBike Flow app.
Starting Operation
As soon as a ConnectModule is installed in an eBike, it can be activated once via the eBike Flow app.
Services such as can be activated and used via the eBike Flow app.
Depending on the smartphone's operating system, the eBike Flow app can be downloaded free of charge from the Apple App Store and the Google Play store.
Use your smartphone to scan the code in order to download the eBike Flow app.
The ConnectModule services can be deactivated at any time via the eBike Flow app. The user can reactivate all services as long as the user has a valid activation.
Deactivation of the ConnectModule itself is not provided.
Switching On and Off
The ConnectModule does not have to be switched on or off separately.
As long as the ConnectModule is supplied with voltage and the relevant services are activated, it sends data to the bicycle owner.
The ConnectModule has a internal battery in order to be able to provide the services independently of the eBike battery. The internal battery's state of charge can be viewed via the eBike Flow app. If the internal battery's state of charge is critical, an eBike battery should be inserted and the Bosch eBike charger should be connected.
Maintenance and servicing
Maintenance and Cleaning
The ConnectModule is maintenance-free. In the event of damage or failure, contact an authorised specialist dealer directly.
If services are not functioning despite being activated, contact your bike dealer directly, from whom you purchased the ConnectModule.
If you are handing in your eBike to a bicycle dealer for maintenance, it is recommended that you temporarily deactivate the services, and . This prevents false alarms.
Transport
As soon as you transport your eBike (e.g. in a vehicle trailer, train, aeroplane, etc.), we recommend deactivating all individual services or activating the function. This also deactivates any ConnectModule communication. This will allow you to prevent false alarms.
After-sales service and advice on using products
If you have any questions about the eBike system and its components, contact an authorised bicycle dealer.
For contact details of authorised bike dealerships, please visit www.bosch-ebike.com.
Disposal
The drive unit, on-board computer incl. operating unit, battery, speed sensor, accessories and packaging should be disposed of in an environmentally correct manner.
Check that your personal data has been deleted from the device.
Do not dispose of eBikes and their components with household waste.
In accordance with Directive 2012/19/EU and Directive 2006/66/EC respectively, electronic devices that are no longer usable and defective/drained batteries must be collected separately and recycled in an environmentally friendly manner.
Please return Bosch eBike components that are no longer usable free of charge to an authorised bicycle dealer or to a recycling facility.
Subject to change without notice.
Sicherheitshinweise
Read all the safety information and instructions. Failure to observe the safety information and follow instructions may result in electric shock, fire and/or serious injury.
Save all safety warnings and instructions for future reference.
The term battery is used in these instructions to mean all original Bosch eBike rechargeable battery packs.
Read and observe the safety warnings and directions contained in all the eBike system operating instructions and in the operating instructions of your eBike.
Do not attempt to change - and especially increase the power of your drive or the maximum speed that it supports. Doing this may put yourself and others at risk, and you may also breach statutory regulations.
Do not make any modifications to your eBike system or fit any other products that might increase the performance of your eBike system. Doing so will generally reduce the service life of the system and risks damaging the drive unit and the bike. You also run the risk of losing the guarantee and warranty claims on the bicycle you have purchased. By handling the system improperly you are also endangering your safety and that of other road users, thus running the risk of high personal liability costs and possibly even criminal prosecution in the event of accidents that can be attributed to manipulation of the bicycle.
Do not open the drive unit yourself. The drive unit must only be repaired by qualified personnel using only original spare parts. This will ensure that the safety of the drive unit is maintained. Unauthorized opening of the drive unit will render warranty claims null and void.
All components fitted to the drive unit and all other components of the eBike drive (e.g. chainring, chain-ring receptacle, pedals) must only be replaced with identical components or components that have been specifically approved by the manufacturer for your eBike. This will protect the drive unit from overloading and becoming damaged.
- Remove the battery from the eBike before beginning work (e.g. inspection, repair, assembly, maintenance, work on the chain, etc.) on the eBike, transporting it with a car or aeroplane, or storing it. Unintentional activation of the eBike system poses a risk of injury.
On sections of the drive, temperatures >60^ may occur in extreme conditions, e.g. when carrying consistently high loads at low speed when riding up hills or transporting loads.
After a ride, do not allow your unprotected hands or legs to come into contact with the housing of the drive unit. Under extreme conditions, such as continuously high torques at low travel speeds, or when riding up hills or carrying loads, the housing may reach a very high tem
perature.
The temperature that the drive unit housing may reach is influenced by the following factors:
Ambient temperature
Ride profile (route/gradient)
Ride duration
Total weight (rider, eBike, luggage)
Motor cover on the drive unit
Heat dissipation properties of the bicycle frame
Type of drive unit and type of gear-shifting
Use only original Bosch batteries that the manufacturer has approved for your eBike. Using other batteries can lead to injuries and pose a fire hazard. Bosch accepts no liability or warranty claims if other batteries are used.
Keep the magnet away from implants and other medical devices, e.g. pacemakers or insulin pumps. The magnet generates a field that can impair the function of implants and medical devices.
Keep the magnet away from magnetic data carriers and magnetically sensitive devices. The effect of the magnets may lead to irreversible data losses.
Observe all national regulations which set out the approved use of eBikes.
Privacy notice
When you connect the eBike to the Bosch DiagnosticsTool 3, data about Bosch drive unit (e.g. energy consumption, temperature, etc.) is transferred to Bosch eBike Systems (Robert Bosch GmbH) for the purposes of product improvement. You can find more information about this on the Bosch eBike website at www.bosch-ebike.com.
Product description and specifications
Intended use
The drive unit is intended exclusively for driving your eBike and must not be used for any other purpose.
In addition to the functions shown here, changes to software relating to troubleshooting and functional modifications may be introduced at any time.
Product features
Individual illustrations in these operating instructions may differ slightly from the actual conditions depending on the equipment of your eBike.
The numbering of the components shown refers to the illustrations on the graphics pages at the beginning of the manual.
(1) Drive unit
(2) Speed sensor a)
(3) Spoke magnet
(4) CenterLock magnet
(5) Rim magnet
a) different sensor type and installation position is possible
b) different installation position is possible
Technical data
Drive unit Performance Line
Product code BDU3360
Continuous rated power W 250
Torque at drive, max. Nm 75
Rated voltage V= 36
Operating temperature °C -5 to +40
Storage temperature °C +10 to +40
Protection rating IP54
Weight, approx. kg 3.2
The Bosch eBike system uses FreeRTOS
(see http://www.freertos.org).
Bicycle lightsA)
Voltage approx. B)
V=
12
Maximum power
- Front light
W
17.4
- Tail light
W
0.6
A) Depends on legal regulations, not possible in all country-specific models via the eBike battery
B) When changing the bulbs, ensure that they are compatible with the Bosch eBike system (ask your bicycle dealer) and are suitable for the specified voltage. Bulbs must only be replaced with bulbs of the same voltage.
Inserting a bulb incorrectly can cause it to blow.
Information on the noise emissions of the drive unit
Typically, the A-weighted noise emission level of the eBike system is < 70dB(A) . A key feature of the service is that the drive unit will emit an alarm tone in response to unauthorized movement of the eBike. This alarm tone can exceed a noise emission level of 70 dB(A) and measures 80 dB(A) at a 2 m distance from the drive unit. The alarm tone is only available once the service has been activated and can be deactivated via the app eBike Flow.
Assembly
Checking the speed sensor (see figure A)
Speedsensor (slim)
The speed sensor (2) and its CenterLock magnet (4) or spoke magnet (3) are mounted ex works in such a manner that the magnet, after a turn of the wheel, moves past the speed sensor with a clearance of at least 2mm , yet no more than 15mm .
If any structural changes are made, the correct distance between the magnet and the sensor must be complied with (see figure A).
Note: Make sure you do not damage the sensor or the sensor holder when fitting or removing the rear wheel.
When changing a wheel, make sure that the sensor cable is routed so that it is not under tension and has no kinks.
The CenterLock magnet (4) can only be removed and reinserted up to five times.
Rim magnet
When installing a rim magnet, no sensor is required to detect a wheel turn. The drive unit itself detects when the magnet is close to it and calculates the speed and any other data required from the frequency of the emergence of the magnet field.
Since the drive unit is sensitive to magnetic fields, avoid other magnetic fields in the vicinity of the drive unit (e.g. magnetic clipless pedals, magnetic cadence sensors, etc.) in order to prevent disruption to the drive unit.
Operation
A control unit is required for the starting operation of the eBike system. Observe the starting operation for the eBike system and drive unit control in the control unit operating instructions.
Notes on cycling with the eBike system
When does the eBike drive work?
The eBike drive assists your cycling only when you are pedalling. If you do not pedal, the assistance will not work. The motor output always depends on the pedalling force you apply.
If you apply less force, you will receive less assistance than if you apply a lot of force. This applies irrespective of the assistance level.
The eBike drive automatically switches off at speeds over 25km / h . When the speed falls below 25km / h , the drive automatically becomes available again.
An exception applies to the push assistance function, in which the eBike can be pushed at low speed without pedalling. The pedals may rotate when the push assistance is in use.
You can also use the eBike as a normal bicycle without assistance at any time, either by switching off the eBike system or by setting the assistance level to OFF. The same applies when the battery is drained.
Interaction between the eBike system and gear-shifting
The gear-shifting should be used with an eBike drive in the same way as with a normal bicycle (observe the operating instructions of your eBike on this point).
Irrespective of the type of gear-shifting, it is advisable to briefly stop pedalling when changing gear. This will facilitate the gear change and reduce wear on the powertrain.
By selecting the correct gear, you can increase your speed and range while applying the same amount of force.
Gaining initial experience
We recommend that you gain initial experience with the eBike away from busy roads.
Test the various assistance levels, beginning with the lowest level. As soon as you feel confident, you can ride your eBike in traffic like any other bicycle.
Test the range of your eBike in different conditions before planning longer and more demanding trips.
Influences on range
The range is affected by a number of factors, such as:
Assistance level
Speed
Gear shifting behaviour
-Tyre type and tyre pressure
Age and condition of the battery
Route profile (gradients) and conditions (road surface)
Headwind and ambient temperature
Weight of eBike, rider and luggage
For this reason, it is not possible to predict the range accurately before and during a trip. However, as a general rule:
With the same assistance level on the eBike drive: The less energy you need to exert in order to reach a certain speed (e.g. by changing gears optimally), the less energy the eBike drive will consume and the higher the range per battery charge will be.
The higher the selected assistance level under otherwise constant conditions, the smaller the range will be.
Taking care of your eBike
Please observe the operating and storage temperatures of the eBike components. Protect the drive unit, on-board computer and battery against extreme temperatures (e.g. from intense sunlight without adequate ventilation). Extreme tem
peratures can cause the components (especially the battery) to become damaged.
Have your eBike system checked by an expert at least once a year (including mechanical parts, up-to-dateness of system software).
Maintenance and servicing
Maintenance and cleaning
When changing the bulbs, ensure that they are compatible with the Bosch eBike system (ask your bicycle dealer) and are suitable for the specified voltage. Bulbs must only be replaced with bulbs of the same voltage.
Do not immerse any components, including the drive unit, in water or clean them with pressurised water.
Have your eBike system checked by an expert at least once a year (including mechanical parts, up-to-dateness of system software).
Please have your eBike serviced and repaired by an authorised bicycle dealer.
After-sales service and advice on using products
If you have any questions about the eBike system and its components, contact an authorised bicycle dealer.
For contact details of authorised bike dealerships, please visit www.bosch-ebike.com.
Disposal
The drive unit, on-board computer incl. operating unit, battery, speed sensor, accessories and packaging should be disposed of in an environmentally correct manner.
Check that your personal data has been deleted from the device.
Do not dispose of eBikes and their components with household waste.
In accordance with Directive 2012/19/EU and Directive 2006/66/EC respectively, electronic devices that are no longer usable and defective/drained batteries must be collected separately and recycled in an environmentally friendly manner.
Please return Bosch eBike components that are no longer usable free of charge to an authorised bicycle dealer or to a recycling facility.
Subject to change without notice.
Sicherheitshinweise
Read all the safety information and instructions. Failure to observe the safety information and follow instructions may result in electric shock, fire and/or serious injury.
Save all safety warnings and instructions for future reference.
The term battery is used in these instructions to mean all original Bosch eBike rechargeable battery packs.
Read and observe the safety warnings and directions contained in all the eBike system operating instructions and in the operating instructions of your eBike.
Do not attempt to change - and especially increase the power of your drive or the maximum speed that it supports. Doing this may put yourself and others at risk, and you may also breach statutory regulations.
- Do not make any modifications to your eBike system or fit any other products that might increase the performance of your eBike system. Doing so will generally reduce the service life of the system and risks damaging the drive unit and the bike. You also run the risk of losing the guarantee and warranty claims on the bicycle you have purchased. By handling the system improperly you are also endangering your safety and that of other road users, thus running the risk of high personal liability costs and possibly even criminal prosecution in the event of accidents that can be attributed to manipulation of the bicycle.
Do not open the drive unit yourself. The drive unit must only be repaired by qualified personnel using only original spare parts. This will ensure that the safety of the drive unit is maintained. Unauthorized opening of the drive unit will render warranty claims null and void.
All components fitted to the drive unit and all other components of the eBike drive (e.g. chainring, chain-ring receptacle, pedals) must only be replaced with identical components or components that have been specifically approved by the manufacturer for your eBike. This will protect the drive unit from overloading and becoming damaged.
- Remove the battery from the eBike before beginning work (e.g. inspection, repair, assembly, maintenance, work on the chain, etc.) on the eBike, transporting it with a car or aeroplane, or storing it. Unintentional activation of the eBike system poses a risk of injury.
On sections of the drive, temperatures >60^ may occur in extreme conditions, e.g. when carrying consistently high loads at low speed when riding up hills or transporting loads.
After a ride, do not allow your unprotected hands or legs to come into contact with the housing of the drive unit. Under extreme conditions, such as continuously high torques at low travel speeds, or when riding up hills or carrying loads, the housing may reach a very high tem
perature.
The temperature that the drive unit housing may reach is influenced by the following factors:
Total weight (rider, eBike, luggage)
Motor cover on the drive unit
Heat dissipation properties of the bicycle frame
Type of drive unit and type of gear-shifting
Use only original Bosch batteries that the manufacturer has approved for your eBike. Using other batteries can lead to injuries and pose a fire hazard. Bosch accepts no liability or warranty claims if other batteries are used.
Keep the magnet away from implants and other medical devices, e.g. pacemakers or insulin pumps. The magnet generates a field that can impair the function of implants and medical devices.
Keep the magnet away from magnetic data carriers and magnetically sensitive devices. The effect of the magnets may lead to irreversible data losses.
Observe all national regulations which set out the approved use of eBikes.
Privacy notice
When you connect the eBike to the Bosch DiagnosticTool 3, data about Bosch drive unit (e.g. energy consumption, temperature, etc.) is transferred to Bosch eBike Systems (Robert Bosch GmbH) for the purposes of product improvement. You can find more information about this on the Bosch eBike website at www.bosch-ebike.com.
Product description and specifications
Intended use
The drive unit is intended exclusively for driving your eBike and must not be used for any other purpose.
In addition to the functions shown here, changes to software relating to troubleshooting and functional modifications may be introduced at any time.
Product features
Individual illustrations in these operating instructions may differ slightly from the actual conditions depending on the equipment of your eBike.
The numbering of the components shown refers to the illustrations on the graphics pages at the beginning of the manual.
(1) Drive unit
(2) Speed sensor a)
(3) Spoke magnet
(4) CenterLock magnet
(5) Rim magnet
a) different sensor type and installation position is possible
b) different installation position is possible
Technical data
Drive unit Drive Unit
Performance Line
CX/Cargo/
CX Race Edition/
Speed
Product code BDU3740
BDU3741
BDU3760
BDU3761
BDU3780
BDU3781
Continuous rated power W 250
Torque at drive, max. Nm 85
Rated voltage V= 36
Operating temperature °C -5 to +40
Storage temperature °C +10 to +40
Protection rating IP54
Weight, approx. kg 3
The Bosch eBike system uses FreeRTOS
(see http://www.freertos.org).
Bicycle lightsA)
Voltage approx.B)
V= 12
Maximum power
- Front light
W 17.4
Bicycle lights
- Tail light
W
0.6
A) Depends on legal regulations, not possible in all country-specific models via the eBike battery
B) When changing the bulbs, ensure that they are compatible with the Bosch eBike system (ask your bicycle dealer) and are suitable for the specified voltage. Bulbs must only be replaced with bulbs of the same voltage.
Inserting a bulb incorrectly can cause it to blow.
Information on the noise emissions of the drive unit
Typically, the A-weighted noise emission level of the eBike system is < 70dB(A) . A key feature of the service is that the drive unit will emit an alarm tone in response to unauthorized movement of the eBike. This alarm tone can exceed a noise emission level of 70 dB(A) and measures 80 dB(A) at a 2 m distance from the drive unit. The alarm tone is only available once the service has been activated and can be deactivated via the app eBike Flow.
Assembly
Checking the speed sensor (see figure A)
Speedsensor (slim)
The speed sensor (2) and its CenterLock magnet (4) or spoke magnet (3) are mounted ex works in such a manner that the magnet, after a turn of the wheel, moves past the speed sensor with a clearance of at least 2mm , yet no more than 15mm .
If any structural changes are made, the correct distance between the magnet and the sensor must be complied with (see figure A).
Note: Make sure you do not damage the sensor or the sensor holder when fitting or removing the rear wheel.
When changing a wheel, make sure that the sensor cable is routed so that it is not under tension and has no kinks.
The CenterLock magnet (4) can only be removed and reinserted up to five times.
Rim magnet
When installing a rim magnet, no sensor is required to detect a wheel turn. The drive unit itself detects when the magnet is close to it and calculates the speed and any other data required from the frequency of the emergence of the magnet field.
Since the drive unit is sensitive to magnetic fields, avoid other magnetic fields in the vicinity of the drive unit (e.g. magnetic clipless pedals, magnetic cadence sensors, etc.) in order to prevent disruption to the drive unit.
Operation
A control unit is required for the starting operation of the eBike system. Observe the starting operation for the eBike
system and drive unit control in the control unit operating instructions.
Notes on cycling with the eBike system
When does the eBike drive work?
The eBike drive assists your cycling only when you are pedalling. If you do not pedal, the assistance will not work. The motor output always depends on the pedalling force you apply.
If you apply less force, you will receive less assistance than if you apply a lot of force. This applies irrespective of the assistance level.
The eBike drive automatically switches off at speeds over 25 / 45km / h . When the speed falls below 25 / 45km / h , the drive automatically becomes available again.
An exception applies to the push assistance function, in which the eBike can be pushed at low speed without pedalling. The pedals may rotate when the push assistance is in use.
You can also use the eBike as a normal bicycle without assistance at any time, either by switching off the eBike system or by setting the assistance level to OFF. The same applies when the battery is drained.
Interaction between the eBike system and gear-shifting
The gear-shifting should be used with an eBike drive in the same way as with a normal bicycle (observe the operating instructions of your eBike on this point).
Irrespective of the type of gear-shifting, it is advisable to briefly stop pedalling when changing gear. This will facilitate the gear change and reduce wear on the powertrain.
By selecting the correct gear, you can increase your speed and range while applying the same amount of force.
Gaining initial experience
We recommend that you gain initial experience with the eBike away from busy roads.
Test the various assistance levels, beginning with the lowest level. As soon as you feel confident, you can ride your eBike in traffic like any other bicycle.
Test the range of your eBike in different conditions before planning longer and more demanding trips.
Influences on range
The range is affected by a number of factors, such as:
Assistance level
Speed
Gear shifting behaviour
-Tyre type and tyre pressure
Age and condition of the battery
Route profile (gradients) and conditions (road surface)
Headwind and ambient temperature
Weight of eBike, rider and luggage
For this reason, it is not possible to predict the range accurately before and during a trip. However, as a general rule:
With the same assistance level on the eBike drive: The less energy you need to exert in order to reach a certain speed (e.g. by changing gears optimally), the less energy the eBike drive will consume and the higher the range per battery charge will be.
The higher the selected assistance level under otherwise constant conditions, the smaller the range will be.
Taking care of your eBike
Please observe the operating and storage temperatures of the eBike components. Protect the drive unit, on-board computer and battery against extreme temperatures (e.g. from intense sunlight without adequate ventilation). Extreme temperatures can cause the components (especially the battery) to become damaged.
Have your eBike system checked by an expert at least once a year (including mechanical parts, up-to-dateness of system software).
Maintenance and servicing
Maintenance and cleaning
When changing the bulbs, ensure that they are compatible with the Bosch eBike system (ask your bicycle dealer) and are suitable for the specified voltage. Bulbs must only be replaced with bulbs of the same voltage.
Do not immerse any components, including the drive unit, in water or clean them with pressurised water.
Have your eBike system checked by an expert at least once a year (including mechanical parts, up-to-dateness of system software).
Please have your eBike serviced and repaired by an authorised bicycle dealer.
After-sales service and advice on using products
If you have any questions about the eBike system and its components, contact an authorised bicycle dealer.
For contact details of authorised bike dealerships, please visit www.bosch-ebike.com.
Disposal
The drive unit, on-board computer incl. operating unit, battery, speed sensor, accessories and packaging should be disposed of in an environmentally correct manner.
Check that your personal data has been deleted from the device.
Do not dispose of eBikes and their components with household waste.
In accordance with Directive 2012/19/EU and Directive 2006/66/EC respectively, electronic devices that are no longer usable and defective/drained batteries must be collected separately and recycled in an environmentally friendly manner.
English - 4
Please return Bosch eBike components that are no longer usable free of charge to an authorised bicycle dealer or to a recycling facility.
Subject to change without notice.
Sicherheitshinweise
Read all the safety and general instructions. Failure to observe the safety and general instructions may result in electric shock, fire and/or serious injury.
The contents of lithium-ion battery cells are flammable under certain conditions. You must therefore ensure that you have read and understood the rules of conduct set out in these operating instructions.
Save all safety warnings and instructions for future reference.
The term battery is used in these instructions to mean all original Bosch eBike rechargeable battery packs.
Read and observe the safety warnings and directions contained in all the eBike system operating instructions and in the operating instructions of your eBike.
- Remove the battery from the eBike before beginning work (e.g. inspection, repair, assembly, maintenance, work on the chain, etc.) on the eBike, transporting it with a car or aeroplane, or storing it. Unintentional activation of the eBike system poses a risk of injury.
Do not open the battery. There is a risk of short-circuiting. Opening the battery voids any and all warranty claims.
- Protect the battery against heat (e.g. prolonged sun exposure), fire and from being submerged in water. Do not store or operate the battery near hot or flammable objects. There is a risk of explosion.
- When the battery is not in use, keep it away from paper clips, coins, keys, nails, screws or other small metal objects that could make a connection from one terminal to another. A short circuit between the battery terminals may cause burns or a fire. Short circuit damage which occurs in this instance voids any and all warranty claims against Bosch.
Avoid mechanical loads and exposure to high temperatures. These can damage the battery cells and cause the flammable contents to leak out.
Do not place the charger or the battery near flammable materials. Ensure the battery is completely dry and placed on a fireproof surface before charging. There is a risk of fire due to the heat generated during charging.
The eBike battery must not be left unattended while charging.
If used incorrectly, liquid may leak from the battery. Contact with this liquid should be avoided. If contact occurs, rinse off with water. If the liquid comes into contact with your eyes, seek additional medical attention. Liquid leaking from the battery may cause irritation or scalding.
Batteries must not be subjected to mechanical shock. There is a risk of the battery being damaged.
The battery may give off fumes if it becomes damaged or is used incorrectly. Ensure the area is well ventil
ated and seek medical attention should you experience any adverse effects. The fumes may irritate the respiratory system.
Only charge the battery using original Bosch chargers. When using chargers that are not made by Bosch, the risk of fire cannot be excluded.
Use the battery only in conjunction with eBikes that have original Bosch eBike drive systems. This is the only way in which you can protect the battery against dangerous overload.
Use only original Bosch batteries that the manufacturer has approved for your eBike. Using other batteries can lead to injuries and pose a fire hazard. Bosch accepts no liability or warranty claims if other batteries are used.
- Keep the battery away from children.
The safety of both our customers and our products is important to us. Our eBike batteries are lithium-ion batteries which have been developed and manufactured in accordance with the latest technology. We comply with or exceed the requirements of all relevant safety standards. When charged, these lithium-ion batteries contain a high level of energy. If a fault occurs (which may not be detectable from the outside), in very rare cases and under unfavourable conditions, lithium-ion batteries can catch fire.
Privacy notice
When you connect the eBike to the Bosch DiagnosticsTool 3, data about the eBike batteries (e.g. temperature, cell voltage, etc.) is transferred to Bosch eBike Systems (Robert Bosch GmbH) for the purposes of product improvement. You can find more information about this on the Bosch eBike website at www.bosch-ebike.com.
Product description and specifications
Intended Use
The Bosch eBike rechargeable batteries are intended exclusively for the power supply of your Bosch eBike drive unit and must not be used for any other purpose.
Product features
The numbering of the components shown refers to the illustrations on the graphics pages at the beginning of the manual.
All representations of bicycle parts, apart from the batteries and their holders, are schematic and may differ from those on your own eBike.
In addition to the functions shown here, changes to software relating to troubleshooting and functional modifications may be introduced at any time.
(1) Key for the battery lock
(2) Battery lock
(3) PowerTube battery safety hook
Operating temperature °C -5 to +40 -5 to +40 -5 to +40
Storage temperature °C +10 to +40 +10 to +40 +10 to +40
Permitted charging temperature range °C 0 to +40 0 to +40
0 to +40
Weight, approx.
kg
3.0
3.6
4.3
Protection rating
IP54
IP54
IP54
Li-ion battery
PowerPack 545
PowerPack 725
Product code
BBP3551
BBP3570
Rated voltage V= 36 36
Nominal capacity Ah
14.4
19.2
Energy Wh
545
725
Operating temperature °C
-5 to +40
-5 to +40
Storage temperature °C
+10 to +40
+10 to +40
Permitted charging temperature range °C
0 to +40
0 to +40
Weight, approx.
kg
3.0
4.0
Protection rating
IP54
IP54
UK CA
Fitting
Ensure the battery is placed on clean surfaces only.
Avoid getting dirt, e.g. sand or soil, in the charging socket and contacts in particular.
Testing the battery before using it for the first time
Test the battery before charging it for the first time or using it in your eBike.
To do this, press the on/off button (7) to switch the battery on. If none of the LEDs on the battery charge indicator (6) light up, the battery may be damaged.
If at least one (but not all) of the LEDs on the battery charge indicator (6) lights up, the battery will need to be fully charged before using it for the first time.
Do not charge or use batteries if they are damaged.
Contact an authorised bicycle dealer.
Charging the battery
A Bosch eBike battery must only be charged using an original Bosch eBike charger.
Note: The battery is supplied partially charged. To ensure full battery capacity, fully charge the battery in the charger before using it for the first time.
To charge the battery, read and follow the instructions in the operating manual for the charger.
The battery can be charged at any state of charge. Interrupting the charging process does not damage the battery.
The battery has a temperature monitoring function which only allows it to be charged within a temperature range of 0^ to 40^ .
If the temperature of the battery is outside this charging range, three of the LEDs on the battery charge indicator (6) will flash. Disconnect the battery from the charger and let it acclimatise.
Do not reconnect the battery to the charger until it has reached the correct charging temperature.
Battery charge indicator
The five LEDs on the battery charge indicator (6) indicate the battery's state of charge when the battery is switched on.
Each LED represents approximately 20% of the charging capacity. When the battery is fully charged, all five LEDs will be lit.
The battery's state of charge when switched on is also shown on the display of the on-board computer. Read and follow the instructions in the operating manuals for the drive unit and on-board computer.
If the battery capacity is less than 10% , the last remaining LED will flash.
If the battery capacity is less than 5% , all the LEDs on the battery charge indicator (6) on the battery will go out. The display function of the on-board computer, however, will carry on working.
Once charging is complete, disconnect the battery from the charger and the charger from the mains.
Inserting and removing the battery
Always switch off the battery and the eBike system when inserting the battery into the holder or removing it from the holder.
Removing the PowerTube battery (pivot) (see figure A)
To remove the PowerTube battery (4), open the lock (2) using the key (1). The battery will be unlocked and fall into the safety restraint (8).
Press on the safety restraint from above. The battery will be unlocked completely and fall into your hand. Pull the battery out of the frame.
Note: As a result of varying designs, the battery may need to be inserted and removed using a different method. Read the operating instructions of the eBike manufacturer.
Inserting the PowerTube battery (pivot) (see figure B)
In order for the battery to be inserted, the key (1) must be inserted into the lock (2) and the lock must be open.
To insert the PowerTube battery (4), place it so that its contacts are in the lower holder of the frame.
Push the battery upwards until it is held by the safety restraint (8).
Hold the lock open with the key and press the battery upwards until you hear it click into place. Check that the battery is secure in all directions.
Always secure the battery by closing the lock (2) otherwise the lock may open and the battery may fall out of the holder.
Always remove the key (1) from the lock (2) after locking it. This prevents both the key from falling out and the battery from being removed by unauthorised third parties when the eBike is not in use.
Removing the PowerTube battery (axial) (see figure C)
To remove the PowerTube battery (12), open the lock (2) using the key (1), remove the key (1) and fold the locking mechanism (9) to the side.
Use the pull strap (10) to pull the battery (12) out of the frame and keep hold of it so that it does not fall out of the frame.
Note: As a result of varying designs, the battery may need to be inserted and removed using a different method. Read the operating instructions of the eBike manufacturer.
Inserting the PowerTube battery (axial) (see figure D)
In order for the battery to be inserted, the locking mechanism (9) must be folded to the side. At this point, the key (1) must not be inserted in the battery lock (2).
To insert the PowerTube battery, insert it into the frame with the socket for the charging connector (5) facing upwards until the battery clicks into place. Ensure that the battery is aligned correctly.
Close the locking mechanism (9), insert the key (1) into the battery lock (2) and secure the battery. Make sure that the safety hook (3) is hooked in at the opening of the axial rail (11).
Check that the battery is secure in all directions.
Always remove the key (1) from the lock (2) after locking it. This prevents both the key from falling out and the battery from being removed by unauthorised third parties when the eBike is not in use.
Inserting and Removing the PowerPack battery (see figure E)
In order to insert the battery, the key (1) must not be inserted in the lock (2).
To insert the PowerPack battery (15), place it so that its contacts are in the lower holder (16) on the eBike. Tilt it into the upper holder (14) as far as possible until you hear it click into place.
Check that the battery is secure in all directions.
Do not ride with the key (1) inserted. Make sure that the key is no longer inserted when you park the eBike.
To remove the PowerPack battery (15), switch it off and open the lock (2) using the key (1).
Tilt the battery out of the upper holder (14) and pull it out of the lower holder (16).
Operation
Start-up
Use only original Bosch batteries that the manufacturer has approved for your eBike. Using other batteries can lead to injuries and pose a fire hazard. Bosch accepts no liability or warranty claims if other batteries are used.
Switching on/off
Switching on the battery is one way to switch on the eBike system. Read and follow the instructions in the operating manuals for the drive unit and on-board computer.
Before switching on the battery, i.e. the eBike system, make sure that the lock (2) is closed.
To switch on the battery, press the on/off button (7). Do not use any sharp or pointed objects to press the button. The LEDs on the indicator (6) will light up, indicating the battery's state of charge at the same time.
Note: If the battery capacity is less than 5% , none of the LEDs on the battery charge indicator (6) will light up.
Whether the eBike system is switched on is only visible on the on-board computer/control unit.
To switch off the battery, press the on/off button (7) again. The LEDs on the indicator (6) will go out. This will also switch the eBike system off.
If no power is drawn from the eBike drive for about 10 minutes (e.g. because the eBike is not moving) and no button is pressed on the on-board computer or the control unit of the eBike, the eBike system will switch off automatically.
The battery is protected against deep discharge, overloading, overheating and short-circuiting by the "Battery Management System (BMS)". In the event of danger, a protective circuit switches the battery off automatically.
If a fault is detected in the battery, two of the LEDs on the battery charge indicator (6) will flash. Contact an authorised bicycle dealer if this happens.
Recommendations for optimal handling of the battery
The service life of the battery can be extended if it is looked after well and especially if it is stored at the correct temperature.
As it ages, however, the capacity of the battery will diminish, even with good care.
A significantly reduced operating time after charging indicates that the battery has deteriorated. The battery should be replaced.
Recharging the battery before and during storage
When you are not going to use the battery for an extended period (longer than three months), store it at a state of charge of around 30% to 60% (when two to three of the LEDs on the battery charge indicator (6) are lit).
Check the state of charge after six months. If only one of the LEDs on the battery charge indicator (6) is lit, charge the battery back up to around 30% to 60% .
Note: If the battery is stored with no charge for an extended period of time, it may become damaged despite the low self-discharge and the battery capacity could be significantly reduced.
Leaving the battery permanently connected to the charger is not recommended.
Storage conditions
If possible, store the battery in a dry, well-ventilated place. Protect it against moisture and water. When the weather conditions are bad, it is advisable to remove the battery from the eBike and store it in a closed room until you use it next, for example.
Store the eBike batteries in the following locations:
In a room with a smoke alarm
Away from combustible or easily flammable objects
Away from heat sources
To ensure an optimum service life, store the eBike batteries at temperatures between 10^ and 20^ . Never store them at temperatures below -10^ or above 60^ .
Make sure that the maximum storage temperature is not exceeded. Do not leave the battery in your car in the summer, for example, and store it away from direct sunlight.
Leaving the battery on the bicycle for storage is not recommended.
Action in the event of a fault
The Bosch eBike rechargeable battery must not be opened, including for repairs. There is a risk of the Bosch eBike rechargeable battery catching fire, e.g. as a result of a short circuit. This risk continues to apply on any Bosch eBike rechargeable battery ever opened, even at a later point in time.
In the event of a fault, do not have your Bosch eBike rechargeable battery repaired; instead, have it replaced with an original Bosch eBike rechargeable battery by your specialist retailer.
Maintenance and servicing
Maintenance and cleaning
The battery must not be submerged in water or cleaned using a jet of water.
Keep the battery clean and avoid contact with skincare products and insect repellant. Clean it carefully with a soft, damp cloth.
Clean and lightly grease the connector pins occasionally.
Please contact an authorised bicycle dealer if the battery is no longer working.
After-sales service and advice on using products
If you have any questions about the batteries, contact an authorised bicycle dealer.
Note down the key manufacturer and number on the key (1). Contact an authorised bicycle dealer if you lose the key. Give them the name of the key manufacturer and the number on the key.
For contact details of authorised bicycle dealers, please visit www.bosch-ebike.com.
Transport
If you transport your eBike attached to the outside of your car, e.g. on a bike rack, remove the on-board computer and the eBike battery to avoid damaging them.
The batteries are subject to legislation on the transport of dangerous goods. Private users can transport undamaged batteries by road without having to comply with additional requirements.
When batteries are transported by commercial users or third parties (e.g. air transport or forwarding agency), special requirements on packaging and labelling (e.g. ADR regulations) must be met. When preparing items for shipping, a dangerous goods expert can be consulted as required.
Do not ship batteries if the housing is damaged or the rechargeable battery is not fully functional. Use only the original Bosch packaging for transport. Apply tape over exposed contacts and pack the battery such that it cannot move around inside the packaging. Inform your parcel service that the package contains dangerous goods. Please also observe any additional national regulations should these exist.
If you have any questions about transporting the batteries, contact an authorised bicycle dealer. You can also order suitable transport packaging from the dealer.
Disposal
Batteries, accessories and packaging should be recycled in an environmentally friendly manner.
Do not dispose of batteries along with household waste.
Apply tape over the contact surfaces of the battery terminals before disposing of batteries.
Do not touch severely damaged eBike batteries with your bare hands - electrolyte may escape and cause skin irritation. Store the defective battery in a safe location outdoors. Cover the terminals if necessary and inform your dealer. They will help you to dispose of it properly.
In accordance with Directive 2012/19/EU and Directive 2006/66/EC respectively, electronic devices that are no longer usable and defective/drained batteries must be collected separately and recycled in an environmentally friendly manner.
Li-ion: Please observe the information in the section on (see "Transport", page English - 5).
Please return batteries that are no longer usable to an authorised bicycle dealer.
Subject to change without notice.
02750073P3(2022.05)T/7WEU
www.bosch-ebike.com
Robert Bosch GmbH
72757 Reutlingen
Germany
BOSCH
English
Dear customers,
changes have been made to this operating manual
WEU: 0 275 007 3PX (2022.03). Contrary to the informa
tion on the cover and in the Technical Data, the following currently applies:
The following product versions for the PowerPack rechargeable batteries were added:
Product name Product code
PowerPack 545 BBP3551
PowerPack 725 BBP3570
The product versions of the PowerPack rechargeable battery already contained in the operating manual are not currently available yet. The schematic diagrams and information on handling are accurate and also apply for the added product versions.
Technical Data
The following technical data currently applies:
Li-ion battery PowerPack
545
PowerPack
725
Product code BBP3551
BBP3570
Rated voltage V= 36 36
Nominal capacity Ah 14.4 19.2
Energy Wh 545 725
Operating temperature °C -5 to +40 -5 to +40
Storage temperature °C +10 to +40 +10 to +40
Permitted charging temperature range
°C 0 to +40 0 to +40
Weight, approx.
kg
3.0
4.0
Protection rating
IP54
IP54
Note: You can find more information in the Service area of the official website: http://www.bosch-ebike.com.
Thank you for your understanding.
Sicherheitshinweise
Cheres clients, chers clients,
Read all the safety and general instructions. Failure to observe the safety and general instructions may result in electric shock, fire and/or serious injury.
Save all safety warnings and instructions for future reference.
The term battery is used in these instructions to mean all original Bosch eBike rechargeable battery packs.
Read and observe the safety warnings and directions contained in all the eBike system operating instructions and in the operating instructions of your eBike.
Carefully cover the charging socket with the flap after charging the eBike. This ensures that no dirt or water gets in.
Do not expose the charger to rain or wet conditions. If water enters a charger, there is a risk of electric shock.
Charge only Bosch lithium-ion batteries that are approved for use in eBikes. The battery voltage must match the battery charging voltage of the charger. Otherwise there is a danger of fire and explosion.
- Keep the charger clean. Dirt poses a risk of electric shock.
Always check the charger, cable and plug before use. Stop using the charger if you discover any damage. Do not open the charger. Damaged chargers, cables and plugs increase the risk of electric shock.
Do not operate the charger on an easily ignited surface (e.g. paper, textiles, etc.) or in a flammable environment. There is a risk of fire due to the charger heating up during operation.
Take care if you touch the charger while it is charging. Wear protective gloves. The charger can get very hot, especially when the ambient temperature is high.
The battery may give off fumes if it becomes damaged or is used incorrectly. Ensure the area is well ventilated and seek medical attention should you experience any adverse effects. The fumes may irritate the respiratory system.
The eBike battery must not be left unattended while charging.
Children or persons who, owing to their physical, sensory or mental limitations or to their lack of experience or knowledge, are not capable of safely operating the charger may only use this charger under supervision or after having been instructed by a responsible person. Otherwise, there is a danger of operating errors and injuries.
A sticker in English is adhered to the bottom of the charger (marked 4) in the diagram on the graphics page). This says:
Use ONLY with BOSCH lithium-ion rechargeable batteries!
eBike Battery Charger BPC3400
4A Charger
EB12.110.001
Input: 220-240 V ~ 50-60 Hz 1.65 A
Output: 36V = 4A
Made in Vietnam
Robert Bosch GmbH
72757 Reutlingen, Germany
Li-Ion
Use ONLY with BOSCH Li-Ion batteries
ESY210013
Product description and specifications
Intended Use
In addition to the functions shown here, changes to software relating to troubleshooting and functional modifications may be introduced at any time.
The Bosch eBike chargers are intended exclusively for charging Bosch eBike batteries and must not be used for any other purpose.
The Bosch eBike charger depicted here is compatible with Bosch eBike batteries from the new system generation the smart system.
Product features
The numbering of the components shown refers to the illustrations on the graphics pages at the beginning of the manual.
Individual illustrations in these operating instructions may differ slightly from the actual conditions depending on the equipment of your eBike.
A) You can find the charging times for additional batteries at: http://www.bosch-ebike.com
The specifications apply to a rated voltage [U] of 230 V. These specifications may vary at different voltages and in country-specific models.
UK CA
Operation
Start-up
Connecting the charger to the mains (see figure A)
Pay attention to the mains voltage. The voltage of the power source must match the voltage specified on the rating plate of the charger. Chargers marked 230V can also be operated at 220V .
Plug the device connector (3) of the power cable into the device socket (2) on the charger.
Connect the power cable (country-specific) to the mains.
Charging the removed battery (see figure B)
Switch the battery off and remove it from its holder on the eBike. When doing so, read and observe the operating instructions of the battery.
Ensure the battery is placed on clean surfaces only.
Avoid getting dirt, e.g. sand or soil, in the charging socket and contacts in particular.
Plug the charging connector (5) of the charger into the socket (6) on the battery.
Charging the battery on the bike (see figures C and D)
Switch the battery off. Clean the cover of the charging socket (7). Avoid getting dirt, e.g. sand or soil, in the charging socket and contacts in particular. Lift the cover of the charging socket (7) and plug the charging connector (5) into the charging socket (6).
There is a risk of fire due to the charger heating up during charging. Ensure the battery on the bike is completely dry and placed on a fireproof surface before charging. If this is not possible, remove the battery from the holder and charge it in a more suitable location. When doing so, read and observe the operating instructions of the battery.
Charging process
The charging process begins as soon as the charger is connected to the battery or charging socket on the bike and to the mains.
Note: The charging process is only possible when the temperature of the eBike battery is within the permitted charging temperature range.
Note: The drive unit is deactivated during the charging process.
The battery can be charged with and without the on-board computer. When charging without the on-board computer, the charging procedure can be observed on the battery charge indicator.
When the on-board computer is connected, a charging notification appears on the display.
The state of charge is displayed by the battery charge indicator (8) on the battery and by the bars on the on-board computer.
The LEDs on the battery charge indicator (8) flash during the charging process. Each solid illuminated LED represents approximately 20% of the charging capacity. The flashing LED indicates the next 20% currently charging.
Once the eBike battery is fully charged, the LEDs go out immediately and the on-board computer is switched off. The charging process is terminated. The state of charge can be displayed for 5 seconds by pressing the on/off button (9) on the eBike battery.
Disconnect the charger from the mains and the battery from the charger.
When the battery is disconnected from the charger, the battery is automatically switched off.
Note: If you have charged the battery on the bike, carefully close the charging socket (6) with the cover (7) after charging, so that no dirt or water can get in.
If the charger is not disconnected from the battery after charging, after a few hours the charger will switch itself back on, check the state of charge of the battery and begin the charging procedure again if necessary.
Errors - causes and corrective measures
Cause Corrective measures
Battery defective
Two LEDs flash on the battery.
Contact an authorised bike dealership.
Battery too warm or too cold
Three LEDs flash on the battery.
Disconnect the battery from the charger until the charging temperature range has been reached.
Do not reconnect the battery to the charger until it has reached the correct charging temperature.
The charger is not charging.
No LEDs flashing (one or more LEDs will remain permanently lit depending on the state of charge of the eBike battery).
Contact an authorised bike dealership.
Charging not possible (no indicator on battery)
Connector not attached properly Check all connections.
Battery contacts dirty Carefully clean the battery contacts.
Plug socket, cable or charger defective Check the mains voltage, have the charger checked over by a bike dealership.
Battery defective Contact an authorised bike dealership.
Maintenance and servicing
Maintenance and cleaning
If the charger fails, please contact an authorised bike dealership.
After-sales service and advice on using products
If you have any questions about the eBike system and its components, contact an authorised bicycle dealer.
For contact details of authorised bike dealerships, please visit www.bosch-ebike.com.
Disposal
Chargers, accessories and packaging should be recycled in an environmentally friendly manner.
Do not dispose of chargers along with household waste.
Check that your personal data has been deleted from the device.
Only for EU countries:
According to the European Directive 2012/19/EU on Waste Electrical and Electronic Equipment and its implementation into national law, chargers that are no longer usable must be collected separately and disposed of in an environmentally friendly manner.
Please return Bosch eBike components that are no longer usable free of charge to an authorised bicycle dealer or to a recycling facility.
Subject to change without notice.
Sicherheitshinweise
eBike Battery Charger BPC3400 4A Charger
EB12.110.001
Input: 220-240 V ~ 50-60 Hz 1.65 A
Output: 36 V = = 4 A
Made in Vietnam
Robert Bosch GmbH
72757 Reutlingen, Germany
Li-ion
Use ONLY with BOSCH Li-Ion batteries
ESV210018
Addresses and telephone numbers:
Trek European Head Office
Bikeurope B.V. / Trek Benelux
Ceintuurbaan 2-20C
3847 LG Harderwijk
The Netherlands
Tel.: +31 (0)88-4500699
www.trekbikes.com
Trek UK
Trek Bicycle Corporation Ltd.
9 Sherbourne Drive, Tilbrook
Milton Keynes MK7 8HX
United Kingdom
Tel.: +44 1908 360 140
www.trekbikes.com
Electra
Bikeurope B.V.
Ceintuurbaan 2-20C
3847 LG Harderwijk
The Netherlands
Tel.: +31 (0)88-4500699
www.electrabike.com
Trek/Diamant
Trek Fahrrad GmbH
Auenstrasse 10
CH-8600 Dubendorf
Switzerland
Tel.: 00800 8735 8735
www.diamantrad.com
For Service and Warranty, please contact your local dealer.
Please refer to the website (Menu/Support) for the latest revision of this manual.
New features, as described in the latest manual, may not be applicable on your electric bike.
Kontakt
Trek European Head Office
Bikeurope B.V. / Trek Benelux
Ceintuurbaan 2-20C
3847 LG Harderwijk
Niederlande
Tel.: +31 (0)88-4500699
www.trekbikes.com
Trek/Diamant
Trek Fahrrad GmbH
Auenstrasse 10
CH-8600 Dubendorf
Schweiz
Tel.: 00800 8735 8735
www.diamantrad.com
Electra
Bikeurope B.V.
Ceintuurbaan 2-20C
3847 LG Harderwijk
Niederlande
Tel.: +31 (0)88-4500699
www.electrabike.com
Trek European Head Office
Bikeurope B.V. / Trek Benelux
Ceintuurbaan 2-20C
3847 LG Harderwijk
Nederland
Tel.: +31 (0)88-4500699
www.trekbikes.com
Electra
Bikeurope B.V.
Ceintuurbaan 2-20C
3847 LG Harderwijk
Nederland
Tel.: +31 (0)88-4500699
www.electrabike.com
European Head Office
Bikeurope B.V. / Trek Benelux
Ceintuurbaan 2-20C
3847 LG Harderwijk
The Netherlands
Tél.: +31 (0)88-4500699
www.trekbikes.com
Trek South West Europe
Ronda de Poniente, 12. 1^a Dcha
Parque Empresarial Euronova
28760 Tres Cantos
Spain
Tél. (France):
+33(0)562120810
www.trekbikes.com
Trek/Diamant
Trek Fahrrad GmbH
Auenstrasse 10
CH-8600 Dubendorf
Switzerland
Tél.: 00800 8735 8735
www.diamantrad.com
Electra
Bikeurope B.V.
Ceintuurbaan 2-20C
3847 LG Harderwijk
The Netherlands
Tél.: +31 (0)88-4500699
www.electrabike.com
Other manuals TREK
Discover other manuals and user guides for the brand TREK
💬 Hi! I'm your manual assistant.I know your TREK Powerfly 5 Gen 4.
How can I help you? (use, settings, error codes, maintenance, explaining a step from the manual, etc.)💡 Examples :
• How do I use it ?
• Error code E3 ?
• How do I clean it ?