Powerfly FS 9 Equipped Gen 2 - Bike TREK - Free user manual and instructions
Find the device manual for free Powerfly FS 9 Equipped Gen 2 TREK in PDF.
| Product type | All-terrain electric bike (e-MTB) |
| Brand | Trek |
| Model | Powerfly FS 9 Equipped Gen 2 |
| Motor | Bosch Performance CX (250 W, 75 Nm) |
| Battery | Bosch PowerPack 500 (500 Wh, 36 V) |
| Range | 40 to 120 km depending on assistance mode and terrain |
| Assisted maximum speed | 25 km/h (Pedelec) / 45 km/h (S-Pedelec optional) |
| Drivetrain | Shimano Deore XT, 12 speeds |
| Front suspension | RockShox 35 Gold RL, travel 150 mm |
| Rear suspension | Fox Float Performance, travel 150 mm |
| Brakes | Shimano Deore XT hydraulic disc, 203 mm |
| Weight | Approximately 25 kg (with battery) |
| Display | Bosch Intuvia, Purion or Kiox (depending on version) |
| Assistance modes | ECO, TOUR, SPORT/eMTB, TURBO, OFF |
| Connectivity | Bluetooth (via Kiox) for the eBike Connect app |
| Lighting | Integrated front and rear lights, powered by the battery |
| Walk assistance | Yes, up to 6 km/h |
| Warranty | Limited lifetime warranty on the frame |
| Maintenance and cleaning | Clean with a damp cloth, do not use a high-pressure jet |
| Safety | Optional ABS, mandatory lighting, powerful brakes |
Frequently Asked Questions - Powerfly FS 9 Equipped Gen 2 TREK
User questions about Powerfly FS 9 Equipped Gen 2 TREK
0 question about this device. Answer the ones you know or ask your own.
Ask a new question about this device
Download the instructions for your Bike in PDF format for free! Find your manual Powerfly FS 9 Equipped Gen 2 - TREK and take your electronic device back in hand. On this page are published all the documents necessary for the use of your device. Powerfly FS 9 Equipped Gen 2 by TREK.
USER MANUAL Powerfly FS 9 Equipped Gen 2 TREK
OWNER'S MANUAL BENUTZERHANDBUCH GEBRUIKERSHANDLEIDING LE MANUEL DU PROPRIÉTAIRE
ELECTRIC BICYCLE
EN DE NL HR
epowered by

BOSCH
eBike Systems
25 km/h - 45 km/h
TREK
Diamant
Electra

IT IS IMPORTANT TO READ THE WARNINGS AND INSTRUCTIONS IN THIS MANUAL BEFORE RIDING YOUR NEW BICYCLE. LESEN SIE SÄMTLICHE WARNHINWEISE UND ANWEISUNGEN IN DIESER BEDIENUNGSANLEITUNG VOR DER ERSTEN FAHRT MIT IHREM NEUEN BIKE GRÜNDLICH DURCH.
HET IS BELANGRIJK DE WAARSCHUWINGEN EN INSTRUCTIES IN DEZE HANDLEIDING TE LEZEN VÓÓR U MET UW NIEUWE FIETS RIJDT. IL EST IMPORTANT DE LIRE LES MISES EN GARDE ET INSTRUCTIONS CONTENUES DANS CE MANUEL AVANT D'UTILISER VOTRE NOUVEAU VÉLO.
Welcome to our bike family
Thank you for purchasing your new bike.
We believe in bikes. We make high quality bikes that are built to last. That is why each bike we make comes with a limited lifetime warranty.
We wish you many carefree and enjoyable cycling kilometers with your new bike!
However, if you experience any problems with your bike, do not hesitate to contact your local retailer.
If the problem persists, please call our customer service for a solution.
• Active Line / Active Line Plus / Performance Line (Generation 3) 259
- Performance Line / Cargo Line (Generation 4).... 285
English, Deutsch, Nederlands, Français
Battery 311
English, Deutsch, Nederlands, Français
Charger 343
English, Deutsch, Nederlands, Français
Contact - Kontakt - Contact - Contacter 365
The most important points for you to do
-
Even if you have ridden a bicycle for years, it is important for every person to read the general "Bike Owner's manual" and the specific "Electric Bicycle Owner's manual" carefully before you ride on the new e-bicycle.
-
Both manuals contains detailed information and useful suggestions about your new bicycle.
-
Make sure that you understand the proper use, maintenance, and disposal of the components of the electrical system of your new e-bicycle.
-
Think about safety. Your safety and that of other road users is very important.
-
Do not ride the electric bike without the battery pack. The battery pack must be on the bike while riding, else the bike has no lights when needed.
- Do not misuse the electric bike by riding it without a saddle. Some bikes have a quick release on the seat post. If the saddle gets stolen, it may lead to hazardous situations when still riding on the electric bike without a saddle.
- Check your bike for normal operation, loose parts and defects before riding. If you find any problem, visit your bike dealer for repairs before riding.
- Be aware that other road users do not expect that an electric bike can ride faster than a normal bike. Riding faster also increases the risk of accidents.
- Do not ride abusively. Only ride in the use conditions specified for your bike. Condition 1 (paved roads with tires staying on the ground) is valid for electric City/Trekking bikes, condition 3 (rougher surfaces, tires momentarily NOT on the ground) is valid for electric Mountain bikes. Please refer to the general Bicycle Owner's manual for more detailed information.
- Do not over load the rear rack. The maximum allowable weight for the rear rack on electric bikes is 20 kg for bikes with a rear rack battery pack and 25 kg for bikes with a down tube battery. On bicycles with a luggage rack at both sides of the rear fender only, without a top deck, the maximum allowed load on the rack is 15 kg in total.
-
The electric system of your new bicycle needs special attention.
-
Do not clean your electric bicycle with a high pressure washer. Any electric system is sensitive for moisture. High pressure water might ingress in connectors or other parts of the electric system.
-
Handle your battery pack with care. Do not drop or impact the battery pack. Mishandling of the battery pack could lead to severe damage or over-heating. In an extremely rare case, a battery pack that has been severely impacted or otherwise mishandled could potentially catch fire. If you suspect damage to your battery pack, visit your dealer immediately for inspection.
-
Maintain the battery pack as instructed in this Electric Bicycle Owner's manual.
Failure to follow these instructions may result in damage to your battery pack and may require battery pack replacement:
- Only charge the battery pack with the included Bosch charger.
- When not using the battery pack for a longer period, charge it to approx. 60 % (3 to 4 LEDs lit on the charge-control indicator). Check the charge condition after 6 months. When only one LED of the charge-control indicator lights up, recharge the battery pack again to approx. 60 %.
- It is not recommended to have the battery pack connected permanently to the charger.
- When the battery pack is stored discharged (empty) for longer periods, it can become damaged despite the low selfdischarging and the battery-pack capacity may be strongly reduced.
- Store the battery pack in a dry, well-ventilated location. Protect the battery pack against moisture and water.
- Under unfavorable weather conditions, it is recommended e.g. to remove the battery pack from the bike and store it in an enclosed location until being used again.
- Store the battery packs in the following locations: in a room with a smoke alarm, away from combustible or easily flammable objects and away from heat sources.
- The battery pack can be stored at temperatures between -10^ and +60^ . For a long battery pack life, however, storing the battery pack at room temperature of approx. 20^ is of advantage.
- Take care that the maximal storage temperature is not exceeded. As an example, do not leave the battery pack in a vehicle in summer and store it out of direct sunlight.
- It is recommended to not store the battery pack on the bike.
5. Be careful when transporting an electric bicycle.
- An e-bike is heavier than a normal bike. If transporting on a vehicle, be aware of the maximum load capacity of the vehicle's roof, towing hook and/or of the applied bike carrier. Refer to the manual of the vehicle and bike carrier for details.
- Remove the controller, battery pack and, if present, panniers from the bicycle and store them elsewhere in the vehicle during the drive.
- Always respect local laws about transportation of a(n electric) bicycle.
- Because Li-Ion battery packs of this size and power are considered 'Dangerous goods, class 9' when transporting, regulations may restrict the transport of separate Li-Ion batteries in some places. The restrictions apply to most airlines and some trucking companies. But, if you intend to ship or travel with your complete e-bike (with installed battery pack), the regulations are less strict. Make sure to check ahead with your airline or carrier, before booking your trip, if it is allowed to travel with your complete e-bike.
6. Mounting accessories on an e-bike.
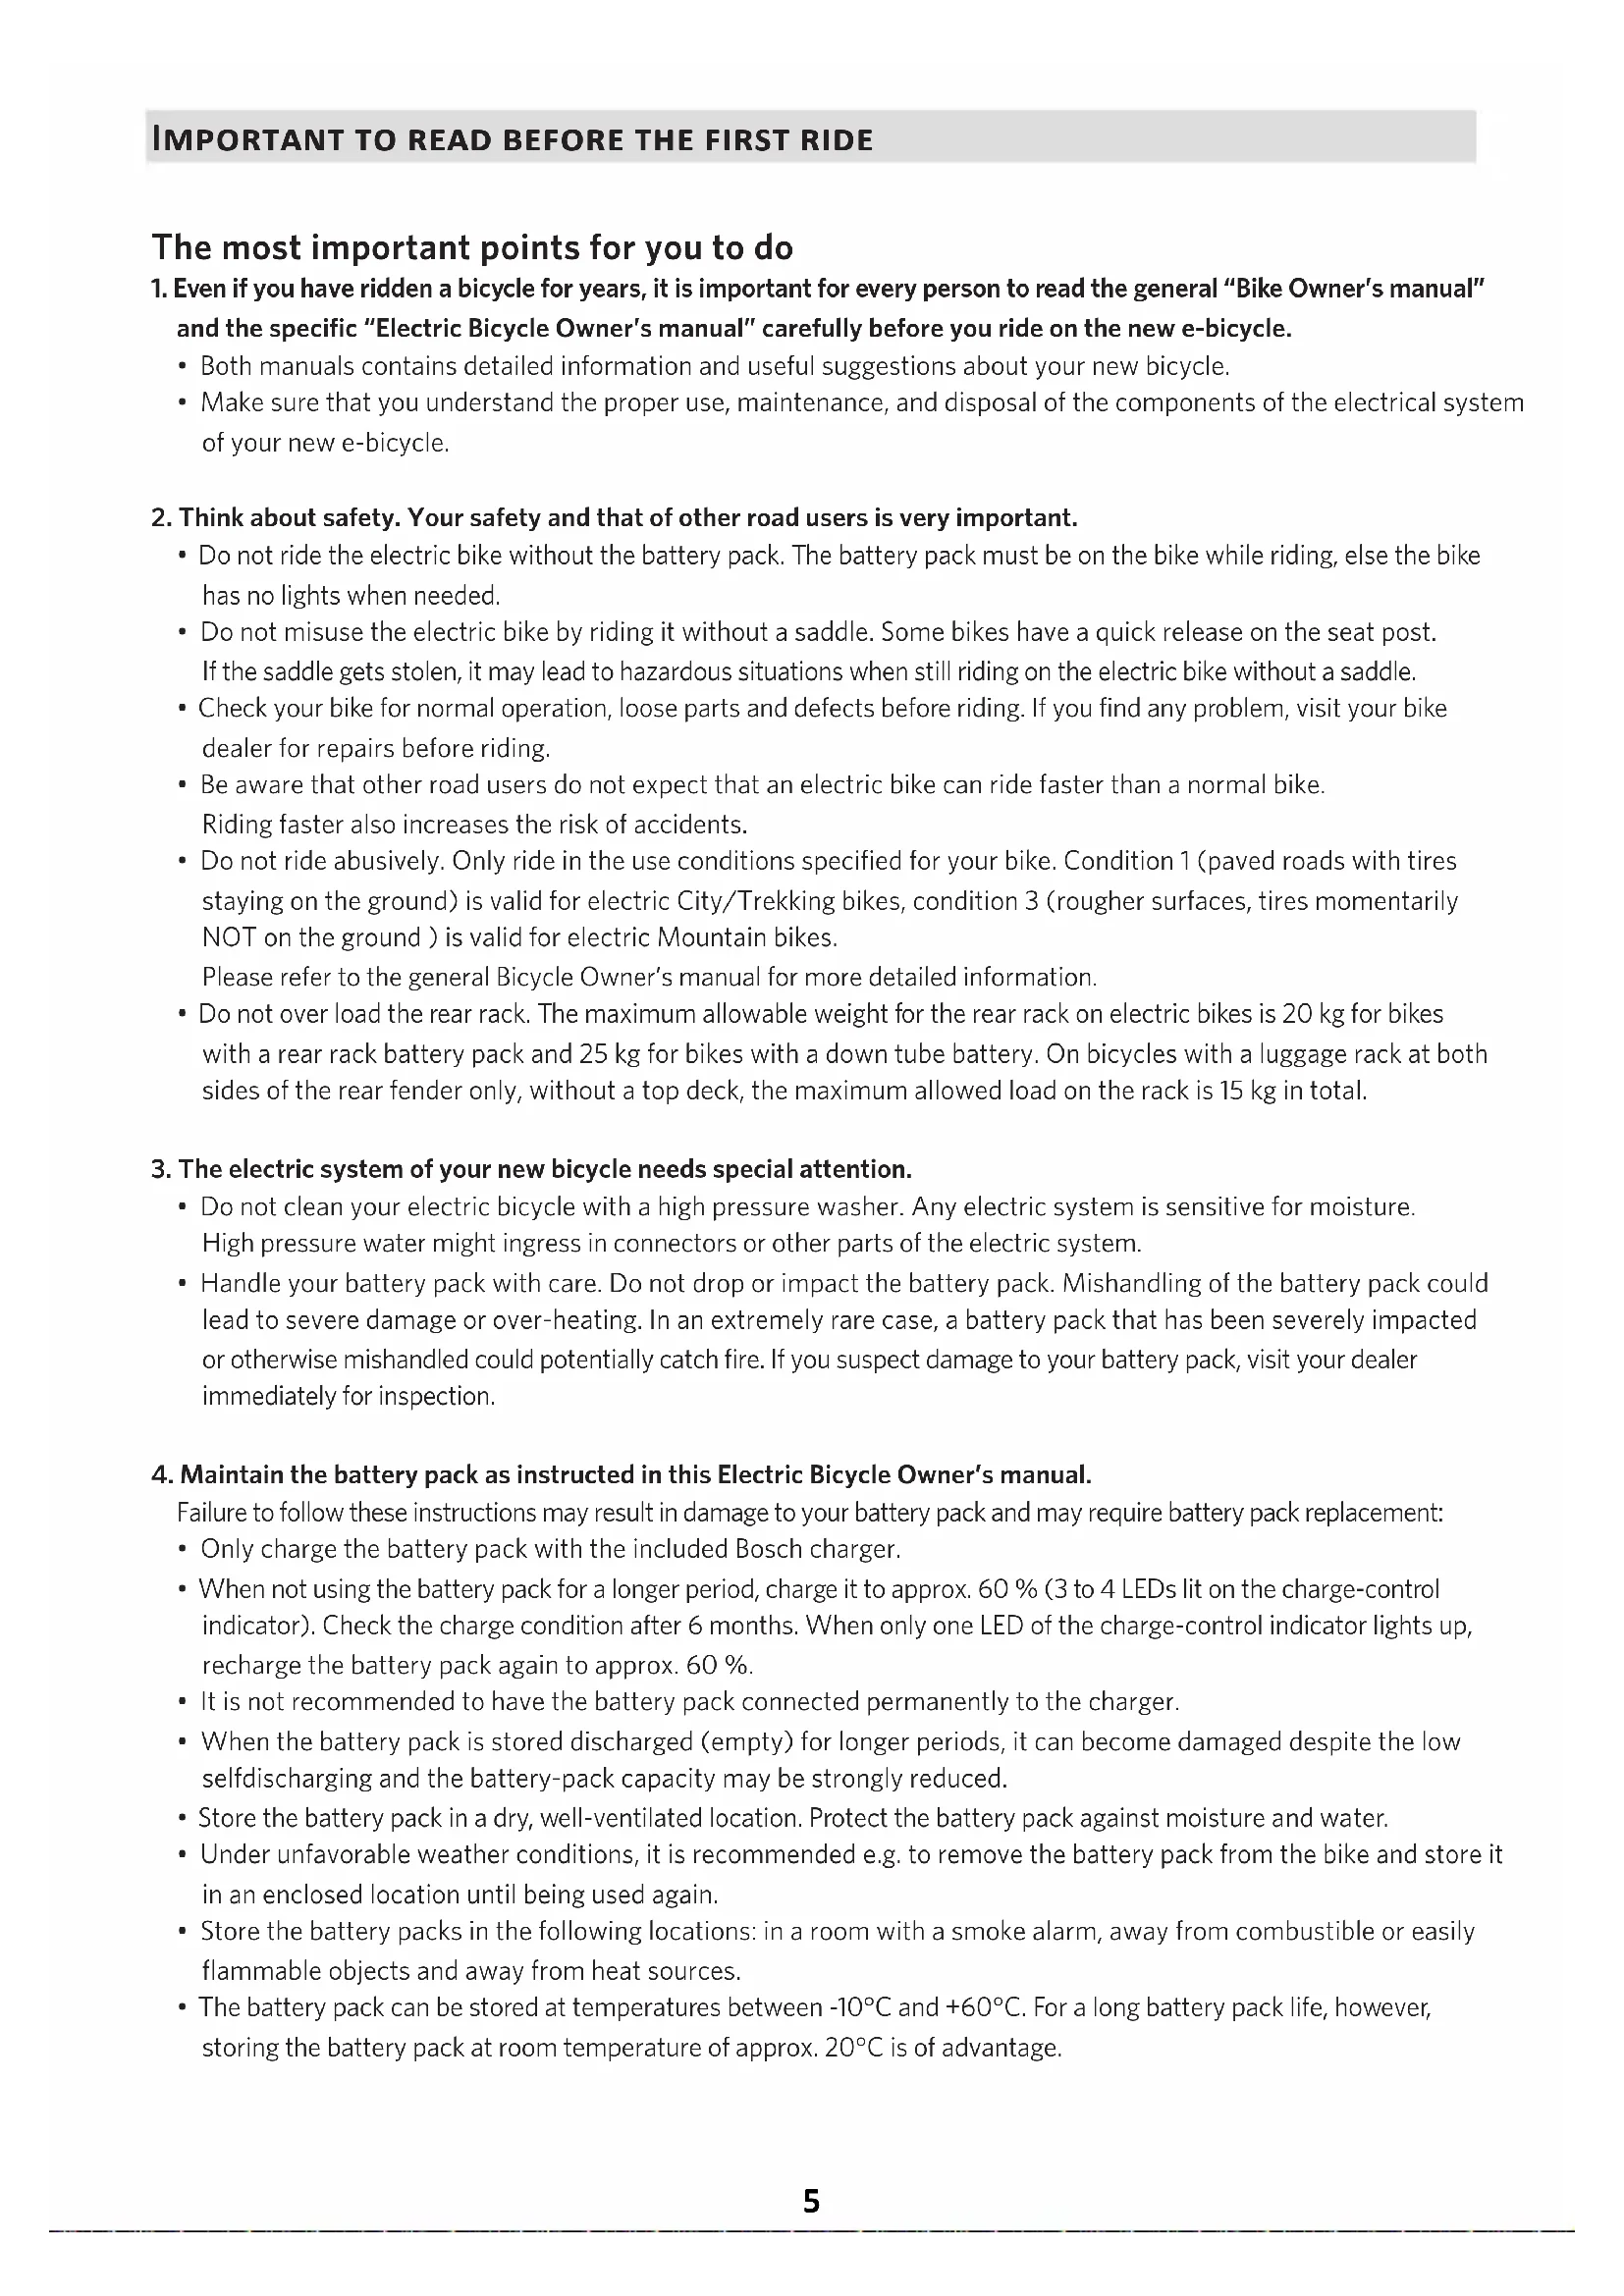
An electric bike has hidden wiring through frame and has other critical e-bike parts like the drive unit and battery pack. When mounting accessories (e.g. a bottle cage), be sure not to impact the wiring or battery pack, e.g. by using too long or pointed bolts. This might cause a short circuit to the electric system and/or damage to the battery.
natural_image
Diagram showing two battery plugs with a crossed-out screw and a prohibition symbol (no text or labels)WARNING. A short circuit in the electric system and/or damage to the battery might lead to over-heating. In an extremely rare case, a battery pack that has been severely impacted could potentially catch fire.
7. Visit your dealer on a regular basis for maintenance of your new e-bike.
- To guarantee the safe and proper functioning of the bike, the bike must be maintained on a regular basis, at least once a year, by an authorized electric bicycle dealer.
- Your dealer has the right knowledge and equipment to maintain your e-bike and to mount accessories safely.
- If you have questions about your new electric bicycle, ask your dealer!
Compliance
Your bicycle has been designed, tested, and produced in accordance with the applicable European Directives and Harmonised Standards. Therefore, all electric bicycles are in compliance with CE. For more detailed compliance information, please refer to the Declaration of Conformity (DoC) which was included along with your bicycle. If you have misplaced your DoC, a new one can be furnished upon request, by the bicycle shop at which you purchased your electric bicycle.
Limited warranty
Your bicycle is covered by a Lifetime Limited Warranty. Please visit our web site for details.
Additional information for 'Fast Electric Bicycles' ^*
The Fast Electric Bicycle is an electric bicycle that provides assistance that does not stop at 25 km/h.
The maximum assisted speed is higher than that provided by a standard Pedelec.
Note, though, that the actual maximum speed that you can reach depends first and foremost on how strongly you pedal.
*‘Fast’ Electric bicycles are not available in all European countries.
European Type Approval
Legally, the Fast Electric Bicycle is no longer considered a 'bicycle' but an 'electric motor vehicle'.
It has European Type Approval (Class L1e-B) as such, with regards to Directive (EU)168/2013. Each Fast Electric Bicycle has a Type-approval plate on the frame and a unique VIN number (VIN = Vehicle Identification Number).
The technical equipment of these Fast Electric Bicycles is almost identical to that on 25 km/h Pedelecs. The following parts are additional and/or different:
- Rear view mirror • Insurance plate / license plate and holder for this plate • License plate light • Extra reflectors
- Slightly different brake levers • Rear brake light • Horn • Type approved front and rear lights.
NOTICE. These parts are all part of the type approval. It is not allowed to remove or exchange them for other (non-certified) equipment. This also applies to the fork, tires, kickstand, motor, battery pack and display.
WARNING. Speed Pedelecs built after January 1, 2018 have to comply with new requirements.
As a result, they must be delivered to the market with the front brake lever located on the right hand side of the handlebars and the rear brake lever on the left hand side*. Be aware that this can differ from the configuration on a regular bicycle!
*IMPORTANT NOTICE. In your country, it may legally not be allowed to change this configuration after the bicycle has been delivered. Please obey the local rules.
Local legislation/rules\*
- The legal rules to use a Fast Electric Bicycle vary per country.
- As a Fast Electric Bicycle is legally seen as an electric motor vehicle, you will have to comply with the local legal rules about the minimum age of the rider, driving license, insurance, insurance /license plate, traffic and maximum speed regulations, etc.
- For a Fast Electric Bicycle, third party insurance is mandatory.
- In many countries, wearing a helmet is mandatory for these bicycles.
Even, when wearing a helmet is not mandatory in your country, we strongly recommend to always wear a helmet for your own safety.
*NOTICE. The local legislation/ rules may be subject to changes in time.
Advice for use
- Technically, riding is the same as the Pedelec bicycles, except that the assistance does not stop at 25 km/h.
- Your Fast Electric Bicycle can still be ridden as a bicycle. On the road, you will usually have to obey the rules for mopeds, however, even if you ride without assistance.
- The maximum range on one battery charge depends very much on your style of use.
- Due to the higher speed that can be reached, be prepared to find the range slightly shorter than on regular Pedelec bicycles that have a maximum assistance speed of 25km / h .
- Be aware that other road users may not expect a bicycle to go this fast. Ride accordingly.
natural_image
Diagram showing two battery cells with no text or symbols, one circled without a prohibition sign (no text or symbols present)natural_image
Diagram showing two battery plates with a crossed screw and a circle indicating no text or symbols (no readable text or symbols)Read all the safety information and instructions. Failure to observe the safety information and follow instructions may result in electric shock, fire and/or serious injury.
Save all safety warnings and instructions for future reference.
The term battery is used in these instructions to mean all original Bosch eBike rechargeable battery packs.
▶ Do not allow yourself to be distracted by the on-board computer's display. If you do not focus exclusively on the traffic, you risk being involved in an accident. If you want to make entries in your on-board computer other than switching the assistance level, stop and enter the appropriate data.
▶ Do not use the on-board computer as a handle. Lifting the eBike up by the on-board computer can cause irreparable damage to the on-board computer.
Read and observe the safety warnings and directions contained in all the eBike system operating instructions and in the operating instructions of your eBike.
Product description and specifications
Intended use
The Intuvia on-board computer is designed to control Bosch eBike systems and display cycling data.
In addition to the functions shown here, changes to software relating to troubleshooting and functional modifications may be introduced at any time.
Product features
The numbering of the components shown refers to the illustrations on the graphics pages at the beginning of the manual.
All illustrations of bike parts except for the drive unit, on-board computer (including operating unit), speed sensor and the corresponding holders are a schematic representation and may differ on your eBike.
(1) Display function button i
(2) Bike light button
(3) On-board computer
(4) Holder for on-board computer
(5) On/off button for on-board computer
(6) RESET button
(7) USB port
(8) Protective cover for the USB port
(9) Operating unit
(10) Display function button i on the operating unit
(11) Decrease assistance level/scroll down button -
(12) Increase assistance level/scroll up button +
(13) Push assistance button WALK
(14) Locking mechanism for on-board computer
(15) Locking screw for on-board computer USB charging cable (Micro A - Micro B) ^A)
A) Not depicted, available as an accessory
Display elements of on-board computer
(a) Drive unit assistance indicator
(b) Assistance level indicator
(c) Illumination indicator
(d) Text indicator
(e) Value indicator
(f) Speedometer
(g) Gear change recommendation: Higher gear
(h) Gear change recommendation: Lower gear
(i) Battery charge indicator
Technical data
| On-board computer Intuvia | ||
| Product code BUI255 | ||
| Max. USB port charging current | mA 500 | |
| USB port charging voltage V 5 | ||
| USB charging cableA) | 1 270 016 360 | |
| Operating temperature °C -5 to +40 | ||
| Storage temperature °C +10 to +40 | ||
| Charging temperature °C 0 to +40 | ||
| Internal lithium-ion battery | V | 3.7 |
| mAh | 230 | |
| Protection ratingB) | IP 54 (dust and splash-proof) | |
| Weight, approx. kg 0.15 | ||
A) Not included with the product as standard
B) When the USB cover is closed
The Bosch eBike system uses FreeRTOS
(see http://www.freertos.org).
Fitting
Inserting and removing the battery
For inserting and removing the eBike battery in/from the eBike, please read and observe the battery operating instructions.
Fitting and removing the on-board computer (see figure A)
To fit the on-board computer (3), slide it forwards into the holder (4).
To remove the on-board computer (3), press the locking mechanism (14) and slide the on-board computer forwards out of the holder (4).
▶ Remove the on-board computer when you park the eBike.
The on-board computer can be secured in place to prevent it from being removed from the holder. To do so, remove the holder (4) from the handlebars. Put the on-board computer in the holder. Screw the locking screw (15) (M3 thread, 8 mm long) from below into the thread provided in the holder. Mount the holder back onto the handlebars.
Please note: The locking screw is not designed to prevent theft.
Operation
Prerequisites
The eBike system can only be activated when the following requirements are met:
- A sufficiently charged battery is inserted (see battery operating instructions).
- The on-board computer is properly inserted in the holder (see "Fitting and removing the on-board computer (see figure A)", page English - 1).
- The speed sensor is connected properly (see drive unit operating instructions).
Switching the eBike system on/off
The following options are available for switching on the eBike system:
- If the on-board computer is already switched on when you insert it into the holder, the eBike system will be activated automatically.
- Once the on-board computer and the eBike battery are fitted, briefly press the on/off button on the on-board computer.
- With the on-board computer inserted, push the on/off button on the eBike battery (bicycle manufacturer-specific solutions are possible when there is no access to the battery on/off button; see the battery operating instructions).
The drive is activated as soon as you start pedalling (except if you are using the push-assistance function or if the assistance level is set to OFF). The motor output depends on the settings of the assistance level on the on-board computer.
As soon as you stop pedalling when in normal operation, or as soon as you have reached a speed of 25/45 km/h, the eBike drive switches off the assistance. The drive is automatically reactivated as soon you start pedalling again and the speed is below 25/45 km/h.
The following options are available for switching off the eBike system:
- Press the on/off button of the on-board computer.
- Switch off the eBike battery using its on/off button (bicycle manufacturer-specific solutions are possible when there is no access to the battery on/off button; see the bicycle manufacturer operating instructions).
- Remove the on-board computer from its holder. If no power is drawn from the eBike drive for about 10 minutes (e.g. because the eBike is not moving) and no button is pressed on the on-board computer or the operating unit of the eBike, the eBike system, and therefore also the battery, will switch off automatically to save energy.
eShift (optional)
eShift is the integration of electronic gear-shifting systems into the eBike system. The eShift components are electrically connected to the drive unit by the manufacturer. The separate operating instructions describe how to operate the electronic gear-shifting systems.
Energy supply of the on-board computer
If the on-board computer is in the holder (4), a sufficiently charged battery is inserted in the eBike and the eBike system is switched on, then the on-board computer is powered by the battery of the eBike.
If the on-board computer is removed from the holder (4), the energy is supplied via an internal battery. If the internal battery is weak when the on-board computer is switched on,
To charge the internal battery, put the on-board computer back in the holder (4) (when a battery is inserted in the eBike). Switch the eBike battery on by its on/off button (see battery operating instructions).
You can also charge the on-board computer via the USB port. To do this, open the protective cap (8). Connect the USB port (7) of the on-board computer via a suitable USB cable to a standard USB charger or the USB port of a computer (5 V charging voltage, max. 500 mA charging current).
Switching on/shutting down the on-board computer
To switch on the on-board computer, briefly press the on/off button (5). The on-board computer can also be switched on when it is not inserted in the holder (if the internal battery is sufficiently charged).
To switch off the on-board computer, press the on/off button (5).
If the on-board computer is not inserted in the holder, it automatically switches off after 1 minute to save energy if no button is pressed.
If you are not going to be using your eBike for several weeks, remove the on-board computer from its holder. Store the on-board computer in a dry environment at room temperature. Regularly recharge the on-board computer's battery (at least every 3 months).
Battery charge indicator
The battery charge indicator (i) displays the state of charge of the eBike battery, not that of the on-board computer's in-
ternal battery. The state of charge of the eBike battery can also be checked on the LEDs of the battery itself.
Each bar of the battery symbol on the indicator (i) represents approximately 20 % of the capacity:

The eBike battery pack is fully charged.

The eBike battery pack should be recharged.

The LEDs of the battery charge indicator on the battery go out. The capacity for assisting the drive has been used up, and assistance is gently switched off. The remaining capacity is made available for the lighting and the onboard computer. The indicator flashes. The capacity of the eBike battery is enough for about two hours of lighting. This does not account for other consumers (e.g. automatic gearbox, charging external devices at the USB port).
If the on-board computer is removed from the holder (4), the last displayed state of charge of the battery is saved. If an eBike is powered by two batteries, the battery charge indicator (i) displays the state of charge of both batteries.
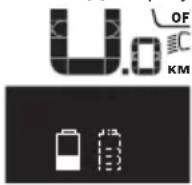
If an eBike has two batteries inserted into it and both batteries are charged on the bike, the charging progress of both batteries will be indicated on the display (the left-hand battery pack is being charged in the illustration). You can also tell by the flashing indicator on the battery which of the two batteries is being charged.
Setting the assistance level
On the operating unit (9), you can set the level of assistance you want the eBike drive to provide you with while pedalling. The assistance level can be changed at any time, even while cycling.
Note: In some models, the assistance level may be preset and cannot be changed. There may also be fewer assistance levels available than stated here.
The following assistance levels are available as a maximum:
- OFF: Motor assistance is switched off. The eBike can just be moved by pedalling, as with a normal bicycle. The push assistance cannot be activated at this assistance level.
- ECO: Effective assistance with maximum efficiency, for maximum range
- TOUR: Steady assistance, long range for touring
- SPORT/eMTB:
SPORT: Powerful assistance, for mountain biking and cycling in urban traffic
eMTB: Optimum assistance whatever the terrain, rapid acceleration when starting from a standstill, improved dynamics and top performance (eMTB only available in combination with the drive units BDU250P CX, BDU365, BDU450 CX and BDU480 CX. A software update may be required.)
- TURBO: Maximum assistance even at high pedalling speeds, for sport cycling
To increase the assistance level, press the + button (12) on the operating unit repeatedly until the required assistance level appears on indicator (b). To decrease the assistance level, press the - button (11).
The requested motor output is displayed in the indicator (a). The maximum motor output depends on the selected assistance level.
When the on-board computer is removed from the holder (4), the assistance level that was last displayed is saved; the motor output indicator (a) remains empty.
Interaction between the eBike system and gear-shifting
The gear-shifting should be used with an eBike drive in the same way as with a normal bicycle (observe the operating instructions of your eBike on this point).
Irrespective of the type of gear-shifting, it is advisable that you briefly stop pedalling when changing gear. This will aid the gear change and reduces wear on the powertrain.
By selecting the correct gear, you can increase your speed and range while applying the same amount of force.
For this reason, follow the gear change recommendations provided by the indicators (g) and (h) on your display. If indicator (g) is displayed, you should change to a higher gear with lower cadence. If indicator (h) is displayed, you should select a lower gear with higher cadence.
Switching bike lights on/off
On the model on which the lighting is powered by the eBike system, the front and rear lights can be switched on and off at the same time via the on-board computer using the bike light button (2).
Check that your bike lights are working correctly before every use.
When the lighting is switched on,
The on-board computer saves the light status and activates this saved status accordingly after a restart.
Switching the bike lights on and off has no effect on the backlighting of the display.
Switching the push assistance on/off
The push assistance aids you when pushing your eBike. The speed in this function depends on the selected gear and can reach a maximum of 6 km/h. The lower the selected gear, the lower the speed of the push assistance function (at full power).
The push assistance function must only be used when pushing the eBike. There is a risk of injury if the wheels of the eBike are not in contact with the ground while using the push assistance.
To activate the push assistance, briefly press the WALK button on your on-board computer. After activation, press the + button within 3 s and keep it pressed. The eBike drive is switched on.
Note: The push assistance cannot be activated at assistance level OFF.
The push assistance is switched off as soon as one of the following occurs:
- You release the + button;
- The wheels of the eBike are locked (e.g. by applying the brakes or hitting an obstacle);
- The speed exceeds 6 km/h.
The push assistance function is subject to local regulations; the way it works may therefore differ from the description above, or the function may even be deactivated completely.
Powering external devices via the USB port
The USB port can be used to operate or charge most devices that can be powered via USB (e.g. various mobile phones).
Charging requires the on-board computer to be mounted and a sufficiently charged battery to be inserted in the eBike.
Open the protective cap (8) for the USB port on the onboard computer. Use a Micro-A – Micro-B USB charging cable (available from your Bosch eBike dealer) to connect the USB port on the external device to the USB port (7) on the on-board computer.
Once the electrical load has been disconnected, the USB port must be carefully resealed with the protective cap (8).
USB connections are not waterproof. When cycling in the rain, do not connect any external devices and make sure that the USB port is fully sealed by the protective cover (8).
Important: If electrical loads are connected, this can affect the range of the eBike.
Displays and configurations of the on-board computer
Speed and distance indicators
The speedometer (f) always displays the current speed.
You can choose from the following functions in the function display (combination of text indicator (d) and value indicator (e)):
: Current time : Maximum speed achieved since the last reset : Average speed achieved since the last reset : Journey time since the last reset : Estimated range of the available battery charge (at constant conditions such as assistance level, route profile, etc.) : Total distance travelled with the eBike (cannot be reset) : Distance travelled since the last reset
To switch between display functions, press the i button (1) on the on-board computer or the i button (10) on the operating unit repeatedly until the required function is displayed.
To reset the
This will also reset the values of the other two functions.
To reset the
To reset the
If the on-board computer is removed from the holder (4), all values of the functions are saved and can still be displayed.
Displaying/adjusting basic settings
The basic settings can be displayed and changed regardless of whether the on-board computer is inserted in the holder (4) or not. Some settings can only be viewed and changed when the HMI is inserted. Depending on the equipment of your eBike, some menu items may not be present.
To go to the basic settings menu, simultaneously press the RESET button (6) and the i button (1) until
To switch between the basic settings, press the i button (1) on the on-board computer repeatedly until the required basic setting is displayed. If the on-board computer is inserted in the holder (4), you can also press the i button (10) on the operating unit.
To change the basic settings, press the on/off button (5) next to the - indicator to reduce or scroll down, or the lighting button (2) next to the + indicator to increase or scroll up. If the on-board computer is inserted in the holder (4), it is also possible to change the settings with the - (11) and + (12) buttons on the operating unit.
To exit the function and save a changed setting, press the RESET button (6) for three seconds.
You can choose between the following basic settings:
- <- Clock +>: Setting the current time. The time can be changed faster by pressing the setting buttons for a longer period.
- <- Wheel circum. +>: Changing the value pre-set by the manufacturer by ± 5 %. This menu item is displayed only when the on-board computer is in the holder.
- <- English +>: Changing the language of the text indicator. You can choose between German, English, French, Spanish, Italian, Portuguese, Swedish, Dutch and Danish.
- <- Unit km/mi +>: Displaying the speed and distance in either kilometres or miles.
- <- Time format +>: Displaying the time in 12-hour or 24-hour format.
- <- Shift recom. on +>/< - Shift recom. off +>: Switching the shift recommendation display on or off.
: Total time travelled with the eBike (cannot be changed) -
: Display software version. -
: Drive unit software version. This menu item is displayed only when the on-board computer is in the holder. : Drive unit serial number. This menu item is displayed only when the on-board computer is in the holder. : Drive unit part number. This menu item is displayed only when the on-board computer is in the holder and the drive unit provides a part number. : This menu item is displayed if the bicycle manufacturer has set a fixed service date. : This menu item is displayed if the bicycle manufacturer has set a service date after travelling a certain distance. : Battery software version. This menu item is displayed only when the on-board computer is in the holder. When using two batteries, the software versions of both batteries are displayed successively. -
: eBike battery part number. This menu item is displayed only when the on-board computer is in the holder and the eBike battery provides a part number. When using two batteries, the software versions of both batteries are displayed successively. -
: Software version of the charger used to charge the eBike battery. This is displayed only if the charger provides the software version. - If the eBike is equipped with ABS, the software version, serial number and part number of the ABS are also displayed.
Error code indication
The components of the eBike system are continuously and automatically monitored. If an error is detected, the corresponding error code will appear on the text indicator (d).
Press any button on the on-board computer (3) or on the operating unit (9) to return to the standard indication.
The drive may be automatically shut down, depending on the type of error. However, if you wish to continue cycling, you will always be able to do so without assistance from the drive. Before undertaking any other journeys, the eBike should be checked.
▶ Have all repairs performed only by an authorised bike dealer.
| Code Cause Corrective measures | |
| 410 One or more buttons of the on-board computer are disabled. | Check whether any buttons are stuck, e.g. as a result of dirt finding its way in. Clean the buttons if need be. |
| 414 Operating unit connection problem Have the connections checked | |
| 418 One or more buttons on the operating unit are disabled. | Check whether any buttons are stuck, e.g. as a result of dirt finding its way in. Clean the buttons if need be. |
| 419 Configuration error Restart the system. If the problem persists, contact your Bosch eBike dealer. | |
| 422 Drive unit connection problem Have the connections checked | |
| 423 eBike battery connection problem Have the connections checked | |
| 424 Communication problem between components | Have the connections checked |
| 426 Internal time-out error Restart the system. If the problem persists, contact your Bosch eBike dealer. With this error, it is not possible to bring up the wheel circumference in the basic settings menu or to adjust it. | |
| 430 Internal battery of the on-board computer is flat (does not apply to BUI350) | Charge the on-board computer (in the holder or via the USB port) |
| 431 Software version error Restart the system. If the problem persists, contact your Bosch eBike dealer. | |
| 440 Internal drive unit fault Restart the system. If the problem persists, contact your Bosch eBike dealer. | |
| 450 Internal software error Restart the system. If the problem persists, contact your Bosch eBike dealer. | |
| 460 Error at USB port Remove the cable from the USB port of the on-board computer. If the problem persists, contact your Bosch eBike dealer. | |
| 490 Internal fault of the on-board computer Have the on-board computer checked | |
| 500 Internal drive unit fault Restart the system. If the problem persists, contact your Bosch eBike dealer. | |
| 502 Bike light fault Check the light and the associated wiring. Restart the system. If the problem persists, contact your Bosch eBike dealer. | |
Code Cause Corrective measures
| 503 Speed sensor fault Restart the system. If the problem persists, contact your Bosch eBike dealer. | |
| 504 Speed signal distortion detected. Check that the spoke magnet is positioned correctly, and adjust it if necessary. Check that nothing has been tampered with (tuning). Drive assistance is reduced. | |
| 510 Internal sensor fault Restart the system. If the problem persists, contact your Bosch eBike dealer. | |
| 511 Internal drive unit fault Restart the system. If the problem persists, contact your Bosch eBike dealer. | |
| 530 Battery fault Switch off the eBike, remove the eBike battery and reinsert the eBike battery. Restart the system. If the problem persists, contact your Bosch eBike dealer. | |
| 531 Configuration error Restart the system. If the problem persists, contact your Bosch eBike dealer. | |
| 540 Temperature error The eBike is outside of the permissible temperature range. Switch off the eBike system and allow the drive unit to either cool down or heat up to the permissible temperature range. Restart the system. If the problem persists, contact your Bosch eBike dealer. | |
| 550 An impermissible load has been detected. Remove the load. Restart the system. If the problem persists, contact your Bosch eBike dealer. | |
| 580 Software version error Restart the system. If the problem persists, contact your Bosch eBike dealer. | |
| 591 Authentication error Switch off the eBike system. Remove the battery pack and reinsert it. Restart the system. If the problem persists, contact your Bosch eBike dealer. | |
| 592 Incompatible component Use a compatible display. If the problem persists, contact your Bosch eBike dealer. | |
| 593 Configuration error Restart the system. If the problem persists, contact your Bosch eBike dealer. | |
| 595, 596 Communication error Check the wiring to the drive and restart the system. If the problem persists, contact your Bosch eBike dealer. | |
| 602 Internal battery fault | Restart the system. If the problem persists, contact your Bosch eBike dealer. |
| 603 Internal battery fault | Restart the system. If the problem persists, contact your Bosch eBike dealer. |
| 605 Battery temperature error | The battery is outside of the permissible temperature range. Switch off the eBike system and allow the battery to either cool down or heat up to the permissible temperature range. Restart the system. If the problem persists, contact your Bosch eBike dealer. |
| 606 External battery fault | Check the wiring. Restart the system. If the problem persists, contact your Bosch eBike dealer. |
| 610 Battery voltage error | Restart the system. If the problem persists, contact your Bosch eBike dealer. |
| 620 Charger fault | Replace the charger. Contact your Bosch eBike dealer. |
| 640 Internal battery fault | Restart the system. If the problem persists, contact your Bosch eBike dealer. |
| 655 Multiple battery faults | Switch off the eBike system. Remove the battery pack and reinsert it. Restart the system. If the problem persists, contact your Bosch eBike dealer. |
| 656 Software version error Contact your Bosch eBike dealer so that they can perform a software update. | |
Code Cause Corrective measures
| 7xx Error relating to third-party components Observe the information in the operating instructions of the respective component manufacturer. | ||
| 800 Internal ABS fault Contact your Bosch eBike dealer. | ||
| 810 Implausible signals from the wheel speed sensor | Contact your Bosch eBike dealer. | |
| 820 Fault in the wire to the front wheel speed sensor | Contact your Bosch eBike dealer. | |
| 821 to 826 Implausible signals from the front wheel speed sensorThe sensor disc may be missing, defective or fitted incorrectly; there is a significant difference in diameter between the front wheel and the rear wheel; extreme riding situation, e.g. riding solely on the rear wheel | Restart the system and carry out a test ride lasting at least two minutes. The ABS indicator light must go out. If the problem persists, contact your Bosch eBike dealer. | |
| 830 Fault in the wire to the rear wheel speed sensor | Contact your Bosch eBike dealer. | |
| 831833 to 835 | Implausible signals from the rear wheel speed sensorThe sensor disc may be missing, defective or fitted incorrectly; there is a significant difference in diameter between the front wheel and the rear wheel; extreme riding situation, e.g. riding solely on the rear wheel | Restart the system and carry out a test ride lasting at least two minutes. The ABS indicator light must go out. If the problem persists, contact your Bosch eBike dealer. |
| 840 Internal ABS fault Contact your Bosch eBike dealer. | ||
| 850 Internal ABS fault Contact your Bosch eBike dealer. | ||
| 860, 861 Fault in the power supply Restart the system. If the problem persists, contact your Bosch eBike dealer. | ||
| 870, 871880883 to 885 | Communication error Restart the system. If the problem persists, contact your Bosch eBike dealer. | |
| 889 Internal ABS fault Contact your Bosch eBike dealer. | ||
| 890 ABS indicator light is defective or missing;ABS may not be working. | Contact your Bosch eBike dealer. | |
| No display | Internal fault of the on-board computer Restart your eBike system by switching it off and back on. | |
Maintenance and servicing
Maintenance and cleaning
Do not immerse any components, including the drive unit, in water or clean them with pressurised water.
Clean your on-board computer using a soft cloth dampened only with water. Do not use any detergents.
Have your eBike system checked by an expert at least once a year (including mechanical parts, up-to-dateness of system software).
The bicycle manufacturer or dealer may also base the service date on the distance travelled and/or a period of time. In this case, the on-board computer displays a message telling
you when the service date is due for 4 seconds each time it is switched on.
Please have your eBike serviced and repaired by an authorised bicycle dealer.
▶ Have all repairs performed only by an authorised bike dealer.
After-sales service and advice on using products
If you have any questions about the eBike system and its components, contact an authorised bicycle dealer.
For contact details of authorised bike dealerships, please visit www.bosch-ebike.com.
Transport
If you transport your eBike attached to the outside of your car, e.g. on a bike rack, remove the on-board computer and the eBike battery to avoid damaging them.
Disposal

The drive unit, on-board computer incl. operating unit, battery, speed sensor, accessories and packaging should be disposed of in an environmentally correct manner.
Do not dispose of eBikes and their components with household waste.
In accordance with Directive 2012/19/EU and Directive 2006/66/EC respectively, electronic devices that are no longer usable and defective/drained batteries must be collected separately and recycled in an environmentally friendly manner.
Please return Bosch eBike components that are no longer usable to an authorised bicycle dealer.
Subject to change without notice.
Sicherheitshinweise

natural_image
Illustration of a walking hand-worn shaver with digital display and cable (no text or symbols)en Original operating instructions
Safety instructions

Read all the safety information and instructions. Failure to observe the safety information and follow instructions may result in electric shock, fire and/or serious injury.
Save all safety warnings and instructions for future reference.
The term battery is used in these instructions to mean all original Bosch eBike rechargeable battery packs.
▶ Do not allow yourself to be distracted by the on-board computer's display. If you do not focus exclusively on the traffic, you risk being involved in an accident. If you want to make entries in your on-board computer other than switching the assistance level, stop and enter the appropriate data.
Read and observe the safety warnings and directions contained in all the eBike system operating instructions and in the operating instructions of your eBike.
▶ Set the display brightness so that you can adequately see important information such as speed and warning symbols. Incorrectly set display brightness may lead to dangerous situations.
Product description and specifications
Intended use
The Purion on-board computer is designed to control Bosch eBike systems and display cycling data.
In addition to the functions shown here, changes to software relating to troubleshooting and functional modifications may be introduced at any time.
Product features
The numbering of the components shown refers to the illustrations on the graphics pages at the beginning of the manual.
Individual illustrations in these operating instructions may differ slightly from the actual conditions depending on the equipment of your eBike.
(1) On/off button for on-board computer
(2) Push assistance button WALK
(3) Fastening screw for on-board computer
(4) Holder for on-board computer
(5) Decrease assistance level button -
(6) Increase assistance level button +
(7) Display
(8) Protective cap for USB port
(9) USB diagnostic port (for servicing purposes only)
(10) Battery compartment cover
Display elements of on-board computer
(a) Speedometer
(b) km/h unit indicator
(c) mph unit indicator
(d) Total distance indicator TOTAL
(e) Range indicator RANGE
(f) Service indicator
(g) Battery charge indicator
(h) Illumination indicator
(j) Trip distance indicator TRIP
(i) Assistance level indicator/value indicator
Technical data
| On-board computer Purion | |
| Product code BUI215 | |
| BatteryA) | 2 × 3 V CR2016 |
| Operating temperature °C -5 to +40 | |
| Storage temperature °C +10 to +40 | |
| Protection ratingB) | IP 54 (dust and splash-proof) |
| Weight, approx. kg 0.1 | |
A) We recommend using the batteries offered by Bosch. You can purchase them from your bicycle dealer (article number: 1 270 016 819).
B) When the USB cover is closed The Bosch eBike system uses FreeRTOS (see http://www.freertos.org).
Operation
Symbols and their Meaning
| Symbol Explanation | |
| Short button press (less than 1 second) | |
| Medium button press (between 1 second and 2.5 seconds) | |
| Long button press (longer than 2.5 seconds) | |
Start-up
Prerequisites
The eBike system can only be activated when the following requirements are met:
- A sufficiently charged battery is inserted (see battery operating instructions).
- The speed sensor is connected properly (see drive unit operating instructions).
Switching the eBike system on/off
The following options are available for switching on the eBike system:
- Press the on/off button (1) of the on-board computer with the eBike battery inserted.
- Press the on/off button of the eBike battery (see battery operating instructions).
The drive is activated as soon as you start pedalling (except if you are using the push-assistance function or if the assistance level is set to OFF). The motor output depends on the settings of the assistance level on the on-board computer.
As soon as you stop pedalling when in normal operation, or as soon as you have reached a speed of 25/45 km/h, the eBike drive switches off the assistance. The drive is automatically reactivated as soon you start pedalling again and the speed is below 25/45 km/h.
The following options are available for switching off the eBike system:
- Press the on/off button (1) of the on-board computer.
- Switch off the eBike battery using its on/off button (bicycle manufacturer-specific solutions are possible when there is no access to the battery on/off button; see the bicycle manufacturer operating instructions).
The system shuts down after being switched off. This takes approximately 3 seconds. It cannot be switched back on until shutdown has been completed.
If the eBike is not moved for approx. 10 min and no button is pressed on the on-board computer, the eBike system switches off automatically in order to save energy.
Note: Always switch off the eBike system when you park the eBike.
Note: If the batteries of the on-board computer are empty, you can still switch on your eBike using the bike's battery. It is, however, recommended that you replace the internal batteries as soon as possible in order to avoid damage.
Energy supply of the on-board computer
The on-board computer is supplied with voltage by two CR2016 button cells.
Changing the batteries (see figure A)
If the on-board computer shows LOW BAT on the display, remove the on-board computer from the handlebars by un-screwing the fastening screw (3) of the on-board computer.
Open the battery compartment cover (10) using a suitable coin, remove the used batteries and insert new CR2016 batteries. You can obtain the batteries recommended by Bosch from your bicycle dealer.
When inserting the batteries, ensure that the polarity is correct.
Close the battery compartment again and fasten the on-board computer to your eBike's handlebars using the fastening screw (3).
Switching the push assistance on/off
The push assistance aids you when pushing your eBike. The speed in this function depends on the selected gear and can reach a maximum of 6 km/h. The lower the selected gear, the lower the speed of the push assistance function (at full power).
The push assistance function must only be used when pushing the eBike. There is a risk of injury if the wheels of the eBike are not in contact with the ground while using the push assistance.
To activate the push assistance, briefly press the WALK button on your on-board computer. After activation, press the + button within 3 s and keep it pressed. The eBike drive is switched on.
Note: The push assistance cannot be activated at assistance level OFF.
The push assistance is switched off as soon as one of the following occurs:
- You release the + button;
- The wheels of the eBike are locked (e.g. by applying the brakes or hitting an obstacle);
- The speed exceeds 6 km/h.
The push assistance function is subject to local regulations; the way it works may therefore differ from the description above, or the function may even be deactivated completely.
Setting the assistance level
You can set the level at which the eBike drive assists you while pedalling on the on-board computer. The assistance level can be changed at any time, even while cycling.
Note: In some models, the assistance level may be preset and cannot be changed. There may also be fewer assistance levels available than stated here.
The following assistance levels are available as a maximum:
- OFF: Motor assistance is switched off. The eBike can just be moved by pedalling, as with a normal bicycle. The push assistance cannot be activated at this assistance level.
- ECO: Effective assistance with maximum efficiency, for maximum range
- TOUR: Steady assistance, long range for touring
- SPORT/eMTB:
SPORT: Powerful assistance, for mountain biking and cycling in urban traffic
eMTB: Optimum assistance whatever the terrain, rapid acceleration when starting from a standstill, improved dynamics and top performance (eMTB only available in combination with the drive units BDU250P CX, BDU365, BDU450 CX and BDU480 CX. A software update may be required.)
- TURBO: Maximum assistance even at high pedalling speeds, for sport cycling
To increase the assistance level, briefly press the button + (6) on the on-board computer repeatedly until the required assistance level appears on the indicator (i). To decrease the assistance level briefly press the button - (5). If the display is set to TRIP, TOTAL or RANGE, the selected assistance level will only be superimposed briefly (for approx. one second) on the display when switching over.
Switching bicycle lights on/off
For the model which has the bike lights powered by the eBike system, a medium-length press ⚙ of the button + will switch on the front and rear lights simultaneously. To switch off the bike lights, press and hold ⚙ the button +.
The lighting symbol (h) is displayed when the light is on.
Check that your bike lights are working correctly before every use.
The on-board computer saves the light status and activates this saved status accordingly after a restart.
Switching the bike lights on and off has no effect on the backlighting of the display.
Displays and configurations of the on-board computer
Battery charge indicator
The battery charge indicator (g) displays the eBike battery's state of charge. The state of charge of the eBike battery can also be checked on the LEDs of the battery itself.
In the indicator (g), each bar in the battery symbol represents approximately 20 % capacity:

The eBike battery is fully charged.

The eBike battery should be recharged.

The LEDs of the battery charge indicator on the battery go out. The capacity for assisting the drive has been used up, and assistance is gently switched off. The remaining capacity is made available for the lighting. The indicator flashes.
The capacity of the eBike battery is enough for about two hours of lighting.
Speed and distance indicators
The speedometer (a) always displays the current speed. Indicator (i) always displays the last setting as standard. Repeated medium-length presses of the button – will display the trip distance TRIP, the total distance TOTAL and the range of the battery RANGE one after the other. (Briefly pressing the button – will decrease the assistance level.)
To reset the trip distance TRIP, select the trip distance TRIP and simultaneously press and hold ⏻ the buttons + and - . The display will initially show RESET. If you continue to press both buttons, the trip distance TRIP will be set to 0.
To reset the range of the battery RANGE, select the battery range RANGE and simultaneously press and hold ⏻ the buttons + and - . The display will initially show RESET. If you continue to press both buttons, the trip distance TRIP will be set to 0.
You can switch the displayed values from kilometres to miles by holding down ⏻ the button – and briefly pressing the on/off button (1).
The versions of the subsystems and their model part numbers can be displayed for the purposes of servicing, provided the subsystems divulge this information (dependent on the subsystem). With the system switched off, simultaneously press the buttons - and + and then press the on/off button (1).
The USB port is reserved for connecting diagnostic systems. The USB port does not have any other function.
The USB connection must always be completely sealed with the protective cap (8).
| Action Buttons Duration | ||
| Switch on on-board computer | ◎ | ◎ |
| Switch off on-board computer | ◎ | ◎ |
| Increase assistance | + | ◎ |
| Action Buttons Duration | ||
| Decrease assistance | - | |
| DisplayTRIP, TOTAL, RANGE,assistance modes | - | |
| Switch on bike lights | + | |
| Switch off bike lights | + | |
| Reset trip distance | - + | |
| Activate push assistanceImplement push assistance | WALK+ | 1.2. Any |
| Switch from kilometres to miles | - | 1. Keeppressed |
| ( ) | 2. | |
| Display the versions^A)B) | - + | 1. Keeppressed |
| ( ) | 2. | |
| Adjust display brightness^C) | - + | 1. Keeppressed |
| ( ) | 2. | |
A) The eBike system must be switched off.
B) The information is shown as scrolling text.
C) The display must be switched off.
Error code display
The eBike system's components are continuously and automatically monitored. If an error is detected, the corresponding error code is displayed on the on-board computer.
The drive may be automatically shut down, depending on the type of error. However, if you wish to continue cycling, you
will always be able to do so without assistance from the drive. Before undertaking any other journeys, the eBike should be checked.
▶ Have all repairs performed only by an authorised bike dealer.
| Code Cause Corrective measures | |
| 410 One or more buttons of the on-board computer are disabled. | Check whether any buttons are stuck, e.g. as a result of dirt finding its way in. Clean the buttons if need be. |
| 414 Operating unit connection problem Have the connections checked | |
| 418 One or more buttons on the operating unit are disabled. | Check whether any buttons are stuck, e.g. as a result of dirt finding its way in. Clean the buttons if need be. |
| 419 Configuration error Restart the system. If the problem persists, contact your Bosch eBike dealer. | |
| 422 Drive unit connection problem Have the connections checked | |
| 423 eBike battery connection problem Have the connections checked | |
| 424 Communication problem between components | Have the connections checked |
| 426 Internal time-out error Restart the system. If the problem persists, contact your Bosch eBike dealer. With this error, it is not possible to bring up the wheel circumference in the basic settings menu or to adjust it. | |
| 430 Internal battery of the on-board computer is flat (does not apply to BUI350) | Charge the on-board computer (in the holder or via the USB port) |
| 431 Software version error Restart the system. If the problem persists, contact your Bosch eBike dealer. | |
| 440 Internal drive unit fault Restart the system. If the problem persists, contact your Bosch eBike dealer. | |
| 450 Internal software error Restart the system. If the problem persists, contact your Bosch eBike dealer. | |
| 460 Error at USB port Remove the cable from the USB port of the on-board computer. If the problem persists, contact your Bosch eBike dealer. | |
| 490 Internal fault of the on-board computer Have the on-board computer checked | |
| 500 Internal drive unit fault Restart the system. If the problem persists, contact your Bosch eBike dealer. | |
| 502 Bike light fault Check the light and the associated wiring. Restart the system. If the problem persists, contact your Bosch eBike dealer. | |
| 503 Speed sensor fault Restart the system. If the problem persists, contact your Bosch eBike dealer. | |
| 504 Speed signal distortion detected. Check that the spoke magnet is positioned correctly, and adjust it if necessary. Check that nothing has been tampered with (tuning). Drive assistance is reduced. | |
| 510 Internal sensor fault | Restart the system. If the problem persists, contact your Bosch eBike dealer. |
| 511 Internal drive unit fault Restart the system. If the problem persists, contact your Bosch eBike dealer. | |
| 530 Battery fault | Switch off the eBike, remove the eBike battery and reinsert the eBike battery. Restart the system. If the problem persists, contact your Bosch eBike dealer. |
| 531 Configuration error Restart the system. If the problem persists, contact your Bosch eBike dealer. | |
Code Cause Corrective measures
| 540 Temperature error The eBike is outside of the permissible temperature range. Switch off the eBike system and allow the drive unit to either cool down or heat up to the permissible temperature range. Restart the system. If the problem persists, contact your Bosch eBike dealer. | ||
| 550 An impermissible load has been detected. Remove the load. Restart the system. If the problem persists, contact your Bosch eBike dealer. | ||
| 580 Software version error Restart the system. If the problem persists, contact your Bosch eBike dealer. | ||
| 591 Authentication error Switch off the eBike system. Remove the battery pack and reinsert it. Restart the system. If the problem persists, contact your Bosch eBike dealer. | ||
| 592 Incompatible component Use a compatible display. If the problem persists, contact your Bosch eBike dealer. | ||
| 593 Configuration error Restart the system. If the problem persists, contact your Bosch eBike dealer. | ||
| 595, 596 Communication error Check the wiring to the drive and restart the system. If the problem persists, contact your Bosch eBike dealer. | ||
| 602 Internal battery fault Restart the system. If the problem persists, contact your Bosch eBike dealer. | ||
| 603 Internal battery fault Restart the system. If the problem persists, contact your Bosch eBike dealer. | ||
| 605 Battery temperature error The battery is outside of the permissible temperature range. Switch off the eBike system and allow the battery to either cool down or heat up to the permissible temperature range. Restart the system. If the problem persists, contact your Bosch eBike dealer. | ||
| 606 External battery fault Check the wiring. Restart the system. If the problem persists, contact your Bosch eBike dealer. | ||
| 610 Battery voltage error Restart the system. If the problem persists, contact your Bosch eBike dealer. | ||
| 620 Charger fault Replace the charger. Contact your Bosch eBike dealer. | ||
| 640 Internal battery fault Restart the system. If the problem persists, contact your Bosch eBike dealer. | ||
| 655 Multiple battery faults | Switch off the eBike system. Remove the battery pack and reinsert it. Restart the system. If the problem persists, contact your Bosch eBike dealer. | |
| 656 Software version error Contact your Bosch eBike dealer so that they can perform a software update. | ||
| 7xx | Error relating to third-party components | Observe the information in the operating instructions of the respective component manufacturer. |
| 800 Internal ABS fault | Contact your Bosch eBike dealer. | |
| 810 Implausible signals from the wheel speed sensor | Contact your Bosch eBike dealer. | |
| 820 Fault in the wire to the front wheel speed sensor | Contact your Bosch eBike dealer. | |
| 821 to 826 | Implausible signals from the front wheel speed sensorThe sensor disc may be missing, defective or fitted incorrectly; there is a significant difference in diameter between the front wheel and the rear wheel; extreme riding | Restart the system and carry out a test ride lasting at least two minutes. The ABS indicator light must go out. If the problem persists, contact your Bosch eBike dealer. |
| Code Cause Corrective measures | ||
| situation, e.g. riding solely on the rear wheel | ||
| 830 Fault in the wire to the rear wheel speed sensor | Contact your Bosch eBike dealer. | |
| 831833 to 835 | Implausible signals from the rear wheel speed sensorThe sensor disc may be missing, defective or fitted incorrectly; there is a significant difference in diameter between the front wheel and the rear wheel; extreme riding situation, e.g. riding solely on the rear wheel | Restart the system and carry out a test ride lasting at least two minutes. The ABS indicator light must go out. If the problem persists, contact your Bosch eBike dealer. |
| 840 Internal ABS fault Contact your Bosch eBike dealer. | ||
| 850 Internal ABS fault Contact your Bosch eBike dealer. | ||
| 860, 861 Fault in the power supply Restart the system. If the problem persists, contact your Bosch eBike dealer. | ||
| 870, 871880883 to 885 | Communication error Restart the system. If the problem persists, contact your Bosch eBike dealer. | |
| 889 Internal ABS fault Contact your Bosch eBike dealer. | ||
| 890 ABS indicator light is defective or missing;ABS may not be working. | Contact your Bosch eBike dealer. | |
| No display | Internal fault of the on-board computer Restart your eBike system by switching it off and back on. | |
Maintenance and servicing
Maintenance and cleaning
Do not immerse any components, including the drive unit, in water or clean them with pressurised water.
Clean your on-board computer using a soft cloth dampened only with water. Do not use any detergents.
Have your eBike system checked by an expert at least once a year (including mechanical parts, up-to-dateness of system software).
The bicycle manufacturer or dealer can also store a distance travelled for the service date in the system. In this case, the on-board computer will show you that the service date is due by displaying (f) ↗.
Please have your eBike serviced and repaired by an authorised bicycle dealer.
After-sales service and advice on using products
If you have any questions about the eBike system and its components, contact an authorised bicycle dealer.
For contact details of authorised bike dealerships, please visit www.bosch-ebike.com.
Disposal

The drive unit, on-board computer incl. operating unit, battery, speed sensor, accessories
and packaging should be disposed of in an environmentally correct manner.
Do not dispose of eBikes and their components with household waste.
In accordance with Directive 2012/19/EU and Directive 2006/66/EC respectively, electronic devices that are no longer usable and defective/drained batteries must be collected separately and recycled in an environmentally friendly manner.
Please return Bosch eBike components that are no longer usable to an authorised bicycle dealer.
Subject to change without notice.
Sicherheitshinweise

natural_image
Exterior view of a Bosch electric sensor device showing its control panel and external key (no text or symbols visible)en Original operating instructions
Safety instructions

Read all the safety information and instructions. Failure to observe the safety information and follow instructions may result in electric shock, fire and/or serious injury.
Save all safety warnings and instructions for future reference.
The term battery is used in these instructions to mean all original Bosch eBike rechargeable battery packs.
▶ Do not allow yourself to be distracted by the on-board computer's display. If you do not focus exclusively on the traffic, you risk being involved in an accident. If you want to make entries in your on-board computer other than switching the assistance level, stop and enter the appropriate data.
▶ Set the display brightness so that you can adequately see important information such as speed and warning symbols. Incorrectly set display brightness may lead to dangerous situations.
▶ Do not open the on-board computer. Opening the on-board computer may damage it beyond repair and void any warranty claims.
▶ Do not use the on-board computer as a handle. Lifting the eBike up by the on-board computer can cause irreparable damage to the on-board computer.
▶ Do not stand your bicycle upside down on its saddle and handlebars if the on-board computer or its holder protrude from the handlebars. This may irreparably damage the on-board computer or the holder. Also remove the on-board computer before placing the bicycle on a wall mount to ensure that the on-board computer does not fall off or become damaged.
Caution! When using the on-board computer with Bluetooth® and/or WiFi, interference can occur with other devices and equipment, aircraft and medical devices (e.g. pacemakers, hearing aids). Likewise, injury to people and animals in the immediate vicinity cannot be excluded entirely. Do not use the on-board computer with Bluetooth® in the vicinity of medical devices, petrol stations, chemical plants, areas with a potentially explosive atmosphere or on blast sites. Do not use the on-board computer with Bluetooth® in aeroplanes. Avoid using the on-board computer near your body for extended periods.
The Bluetooth® word mark and logos are registered trademarks owned by Bluetooth SIG, Inc. and any use of such marks by Bosch eBike Systems is under licence.
The on-board computer is equipped with a wireless interface. Local operating restrictions, e.g. in aeroplanes or hospitals, must be observed.
Safety information relating to the navigation system
▶ Do not plan your routes whilst you are cycling. Stop and wait until you are stationary before entering a
new destination. If you do not focus exclusively on the traffic, you risk being involved in an accident.
▶ Abandon your route if the navigation system suggests a path or road that is too ambitious, risky or dangerous for you based on your cycling ability. Have your navigation system propose an alternative route.
▶ Do not ignore any road signs, even if the navigation system tells you to take a specific route. The navigation system cannot take roadworks or temporary diversions into account.
▶ Do not use the navigation system in situations that are safety-critical or unclear (road closures, diversions, etc.). Always carry extra maps and means of communication with you.
Privacy notice
If the on-board computer is sent to Bosch Service because it requires servicing, the data stored on the on-board computer may be transmitted to Bosch.
Product description and specifications
Intended use
The Kiox on-board computer is designed to control Bosch eBike systems and display riding data.
To access the full functionality of the Kiox on-board computer, you will need a compatible smartphone installed with the eBike Connect app (available from the App Store or Google Play Store) and a registration with the eBike Connect portal (www.ebike-connect.com).
Product features
The numbering of the components shown refers to the illustrations on the graphics pages at the beginning of the manual.
(1) On-board computer
(2) Display
(3) Bike light button
(4) On/off button for on-board computer
(5) Holder for on-board computer
(6) USB port
(7) Operating unit
(8) Next/right page button >
(9) Select button
(10) Previous/left page button <
(11) Decrease assistance level button -/ Scroll down button
(12) Increase assistance level button +/ Scroll up button
(13) Push assistance button
(14) Drive unit contacts
(15) Locking screw for on-board computer
(16) Headset screw
(17) Protective cover for USB port ^4
(18) Magnetic holder
(19) Holder for operating unit
a) Available as spare part
Technical data
| On-board computer Kiox | ||
| Product code BUI330 | ||
| Max. charging current of USB port ^A) | mA | 1000 |
| USB port charging voltage V 5 | ||
| USB charging cable ^B) | 1 270 016 360 | |
| Operating temperature °C -5 to +40 | ||
| Charging temperature °C 0 to +40 | ||
| Storage temperature °C +10 to +40 | ||
| Internal lithium-ion battery V | mAh | 3.7230 |
| Protection rating ^C) | IP x7 | |
| Weight, approx. g 60 | ||
| Bluetooth® Low Energy | ||
| – Frequency | MHz | 2400–2480 |
| – Transmission power | mW | < 10 |
A) At an ambient temperature of <25^
B) Not included as part of standard delivery
C) When the USB cover is closed
Declaration of Conformity
Hereby, Robert Bosch GmbH, Bosch eBike Systems declares that the radio equipment type Kiox is in compliance with Directive 2014/53/EU and the Radio Equipment Regulations 2017 as amended. The full text of the EU declaration of conformity and the UK declaration of conformity are available at the following internet address:
https://www.ebike-connect.com/conformity.

Fitting
Fitting and removing the on-board computer (see figure A)
Fit the lower part of the Kiox into the holder (5) first and tilt it forward gently until you can feel that the on-board computer is firmly fixed in the magnetic holder.
To remove the on-board computer, hold it by the top end and pull it towards you until it disengages from the magnetic holder.
▶ Remove the on-board computer when you park the eBike.
The on-board computer can be secured in place to prevent it from being removed from the holder. To do this, loosen the headset screw (16) until the Kiox holder can be swivelled sideways. Put the on-board computer in the holder. Screw the locking screw (M3 thread, 6 mm long) from below into the thread provided in the on-board computer (using a longer screw may damage the on-board computer). Swivel the holder back into place and tighten the headset screw in accordance with the manufacturer's specifications.
Operation
Before initial commissioning
The Kiox is supplied with a partially charged battery. Before using it for the first time, this battery must be charged for at least one hour via the USB port (see "Power supply of the onboard computer", page English – 3) or via the eBike system.
The control unit should be attached such that the buttons are almost perpendicular to the handlebars.
When using the on-board computer for the first time, the language selection page is displayed initially. You can then choose to have essential functions and indications explained via the
Switching the on-board computer on/off
To switch on and switch off the on-board computer, briefly press the on/off button (4).
Selecting system settings
Fit the on-board computer in the holder and proceed as follows with the bicycle stationary:
Go to the status page (use the < button (10) on the control unit to get to the first display) and call up the
You can use the - (11) and + (12) buttons to select the setting you want. You can open the settings, as well as any additional submenus, using the select button (9). You can use the < button (10) to go back to the previous menu from any settings menu.
The following settings can be changed in the
- <24h form (24h time format)>
Starting up the eBike system
Requirements
The eBike system can only be activated when the following requirements are met:
- A sufficiently charged eBike battery is inserted (see operating instructions for the battery).
- The on-board computer is properly fitted to the holder.
Switching the eBike system on/off
The following options are available for switching on the eBike system:
- Once the on-board computer and the eBike battery are fitted, briefly press the on/off button (4) on the on-board computer.
- With the on-board computer inserted, push the on/off button on the eBike battery (bicycle manufacturer-specific solutions are possible when there is no access to the battery on/off button; see the battery operating instructions).
The drive is activated as soon as you start pedalling (except if you are using the push-assistance function or if the assistance level is set to OFF). The motor output depends on the settings of the assistance level on the on-board computer.
As soon as you stop pedalling when in normal operation, or as soon as you have reached a speed of 25/45 km/h, the eBike drive switches off the assistance. The drive is automatically reactivated as soon you start pedalling again and the speed is below 25/45 km/h.
The following options are available for switching off the eBike system:
- Briefly press the on/off button (4) of the on-board computer.
- Switch off the eBike battery using its on/off button (bicycle manufacturer-specific solutions are possible when there is no access to the battery on/off button; see the bicycle manufacturer operating instructions).
- Remove the on-board computer from its holder. If no power is drawn from the eBike drive for about 10 minutes (e.g. because the eBike is not moving) and no button is pressed on the on-board computer or the operating unit of the eBike, the eBike system, and therefore also the battery, will switch off automatically to save energy.
Power supply of the on-board computer
If the on-board computer is in the holder (5), a sufficiently charged eBike battery is inserted into the eBike and the
eBike system is switched on, then the on-board computer battery is powered and charged by the eBike battery.
If the on-board computer is removed from the holder (5), the power is supplied by the on-board computer battery. If the on-board computer battery's charge is running low, a warning message appears on the display.
To charge the on-board computer battery, slide the on-board computer back onto the holder (5). Note that if you do not charge the eBike battery straight away, the eBike system will automatically switch off after 10 minutes of inactivity. If this happens, the on-board computer battery will also stop charging.
You can also charge the on-board computer via the USB port (6). To do this, open the protective cap (17). Use a Micro USB cable to connect the USB port on the on-board computer to a commercially available USB charger (not included with the product as standard) or to the USB port of a computer (max. 5 V charging voltage; max. 1000 mA charging current).
If the on-board computer is removed from the holder (5), all values for the functions are saved and can still be scrolled through.
After use, the USB port must be carefully resealed with the protective cap (17).
If the Kiox battery is not recharged, the date and time will be retained for up to 6 months. When the on-board computer is switched on again, the date and time will be reset if a Bluetooth® connection to the app has been established and the smartphone has successfully identified the current location via GPS.
Note: The Kiox only charges while it is switched on.
Note: If the Kiox is switched off during charging via a USB cable, the Kiox can only be switched on again once the USB cable has been disconnected.
Note: To maximise the lifespan of the on-board computer's battery, it should be recharged for one hour every three months.
Battery Charge Indicator
The battery charge indicator of the eBike battery d (see "Start page", page English – 7) can be read on the status page and in the status bar. The eBike battery's state of charge is also indicated by the LEDs on the eBike battery itself.
Colour of the indicator Explanation
| White The eBike battery is over30 % charged. |
| Yellow The eBike battery is between15 % and 30 % charged. |
| Red The eBike battery is between0 % and 15 % charged. |
| Red + ! The capacity for assisting thedrive has been used up, andassistance is switched off.The remaining capacity willbe provided for the bike |
Colour of the indicator Explanation
| lights and the on-board computer. |
If the eBike battery is being charged on the bike, a corresponding notification will be displayed.
If the on-board computer is removed from the holder (5), the state of charge that was last displayed for the battery is saved.
Storage mode/resetting the Kiox
The on-board computer has an energy-saving storage mode which minimises the rate at which the internal battery discharges. Setting to this mode erases the date and time.
This mode can only be activated by pressing and holding the on/off button (4) of the on-board computer for at least 8 seconds.
If the on-board computer does not start when the on/off button (4) is pressed briefly, the on-board computer is in storage mode.
You can deactivate storage mode by pressing the on/off button (4) for at least 2 seconds.
The on-board computer detects whether it is in a fully functional condition. If you press and hold the on/off button (4) for at least 8 seconds while in a fully functional condition, the on-board computer will go into storage mode. If, contrary to expectations, the Kiox is not in a fully functional condition and cannot be operated, pressing and holding the on/off button (4) (for at least 8 seconds) will reset it. After being reset, the on-board computer will restart automatically after approx. 5 seconds. If the Kiox does not restart, press the on/off button (4) for 2 seconds.
To reset the Kiox to its factory settings, select
Setting the assistance level
On the operating unit (7), you can set the level of assistance you want the eBike drive to provide you with while pedalling. The assistance level can be changed at any time, even while cycling.
Note: In some models, the assistance level may be preset and cannot be changed. There may also be fewer assistance levels available than stated here.
The following assistance levels are available as a maximum:
- OFF: Motor assistance is switched off. The eBike can just be moved by pedalling, as with a normal bicycle. The push assistance cannot be activated at this assistance level.
- ECO: Effective assistance with maximum efficiency, for maximum range
- TOUR: Steady assistance, long range for touring
- SPORT/eMTB:
SPORT: Powerful assistance, for mountain biking and cycling in urban traffic
eMTB: Optimum assistance whatever the terrain, rapid acceleration when starting from a standstill, improved dynamics and top performance (eMTB only available in combination with the drive units BDU250P CX, BDU365, BDU450 CX and BDU480 CX. A software update may be required.)
- TURBO: Maximum assistance even at high pedalling speeds, for sport cycling
To increase the assistance level, press the + (12) button on the operating unit repeatedly until the desired assistance level appears on the display. To decrease the assistance level, press the - (11) button.
The requested motor output appears on the display h (see "Start page", page English – 7). The maximum motor output depends on the selected assistance level.
If the on-board computer is removed from the holder (5), the assistance level that was last displayed is saved.
Switching the push assistance on/off
The push assistance aids you when pushing your eBike. The speed in this function depends on the selected gear and can reach a maximum of 6 km/h. The lower the selected gear, the lower the speed of the push assistance function (at full power).
The push assistance function must only be used when pushing the eBike. There is a risk of injury if the wheels of the eBike are not in contact with the ground while using the push assistance.
To activate the push assistance, briefly press the WALK button on your on-board computer. After activation, press the + button within 3 s and keep it pressed. The eBike drive is switched on.
Note: The push assistance cannot be activated at assistance level OFF.
The push assistance is switched off as soon as one of the following occurs:
- You release the + button;
- The wheels of the eBike are locked (e.g. by applying the brakes or hitting an obstacle);
- The speed exceeds 6 km/h.
The push assistance function is subject to local regulations; the way it works may therefore differ from the description above, or the function may even be deactivated completely.
Switching bicycle lights on/off
On the model on which the lighting is powered by the eBike system, the front and rear lights can be switched on and off at the same time via the on-board computer using the bike light button (3).
Check that your bike lights are working correctly before every use.
With the light switched on, the lighting c indicator (see "Start page", page English – 7) appears in the status bar on the display.
Switching the bike lights on and off has no effect on the backlighting of the display.
Creating a user ID
To be able to use all functions of the on-board computer, you must register online.
With a user ID, you can analyse your ride data, plan offline routes and transfer these routes to the on-board computer.
You can set up a user ID via your Bosch eBike Connect smartphone app or simply at www.ebike-connect.com. Enter the details required for registration. The Bosch eBike
Connect smartphone app is available to download free of charge from the App Store (for Apple iPhones) or from the Google Play Store (for Android devices).
Connecting to the On-Board Computer using the Bosch eBike Connect App
Follow these steps to establish a connection to your smartphone:
- Load the app.
- Select the tab
- Select
- Add Kiox.
The app will then display an instruction to press and hold the bike lighting button (3) on the on-board computer for 5 seconds.
Press and hold the button (3) for at least 5 seconds. The onboard computer automatically activates the Bluetooth® Low Energy connection and switches to pairing mode.
Follow the instructions on the screen. Once pairing is complete, the user data is synchronised.
Note: The Bluetooth ^® connection does not have to be activated manually.
Activity tracking
In order to record activities, you must be registered with and logged into the eBike Connect portal or the eBike Connect app.
To record activities, you must consent to the storage of your location data in the portal and/or in the app. Without this, your activities will not be shown in the portal or the app. The position is recorded only if you are registered as a user on the on-board computer.
eShift (optional)
eShift is the integration of electronic gear-shifting systems into the eBike system. The eShift components are electrically connected to the drive unit by the manufacturer. The separate operating instructions describe how to operate the electronic gear-shifting systems.
eSuspension (optional)
eSuspension is the integration of electronic shock absorption and suspension elements into the eBike system. You can use the Quick Menu to select predefined settings for the eSuspension system.
For details of these settings, please refer to the operating instructions provided by the eSuspension manufacturer.
eSuspension is only available in combination with the Kiox on-board computer and can only be used with the BDU450 CX, BDU480 CX and BDU490P drive units.
Lock (premium function)
The Lock function is available to purchase from the
Detailed operating instructions can be found online at www.Bosch-eBike.com/Kiox-manual.
Software updates
Software updates are transferred to the on-board computer in the background of the app as soon as it is connected to the app. When an update is complete, this will be displayed the next three times the on-board computer is restarted.
Alternatively, you can check in the
Powering external devices via the USB port
The USB port can be used to operate or charge most devices that can be powered via USB (e.g. various mobile phones).
Charging requires the on-board computer to be mounted and a sufficiently charged battery to be inserted in the eBike.
Open the protective cap (17) for the USB port on the onboard computer. Use a Micro-A – Micro-B USB charging cable (available from your Bosch eBike dealer) to connect the USB port on the external device to the USB port (6) on the on-board computer.
Once the electrical load has been disconnected, the USB port must be carefully resealed with the protective cap (17).
USB connections are not waterproof. When cycling in the rain, do not connect any external devices and make sure that the USB port is fully sealed by the protective cover (17).
Important: If electrical loads are connected, this can affect the range of the eBike.
Displays and settings of the on-board computer
Please note: All screenshots showing the display and text on the following pages are from the approved software version. The display and/or text may change slightly following a software update.
Operating logic
You can use the < (10) and > (8) buttons to switch between the different riding value information pages (even while riding). This way, you can keep both hands on the handlebars while cycling.
You can use the + (12) and - (11) buttons to increase or decrease the assistance level.
The
You can use the select button (9) to perform the following functions:
- You can access the quick menu while riding. - You can access the settings menu from the Status screen while stationary.
- You can confirm values and acknowledge informative hints.
- You can exit a dialogue. If the on-board computer is removed from its holder and not switched off, it will display information regarding the last journey, as well as status information, on a loop.
If no button is pressed after the on-board computer is removed from the holder, it will switch itself off after 1 minute.
Order of pages
Provided the on-board computer is fitted to the holder, you can view the following displays one after the other:
- Start page
- Time and range
- Distance and journey time
- Power and cadence
- Average and maximum speed
- Distance, range, power and heart rate
- Heart rate
- Calories burnt and total distance
- Status page
Start page
When you insert the on-board computer into the holder while it is switched on, it will display the start page.
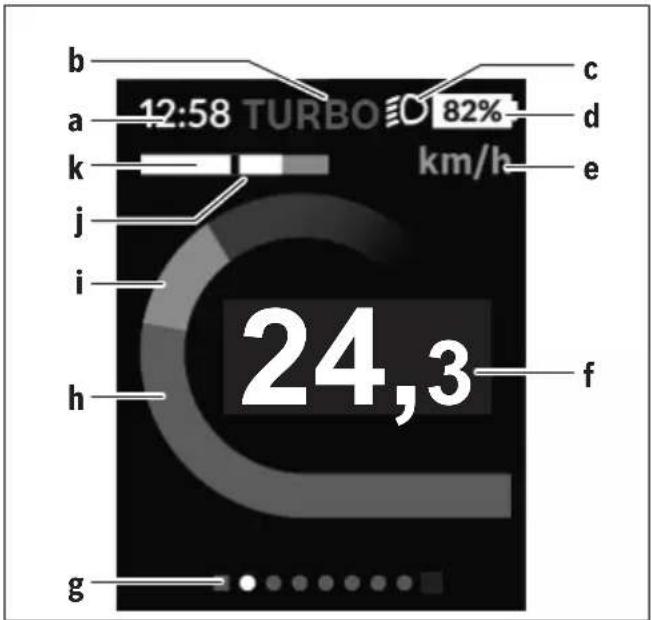
a Time/speed indicator
b Assistance level indicator
c Lighting indicator
d Battery charge indicator of the eBike battery
e Unit of speed indicator ^a)
f Speed
g Navigation bar
h Motor output
i Your performance
j Average speed
k Performance evaluation
a) Can be changed via the
The a ... d indicators form the status bar and are shown on every page. If the speed is already being displayed on the screen itself, the a indicator will change to the current time in hours and minutes. The status bar displays:
- Speed/time: The current speed in km/h or mph or the current time
- Assistance level: Indicates the current level of assistance using a colour code
– Light: A symbol that indicates whether the light is on
- eBike battery state of charge: Indicates the current state of charge as a percentage
The performance evaluation k graphically displays your current speed (white bar) in comparison to your average speed j. The graphic shows you whether your current speed is faster or slower than your average speed (left of the black line = lower than average value; right of the black line = higher than average value).
The navigation bar g indicates which page you are on. Your current page is highlighted. You can use the < (10) and > (8) buttons to move to additional pages.
From the initial start page, you can access the status page via the < (10) button.
Status screen
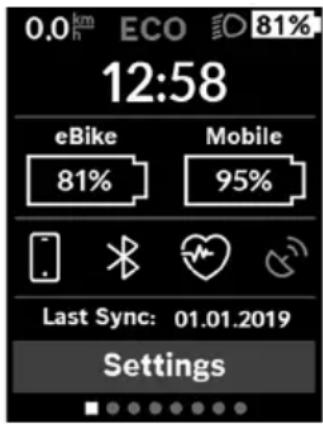
As well as the status bar, the status page also shows you the current time and the state of charge of all your eBike's batteries, as well as the state of charge of your smartphone battery if the smartphone is connected via Bluetooth®.
It may also display symbols to indicate an activated Bluetooth® function or a device connected via Bluetooth® (e.g. a heart-rate monitor). You will also be
shown the date of the most recent synchronisation between the smartphone and Kiox.
You can access the
You can access the settings menu via the status page. The
You can use the - (11) and + (12) buttons to select the setting you want. You can open the settings, as well as any additional submenus, using the select button (9). You can use the < button (10) to go back to the previous menu from any settings menu.
You can find the following superordinate sections on the first navigation level:
-
This menu item is only displayed if you have not yet registered with eBike Connect.
-
You can reset the counters (such as the number of kilometres travelled that day or average values) to zero either automatically or manually, and you can reset the range. You can change the wheel circumference value that was preset by the manufacturer by ±5% . If your eBike features eShift, you can also configure your eShift system here. The bicycle manufacturer or dealer may base the service date on the distance travelled and/or a period of time. The due date for the service is displayed under
The bike component page displays the serial number and hardware and software versions for each component in addition to other key data which is relevant for the components.
-
-
Connected devices are displayed.
-
You can display the speed and distance in kilometres or miles, display the clock in 12- or 24-hour format, adjust the time, date and time zone and select your preferred language. You can reset the Kiox to its factory settings, run a software update (if available) and choose between a black or white design.
-
Information on FAQs (frequently asked questions), certification, contact information, information on licences
You can find a detailed description of each parameter in the online operating instructions at
www.Bosch-eBike.com/Kiox-manual.
Quick Menu
Selected settings are displayed on the Quick Menu. These settings can be changed even while riding.
You can access the Quick Menu via the select button (9). It cannot be accessed from the Status screen.
The following settings can be changed via the Quick Menu:
-
All data on the journey so far is reset to zero.
-
You can set the cadence here.
-
This is where you can set a manufacturer-defined shock absorption or suspension mode.
Error code display
The eBike system's components are continuously and automatically monitored. If an error is detected, the corresponding error code is displayed on the on-board computer.
The drive may be automatically shut down, depending on the type of error. However, if you wish to continue cycling, you
will always be able to do so without assistance from the drive. Before undertaking any other journeys, the eBike should be checked.
▶ Have all repairs performed only by an authorised bike dealer.
| Code Cause Corrective measures | |
| 410 One or more buttons of the on-board computer are disabled. | Check whether any buttons are stuck, e.g. as a result of dirt finding its way in. Clean the buttons if need be. |
| 414 Operating unit connection problem Have the connections checked | |
| 418 One or more buttons on the operating unit are disabled. | Check whether any buttons are stuck, e.g. as a result of dirt finding its way in. Clean the buttons if need be. |
| 419 Configuration error Restart the system. If the problem persists, contact your Bosch eBike dealer. | |
| 422 Drive unit connection problem Have the connections checked | |
| 423 eBike battery connection problem Have the connections checked | |
| 424 Communication problem between components | Have the connections checked |
| 426 Internal time-out error Restart the system. If the problem persists, contact your Bosch eBike dealer. With this error, it is not possible to bring up the wheel circumference in the basic settings menu or to adjust it. | |
| 430 Internal battery of the on-board computer is flat (does not apply to BUI350) | Charge the on-board computer (in the holder or via the USB port) |
| 431 Software version error Restart the system. If the problem persists, contact your Bosch eBike dealer. | |
| 440 Internal drive unit fault Restart the system. If the problem persists, contact your Bosch eBike dealer. | |
| 450 Internal software error Restart the system. If the problem persists, contact your Bosch eBike dealer. | |
| 460 Error at USB port Remove the cable from the USB port of the on-board computer. If the problem persists, contact your Bosch eBike dealer. | |
| 490 Internal fault of the on-board computer Have the on-board computer checked | |
| 500 Internal drive unit fault Restart the system. If the problem persists, contact your Bosch eBike dealer. | |
| 502 Bike light fault Check the light and the associated wiring. Restart the system. If the problem persists, contact your Bosch eBike dealer. | |
| 503 Speed sensor fault Restart the system. If the problem persists, contact your Bosch eBike dealer. | |
| 504 Speed signal distortion detected. Check that the spoke magnet is positioned correctly, and adjust it if necessary. Check that nothing has been tampered with (tuning). Drive assistance is reduced. | |
| 510 Internal sensor fault | Restart the system. If the problem persists, contact your Bosch eBike dealer. |
| 511 Internal drive unit fault Restart the system. If the problem persists, contact your Bosch eBike dealer. | |
| 530 Battery fault | Switch off the eBike, remove the eBike battery and reinsert the eBike battery. Restart the system. If the problem persists, contact your Bosch eBike dealer. |
| 531 Configuration error Restart the system. If the problem persists, contact your Bosch eBike dealer. | |
Code Cause Corrective measures
| 540 Temperature error The eBike is outside of the permissible temperature range. Switch off the eBike system and allow the drive unit to either cool down or heat up to the permissible temperature range. Restart the system. If the problem persists, contact your Bosch eBike dealer. | ||
| 550 An impermissible load has been detected. Remove the load. Restart the system. If the problem persists, contact your Bosch eBike dealer. | ||
| 580 Software version error Restart the system. If the problem persists, contact your Bosch eBike dealer. | ||
| 591 Authentication error Switch off the eBike system. Remove the battery pack and reinsert it. Restart the system. If the problem persists, contact your Bosch eBike dealer. | ||
| 592 Incompatible component Use a compatible display. If the problem persists, contact your Bosch eBike dealer. | ||
| 593 Configuration error Restart the system. If the problem persists, contact your Bosch eBike dealer. | ||
| 595, 596 Communication error Check the wiring to the drive and restart the system. If the problem persists, contact your Bosch eBike dealer. | ||
| 602 Internal battery fault Restart the system. If the problem persists, contact your Bosch eBike dealer. | ||
| 603 Internal battery fault Restart the system. If the problem persists, contact your Bosch eBike dealer. | ||
| 605 Battery temperature error The battery is outside of the permissible temperature range. Switch off the eBike system and allow the battery to either cool down or heat up to the permissible temperature range. Restart the system. If the problem persists, contact your Bosch eBike dealer. | ||
| 606 External battery fault Check the wiring. Restart the system. If the problem persists, contact your Bosch eBike dealer. | ||
| 610 Battery voltage error Restart the system. If the problem persists, contact your Bosch eBike dealer. | ||
| 620 Charger fault Replace the charger. Contact your Bosch eBike dealer. | ||
| 640 Internal battery fault Restart the system. If the problem persists, contact your Bosch eBike dealer. | ||
| 655 Multiple battery faults | Switch off the eBike system. Remove the battery pack and reinsert it. Restart the system. If the problem persists, contact your Bosch eBike dealer. | |
| 656 Software version error Contact your Bosch eBike dealer so that they can perform a software update. | ||
| 7xx | Error relating to third-party components | Observe the information in the operating instructions of the respective component manufacturer. |
| 800 Internal ABS fault | Contact your Bosch eBike dealer. | |
| 810 Implausible signals from the wheel speed sensor | Contact your Bosch eBike dealer. | |
| 820 Fault in the wire to the front wheel speed sensor | Contact your Bosch eBike dealer. | |
| 821 to 826 | Implausible signals from the front wheel speed sensorThe sensor disc may be missing, defective or fitted incorrectly; there is a significant difference in diameter between the front wheel and the rear wheel; extreme riding | Restart the system and carry out a test ride lasting at least two minutes. The ABS indicator light must go out. If the problem persists, contact your Bosch eBike dealer. |
Code Cause Corrective measures
| situation, e.g. riding solely on the rear wheel | ||
| 830 Fault in the wire to the rear wheel speed sensor | Contact your Bosch eBike dealer. | |
| 831833 to 835 | Implausible signals from the rear wheel speed sensorThe sensor disc may be missing, defective or fitted incorrectly; there is a significant difference in diameter between the front wheel and the rear wheel; extreme riding situation, e.g. riding solely on the rear wheel | Restart the system and carry out a test ride lasting at least two minutes. The ABS indicator light must go out. If the problem persists, contact your Bosch eBike dealer. |
| 840 Internal ABS fault Contact your Bosch eBike dealer. | ||
| 850 Internal ABS fault Contact your Bosch eBike dealer. | ||
| 860, 861 Fault in the power supply Restart the system. If the problem persists, contact your Bosch eBike dealer. | ||
| 870, 871880883 to 885 | Communication error Restart the system. If the problem persists, contact your Bosch eBike dealer. | |
| 889 Internal ABS fault Contact your Bosch eBike dealer. | ||
| 890 ABS indicator light is defective or missing;ABS may not be working. | Contact your Bosch eBike dealer. | |
| No display | Internal fault of the on-board computer Restart your eBike system by switching it off and back on. | |
Maintenance and servicing
Maintenance and cleaning
Do not clean any of the components with pressurised water. Keep the screen of your on-board computer clean. Dirt can cause faulty brightness detection.
Clean your on-board computer using a soft cloth dampened only with water. Do not use cleaning products of any kind.
Have your eBike system checked by an expert at least once a year (including mechanical parts, up-to-dateness of system software).
In addition, the bicycle dealer may base the service date on the distance travelled and/or on a period of time. In this case, the on-board computer displays a message telling you when the service date is due each time it is switched on.
Please have your eBike serviced and repaired by an authorised bicycle dealer.
▶ Have all repairs performed only by an authorised bike dealer.
After-sales service and advice on using products
If you have any questions about the eBike system and its components, contact an authorised bicycle dealer.
For contact details of authorised bike dealerships, please visit www.bosch-ebike.com.
Transport
▶ If you transport your eBike attached to the outside of your car, e.g. on a bike rack, remove the on-board computer and the eBike battery to avoid damaging them.
Disposal

The drive unit, on-board computer incl. operating unit, battery, speed sensor, accessories and packaging should be disposed of in an environmentally correct manner.
Do not dispose of eBikes and their components with household waste.
In accordance with Directive 2012/19/EU and Directive 2006/66/EC respectively, electronic devices that are no longer usable and defective/drained batteries must be collected separately and recycled in an environmentally friendly manner.
Please return Bosch eBike components that are no longer usable to an authorised bicycle dealer.
Subject to change without notice.
Sicherheitshinweise