
Smart 90 - Cooker Airforce - Free user manual and instructions
Find the device manual for free Smart 90 Airforce in PDF.

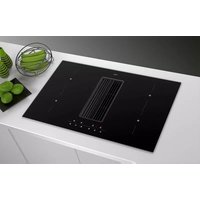
| Product type | Built-in induction hob |
| Brand | Airforce |
| Model | Smart 90 |
| Dimensions (W x D x H) | Approximately 90 x 52 x 5 cm |
| Weight | Approximately 12 kg |
| Power supply | 220-240 V ~ 50/60 Hz |
| Maximum total power | 7,400 W (adjustable via limiter) |
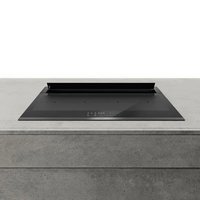
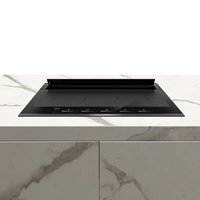
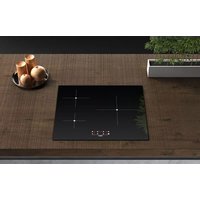
| Number of cooking zones | 5 zones (4 rectangular zones + 1 round central zone) |
| Front left and rear left zones | 210 x 190 mm, 2.1 kW (Boost 3.0 kW) |
| Front right and rear right zones | 210 x 190 mm, 2.1 kW (Boost 3.0 kW) |
| Central zone | ⌀ 250 mm, 2.3 kW (Boost 3.0 kW) |
| Main functions | Induction, Boost, Timer, Keep warm, Pause, Bridge, Automatic heating, Child lock, Pan detection |
| Controls | Touch keys and sliding key |
| Power levels | 9 levels + Boost (P) |
| Residual heat indicator | Yes (H symbol) |
| Safety | Pan detection, child lock, cooking time limitation, automatic shutdown, overheat protection |
| Maintenance and cleaning | Clean with a damp cloth and a mild product; avoid abrasives; use a glass scraper for stubborn residues |
| Adjustable user menu | Total power, recirculation/ducted mode, volume, lighting, animation, pan detection, audio signal |
| After-sales service | Contact an approved service center; use original spare parts |
Frequently Asked Questions - Smart 90 Airforce
User questions about Smart 90 Airforce
0 question about this device. Answer the ones you know or ask your own.
Ask a new question about this device
Download the instructions for your Cooker in PDF format for free! Find your manual Smart 90 - Airforce and take your electronic device back in hand. On this page are published all the documents necessary for the use of your device. Smart 90 by Airforce.
USER MANUAL Smart 90 Airforce
Model: SMART 60
SMART 80
SMART90
| D | MONTAGE- UND GEBRAUCHSANWEISUNG |
| GB | INSTRUCTIONS ON MOUNTING AND USE |
| F | PRESCRIPTIONS DE MONTAGE ET MODE D'EMPLOI |
| NL | MONTAGEVOORSCHRIFTEN EN GEBRUIKSAANWIIZING |
| ES | MONTAJE Y MODO DE EMPLEO |
| I | ISTRUZIONI DI MONTAGGIO E D'USO |

natural_image
Illustration of two gloves with bandages and straps (no text or symbols)EN Always wear work gloves for all installation and maintenance operations
natural_image
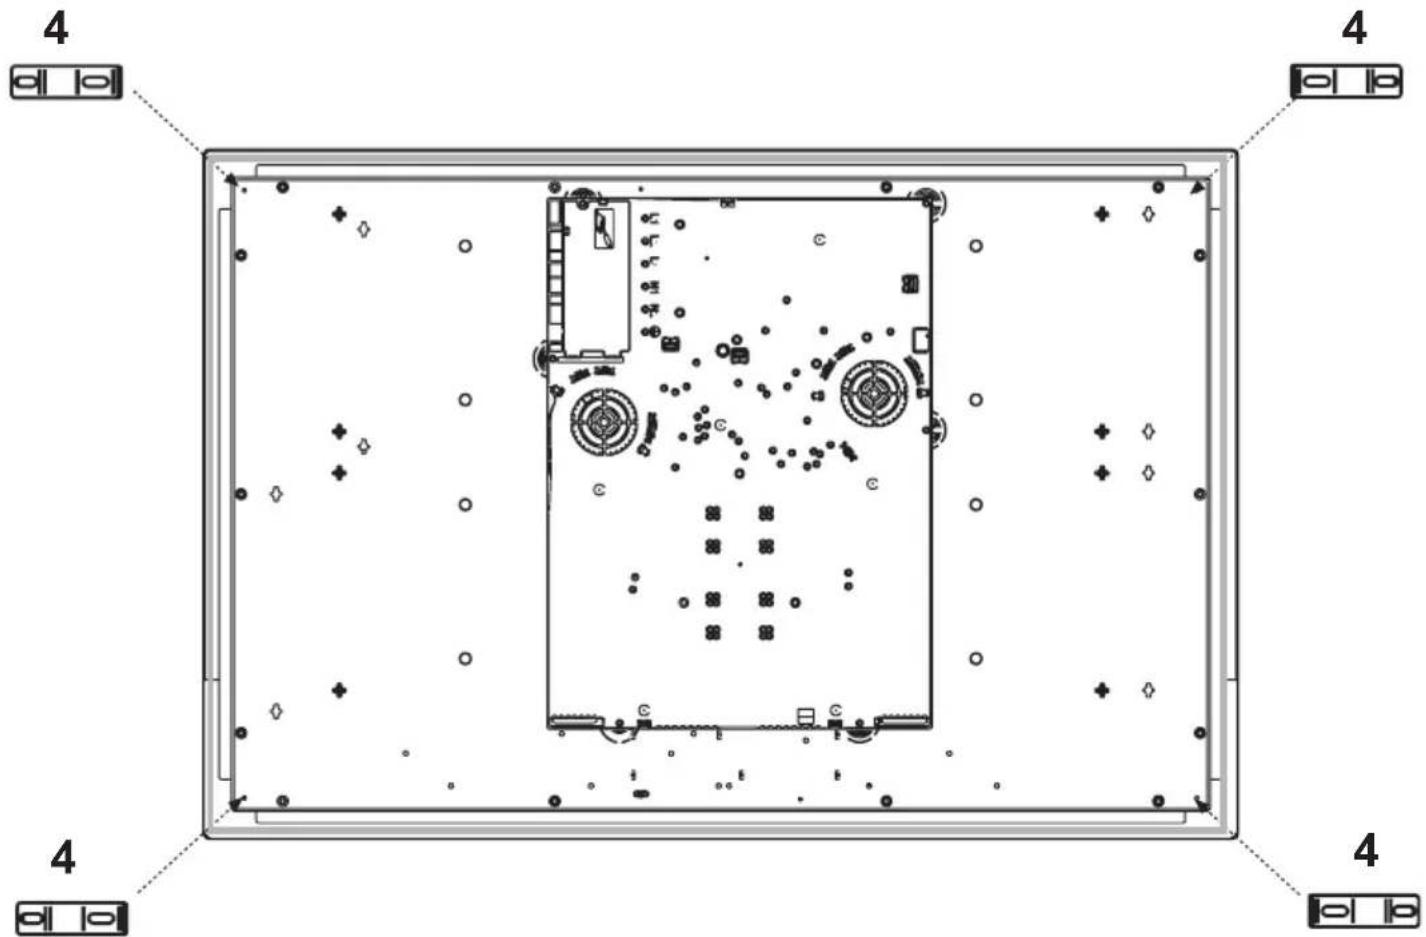
Top-down schematic of a device with internal components and a hand holding a tool, no text or symbols present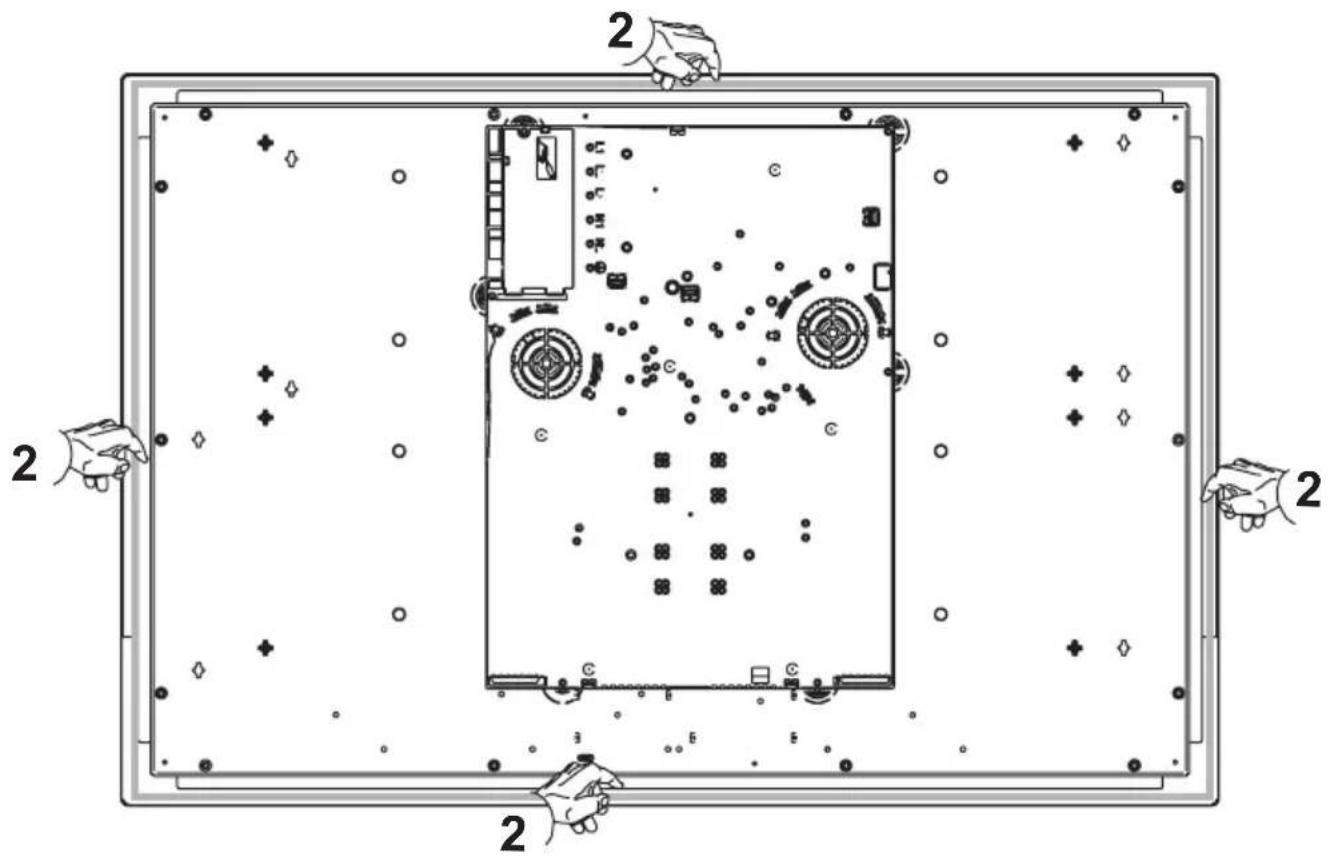

natural_image
Isometric diagram of a 3D box with a flat panel and a downward arrow indicating compression or disassembly (no text or symbols)3
or
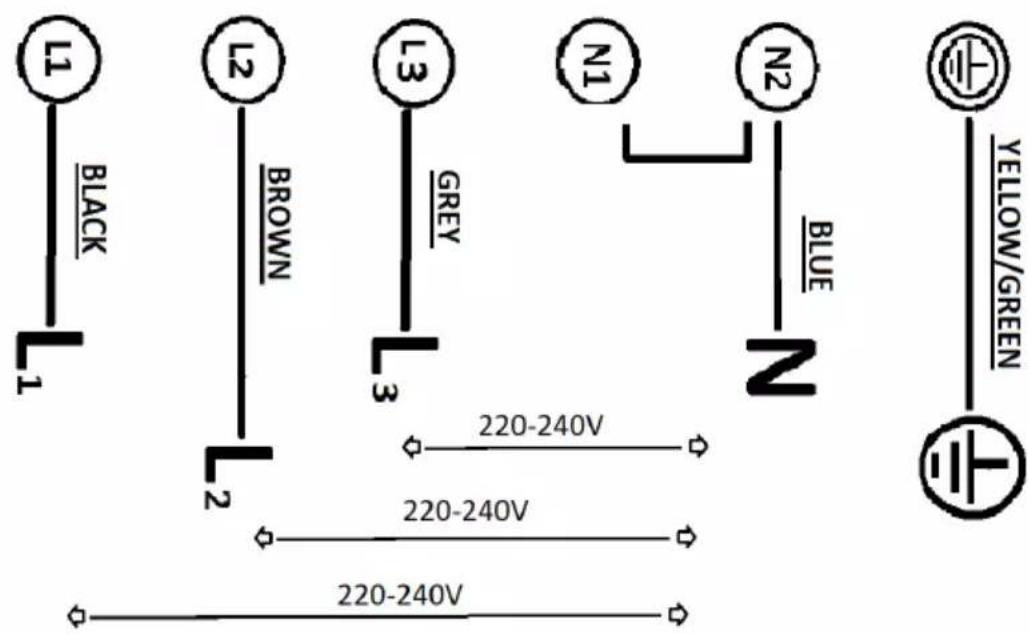
Electrical connection diagram
MODEL: SMART 90
220-240V 50-60 Hz
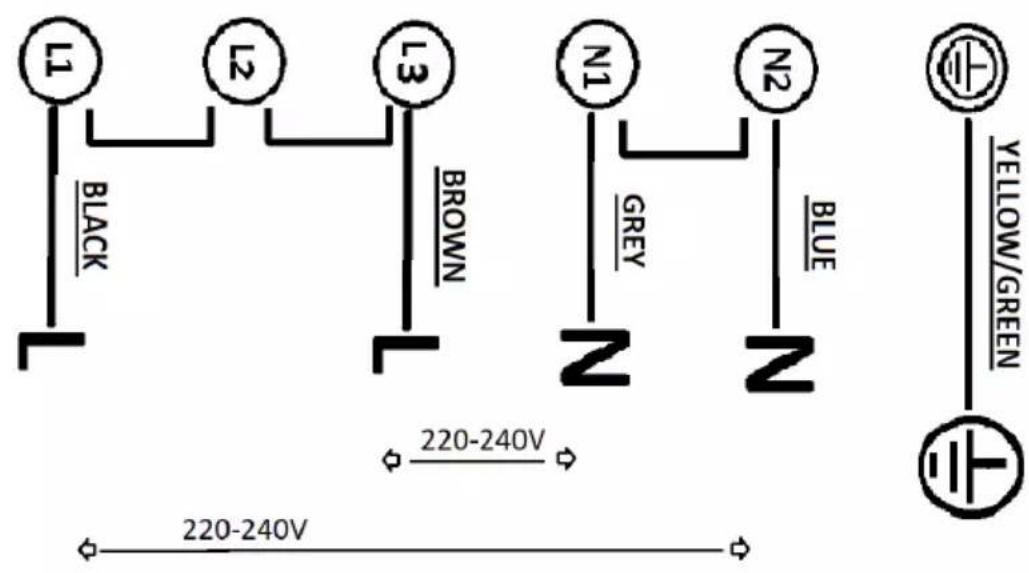
380 - 415V 3N 50-60 Hz
Electrical connection diagram
MODEL: SMART 60
SMART 80
220-240V 50-60Hz
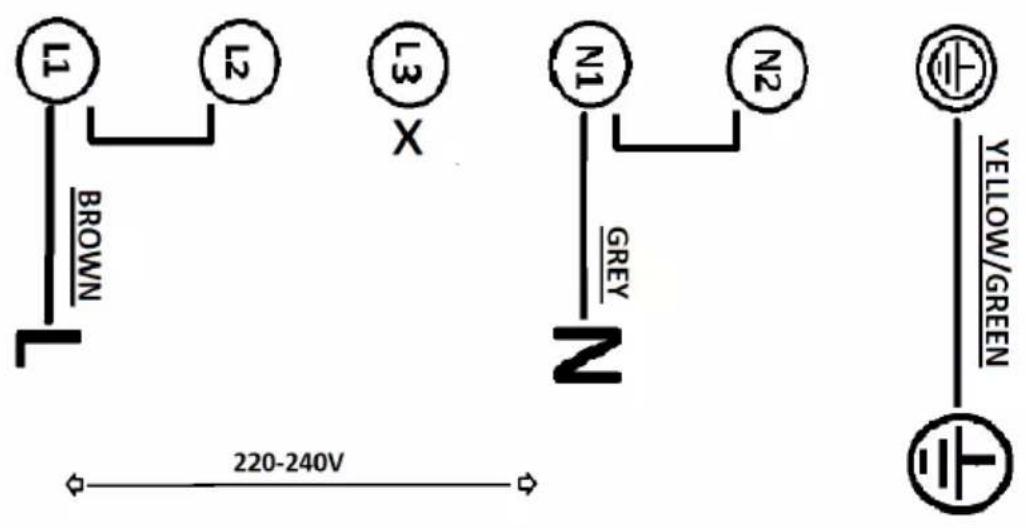
380-415V 2N 50-60Hz
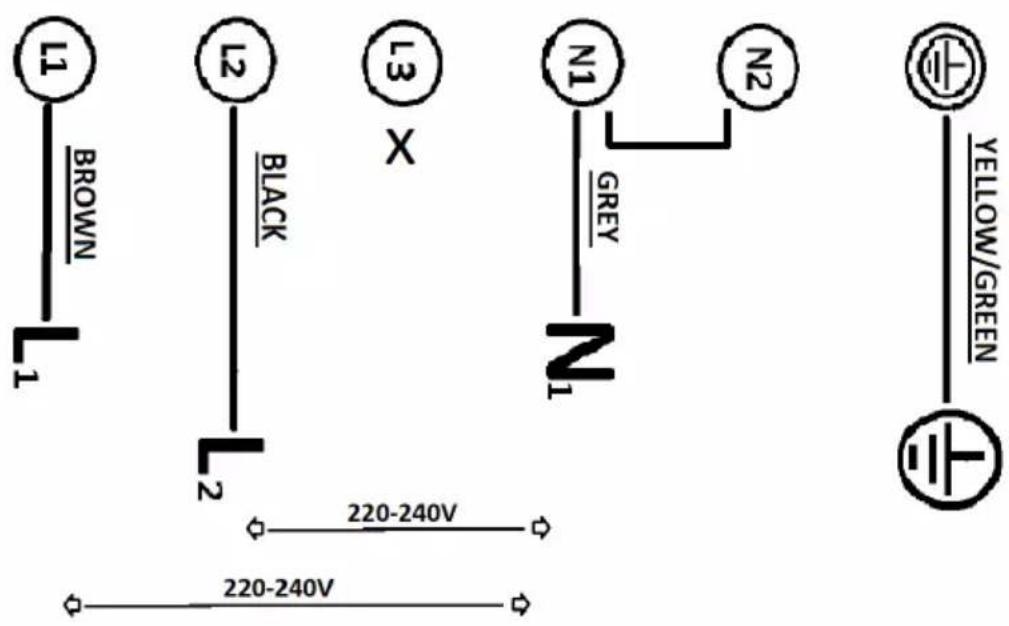
Fig.1
Fig.2
Caution
This instruction handbook is conserved together with the SMART for future consultation. If the equipment is sold or transferred to another person, make certain the instruction handbook is supplied together with it, so that the new user can become aware of the operation of the cooker hood and related warnings. These warnings have been compiled for your safety and the safety of others. Please take the time to read them carefully before installing and using the equipment. Be sure to also consult the drawings in the front pages, including the alphabetic and numeric references in the text descriptions. Closely follow the instructions in this manual. The manufacturer declines all responsibility for any inconveniences, damage or fires caused due to non-compliance with the instructions in this manual. The installation and electrical connection must be provided by a qualified service technician. The supplier is not liable for any warranty for damages caused by improper installation or improper use of the appliance. Do not modify or seek to modify the specifications of this appliance.
The cooking top must always be used within the limits of normal domestic use, not for professional use, but simply to prepare and keep dishes warm. Any other use is not allowed. The unit should not be left unsupervised during its operation.
This appliance can be used by children from the age of 8 onwards, and by persons with reduced physical, sensory or mental capabilities, or lack of experience and knowledge, provided they are properly monitored, or if they have been instructed in the safe use of the appliance and are aware of related dangers.
Children must not be allowed to play with the appliance. Cleaning and maintenance must not be carried out by children without proper supervision.
Make use of the locking device to prevent children from accidentally turning on the device, or modifying its functions. The unit should not be left unsupervised during its operation.
Do not control the cooking top using a remote timer.
The unit should not be left unsupervised during its operation.
Make certain children at home are prevented from toppling hot pots and pans to the floor. Turn the handles and knobs of pots and pans to the side on the cooking top, so that they are above the cooking top, and to prevent the risk of burns.
For safety reasons, the cooking top must be used only after having been installed in its recessed housing.
Prior to proceeding with the installation, check to make sure there are no visible signs of damage
to the cooking top. Never start up a damaged unit, as it may pose a safety risk.
Do not seal the area between the glass and the worktop with silicone because should the cooktop need to be replaced, the glass could break during removal.
The unit's installation and electrical connection to the power grid must be carried out by qualified service technicians only. The device's electrical safety can be guaranteed solely if a regular ground connection is provided for the cooking top. If in doubt, have the electrical system checked by a qualified electrician. If the power cord is damaged, it must be replaced by a qualified service centre or technician only.
Do not connect the cooking top to the mains using extension cords or multiple sockets, since they will not guarantee the required safety (e.g. risk of overheating).
Prior to connecting the cooktop, compare the connection specifications (voltage and fre quency) indicated on the unit's identification nameplate with those of the mains electricity supply.
These specifications must absolutely correspond, otherwise the unit may be subject to damage. Contact an electrician if in doubt.
D disconnect the unit from the mains when carrying out installation work, maintenance or repairs.
Comply with all air discharge regulations.
CAUTION: If the surface is cracked, switch off the appliance to avoid the possibility of electric shock.
Never open unit's outer casing. Any contact with live parts or the modification of electrical or mechanical parts can cause operating abnormalities.
The induction hob should not be used as a work surface. The rough underside of food containers can scratch the surface of the cooktop.
Always keep the cooking areas and underside of food containers perfectly dry.
Fire hazard
Oil and grease that are too hot will catch fire quickly. Do not leave overheated oil or grease unsupervised. If oil or grease should catch fire, do not attempt to put out the flames with water. Extinguish the flames with a lid or plate, or with a fireproof blanket. Turn off the cooking zone. Never place flammable items on the hob.
WARNING: Fire hazard: do not leave objects on the cooking surface.
Burn hazard
CAUTION: This appliance and its accessible parts become very hot during use. Pay attention to avoid touching the heating elements. Keep children under 8 years of age away from the appliance, unless they are continually monitored.
Do not place objects such as knives, forks, spoons or lids on the induction top, as they may overheat.
Do not heat closed containers, such as tin receptacles, on the cooking top. The excess pressure generated could blow up the container.
Suitable food containers
Only ferromagnetic containers are suitable for induction cooking; the following receptacles, in particular, are suitable: enamelled steel, cast iron, special dishes for induction cooking in stainless steel.
Use only pots and pans with a smooth bottom. Do not introduce any objects between the bottom of the pot and the glass ceramic surface, such as adapters.
| Cooking zone Minimum diameter | |
| (single) 110mm | |
| (bridged mode) 220 mm | |
| central 145 mm |
Another type of special receptacle exists for induction cooking, with a bottom that is not entirely ferromagnetic.
Non-suitable food containers
Never use recipients made of: normal finegrained steel, glass, pottery, copper and aluminium. Do not place empty containers on the cooking zone, as they may cause damage.
Do not place hot recipients on the control panel, in the area of the pilot lights or on the edge of the cooking top, as they may cause damage.
Danger of mishaps
Pots from which liquids have completely evaporated can cause damage to the glass ceramic top, for which the manufacturer does not assume any responsibility.
The appliance is equipped with a cooling fan. If a drawer is set under the recessed hob, a suitable distance must be ensured between the contents of the drawer and the lower part of the unit, in order to avoid compromising ventilation.
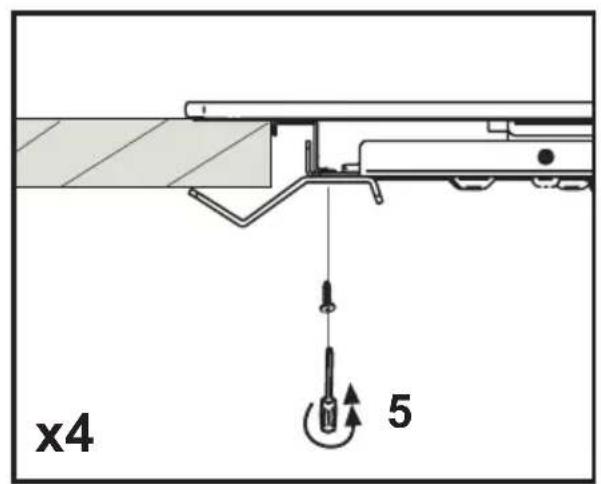
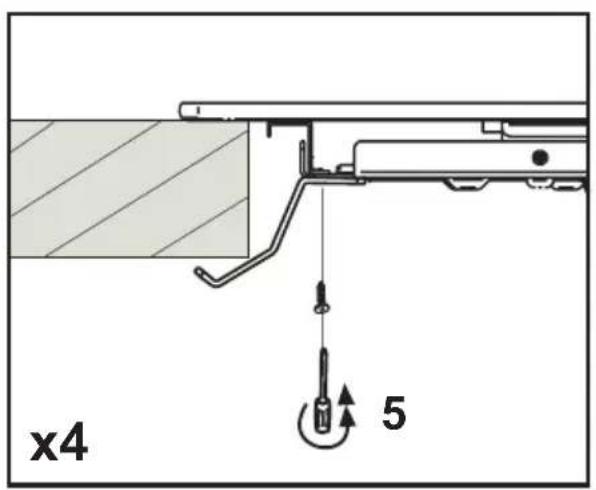
The worktop should be flat and horizontal. The furniture should be cut to measure before installing the appliance. Remove any chips to avoid compromising the operation of electrical components.
Considering the ventilation of the cooktop, the following must be provided:
-a 20 mm space between the rear side of the furniture and kitchen's wall (fig.1-2).
-if the cooktop is installed above a drawer, leave a 65 mm space between the drawer and the top of the cooktop (fig.1).
Do not store small objects or sheets of paper in the drawer under the cooking hob, since such objects may be aspirated and could break the fan, thus hindering the unit's cooling; likewise, do not store metal or inflammable objects, which could become very hot or catch fire.
If the cooking hob is assembled behind a cabinet door, power it on only with the door left open. Close the cabinet door only if the appliance and residual heat indicator lights are off.
If the unit is assembled above an oven or an electric pyrolytic stovetop, it should not be operated while the pyrolytic process is ongoing, as it can trigger the cooktop's overheating protection.
The cooktop should not be installed above dishwashers because the steam released by the latter may lead to faulty operation of the electronic circuit of the cooktop.
Do not make use of any steam devices, as steam can reach the appliance's live parts and cause a short circuit.
Any interventions or repairs on the unit during the warranty period must be carried out solely by the manufacturer's authorised service centre; conversely, the warranty will be is invalidated and terminated immediately. The manufacturer will not recognise any warranties under any circumstances for any problems subsequently encountered.
Replace any defective or damaged parts with original spare parts: only original spare parts can ensure compliance with safety standards.
Notice to persons with pacemakers: keep in mind that an electromagnetic field is generated in the immediate vicinity of the unit while it is in operation.
The possibility that the pacemaker's operation may be affected is very remote. If in doubt, contact the pacemaker manufacturer or your doctor.
Noise emissions
Induction can generate slight noise emissions, which can vary depending on the material, type of pot and power setting selected.
When the cooktop is used frequently, the cooling fan turns itself on to protect the electronics, generating a buzzing sound: this is perfectly normal.
First usage
Use a damp cloth to clean and dry the cooktop before using it for the first time.
It is recommended to dry the appliance after having cleaned it with a damp cloth, in order to prevent the build-up of limescale.
When the unit is powered on for the first time, odours or fumes may be generated. The odour will diminish with each subsequent use, until it disappears altogether. Odours and any fumes are not caused by a faulty connection or damage to the appliance, and are not hazardous to health.
YOUR INDUCTION HOB
Description
Model: SMART 60
Model: SMART 80
Model: SMART 90
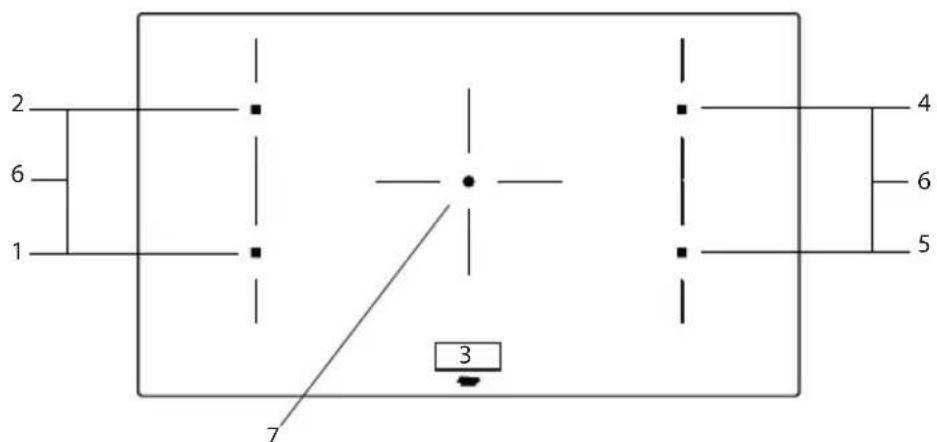
- Cooking zone front left 210 x 190 mm / 2,1 kW (boost 3,0 kW)
- Cooking zone rear left 210 x 190 mm / 2,1 kW (boost 3,0 kW)
- Control panel
- Cooking zone rear right 210 x 190 mm / 2,1 kW (boost 3,0 kW)
- Cooking zone front right 210 x 190 mm / 2,1 kW (boost 3,0 kW)
- Connected cooking zones 21 x 39 cm / 3.7 kW
- Cooking zone central 250 ∅ cm /2,3 kW (boost 3,0 kW)
YOUR INDUCTION HOB
Description
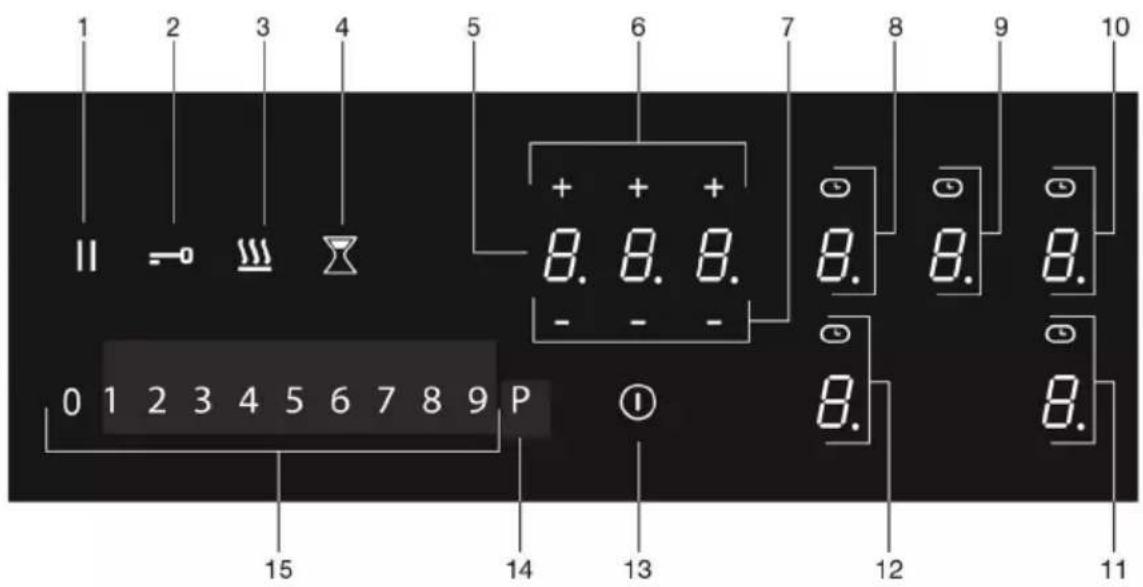
- Pause key
- Lock key
- Keep warm key
- Minute minder key
- Timer display
- Plus key timer
- Minus key timer
- Cooking zone key rear left (cooking zone display) and timer symbol
- Cooking zone key central (cooking zone display) and timer symbol
- Cooking zone key rear right (cooking zone display) and timer symbol
- Cooking zone key front right (cooking zone display) and timer symbol
- Cooking zone key front left (cooking zone display) and timer symbol
- On/Off key
- Boost key
- Slide control (from position 0 to position 9)
Indications in the display
| Cooking zone display Description | |
 | Power level; 1 = low level / 9 = high level. |
 | Boost level active. |
 | No (suitable) pan on cooking zone (pan detection symbol). |
 | Residual heat indicator; The hob has a residual heat indicator for each cooking zone to show those which are still hot. Although the hob is switched off, the indicator ‘H’ will remain on for as long as the cooking zone is hot! Avoid touching them when this indicator is lit. |
 | Danger! Risk of burns. |
| [WKSZ] | Child safety lock active. |
 | Automatic heat-up function active. |
 | Keep warm function active. |
 | Pause function active. |
 | Connected Bridge induction zones active. |
 | Timer active. |
| Timer display Description | |
 | Timer has not been set. |
 | Timer has been set (25 minutes). |
YOUR INDUCTION HOB

Before use, read the separate safety instructions.
Temperature safety
A sensor continuously measures the temperature of certain parts of the hob. Every cooking zone is equipped with a sensor that measures the temperature of the bottom of the pan to avoid any risk of overheating when a pan boils dry. In case of temperatures rising too high, the cooking level is reduced automatically or the hob switches off automatically.
Cooking-time limiter

The cooking-time limiter is a safety function of your cooking appliance. It will operate if you forget to switch off your hob. Depending on the power level you have chosen, the cooking time will be limited as follows:
| Power level Maximum operating time ( in hours, minutes) | |
| 1 8 hours, 36 min. | |
| 2 6 hours, 42 min. | |
| 3 5 hours, 18 min. | |
| 4 4 hours, 18 min. | |
| 5 3 hours, 30 min. | |
| 6 2 hours, 18 min. | |
| 7 2 hours, 18 min. | |
| 8 1 hour, 48 min. | |
| 9 1 hour, 30 min. | |
| P (boost) 5 min (then switches back to level 9) | |
Power management
Two cooking zones one in front of the other effect each other. When both of these cooking zones are switched on at the same time, the power is automatically shared between them. When the Boost function is selected, the other cooking zone will be set to a somewhat lower setting. If a cooking zone is set at boost and you want to set the other one to setting 9, the cooking zone with boost will automatically go to a lower setting. Automatic heat-up function is deactivated.
Use of the touch keys and slide control
Place the tip of your finger flat on a key or the slide control to achieve the best results. You do not have to apply any pressure. The touch keys only react to the light pressure of a fingertip.
Do not operate the controls with any other objects.
Induction noises
A ticking sound
This is caused by the capacity limiter on the left and right zones. Ticking can also occur at lower cooking levels.
Pans are making noise
Pans can make some noise during cooking. This is caused by the energy flowing from the hob to the saucepan. At high levels, this is perfectly normal for some pans. It will not damage either the pans or the hob.
The fan is making noise
To enlarge the lifespan of the electronics, the appliance is equipped with a fan. If you use the appliance intense, the fan is activated to cool down the appliance and you will hear a buzzing sound. The fan runs on for several minutes after the hob has been switched Off.
Appropriate pans
Induction cooking requires a pan with a thick flat bottom (minimum 2.25 mm). Use pans made of magnetic material or pans with a sandwich bottom. Pans made of copper, aluminum or ceramic material are not appropriate.

Only use pans with a flat bottom. A hollow or rounded bottom can interfere with the operation of the empty cooking protection, causing the appliance to become too hot. This may lead to damages. Damage caused by using pans that are not appropriate or that boil dry is excluded from the guarantee.

Pans that have been used on a gas hob cannot be used on an induction hob.

Be careful with thin enamelled sheet-steel pans! The enamel may become damaged at high settings if the pan is too dry. High power level settings may cause the bottom of the pan to warp.
BEFORE FIRST USE

Attention
Make sure the bottom of the pan and the surface of the cooking zone are clean and dry. We recommend that you lift pans and not slide them over the hob.
Pan detection
- If the hob does not detect a (suitable)) pan after a pan is put on a cooking zone, the pan detection symbol flashes in the display. After 20 seconds, the cooking zone switches off.
- If you remove a pan from the cooking zone during cooking, the pan detection symbol shows. The cooking zone switches off. The symbol disappears when you put the pan back. The cooking zone switches on again with the power level set before.
- The automatic pan detection (adjustable: active by default) automatically detects a pan that is put on a cooking zone. The display of this cooking zone lights up more intensely.
Cooking levels
The cooking zones have 9 levels and a 'boost' level (P). Set the cooking level by touch and slide over the slide control. By slide over the slide control, the cooking setting is changed. By move to the right, the level increasing, while moving to the left decreases the level. When you move your finger away from the slide control, the cooking zone starts to operate at the level set.
Boost function
- You can use the 'boost' function to cook at the highest cooking level during a short period of time (max. 5 minutes). After the maximum boost time the power will be reduced to setting 9.
BEFORE FIRST USE
Cooking guidelines
Because the levels depend on the quantity and composition of the contents of the pan, the table below is intended as a guideline only.
Use level 'boost' to:
- bring the food or liquid to the boil quickly;
- 'shrink' greens;
- heat oil and fat;
- wok.
Use level 9 to:
- sear meats;
- cook fish;
- cook omelettes;
- fry boiled potatoes;
- deep fry foods.
Use level 7 and 8 to:
- fry thick pancakes and make French toast;
- fry thick slices of breaded meat;
- fry breaded fish;
- fry bacon (fat);
- cook raw potatoes;
- cook through pasta;
- fry thin slices of (breaded) meat.
Use level 4-6 to:
• complete the cooking of large quantities;
• defrost hard vegetables;
- fry thick slices of breaded meat.
Use level 1-3 to:
- simmer bouillon;
- stew meats;
- simmer vegetables;
- melt chocolate;
- poach;
- melt cheese.
Please read the chapter 'Before first use' very carefully before you start cooking. This prevents incorrect use of the hob.
Start cooking
- Touch and hold the on/off key until you hear an audio signal.
All displays light up; the induction hob is in standby mode.
The cooking zones and the extraction unit have power level zero.
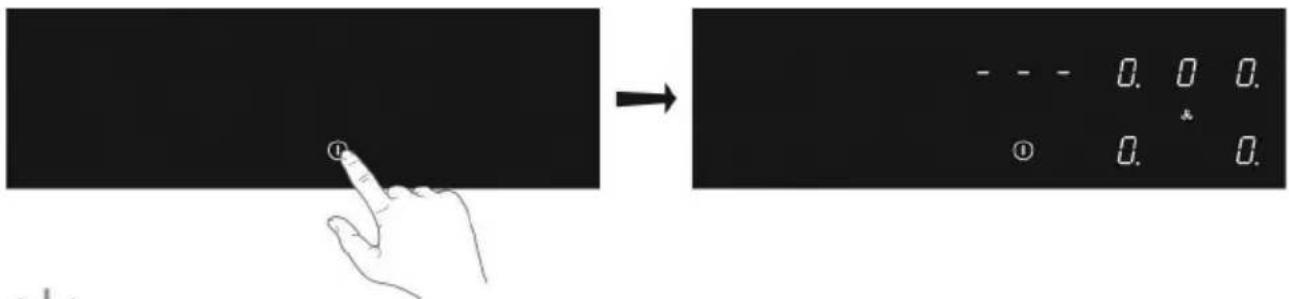

If the hob is not used for 20 seconds, it will shut off automatically.
- Place a suitable pan on the cooking zone.
The cooking zone automatically detects the pan; the display of this cooking zone lights up more intensely.

As long as the display of the cooking zone lights up brightly, the cooking zone is selected and the power level can be set.
- When the response time has elapsed, or during cooking, you can activate the cooking zone by manually selecting the display of the desired cooking zone.

- Within 10 seconds, set the power level by touching the slide control.
The cooking zone starts at the level that has been set.
Boost
You can use the boost function to cook for max. 5 minutes at the highest cooking level. You can use the Boost function for a maximum of two cooking zones alongside each other at the same time.
- Touch power level P to select the Boost function.
▷ P' shows on the display.
After the maximum boost time the power will be reduced to power level 9.
Pan detection symbol
When the pan detection symbol appears in the display:

- you have not placed a pan on the correct cooking zone;
- the pan you're using is not suitable for induction cooking;
- the pan is too small or not properly centred on the cooking zone.
The cooking zone will not work unless there is a suitable pan on the cooking zone.
- Set the power level to '0' to switch off the cooking zone.
- Switch off the induction hob by touching the On/off key.

Symbol H will appear in the display of the cooking zone which is too hot to touch. The symbol disappears when the surface has cooled down to a safe temperature. It can also be used as an energy saving function; if you want to heat other pans, use the cooking zone that is still hot.
Switch on the automatic heat-up function
This function sets the cooking zone at the highest level in order to bring your pan rapidly up to the required temperature. After a given time interval, the power level returns to the established level. This function is available for power level 1 to 8.
| Power level Heat-up time (seconds) | |
| 1 | 48 |
| 2 144 | |
| 3 230 | |
| 4 312 | |
| 5 408 | |
| 6 120 | |
| 7 168 | |
| 8 216 | |
- Switch on the hob and select the desired cooking zone.
- Touch and hold the slide control for at least 3 seconds at the desired level (from 1 to 8).
An 'A' appears in the display alternating with the selected power level. When the automatic heat-up time has expired, the cooking zone will switch automatically to the selected level which will show permanently on the display.
- To stop the automatic heat-up function, select the cooking zone and touch the slide control.
Switch on the keep warm function
- Switch on the hob and put a suitable pan on a cooking zone.
- Touch the cooking zone key of the desired cooking zone.
The '0' of the selected cooking zone will light up clearly and a single beep sounds.
- Touch the keep warm key.
The keep warm symbol 'u' appears in the display. The keep warm function is selected.

- Set the power level to '0' or touch the keep warm key to switch off the keep warm function.
Connecting the Bridge induction cooking zones
Two Bridge induction cooking zones can be connected to each other. This creates one large zone that can be used, for example, with a grill plate or a fish pan on the same power level. The pan must be large enough to cover the centres of the front and rear bridge induction cooking zone (at least 22 cm).
Connection of Bridge induction cooking zones
- Switch on the hob.
- Simultaneously touch the right-hand side cooking zone keys.
The rear cooking zone display shows a connection symbol to indicate that the two cooking zones are connected.
- Set the power level by touching the slide control.
The front cooking zone display shows the power level.
Disconnection of Bridge induction cooking zones
- Simultaneously touch the cooking zone keys of the connected cooking zones.
The connection symbol will disappear on the rear cooking zone display.
Pause cooking
This function stops the cooking activity temporarily (max. 10 minutes); the extraction will go to the lowest setting and timers are paused.
- Touch the pause key.
▶ All the displays show the pause symbol.

- To continue cooking, touch the pause key for at least 1 second until it flashes.
- Touch any other key within 10 seconds and the cooking process will continue.
The hob will automatically switch off after 10 minutes if the pause function is not switched off in the meantime.
Recall function
If the hob was switched off accidentally with the On/off key, all settings can be restored using the recall function.
- Touch the on/off key again within 6 seconds.
The pause key is flashing. - Touch the pause key within 6 seconds.
The previous settings are active again.
The minute minder is not connected to a cooking zone. The minute minder does not switch off a cooking zone or the extractor unit.
The hob is switched on.
- Touch the minute minder key to switch on the minute minder.
The timer display shows '0.00'.

- Use the '+' or '-' key to set the desired time (from 1 minute to 9 hours and 59 minutes).
The left position of the timer display shows the hours, the other positions the minutes.
▷ When the time is set, it will begin to countdown.
The timer display will show the remaining time.
The last 10 minutes will be displayed in minutes and seconds.
The timer flashes and the alarm beeps after the set time has passed.
- Touch the timer display to stop the alarm.
The alarm stops automatically after 2 minutes.

Touch the minute minder k.key and then touch the '-' key to set the time to '0.00' to switch off the minute minder before the time has passed.

When the hob is switched off; touch the on/off key twice to switch off the minute minder before the time has passed.
Using the cooking timer

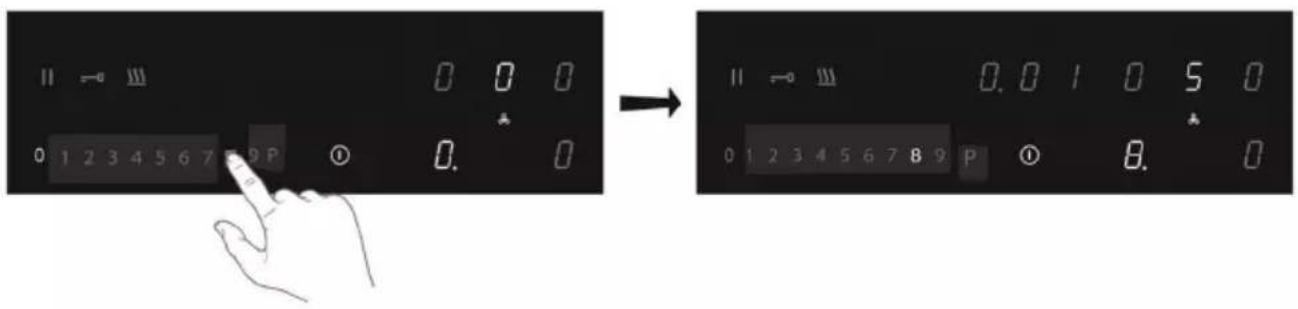
The cooking timer is connected to a cooking zone. After the set time has elapsed, the cooking zone will switch off automatically.
The hob is switched on and for at least one cooking zone a power level has been set.
- Touch the desired cooking zone key.
- Touch the timer symbol.
The timer symbol of the active cooking timer lights up brightly.
The timer display shows '0.00'.
- Use the '+' or '-' key to set the desired time (from 1 minute to 9 hours and 59 minutes).
The left position of the timer display shows the hours, the other positions the minutes.
- When the time is set, it will begin to countdown and the timer symbol flashes slowly.
The timer display will show the remaining time.
The last 10 minutes will be displayed in minutes and seconds.
The selected cooking zone will switch off automatically once the set time has elapsed.
The timer flashes and the alarm beeps after the set time has passed.
- Touch the timer symbol to stop the alarm.
The alarm stops automatically after 2 minutes.

All the cooking zones can have a cooking timer that has been set. The display will always show the time of the cooking zone with the shortest time remaining.
Changing the pre-set cooking time
The cooking time can be changed anytime during the operation.
- Touch the relevant cooking zone key.
- Touch the timer symbol.
- Use the '+' or '-' key to change the time.
Checking the remaining cooking time
- Touch the cooking zone key to select the zone of which you want to see the remaining time.
A zone connected to the cooking timer is identified by a flashing timer symbol above the cooking zone display.
The timer will display the remaining time of the selected cooking zone.
During the last 10 minutes of countdown, the remaining time will be displayed in minutes and seconds.
Switching off the cooking timer
If you want to switch off the cooking timer before the end of pre-set time:
-
Touch the cooking zone key to select the zone of which you want to switch off the cooking timer.
A zone connected to the cooking timer is identified by a flashing timer symbol above the cooking zone display. -
Touch the timer symbol.
-
Touch the '-' key(s) to set the time to '0.00'.
The timer symbol is no longer brightly lit.
- Confirm the setting; touch the timer symbol again.
Child safety lock
To activate the child safety lock, the steps described must be completed within 10 seconds.
- Switch on the hob.
- Touch and hold any of the cooking zone keys for 3 seconds.
- Release and slide your finger from 0 to 9 along the slide control.
▷ All displays show the symbol 'L'.
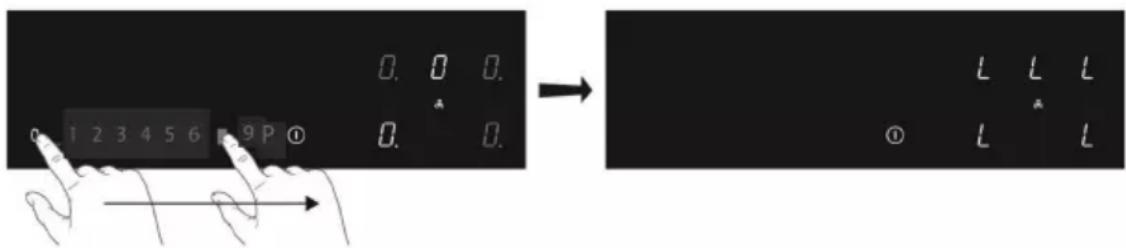
The hob is now locked. It prevents unintended switching on. After 20 seconds, the hob will switch off automatically.
To deactivate the child safety lock, the steps described must be completed within 10 seconds.
- Switch on the hob.
- Touch and hold any of the cooking zone keys for 3 seconds.
- Release and slide your finger from 9 to 0 along the slide control.

Locking function for rapid cleaning during cooking
- Touch the lock key.
The lock key lights up brightly; the settings of the hob are locked to allow rapid cleaning. - Touch the lock key again after the rapid cleaning to switch off the function.

USER MENU
The user menu enables the user to set a.o. the signals on the hob as desired. This concerns both audio (tone and volume) and visual signals.
| Menu code | Discription Configuration value | |
| U0 | Total power available for the appliance | From 1400W to 7400W (default) in 100W steps |
| U1 | Ducted mode / Recirculation mode | 0: ducted mode (default) 1: recirculation mode |
| U2 Volume key sound 0 (off) - 1 - 2 - 3 max. | (default) | |
| U3 Volume alarm signal 0 (off) - 1 - 2 - 3 max. | (default) | |
| U4 Lighting level display Max. 0 (default)- 1 | - 2 - 3 - 4 - 5 - 6 - 7 - 8 - 9 Min. | |
| U5 Countdown animation 0: off (default) 1: on | ||
| U6 Automatic | pan detection | 0: off1: on (default) |
| U7 Audio signal countdown timer | 0: audio signal during 120 seconds (default) 1: audio signal during 10 seconds 2: no audio signal | |
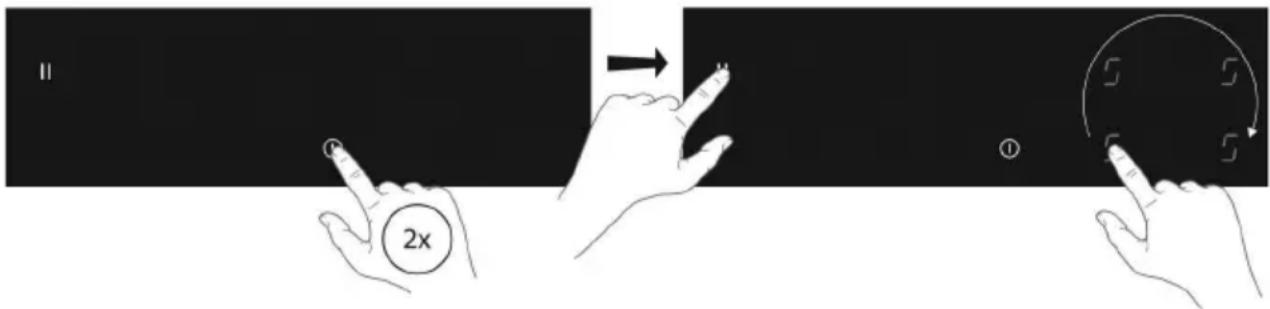
Open the user menu
- Touch the on/off key twice within three seconds.
The pause key is blinking.
- Touch and hold the pause key.
- Then, touch each cooking zone key clockwise (start with the cooking zone key on the front left).
USER MENU
4. Release the pause key.
“U” is flashing alternately with number “0” on the cooking zone display on the rear left.
With menu code U0, the configuration value appears in the timer display.
For all other menu codes, the configuration value appears in the cooking zone display on the front left.


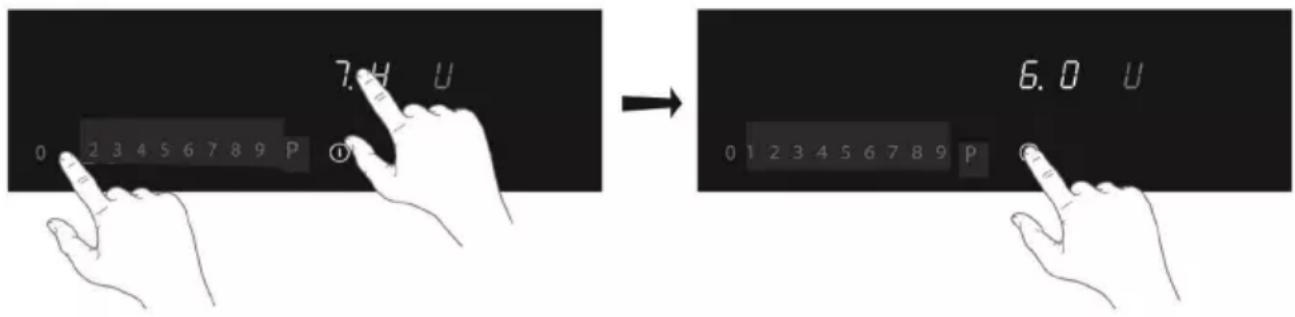
Menu code U0 (total maximum power)
If the electric installation in your home has different current limits, maximum power consumption of the cooking hob can be reduced.
- You have opened the user menu.
-
Touch the timer display once and use the left side of the slide control to decrease the power with 0,1kW per step. Use the right side of the slide control to increase the power with 0,1kW per step.
-
Confirm the setting; touch and hold the on/off key until you hear an audio signal.
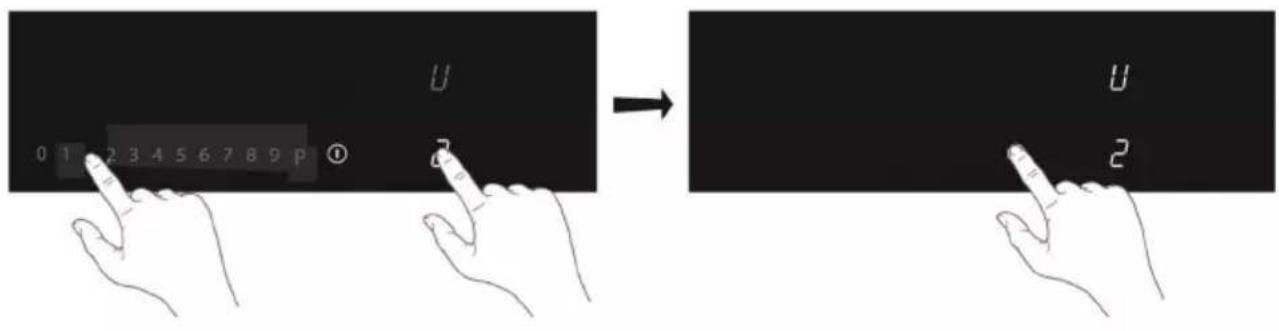
Menu code U1 - U7
- You have opened the user menu.
- Touch the cooking zone key on the rear left and choose the correct number of the menu code (see table).

USER MENU
- Touch the cooking zone key on the front left and select the correct value (see table).
- Confirm the setting; touch and hold the on/off key until you hear an audio signal.
POWER LIMITER

Setting the power limiter should only be carried out by a registered and qualified installer. Please read the safety regulations and the installation instructions carefully.
The hob is equipped with a power limiter. If the total power of operating cooking zones exceeds the maximum available amount of power, the power is automatically reduced. The display of the cooking zone who is being reduced in its power is first flashing; the level is then automatically reduced to the highest available power.
- The limiter is factory set at 7400W, but this setting can be changed up to 1400W in steps of 100W each..
Power limiter configuration
Make sure there are no pots or pans on the hob before you start!
- Disconnect the appliance from the main power supply by removing the power connector from the socket, by removing the fuse or turning the circuit breaker off.
- Reconnect the appliance to the power supply.
The minute minder key is flashing.
- Perform, within 2 minutes after reconnecting the hob to the power supply, the following steps.
• Make sure all cooking zones are switched off.
3 Touch and hold the minute minder key.
4. Then, touch each cooking zone key counterclockwise (start with the cooking zone key on the front right).

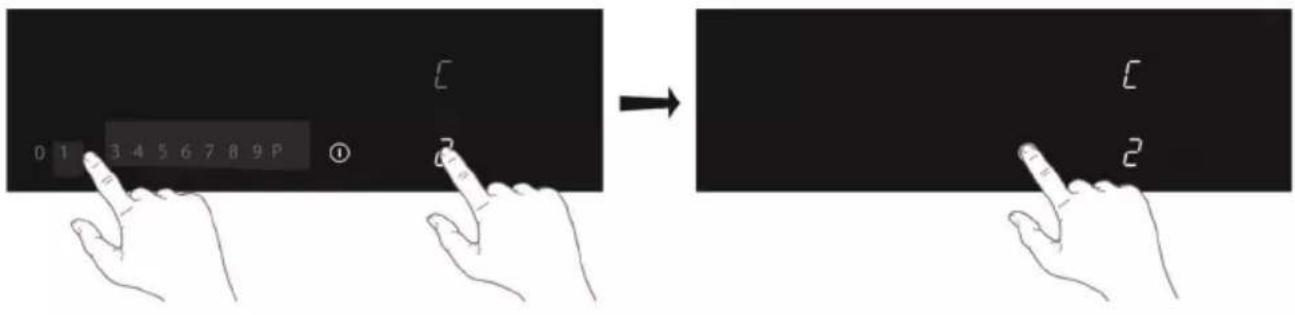
POWER LIMITER
- Release the minute minder key.
“C” is flashing alternately with “0” on the cooking zone display on the rear left.
The configuration value appears in the cooking zone display on the front left.
- Touch the cooking zone key on the rear left and choose "8" by using the slide control.
“C” is flashing alternately with “8” on the cooking zone display on the rear left.

- Touch the cooking zone key on the front left and select the power limitation wanted with the slide control.
- Then, touch and hold the On/off key until all the display segments disappear.
The hob is now ready for use with the selected power limiter active.
MAINTENANCE
Cleaning
First use
- Use a damp cloth to clean and dry the glass surface before using it for the first time.
- It is recommended to dry the appliance after having cleaned it with a damp cloth, in order to prevent the build-up of limescale.
Daily cleaning
- Although food spills cannot burn into the glass, we nevertheless recommend you to clean the hob immediately after use.
- Best for daily cleaning is a damp cloth with a mild cleaning agent.
• Dry with kitchen paper or a dry teacloth.
Stubborn stains
- Stubborn stains can also be removed with a mild cleaning agent such as washing-up liquid.
- Remove watermarks and lime scale with vinegar.
- Metalmarks (caused by sliding pans) can be difficult to remove. Special agents are available.
- Use a glass scraper to remove food spills. Melted plastic and sugar is also best removed with a glass scraper.

Never use abrasives. They leave scratches in which dirt and lime scale can accumulate. Never use anything sharp such as steel wool or scourers.
TROUBLESHOOTING

Attention
If you see a crack in the glass top (however small), switch off the hob immediately and disconnect it from the power mains. Contact the service department.
If the appliance does not work properly, this does not always mean that it is defective. Try to deal with the problem yourself first by checking the table below. You can also take a look on our website for more information. If the problem continues, contact the service department.
| Symptom Possible cause Solution | ||
| The display lights up when the hob is activated for the first time. | This is the standard set-up routine. | Normal operation. |
| The fan runs on for several minutes after the hob has been switched off. | The hob is cooling. Normal operation. | |
| A slight smell is noticeable the first few times the hob is used. | The new appliance is heating up. | This is normal and will disappear once it has been used a few times. Ventilate the kitchen. |
| The pans make a noise while cooking. | This is caused by the energy flowing from the hob to the saucepan. | At high levels this is perfectly normal for some pans. It will not damage either the pans or the hob. |
| You have switched on a cooking zone, but the display shows u. | The pan you are using is not suitable for induction cooking, or has a to small diameter. | Use a suitable pan. |
| A cooking zone suddenly stops working and you hear a signal. | The time that has been set for the timer has ended. | Touch the left or right timer key to stop the alarm. |
| The hob is not working and nothing appears in the display. | There is no power supply due to a defective cable or a faulty connection. | Check the fuses or the electric switch (if there is no plug). |
| A fuse blows as soon as the hob is switched on. | The hob has been wrongly connected. | Contact a professional installer. |
| L shows on the display. Child safety lock is activated. See chapter 'Operation of the hob/Child safety lock'. | ||
| Error code ER 03. You have pressed two or more keys at the same time. | Do not operate more than one key at the same time. | |
| Clean the control panel. | ||
TROUBLESHOOTING
| Symptom Possible cause Solution | ||
| Error code ER21. Overheating. | Let the hob cool down. | |
| Error code E2. Excess temperature of the induction element. Empty cookware might have been used. | Do not heat empty cookware. | |
| Error code E3. Wrong pan. Use appropriate pans. | ||
| Other error codes. Contact the service | department. | |
Achtung

BETRIEB DES KOCHFELDES
Boost-Funktion
BETRIEB DES KOCHFELDES
BENUTZERMENÜ
LEISTUNGSBEGRENZER

FONCTIONNEMENT DE LA PLAQUE DE CUISSON
LIMITEUR DE PUISSANCE


MENU UTENTE
LIMITATORE DI POTENZA
natural_image
Abstract spiral logo design with no text or symbolsAirforce
made in Italy
AFLIPC07 Ed.16-05-23
@

- Electrical connection diagram
- Caution
- Fire hazard
- Burn hazard
- Suitable food containers
- Non-suitable food containers
- Danger of mishaps
- Noise emissions
- First usage
- YOUR INDUCTION HOB
- Description
- Indications in the display
- Before use, read the separate safety instructions.
- Temperature safety
- Cooking-time limiter
- Power management
- Use of the touch keys and slide control
- Induction noises
- Appropriate pans
- BEFORE FIRST USE
- Pan detection
- Cooking levels
- Boost function
- Cooking guidelines
- Start cooking
- Boost
- Pan detection symbol
- Switch on the automatic heat-up function
- Switch on the keep warm function
- Connecting the Bridge induction cooking zones
- Disconnection of Bridge induction cooking zones
- Pause cooking
- Recall function
- Using the cooking timer
- Checking the remaining cooking time
- Switching off the cooking timer
- Child safety lock
- Locking function for rapid cleaning during cooking
- USER MENU
- Open the user menu
- Release the pause key.
- Menu code U0 (total maximum power)
- Menu code U1 - U7
- POWER LIMITER
- Power limiter configuration
- MAINTENANCE
- Cleaning
- First use
- Daily cleaning
- Stubborn stains
- TROUBLESHOOTING
- Attention
- Achtung
- BETRIEB DES KOCHFELDES
- Boost-Funktion
- BENUTZERMENÜ
- LEISTUNGSBEGRENZER
- FONCTIONNEMENT DE LA PLAQUE DE CUISSON
- LIMITEUR DE PUISSANCE
- MENU UTENTE
- LIMITATORE DI POTENZA
- Airforce
- made in Italy
Brand : Airforce
Model : Smart 90
Category : Cooker