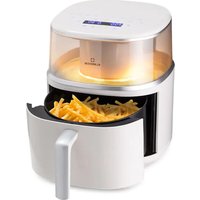
Air Glaze Digital - Deep fryer Klarstein - Free user manual and instructions
Find the device manual for free Air Glaze Digital Klarstein in PDF.

| Product type | Air fryer / Electric oven |
| Brand | Klarstein |
| Model | Air Glaze Digital |
| Capacity | 34 liters |
| Power supply | 220-240 V ~ 50-60 Hz |
| Power | 2200 W |
| Temperature range | 40 to 350 °C |
| Cooking programs | Air fry, Grill, Bake, Rotisserie, Pizza (frozen, New York, wood-fired), Yogurt, Defrost, Cake, Cookie, Max Roast, Toast, Bagel, Reheat, Dehydrate, Ferment, Fries, Wings |
| Included accessories | Crumb tray, Oven rack, Pizza stone, Enamel baking tray, Air fryer basket, Rotisserie forks, Rotisserie tongs |
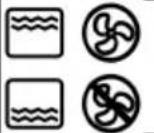
| Cleaning | Hand wash accessories with warm soapy water (except pizza stone). Do not use dishwasher. Clean interior and panel with a damp cloth. |
| Safety | Hot surface - risk of burns. Do not immerse cord. Use oven mitts. Do not cover air vents. Unplug after use. |
| Manufacturer | Chal-Tec GmbH, Wallstraße 16, 10179 Berlin, Germany |
Frequently Asked Questions - Air Glaze Digital Klarstein
User questions about Air Glaze Digital Klarstein
0 question about this device. Answer the ones you know or ask your own.
Ask a new question about this device
Download the instructions for your Deep fryer in PDF format for free! Find your manual Air Glaze Digital - Klarstein and take your electronic device back in hand. On this page are published all the documents necessary for the use of your device. Air Glaze Digital by Klarstein.
USER MANUAL Air Glaze Digital Klarstein
text_image
COOKINGCO COOKINGCOO KINGCOOKING KINGCOOKING COOKINGCOO KINGCOOKING KINGCOOKING KINGCOOKING
KLARSTEIN
www.klarstein.com

area
| Category | Value | | -------- | ----- | | 1 | 100 | | 2 | 100 | | 3 | 100 | | 4 | 100 | | 5 | 100 | | 6 | 100 | | 7 | 100 | | 8 | 100 | | 9 | 100 | | 10 | 100 | | 11 | 100 | | 12 | 100 | | 13 | 100 | | 14 | 100 | | 15 | 100 | | 16 | 100 | | 17 | 100 | | 18 | 100 | | 19 | 100 | | 20 | 100 | | 21 | 100 | | 22 | 100 | | 23 | 100 | | 24 | 100 | | 25 | 100 | | 26 | 100 | | 27 | 100 | | 28 | 100 | | 29 | 100 | | 30 | 100 | | 31 | 100 | | 32 | 100 | | 33 | 100 | | 34 | 100 | | 35 | 100 | | 36 | 100 | | 37 | 100 | | 38 | 100 | | 39 | 100 | | 40 | 100 | | 41 | 100 | | 42 | 100 | | 43 | 100 | | 44 | 100 | | 45 | 100 | | 46 | 100 | | 47 | 100 | | 48 | 100 | | 49 | 100 | | 50 | 100 | | 51 | 100 | | 52 | 100 | | 53 | 100 | | 54 | 100 | | 55 | 100 | | 56 | 100 | | 57 | 100 | | 58 | 100 | | 59 | 100 | | 60 | 100 | | 61 | 100 | | 62 | 100 | | 63 | 100 | | 64 | 100 | | 65 | 100 | | 66 | 100 | | 67 | 100 | | 68 | 100 | | 69 | 100 | | 70 | 100 | | 71 | 100 | | 72 | 100 | | 73 | 100 | | 74 | 100 | | 75 | 100 | | 76 | 100 | | 77 | 100 | | 78 | 100 | | 79 | 100 | | 80 | 100 | | Note: The actual values are not provided in the code. I have used the label 'Value' as a placeholder for the value detection. You would need to run the code to get the actual values from the code list. Please note that the actual values would be the result of this example. You would need to run the code to get the actual values from the code list. You would need to run the code to get the actual values from the code list. You would need to run the code to get the actual values from the code list. You would need to run the code to get the actual values from the code list. You would need to run the code to get the actual values from the code list. You would need to run the code to get the actual values from the code list. You would need to run the code to get the actual values from you would need to run the code. You would need to run the code to get the actual values from you would need to run the code.text_image
QR code image containing encoded data, no visible human-readable textINHALT
text_image
200+ recipes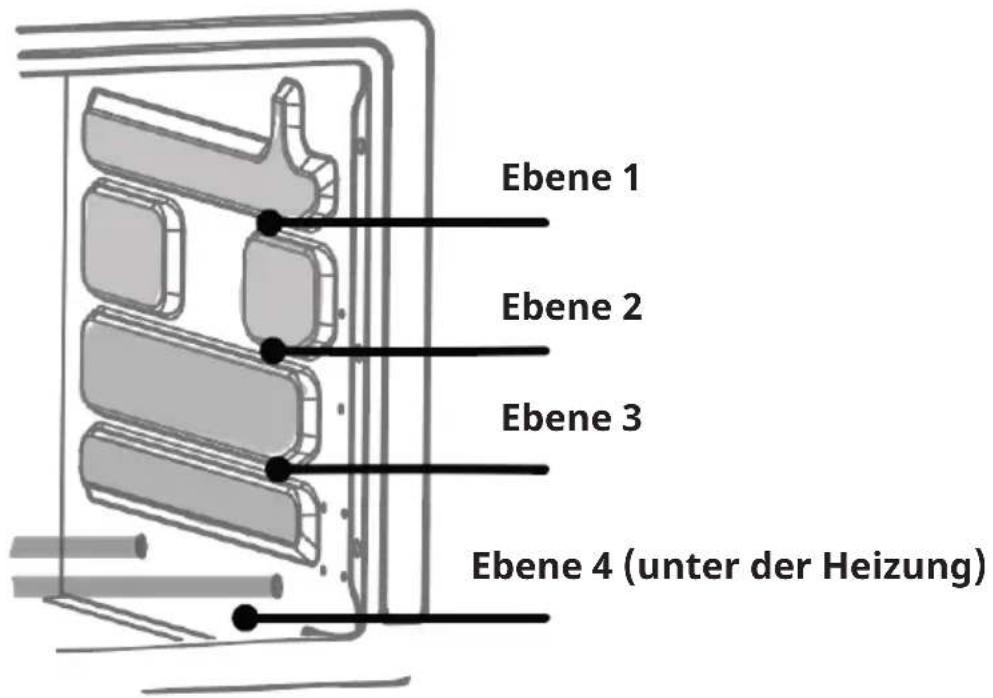
natural_image
Symbol of a trash bin with crossed lines indicating no waste or discharge, and a solid black rectangle below (no text or labels)Berlin Brands Group UK Limited
PO Box 42
272 Kensington High Street
London, W8 6ND
United Kingdom
Dear Customer,
Congratulations on purchasing this equipment. Please read this manual carefully and take care of the following hints on installation and use to avoid technical damages. Any failure caused by ignoring the items and cautions mentioned in the operation and installation instructions are not covered by our warranty and any liability. Scan the QR code to get access to the latest user manual and more product information.

text_image
QR code image containing encoded data, no visible human-readable textCONTENTS
Safety Instructions 26
Control panel 28
Before first use 28
Functions 29
Accessories 34
How to use the rotisserie 36
Usage 38
Cleaning and Care 40
Troubleshooting 40
Disposal Considerations 42
Manufacturer & Importer (UK) 42
TECHNICAL DATA
| Article number 10046476, 10046477 | |
| Power supply 220-240 V ~ 50-60 Hz | |
| Power rating 2200 W | |
| Volume 34 L | |
| Adjustable temperature 40-350 °C | |
SAFETY INSTRUCTIONS
Read this manual thoroughly before first use, even if you are familiar with this type of product. The safety precautions enclosed herein reduce the risk of fire, electric shock and injury when correctly adhered to. Keep the manual in a safe place for future reference.
CAUTION
Risk of burns! The temperature of accessible surfaces may be high when the appliance is operating. Do not touch them.
- Read all instructions before using the heater and its accessories.
- This appliance can be used by persons with reduced physical, sensory or mental capabilities or lack of experience and knowledge, if they have been given supervision or instruction concerning the safe use of the appliance and understand the hazards involved.
- Check the contents to ensure that you have all the parts you need to operate your heater properly and safely.
- DO NOT use an extension cord. A short power cord is used to reduce the risk of children grabbing or tangling the cord and to reduce the risk of people tripping over a longer cord. Also, the units are not designed to be operated with an external timer or separate remote control.
- NEVER use the under-counter socket.
- Keep the appliance and its cord out of the reach of children. Do not allow children to use the appliance. Close supervision is required when used near children.
- DO NOT let the cord hang over edges of tables or counters or touch hot surfaces, including cookers and other heating appliances.
- NEVER leave the oven unattended while it is in use.
- On high temperature professional programmes, NEVER place baking paper on accessories. This could cause a fire.
- To reduce the risk of electric shock, DO NOT immerse the power cord, plugs or main unit housing in water or other liquids.
- Do not operate this appliance if the cord or plug is damaged, malfunctioning, or if it has been dropped or damaged in any way. Such cases will result in hazard or danger. For information on inspection, repair or adjustment, contact the manufacturer's customer service telephone number.
- DO NOT cover the air intake or outlet openings while the unit is operating. Doing so may damage the unit or cause it to overheat.
- DO NOT insert or obstruct anything into the ventilation slots.
- DO NOT place anything on the surface while the unit is operating, except for authorised, recommended accessories.
- Before placing any accessories in the oven, ensure that they are clean and dry.
- Designed for countertop use only.
-
DO NOT place the heater near the edge of a worktop. Ensure that the surface is level, clean and dry.
-
DO NOT store any materials other than the supplied accessories in this oven when it is not in use.
- This appliance is intended for domestic and indoor use only. It is not intended for commercial or industrial use.
- DO NOT use accessories and attachments that are not recommended or sold.
- When using this heater, allow sufficient space above and on all sides for air circulation. The back of the appliance should be placed against a wall, but not too close.
- Fire may occur during operation if the stove is covered or in contact with flammable material, including curtains, drapes or the like.
- Avoid scratching door surfaces or nicking edges.
- DO NOT spray any aerosol sprays or flavours into the oven during cooking.
• Take care when placing items in and removing them from the oven, especially when it is hot. - DO NOT allow food to come into contact with the heating elements. Excessive food loads can cause personal injury, damage to property or compromise the safe use of the oven.
- DO NOT place any of the following materials in the oven: paper, cardboard, plastic, roasting bags and the like.
- Extreme care should be taken when using containers made of materials other than metal or glass.
- Caution: The temperature of the accessible surface may be high when the appliance is in use. To avoid burns or personal injury ALWAYS use hot pads or insulated oven gloves and use available handles, knobs, etc.
- Spilled food can cause severe burns. Exercise extreme caution when hot food is in the oven. Improper use may result in personal injury.
- Unplug the appliance when not in use. To unplug, grasp the plug by the body and pull it out of the socket. Never unplug by grasping and pulling the flexible cord.
- Allow the heater to cool completely before cleaning, moving or storing. Refer to the Cleaning section for regular maintenance of the heater.
- Cleaning and maintenance should not be carried out by children.
- DO NOT clean with metal scouring pads. Pieces may come off the pad and touch electrical parts, creating a risk of electric shock.
- DO NOT use the heater as a heat source or for drying.
CONTROL PANEL
text_image
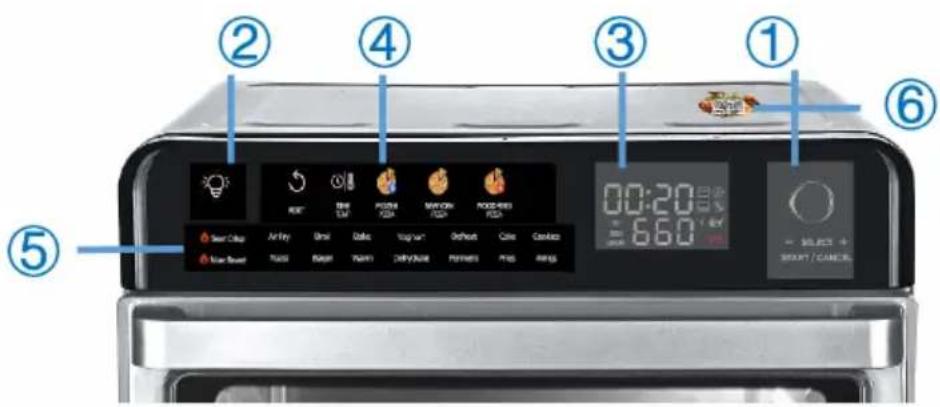
① ② ③ ④ ⑤ ⑥ 00:20 660 SELECT + SHORT/CANCE:| Region 1 Select / Start / Pause / Reset function button | |
| Region 2 Lamp button | |
| Region 3 Display | |
| Region 4 Touchscreen | |
| Region 5 Daily programs list | |
| Region 6 QR-Code for recipe website |
BEFORE FIRST USE
- Remove and discard all packaging, promotional stickers and tape from the unit.
- Remove any accessories from the packaging and read this manual carefully. Pay particular attention to the operating instructions, warnings and important safety precautions to avoid personal injury or property damage.
- Wash the accessories (except the Pizza Stone) in warm soapy water, then rinse and dry thoroughly. NEVER clean the main unit/accessories in a dishwasher.
• We recommend that you place all the accessories in the oven and run them on the 'Air Fry' function at maximum temperature for 10 minutes without adding any food. - This will remove all traces of packaging and odours and is completely safe and will not affect the performance of the oven.
- Ensure that the area is well ventilated.
FUNCTIONS
Region 1
Select
- In standby mode, turn the knob to select a function in region 5.
- Press the "time" / "temperature" button and turn the knob to adjust the setting in region 4 / 5.
Start
- Press the knob and the unit works based on the settings.
Pause
- Press the knob while the machine is working and the machine will pause. Press the button again and the machine will continue to work.
Reset
- In cooking mode (not preheating), pressing and holding the knob for 2 seconds will cancel the programme in progress. The panel returns to standby mode with the original settings.
- If no operation has been performed for more than 10 minutes, the panel automatically turns off the screen. Turning the knob returns the panel to the standby state with the default settings.
Region 2
- Press the button and the light inside the oven will stay on for 2 minutes. It then switches off automatically.
Region 3
| Symbol Meaning | ||
 | The inside of the oven has reached the required temperature. You can put the food in the oven now. | |
| The interior temperature is still NOT ready for cooking. Do not place any food in the oven. | ||
 | Icons for Fan/Heater, working in groups | |
| PRE | The product is preheating. | |
| PAUSE | The function of the product is paused. | |
| COOK | The product is cooking. | |
Region 4
| Symbol Meaning | ||||||
 | TIMETEMP |  |  |  | ||
| Touchscreen functions, all functions in this are are touch-activated.Press one of these buttons, the selected button will flash.Press the button in region 1, the unit starts to work.If an optional assistant function is available, the corresponding buttons on the panel will remain lit. If not, other buttons will be switched off. | ||||||
 | Reset function; Pressing this button cancels the current programme. The panel will return to its original settings. | |||||
| Time and Temperature function; Press this button and turn the knob to select the desired setting. | ||||||
 | NEWYORKPIZZA | HY4YI | Programs for Frozen/New Yok/Wood fired pizza | |||
| Function Usage (T /Thickness) only for reference) | |
| Wood fired (as Napolitan/ Margherita Pizza) | For a thin (T=1,5 cm) fresh pizza with tomatoes/ mozzarella cheeseNote: The product does not utilize any wood or wood byproduct. The term “wood fired” refers to the specific heat performance characteristic of this oven that replicates that of a wood fire brick oven. |
| Frozen Bought from the supermarket directly with ingredients on top. | |
| New York For a thin (T=1,5 cm) fresh pizza with ingredients of your choice as topping | |
- For large fresh vegetables, meats or seafood, change the programme to "New York" as they need more cooking time.
- If you are using large frozen vegetables, meat or seafood, change the programme to "Frozen Pizza" as they need much more cooking time.
Recipe for "Wood fired pizza"
We suggest buying from a bakery or supermarket. If not available, below is the recipe for a 25 cm home pizza.
Ingredients: Bread flour 100g; Sugar 5g; Salt 1g; Yeast 1g; Milk 63g; Butter 5g
- After mixing the ingredients well, put them in cling film for 1 hour.
- Add some flour to the above leavened mixture and make it into a ball shape.
- Add some oil to the surface of the dough ball and wrap in cling film again.
- Place the dough ball in the fridge for at least 6 hours.
- Before using, remove the dough ball and allow it to defrost for at least 1 hour.
-
Prepare your pizza when the preheating is almost finished. It is easier to transfer the pizza from the table to the oven.
-
Put some flour on the table and then use your hand to stretch the dough
- the thickness of the ball by stretching it (better than rolling it).
- When the crust is ready, add a little flour to the top of the pizza peel (very useful for transferring the pizza to the stone), then place the crust on the peel. The crust should slide.
- Do not add your favourite topping to the pizza, such as cheese, ham or sauce, until the crust has been placed on the stone.
- To get a thin/crispy bubble/edge, leave about 3cm of the crust edge without any sauce or food for an amazing thin/crispy pizza.
- Quickly place the pizza in the oven if the pizza is stuck together with the pizza shovel.
Region 5
| Sear Crisp | Air Fry | Broil | Bake | Yoghurt | Defrost | Cake | Cookies | List of daily programs |
| Max Roast | Toast | Bagel | Warm | Dehydrate | Ferment | Fries | Wings | |
| Program Function | |
| Sear Crisp For meals, thicker proteins and roasted vegetables. In this mode, food can be crispy on the outside and well cooked on the inside. | |
| AirFry For chicken wings, chips, chicken nuggets and similar foods. In this mode, food is fried with little or no oil added. | |
| Broil For steaks, fish, nachos and for finishing casseroles. | |
| Bake For cakes, cookies and similar food. | |
| Yoghurt For yogurt and similar food. | |
| Defrost Speed up the frozen food thawing. | |
| Cake/ Cookie Program for preparing cakes or cookies. | |
| Max Roast (350 °C, no convection fan) | For large proteins, such as a large whole chicken, turkey on its own size. |
| Toast For toasting max. 6 slices at a time | |
| Bagel For toasting, place a maximum of 6 bagel halves cut-side up on a wire rack. | |
| Warm Heat food without overcooking. | |
| Dehydrate For healthy snacks such as vegetables, fruit and even meat. | |
| Ferment Speeds up dough fermentation, especially in cool/cold weather | |
| Fries Program for preparing fries. Do not put too much at one time.Suggest within 500g per time with favourite spices on top. Half way through the frying time (about 10 minutes), coat the chips from top to bottom with the 2nd layer of seasoning. This will give an even cooking result. | |
| Wings Program for preparing wings. | |
Region 6
Scan the QR-Code to enter the website with cooking recipes (no log-in required).

text_image
200+ recipesACCESSORIES
text_image
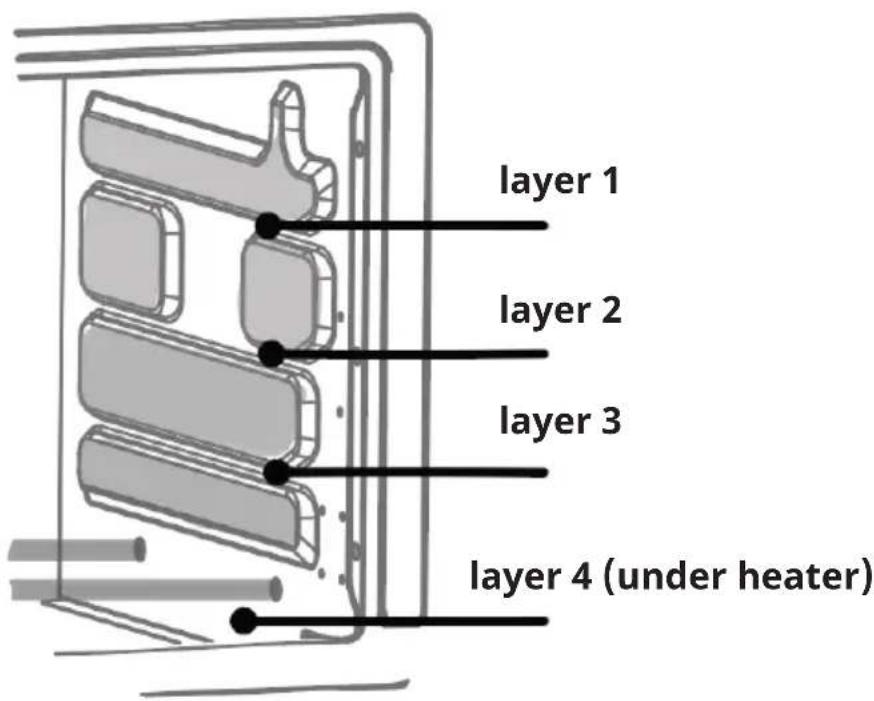
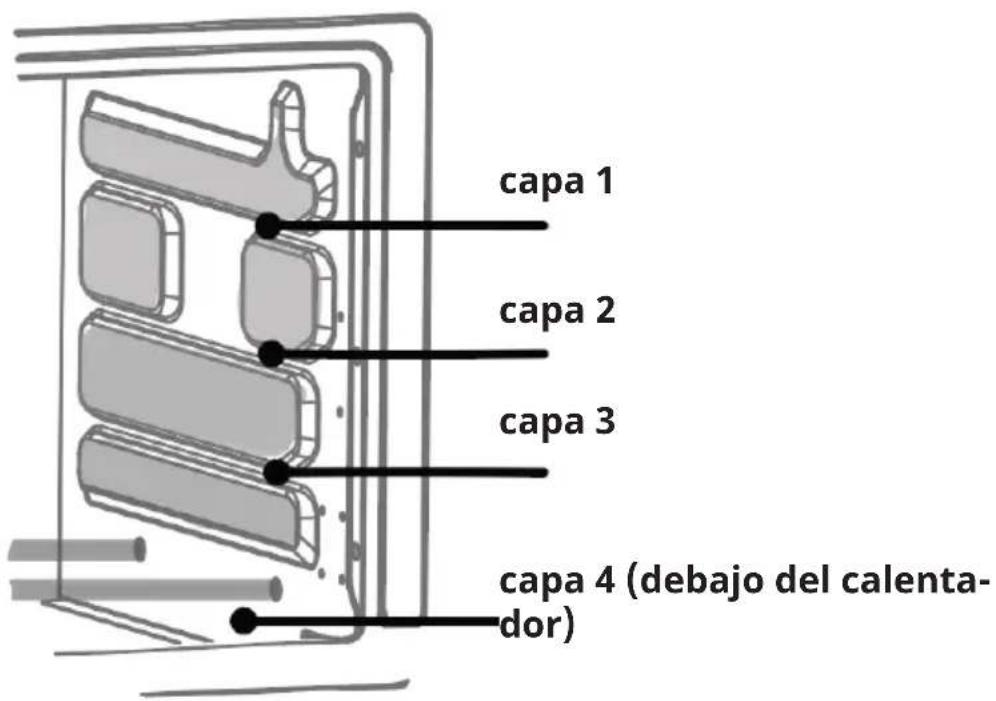
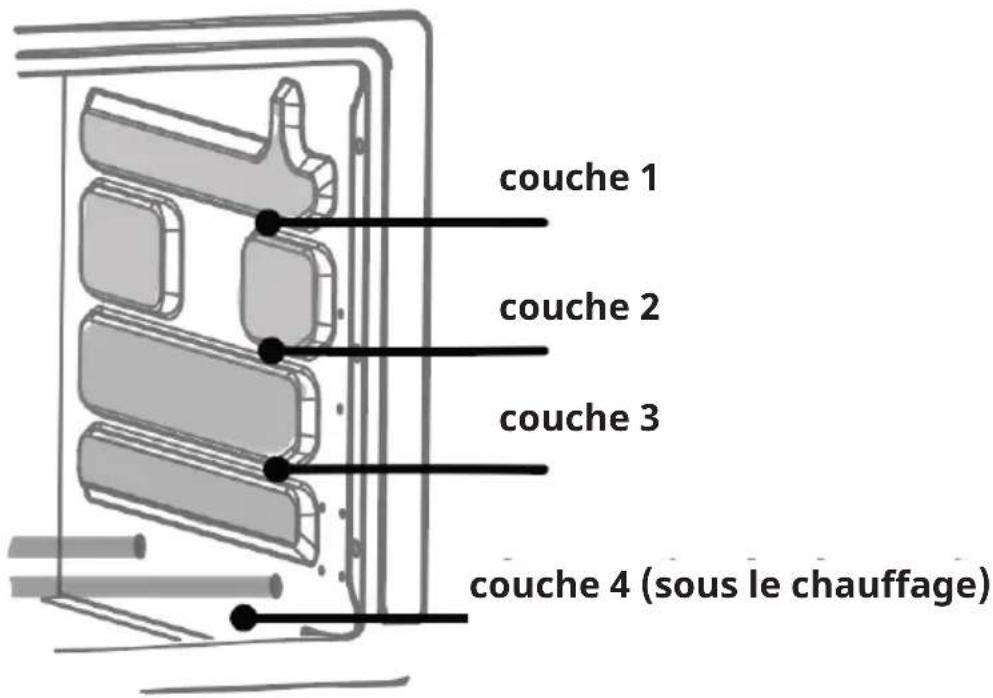
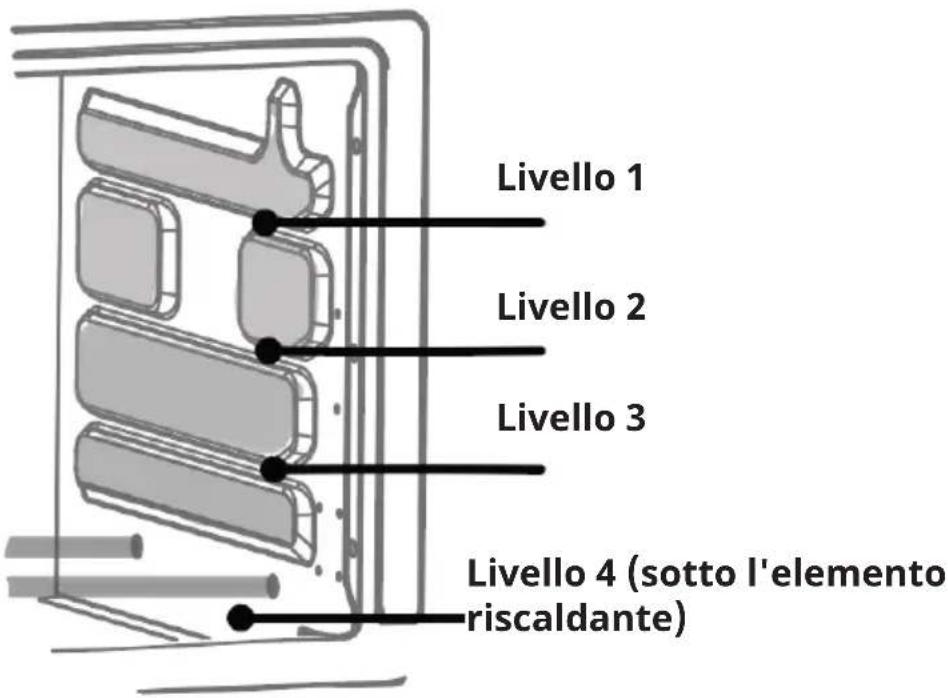
layer 1 layer 2 layer 3 layer 4 (under heater)| Picture Description | |
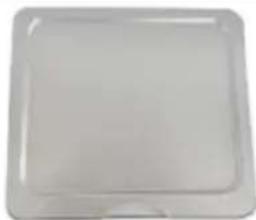 | Crumb Tray (in layer 4)Collects small parts / grease from foodRemovable for easy cleaning |
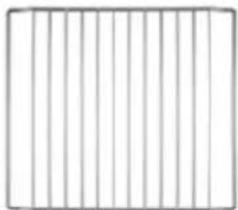 | Oven Rack (in layer 1/2/3)Place food directly on it for cookingPlace accessories on it for functions |
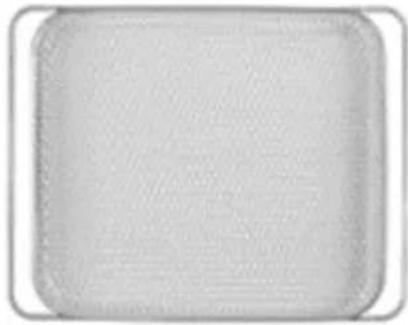
 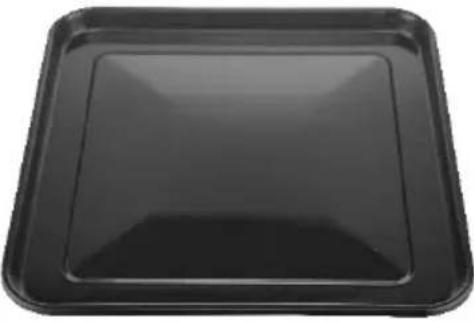 | Pizza Stone (Always place it on the oven rack.)The stone is fragile and can break if bumped or dropped.The stone is very hot during usage and stays hot for a long time. Allow the pizza oven to cool before moving, cleaning or storing it.DO NOT cool the stone with water when the stone is hot. If clean the stone with water, please dry the stone before usage. Store the pizza stone in a dry or warm place.For the original pizza / Bread taste.Enamel coated Baking Tray(Always lay on the oven rack.)During usage, the pan is possibly distorted due to high temperature. Once cools down, it will be back to normal shape.After usage, wash / clean it in time.Cool the tray after usage, soak it in water for 30 min. Use the soft bristle brush to clean. |
 | Air Fry Basket (in layer 1/2)For dry ingredients.After usage, must wash/clean it in time. |
 | Rotisserie Forks |
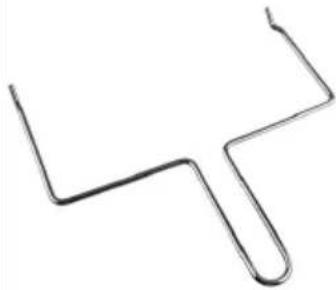 | Rotisserie Tong |
HOW TO USE THE ROTISSERIE
How to prepare the chicken
Do not use chicken heavier than 1.5 kg. Season the chicken and tie the chicken with kitchen twine as follows:
| a | Lay the chicken on its back with the legs facing you. |
| b | Slip a piece of kitchen twine under the back of the chicken between the wings and the thighs. |
| c | Pull both ends of the kitchen twine up under the chicken's armpits and then over the wings. |
| d | Cross the kitchen twine around the top of the breast, making sure the skin is tight. |
| e | Bring the ends of the kitchen twine back to you and run them along the sides of the breast over the wings and thighs. |
| f | Cross the ends of the kitchen twine and pull it tightly up and under the crown of the chicken. |
| g | Loop the ends of the kitchen twine under the legs and then over the top of the legs. Cross and tighten. The thighs should stick up a little. |
| h | Turn the chicken onto its belly and finish by tying the strings around the tail in a knot. Cut off the ends. |
To attach the chicken to the rotisserie
| 1 | After the chicken is tied, carefully thread the rotisserie through the chicken from the neck to the legs. |
| 2 | Slide the rotisserie forks through the chicken on both sides of the rotisserie. Make sure the chicken is firmly seated. |
| 3 | Lightly tighten the rotisserie forks with the nut. Do not over tighten them or removing the rotisserie forks may become difficult after cooking. |
| 4 | Open the door. First, insert the long end of the rotisserie into the holder on the left side of the oven. Then insert the other end into the slot in the holder on the right side of the oven. Do not force the rotisserie into the rotisserie holder, but rather rotate it until it slides in easily. |
 | |
| 5 | Close the door, press the button to turn on the device and select the preset for the grill. |
To remove the rotisserie and rotisserie forks
| 1 | Open the door. |
| 2 | Grasp the rotisserie tongs with both hands. Hook the lower left and right sides of the rotisserie into the recesses of the rotisserie tongs. |
| 3 | Carefully lift the rotisserie out of the slot in the holder on the right side of the oven. Pull the rotisserie out of holder on the left side of the oven and remove it. |
USAGE
There is a QR code in Region 6, you can use your smartphone to scan it and check some recipes for food preparation.
Frozen meat / fish:
Before preparation, defrost completely and make sure that there is no water on the surface.
Frozen Pizza
Can be put into the oven directly for preparation, no defrosting needed
Fries
- For frozen chips, no need to wait for defrosting. Mix with a few drops of oil for better performance.
- For fresh fries, cut the potato into pieces, wash and cool for 1 minute. Take out to cool, then absorb water through paper, then put in the refrigerator for 6 hours. After the refrigerator then repeat "frozen fries" way.
- It is very important not to put too much at once. We recommend using 400g at a time and not piling up. After about 15 minutes, roll the chips from top to bottom. This will ensure an even cooking result.
Steps
| Step 1Power on | When plugged in, the unit goes into standby mode and the panel displays all the function icons |
| Step 2Select function | For region 4 functions:In standby mode, touch the desired “programme” button. The selected one flashes and its default time appears on the display.For region 5 functions: In standby modeTurn the knob to select a function.If you need to adjust the programme setting of region 4/region 5, press the “TIME” or “TEMPERATURE” button and turn the knob to reduce or increase the time. |
| Step 3Put Food in | Once selected, its assistant icons will appear.1. Once displayedThe food can be put into the oven.When the oven is in cool state, before putting the food into the oven for cooking, it is better to preheat the oven at 170 °C for 5 minutes.Press down the knob, the selected function will work.Once displayedFood cannot be placed into the oven. Only put its accessories in the oven for the next preheating.Press down the knob for preheating when “PRE” is displayed.As soon as the preheating is finished and the symbol appears, the food can be placed in the oven.For pizza: Only prepare your pizza when preheating is almost finished. It is easier to move the pizza from the table to the oven. |
| Step 4End | When the chosen programme is finished, you will hear a “bi” sound and the words “End” will appear in the display.Pull the accessories out of the oven and remove them. Note the high temperature.If more cooking is required, repeat steps 1-3. If no more cooking is required, unplug the appliance and wait for it to cool down for cleaning. |
CLEANING AND CARE
- The appliance should be cleaned after each use.
- Never clean the main unit/accessories in a dishwasher.
- Unplug the machine and allow it to cool before cleaning.
- Remove all accessories from the machine, including the crumb tray.
- Soak the other accessories, except the Pizza Stone, in warm soapy water for 30 minutes. Use the soft bristle brush for cleaning. Do not use hard tools for cleaning. Then rinse 2 times with fresh water and dry thoroughly.
- Wipe the inside of the machine with a soft damp sponge.
- Clean the main unit and the control panel with a damp cloth.
- Use a dry cloth to clean the Pizza Stone.
TROUBLESHOOTING
| Problem Possible cause and solution | |
| The air fryer oven is not turning on. | ·Check and make sure you have selected a function or set the temperature and timer, then press the Start button.·Check and make sure that the power cord is plugged in, that the power is on and that the socket is working (test the machine on a different socket). |
| Food is undercooked. | ·You may have overfilled the basket. Place smaller batches of food in the basket for more even cooking.·Check that the temperature is set correctly.·Increase the cooking time. |
| Smoke is coming from the appliance when switching it on. | ·This is normal when using the appliance for the first time and is not a cause for concern. Ensure good ventilation.·If you have used the fryer before, unplug the appliance and allow it to cool. Check and ensure that the interior surfaces and all accessories inside the oven are clean and free of food residue.·When air frying fatty foods, oil will drip into the pan where it may cause white smoke. This will not affect the appliance or the end result.·If you have cleaned the appliance properly and it still emits smoke, stop using it and contact our customer service centre. |
| Steam is escaping from door | ·Food always contains moisture. Steam is produced during baking and may escape at the top of the oven door during use. This is normal and does not affect the cooking result or the quality of the appliance.·Defrost food before cooking to reduce moisture content. |
| Food is fried unevenly. | ·Try shaking the basket halfway through cooking, but be careful not to burn yourself. The metal parts are very hot when in use. |
| Home-made chips are fried unevenly. | You may not be using the right type of potatoes.Use fresh potatoes that stay firm during cooking.Also make sure that the cut potato sticks are well rinsed and dried before cooking.Do not add too much at a time.We recommend using 500g at a time with the seasoning on top. Half way through cooking (about 10 minutes), coat the chips from top to bottom with the 2nd layer of seasoning. This will give an even cooking result. |
| The batter is coming off when air-frying. | Make sure your batter is not too wet.Add a dry layer and pat it firmly onto the (battered) pieces of food to ensure it stays on the food during the frying process. |
| The removable tray is warping during cooking. | Tray warping most commonly occurs in any type of baking when a tray is exposed to rapid changes in temperature.It can return to its original shape when it cools. |
| A strange sound occurs during usage | The interior of the oven is made entirely of metal. This occurs when the oven interior is exposed to rapid changes in temperature. Metal parts are exposed and make noise. This is most common regular case, does not affect the use.If the sound is continuous, seems to scratch other thing. Stop the machine and wait for the oven to cool down, then use it again.If the problem persists, contact our customer service centre. |
| Circuit breaker or safety switch tripped | This appliance uses a lot of power when in use, if it is used in conjunction with other kitchen appliances on the same circuit at the same time, it may trip a circuit breaker or safety switch with built-in overload protection.Check to see if other appliances (e.g. kettles, toasters, microwaves) are operating at the same time to isolate them from the same circuit, then operate the appliance separately to confirm that the circuit is no longer tripped. |
| Condensation / water / moisture gathers inside the oven door | This is a natural occurrence, especially when the room temperature is cold. This does not affect the functioning of the appliance and the condensation will disappear once the oven has cooled down.Preheat your oven 15 minutes before cooking to reduce condensation.If food is placed in the oven to be cooked from a cold start, there is a greater chance of condensation forming before the oven is up to temperature. |
If an error occurs, contact the Klarstein customer service.
Any other servicing should be performed by an authorized service representative.
DISPOSAL CONSIDERATIONS
natural_image
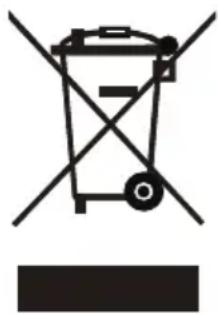
Symbol of a trash bin with crossed lines indicating no waste, and a solid rectangle below (no text or labels)If there is a legal regulation for the disposal of electrical and electronic devices in your country, this symbol on the product or on the packaging indicates that this product must not be disposed of with household waste. Instead, it must be taken to a collection point for the recycling of electrical and electronic equipment. By disposing of it in accordance with the rules, you are protecting the environment and the health of your fellow human beings from negative consequences. For information about the recycling and disposal of this product, please contact your local authority or your household waste disposal service.
MANUFACTURER & IMPORTER (UK)
Manufacturer:
Chal-Tec GmbH, Wallstrasse 16, 10179 Berlin, Germany.
Importer for Great Britain:
Berlin Brands Group UK Limited
PO Box 42
272 Kensington High Street
London, W8 6ND
United Kingdom
Estimado cliente:
text_image
QR code image containing encoded data, no visible human-readable textÍNDICE
text_image
200+ recipesACCESORIOS
text_image
capa 1 capa 2 capa 3 capa 4 (debajo del calenta- dor)natural_image
Symbol of a trash bin with crossed lines indicating no waste or discharge, and a solid rectangle below (no text or labels)Berlin Brands Group UK Limited
PO Box 42
272 Kensington High Street
London, W8 6ND
United Kingdom
Chère cliente, cher client,
text_image
QR code image containing encoded data, no visible human-readable textSOMMAIRE
text_image
200+ recipesACCESSOIRES
text_image
a b c d e f g h finishednatural_image
Symbol of a trash bin with crossed lines indicating no waste or discharge, and a solid black rectangle below (no text or labels)Berlin Brands Group UK Limited
PO Box 42
272 Kensington High Street
London, W8 6ND
United Kingdom
Gentile cliente,
text_image
QR code image containing encoded data, no visible human-readable textINDICE
text_image
200+ recipesACCESSORI
text_image
Livello 1 Livello 2 Livello 3 Livello 4 (sotto l'elemento riscaldante)text_image
a b c d e f g h finishedBerlin Brands Group UK Limited
PO Box 42
272 Kensington High Street
London, W8 6ND
United Kingdom

area
| Category | Value | | -------- | ----- | | A | 100 | | B | 100 | | C | 100 | | D | 100 | | E | 100 | | F | 100 | | G | 100 | | H | 100 | | I | 100 | | J | 100 | | K | 100 | | L | 100 | | M | 100 | | N | 100 | | O | 100 | | P | 100 | | Q | 100 | | R | 100 | | S | 100 | | T | 100 | | U | 100 | | V | 100 | | W | 100 | | X | 100 | | Y | 100 | | Z | 100 |