PP400L - Saw Greencut - Free user manual and instructions
Find the device manual for free PP400L Greencut in PDF.

| Product Type | Pole Pruner |
| Brand | Greencut |
| Model | PP400L |
| Power Source | Lithium-ion battery 40 V DC |
| Compatible Battery | BT402L (2 Ah) and BT404L (4 Ah) |
| Compatible Charger | CBT400L (40 V) |
| Guide Bar Length | 203 mm (8 inches) |
| Chain Pitch | 3/8 inch |
| Chain Cutting Speed | 6 m/s |
| Sound Power Level (LWA) | 96 dB(A) |
| Integrated Oil Tank | Yes (for automatic chain lubrication) |
| Chain Tensioning System | Tool-less adjustment via knob |
| Safety | Safety lock on handle, lock-off trigger |
| Telescopic Handle | Adjustable front and rear tube with coupler |
| Box Contents | 1 pruner, 1 guide bar, 1 chain, 1 user manual |
| Warranty | 24 months (Europe) |
| Certifications | CE, directives 2006/42/EC, 2014/30/EU, 2000/14/EC |
| Recommended Use | Cutting tree branches and shrubs (non-professional use) |
| Maintenance | Clean guide bar rails, lubricate chain regularly |
| Storage | Disconnect battery, store in a dry and ventilated place |
Frequently Asked Questions - PP400L Greencut
User questions about PP400L Greencut
0 question about this device. Answer the ones you know or ask your own.
Ask a new question about this device
Download the instructions for your Saw in PDF format for free! Find your manual PP400L - Greencut and take your electronic device back in hand. On this page are published all the documents necessary for the use of your device. PP400L by Greencut.
USER MANUAL PP400L Greencut
text_image
Diagram showing two mechanical components with directional arrows indicating motion or transformation, labeled 1 and 2.text_image
Diagram illustrating a coiled spring and its winding mechanism, labeled with steps 1 and 2.ESPADA Y CADENA
text_image
Technical diagram showing a chain-cranked robotic device with gear mechanism and mechanical component, including a magnified view of the 3-4 mm thread.natural_image
Illustration of a hand using a screwdriver to draw a black object (no text or symbols visible)natural_image
Diagram of a coiled wire with a directional arrow and label '1' (no text or symbols on the diagram itself)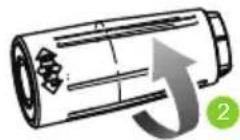
natural_image
Diagram of a coiled wire with a directional arrow and label '2' (no text or symbols on the diagram itself)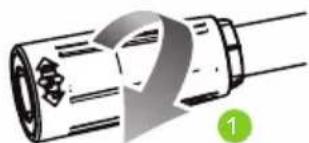
natural_image
Diagram of a cylindrical mechanical component with a curved arrow indicating rotation or force direction (no text or symbols)ÉPÉE ET CHAÎNE
natural_image
Diagram of a chain-link robotic device with circular motion indicators and a central gear mechanism (no text or symbols)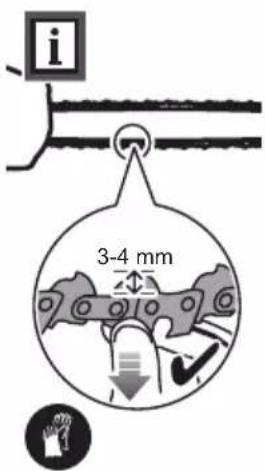
text_image
i 3-4 mmLUBRIFICATION DE LA FAUCHEUSE
natural_image
Illustration of a hand using a screwdriver to draw a black object (no text or symbols visible)PROBLÈME CAUSE POSSIBLE SOLUTION
natural_image
Diagram showing two mechanical components: a coiled spring and a cylindrical housing with internal structure, both with directional arrows indicating motion (no text or symbols)text_image
Diagram illustrating a mechanical assembly process with labeled steps 1 and 2, showing a threaded component before and after rotation.SPADA E CATENA
natural_image
Diagram of a chain-link robotic device with circular motion arrows indicating rotational cycles (no text or symbols)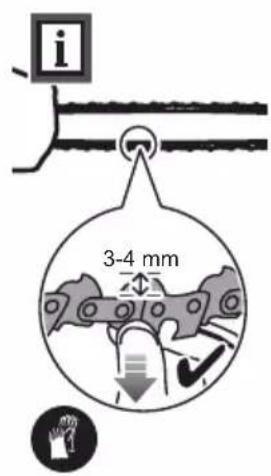
text_image
i 3-4 mmnatural_image
Illustration of a hand using a screwdriver to apply material to a black surface (no text or symbols)PRODUCT DESCRIPTION 43
BOX CONTENTS 44
ASSEMBLY 44
PRODUCT USE 46
MAINTENANCE 46
TROUBLESHOOTING 48
TRANSPORTATION AND STORAGE 48
RECICLYING AND DISPOSING 49
GUARANTEE 49
DECLARATION OF CONFORMITY (EC) 50
INTRODUCTION
Thank you for choosing this GREENCUT product. We are confident that you will appreciate its quality and meet your needs for a long period of time.
Remember that you can contact our Official Technical Service for questions about assembly, use, maintenance, identification and troubleshooting and for the purchase of spare parts and/or accessories.

ATTENTION: Please read this manual carefully before using the product. Failure to comply with the operating instructions and safety warnings may result in damage to the user and/or the product itself. The manufacturer is not responsible for accidents and damage to the user, third parties and objects resulting from ignoring the contents of this manual.
This product is not intended for professional use.
Keep this instruction manual for future reference. If you sell this product, remember to give this manual to the new owner.
SAFETY RULES AND PRECAUTIONS
The following symbols and signal words and their meanings are intended to explain the hazards and information related to this product.
SYMBOL WORD MEANING

ATTENTION
It indicates a dangerous situation where you need to pay full attention to avoid any kind of personal injuries or damage to the device.

NOTE It indicates useful information which can facilitate your task.

ATTENTION: Read and understand all warnings and safety instructions before using this product. Failure to do so may result in electric shock, fire and/or serious injury.
All information included in this manual is relevant to your own safety and that of your environment. If you have any questions about the information included in this manual, consult a professional or contact the Authorised Service Centre.
The following information on hazards and precautions includes the most probable situations that may arise during the use of this machine. Check all the documentation, packaging and product labels before using it.
If you encounter a situation not described in this manual use common sense to use the machine as safely as possible and, if you see any danger, do not use the machine.
USERS
- This machine has been designed to be manipulated only by users of legal age who have read and understood these instructions.
- Familiarize yourself with this machine before using it. Make sure you know the controls and safety devices and how they should be used.
- If you are an inexperienced user, we recommend that you do some practice doing simple jobs and, if possible, in the company of an experienced person.
PERSONAL SAFETY
- Do not use this machine for other purposes other than those for which it has been designed.
- Do not force this machine. A correct use for the type of work to be done will allow you to work better and more safely.
- Be alert, watch what you are doing and use common sense when operating this machine. Never use the machine with defective protections or without safety devices.
- Do not modify the controls of this machine.
- Do not use this machine if any of its components is damaged.
- Do not use this machine if the switch does not change between "ON" and "OFF". Any power tool that can not be controlled with the switch is dangerous and must be repaired.
- Do not use this machine when you are tired or under the influence of drugs, alcohol or medication.
- If the machine vibrates in an unusual way stop it, remove the battery and inspect the machine for the possible cause and repair it. If you can not find the reason, contact Authorised Service Centre.
- The machine must be placed horizontally on a stable and levelled surface, without a steep slope.
- Remove all keys or hand tools from the work area before starting this machine.
- Keep your feet firmly on the ground and keep your balance at all times. Sliding or unstable surfaces can cause a loss of balance and control of the machine.
- Keep all body parts away from the blade. Do not remove the cut material or hold the material to be cut when the blades are moving.
- Make sure the switch is OFF when clearing jammed material.
- Store the product with the battery disconnected and out of the reach of children.
WORKWEAR
- Dress properly. Do not wear loose clothing or jewellery. Keep your hair and clothes away from moving parts. Loose clothes, jewellery or long hair can be caught by moving parts. Use:
-Eye and hearing protection.
-Long trousers.
-Head and face protection
-Hand protection (resistant and non-slip gloves).
-Foot protection.
- Protective equipment such as a dust mask, safety gloves, non-skid safety boots and a hard hat will reduce the risk of personal injury.
WORK AREA SAFETY
- Do not operate this machine in explosive atmospheres, such as in the presence of flammable liquids, gases or dust. Power tools create sparks that can ignite the dust or fumes.
- When you are working on streets, roads or nearby areas, check that it does not endanger traffic.
- Keep bystanders, children or animals away while operating this machine. Distractions can cause you to lose control.
- Keep the work area clean and work only with sufficient lighting. Messy and dark areas can cause accidents.
MAINTENANCE, TRANSPORTATION AND STORAGE SAFETY
- Carry out maintenance of the machine. We recommend that maintenance and repairs not described in this manual be carried out by the Authorised Service Centre.
- Ensure that the cutting blade is installed correctly and securely fastened and replace the cutting blades or any other part that is cracked, chipped or damaged.
- Keep handles dry and clean. Dirty grips can cause a loss of control.
- Avoid accidental starting of the machine. Make sure the switch is in the "OFF" position before picking up or transporting the machine. Transporting power tools with the switch in the "ON" position can put your safety at risk and cause accidents.
- Disconnect the battery from the machine before making any adjustments, cleaning or storing the machine.
- When transporting or storing the hedge trimmer, always attach the cutting device cover.
- Store the product with the battery disconnected and keep it out of the reach of children.
ELECTRICAL SAFETY
- Never modify the plug in any way. Unmodified plugs and matching bases will reduce the risk of electric shock. If you discover any damage, send your machine to Authorised Service Centre.
- Do not open or attempt to repair the battery or battery charger.
- Protect the battery and charger from moisture. Keep the battery away from extreme heat and cold.
- Charge the battery only at an ambient temperature (surrounding air) between 0^ and 40^ .
- Do not use the cable to carry, lift or unplug the charger. Keep the cable away from heat, oil, sharp edges or moving parts. Damaged or tangled cables increase the risk of electric shock.
- Do not operate the battery charger outdoors.
- Disconnect the charger from the power source when not in use or before cleaning and repairing. Take special care with the battery.
- Store the battery in a dry place between 10^ and 30^ when not in use.
- This battery is sealed and liquid should never come out of it. If the seal breaks down and the liquid touches your skin quickly wash with plenty of soap and water, neutralize the liquid with a weak acid such as lemon or vinegar and seek medical assistance urgently. If battery fluid touches your eyes, rinse thoroughly with water for 10 minutes and seek immediate medical attention.
- The battery should be recharged when it does not produce enough power in jobs that were easily done before. Do not continue to use the product with your battery exhausted.
- The battery is not fully charged at the factory, before you try to use it, charge it completely first.
SERVICE
- Have the product checked regularly by a qualified technician and use only original replacement parts. If you have any questions, please contact the Official Technical Service.
WARNING ICONS
The warning icons on labels in this machine and/or in the manual indicate the necessary information for the safe use of this machine.

Attention, danger!

Danger! Risk of finger amputation. Keep your hands and feet away from the cutting tool.

Read this manual carefully before starting the machine.

Do not expose to rain or damp conditions.

Wear eye and hearing protection.
Before performing maintenance or repair work on the machine, turn it off and remove the battery.

Wear non-slip safety gloves.

Guaranteed sound power level XX Lwa, dB(A).

People who are not properly protected should be within safe distance.
Dispose of your device in an environmentally friendly manner. Do not dispose of in household waste containers.

Keep children away from the machine.

Complies with CE directives.
PRODUCT DESCRIPTION
CONDITIONS OF USE
Use the tool only to cut branches from trees and plants. Any use other than that described above may cause dangerous situations and exempts the manufacturer from any liability.
DETAILED DESCRIPTION OF THE PRODUCT
NOTE: The products detailed in this manual may vary in appearance, inclusions, description and packaging as shown or described here.
TECHNICAL DATA
PP400L
| Battery type 40 V DC Lithium-ion |
| LWA(sound power) 96 dB(A) |
| Chain and bar 8" |
| Chain pitch 3/8" |
| No-load speed 6 m/s |
| Compatible battery BT402L (BAT-40V-2AH) - BT404L (BAT-40V-4AH) |
| Compatible charger CBT400L (CHAR-40V) |
NOTE: GREENCUT reserves the right to modify the technical characteristics without prior notice.
BOX CONTENTS
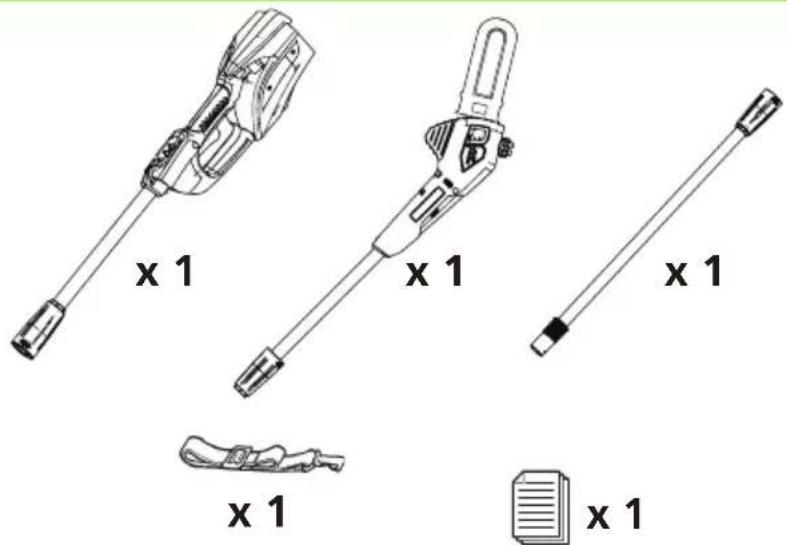
text_image
x 1 x 1 x 1 x 1 x 1 x 1- Remove the product and accessories from the box. Make sure all items are present.
- Inspect the product to ensure that it has not been broken or damaged in transit.
- Do not discard the packaging material until you have carefully inspected and satisfactorily used the product.

ATTENTION: If any part is missing or damaged, please contact the Official Technical Service. Do not use this product without replacing the part. Using this product with damaged or missing parts can cause serious injury to the operator.
ASSEMBLY
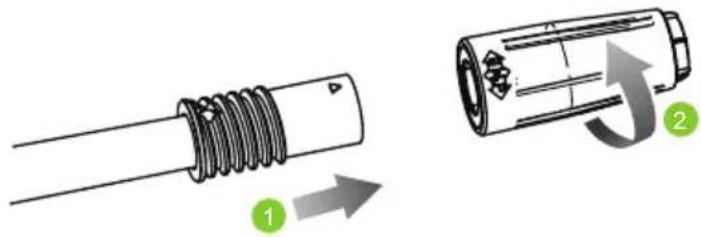
REAR AND FRONT TUBE
- Place the lower tube into the upper tube, note that both the upper and lower tubes have a guide groove.
- Screw on the shaft coupler so that the upper and lower tubes do not swing.
natural_image
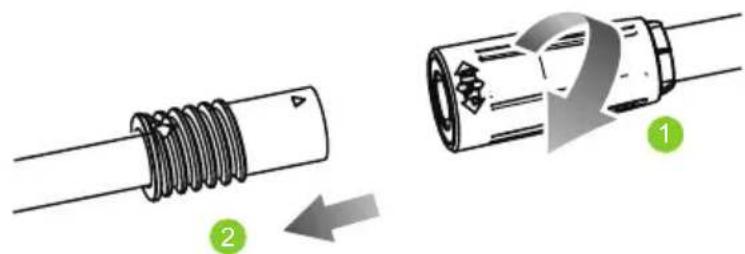
Diagram showing two mechanical components: a coiled spring and a cylindrical housing with directional arrows (no text or symbols)- Loosen the coupler from the shaft, remove the lower tube to separate the upper and lower tube.
text_image
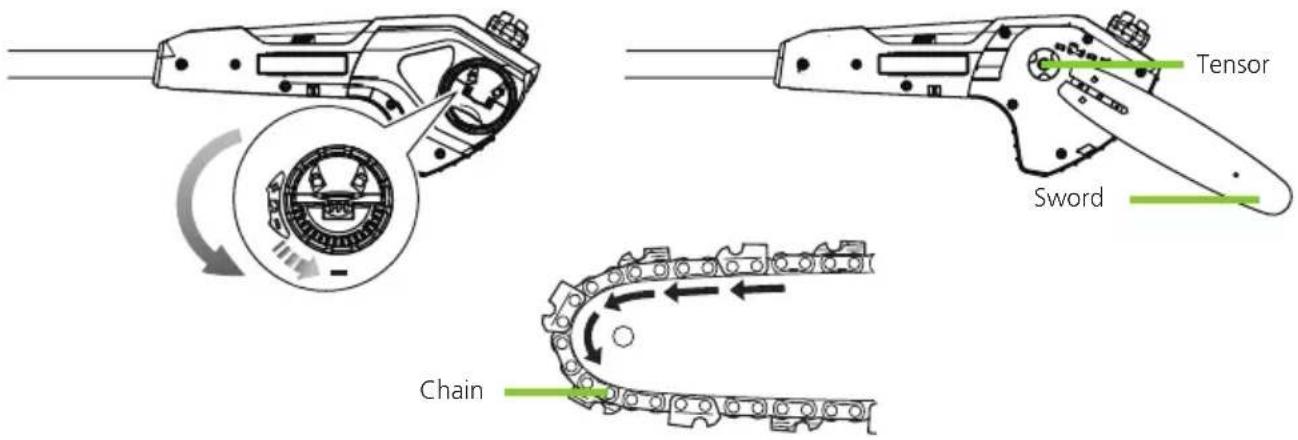
Diagram illustrating two steps of a coiled cable or connector, labeled with arrows and numbered annotations.SWORD AND CHAIN
Install the sword and chain as follows:
- Disassemble the tensioner lock and remove the sprocket cover.
• Install the bar and slide it slowly towards the chain. - Position the chain as shown in the drawing. (Make sure the saw teeth are counterclockwise.
text_image
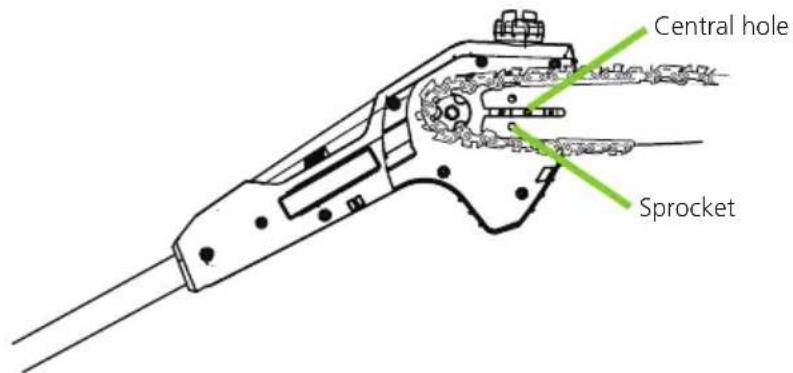
Tensor Sword Chain• Install the sprocket cover on the pin, and turn the sprocket wheel. Make sure the tension block passes through the hole in the bar.
text_image
Central hole Sprocket- Tighten the tension wheel and hold the guide plate.
- Lift the bar and tighten the nuts.
- Turn the chain around the bar. If you feel you are too tense, please loosen the regulator.

natural_image
Diagram of a chain-link robotic device with circular motion arrows indicating rotational cycles (no text or symbols)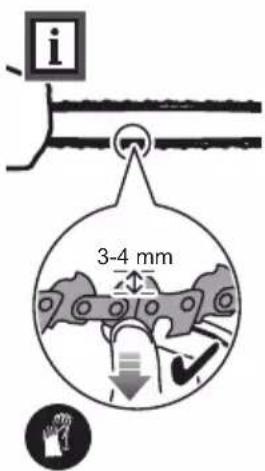
text_image
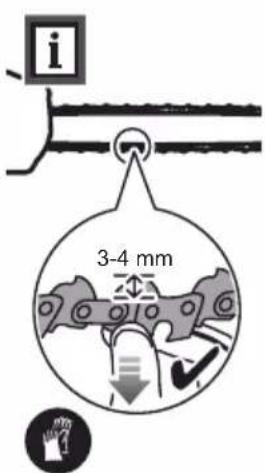
i 3-4 mmMOWER LUBRICATION
- Good lubrication can reduce the frictional force between the saw and the bar and thus extend the service life of your machine.
- Use a high quality professional lubricating oil.
- Do not use old or unknown oil to avoid causing a malfunction.
- In case of emergency, allow dynamo to be used to replace.
- Use Sae30 in summer.
- Use Sae10 in winter or when using the pruner to prune trees with a lot of resin.

PRODUCT USE
START UP
Before starting operation, the battery must be installed in the machine.
To start the machine:
- Press the trigger release button with your thumb.
- Pull the throttle trigger.
Once the throttle trigger is pulled, the trigger release is fixed and you can release it.
MAINTENANCE
Good maintenance will extend the life of the machine. Prolonged or constant use may require more intensive maintenance for the machine to continue to function properly.

ATTENTION: Use only original parts, accessories and manufacturer's couplings. Failure to do so may result in injury, tool malfunction and may void the warranty.

ATTENTION: Repairs require extreme care and knowledge and should only be carried out by a qualified technician. For repairs, we suggest that you return the product to the nearest authorized service center for repair. When carrying out repairs, only use identical spare parts.

ATTENTION: Make sure the engine is completely shut down before performing any maintenance or repair. This will eliminate any potential risk.
• You can make adjustments and repairs described here. For other repairs, please contact the Official Technical Service.
- Before any maintenance or adjustment, deactivate the machine by removing the battery.
- After extending the new cutting line or cleaning, checking the blade, always return the product to its normal operating position before starting any operation.
• After each use, clean the product with a soft, dry cloth.
- Check all nuts, bolts and screws at frequent intervals to ensure that the product is in good working condition. Any damaged parts must be repaired or replaced by an authorized service center.
MAINTENANCE OF THE GUIDE BAR

ATTENTION: Proper maintenance of the guide bar is essential for the good performance of your tool.
Incorrect placement and non-uniform cutter and depth gauge adjustments cause most guide bar problems, resulting in uneven wear of the bar. As the bar wears unevenly, the rails widen, which can cause the chain to make noise and difficulty in making straight cuts. Insufficient lubrication of the guide bar and operation of the saw with a chain that is too tight will contribute to rapid wear of the bar. To help minimize bar wear, maintenance of the guide bar is recommended.
BAR WEAR
Rotate the guide bar frequently at regular intervals (such as after 5 hours of use) to ensure even wear on the top and bottom of the bar.
BAR GROOVES
The bar grooves (or the rails that support and transport the chain) should be cleaned if the tool has been heavily used or if the saw chain appears dirty. The rails should be cleaned each time the chain is removed from the saw.
TO CLEAN THE GUIDE BAR RAILS
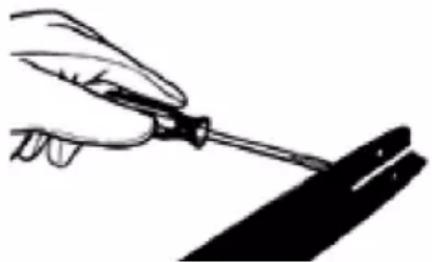
- Remove the sprocket cover, bar and chain. See Replacing / Installing the Saw Chain.
- Use a screwdriver, spatula, wire brush, or similar instrument to clean debris from the rails on the guide bar. This will keep the oil lines open to provide proper lubrication to the bar and chain.
natural_image
Illustration of a hand using a screwdriver to draw a black object (no text or symbols visible)- Reinstall the bar, chain and bar bolt retaining nuts. See Replace saw chain / Installation.
OIL LINES
The oil lines in the bar pad must be cleaned to ensure proper lubrication of the bar and chain during operation. This can be done using a soft wire small enough to be inserted into the oil drain hole.
TROUBLESHOOTING
The table includes some common problems, their causes and solution.
PROBLEM POSSIBILE CAUSE SOLUTION
| The unit does not work | The battery is not in contact.The battery is not correctly installed.Battery not charged. | Check that the battery is fully inserted.Check that the battery is connected correctly.Check the battery charging requirements. |
| The battery does not charge | Battery not inserted in the charger.The charger is not plugged in.Air temperature too hot or too cold. | Insert the battery into the charger until the LED is lit up.Plug the charger into a working outlet.Check the current in the receptacle by plugging in a lamp or other device.Check if the receptacle is connected to a switch that turns off when the lights are turned off.Move the charger and tool to a surrounding air temperature above 50 degrees F (10 degrees C) or below 100 degrees F (+37.8 degrees C). |
| Low power | The battery is uncharged. | Charge the battery. |
NOTE: If you are unable to resolve the problem, please contact the Official Technical Service.
TRANSPORTATION AND STORAGE
• Always disconnect the battery from the machine before transporting it
- Transport the battery in accordance with local and national regulations.
- Follow all special packing and label requirements when transporting batteries for a third party.
- Make sure that no battery can come into contact with other batteries or conductive materials during transport by protecting the exposed connectors with non-conductive insulating caps or tape.
- Do not transport batteries that are cracked or leaking.
- Clean the machine thoroughly before storing it. Store the machine in a dry, well-ventilated place that is inaccessible to children.
- Keep the machine away from corrosive agents, such as garden chemicals and de-icing salts.
• Always place the blade cover on cutting blades before storing.
- Store the battery and charger separately in a dry place, away from moisture and frost.
- Do not store the battery in places where static electricity can be generated. Never transport the battery in a metal box.
- Store the battery in a place away from extreme temperatures, and direct sunlight.
- Store the charger indoors and in a dry place only.
- All batteries gradually lose their charge. Recharge the batteries every 3 months.
RECICLYING AND DISPOSING
Worn products are potentially recyclable and should not be disposed of in the usual waste. Help us to protect the environment and preserve natural resources. Dispose of the device in an environmentally friendly manner. Do not dispose of it with household waste. Its plastic and metal components can be separated and recycled. Take this appliance to an approved recycling centre (green dot).
Gasoline, used oils, oil/gasoline blends and objects stained with gasoline (e.g., rags) should not be disposed of in regular trash, sewage, dirt, rivers, lakes or the sea. Oil-stained items should be disposed of in accordance with local regulations: take them to a recycling center.
The materials used in the packaging of the machine are recyclable: please dispose of them in the appropriate container.
GUARANTEE
GREENCUT guarantees all GREENCUT products for a period of 24 months (valid for Europe). The warranty is subject to the date of purchase taking into account the intended use of the product.
As a condition subject to warranty, the original receipt must be presented indicating the date of purchase and its description as well as the defective tool.
The warranty does not cover normal wear and tear, especially on blades, blade fasteners, turbines, light sources, fan and transmission belts, impellers, air filters, spark plugs and damage caused by improper use, especially non-compliance with operating and maintenance instructions.
In the event that repairs or modifications have been made by the consumer or other than with original GREENCUT spare parts, the warranty will be voided.
In the event of a justified warranty claim, we are entitled, at our discretion, to repair or replace the defective tool free of charge. Other claims beyond this warranty are not valid.
DECLARATION OF CONFORMITY (EC)
PRAT INTERNATIONAL BRANDS S.L. owner of GREENCUT brand, with legal address in Calle Migdia S/N. 43830 – Torredembarra, SPAIN, declares that the pole saw PP400L from 2018 series onwards, is in accordance with the European Parliament Directives and of the Council.
• Directive 2006/42/EC of the European Parliament and of the Council of 17 May 2006 on machinery, and amending Directive 95/16/EC.
• Directive 2014/30/EU of the European Parliament and of the Council of 26 February 2014 on the harmonisation of the laws of the Member States relating to electromagnetic compatibility.
• Directive 2000/14/EC of the European Parliament and of the Council of 8 May 2000 on the approximation of the laws of the Member States relating to the noise emission in the environment by equipment for use outdoors.
The product delivered coincides with the prototype that was submitted to the CE exam.
Torredembarra (SPAIN), 28 November 2017,

Albert Prat Asensio, CEO (Authorized representative and responsible for technical documentation).
GREENCUT®

PRAT INTERNATIONAL BRANDS s.l.
INHALT
natural_image
Diagram of a coiled wire with a directional arrow indicating upward motion (no text or symbols)
natural_image
Diagram of a coiled wire with a labeled component (no text or symbols present)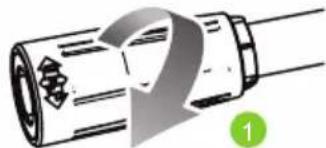
natural_image
Diagram of a cylindrical mechanical component with a curved arrow indicating rotation or force direction (no text or symbols)SCHWERT UND KETTE
natural_image
Diagram of a mechanical tool with gear and circular motion indicators (no text or symbols)