
GS250X-12 - Saw Greencut - Free user manual and instructions
Find the device manual for free GS250X-12 Greencut in PDF.

| Product type | Gasoline chainsaw |
| Brand | Greencut |
| Model | GS250X-12 |
| Dimensions (L × W × H) | 320 × 250 × 250 mm |
| Net weight | 3.75 kg |
| Displacement | 25.4 cm³ |
| Engine power | 1.4 hp |
| Fuel type | Mixture of unleaded 95 gasoline / 2-stroke oil (25:1) |
| Fuel tank capacity | 310 ml |
| Oil tank capacity | 210 ml |
| Guide bar length | 12 inches (304 mm) |
| Chain | Standard 12" (ref. 1000057R04) |
| Maximum rotational speed | 10,000 rpm |
| Idle speed | 3,000 rpm |
| Spark plug | BM6A |
| Ignition | Electronic C.D.I. |
| Chain lubrication | Automatic pump with regulator |
| Included accessories | Guide bar, chain, protector, harness, keys, file, mixing pot, hearing protection, goggles, gloves |
| Warranty | 2 years (Europe) |
| Usage | Non-professional |
Frequently Asked Questions - GS250X-12 Greencut
Important: Never use dirty or improperly mixed fuel.
2. Activate the starter (pull it all the way).
3. Place the machine on a flat surface, with the chain clear.
4. Pull the starter rope slowly until resistance is felt, then pull sharply. Repeat until a brief start.
5. Push the starter back in and restart.
6. Release the chain brake by pulling the lever toward you.
Consult the manual for variations if the engine is hot or flooded.
Tension: The chain should touch the bottom of the guide bar while being liftable 1 to 2 mm in the middle. Use the tensioner after loosening the side screws.
Lubrication: Use special chain oil (SAE 30) and check that the automatic pump works (oil trace on a light surface when accelerating).
Sharpening: Use a suitable file and follow the indicated angles.
If nothing works, consult the troubleshooting section of the manual or contact technical support.
Keep people and animals more than 15 meters away.
Hold the machine with both hands: right hand on the rear handle, left hand on the front handle.
Never cut above shoulder height or with the tip of the guide bar.
Watch out for kickback: do not touch any object with the tip of the guide bar.
Stop the engine before any adjustment or refueling.
A new chain also requires more careful lubrication. Check regularly.
Turn the idle screw (T) clockwise to increase idle, counterclockwise to decrease it.
Do not modify the mixture screws (L and H) unless you are qualified.
Improper adjustment can damage the engine.
Clean external surfaces and apply a light coat of oil to metal parts.
Remove the spark plug, pour 3 ml of oil into the cylinder, pull the rope 2-3 times, then reinstall the spark plug.
Store the machine in a dry place, protected from dust and out of reach of children.
Always protect the guide bar and chain with the cover.
Replace filters every 3 months or when dirty.
The chain should be changed when it no longer cuts effectively or after several sharpenings.
Use only original Greencut parts.
For chain and guide bar replacement, follow the assembly instructions in the manual.
Possible causes: chain too loose, worn guide bar, loose screws, damaged parts.
Also check the anti-vibration dampers.
If you cannot find an obvious cause, take the machine to an authorized service center.
Never ignore vibrations – they indicate a malfunction.
User questions about GS250X-12 Greencut
0 question about this device. Answer the ones you know or ask your own.
Ask a new question about this device
Download the instructions for your Saw in PDF format for free! Find your manual GS250X-12 - Greencut and take your electronic device back in hand. On this page are published all the documents necessary for the use of your device. GS250X-12 by Greencut.
USER MANUAL GS250X-12 Greencut
REPOSTANDO COMBUSTIBLE

ATENCLON
ELIMINATION/RECYCLAGE 38
GARANTIE 38
DECLARATION DE CONFORMITE (CE) 39
INTRODUCTION
Pas 10" CARVING: 1/4" (6,35mm)
10^ / 12^ :3 / 8^ (9,52mm)
Calibre 10" CARVING / 10" / 12": 0,050" (1,27mm)
10" CARVING: 60 dientes
Numero de dents 10":40 dientes
12":44dientes
PRODUCT DESCRIPTION 65
BOX CONTENTS 68
ASSEMBLY 68
PRODUCT OPERATION 70
MAINTENANCE 73
TROUBLESHOOTING 74
TRANSPORTATION AND STORAGE 75
RECICLYING AND DISPOSING 76
GUARANTEE 76
DECLARATION OF CONFORMITY (CE) 77
INTRODUCTION
Thank you for choosing this GREENCUT product. We are sure that you shall appreciate the quality and performance of this machine, which will facilitate your task for a long period of time.
Remember that you can contact our Authorised Service Centre for any queries regarding assembly or maintenance, as well as for the resolution to any problems that may arise, and for the purchase of spare parts and / or accessories.

ATTENTION: Please read these Operating Instructions carefully as well as the Safety Precautions before using this device. The manufacturer will not take responsibility for accidents or injuries caused to the user, third parties, animals or objects, as a result for not following the instructions in this user manual.
This machine is not intended for professional use.
Keep this user manual for future reference. Should you sell this machine in the future, please remember to hand it to the new owner.
SAFETY RULES AND PRECAUTIONS
The following warning signs and their meaning is to explain the levels of risk related to this product.
SYMBOL SIGNAL MEANING

ATTENTION
It indicates a dangerous situation where you need to pay full attention to avoid any kind of personal injuries or damage to the device.

NOTE It indicates useful information which can facilitate your task.

ATTENTION: Read and understand all warnings and safety instructions carefully before using this machine. Failure to follow the warnings and instructions may result in electric shock, fire and/or serious injury.
All information included in this manual is relevant to your own safety and that of your environment. If you have any questions about the information included in this manual, consult a professional or contact the Authorised Service Centre.
The following information on hazards and precautions includes the most probable situations that may arise during the use of this machine.
Check all the documentation, packaging and product labels before using it. If you encounter a situation not described in this manual use common sense to use the machine as safely as possible and, if you see any danger, do not use the machine.
USERS
This machine has been designed to be manipulated by users of legal age who have read and understood these instructions. Do not allow people under age and people who do not understand these instructions to use the machine.
- Familiarise yourself with this machine before using it. Make sure you know where all the controls are, the security devices and how they should be used.
If you are an inexperienced user, it is highly recommend that you practice doing simple jobs and, if possible, in the company of an experienced person.
PERSONAL SAFETY
- Use this machine, accessories, tools, etc. in accordance with these instructions and in the manner provided, taking into account the working conditions and the work to be performed.
- Be alert, watch what you are doing and use common sense when operating this machine. Never use the machine with defective protections or without safety devices.
- Do not modify the controls of this machine.
- Do not use this machine if any of its components are damaged.
- Avoid inhalation of exhaust gases. This machine produces dangerous gases such as carbon monoxide that can cause dizziness, fainting or death.
- Do not use this machine when you are tired or under the influence of drugs, alcohol, or medication.
- Remove all keys or tools from the work area before starting this machine. A nearby key or tool may be touched and projected causing personal injury.
Always maintain proper foot support and operate the machine only when it is on a fixed, secure, level surface. Sliding or unstable surfaces can cause a loss of balance or control of the machine. - When operating from heights, never work on a ladder, tree, or unsafe support and never operate with one hand.
- Keep all body parts away from cutting elements and moving parts when the machine is running. Before starting the machine, make sure that the cutting element is not in contact with any objects. A moment of carelessness during operation may cause your clothing or body part to be cut by the cutting element.
Always hold the saw with your right hand on the rear handle and your left hand on the front handle. Holding the saw with your hands upside down increases the risk of an accident and should never be done. - Check the condition of the tree to prevent dry branches from falling on it while you cut. When cutting a branch that is under tension, be alert to the risk of elastic return. When the tension of the wood fibres is released, the branch, under a spring effect, can hit the operator and/or project the saw out of control.
- Use extreme caution when cutting weeds and young shrubs. Fine materials can trap the saw chain and be projected onto you, or cause you to lose your balance under the effect of traction.
If you are an inexperienced user we recommend that you do a minimal amount of practice cutting logs on a sawhorse or sawing fork. - Do not touch the machine exhaust with the engine running or just after it has stopped.
-
Do not leave this machine unattended during operation. If you have to leave the machine unattended turn off the engine, wait for the cutting tool to stop and unplug the spark plug wire.
-
Do not attempt to remove the cut material from the cutting tool when it is moving. Make sure that the machine is switched off when cleaning up debris.
- Never pick up the machine by the cutting tool. Cutting tools have sharp edges that can hurt you.
WORK CLOTHES
-
Dress appropriately. Do not wear loose clothing or jewelry. Keep your hair and clothing away from moving parts. Loose clothing, jewelry or long hair can be picked up by moving parts.
-
Eye protection (safety glasses/mesh/methacrylate screens).
- Hearing protection (earmuffs/earplugs).
- Head and face protection (helmet and mask).
- Hand protection (gloves/mitons).
- Leg protection (trousers/pants).
-
Foot protection (safety boots).
-
Adequate protective clothing will reduce bodily hazards caused by projected debris or accidental contact with the saw chain.
-
You must take it with you:
-
Tools.
- Signaling tape for the working area.
- Mobile phone (To use in case of emergency).
VIBRATIONS
A high level of vibration and long periods of exposure are the factors contributing to white finger disease (Raynaud's phenomenon). In order to reduce the risk of white finger disease, you need to be aware of these recommendations:
- Always wear gloves.
- Worry about always keeping your hands warm.
- Make sure that the chain is always sharp.
- Take frequent breaks.
- Always hold the machine firmly by the handles.
If you detect any of the symptoms of white finger disease, see your doctor immediately.
WORK AREA SAFETY
- Do not use this machine in explosive atmospheres in the presence of flammable liquids, gases and dust.
- Do not start the machine in a closed room or enclosure. Exhaust gases and fuel vapors contain carbon monoxide and hazardous chemicals.
- The area within a 15-metre radius around the machine must be regarded as a danger zone which must not be entered by anyone while the machine is running (safety zone). When necessary, use ropes and warning signs to mark the safety zone. Keep children and curious persons away while operating this machine. Distractions can cause you to lose control.
- When the work must be performed simultaneously by two or more people, always check the presence and location of the others in order to maintain a sufficient distance between each person to ensure safety.
- Keep the work area clean and work in good lighting. Only use this machine in daylight or with good artificial lighting.
- Remember that the machine operator is responsible for hazards and accidents caused to other people or things. The manufacturer is in no way liable for damage caused by improper or incorrect use of this machine.
FUEL SAFETY
Gasoline and oil are dangerous. Do not inhale or ingest. If you swallow fuel and/or oil, seek medical advice promptly. If it comes into contact with fuel or oil, clean with plenty of soap and water as soon as possible. If irritated eyes or skin occur afterward, consult a doctor immediately.
- Fuel and oil are dangerous and highly flammable chemicals. If they become inflamed, extinguish the fire with a dry powder extinguisher.
- Do not spill fuel or smoke near the machine.
Always turn off the engine before refuelling.
- Always refuel in well-ventilated areas. And never with the engine running, or hot.
- If a fuel leak is found, do not start or run the engine until the leak has been repaired.
- Make sure the fuel cap is properly closed.
- Fuel stored in the carburetor for long periods of time can cause a hard start and may also lead to further repairs and maintenance.
Always store fuel in approved containers.
MAINTENANCE, TRANSPORTATION AND STORAGE SAFETY
- Check that all safety features are installed and in good condition.
- Do not force this machine. Using the right machine for the right type of work will allow you to work better and safer.
- Always keep the machine clean, especially the fuel tank, its surroundings and the air filter.
- Attention! Attention! After the engine has stopped, the muffler will be warm.
- Carry out regular maintenance on the machine. We recommend that maintenance and repairs not described in this manual be performed only by the Official Technical Service.
- Before adjusting or repairing the machine, stop the engine and remove the spark plug wire. These safety precautions reduce the risk of accidentally starting this machine.
- Always make motor adjustments with the unit supported on a flat, clear surface. And never when the unit is in operation.
- Check that moving parts are not misaligned or jammed, that there are no broken parts or other conditions that could affect the operation of the machine. Whenever it is damaged, repair it before use.
- Keep cutting instruments sharp and clean.
- Follow the instructions for lubrication, tensioning and chain change accessories. An incorrectly tensioned and greased chain can break and increase the risk of recoil.
- Keep the handles of this machine dry and clean.
If the machine starts to vibrate strangely, turn it off and examine it for the cause. If you do not see the reason, take your machine to the Official Technical Service. Vibrations are always a sign of a problem on the machine. - Reduce the engine speed when turning off the engine, if the engine is equipped with a fuel shut-off valve, turn off the fuel when the engine has stopped.
- When transporting, hold the chainsaw by the front handle with the machine off, the chain and sword covered with the cover and at a distance from the body parts. When storing the chainsaw, always cover the sword with the cover.
- Store tools out of the reach of children.
UNINVITED REACTIONS WHILE OPERATING WITH THE CHAINSAW
Always be careful when cutting with the chainsaw and be aware of any unexpected reaction forces. There are three unforeseen reaction forces that occur on a chainsaw: rebound, forward pull and recoil.
REBOUND
- If an object is touched with the cutting chain in the area of the tip of the sword while it is running. Contact of the chain on the tip of the sword can cause an unforeseen reaction force that can push the tip of the sword upwards generating a rotating movement that can cause the chain's sword to collide with the user. This reaction can result in loss of control of the machine and severe personal injury.
PULL FORWARD
- When the chain stops abruptly when it is caught in the cutting area by a foreign body in the wood or because it is not cut properly. The chain, when stopped, pushes the saw forward and, if it is not correctly held against the branch or tree by the claw, it causes an unexpected pull that can cause loss of control and severe personal injury.
- To avoid this "pull forward", start cutting at full throttle and always keep the machine at full throttle during cutting and support the saw's claw against the wood to be cut.
REGRESSION
- Backdown can occur if the sword touches an object or when the wood is closed and the chain is stuck in the cut. The tip contact in some cases can cause an extremely fast reverse reaction, moving the sword upwards and towards the user. If the chain is locked in a position on the top edge of the sword, it can be pushed towards the user. In either case, the user may lose control of the machine and be seriously injured.
-
Any of these reactions can cause you to lose control of the saw that could result in a serious personal injury.
These reaction forces are the result of misuse of the tool and/or improper procedures or operating conditions and can be avoided by taking the appropriate precautions specified below: -
Hold the saw firmly with both hands and with both thumbs and fingers around the saw handles and position your body and arms to allow it to withstand unexpected forces.
-
Do not extend your arms too far and do not cut above shoulder height.
-
Always be aware of where the tip of the chain sword is.
- Make sure that the tip of the sword does not touch anything.
-
Do not cut branches with the tip of the sword.
-
Make sure there are no nails or pieces of metal in the cutting area and pay special attention to nails or pieces of iron that may be around the cutting area. Also be careful when cutting hardwood where the chain may become caught and blocked and therefore cause rebound.
-
Start at full throttle and always keep the machine at full throttle during cutting.
- Cut a single branch or piece of wood at a time.
- Use caution when inserting the saw chain into an already started cut to continue.
- Do not cut with the chainsaw until you are familiar with the cutting technique.
-
Do not cut into branches or pieces of wood that may change position during cutting.
-
Keep the chain in good condition.
- Work only if the chain is well sharpened and correctly tensioned.
- Never stand on the cutting plane of the chainsaw.
Use only replacement swords and chains specified by the manufacturer. Incorrectly replaced swords and chains can cause a chain break and/or recoil.
- Follow the manufacturer's instructions for sharpening and maintaining the saw chain.
SERVICING
- Have the machine checked periodically by a qualified technician using only original spare parts. If you have any questions, please contact the Authorised Service Centre.
WARNING SYMBOLS
The warning icons on labels in this machine and/or in the manual indicate the necessary information for the safe use of this machine.

Attention! Danger!

Read this manual carefully before starting or using the machine.

Wear a helmet.

Wear eye and ear protection.

Wear a face mask to protect against dust, steam and other toxic fumes.

Use resistant and anti-slippery gloves.

Wear leg protection and non-slip safety boots with steel protections.

Very hot surface! Risk of burns.

Danger, deadly fumes! Do not use this machine indoors or in inappropriately ventilated places.

Flammable fuel! Risk of fire or explosion. Always shut off the engine before refuelling.

Do not smoke. Keep the machine and fuel away from naked flames.

Check that there are no fuel leaks.

Danger of projection of flying debris. Be careful with all projected materials.

Keep unprotected people away and at a safe distance from the work area.

Keep children away from this machine.

Do not touch the cutting blade.

Guaranteed sound power level XX LWA, dB (A).

Turn off the machine and disconnect it completely before servicing.

Dispose of your device in an environmentally friendly way. This product should not be disposed of with household waste.

Complies with the European Union Directive.
PRODUCT DESCRIPTION
CONDITIONS OF USE
Cut only wood. Do not use the chainsaw for any other purpose not intended. Do not use the chainsaw to cut plastic, bricks or building materials other than wood. Using the chainsaw for other than the intended operations may cause dangerous situations.
DETAILED DESCRIPTION OF THE PRODUCT

- Rear handle
- Throttle lock
- Front handle
- Chain brake
- Chain
- Sword
- Power Button
- Accelerator
- Attaching the harness
-
Cold start assistance
-
Chain tensioner
- Chain damper
- Claw
- Clutch
- Baiter
- Anti-vibration seal
- Starter handle
- Fuel tank cap
- Oil tank cap
- Closing the air filter

NOTE: The products detailed in this manual may vary in appearance, inclusions, description and packaging as shown or described here.


TECHNICAL DATA
| CHAINSAW | |
| Model GS250X | |
| POWER UNIT | |
| Displacement 25,4cc | |
| Power output 1,4cv | |
| Fuel Blend: 95 Gasoline / 2-stroke engine oil: 4%. | |
| Fuel tank capacity 310ml | |
| Oil tank capacity 210ml | |
| Chain oil SAE 30 oil (especially for chainsaw chains) | |
| Carburetor Diaphragm type | |
| Spark plug BM6A | |
| Ignition system Electric starter C.D.I. | |
| Oil supply system Automatic pump with regulator | |
| Sprocket wheel 7T x 0.325" (teeth x pitch) | |
| Dimensions and dimensions 320 x 250 x 250mm (lengthy x width x loud) | |
| Weight 3.75kg | |
| CUTTING HEAD | |
| Sword Type | Toothed wheel end |
| Sword Dimensions | 10" (254mm) / 12"(304mm) |
| CHAINSAW CHAIN | |
| Type | Standard 10" CARVING - 1000057R05 Standard 10" - 11000057R03 Standard 12" - 1000057R04 |
| Step | 10" CARVING: 1/4" (6,35mm) 10" / 12": 3/8" (9,52mm) |
| Calibre | 10" CARVING / 10"/ 12": 0,050" (1,27mm) |
| Number of Teeth | 10" CARVING: 60 teeth 10": 40 teeth 12": 44 teeth |
| Relaxed speed | 3.000rpm |
| Maximum revolutions | 10.000rpm |
BOX CONTENTS

- Chainsaw
- Chain
- Sword
- Protector of the sword
- Harness
- Allen key
- Screwdriver for carburetor adjustment
-
File
-
Spark plug wrench
- Gear lubrication pump (replacement)
- Mixing pot
- Hearing protector
- Glasses
- Gloves
- User's manual
Carefully remove the product and accessories from the box. Make sure that all the items listed above are present.
- Inspect the product to ensure that it has not been broken or damaged in transit.
- Do not discard the packaging material until you have carefully inspected and satisfactorily used the product.

ATTENTION: If any part is missing or damaged, contact the Authorised Service Centre. Do not use this product without having replaced the missing or damaged part. Using this product with damaged or missing parts can cause serious injury to the operator.
ASSEMBLY

ATTENTION: The chainsaw may come with plastic spacers on or around the sword bolts, the spacer is for shipping purposes only and must be removed before mounting the sword. After removing the brake cover, remove the plastic spacers you find and then mount the sword as described. Failure to remove the spacers before mounting and using the chainsaw may result in injury, damage to the unit and void the warranty.
Open the box and install the guide bar and saw into the power unit as follows:
- Pull the chain brake handle toward the back of the saw (or pull toward the back of the saw if the chain brake was installed on the saw).
- Loosen the nuts and remove the unit from the chain brake cover assembly.
- Install the claw (toothed part) on the unit (some models only).
-
Mount the chain on the sprocket and, while adjusting the chain around the guide bar, mount the bar in its housing. The cutting chains are directional, so make sure you have them installed correctly.
-
Adjust the position of the chain tensioner to fit into the chain pin slot.
-
Mount the chain brake cover on the unit. Tighten the side nuts with your fingers, do not tighten them. The sword must be able to move up and down with the fingers.
-
While holding the tip of the sword, adjust the chain tension by turning the tensioning screw on the tensioner until the holding straps touch the bottom of the sword rail. Some chain tensioning screws are located on the front of the unit.
-
You can now tighten the side nuts firmly with the tip of the sword in place.
-
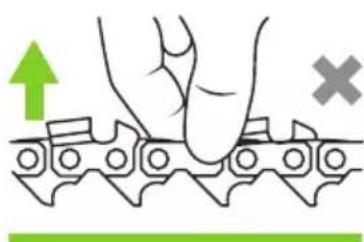
With one gloved hand, check that the chain turns smoothly and is tight. Hold the chain along the top center of the chain saw blade as shown in the picture below and lift it up to check the tension. When released, the chain must quickly snap back into place.

(1) Direction of movement
(2) Loosen
(3) Tighten
(4) Tension nut

- If the chain is too loose or too tight, loosen the nuts before adjusting the chain tensioner. Failure to loosen the nuts will damage the tensioner and void the warranty.


ATTENTION: A new chain will stretch when first used. Check the chain tension regularly with a gloved hand. A loose chain can derail and wear away, as well as wear away the sword. If the chain has to be tightened, always make sure the nuts are loosened before adjusting the chain tensioner.
ADJUST THE CHAIN USING THE CHAIN TENSIONER

ATTENTION
Always wear safety gloves when touching the sharp side of the chain.
- Always disconnect the "spark plug wire" before touching the sharp end of the chain.
- You should check the tension of a new chain within 5 minutes of using it. For an old chain, check the tension every 15 minutes of use.
Always loosen the side nuts before adjusting the chain tensioner.
PRODUCT OPERATION
BEFORE USING
REFUELLING FUEL

ATTENTION
- Use only new, clean, ethanol-free, lead-free 95+ with two-stroke oil (25:1).
- Do not overfill the fuel tank.
- Do not use contaminated sediment or fuel to mix with two-stroke oil.
- Do not allow water or dirt to enter the tank.
-
Tighten the filler cap firmly after adding fuel.
-
Clean the surface around the fuel cap to avoid contamination.
- Slowly loosen the fuel cap. Place it on a clean surface.
- Pour the fuel carefully into the tank. Avoid spills.
- Before replacing the fuel cap, clean and inspect the gasket.
- Immediately replace the fuel filler cap and tighten it by hand. Clean up any fuel spills.
ENGINE START

ATTENTION
- The starter handle can recoil very quickly before you can release it, which can pull your hand strongly towards the engine and cause an injury.
- Do not allow the starter handle to jump backwards, but slowly by hand.
- When starting the engine, make sure that the sharp part is well away from third parties, animals or objects as it may rotate during start-up.
- The cutting edge will engage and rotate when the engine is started and accelerated.
The recoil starter can be damaged by abuse. -
As the engine starts or warms up, it will be possible to restart it, do this several times before starting your work. Motors may run irregularly when cold or when first used.
-
Always remove the sword cover before starting your chainsaw.
- If your chainsaw is equipped with a decompression valve, press it now to help start the engine and start your chainsaw (not required on most models from 2014).
- If your chainsaw has a starter bulb, press it 10 times, this helps with start-up and reduces the number of jerks needed to get started.
- Pull the choke lever all the way out.
- To start the chainsaw, place it on a flat surface. The cutting attachment must not be in contact with the ground to prevent it from blowing off when you start it up and to avoid putting yourself in an unnecessary risk situation.
- To leave the saw on the ground, place your left hand on the handlebar and your right hand on the starter cord. Push its right end toward the rear handle to stabilize the chainsaw.
- Pull the starter rope slowly with your right hand until you feel resistance. Then pull the starter cord a full cycle several times until the engine starts briefly. Pull it upwards, keeping it as vertical as possible, without allowing the rope to catch against the fan housing.
- The engine fires only briefly and dies off again immediately. Push the choke all the way in (some models have a two-stage choke and only reach halfway until the trigger is released to operate the saw).
- Pull the starter cord again until the engine restarts.
-
As soon as the engine has started and is running, touch the throttle trigger briefly with your index finger. (The throttle lever will return to the normal idle setting if equipped with a two-stage throttle).
-
Then slowly lift the chainsaw up, taking care not to touch the throttle trigger.
- Release the chain brake by pulling the chain brake handle towards you with your left hand. Hold the handlebar with your left hand while doing this. When you hear a sound like a click, it means that the chain has been released and you can activate the sword.
- Before starting, check the chain lubrication. Hold the saw against a light-colored background, such as a tree trunk or piece of paper, on the ground and open the throttle fully. If this background shows chain lubricant, you can start working.
- The saw is now ready for use. For safe work practices, refer to the manual.
QUICK START
- Fill the fuel tank with fuel.
- Fill the oil.
- Turn the ON/OFF button on.
- Pull the starter rope outwards.
- The first time you will have to pull the rope until the fuel has passed through the system.
- Once the engine starts, push the rope all the way in until the engine starts and is running.
IF THE ENGINE FAILS TO START
Repeat the appropriate starting procedure (hot or cold engine). If the engine does not start after frequent attempts, the engine may be drowned (too much fuel in the engine). If you suspect that your engine is drowned go to the next section "Starting a drowned engine".
STARTING A DROWNED ENGINE

ATTENTION: Incorrect installation of the spark plug can cause serious engine damage.
- Pull the "spark plug" of the "spark plug".
- Using a spark plug wrench, remove the "spark plug" (turn it counterclockwise to remove it).
- Push the choke lever down.
- Hold the throttle trigger fully (full throttle)
- Pull the starter handle quickly with your right hand to expel/remove excess fuel from the combustion chamber.
- Wipe the spark plug clean with a cloth to remove any excess fuel or oil deposits.
- Reinstall the "spark plug" and tighten it firmly, tighten it by hand plus 1/3 turn with the spark plug wrench.
- Repeat the WARM ENGINE starting procedure above.
- If the engine still does not start, refer to the identification and troubleshooting section.
STOPPING THE ENGINE

ATTENTION: The cutterbar continues to rotate for a short period of time after the throttle is released or the engine is turned off (steering wheel effect).
Stop the engine by turning the switch to the "OFF" position.
FILLING WITH FUEL
- Clean the surface around the fuel cap to avoid contamination.
- Slowly loosen the fuel filler cap. Place the cap on a clean surface.
- Pour the fuel carefully into the tank. Avoid spills.
- Before replacing the fuel cap, clean and inspect the gasket.
- Immediately replace the fuel cap and tighten it by hand. Clean up any fuel spills.
CHECK AND ADJUST IDLE SPEED
Start the engine and leave it idle for about two or three minutes, or until it warms up.
NOTE: The screws of the mix are identified by the symbols L (low speed), H (high speed) and T (accelerator), symbols that can be seen on the side of the chainsaw. Do not touch the H and L screws.
- If the cutterbar rotates quickly while the engine is idling, reduce idle speed by turning the throttle countercount clockwise if necessary.
- If the engine stalls, increase the idle speed by turning the throttle screw clockwise.
CARBURETOR ADJUSTMENT
ATTENTION: The cutterbar can rotate when the engine is at idle speed.
i NOTE
- The engine will return to idle speed after the throttle trigger is released.
- You may require a moderate level of mechanical knowledge for the maintenance of your machine, if in doubt, please contact the Oficial Technical Service.
- As a rule, the engine idle speed should be reduced to a minimum so that the cutterbar does not rotate quickly and the engine is only "running".
TURN THE IDLE AND MIXTURE SCREWS TO THE FACTORY SETTINGS
- Turn the idle speed screw clockwise until it starts to tighten (do not tighten).
- Turn the idle speed screw counterclockwise 5 turns.
- Turn the mixing screw clockwise until it starts to tighten (do not tighten).
- Turn the mixing screw counterclockwise. L 2,5 turns and H 1,25 turns.
NOTE: For high altitudes it is recommended to use low (3 times) and high (1.5 times)
- Now start the engine.
- Make sure the choke is down and the engine is warm.
- Pull the throttle trigger fully (full throttle).
- With the engine running at full speed, turn the mixing screw clockwise until the engine is running at full speed.
ATTENTION: Prevent engine damage once the engine is running at full speed, turn the mix screw counter clockwise 1/4 turn.
- For a good idle speed adjustment, place a cutting head and adjust the idle screw to minimize idle tool movement while keeping the engine running smoothly.
MAINTENANCE
| MAINTENANCE EACH USE | EVERY MONTHOR 12H. USE | EVERY 3MONTHSOR 30H. USE | EVERY 6MONTHS OR60H. USE | EVERY 12MONTHS OR100H. USE | |
| Check for loose nuts and/or bolts | Check | ||||
| Tighten all nuts and bolts Complete Replace | |||||
| Air filter Check Clean / Replace if necessary | |||||
| Fuel filter (if equipped) Check Replace | |||||
| Spark plug Check Replace | |||||
| Cleaning the fuel tank Complete Replace | |||||
| Fuel line Check Replace if necessary | |||||
| Chain Check Replace if necessary | |||||
| Adjusting the idle speed Adjust | |||||
| Regular carburation Check | |||||
| Cleaning the combustion chamber | Check Replace | ||||

ATTENTION
Always wear gloves when working around the blade assembly.
- Before performing any maintenance, repair or cleaning work on the unit, make sure that the motor and cutting attachment are completely stopped. Disconnect the spark plug cable before carrying out any maintenance work.
- Use only original spare parts for this machine.
- Operating the engine without a muffler or with a damaged muffler installed can increase engine noise enough to cause hearing loss.

NOTE: This machine must never operate with a defective or missing spark arrester or muffler. Make sure the muffler is properly secured and in good condition. A damaged muffler is a fire hazard and can cause hearing loss.
- Carefully remove any accumulated dirt or debris from the muffler and fuel tank. The accumulation of dirt in these can lead to engine overheating, fire or premature wear.
- Check for loose or missing screws or components.
- Make sure the cutting attachment is clean and securely fastened.
- Check the entire machine for leaks of fuel or grease.
-
Make sure the nuts, bolts and screws (except the carburetor adjusting screws) are tightened.
-
Clean any dirt or debris from the hedge trimmer blades.
- Lubricate blades before use and after refueling.
- Check that the blades are not damaged or that there is no incorrect adjustment.
- Make sure the cutter attachment is securely fastened.
- Keep the spark plug and cable connections tight and clean.
- Clean all dirt and debris from the engine, check that the cooling fins and air filter are not clogged and clean them if necessary.

NOTE: Under severe machine operating conditions (high temperatures, dusty areas, etc.), shorter maintenance intervals are required.
TROUBLESHOOTING
Good maintenance will extend the useful life of the machine. Prolonged or regular use may require more intensive maintenance so that the machine continues to function properly. The table includes some of the most common problems, their causes and solutions. If the machine does not start:
ENGINE DOES NOT START
| PROBLEM POSSIBLE CAUSE SOLUTION | ||
| The engine won't start? | A. Retractable starter defective. | Take the machine to an Official Technical Service. |
| B. Fluid in the crankcase. | ||
| C. Internal damage. | ||
| No good compression? | A. Spark plug loose. | Tighten and retest. |
| B. Excessive wear of cylinder, piston, rings. | ||
| Does the tank contain no fresh fuel or the correct grade? | Incorrect, past, or contaminated fuel, incorrect mixture. | Fill the tank with the correct grade of new fuel/oil mixture. |
| Is there a spark in the plug terminal? | A. The power switch is in the “OFF” position. | Move the switch to the "ON" position and restart. |
| B. Short-circuit/earth problems. | ||
| C. The ignition unit is defective. | ||
| Check the spark plug. | A. If the plug is wet, there may be excess fuel in the cylinder. | 1. Unplug the motor crank handle, reinstall the plug and restart. |
| B. The plug is dirty or opened incorrectly. | 2. Clean and replace the plug at 0.6mm-0.7mm and reset. | |
| C. The plug is damaged internally or incorrectly sized. | ||

NOTE: If the engine still does not run, take the machine to an Authorised Service Centre.
LOW POWER
PROBLEM POSSIBLE CAUSE SOLUTION
| Does the engine overheat? | The operator is overoperating with the machine. | Cut at a slower speed. |
| The carburetor mixture is too lean. | Take the machine to an Official Technical Service. | |
| The fan, fan cover, or cylinder is dirty or damaged. | Clean or replace as necessary. | |
| The engine knocks or makes noises | He's overheated. | Check that the fuel is the correct octane rating, check that there is no alcohol in the fuel. |
| Incorrect fuel. | ||
| Carbon deposits in the combustion chamber. | Fill the machine with the correct fuel. | |
| The engine does not run normally at all speeds. Black smoke or uncarbonated fuel escapes from the exhaust pipe. | There are carbon deposits on the piston or muffler. | Take the machine to an Official Technical Service. |
| The air filter element is clogged. | Clean or replace the air filter. | |
| Spark plug is loose or damaged. | Tighten or replace the spark plug and restart the machine. | |
| Air escapes or the fuel line is stuck. | Repair or replace the fuel filter and/or fuel line. | |
| There's water in the fuel. | Fill the tank with the correct fuel/oil mixture. | |
| The piston is sticking. | ||
| Defective carburetor and/or diaphragm. | ||
| The fuel mixture for a two-stroke engine is incorrect. | Take the machine to an authorized Service Facility. |
i NOTA: If the engine still does not run, take the machine to an Authorised Service Centre.
TRANSPORTATION AND STORAGE
TRANSPORT
- Never transport the machine whilst it is running.
- Wait 5 minutes after turning the engine off before transporting the machine.
If you are going to transport the machine in a vehicle, secure it firmly to avoid it sliding or turning itself over. Make sure the cutting elements have their protective covers on.
STORAGE
- Do not store the machine near flammable materials (dry grass, wood, etc.), gas or combustible materials.
-
Store this tool in a place not accessible to children and safe in a manner that will not endanger anyone and that is dry, clean and at a temperature between 0^ and 45^ .
-
Always store the machine with the cutting element protection installed.
If the machine is to be stored in an enclosed area, empty the fuel. If the fuel tank has to be emptied, this should be done outdoors and in accordance with recycling regulations.
Storage from 30 days without use:
- Clean the outer parts thoroughly and apply a light layer of oil to all metal surfaces.
- Remove the spark plug and put about 3ml of oil into the cylinder through the hole in the spark plug. Slowly pull the starter cable out 2 or 3 times so that the oil covers the inside of the engine evenly. Reinstall the spark plug.
- Blow dust/waste from the air filter element using compressed air if present.
- Store the machine in a clean, dry, dust-free place.
- Always make sure the chainsaw has the proper cover on the sword and chain assembly.
RECICLYING AND DISPOSING
Worn products are potentially recyclable and should not be disposed of in the usual bin. Help us protect the environment and preserve natural resources.
Dispos of the apian in an environmentaly friendly way. Do not throw it away with the household rubbish. It plastic and metal components can be separated and recycled. Take this device to an approved recycling centre (green point).
Gasoline, used oils, oil / gasoline mixtures as well as objects stained with gasoline (e.g.: rags) should not be disposed of in the usual trash, drainage, land, rivers, lake or sea. Objects stained with oil should be disposed of in accordance with local regulations: take them to the most appropriate recycling centre.
The materials used in the packaging of the machine are recyclable: please throw them in the appropriate container.
GUARANTEE
GREENCUT guarantees all products for a period of 2 years (valid for Europe). This guarantee is subject to the purchasing date and taking into consideration the purpose of use of the product.
In order to claim your guarantee, you must present your receipt of purchase and its description, as well as the defective product.
The guarantee does not cover normal wear and tear, especially on blades, blade elements, turbines, lighting sources, vent and transmission belts, impellers, air filters, spark plugs and damage caused due to improper use of the machine, especially due to failure to comply with the operating and maintenance instructions.
In the event that repairs or modifications have been made by the consumer or any other than with the original GREENCUT spare parts, the guarantee will be voided.
In the event of a justified guarantee claim, we are authorised, at our discretion, to repair or replace the defective tool free of charge. Claims beyond those described in this guarantee will be invalid.
DECLARATION OF CONFORMITY (CE)
PRAT INTERNATIONAL BRANDS S.L., owner of the brand GREENCUT, based in Calle Migdia S/N. 43830 - Torredembarra, SPAIN, we declare that the GS250X chainsaw, from the serial number 2016 onwards, is in conformity with the requirements of the applicable European Parliament and Council Directives:
- Directive 2006/42/EC of the European Parliament and of the Council of 17 May 2006 on machinery, and amending Directive 95/16/EC.
- Directive 2004/108/EC of the European Parliament and of the Council of 15 December 2004 on the approximation of the laws of the Member States relating to electromagnetic compatibility.
- Directive 2000/14/EC of the European Parliament and of the Council of 8 May 2000 on the approximation of the laws of the Member States relating to the noise emission in the environment by equipment for use outdoors.
- Directive 2012/46/EU of 6 December 2012 amending Directive 97/68/EC of the European Parliament and of the Council on the approximation of the laws of the Member States relating to measures against the emission of gaseous and particulate pollutants from internal combustion engines to be installed in non-road mobile machinery.
Harmonised standards:
EN ISO 11681-1:2011, EN ISO 11681-2:2011, EN 55012:2007+A1:2009, EN 61000-6-1:2007
The product delivered coincides with the prototype that was submitted for CE exam.
Torredembarra, 14 September 2016

Albert Prat Asensio, CEO (Authorised representative and responsible for technical documentation).
GREENCUT

PRAT INTERNATIONAL BRANDS S.L.
GREENCUT
www.greencut.es


