
GS200L - Saw Greencut - Free user manual and instructions
Find the device manual for free GS200L Greencut in PDF.

User questions about GS200L Greencut
0 question about this device. Answer the ones you know or ask your own.
Ask a new question about this device
Download the instructions for your Saw in PDF format for free! Find your manual GS200L - Greencut and take your electronic device back in hand. On this page are published all the documents necessary for the use of your device. GS200L by Greencut.
USER MANUAL GS200L Greencut
natural_image
Line drawing of a chainsaw with visible blade and handle (no text or symbols)GS200L
ES
Barra guía 254mm (10in)
natural_image
Illustration of a chain-link robotic device with a circular inset showing a gear and a small arrow (no text or symbols)natural_image
Close-up of a chain drive with a highlighted mechanical component (no text or symbols visible)natural_image
Close-up of a chain-linker with green arrows pointing to specific parts (no text or symbols visible)USO DEL PRODUCTO
PONER ACEITE LUBRICANTE DE CADENA

natural_image
Close-up of a gray electric shaver with black components and a green arrow indicating a specific part (no text or symbols visible)natural_image
Close-up of a mechanical device with a green label pointing to a numbered component (17), no readable text or symbols present.INDICADORES DE LA CARGA
natural_image
3D rendering of a chain-linking tool with labeled parts (11 and 12), no readable text or symbols beyond labelsFRENO DE CADENA
text_image
Diagram illustrating a mechanical or electrical hazard symbol with labeled arrows and a gear mechanism.natural_image
Diagram of a chain with circular flow arrows indicating direction (no text or symbols)EMPUJAR LA SIERRA
natural_image
Diagram of a chain with circular motion arrows indicating movement (no text or symbols)TALA DE UN ÁRBOL
text_image
1 2 2 in (5 cm)ES
TRONCOS APOYADOS

natural_image
Illustration of a chain with a circular inset showing a vehicle (no text or symbols)natural_image
Close-up of a chain drive with green arrows indicating motion, no visible text or symbolsnatural_image
Close-up of a chain-linker with green arrows pointing to specific parts (no text or symbols visible)USAGE DU PRODUIT
METTRE DE L'HUILE DE LUBRIFICATION POUR CHAÎNES

natural_image
Close-up of a gray industrial power tool with black components and a green arrow indicating a specific part (no visible text or symbols)INSTALLATION DES PILES

natural_image
Close-up of a handheld electronic device with a green arrow pointing to the number 17 (no visible text or symbols on the device itself)INDICATEURS DE CHARGE
natural_image
3D rendering of a chain-linking tool with labeled parts (11 and 12), no readable text or symbols beyond labelsFREIN DE CHAÎNE
text_image
Diagram illustrating a mechanical or electrical hazard symbol with labeled arrows and a chain link mechanism.natural_image
Diagram showing a chain with arrows indicating direction, and a circular object with concentric rings (no text or symbols)POUSSER LA SCIE
natural_image
Diagram of a mechanical conveyor belt with directional arrows indicating motion (no text or symbols)L'ABATTAGE D'UN ARBRE
text_image
1 2 2 in (5 cm)MALLES SUPPORTÉES

PROBLÈME POSSIBLE CAUSE SOLUTION
Barra guida 254mm (10in)
natural_image
Illustration of a chain with a circular inset showing a vehicle and a number 97 (no text or symbols on the diagram itself)text_image
Diagram of a chain drive with labeled components and a small inset showing a vehicle outline.natural_image
Close-up of a chain-linking machine with green arrows pointing to specific parts (no text or symbols visible)USO DEL PRODOTTO
METTERE OLIO LUBRIFICANTE PER CATENE

natural_image
Close-up of a gray industrial machine component with black handle and green arrow indicating motion (no visible text or symbols)natural_image
Close-up of a handheld electronic device with a green arrow pointing to the number 17 (no visible text or symbols on the device itself)natural_image
3D rendering of a chain-linking tool with labeled parts (11 and 12), no readable text or symbols beyond labelsFRENO A CATENA
text_image
Diagram illustrating a mechanical or electrical hazard symbol with labeled arrows and motion indicatorsnatural_image
Diagram of a chain with circular components and directional arrows indicating flow or movement (no text or symbols)SPINGERE LA SEGA
natural_image
Diagram of a mechanical component with circular flow arrows indicating motion (no text or symbols)ABBATTIMENTO DI UN ALBERO
text_image
1 2 2 in (5 cm)TRONCHI SUPPORTATI

PRODUCT DESCRIPTION 60
BOX CONTENTS 61
ASSEMBLY 62
PRODUCT USE 63
MAINTENANCE 66
TROUBLESHOOTING 67
TRANSPORTATION AND STORAGE 68
RECYCLING AND DISPOSING 68
GUARANTEE 68
DECLARATION OF CONFORMITY (EC) 69
INTRODUCTION
Thank you for choosing this GREENCUT product. We are confident that you will appreciate its quality and meet your needs for a long period of time.
Remember that you can contact our Official Technical Service for questions about assembly, use, maintenance, identification and troubleshooting and for the purchase of spare parts and/or accessories.

ATTENTION: Please read this manual carefully before using the product. Failure to comply with the operating instructions and safety warnings may result in damage to the user and/or the product itself. The manufacturer is not responsible for accidents and damage to the user, third parties and objects resulting from ignoring the contents of this manual.
This product is not intended for professional use.
Keep this instruction manual for future reference. If you sell this product, remember to give this manual to the new owner.
SAFETY RULES AND PRECAUTIONS
The following symbols and signal words and their meanings are intended to explain the hazards and information related to this product.
SYMBOL WORD MEANING

ATTENTION
It indicates a dangerous situation where you need to pay full attention to avoid any kind of personal injuries or damage to the device.

NOTE It indicates useful information which can facilitate your task.

ATTENTION: Read and understand all warnings and safety instructions before using this product. Failure to do so may result in electric shock, fire and/or serious injury.
All information included in this manual is relevant to your own safety and that of your environment. If you have any questions about the information included in this manual, consult a professional or contact the Authorised Service Centre.
The following information on hazards and precautions includes the most probable situations that may arise during the use of this machine. Consult all the documentation, packaging and product labels before using it.
If you encounter a situation not described in this manual use common sense to use the machine as safely as possible and, if you see danger, do not use the machine.
USERS
- This machine has been designed to be manipulated only by users of legal age who have read and understood these instructions. Do not allow people who may not understand these instructions or under age to use this machine.
- Familiarize yourself with this machine before using it. Make sure you know the controls and safety devices and how they should be used.
- If you are an inexperienced user, we recommend that you do some practice doing simple jobs and, if possible, in the company of an experienced person.
PERSONAL SAFETY
- Be alert, watch what you are doing and use common sense when operating this machine. Never use the machine with defective guards or without safety devices.
- Do not modify the controls of this machine.
- Do not use this machine if any of its components are damaged.
- Do not use this machine when you are tired or under the influence of drugs, alcohol or medicines.
- Remove all keys or hand tools from the work area before starting this machine. A key or tool that is nearby may be touched by a moving part of the machine and be projected causing personal injury.
- Avoid unintentional starting of the machine, make sure the machine and power supply switches are in the OFF position before connecting or moving the product.
- Always ensure that you maintain good balance and are in a safe position. Always maintain proper foot support and operate the machine only when it is on a fixed, safe and level surface. Slippery or unstable surfaces can cause a loss of balance or control of the machine.
- Position your body and arm to resist the forces of recoil.
- Keep all parts of your body away from the chain when the machine is running. Before you start the chainsaw, make sure the chain is not in contact with any object.
- The cutting device on this machine is sharp. Keep all parts of the body away from cutting elements and moving parts when the machine is running. Before starting the machine, make sure that the cutting element is not in contact with any object.
• Always hold the saw with your right hand on the rear handle and your left hand on the front handle. - Do not exceed and do not cut above shoulder height. This helps prevent unintentional contact with the tip and allows better control of the saw in unexpected situations.
- Do not leave this machine running unattended.
- Do not attempt to remove the cut material from the cutting tool when it is in motion. Be sure the machine is turned off when cleaning up material residues.
- Never hold the machine by the cutting tool. The cutting tools have sharp edges that can hurt you.
• Always cut at full engine power and keep the speed constant.
WORKWEAR
• Dress appropriately. Do not wear loose clothing or jewellery. Keep your hair and clothes away from moving parts. Use:
- Eye protection (safety glasses / mesh / methacrylate screens).
-
Hearing protection (earmuffs / earplugs).
-
Head and face protection (hard hat and mask).
- Hand protection (gloves / mittens).
- Leg protection (trousers / chaps).
- Protection for the feet (safety boots).
VIBRATIONS
- A high level of vibrations and long periods of exposure are factors that contribute to the medical condition known as “white finger” (Raynaud’s phenomenon). In order to reduce the risk of white finger/toe disease, it is necessary to take these recommendations into account:
- Always wear gloves.
- Always be sure your hands stay warm.
- Take frequent breaks.
- Always hold the machine firmly by the handles.
- If you detect some of the symptoms of white finger/toe disease, consult your doctor immediately.
WORK AREA SAFETY
- Do not use this machine in an explosive atmosphere in the presence of flammable liquids, gases and dust. Electric machines create sparks that can ignite dust or fumes.
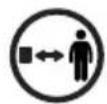
- The area within a radius of 15 metres around the machine must be considered a hazardous area in which no one should enter while the machine is running (safety area). When necessary, use ropes and warning signs to mark the safety zone. Keep children and curious people away while operating this machine. Distractions can cause you to lose control.
- When work must be performed simultaneously by two or more people, always check the presence and location of the others in order to maintain sufficient distance between each person to ensure safety.
- Keep the work area clean and work in good lighting. Only use this machine in daylight or with good artificial lighting. Do not use this machine at night, in fog or in poor visibility that does not allow you to see clearly the work area.
- Check the working area before you mow the lawn and remove any objects (stones, wood, etc.) that may be thrown by the mower or otherwise damage it.
• After hitting a foreign object, stop the engine. Inspect the mower thoroughly for any damage.
CARE, TRANSPORTATION AND STORAGE OF THE MACHINE
- Use this machine, accessories, tools, etc. in accordance with these instructions and in the manner intended, taking into account the working conditions and the work to be performed.
- Check that all the safety elements are installed and in good condition.
- Do not force this machine. Use this machine for the correct application. Using the correct machine for the type of work to be done will allow you to work better and safer.
- Carry out regular maintenance of the machine. Do not attempt any maintenance or repair work that is not described in the instruction manual. We recommend that maintenance and repairs not described in this manual be carried out exclusively by the Official Technical Service.
- Do not clean the machine with solvents, flammable liquids or hard abrasives.
- Inspect the machine before each use and check that it is not misaligned, that there are loose or jammed parts, or that there is no wear or damage that could affect its proper operation. If the machine is damaged, have it repaired by an authorised technical centre before using it again.
- Keep cutting tools sharp and clean. Good maintenance of cutting tools reduces the likelihood of incidents by making them easier to control.
- Spare parts must be original to ensure that the equipment is safe.
-
Keep the handlebars of this machine dry and clean. Greasy or oily handlebars are slippery and cause loss of control over the machine.
-
Store inactive tools out of the reach of children.
- Read the instructions for lubricating, tightening and changing accessories. An improperly tensioned or lubricated chain can break or increase the possibility of kickback.
UNINVITED REACTIONS WHILE OPERATING WITH THE CHAINSAW
- Always be careful when cutting with the chainsaw and be aware of any unexpected reaction forces. There are three unforeseen reaction forces that occur on a chainsaw: rebound, forward pull and recoil.
REBOUND
- If an object is touched with the cutting chain in the area of the tip of the sword while it is running. Contact of the chain on the tip of the sword can cause an unforeseen reaction force that can push the tip of the sword upwards generating a rotating movement that can cause the chain's sword to collide with the user. This reaction can result in loss of control of the machine and severe personal injury.
PULL FORWARD
- When the chain stops abruptly when it is caught in the cutting area by a foreign body in the wood or because it is not cut properly. The chain, when stopped, pushes the saw forward and, if it is not correctly held against the branch or tree by the claw, it causes an unexpected pull that can cause loss of control and severe personal injury.
- To avoid this "pull forward", start cutting at full throttle and always keep the machine at full throttle during cutting and support the saw's claw against the wood to be cut.
REGRESSION
- Backdown can occur if the sword touches an object or when the wood is closed and the chain is stuck in the cut. The tip contact in some cases can cause an extremely fast reverse reaction, moving the sword upwards and towards the user. If the chain is locked in a position on the top edge of the sword, it can be pushed towards the user. In either case, the user may lose control of the machine and be seriously injured.
- Any of these reactions can cause you to lose control of the saw that could result in a serious personal injury.
-
These reaction forces are the result of misuse of the tool and/or improper procedures or operating conditions and can be avoided by taking the appropriate precautions specified below:
-
Hold the saw firmly with both hands and with both thumbs and fingers around the saw handles and position your body and arms to allow it to withstand unexpected forces.
- Do not extend your arms too far and do not cut above shoulder height.
- Always be aware of where the tip of the chain sword is.
- Make sure that the tip of the sword does not touch anything.
- Do not cut branches with the tip of the sword.
- Make sure there are no nails or pieces of metal in the cutting area and pay special attention to nails or pieces of iron that may be around the cutting area. Also be careful when cutting hardwood where the chain may become caught and blocked and therefore cause rebound.
- Start at full throttle and always keep the machine at full throttle during cutting.
- Cut a single branch or piece of wood at a time.
- Use caution when inserting the saw chain into an already started cut to continue.
- Do not cut with the chainsaw until you are familiar with the cutting technique.
- Do not cut into branches or pieces of wood that may change position during cutting.
- Keep the chain in good condition.
- Work only if the chain is well sharpened and correctly tensioned.
- Never stand on the cutting plane of the chainsaw.
- Use only replacement swords and chains specified by the manufacturer. Incorrectly replaced swords and chains can cause a chain break and/or recoil.
- Follow the manufacturer's instructions for sharpening and maintaining the saw chain.
ELECTRICAL SAFETY
- Never modify the plug in any way. Unmodified plugs and matching sockets will reduce the risk of electric shock. If you discover any damage, send your machine to the Official Technical Service.
- Do not open or attempt to repair the battery or battery charger.
- Protect the battery and charger from moisture. Keep the battery away from extreme heat and cold.
- Only charge the battery at an ambient temperature (surrounding air) between 0^ and 40^ .
- Do not use the cable to carry, lift or unplug the charger. Keep the cable away from heat, oil, sharp edges or moving parts. Damaged or entangled cables increase the risk of electric shock.
- Do not operate the battery charger outdoors.
- When not in use or before cleaning and repairing, disconnect the charger from the power source. Take special care with the battery.
- Store the battery in a dry place between 10^ and 30^ when not in use.
- This battery is sealed and no liquid should ever leak from it. If the seal is broken and the liquid touches your skin quickly, wash with plenty of soap and water, neutralise the liquid with a weak acid such as lemon or vinegar and go to your medical centre urgently. If the battery liquid touches your eyes, wash them thoroughly with water for 10 minutes and call for medical assistance immediately.
- The battery should be recharged when it does not produce enough energy for the work that was easily done before. Do not continue to use the product with a dead battery.
- The battery is not fully charged at the factory, before attempting to use it fully charge it first.
- Never switch on the device during the charging process.
- Use only batteries and chargers approved by the manufacturer.
SERVICE
- Have the machine checked periodically by a qualified technician using only original spare parts. If you have any questions, please contact the Authorised Service Centre.
WARNING ICONS
The icons on the warning labels on this machine and/or in the manual indicate information necessary for the safe use of this machine.

Attention danger!
People who are not properly protected should be at a safe distance.

Read this manual carefully before starting the machine.

Keep children away from the machine.

Wear a hard hat.

Before starting the machine, remove all stones, wood, cables and foreign objects that may be thrown by the cutting tool.

Wear eye and ear protection.
Danger! Risk of amputation of the fingers. Keep your feet and hands away from the cutting tool.

Wear a face mask to protect against dust, steam and other toxic gases.
Do not allow your hands or any other part of your body to get near the moving parts of the machine.

Wear resistant, non-slip gloves.
Before performing maintenance or repair work on the machine, turn it off and remove the battery.

Wear leg protection and non-slip safety boots with steel protections.

Guaranteed sound power level XX Lwa, dB (A).

Do not expose to rain or damp conditions.
Dispose of your device in an environmentally friendly way. Do not throw it into the household rubbish containers.
Danger of electrocution! Never project water on power tools and power cords.

This machine complies with the CE directives.
PRODUCT DESCRIPTION
CONDITIONS OF USE
Cut only wood. Do not use the chainsaw for any other purpose. Do not use the chainsaw to cut plastic materials, bricks or building materials other than wood. Any other use than that described above can lead to dangerous situations and exempts the manufacturer from any liability.
DETAILED DESCRIPTION OF THE PRODUCT

- Rear handle
- Oil tank cover
- Front protector / chain brake
- Chain
- Sword
- Chain tensioner
- Blocking the sword
- Sprocket cover
- Oil level
-
Rear bumper
-
Trigger lock/unlock
- On/off trigger
- Battery
- Front handle
- Battery level
- Battery indicator
- Battery lock
- Charge indicator
- Battery charger

NOTE: The products detailed in this manual may vary in appearance, inclusions, description and packaging as shown or described here.
TECHNICAL DATA
GS200L
Idle speed 2300rpm
Guide bar 254mm (10in)
Cutting speed 5m/s
Oil capacity 180ml
Sword Type 12"Oregon (304mm)
Sound power level <96 dB(A)
Weight 3,7Kg
BATERÍA
Type Li-Ion
Nominal voltage 20 V
Capacity 4000 mAh
Charging time 120 min
Compatible battery BT202L - BT204L
CARGADOR
Nominal voltage 230 V\~, 60 Hz
Nominal power 140W
Load current 2,4 A
Protection class II
Compatible charger CBT200L

NOTE: GREENCUT reserves the right to modify the technical characteristics without prior notice.
BOX CONTENTS
- Chainsaw
- Battery
- Charger
-
Instruction manual
-
Remove the product and accessories from the box carefully. Make sure all the items listed above are present.
• Inspect the product carefully to make sure it has not suffered any breakage or damage during transport. - Do not discard the packaging material until you have thoroughly inspected the product and used it satisfactorily.

ATTENTION: If any part is missing or damaged, contact the Official Technical Service. Do not use this product without having replaced the missing or damaged part. Using this product with damaged or missing parts can cause serious injury to the operator.
ASSEMBLY
ASSEMBLY OF THE CHAIN AND THE SWORD
-
Release the chain brake by moving the front protector (3) backwards.
-
Unlock and release the bar locking device (7), then remove the chain sprocket protector (8).
-
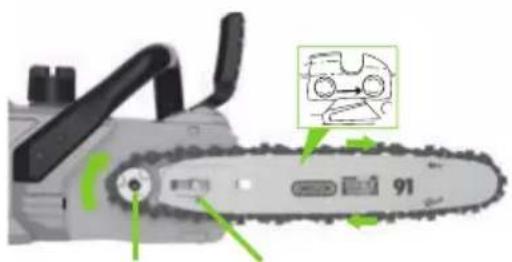
Place the chain of the chainsaw (4) around the bar (5). Check the correct position in the groove of the bar. Pay attention to the correct direction of rotation of the chain: the direction in which the arrow points on the chain must match the direction marked on the bar.

ATTENTION: When placing the chain on the saw, observe the correct position of the guide groove on the bar.

text_image
3 7 8
natural_image
Illustration of a chain-link robotic device with a circular inset showing a gear and a small arrow pointing to its head (no text or symbols present)-
Keep the chain in the correct position on the bar and place the chain around the gear (chain wheel). Fit the bar flush with the mounting surface so that the turn of the chain pin fits into the long groove of the bar.
-
Fit the chain sprocket guard (8).
-
Gently press the bar lock (7) in a clockwise direction.
natural_image
Close-up of a chain drive with a highlighted mechanical component (no text or symbols visible)Sprocket of the chain
Sword Slot
CHAIN TENSION ADJUSTMENT

ATTENTION: During operation, re-tension the saw chain and bar after a maximum of 5 cuts.
-
Raise the tip of the sword slightly.
-
Check if the chain of the chainsaw works well by turning it manually.
-
Turn the tensioning knob (6) clockwise until the chain is attached to the bottom of the bar.
-
Tighten and lock the locking device on the bar.

natural_image
Close-up of a chain-linking gear with green arrows pointing to specific parts (no text or symbols visible)PRODUCT USE
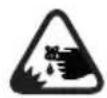
PUT CHAIN LUBE OIL

ATTENTION: Never work without chain lubricant. If the saw chain works without lubricant, the bar and the saw chain may be damaged. It is therefore essential to check the oil level in the oil level indicator frequently and also every time before you start using the saw. Use special chainsaw oil.
CHECKING THE LUBRICATION
- Start the device.
- Keep the saw chain running at about 15 cm per surface for a short period of time (15 s). If there is enough lubrication, the oil coming out of the saw chain will form a slight trace.
OIL FILLING
- Place the device in a safe position with the oil tank cover upwards.
- Before opening, clean the oil tank cover if necessary.
- Remove the oil tank cap by turning it counterclockwise.
- Carefully fill the oil tank with chainsaw oil. Do not spill it. If you spill any drops, be sure to clean them up.
- This device contains an automatic oil pump that lubricates the chain. Check the remaining oil level through the oil level window (9).
- Place the oil tank cover by turning it clockwise.
natural_image
Close-up of a gray electric shaver with black components and a green arrow indicating a specific part (no text or symbols visible)BATTERY INSTALLATION

NOTE: If the battery is fully charged, the charger will automatically switch to the maintenance charging function. In this way, the battery can remain in the charger safely and indefinitely.

ATTENTION: The battery must be charged before the first start.
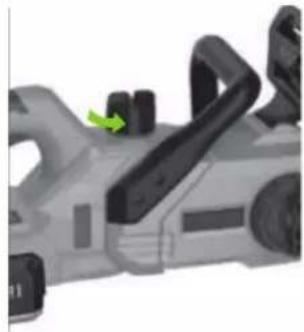
- Press the lock button and remove the battery from the device.
- Insert the battery into the charger.
- Plug the charger into the power supply unit. The charge status is shown by the indicators on the charger.
- Insert the battery pack into the device and make sure that it clicks into place correctly.

natural_image
Close-up of a handheld electronic device with a green arrow pointing to a numbered component (17), no visible text or symbols on the device itself.LOAD INDICATORS
• 4 leds on: The battery is full.
• 1,2 or 3 leds on: The battery has enough energy.
• 1 led on: The battery is empty. Recharge the battery.
- 4 leds blinking: The battery is too hot or too cold. Do not use or charge the battery, wait until the battery temperature is between 4°C and 40°C.
SWITCHING ON AND OFF

ATTENTION: Before starting the operation, you must install the battery in the machine.
-
Pull the lever of the front guard/chain brake strongly towards the front handle.
-
Push the trigger release button with your thumb.
-
Pull the throttle trigger. Once the throttle trigger has been depressed, the trigger release is fixed, so you can release it.
-
To switch off the chainsaw, release the on/off switch.

natural_image
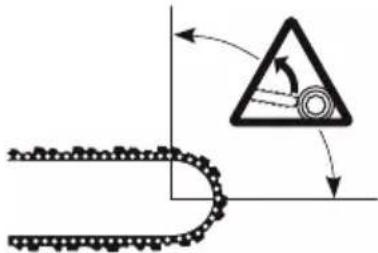
Close-up of a chain-linking power tool with labeled parts (11 and 12), no readable text or symbols beyond labelsCHAIN BRAKE
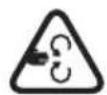
The recoil occurs if the upper edge or the tip of the sword hits the wood or other hard objects. The device is thrown back and forth with force, which can cause extremely serious injuries.
text_image
Diagram illustrating a mechanical or electrical hazard symbol with labeled arrows and motion arrows, likely representing a system or process.In order to reduce the risk of injury in the event of a kickback, the device is equipped with a chain brake that is automatically activated at the moment of impact and will immediately stop the saw chain.

ATTENTION: Before starting to work with this device, the correct functioning of the chain brake must be checked. If the chain brake does not work properly, contact a service technician immediately.
- Place the device on the floor.
- Turn the device on.
- Tilt the front protector forward. The chain must stop immediately.
SAWING TECHNIQUE
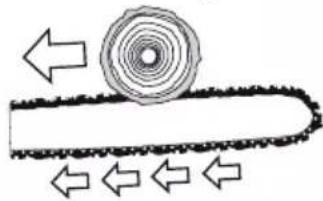
PULLING THE SAW
With this technique, the sawing is done with the lower part of the sword from the top down. The saw pushes the device forward, away from the user. In this way, the front edge of the device forms a support, which captures the forces that arise in the tree trunk when sawing. The user has much more control over the device and can better avoid kickback. This is therefore the preferred sawing technique.
-
Saw as close as possible to the engine block and allow the stop to grip the wood.
-
If the stop is gripped too tightly, pull the saw handle upwards. The leverage will push the bar down, making the sawing work easier.
natural_image
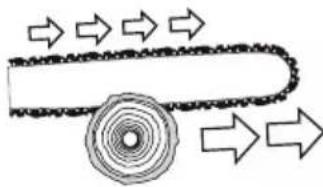
Diagram of a chain with circular components and directional arrows indicating flow or movement (no text or symbols)PUSHING THE SAW
With this technique, the sawing is done with the upper edge of the guide bar from the bottom to the top. The saw pushes the device back towards the user.

ATTENTION: If the user does not balance the strength of the saw when pushing back with his body strength, there is a danger that only the tip of the guide bar will come into contact with the wood, thus creating a kickback.
natural_image
Diagram of a mechanical component with circular flow arrows indicating motion (no text or symbols)FELLING A TREE
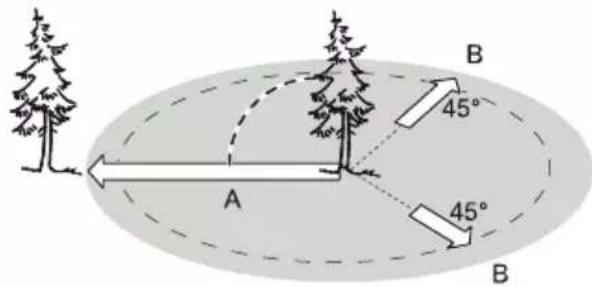
Before starting logging work, make sur
- Before starting logging work, make sure There are no people or animals in the felling area of the tree.
- There is an unobstructed escape route for each participant. Withdrawal takes place diagonally against the direction of felling.
- The area around the trunk is free of obstacles (risk of tripping).
- The next workplace is at least two and a half metres away from the tree. Before felling, the direction in which the tree is felled must be checked.
text_image
A B 45° 45° B-
Mark the trunk approximately one third of its diameter on the side of the direction of felling.
-
On the other side, make the felling cut, which should be slightly higher than the felling notch (about 2 inches).
text_image
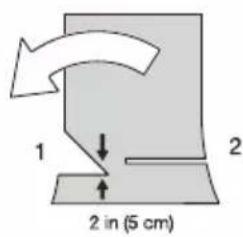
1 2 2 in (5 cm)SUPPORTED TRUNKS

ATTENTION: Do not cut any logs under tension. Chipped wood or a twisted sword can cause extremely serious injuries.
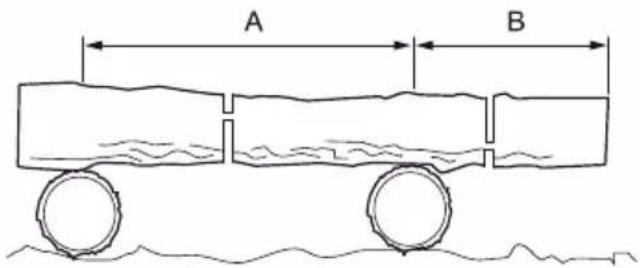
It is recommended that the logs to be sawn are placed on trestles.
In zone A, first approximately one third of the diameter of the log is cut from the top down, and then the final cut is made from the bottom up. In zone B, first approximately one third of the diameter of the log is cut from the bottom to the top, and then it is cut from the top.
text_image
A BCUTTING BRANCHES
Always work on the opposite side of the branch in question.
- Start at the bottom of the tree and work your way up.
- Always guide the saw from top to bottom through the wood.
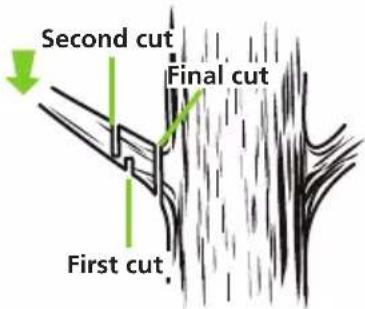
- When you cut thicker branches, make the first cut from the bottom. Then cut from the top, and then finish by cutting the remaining stump
- When removing the branches from the trunks that are lying down, cut off the loose branches that stick out in the air first. Only the supporting branches are cut when the trunk is cut into pieces.
text_image
Second cut Final cut First cut,MAINTENANCE
Good maintenance will extend the life of the machine. Prolonged or constant use may require more intensive maintenance for the machine to continue to function properly.

ATTENTION: Make sure the engine is completely shut down before performing any maintenance or repair. This will eliminate any potential risk.
PERIODIC MAINTENANCE
DAILY CHECK
Lubrication of the sword Before every use
Chain tension Before every use and frequently
Sharpening the chain Before each use, visual check
For damaged parts Before every use
For loose bolts Before every use
Chain brake function Before every use
INSPECT AND CLEAN
Sword Before every use
Complete saw After each use
Chain brake Every 5 hours*

ATTENTION:
• Always use gloves when working around the blade assembly.
- Use only original spare parts for this machine.
- Clean the device with a slightly damp cloth.
REPLACEMENT OF SWORD AND SAW CHAIN

ATTENTION: Saw chain is very sharp, always use protective gloves when doing any kind of maintenance to the chain. A dull or worn out chain can cause excessive engine speed during cutting, which can cause severe damage to the engine. Incorrect chain sharpening increases the potential for kickback. Failure to replace or repair a damaged chain can cause serious injury.
- To replace the parts, follow the same assembly instructions as for the bar and chain of the chainsaw.
INSPECTION AND CLEANING OF THE CHAIN BRAKE
• Always keep the chain brake mechanism clean by lightly brushing the connections so that there is no dirt.
• Always check the operation of the chain brake after cleaning.
TROUBLESHOOTING
The table includes some of the most common problems, their causes and remedies.
PROBLEM POSSIBLE CAUSE SOLUTION
| The battery is not installed correctly. Put the battery in place. | ||
| The ON/OFF switch is not on. Make sure the machine is turned on. | ||
| The device does not work. | The chain brake is not set backwards. | 1. Pull the chain brake back (towards the user).2. Release the ON/OFF switch and the safety lock.3. Restart the device by pressing the ON/OFF switch and the safety lock. |
| The battery is exhausted. Charge the battery. | ||
| The battery is defective. | Contact the after-sales service. | |
| The device is defective. | ||

NOTE: If you are unable to resolve the problem, please contact the Official Technical Service..
TRANSPORTATION AND STORAGE
- Stop the machine, remove the battery and allow the tool to cool down before storing or transporting it.
- Transport the battery in accordance with local and national regulations.
- Ensure that no battery can come into contact with other batteries or conductive materials during transportation by protecting exposed connectors with non-conductive covers or insulating tape.
- Do not transport batteries that are cracked or leaking.
- Clean any foreign material from the product. Store in a cool, dry and well ventilated area out of the reach of children. Keep the product away from corrosive agents, such as garden chemicals and defrosting salts. Do not store outdoors.
- Cover the sword with its cover before storing the unit or during transport.
- Store the battery and charger separately in a dry place, free from moisture and frost.
- Do not store the battery in places where static electricity can be generated. Never transport the battery in a metal box.
- Store the battery in a place without extreme temperatures and away from direct sunlight.
- Only store the charger in a closed and dry place.
- All batteries gradually lose their charge. Recharge the batteries every 3 months.
•
RECYCLING AND DISPOSING
Used products are potentially recyclable and should not be disposed of in the usual rubbish. Help us protect the environment and preserve natural resources.
Dispose of the appliance in an environmentally friendly way. Do not throw it away with the household rubbish. Its plastic and metal components can be separated and recycled. Take this device to an approved recycling centre (green point).
Package materials are recyclables. Please, throw them away on the appropriate trash can.

ATTENTION: Take the battery to a local recycling and/or disposal centre that is certified for disposal. If the battery pack breaks or cracks, whether it leaks or not, do not recharge it and do not use it. Get rid of it and replace it with a new battery pack. DO NOT ATTEMPT TO REPAIR IT!
GUARANTEE
GREENCUT guarantees all GREENCUT products for a period of 3 years (valid for Europe). The warranty is subject to the date of purchase taking into account the intended use of the product.
As a condition subject to warranty, the original receipt must be presented indicating the date of purchase and its description as well as the defective tool.
The warranty does not cover normal wear and tear, especially on blades, blade fasteners, turbines, light sources, fan and transmission belts, impellers, air filters, spark plugs and damage caused by improper use, especially non-compliance with operating and maintenance instructions.
In the event that repairs or modifications have been made by the consumer or other than with original GREENCUT spare parts, the warranty will be voided.
In the event of a justified warranty claim, we are entitled, at our discretion, to repair or replace the defective tool free of charge. Other claims beyond this warranty are not valid.
DECLARATION OF CONFORMITY (EC)
We, PRAT INTERNATIONAL BRANDS S.L., owner of the GREENCUT brand, with headquarters in Calle Blanquers (plot 7-8) Polígono Industrial Valls. 43800 - Valls, SPAIN, declares that the GS200L chainsaw from the year 2020 onwards are in conformity with the requirements of the applicable Directives of the European Parliament and of the Council:
• Directive 2006/42/EC of the European Parliament and of the Council of 17 May 2006 on machinery, and amending Directive 95/16/EC.
• Directive 2014/30/EU of the European Parliament and of the Council of 26 February 2014 on the harmonisation of the laws of the Member States relating to electromagnetic compatibility.
- Directive 2011/65/EU of the European Parliament and of the Council of 8 June 2011 on the restriction of the use of certain hazardous substances in electrical and electronic equipment.
Harmonised standards:
EN 60745-1:2009 + A11:2010, EN 60745-2-13 : 2009 + A1:2010, EN 55014-1:2017, EN 55014-2:2015.
The product delivered coincides with the prototype that was submitted for CE exam.
Valls (SPAIN), 10 October 2020,
$$ \mathrm {C l o} $$
Mireia Calvet, CEO (Authorized representative and responsible for technical documentation).
GREENCUT®

Beself Brands
INHALT
EINLEITUNG 70
natural_image
Illustration of a chain-link robotic device with a circular inset showing a gear and a small icon (no text or symbols)natural_image
Close-up of a chain drive with a highlighted mechanical component (no text or symbols visible)natural_image
Close-up of a chain-link robotic device with green arrows pointing to specific parts (no text or symbols visible)PRODUKT-NUTZUNG
KETTENSCHMIERÖL EINSETZEN

natural_image
Close-up of a gray industrial sewing machine with black components and a green arrow indicating a component (no visible text or symbols)BATTERIEANLAGE

natural_image
Close-up of a handheld electronic device with a green arrow pointing to the number 17 (no visible text or symbols on the device itself)LASTANZEIGEN
natural_image
Close-up of a chain-linking power tool with labeled parts (11 and 12), no readable text or symbols beyond labelsKETTENBREMSE
text_image
Diagram illustrating a mechanical or electrical hazard symbol with labeled arrows and a gear mechanism.natural_image
Diagram of a chain with circular components and directional arrows indicating flow or movement (no text or symbols)SCHIEBEN DER SÄGE
natural_image
Diagram of a chain with a gear and directional arrows indicating motion (no text or symbols)text_image
1 2 2 in (5 cm)UNTERSTÜTZTE TRUNKS


