
KG470.9 - Snow blower KRESS - Free user manual and instructions
Find the device manual for free KG470.9 KRESS in PDF.

| Product type | Battery-powered snow blower |
| Brand | Kress |
| Model | KG470.9 |
| Rated voltage | 60 V max (54 V nominal) |
| No-load speed | 6500 ± 200 rpm |
| Clearing width | 61 cm |
| Maximum working depth | 45 cm |
| Operation type | Two-stage |
| Throwing distance | 15.8 m |
| Wheel size | 38.1 cm |
| Battery type | Lithium-ion |
| Recommended battery | KA3002 (4.0 Ah) |
| Recommended charger | KA3706 (8.0 A) |
| Weight (tool only) | 60 kg |
| Sound pressure level | 84.09 dB(A) (K=3 dB) |
| Sound power level | 95.09 dB(A) (K=2 dB) |
| Vibration (total value) | < 2.5 m/s² (K=1.5 m/s²) |
| Lighting | Integrated LED |
| Auger | 61 cm, shear bolts |
| Skid shoes | Adjustable |
| Discharge chute | Adjustable orientation with deflector |
| Reverse | Yes |
| Controls | Variable drive and auger speed |
| Maintenance | Dry cleaning, chute clearing tool included |
| Included accessories | Cleaning tool, spare shear bolts |
Frequently Asked Questions - KG470.9 KRESS
User questions about KG470.9 KRESS
0 question about this device. Answer the ones you know or ask your own.
Ask a new question about this device
Download the instructions for your Snow blower in PDF format for free! Find your manual KG470.9 - KRESS and take your electronic device back in hand. On this page are published all the documents necessary for the use of your device. KG470.9 by KRESS.
USER MANUAL KG470.9 KRESS
Introduction. 3
Component List. 4
Product Safety. 6
Assembly & Operation. 10
Transportation 13
Maintenance. 14
Cleaning. 14
Storage 14
Technical Data. 15
Environmental Protection. 16
Declaration of Conformity 16
INTRODUCTION
Dear Customer,
Thank you for buying this Kress product. We are dedicated to developing high quality products to meet your landscaping requirements.
The Kress brand is synonymous with premium quality service. Over the years of your product's life, if you have any questions or concerns about your product, please contact your location of purchase or our Customer Service Team for assistance.
We are confident you will enjoy working with your Kress product for years to come.
INTENDED USE
A two stage snow thrower is a powerful machine designed and intended to clear heavy snowfall quickly and efficiently.
This appliance is not intended for use by persons (including children) with reduced physical, sensory or mental capabilities, or lack of experience and knowledge, unless they have been given supervision or instruction concerning use of the appliance by a person responsible for their safety.
The machine is not intended for cutting hard materials such as stones or metal materials in the soil into small pieces, and not intended for mowing grass, cutting bushes, vacuuming, cleaning garbage, etc.
EN
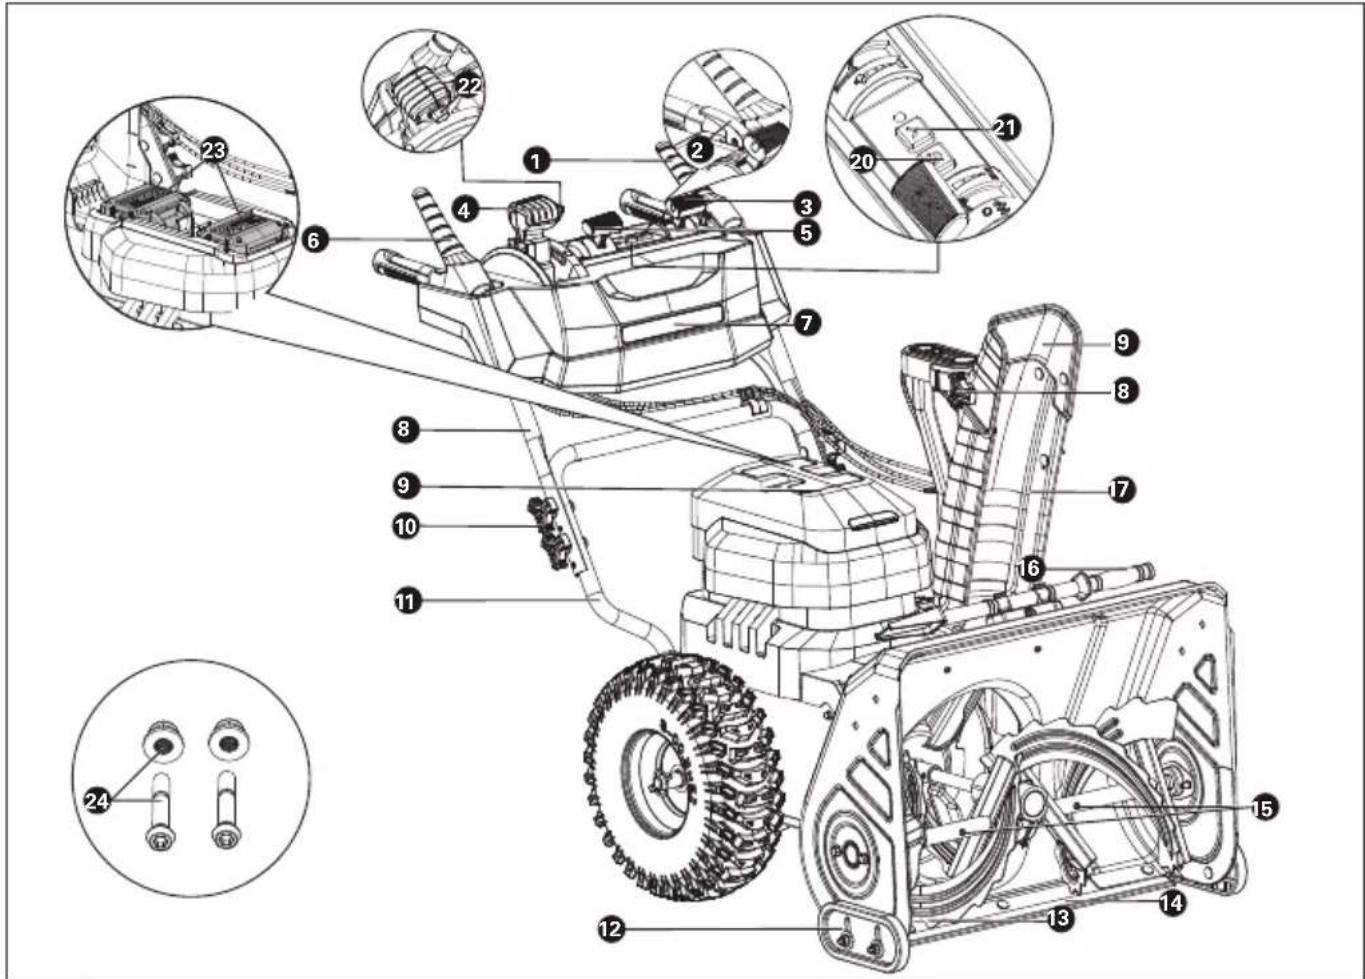
COMPONENT LIST
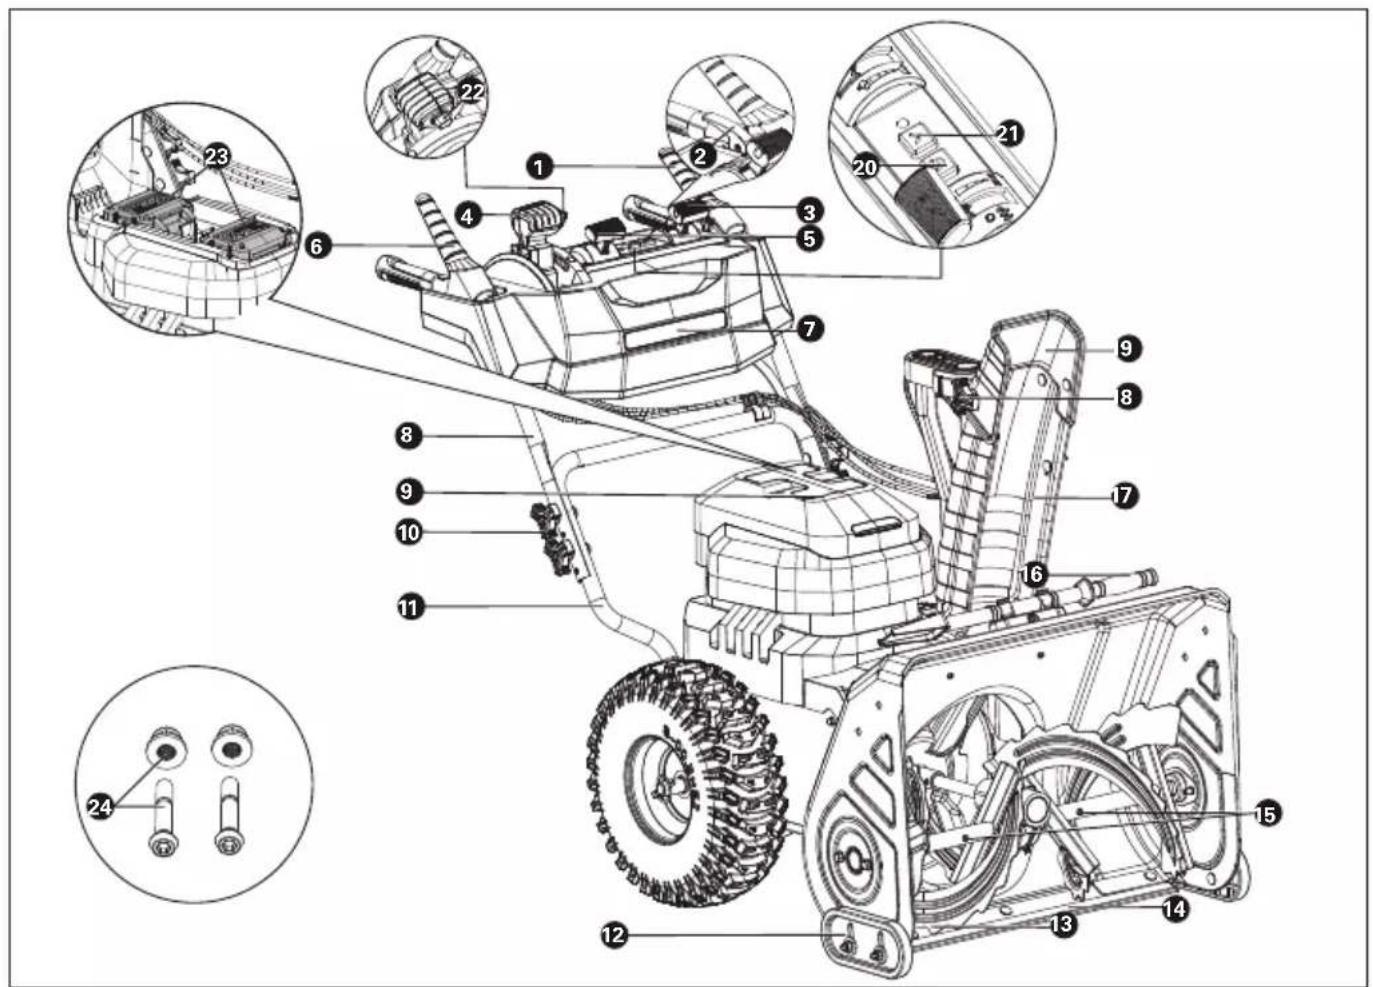
1.AUGER CONTROL LEVER
2. SAFETY SWITCH
3. AUGER SPEED CONTROL
4. DISCHARGE CHUTE CONTROL
5.DRIVE SPEED CONTROL
6. DRIVE CONTROL LEVER
7. LED LIGHTS
8. UPPER HANDLE
9. DUAL PORT POWERHEAD
10. HANDLE KNOB + BOLT
11 LOWER HANDLE
12. ADJUSTABLE SKID SHOES
13.61 CM AUGER
14. STEEL SHAVE PLATE
15 SHEAR BOLTS + NUTS
16. CHUTE CLEAN-OUT TOOL
17. DISCHARGE CHUTE
- CHUTE DEFLECTOR KNOB
- CHUTE DEFLECTOR
- LED BUTTON
- REVERSE BUTTON
22.DISCHARGE CHUTE LOCK BUTTON - BATTERY PACK*
-
SHEAR BOLTS + NUTS (SPARE)
-
Not all the accessories illustrated or described are included in standard delivery.
ORIGINAL INSTRUCTIONS PRODUCT SAFETY GENERAL POWER TOOL SAFETY WARNINGS
WARNING Read all safety warnings, instructions, illustrations and specifications provided with this power tool. Failure to follow all instructions listed below may result in electric shock, fire and/or serious injury.
Save all warnings and instructions for future reference.
The term "power tool" in the warnings refers to your mains-operated (corded) power tool or battery-operated (cordless) power tool.
1) Work area safety
a) Keep work area clean and well lit. Cluttered or dark areas invite accidents.
b) Do not operate power tools in explosive atmospheres, such as in the presence of flammable liquids, gases or dust. Power tools create sparks which may ignite the dust or fumes.
c) Keep children and bystanders away while operating a power tool. Distractions can cause you to lose control.
2) Electrical safety
a) Power tool plugs must match the outlet. Never modify the plug in any way. Do not use any adapter plugs with earthed (grounded) power tools. Unmodified plugs and matching outlets will reduce risk of electric shock.
b) Avoid body contact with earthed or grounded surfaces, such as pipes, radiators, ranges and refrigerators. There is an increased risk of electric shock if your body is earthed or grounded.
c) Do not expose power tools to rain or wet conditions. Water entering a power tool will increase the risk of electric shock.
d) Do not abuse the cord. Never use the cord for carrying, pulling or unplugging the power tool. Keep cord away from heat, oil, sharp edges or moving parts. Damaged or entangled cords increase the risk of electric shock.
e) When operating a power tool outdoors, use an extension cord suitable for outdoor use. Use of a cord suitable for outdoor use reduces the risk of electric shock.
f) If operating a power tool in a damp location is unavoidable, use a residual current device (RCD) protected supply. Use of an RCD reduces the risk of electric shock.
3) Personal safety
a) Stay alert, watch what you are doing and use common sense when operating a power tool. Do not use a power tool while you are tired or under the influence of drugs, alcohol
or medication. A moment of inattention while operating power tools may result in serious personal injury.
b) Use personal protective equipment. Always wear eye protection. Protective equipment such as dust mask, non-skid safety shoes, hard hat, or hearing protection used for appropriate conditions will reduce personal injuries.
c) Prevent unintentional starting. Ensure the switch is in the off-position before connecting to power source and/or battery pack, picking up or carrying the tool. Carrying power tools with your finger on the switch or energising power tools that have the switch on invites accidents.
d) Remove any adjusting key or wrench before turning the power tool on. A wrench or a key left attached to a rotating part of the power tool may result in personal injury.
e) Do not overreach. Keep proper footing and balance at all times. This enables better control of the power tool in unexpected situations.
f) Dress properly. Do not wear loose clothing or jewellery. Keep your hair and clothing away from moving parts. Loose clothes, jewellery or long hair can be caught in moving parts.
g) If devices are provided for the connection of dust extraction and collection facilities, ensure these are connected and properly used. Use of dust collection can reduce dust-related hazards.
h) Do not let familiarity gained from frequent use of tools allow you to become complacent and ignore tool safety principles. A careless action can cause severe injury within a fraction of a second.
4) Power tool use and care
a) Do not force the power tool. Use the correct power tool for your application. The correct power tool will do the job better and safer at the rate for which it was designed.
b) Do not use the power tool if the switch does not turn it on and off. Any power tool that cannot be controlled with the switch is dangerous and must be repaired.
c) Disconnect the plug from the power source and/or remove the battery pack, if detachable, from the power tool before making any adjustments, changing accessories, or storing power tools. Such preventive safety measures reduce the risk of starting the power tool accidentally.
d) Store idle power tools out of the reach of children and do not allow persons unfamiliar with the power tool or these instructions to operate the power tool. Power tools are dangerous in the hands of untrained users.
e) Maintain power tools and accessories. Check for misalignment or binding of moving parts, breakage of parts and any other condition that may affect the power tool's operation. If damaged, have the power tool repaired before use. Many accidents are caused by poorly maintained power tools.
f) Keep cutting tools sharp and clean. Properly
maintained cutting tools with sharp cutting edges are less likely to bind and are easier to control.
g) Use the power tool, accessories and tool bits etc. in accordance with these instructions, taking into account the working conditions and the work to be performed. Use of the power tool for operations different from those intended could result in a hazardous situation.
h) Keep handles and grasping surfaces dry, clean and free from oil and grease. Slippery handles and grasping surfaces do not allow for safe handling and control of the tool in unexpected situations.
5) Battery tool use and care
a) Recharge only with the charger specified by the manufacturer. A charger that is suitable for one type of battery pack may create a risk of fire when used with another battery pack.
b) Use power tools only with specifically designated battery packs. Use of any other battery packs may create a risk of injury and fire.
c) When battery pack is not in use, keep it away from other metal objects, like paper clips, coins, keys, nails, screws or other small metal objects, that can make a connection from one terminal to another. Shorting the battery terminals together may cause burns or a fire.
d) Under abusive conditions, liquid may be ejected from the battery; avoid contact. If contact accidentally occurs, flush with water. If liquid contacts eyes, additionally seek medical help. Liquid ejected from the battery may cause irritation or burns.
e) Do not use a battery pack or tool that is damaged or modified. Damaged or modified batteries may exhibit unpredictable behaviour resulting in fire, explosion or risk of injury.
f) Do not expose a battery pack or tool to fire or excessive temperature. Exposure to fire or temperature above 130^ may cause explosion.
g) Follow all charging instructions and do not charge the battery pack or tool outside the temperature range specified in the instructions. Charging improperly or at temperatures outside the specified range may damage the battery and increase the risk of fire.
6) Service
a) Have your power tool serviced by a qualified repair person using only identical replacement parts. This will ensure that the safety of the power tool is maintained.
b) Never service damaged battery packs. Service of battery packs should only be performed by the manufacturer or authorized service providers.
SAFETY INSTRUCTIONS FOR PEDESTRIAN-CONTROLLED SNOW
THROWERS
General
This machine is capable of amputating hands and feet and throwing objects. Failure to observe the following safety instructions could result in serious injury.
Training
1) Read, understand and follow all instructions on the machine and in the manual before operating this unit. Be thoroughly familiar with the controls and the proper use of the machine. Know how to stop the unit and disengage the controls quickly.
2) Never allow children to operate the machine. Never allow adults to operate the equipment without proper instruction.
3) Keep the area of operation clear of all persons, particularly small children.
4) Exercise caution to avoid slipping or falling, especially when operating the machine in reverse.
Preparation
1) Thoroughly inspect the area where the machine is to be used and remove all doormats, sleds, boards, wires and other foreign objects.
2) Disengage all clutches and shift into neutral before starting the motor.
3) Do not operate the machine without wearing adequate winter garments. Avoid loose fitting clothing that can get caught in moving parts. Wear footwear that will improve footing on slippery surfaces.
4) Always wear safety glasses or eye shields during operation or while performing an adjustment or repair to protect eyes from foreign objects that may be thrown from the machine.
5) Adjust the collector housing height to clear gravel or crushed rock surface.
6) Never attempt to make any adjustments while the motor is running (except when specifically recommended by manufacturer).
Operation
1) Do not put hands or feet near or under rotating parts. Keep clear of the discharge opening at all times.
2) Exercise extreme caution when operating on or crossing gravel drives or walks. Stay alert for hidden hazards or operating near public roads.
3) After striking a foreign object, stop the motor, remove the wire from the spark plug, disconnect the cord on electric motors, thoroughly inspect the snow thrower for any damage, and repair the damage before restarting and operating the snow thrower.
4) If the machine should start to vibrate abnormally, stop the motor and check immediately for the cause. Vibration is generally a warning of trouble.
5) Stop the motor whenever you leave the operating position, before unclogging the
collector/impeller housing or discharge chute, and when making any repairs, adjustments or inspections.
6) Exercise extreme caution when operating on slopes.
7) Never operate the machine without proper guards and other safety protective devices in place and working.
8) Never direct the discharge toward people or areas where property damage can occur. Keep children and others away.
9) Do not overload the machine capacity by attempting to clear snow at too fast a rate.
10) Never operate the machine at high transport speeds on slippery surfaces. Look behind and use care when operating in reverse.
11) Disengage power to the collector/impeller when the machine is transported or not in use.
12) Use only attachments and accessories approved by the manufacturer of the machine (such as wheel weights, counterweights or cabs).
13) Never operate the machine without good visibility or light. Always be sure of your footing, and keep a firm hold on the handles. Walk; never run.
14) Never touch a hot motor.
Clearing a Clogged Discharge Chute
Hand contact with the rotating impeller inside the discharge chute is the most common cause of injury associated with snow throwers. Never use your hand to clean out the discharge chute.
To clear the chute:
- SHUT THE MOTOR OFF!
- Wait 10 seconds to be sure the impeller blades have stopped rotating.
- Always use a clean-out tool, not your hands.
Maintenance and storage
1) Check other bolts at frequent intervals for proper tightness to be sure the equipment is in safe working condition.
2) Always refer to instruction handbook for important details if the snow thrower is to be stored for an extended period.
3) Maintain or replace safety labels, as necessary.
4) Run the machine a few minutes after throwing snow to prevent freeze-up of the collector/ impeller.
5) When cleaning, repairing or inspecting the snow thrower, stop the motor and make certain the collector/impeller and all moving parts have stopped. Disconnect the battery pack from the machine to prevent someone from accidentally starting the motor.
SAFETY WARNINGS FOR BATTERY PACK
a) Do not dismantle, open or shred cells or battery pack.
b) Do not short-circuit a battery pack. Do not store battery packs haphazardly in a box or drawer where they may short-circuit each other or be short-circuited by conductive materials. When battery pack is not in use, keep it away from other metal objects, like paper clips, coins, keys, nails, screws or other small metal objects, that can make a connection from one terminal to another. Shorting the battery terminals together may cause burns or a fire.
c) Do not expose battery pack to heat or fire. Avoid storage in direct sunlight.
d) Do not subject battery pack to mechanical shock.
e) In the event of battery leaking, do not allow the liquid to come into contact with the skin or eyes. If contact has been made, wash the affected area with copious amounts of water and seek medical advice.
f) Keep battery pack clean and dry.
g) Wipe the battery pack terminals with a clean dry cloth if they become dirty.
h) Battery pack needs to be charged before use. Always refer to this instruction and use the correct charging procedure.
i) Do not maintain battery pack on charge when not in use.
j) After extended periods of storage, it may be necessary to charge and discharge the battery pack several times to obtain maximum performance.
k) Recharge only with the charger specified by Kress. Do not use any charger other than that specifically provided for use with the equipment.
I) Do not use any battery pack which is not designed for use with the equipment.
m) Keep battery pack out of the reach of children.
n) Retain the original product literature for future reference.
o) Remove the battery from the equipment when not in use.
p) Dispose of properly.
q) Do not mix cells of different manufacture, capacity, size or type within a device.
r) Keep the battery away from microwaves and high pressure.
s) Warning! Do not use non-rechargeable batteries.
RESIDUAL RISK
Even with the intended use of the appliance there still can be some other risks, which can not prevented. According to the type and construction of the appliance the following potential hazards might apply:
- Flung out of stones or the like from the working area
- Flung out of parts from the snow thrower
- Without the ear protection can result a hearing loss
- Cuts of the fingers with maintenance work
- Involved in to the collector hazard zone
-
Involved in to the discharge hazard zone
-
Access to the rotating parts
- Electrical shock when touching uninsulated live parts
SYMBOLS
| Warning |
| Read the operator's manual. |
| Wear ear protection |
| Wear safety footwear |
| Wear protective gloves |
| Wear face shield |
| Wear head protection |
| Avoid injury from rotating auger - Keep hands, feet, and clothing away. |
| Shut off motor before unclogging discharge chute. |
| Waste electrical products must not be disposed of with household waste. Please recycle where facilities exist. Check with your local authorities or retailer for recycling advice. |
| Li-Ion battery This product has been marked with a symbol relating to 'separate collection' for all battery packs and battery pack. It will then be recycled or dismantled in order to reduce the impact on the environment. Battery packs can be hazardous for the environment and for human health since they contain hazardous substances. | |
| Li-Ion | Do not burn |
| Batteries may enter water cycle if disposed improperly, which can be hazardous for ecosystem. Do not dispose of waste batteries as unsorted municipal waste. | |
| Remove battery from the snow thrower before carrying out any adjustment, servicing or maintenance. | |
EN
ASSEMBLY &OPERATION
NOTE: Before using the tool, read the instruction book carefully.
ASSEMBLY
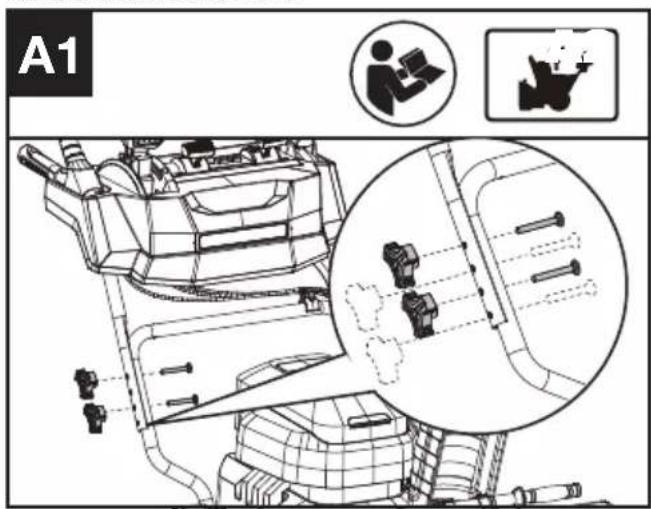
Assembling the handles (See Fig. A1)
Choose the appropriate height and tighten the handle knobs and bolts.
Assembling the discharge chute (See Fig. A2)
EN

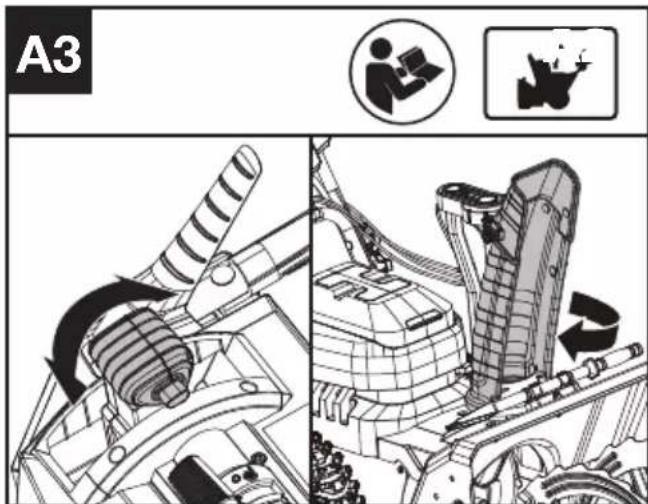
Adjust the discharge chute direction (See Fig. A3)
WARNING: Never direct the snow discharge chute at the operator, at bystanders, at vehicles or at nearby windows. The discharged snow and foreign objects accidentally picked up by the snow thrower can cause serious damage and personal injury. Always orient the discharge chute in the opposite direction from where you, bystanders, surrounding vehicles, or windows are located.
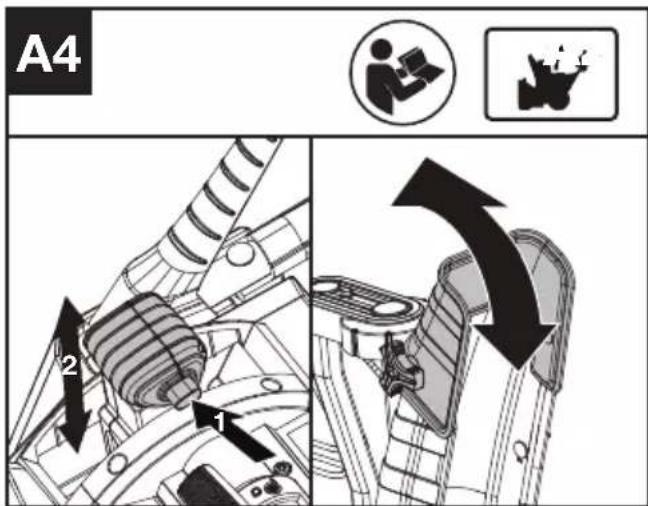
Adjust the chute deflector (See Fig. A4)
WARNING: Make sure that the chute deflector snaps and locks completely onto the discharge chute. Do not advance the chute deflector too far forward causing an opening to appear between the chute deflector and discharge chute. You can tighten the chute deflector knob after adjusting the chute deflector.
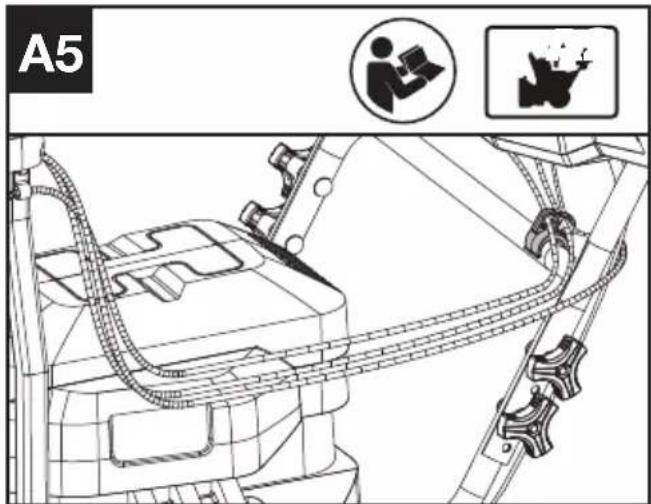
Using the clip (See Fig. A5)
Adjust adjustable skid shoes to control working height according to different working conditions.(See Fig. A6)
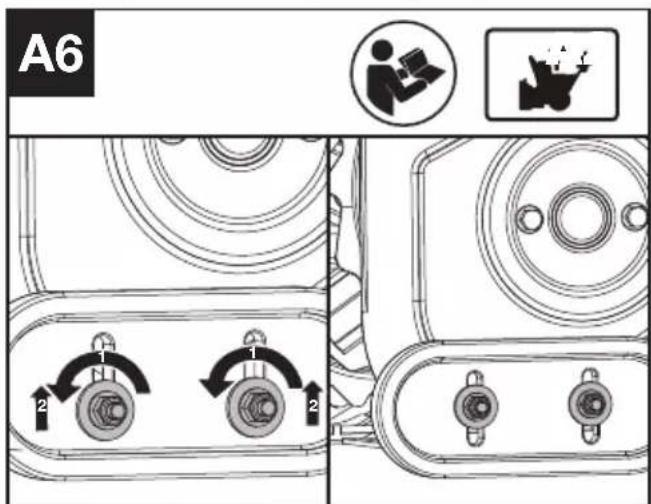
NOTE: Adjust upward for hard-packed snow. Adjust downward when operating on gravel or crushed rock surfaces.
Checking the battery charge condition (See Fig. B1)
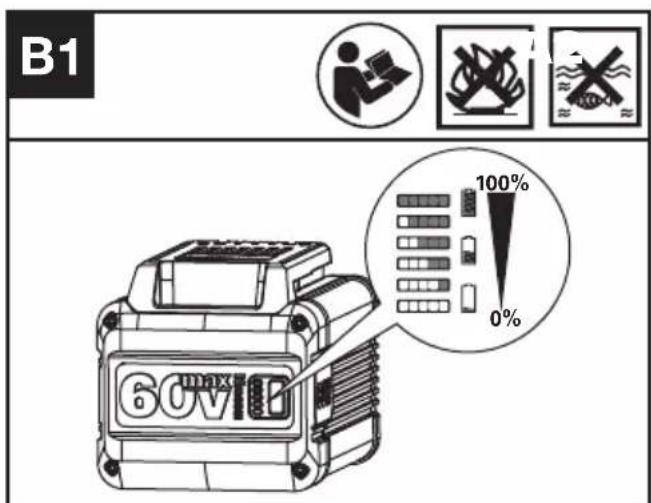
NOTE: Fig. B1 only applies for the battery pack with battery indicator light. The battery level can be known from the battery
indicator light by pressing the button beside the lights. Before starting or after use, press the button beside the power indicator light on the battery pack to check the battery capacity
| Remarks | LED-light | Battery condition |
| Five green lights are illuminated. | 70% ≤ Power level ≤ 100% | |
| Four green lights are illuminated. | 50% ≤ Power level < 70% | |
| Three green lights are illuminated. | 35% ≤ Power level < 50% | |
| Two green lights are illuminated. | 20% ≤ Power level < 35% | |
| One green light are illuminated. | 10% ≤ Power level < 20% | |
| No light is illuminated. | Power level < 10% |
Charging the battery pack (See Fig. B2)
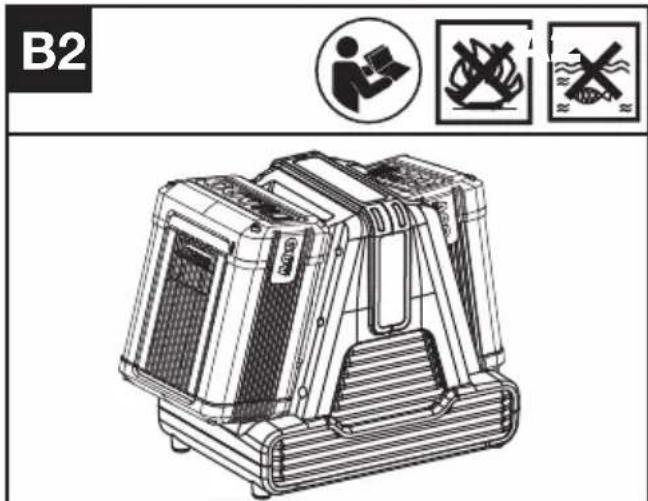
- Your battery pack is partly charged and needs to be fully charged before first use.
- More details can be found in charger's manual.
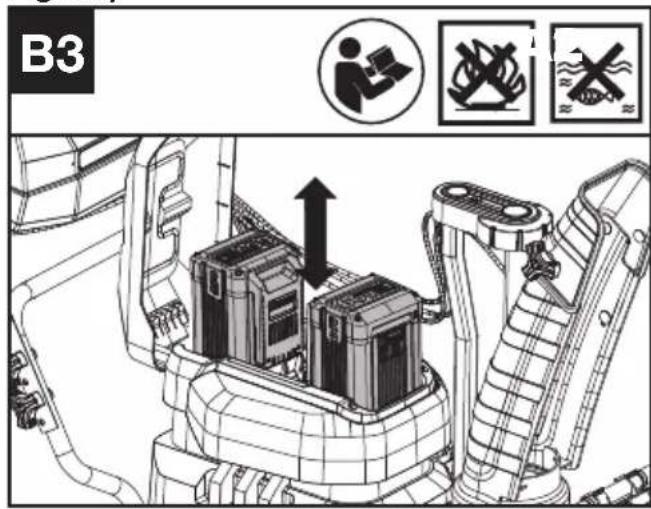
Installing & removing the battery pack.(See Fig. B3)
OPERATION
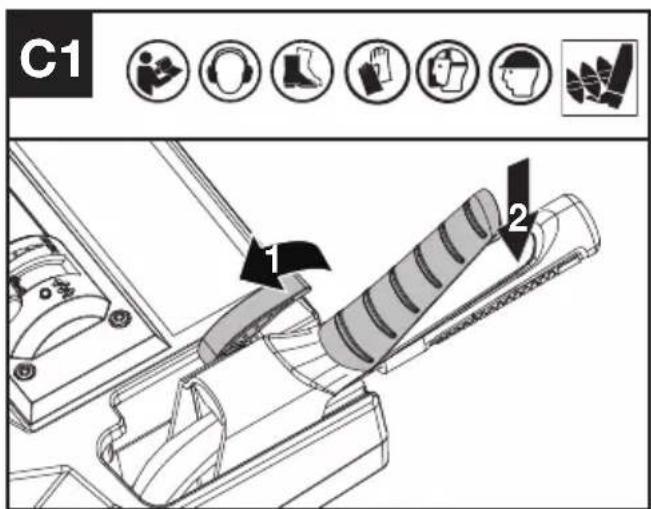
Starting and stopping snow throwing (See Fig. C1 C2)
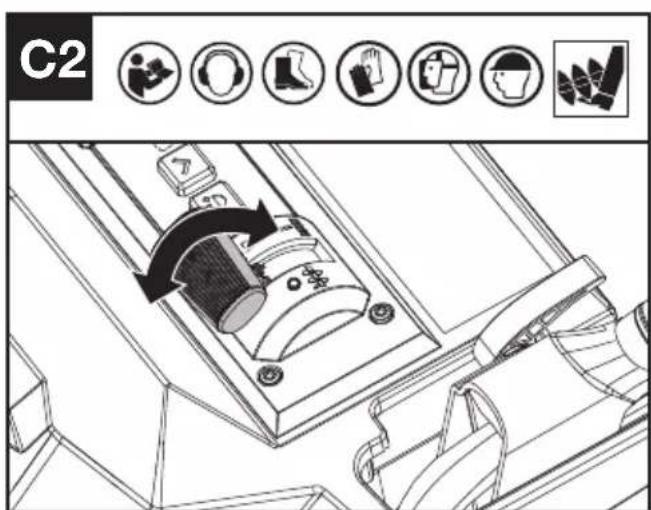
NOTE: Position discharge chute deflector at a safe angle before starting snow throwing.
-Flip up the safety switch and press the auger control lever to start snow throwing action.
-Use the auger speed control to set a comfortable speed for snow throwing.
-Release auger control lever to stop.
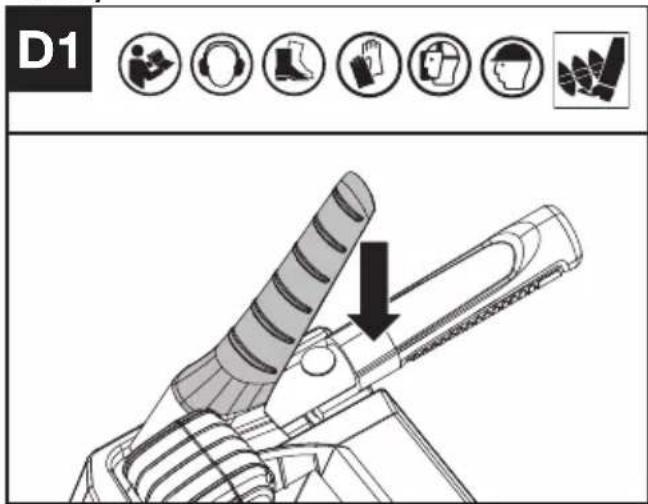
Starting and stopping wheel drive (See Fig. D1 D2)
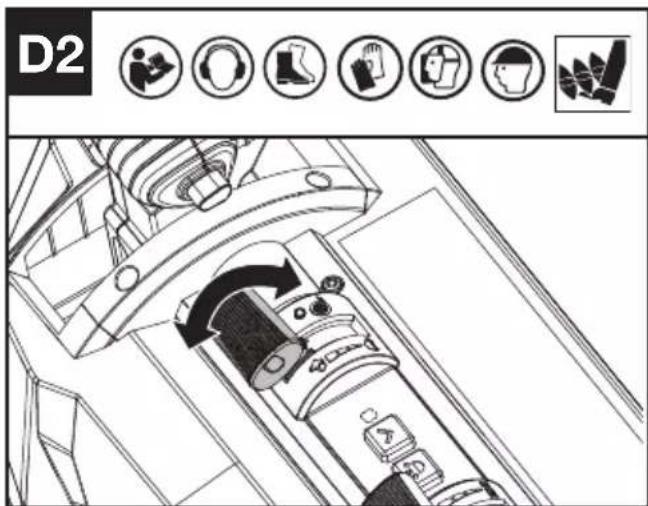
-Press the drive control lever to activate the wheel drive.
NOTE: Release the drive control lever while keeping the auger control lever pressed to maintain the movement.
-Use the drive speed control to set a comfortable driving speed.
Reserve traveling (See Fig. E)
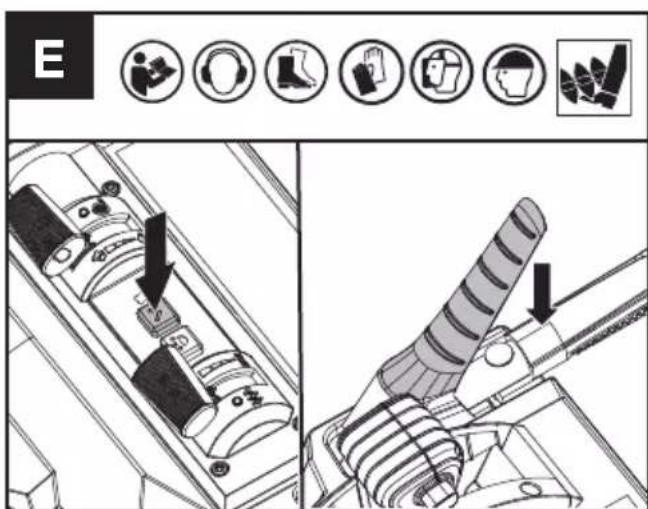
Press the reverse button and drive control lever and the snow thrower will move backward.
NOTE: Always look down and behind before
moving backward. Do not start snow throwing action when moving backward.
Stopping snow throwing
Release the auger control lever and both auger and drive motor will stop.
NOTE: Remove the batteries and wait for all revolving parts to stop completely after operation.
LED lights (See Fig. F)
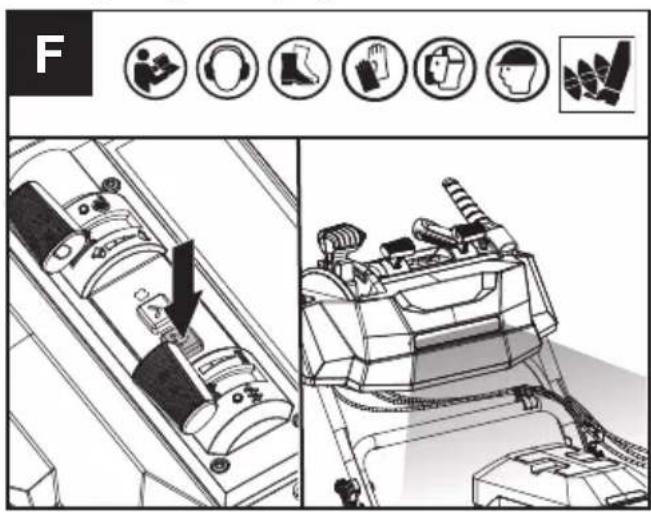
Press the LED button to turn on the LED lights. LED lighting increases visibility - great for dark or enclosed area.
HOW TO USE YOUR SNOW THROWER
- Remove all foreign objects from the area to be thrown before operating the machine.
- Do not force your snow thrower.
- If the snow thrower collides with obstacles or foreign objects while moving, stop the snow thrower, remove the battery, clear the obstacles or foreign objects, and check if the unit is damaged.
HOW TO CLEAR A DRIVEWAY/EXPERTS OFF TACTICAL TIPS (See Fig. G)
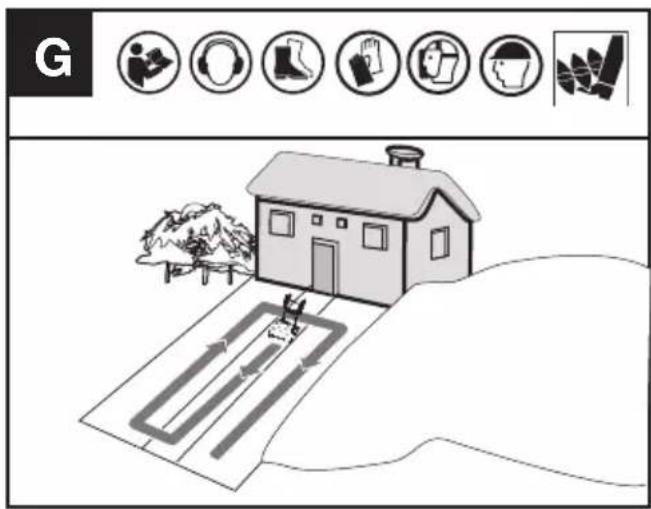
SNOW THROWER (NON-WINDY CONDITIONS)
(1) Cut a path straight down the middle of the driveway with the discharge chute facing left.
(2) Without adjusting the discharge chute, turn machine around 180 degrees.
(3) Return to driveway's start. Turn machine the same direction as before.
(4) Continue making circle.
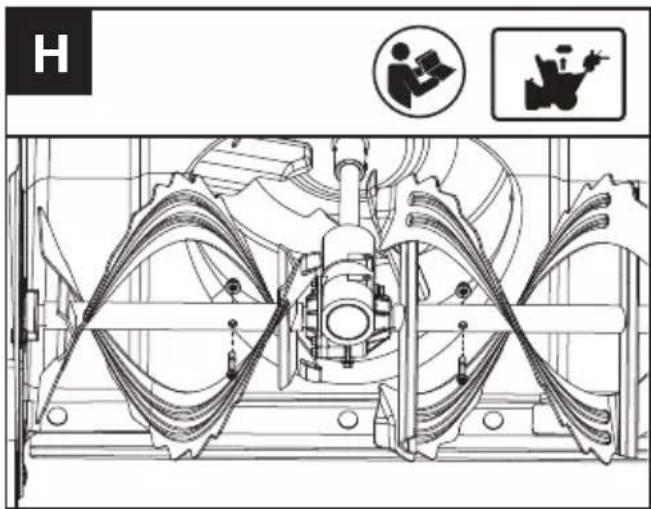
Replacing Shear Bolts (See Fig. H)
FOR BATTERY TOOLS
The ambient temperature range for tool and battery use and storage is 0^ - 45^ (32 F-113 F).
The recommended ambient temperature range for the charging system during charging is 0^ - 40^ (32^ - 104^)
Details regarding safe disposal of used batteries At the end of the life of the appliance, remove the battery pack safely before disposing of the appliance. Do not throw batteries away or throw them in the normal trash can. Also do not dispose of the battery with the machine. Remove the used battery pack from the appliance and dispose of it at the nearest or convenient dedicated recycling facility. If in doubt, consult your local environmental protection department. Batteries may enter water cycle if disposed improperly, which can be hazardous for ecosystem. Do not dispose of waste batteries as assorted municipal waste.
TRANSPORTATION
Transporting the machine
- Switch off the machine and remove the battery.
- When transporting your machine in a vehicle, secure and position it to prevent movement or damage.
Transporting the battery
- Ensure the battery is in a safe condition.
- Use non-conductive packaging when transporting the battery.
- The contained Li-ion batteries are subject to the
dangerous goods legislation requirements.
Transport batteries only when the battery housing is undamaged. Pack up the batteries in such a manner that cannot move around in the packaging.
MAINTENANCE

Remove the battery from the machine before carrying out any adjustment, servicing or maintenance.
There are no user serviceable parts in your power tool. Never use water or chemical cleaners to clean your power tool. Wipe clean with a dry cloth. Always store your power tool in a dry place. Keep the motor ventilation slots clean. Keep all working controls free of dust.
(1) Do not attempt to repair the machine unless you have the proper tools and instructions for disassembly and repair of the machine.
(2) Check bolts at frequent intervals for proper tightness to ensure that the equipment is in safe working condition.
(3) After each snow removal session, run the snow thrower for a few minutes to prevent the auger from freezing. Shut off the motor, wait for all revolving parts to stop completely, and wipe residual ice and snow off the unit.
CLEANING
- Switch off the machine, remove the battery pack and wait until the machine comes to a complete stop.
- Do not use aggressive detergents or solvents. Clean the machine after use with a damp cloth dipped in mild detergent.
- Using an object such as a wooden or plastic implement, wipe out any accumulation of snow or other foreign objects around the area of auger and steel shave plate. Be careful of the sharp edges.
- Use the chute clean-out tool to clear the discharge chute. Do NOT use hands to clear a clogged discharge chute.
- Keep battery connection free of dirt and debris, and clean with a soft and dry brush or cloth.
- Do not spray water onto the motor and electrical components.
- Do not use pressure washer to clean your machine.
STORAGE

WARNING: Remove the battery pack. Wear protective gloves when carrying out any adjustment, servicing or maintenance. Do not place your hand or fingers between blades and getting pinched or cut.
- Allow the motor to cool and clean the snow thrower before storing or transporting. Be sure to secure the unit while transporting.
- Remove the battery pack from the snow thrower.
- Inspect the snow thrower carefully for worn, loose, or damaged parts. Check connections and screws and tighten if necessary. For repairing or replacing parts, contact your Kress dealer.
- Store the unit, along with the removed battery packs, in a locked, dry place out of the reach of children to prevent unauthorized use or damage. Cover loosely with a tarp for added protection.
TROUBLE SHOOTING
The following table gives problems and actions that you can perform if your machine does not operate correctly.

WARNING: Switch the machine off and remove the battery prior to any troubleshooting.
| PROBLEM POSSIBLE | CAUSE SOLUTION | |
| The handle is not in position. Handle | knobs are not secured. | Make sure that the knobs are fully tightened and closed. |
| The snow thrower doesn't start. | Safety switch is not flipped up. | Flip up the safety switch and press the auger control lever to start snow throwing action. |
| The auger control lever is defective. | Have the auger control lever replaced by an authorized service center. | |
| Battery capacity is low. Charge the battery. | ||
| The battery is not attached to the motor. | Check the connection between the motor connector and the battery. | |
| The motor is on, but the auger does not turn. | The auger control lever is defective. | Have the auger control lever replaced by an authorized service center. |
| The snow thrower leaves a thin layer of snow behind. | The steel shave plate is worn. | Have the steel shave plate replaced by an authorized service center. |
TECHNICAL DATA
Type KG470 KG470.X (470- designation of machinery, representative of Battery-operated snow thrower)
| KG470 KG470.X ** | |
| Rated voltage 60 V Max *** | --- |
| Max. No-load speed | 6500±200 /min |
| Clearing width | 61 cm |
| MAX Working Depth | 45 cm |
| Operation type Double-Stage | |
| Throw distance 15.8 m | |
| Wheel size 38.1 cm | |
| Battery type Lithium-ion | |
| Machine weight (bare tool) 60 kg |
** X=1-999, A-Z, M1-M9 there are only used for different customers, there are no safe relevant changes between these models
*** Voltage measured without workload. Initial battery voltage reaches maximum of 60 volts. Nominal voltage is 54 volts.
SUGGESTED BATTERIES AND CHARGERS
| Battery Amp Charger Amperage | |||
| KA3002 4.0 Ah KA3706 | 8.0 A | ||
We recommend that you purchase your accessories from the same store that sold you the tool. Refer to the accessory packaging for further details. Store personnel can assist you and offer advice.
NOISE INFORMATION
| A weighted sound pressure | LpA: 84.09 dB(A)KpA= 3.0 dB(A) |
| A weighted sound power | LwA: 95.09 dB(A)KwA= 2.0 dB(A) |
| Wear ear protection |
VIBRATION INFORMATION
Vibration total values (triax vector sum) determined according to EN 62841:
Vibration emission value: a_p < 2.5 m/s^2
Uncertainty K = 1.5m / s^2
The declared vibration total value and the declared noise emission value have been measured in accordance with a standard test method and may be used for comparing one tool with another.
The declared vibration total value and the declared noise emission value may also be used in a preliminary assessment of exposure.
WARNING: The vibration and noise emissions during actual use of the power tool can differ from the declared value depending on the ways in which the tool is used especially what kind of workpiece is processed dependant on the following examples and other variations on how the tool is used:
How the tool is used and the materials being cut or drilled.
The tool being in good condition and well maintained. The use of the correct accessory for the tool and ensuring it is sharp and in good condition.
The tightness of the grip on the handles and if any anti vibration and noise accessories are used.
And the tool is being used as intended by its design and these instructions.
This tool may cause hand-arm vibration syndrome if its use is not adequately managed.
WARNING: To be accurate, an estimation of exposure level in the actual conditions of use should also take account of all parts of the operating cycle such as the times when the tool is switched off and when it is running idle but not actually doing the job. This may significantly reduce the exposure level over the total working period.
Helping to minimise your vibration and noise exposure risk.
Always use sharp chisels, drills and blades. Maintain this tool in accordance with these instructions and keep well lubricated (where appropriate).
If the tool is to be used regularly then invest in anti vibration and noise accessories.
Plan your work schedule to spread any high vibration tool use across a number of days.
ENVIRONMENTAL PROTECTION

Waste electrical products must not be disposed of with household waste. Please recycle where facilities exist. Check with your authorities or retailer for recycling advice.
DECLARATION OF CONFORMITY
We, Positec Germany GmbH Postfach 32 02 16,50796 Cologne,Germany
On behalf of Positec declare that the product Description Battery-operated snow thrower Type KG470 KG470.X (470- designation of machinery, representative of Battery-operated snow thrower)
Function Removing snow
Complies with the following directives, 2006/42/EC, 2014/30/EU, 2011/65/ EU&(EU)2015/863, 2000/14/EC amended by 2005/88/EC
2000/14/EC amended by 2005/88/EC: Conformity assessment procedure as per Annex V Measured sound power level 96 dB(A) Declared guaranteed sound power level 97 dB(A)
Standards conform to, EN 62841-1, EN ISO 8437-2, EN ISO 3744, EN IEC 55014-1, EN IEC 55014-2, EN IEC 63000
The person authorized to compile the technical file,
Name Marcel Filz
Address Positec Germany GmbH
Postfach 32 02 16, 50796 Cologne, Germany

2023/04/06
Allen Ding
Deputy Chief Engineer, Testing & Certification
Positec Technology (China) Co., Ltd
18, Dongwang Road, Suzhou Industrial Park, Jiangsu 215123, P. R. China
DECLARATION OF CONFORMITY
We,
Positec (UK & Ireland) Ltd,
PO Box 6242, Newbury, RG14 9LT, UK
On behalf of Positec declare that the product
Description Battery-operated snow thrower
Type KG470 KG470.X (470- designation of machinery, representative of Battery-operated snow thrower)
Function Removing snow
Complies with the following regulations:
Supply of Machinery (Safety) Regulations 2008
Electromagnetic Compatibility Regulations 2016
The Restriction of the Use of Certain Hazardous
Substances in Electrical and Electronic
Equipment Regulations
Noise Emission in the Environment by
Equipment for Use Outdoors Regulations
- Conformity assessment procedure as per
SCHEDULE 8
-
Measured sound power level
-
Declared guaranteed sound power level 97 dB(A)
Standards conform to
BS EN 62841-1, BS EN ISO 8437-2, BS EN ISO
3744, BS EN IEC 55014-1, BS EN IEC 55014-2,
BS EN IEC 63000
The person authorized to compile the technical file,
Name Jim Kirkwood
Address Positec (UK & Ireland) Ltd,
PO Box 6242, Newbury, RG14 9LT, UK


2023/04/06
Allen Ding
Deputy Chief Engineer, Testing & Certification
Positec Technology (China) Co., Ltd
18, Dongwang Road, Suzhou Industrial
Park, Jiangsu 215123, P. R. China
INHALTSVERZEICHNIS
INFORMATIONS RELATIVES AU BRUIT
INFORMATIONS RELATIVES AUX VIBRATIONS
Remove the battery from the machine before carrying out any adjustment, servicing or maintenance.
18, Dongwang Road, Suzhou Industrial
Park, Jiangsu 215123, P. R. China
INDICE
Hand contact with the rotating impeller inside the discharge chute is the most common cause of injury associated with snow throwers. Never use your hand to clean out the discharge chute.
To clear the chute:
- SHUT THE MOTOR OFF!
- Wait 10 seconds to be sure the impeller blades have stopped rotating.
- Always use a clean-out tool, not your hands.
18, Dongwang Road, Suzhou Industrial
Park, Jiangsu 215123, P. R. China
INHOUDSOPGAVE
18, Dongwang Road, Suzhou Industrial
Park, Jiangsu 215123, P. R. China
INDHOLD
Introduktion 95
Delliste. 96
Produktikherd 98
Samling og brug. 102
Transport 105
Vedligeholdelse. 106
Rengoring. 106
Opmagasinering. 106
Tekniske data. 107
Miljobeskyttelse 108
Konformitetserklaring. 109
INTRODUKTION
Karekunde,
WARNING Read all safety warnings,
instructions, illustrations and specifications
provided with this power tool. Failure to follow all instructions listed below may result in electric shock, fire and/or serious injury.
Save all warnings and instructions for future reference.
The term "power tool" in the warnings refers to your mains-operated (cored) power tool or battery-operated (cordless) power tool.
1) ARBEJDSOMRADE
2) ELSIKKERHED
Transport of maskinen
Transport of batteriet
18, Dongwang Road, Suzhou Industrial
Park, Jiangsu 215123, P. R. China
CODEPXXAHNE
BVeJeHne. 110
CnncokKomnoheHOB 111
Be3oNaChocbIpoDyKta. 113
C6opka npa6ota 118
IepemeueHne. 122
Texnueckoe ObcnykBaHne. 122
OuicTka 122
XpaHeHne. 123
TexnueckneDaHHbIe. 123
3aunTa Okpykaioe Cpebl. 125
Декларачи СоТВЕТСВИ. 125
RU
BBEDEHNE
YbaxaemblnokynateIb!
Blaoradapm Bac 3a npno6peTeHne npodykunn Kress. Mbl cneuaann3npyemcna pa3pa60tke BbICOKOKaueCTBeHHo npoDyKUnn B COOTBeTCTBnN C NOTpe6HOCTaM N KIneHTOB NO blaarOyctpoiCTBy I O3eJIeHeHIO.
ToproBaMapka KressЯВЯETcR cHOnHMOM npemnaIbHOro kaYeCTBa.Ha npotJxKeHN BCero MHOJTeHrO cPoka cnyK6bl pRn BO3NKnHOBeHN BOpocOB nIN npo6IeM, noKaJIyIcTa, 0bpaauTecb 3a nOMouBIO NO MeCTy npno6peTeHN IIN B Hauy cnyK6by TexHnueCKo nOndepkKn.
Mbl ybepehbl, YTO B TeueHne CneDyUOxN JET 3KcNpyatauIN npodykun Kress npnecet Bam MHOYIOBONbCTBnB pa6ote.
ПРИМЕHEHNE NO HA3HAUYECHNIO
IbuxctyneHcTbI cheroy6oOpHbI annapaT - 3TO MOUHa MaUNHa, pa3pa6oTaHHa I npedHa3NaueHHa dIg 6bICTpOro n 3000eKTHBHO ydaJeHn CINbHbIX ChEROnaIOB.
3TOT npi6op He npedHa3HaeH dIy IcNoIb3OBaHn JIuamn (BkIIOUaJeTei) C orpaHnueHHbIMN fIn3nueckm, CEHCOPHBIM NIIY UMCTBeHHbIMN BO3MOXHOCTaMn, a TaKKe HeNOCTaKOM ONbITa N 3HaHn, ecNI OHn HE NOlyuJIH NaJIeXaJcero Ha6JIIOHeH NII INHCTpyKcIy OT LNuCA, OTBETCTBEHHORO 3a IX 6e3ONaCHOCTb, OTHOCHTeJIbHO IcNoIb3OBaHn DaHHORO pIN6opa. MaunHa He npedHa3HaeHa dIy pe3Kn TBepdbIX MaTePnaIOB, TaKx KaKamH NII MetaJIInueckne MaTePnaJIb I NoUBe Ha MeJIKne YAcTNUbl, a TaKKe He npedHa3HaueHa dIy KOWeHn TpaBbl, Obpe3KN KycTOB, IcNoIb3OBaHn B KaueCTBe nbJIecOca, y6OpKn MyCopa n T. d.
RU
CINCOK KOMNOHEHOB
- Pbyar ynpablenia uHEKOM
- BbIKIOUATEJIb BE3ONACHOCTN
- PERYUNPOBKA CKOPOCTN UHEKA
- YNPABJIEHNE HANPABJIEHNEM BbIbPOCA
- PERYNJNPOBKA CKOPOCTNI NEPEdBNXEHHNA
- Pbyar ynpableny npebdnxxehnem
- CBETOДNOДьE JAMNBI
- BEPXHЯ PYKÖRTKA
- DBYXNOPTOBAR CNIOBAR TONOBKA
- PPyKA PyKoRtKN + BoNT
11 HIXHJpyKoRTKA - PERYNJHPYEMbI E HAKJIaDKN IJRA CHERA
- 61 CM UHEK
- CTaJIbHAR OroJIOBKA
15 CTONOPHbIE BOJtbl+RAJKN - HHCTPYMEHTДЯ OYNCTKJ XEJOBA
-
XEJIOBДЯ BbIbPOCA CHEGA
-
PUYKA PEGYUNPOBKN OTKJIOHEHNA BBIBPOCA
- OTKJOHHTENb BblBPOCA
- KHONKA CBETOДNOIDA
- KHONKA 3ADHERO XODA
- KHONKA BLOKNPBOKN JEJIOBA JIJI BBIBPOCA CHEFA
- AKKYMЛТОРHA BATAPER*
-
CTONOPHbIe BOJtbl + TAIKN (3APACHO)
-
HE BCE ПОKA3AHHBIE ИЛN ONICAHHBIE AKCECCYAPbl BKJIIOUChHbI BCTAHДAPTHYIO NOCTABKy.
OPHUNHAJIbHOEPYKOBODCTBO NO3KCPJLYATAUINBE3OJACHOCTBIPODYKTAOBIHEPABNATEXHNKINBE3OJACHOCTNIPIPNABOTE C3JEKTPOHHCTPym

ДляakKуMnyTOpHbIXMHCTpyMeHTOB
NcNoJIb3OBaHnI INCTpyMeHTa:
Kak nCnoJb3yeTcN HCTpymeH N KaKe MaTePnaJIbI peKyTcN INN CBePJIaTcR.
HCTpymEnB XopoWem COCTOHN.
IcnoIb3OBAHnne npabunbHoro akceccyapa nIa INCTpyMeHTa n obecneueHne ero pe3KocTn nIcnpaBHOCTn.
ПлOTHOCt b 3axBaTа Ha pyKoRrKaX n, ecn INcNoIb3yIOTcKaKHe-JIn6o AkCeCCsyApbl npOTNB Bn6paunn n Wyma.
INHCTpyMeHTNcNoJIb3yETcB COOTBeTCTBUN C IN3aHOM N3TUMN INHCTpyKUJRMN.
3TOT HCTpyMeHT MOKeT BbI3BaTb BN6paUHOHHyO 60ne3Hb pyK n3-3a HenpaBnIbHoro NCNoIb3OBaHna.

BHIMAHNE:YTo6bI 6bItb TOHbIM,
OuHcKa UPOBnBaO3dEiCTBnBa BpeaJIbHbIX
ycnOBnx nCnONb3OBAHn DOnJXHa BbINONHrTbcR,
yUHTbIBaBce Yactn pa6oery OIKNa, TaKne KaK
Bpem, KOrda INHCTpyMeH T BbIKIOueH N KOrda OH
pa6otaet BXoIOcTyO, HO 0aKTnueckn He BbIOnHReT
pa6oty. 3To MoKeT 3NaHTeNbHO ChN3NTb yPoBeHb
BO3DeiCTBnB T TeueHne BCero pa6oery nepNoDa.
Pomoraem MInHMn3npoBaT bN6paunu N IwM.
Bcerda nCnONb3yIte ocTpblc 3y6nla, Cbepna n
JIe3BnJ.
Iopdepxnbte 3TOT INHCTpymEnB COOTBETCTBnC 3TtMM INHCTpyKUJMaN N COXpAHNe T eero XopoOcMaaHHbIM (npn Heo6xOAnMoCTn).
EcnHnCTpymEn6yDet nCNoB3OBaTbcr peYyIaPHO,kyNTe aHTNBb6paCIOHHbIe N IyMOBbIe akceccyapbl.
OTXOaMNI. OHN DOJNXHbI 6bITb DOCTaJIeHbIB MeTHbI CEHTp yTUNIN3aun INI HaJIeXaUeI nepepa60tKn.
Tin moJe nn KG470 KG470.X (470
-обознayaенпдя Maшинь, npedctablaюше co6oakymyIaTOpHbI cherooy6bopuK)
Ha3naYeHne YdaJIeHne chera
CoOTBeTCTByeT NOJIOKeHnM DnpeKtNB,
2006/42/EC, 2014/30/EU, 2011/65/
EU&(EU)2015/863, 2000/14/EC
donoJIHeHHo 2005/88/EC
2000/14/EC donoJHHeHHo 2005/88/EC:
- PpoceDpya OueHKn COOTBETCTBnCOrIaCHO
PpJIOKeHnIO PpJIOKeHne V
-Измерени уровень 3ByKOBOI MOUHOCTN 96 dB(A)
-3aBHeHHbI rapaHTnpOBaHHbI ypOBeHb 3ByKOBOI MOLCHOCTH 97 dB(A)
I cTaHapTaM,
EN 62841-1, EN ISO 8437-2, EN ISO 3744, EN IEC 55014-1, EN IEC 55014-2, EN IEC 63000
JIuO, yNoJHOMOeHHoe COCTaBNTb TEXHueCKn 1
NMa
Marcel Filz
Ampc
Positec Germany GmbH
Postfach 32 02 16, 50796 Cologne, Germany


2023/04/06
Allen Ding
3aMeCTnTeNb rIaBHO rHKeHepa, TcTnpOBaHne n cepTnФnKaun
Positec Technology (China) Co., Ltd
18, Dongwang Road, Suzhou Industrial
Park, Jiangsu 215123, P. R. China
INNEHÄLLSFORTECKNING
Introduktion 126
Komponenter 127
Produktssakerhet. 129
Montering & Hantering 133
Transport. 136
Underhäll 137
Rengoring. 137
Förvaring. 137
Tekniska Data 138
Miljöskydd 139
SV
Deklaration om overensstammelse 140
INTRODUKTION
Bästa kund,