Joy WM5B-200 - Waffle Maker WILFA - Free user manual and instructions
Find the device manual for free Joy WM5B-200 WILFA in PDF.

| Product type | Waffle maker |
| Brand | Wilfa |
| Model | Joy WM5B-200 |
| Dimensions (approx.) | 25 x 25 x 10 cm |
| Weight (approx.) | 1.5 kg |
| Power supply | 230 V ~ 50 Hz |
| Power consumption | 1000 W |
| Plate material | Non-stick coating |
| Number of waffles at once | 1 |
| Thermostat adjustment | Yes, adjustable |
| Indicator lights | Red (power on) and green (ready) |
| Audible signal | Yes, can be turned on/off |
| Safety | Automatic shut-off not mentioned; do not immerse |
| Included accessories | Measuring ladle |
| Cleaning | Damp cloth, do not use metal objects |
| Warranty | 5 years |
| Recipe included | Yes, for about 22-28 waffles |
| Use | Indoor household use only |
Frequently Asked Questions - Joy WM5B-200 WILFA
User questions about Joy WM5B-200 WILFA
0 question about this device. Answer the ones you know or ask your own.
Ask a new question about this device
Download the instructions for your Waffle Maker in PDF format for free! Find your manual Joy WM5B-200 - WILFA and take your electronic device back in hand. On this page are published all the documents necessary for the use of your device. Joy WM5B-200 by WILFA.
USER MANUAL Joy WM5B-200 WILFA
natural_image
Black wifa grater and ladle on a white background (no text or symbols visible)JOY
WAFFLE IRON WM5B-200
EN · Instruction manual
NO · Bruksanvisning
SE · Bruksanvisning
IMPORTANT SAFETY INSTRUCTIONS
- Do not touch hot surfaces. Use the handle or thermostat button.
- The outer surface may get hot when the appliance is in use.
- To protect against risk of electrical shock, do not immerse the cord, plug or appliance in water or other liquid.
- Close supervision is necessary when any appliance is used by or near children.
- Unplug from outlet when not in use or before cleaning the appliance.
- Do not let the cord hang over the edge of a table or counter, or touch hot surfaces, including the stove.
- Do not place the appliance on or near a gas or electric burner, or other heated oven.
- To disconnect the appliance, remove plug from wall outlet.
- Do not use the appliance for things other than for what it was intended.
- If the supply cord is damaged, it must be replaced by the manufacturer, its service agent or similarly qualified persons in order to avoid a hazard.
- The appliance is not intended to be operated by means of an external timer or separate remote-control system.
- This appliance can be used by children aged from 8 years and above and persons with reduced
physical, sensory or mental capabilities or lack of experience and knowledge if they have been given supervision or instruction concerning use of the appliance in a safe way and understand the hazards involved. Children shall not play with the appliance. Cleaning and user maintenance shall not be made by children unless they are older than 8 and supervised. Keep the appliance and its cord out of reach of children aged less than 8 years.
- This product is intended for indoor, non-industrial, non-commercial, household use only.
Note:
- A short power cord is provided to reduce the hazards resulting from entanglement or tripping over a longer cord. An extension cord may be used with care; however, its marked electrical rating should be at least as great as the electrical rating of this appliance. The extension cord should be positioned such that it does not hang over the counter or tabletop where it can be pulled on by children or tripped over.
- The electrical rating of this appliance is listed on the appliance's rating plate.
BEFORE USING FOR THE FIRST TIME
Before using for the first time, the hotplates should be cleaned with a moist cloth. We recommend lightly greasing the hotplates when using the appliance for the first time. This will not be necessary on subsequent occasions. The first waffle should not be eaten.
EN
MAKING WAFFLES
- Insert the plug into a standard electrical outlet. Make sure that the voltage to be used agrees with the rated voltage of your appliance.
- Close the waffle iron and prepare waffle batter while the waffle iron heats up. Set the thermostat regulator to the desired setting.
- The power (red), indicator lights will light up. When the green indicator lights up (after about 4 minutes), the waffle iron is ready for baking.
- Open the appliance and pour the waffle batter onto the centre of the lower hotplates. Using the included ladle will result in the correct amount of batter being used. Close the appliance carefully. Do not force shut. Steam may be ejected from between the hotplates.
- When the green indicator light turns off, the red indicator light will light. After few minutes the green light will light up and the waffle is ready.
- If you think the waffle is too light or too dark, adjust the thermostat.
Note:
- Care must be taken to ensure that fingers do not come into contact with the hotplates.
- During baking, the ready light will turn on and off as the thermostat keeps the waffle iron at the right temperature.
- Your waffle will bake in about 2 minutes or longer depending on your personal tastes. When baking is finished, open the waffle iron and remove the waffle with a plastic or wooden spatula. Never use a metal knife as this may damage the non-stick coating. The appliance should be kept closed in-between baking waffles.
• After use, remove the plug from the wall socket.
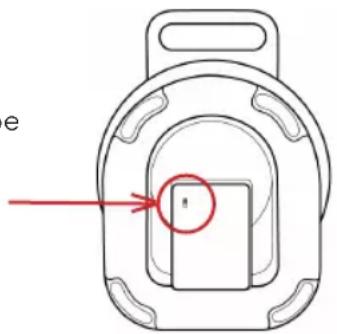
AUDIO SIGNAL
This model is equipped with an audio signal, which can be turned on and off. The on/off button is found under the waffle iron (see illustration).
text_image
eHELPFUL HINTS
- Always preheat the waffle iron before baking. Plug the waffle iron in first, and prepare the batter while the waffle iron is heating.
- If you want light-coloured waffles, turn the thermostat lower (anti-clockwise). If you prefer darker waffles, turn the thermostat higher (clockwise).
- If the lid resists lifting allow the waffle to bake a little longer, and then try lifting the lid again.
- If the waffle sticks to the top cooking plates, remove them with a plastic or wooden spatula.
- Let waffle cool slightly on an oven grate before eating to avoid possible
burns.
- Top baked waffles with different fruits or ice cream to create your own specialties.
- The included ladle measures out the correct amount of batter.
- These waffle irons hotplates are a new, revolutionary design. The coned design ensures that the batter is evenly distributed and that all the air is pressed out of the waffle iron. It is therefore not necessary to spread out the waffle batter using a ladle or similar. This is done automatically when you close the waffle iron.
CLEANING
- Always pull out the plug before any cleaning operation and allow the appliance to cool down.
- Never immerse the appliance in water or hold it under running water.
- Wipe down the casing with a moist cloth only.
- Clean the hotplates after they have cooled down with a moist cloth or with a very soft brush.
- Never use sharp or pointed objects or any abrasive cleaning agents for cleaning purposes.
WAFFLE RECIPE
22-28 waffles:
6 egg
2 dl sugar
9.5 dl milk
1.2 L flour
2 tsp baking powder
1 tsp vanilla sugar
1 tsp vanilla extract
3 dl sour cream
180 g melted butter
- Beat eggs and sugar together in a bowl until it thickens and the colour is pale yellow.
- Switch mix the flour, baking powder, vanilla sugar and the milk into the egg and sugar mix.
- Put in melted butter and the sour cream, lastly vanilla extract, and mix it together.

text_image
BEYOND EXPECTATIONS 5 SINCE 1948 YEAR GUARANTEEGUARANTEE
Wilfa issues a 5 year guarantee on this product from the day of purchase. The guarantee covers production failure or defects that arise during the guarantee period. Your purchase receipt works as proof towards retailer if claiming your guarantee.
The guarantee is valid only for products that are bought and used in private households. The guarantee is not valid if the product is used commercially. The guarantee is not valid if the product is misused, used by negligence, if not following instructions given by Wilfa, if modified or if unauthorized reparation is done. The guarantee is also not valid for normal wear of the product, misuse, lack of maintenance, use of wrong electrical voltage or:
• Overloading of product
- Coating
Instruction manual is also available at our website; wilfa.com
PRODUCT SPECIFICATIONS
220-240V \~ 50/60Hz 900W
SUPPORT AND SPARE PARTS
For support please visit us at wilfa.com, and see our customer service/support page. Here you will find frequently asked questions, spare parts, tips and tricks and all our contact information.
RECYCLABILITY
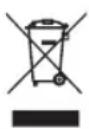
This marking indicates that this product should not be disposed with other household wastes throughout the EU. To prevent possible harm to the environment or human health from uncontrolled waste disposal, recycle it responsibly to promote the sustainable reuse of material resources. To return your used device, please use the return and collection systems or contact the retailer where the product was purchased. They can take this product for environmentally safe recycling free of charge.
NO
NO
INNHOLD
12 SIKKERHETSANVISNINGER
13 F∅R F∅RSTE GANGS BRUK
14 HVORDAN LAGE VAFLER
14 NYTTIGE TIPS
15 RENGJ∅RING
15 VAFFELOPPSKRIFT
16 GARANTI
17 PRODUKTSPESIFIKASJONER
17 SUPPORT OG RESERVEDELER
17 GJENVINNING
SIKKERHETSANVISNINGER
natural_image
Diagram of a mechanical component with a red arrow pointing to a square feature (no text or symbols)NYTTIGE TIPS
natural_image
Diagram of a mechanical component with a red arrow pointing to a central square feature (no text or symbols)HYÖDYLLISIÄ NEUVOJA
46 SO MACHEN SIE WAFFELN
47 HILFREICHE TIPPS
47 REINIGUNG
48 WAFFELREZEPT
50 GARANTIE
51 PRODUKTDATEN
51 SUPPORT UND ERSATZTEILE
51 RECYCLINGFÄHIGKEIT
SO MACHEN SIE WAFFELN
natural_image
Diagram of a mechanical component with a red arrow pointing to a central square feature (no text or symbols)HILFREICHE TIPPS
natural_image
Diagram of a device with a red circle highlighting a component, no text or symbols presentHANDIGE TIPS
1 tl vanille-extract
3 dl zure room
180 g gesmolten boter
natural_image
Diagram of a mechanical component with a red arrow pointing to a central square (no text or symbols)POMOCNE WSKAZÓWKI
CARACTÉRISTIQUES DU PRODUIT
220-240V \~ 50/60Hz 900W
ASSISTANCE ET PIÈCES DÉTACHÉES
natural_image
Technical line drawing of a mechanical component with a red arrow pointing to a specific part (no text or symbols present)SUGGERIMENTI UTILI
natural_image
Technical line drawing of a mechanical component with a red arrow pointing to a central square (no text or symbols)CONSEJOS ÚTILES
text_image
FSC www.fsc.org 100% From well- managed forests FSC® C000000WM5B-200_20_01