Findoo Profiline Uno - Inspection camera dnt - Free user manual and instructions
Find the device manual for free Findoo Profiline Uno dnt in PDF.

User questions about Findoo Profiline Uno dnt
0 question about this device. Answer the ones you know or ask your own.
Ask a new question about this device
Download the instructions for your Inspection camera in PDF format for free! Find your manual Findoo Profiline Uno - dnt and take your electronic device back in hand. On this page are published all the documents necessary for the use of your device. Findoo Profiline Uno by dnt.
USER MANUAL Findoo Profiline Uno dnt
Findoo Profi line Uno
Bedienungsanleitung
user manual
Mode d'emploi
Gebruiksaanwijzing
natural_image
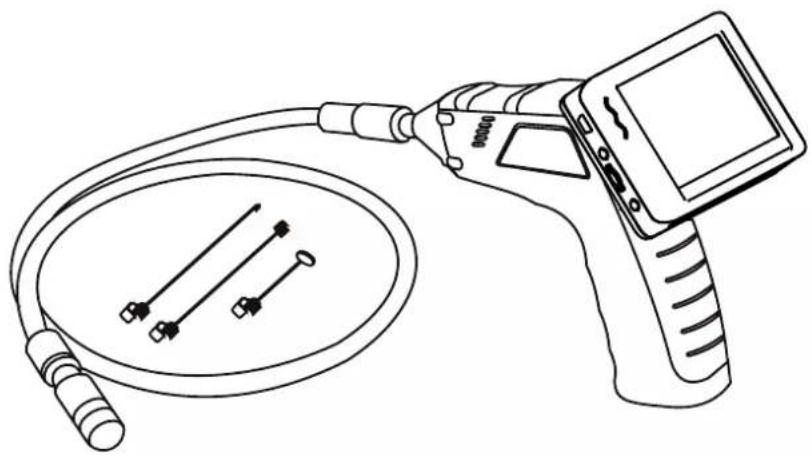
Line drawing of an endoscopic medical device with a coiled tube and three inserted pins (no text or symbols)Inhalt
natural_image
Line drawing of a device with buttons and a hand holding a belt (no text or symbols)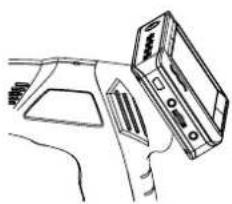
natural_image
Line drawing of a car interior showing dashboard and steering wheel (no text or symbols)Betrieb
Betrieb
natural_image
Diagram showing a device with an arrow pointing to it, no text or symbols presenttext_image
Language OK: ✓ EnglishSprache auswählen:
text_image
Video system NTSC OK: ✓ NTSC PAL NTSC NTSCVideoformat:
Security instructions ....19
delivery content 20
Appliance description
Appliance description 21
Getting started
Insert batteries 22
Installing imager head cable 22
Installing the accessories 23
Charging the battery in the monitor 23
Mounting the monitor 23
Operation
Hand grip 24
Monitor functions 24
Recording Videos and Photos 25
Videos and Photos playback 26
Videos and Photos deleting 28
Settings, Menu 29
Connect the monitor to the computer ....31
Technical specification 3
Disposal of electrical and electronic equipment ....33
Service information 33
Declaration of Conformity 33,66
Warranty regulations 67
Security instructions

Please read this information carefully before you use the product.
General instructions
- Don't place the unit on unstable location, if it falls down, people may be injured.
● The unit is not a toy, please beware of small children. - If you connect the unit to other electronic devices, please study also the security instruction of this device.
- If you have any question regarding the unit, how it works, the safety or the correct connection please contact our technical support or ask any specialist.
● The seller will not be liable for any damages caused by misuse of the product and any claim from third parties.
Environmental conditions
- Don't drop or shake the unit, it might be damaged.
● Avoid too high pressure to the LC-display, it might be damaged. - Don't leave the unit where the temperature is higher than 60°C, e.g. in cars with closed windows in the summertime, near heaters or any other type of heat source.
- Don't use the unit in rooms with high humidity e.g. bathrooms. Parts of the apparatus, tube and mini camera, are water proofed See technical specifications for details
- Don't use the unit at dusty places.
Technical problems
- In case any foreign material or liquid gets into the product, please immediately remove the power cord. Before you use it again, ask your authorised dealer to check the product carefully.
- Please do not hesitate to contact our service center.
Packaging material
- Please don't keep any packaging material within reach of small children. It can become a dangerous toy.
Maintenance
- Please remove the battery in case you don't use the product for a longer period of time. Leaking batteries can damage the product. Store the product at a clean and dry place.
● For cleaning use dry and soft cloth.
Delivery content
Interference by radio
- The apparatus operates on a frequency, which is also used by other devices, that transmits video by radio. In some cases this may cause interferences.
Delivery content
English
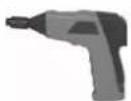

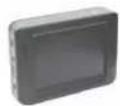
Hand grip 9mm Tube with mini camera TFT monitor
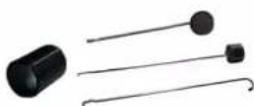
Hook, Magnet, Mirror
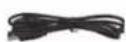
USB

Video
cable


CD Charger/Power supply for the monitor 4 x AA Batteries
Getting started
Appliance description
text_image
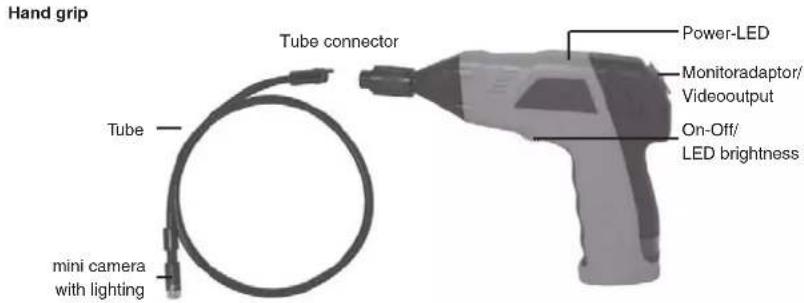
Hand grip Tube connector Power-LED Monitoradaptor/ Videoutput On-Off/ LED brightness Tube mini camera with lightingEnglish
Monitor
text_image
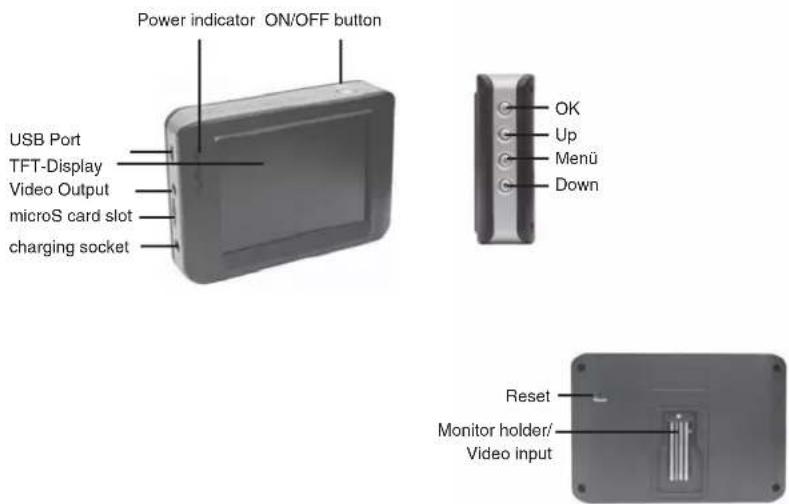
Power indicator ON/OFF button USB Port TFT-Display Video Output microS card slot charging socket OK Up Menü Down Reset Monitor holder/ Video inputGetting started
Insert Batteries
Insert the batteries into a battery box in the grip.
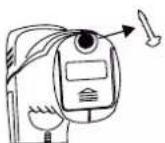
- Remove the screw using a screwdriver on the lower side of the grip.
English
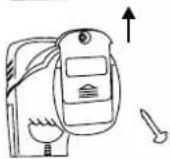
- Slide the cover in the direction of the arrow.
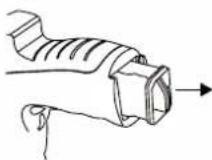
- Remove the battery compartment.
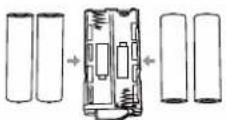
- Insert four new batteries(included) into the slots of the battery compartment.
The proper orientation of the batteries is indicated on the compartment.
- Install the battery cap into place.

Always exchange a complete set of new batteries.
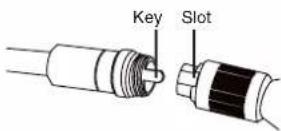
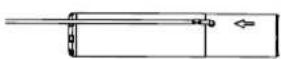
Installing the imager head cable
To use the Findoo the imager head cable must be connected to the hand grip. Be sure that the key and slot are properly aligned. Once they are aligned, finger tighten the knurled knob to hold the connection in place.

Getting started
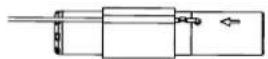
Installing the accessory
The accessories consist of 3 parts, a mirror, a magnet and a hook, which are all attached to the imager head on the same way. The accessories have 2 mounting positions on the imager head.
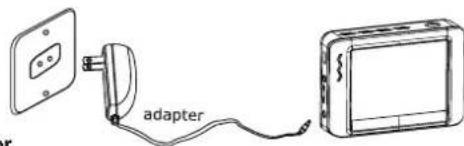
Charging battery in the monitor
The monitor has a built-in Li-Ion battery. A fully charged battery is enough for approx. 2 hours. Recharging the battery takes about 3 hours.
● During charging the power LED indicates red.
● The monitor can be used during charging.

Inspect the inspection camera before use and correct any problems to reduce the risk of serious injury from electric shock and other causes and prevents tool damage.
text_image
adapterMounting the monitor
The monitor can be operated wireless or fixing on the hand grip. On the rear side of the hand grip are 4 connectors and a fitting, where the monitor can be mounted.

text_image
Slide the monitor downwardOperation
Operation
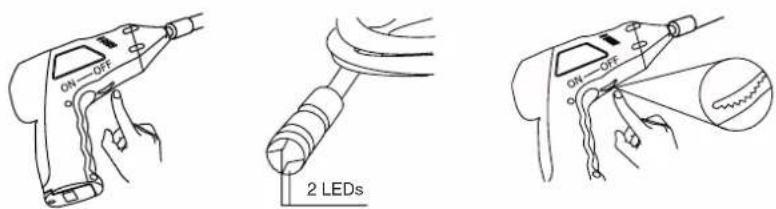
Turn on the power at the bottom side of the hand grip. The power indicator lights. The switch acts also as a dimmer for the twin LEDs at the imager head.

Don't buckle the tube. The min. inside radius of the 9mm camera tube should not go below 7 cm. This depends on the environmental temperature.
Monitor
Turn the monitor on with the Power ON/OFF button. The power indicator lights. Setup a suitable lighting on the hand grip. In the next step setup channel 4 (CH4) for the transmission. Press and hold the Power ON/OFF button to turn the monitor off.

Selection photo or video recording
Pressing repeatedly to select channel 4
The signal transmission from hand grip to monitor uses the connector if the monitor is mounted on the hand grip. If not, the transmission is wireless via radio.

The range between monitor and hand grip is up to about 5m. In some cases the range can be up to 10m. The transmission range may vary according to the weather, location, interference and building construction.
Operation
Monitor, Setup and Operation
The monitor can act as a video recorder. You can make sapshots and videos, which are stored on the microSD card. The internal memory can not be used for records.
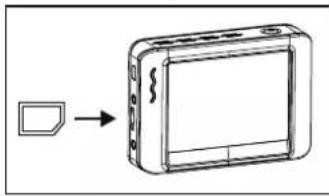
Insert SD Card (the SD card is optional)
natural_image
Diagram showing a device with a square outline pointing to its screen (no text or symbols present)The microSD card slot has a built-in spring mechanism. After pushing the card it locks in place. If you have not pushed it in completely, it might jump away because of the power of the spring and low weight.
A microSD card is in the slot.
F The memory in the SD card is full
No SD card in the slot
To record a video
In the realtime monitoring status, press 🔊 button to enter VIDEO status as follows:
- Press OK button to start the record.

text_image
Capacity Of Battery VIDEOicon Date/ time 2009/02/11 14:50:40 CH4 Current Channel SD Card Icon remaining time [00:45:43]After the recording is started the display shows:
text_image
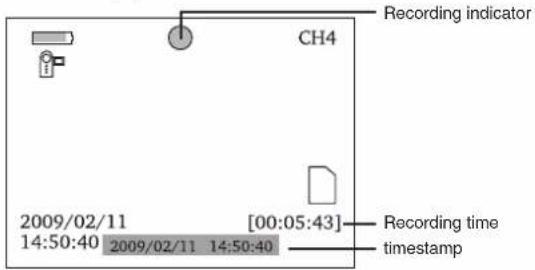
CH4 Recording indicator 2009/02/11 14:50:40 2009/02/11 14:50:40 [00:05:43] Recording time timestampTo stop recording press OK button again.

The video is automatically saved in a file every 30 minutes.
Operation
To take a photo
In the realtime monitoring status, press 🔊 button to enter the photo mode as follows:
● Take a photo with the OK button.
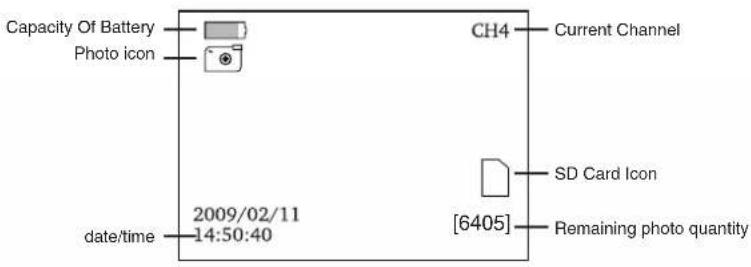
text_image
Capacity Of Battery Photo icon CH4 Current Channel SD Card Icon [6405] Remaining photo quantity date/time 2009/02/11 14:50:40Playback of photos and videos
- Press the=button.
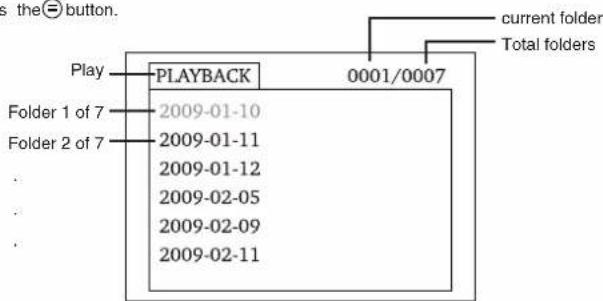
text_image
play PLAYBACK 0001/0007 current folder Total folders Folder 1 of 7 2009-01-10 Folder 2 of 7 2009-01-11 2009-01-12 2009-02-05 2009-02-09 2009-02-11- The first layer show the folders, which are created by the unit. The date, where the records are created, is the name of the folder.
- Select a folder with the ⚠️ Buttons and press the OK button.
● The second layer shows a list of records.
Operation
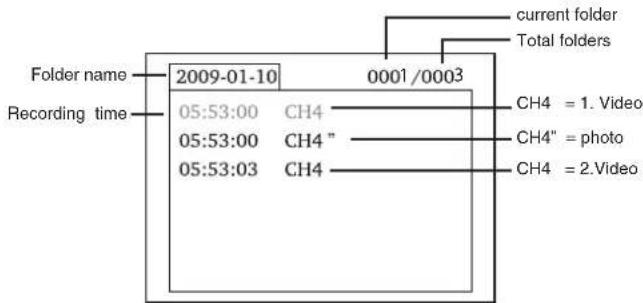
text_image
Folder name Recording time 2009-01-10 05:53:00 CH4 05:53:00 CH4" 05:53:03 CH4 0001/0003 current folder Total folders CH4 = 1. Video CH4" = photo CH4 = 2.Video
The " character with CH4 Indicates, that the fl le is a photo.
Playback a video:
- Select a video with ▲buttons and press OK button to confirm.
● For pause press OK button - For fast forward press and hold the button.
- For fast backward press and hold the 📋 button.
- To exit press button.
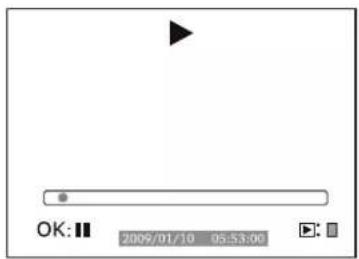
text_image
OK: Ⅱ 2009/01/10 05:53:00Playback photos:
- Select a photo with 🔒 buttons and press OK button to confirm.
- To exit press OK button.
Operation
To delete videos and photos
- Choose a video or a photo as described previously.
- Press the ≡ key for approx. 2 seconds.

text_image
2009-01-10 0002/0005 DELETE CURRENT FILE? 05:53:03 CH5 NO 05:56:40 CH5 YES 05:59:03 CH5 06:05:17 CH5- Choose YES with the ⚠️▼key and confirm with the OK key.
● To cancel, choose NO and confirm with OK key.
Delete folder
- Choose a folder as described just now.
- Press the Ⓔ key for approx 2 seconds in order to delete the folder.
- If the folder is not empty, you receive the following message: NOT EMPTY
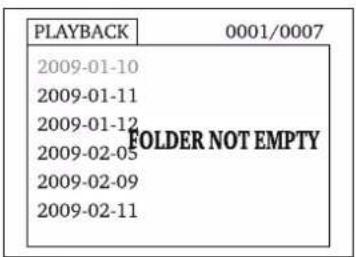
text_image
PLAYBACK 0001/0007 2009-01-10 2009-01-11 2009-01-12 2009-02-05 FOLDER NOT EMPTY 2009-02-09 2009-02-11- Delete the file in the folder

Only an empty folder can be deleted.
Settings
The monitor has a menu where various adjustments can be done, like the language, the framerate, format of the memory etc.
- In order to reach the adjustments, press the Ⓞkey for approx. 2 seconds..
Operation
- For further procedure it makes sense to check, whether the right OSD language is selected.
- If the monitor language is set wrong, press the OK key twice to reach the selection menu. There the country flags are shown.
- Choose the correct flag and confirm with OK key
Menu navigation:
▲▼Keys: Choice of a menu entry
OK-key: Confi rm choice
key: back in menu, interruption, leave the menu
● The main menu is set up as follows:
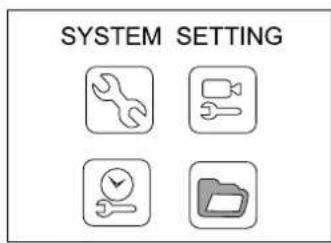
text_image
SYSTEM SETTING
System setting: choose language, video system, format of the memory, favorite adjustments (factory adjustments) software version of the monitor
text_image
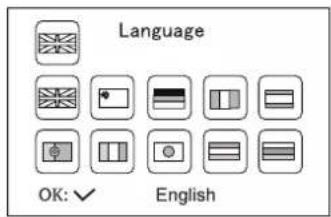
Language OK: ✓ EnglishChoose language:
Following languages are implemented english, easy chinese, german, french, spanish, portugiese, italian, japanese, dutch and russian.
text_image
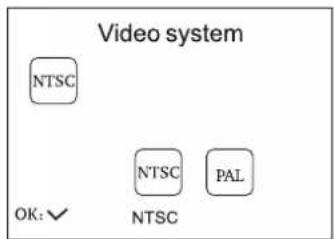
Video system NTSC OK: ✓ NTSC PAL NTSC NTSCVideo system:
PAL and NTSC are available as video system
Operation

text_image
FORMAT WILL ERASE ALL DATA ARE YOU SURE? NO YESFormat:
By formatting, the content of the complete card is erased. For this reason an additional confirmation prompt appears.
To format choose YES, for program termination choose NO.
Confir rm with OK key.
text_image
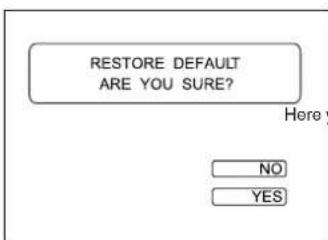
RESTORE DEFAULT ARE YOU SURE? Here NO YESFactory reset:
You can restore all setups of the monitor to factory setting.
Here you receive a confirmation prompt on the monitor. To reset choose YES, for termination choose NO, confirm with OK key
text_image
Frame Rate Fps The 30 FPS ▲▼ OK: ✓
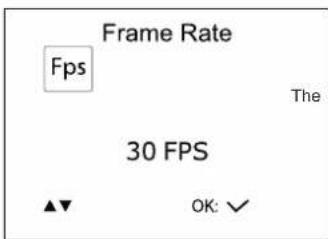
Recorder settings:
FPS, time stamp on/off, Preset Video or photo mode
The setting of picture rate per sec. affects the quality of the video. The more photos are taken per second, the better is the playback. However, the memory usage increases with higher picture rate.
text_image
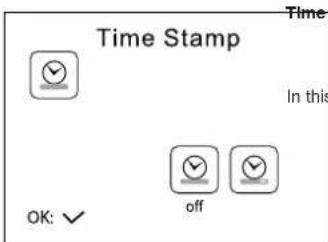
Time Stamp In this OK: ✓ offTime stamp: In many cases it makes sense to document the date and time for documentation in order to see date and time on the video upon viewing on the computer.
In this menu it can be defined, whether photos and videos must be marked with a time stamp. Choose OFF for time stamp off or ON for time stamp on.
Operation
text_image
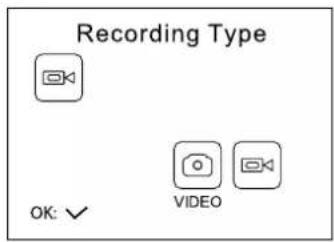
Recording Type OK: ✓ VIDEORecording photos or videos
Type: Select the favorite mode of the monitor
text_image
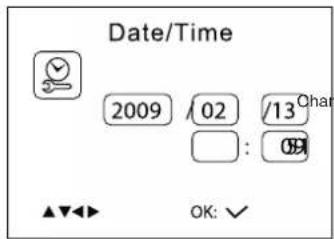
Date/Time 2009 02 13 Char : 09 ▲▼▼ OK: ✓
Date/Time: Date and time must be adjusted correctly so the correct time and date is marked on the video
the input position with the OK key. Adjust the value with the 🔒 keys. Exit the menu with the key.
English

Playback: Choose this menu when you want to start playback on the monitor. The selection occurs as described on page 10
software and connection to the computer
As soon as the monitor is connected to the computer via USB cable, it is set up as USB device. A corresponding symbol appears on the computer. The hardware installation can take a few minutes, depending on the operation system.
After the unit is set up on the computer, you can copy and delete videos or photos, like a harddisk. Should you have problems to play the videos, pls. install the video-player with the CD from the delivery content.
Technical data
hand grip
Imaging Sensor CMOS
Total Pixels 640 x 480
Horizontal View Angle 45°
Transmission Frequency 2468 MHz
Minimum Illumination 0 Lux
Modulation Type FM
Bandwidth 18 MHz
Unobstructed Effective Range 10 m
Power Supply 4xAA Batteries
Handle Dimensions(WDXH) 186 x 145 x 41(mm)
Weight(camera and handle) 450 g
camera diameter 9 mm
monitor
LCD Screen Type 3.5 ^® colour TFT
Resolution 320 x 240
Videosystem PAL/NTSC
Transmission Frequency 2414, 2432, 2450, 2468 MHz
Supply Voltage built-in Li-Ion-Akku
Exterior Supply Voltage 5V/500mA
Videopegel 0,9-1,3Vpp / 75Ohm
Picture/Video Pixels 640 x 480
Video Size 27MB /minute
Frame Rate 30 frame/second
Dimensions(W x D x H) 100x70x25mm
Weight(About) 140g
Operating Temperature -10°C\~+50°C/+14°F\~+122°F
Operating Humidity 15-85%RH

If the monitor is In an operating condition, which deviates from the function mode described here, it can be necessary to do a reset. Bend a paper clip upward in a 90° position and press with the paper clip carefully the RESET key, which is absorbedly inserted on the back of the monitor.
Declaration of conformity/Service information
Declaration of conformity
Hereby, dnt GmbH, declares that this Findoo Profi line Uno is in compliance with the essential requirements and other relevant provisions of Directive 1999/5/EC. Please see page 66 also.
The declaration of conformity for this product can be downloaded from:
http://www.dnt.de/conformity
Disposal of electrical and electronic equipment
This symbol on the product or in the instructions means that your electrical and electronic equipment should be disposed at the end of its life separately from your household waste. There are separate collection systems for recycling in the EU.
For more information, please contact the local authority or your retailer where you purchased the product.
Batteries do not belong into the domestic refuse. Empty batteries must be delivered to the specially arranged collecting points.
Service information
In case of complaints your device shows a defect, please consult your dealer or contact the service department of dnt to agree a servicing.
Service time: Monday until Thursday from 8.00-17.00h
Friday from 8.00-16.00h
Hotline/service: +49 6074 3714 31
E-mail: support@dnt.de
Please do not send your device to our address without request by our service team. The expense and the risk of loss are for debits of the sender. We reserve to refuse the unrequested shipment or return corresponding goods to the sender at buyer's risk and expense.
Contenu
natural_image
Line drawing of a device with ports and a hand holding a connector (no text or symbols)
natural_image
Line drawing of a car interior showing hand positioning and door panel (no text or symbols)Fonctionnement
Fonctionnement
Dimensions 100x70x25mm
Poids 140g
Plage de température -10^ -+50°C/+14°F-+122°F
Haak, magneet, spiegel
natural_image
Line drawing of a handheld electronic device with ports and a hand holding a connector (no text or symbols visible)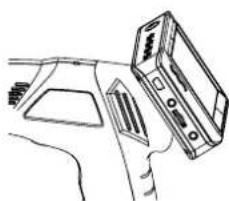
natural_image
Line drawing of a car interior showing dashboard and steering wheel (no text or symbols)Bedrijf
Bedrijf
text_image
Taal OK: ✓ EnglishTaal selecteren:
EC-Declaration of Conformity

marking
We, Manufacturer/Importer
D-63128 Dietzenbach, Germany
Declare that the product Findoo Profi line Uno
is in conformity with
Council Directive 1999/5/EC (R&TTE Directive)
EN 300 440-2 V1.1.2(2004-07)
EN 301 489-3 V1.4.1 (2002-08)
EN 301 489-1 V1.6.1 (2005-09)
EN 60065:2002+A1:2006
EN 50371:2002
2005/32/EC 2005(EC Regulation 1275/2008)
2005/32/EC 2005(EC Regulation 278/2009)
C€1313
Contact person: Reinhold Bauer
Tel. +49 (0)6074 37140
Dietzenbach October 28th, 2009
R.Bauer


Garantiebedingungen
Warranty regulations
- In general the European warranty regulations are valid. Warranty starts with receipt of unit. In a warranty case, please submit the unit together with invoice, unit pass and error description. Without these documentary evidence we are not obliged to a warranty performance.
- During warranty period we repair all constructional or material defects which are caused by a manufacturing fault. It is in the decision of the manufacturer to change or replace defective parts/units. Further claims are excluded. Changed parts will automatically go over into our property. We will not be held responsible for future damages.
- Manipulation on the unit through non-authorized companies/persons automatically leads to an end of warranty period.
- Excluded of warranty claims are damages due to improper treatment, not following the manual, oxidation of batteries, permanent usage.
- The initial warranty period is not extended because of repair or replacement of parts.
- These warranty regulations are valid in the Federal Republik of Germany.
Application de la garantie
Stamp and signature of the dealer