
GIGASET 4000 MICRO - Cordless phone SIEMENS - Free user manual and instructions
Find the device manual for free GIGASET 4000 MICRO SIEMENS in PDF.

| Product Type | Cordless Phone |
| Brand | Siemens (Gigaset) |
| Model | Gigaset 4000 Micro |
| Power Supply | Rechargeable NiMH 500 mAh battery, mains adapter included |
| Standby Time | Up to 250 hours |
| Talk Time | Approx. 15 hours |
| Charging Time | Approx. 5.5 hours |
| Range | Up to 300m outdoors, 50m indoors |
| Display | Icon display (status, charge, reception) |
| Directory | Up to 200 entries |
| Main Features | Hands-free, redial of last 5 numbers, alarm, appointments, messaging, room monitoring, walkie-talkie mode, call waiting/transfer |
| Keypad | Alphanumeric, navigation keys, screen keys |
| Connections | Headset/MP3 player jack |
| Compatibility | Works with Gigaset bases (GAP) |
| Care and Cleaning | Wipe with a damp or anti-static cloth, do not use a dry cloth |
| Safety | Use only approved battery, do not expose to water, do not use in explosive atmosphere |
| Spare Parts | Battery (ref. V30145-K1310-X125 or -X229), desktop charger (ref. L36880-N4001-X109-A102) |
| Repairability | Legal warranty, standard repair or replacement by Siemens customer service |
| Dimensions | Approx. 150 x 50 x 30 mm (estimate) |
| Weight | Approx. 130 g (with battery) |
Frequently Asked Questions - GIGASET 4000 MICRO SIEMENS
User questions about GIGASET 4000 MICRO SIEMENS
0 question about this device. Answer the ones you know or ask your own.
Ask a new question about this device
Download the instructions for your Cordless phone in PDF format for free! Find your manual GIGASET 4000 MICRO - SIEMENS and take your electronic device back in hand. On this page are published all the documents necessary for the use of your device. GIGASET 4000 MICRO by SIEMENS.
USER MANUAL GIGASET 4000 MICRO SIEMENS
Gigaset Communications GmbH is the legal successor to Siemens Home and Office Communication Devices GmbH & Co. KG (SHC), which in turn continued the Gigaset business of Siemens AG. Any statements made by Siemens AG or SHC that are found in the user guides should therefore be understood as statements of Gigaset Communications GmbH.
We hope you enjoy your Gigaset.
Gigaset Communications GmbH is a trademark
licensee of Siemens AG
© Gigaset Communications GmbH 2008
All rights reserved.
Subject to availability. Rights of modifications reserved.
Operating instructions
Mode d'emploi
Istruzioni d'uso
natural_image
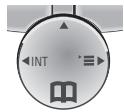
Simple diagram of a curved object with a blue double-headed arrow indicating vertical motion (no text or symbols)Steuer-Taste

natural_image
Two remote control switches with directional arrows indicating movement (no text or symbols)Mobilteil anmelden
Schritt 1:
Menü öffnen.
natural_image
3D rendered image of a remote control device with a handle and scroll (no text or symbols visible)Operating instructions
and safety precautions


The display is protected by a plastic film.
Remove the plastic film.
Status LED (light-emitting diode)
lights up during a call; flashes at:
- Incoming call
- New messages
– Alarm call, appointments, anniversaries
Reception strength
Control key
Talk key
- Accept call
- Dial number
- Switch from hands-free talking to handset
Open the directory
Key 1
Hold down to select Answ. machine/Mailbox
Asterisk key
Hold down to activate and deactivate the ringer
Keypad protection
On/off hold key down!
Handsfree key
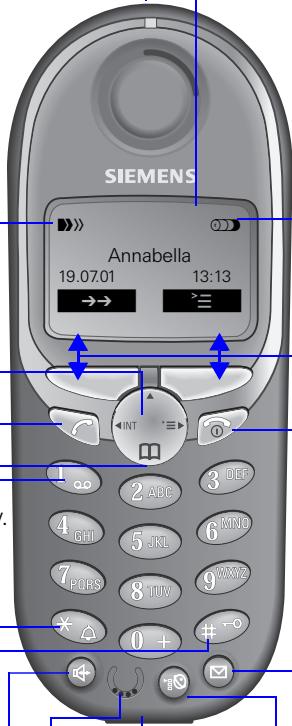
Microphone
Socket
- for Headset, MP3-Player
Display (display field)
Charging status
empty
full
flashes: Battery low
Current functions and display keys
With the display keys, you have access to the current functions.
End call and On/Off key
- End call
- Cancelling function
- One menu level back (press briefly)
- Return to idle state (hold down)
- Handset on/off (hold key down)
Caller list
Access to message lists
Sel Services key
- Open network access list: press briefly!
- R key function: hold key down!
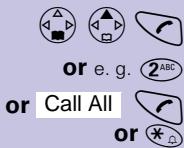
Interaction between control key and display keys
Display keys


With the display keys you can carry out functions that can also be partly controlled with the control key.
The side of the control key which you must press is indicated in the operating instructions by arrows:


(left/right)


(top/bottom)
Control key
Important menus

flowchart
graph TD
    A["Text Message*"] --> B["OK"]
    C["Sound Settings"] --> B
    D["Call Charges"] --> B
    E["H/Set Settings"] --> B
    F["Base Settings"] --> B
    G["Answer Machine"] --> B
    H["Handset Volume"] --> B
    I["Ringer Settings"] --> B
    J["Advisory Tones"] --> B
    K["New Entry"] --> L["Display Number"]
    L --> M["Available Memory"]
    N["Anne"] --> L
    O["Barbara"] --> L
    P["Chris"] --> L
    Q["Delete Entry"] --> L
    R["Copy Entry"] --> L
    S["Delete List"] --> L
    T["Send List"] --> L
Display symbols
The following symbols appear above the display keys depending on the situation:
| Display keys | Meaning |
| ≡ | Menu key: Activates the main menu when the phone is idle. During a call, it activates a menu for the particular situation. |
| OK | Selects and confirms the menu function. Ends and saves an entry. |
| ← | Delete key (Backspace): Deletes characters from right to left. |
| →→ | Automatic redial key: Opens a list of the last five numbers dialled. |
| ✉ | Displayed if SMS*, answering machine, mail service box or caller list is active |
| → | One menu level back, cancel |
* Not available in all countries
Safety precautions


Only use the power supply unit supplied as indicated on the underside of the device.

Only insert approved rechargeable batteries of the same type. Never use ordinary (non-rechargeable) batteries as they may pose a health hazard or cause injury.

Make sure the rechargeable battery is inserted the right way round

Use the battery specified in these operating instructions

The phone may affect medical equipment so always switch your phone off before entering hospitals or doctors' practices.

The handset may cause an unpleasant humming noise in hearing aids.

Do not operate the phone in places where there is a risk of explosion (such as paint workshops).

The handset is not splash-proof.

Drivers must not use the phone while driving (including the walkie-talkie function).

The phone must be switched off at all times in an aircraft (including the walkie-talkie function). Make sure it cannot be switched on accidentally.

If you give your Gigaset to someone else you should also give them the operating instructions.

Dispose of batteries and the phone carefully. Do not pollute the environment.
Not all the functions described in these operating instructions are available in all countries.
Contents
Brief overview of the handset 2
Interaction between control key and display keys. 2
Important menus 3
Display symbols 3
Safety precautions 4
Preparing the handset....6
Delivery package....6
Inserting the battery 6
Registering the handset 6
Charging the battery 7
Attaching the belt clip 7
Setting the date and time 8
Changing the display language 8
Making calls 9
Making an external call 9
Making internal calls 9
Answering a call 9
Handsfree talking....10
Forwarding an external call, enquiry call ....10
Automatic redial....11
Directory and network access list 12
Speed dialling from the network access list ....13
Dialling with speed dialling 13
Settings 17
Setting the alarm clock 17
Deactivating the alarm clock 17
Turning off the alarm call....17
Handset and loudspeaker volume....19
Activating/deactivating warning and signal tones .....20
Activating/deactivating the vibration alarm .....21
Auto talk feature on/off .....21
Room monitoring (babyphone)....22
Walkie-talkie mode 24
Appendix 25
Operating on base stations in the Gigaset family .....25
Range 26
Guarantee 26
Service: 26
Press Keys:
Preparing the handset
Delivery package
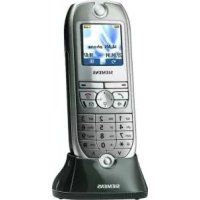
Gigaset 4000 Micro handset, one battery, charging unit, belt clip, operating instructions.
Inserting the battery
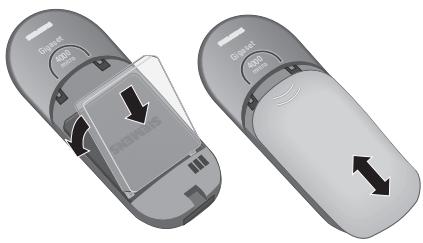
natural_image
Two grayscale images showing a device with labeled buttons and directional arrows indicating movement or change (no text or symbols present)Registering the handset
Step 1:
Open the menu.
Select and confirm.
Select and confirm.
Select base (Base 1, Base 2, Base 3 or Base 4).
Key in PIN and confirm (as supplied: 0000):
Registr.Procedure Base 1 is displayed, for example.
Step 2:
Press down the key on the back of the Gigaset 4010/4015 Micro base and keep it pressed down for a while. The handset will be automatically assigned the next free internal number (1–6). The internal number 6 will be overwritten if all positions are already occupied. The handset will return to the idle condition following successful registration. The internal number (e.g. "INT1") is displayed.
| Gigaset | On the base station or base telephone |
| 4010/4015 | Hold down the key on the underside of the base station. |
| 3010/3015 | Hold down the paging-key ● on the base station until you hear signal tones. |

H/Set Settings
Register H/Set


Press Keys:
| 3020/253030/354030/35 | Select settings, system settings and register handset in the menu at the base station telephone and confirm with OK. |
| 3070/754070/75 | Press the LED – it will flash during registration. |
| Non-Siemens base stations | To register at “GAP base stations,” follow the relevant operating instructions (steps 2 and 3). |
Charging the battery

Leave the handset for approx. 5,5 hours in the charging unit to charge the battery, as they are not charged when they leave the factory. The charging status icon flashes on the handset to indicate that the battery are being charged:
See the appendix for a list of recommended battery.
- The battery heat up during charging. This is normal and not dangerous.
- Opening the battery compartment unnecessarily may cause the wrong charging status to be displayed.
Attaching the belt clip
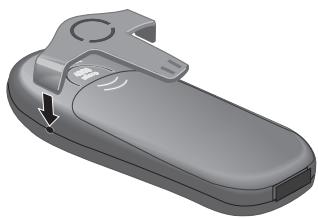
natural_image
3D rendering of a gray remote control device with a handle and scroll (no text or symbols visible)Push the belt clip onto the back of the handset until the lugs at the side click into place.
Press Keys:


Calendar/Clock
Date/Time


Save


H/Set Settings
Language


Setting the date and time
You need to set the date and time so that the time that messages and calls are received is shown correctly.
Open the menu.
Select and confirm.
Select and confirm.
The current setting is shown.
Enter the date
Enter the day/month/year.
In this case 20.05.2001. e. g. 2^ABC 0 + 0 + 5^JKL 0 + 1_
Go down one line.
Enter the time
Enter hours and minutes.
In this case 19:05
e. g. 1oo 9WXYZ 0 + 5JKL
Go down one line.
Select the display mode
use the left side of the control key to select the 12-hour mode (am or pm) or the 24-hour mode (default).
Save the settings.
Changing the display language
Open the menu.
Confirm the function.
The current language is marked with a √.
Select the language you want and confirm.
Displays for language settings:
Dialling an emergency number
You can dial the emergency numbers saved in the base station even if the telephone lock is activated. Please refer to the operating instructions for your base station.
Press Keys:


Making calls
Making an external call
Enter the telephone number. If you make a mistake use the key to correct individual digits.
Press the talk key.
Press the end call key to end the call.
- You can also press the talk key 📄 first and then enter the telephone number - each digit will be dialled immediately.
- You can cancel the dialling operation by pressing the end call key 🔒.
- You can insert a pause: After entering the prefix, open the menu using the display key 📋 and select "insert pause."
Making internal calls
Open the list of internal users. Your own handset is identified by "<".
Select the handset you want and press the talk key.
Enter the internal number of the handset.
All handsets are called.
Press the end call key to end the call.
Answering a call
Your telephone will ring (ringing tone) and the status LED will flash.
Press the talk key or handsfree key.
Simply remove the handset from the charging unit (factory setting: "Auto talk").
Press Keys:

Open caller list/message list\*
A message appears in the display and the status LED flashes to indicate that there are new calls/messages.
Press
Handsfree talking
Handsfree talking when dialling
Dial the telephone number.
Press the handsfree key.
When handsfree talking is activated, the handsfree key ⏻ and the status LED lights up.
Handsfree talking during a call
Activate handsfree talking.
To set the volume:
Press the handsfree key 📋 once more.
Raise or lower the volume.
Save the volume level.


Change from handsfree talking to the handset
End the call.
Forwarding an external call, enquiry call
You can forward an external call to another handset or make an internal enquiry call.
Open the list of internal users.
Select the internal user and call.
If the internal user answers:
● To forward the call: Press the end call key
- To end the enquiry call: Use End to return to the waiting party.


Press Keys:


Automatic Redial


Delete Entry


Copy to Directory


Save Entry

Automatic redial
Manual redial
You have access to the last five telephone numbers dialled.
Display and select the telephone number.
Press the talk key.
Automatic redial
This function is not available in all countries.
The handsfree key flashes and open listening is activated. The function is deactivated after ten unsuccessful call attempts or if a call was made in the meantime.
Press Off or any key if the person you called is not available.
Display and select the telephone number.
Open the menu.
Activate.
If the other person answers press the talk key.
Deleting a number from the redialling list
Display and select the telephone number.
Open the menu.
The telephone number is deleted.
Copying a telephone number to the directory
Display and select the telephone number.
Open the menu.
The telephone number is entered.
If you like you can change the number and enter a name (you can also enter an anniversary s. page 16). For notes on how to enter letters and characters s. page 14.
Open the menu.
Save the entry.
Press Keys:


New Entry


Save Entry


e. g.


Directory and network access list
With the ⏻ directory you can store up to 200 telephone numbers and then dial them at the push of a button.
You can save the prefixes (Call-by-Call) ^* of telephone companies in the network access list ☐. The directory and network access list are used in exactly the same way.
Storing an entry
Open the directory/network access list.
Select the menu item and confirm.
Enter the telephone number (no more than 32 digits).
Scroll to the name field and enter the name. You can also enter an anniversary in the directory, see also page 16.
Open the menu.
Store the entry
Dialling with the directory
Open the directory.
Enter the first letter of the name. For example for "E" press the ③ DEF key twice or scroll with the △ key.
Press the talk key.
After selecting the name you can also open the menu, select Display Number, extend/change the number and dial with the talk key 🔑.
Press Keys:


Display Number


or


Dialling with the network access list (Call-by-Call)
Open the network access list.
Select call-by-call number and open the menu.
Select the menu item and confirm.
Enter the telephone number of the person you want to call.
Select the telephone number in directory and confirm.
Press the talk key. The telephone number is dialled.
Speed dialling from the network access list
You can store 8 speed dialling numbers in the network access list. Enter a speed dialling number (2–9) before the name.
Example: Press speed dial key 2 and then enter the network provider's name.
Dialling with speed dialling
e. g.

e. g.

or


Hold down the key:
The stored network provider's name is displayed.
Enter the telephone number
Select an entry from the directory and confirm.
Press.
Press Keys:
Character map
Press the relevant key repeatedly or hold down:
| 1 x | 2 x | 3 x | 4 x | 5 x | 6 x | 7 x | 8 x | 9 x | 10 \ x | |
| [HHBD] | [1668] | 1 | [1679] | £ | [1880] | [1897] | ø | |||
| [1612] | [1588] | b | [1611] | 2 | [1910] | [7014] | à | [1999] | ã | ç |
| [1618] | [1945] | e | [1812] | 3 | [1546] | [1679] | è | [1680] | ||
| [1811] | [1646] | h | [19712] | 4 | [1888] | [1999] | ì | [1890] | ||
| [1915] | [1918] | k | [1888] | 5 | [18910] | [1898] | [18910] | |||
| [1974] | [1980] | n | [19712] | 6 | [15550] | [1597] | ó | [15107] | ô | õ |
| [1622] | [1884] | q | [19104] | s | [1549] | [16184] | [1594] | |||
| [18174] | [1884] | u | [17450] | 8 | [1628] | [18145] | ù | [18138] | ||
| [1888] | [1979] | x | [1828] | z | [1534] | [18128] | ý | [18179] | [19182] | å |
| [1788] | → | * | [18190] | ( | [17810] | [19714] | = | [1883] | [1883] | |
| [20018] | [1714] | , | [1888] | ! | [1507] | [1679] | - | [17177] | [17182] | i * |
| [1916] | [1898] | @ | [1889] | & | [1689] | [17485] | [18630] | [18180] |
*
Other characters on this key: “,”,”_
The first letter of the name is automatically written in uppercase and the rest in lowercase.
To change one letter from uppercase to lowercase or vice versa press *_ .
Control the cursor with actors with


Delete char-
Letters are always inserted to the left of the cursor.
Inserting a blank ▪ before a name takes that name to the top of the directory (for example “□Karla”).
Sort sequence:
| 1. Blank (☐) | 3. Letters (alphabetical) |
| 2. Digits (0-9) | 4. Other characters |
Press Keys:


View
Change


Save Entry
OK
or


Delete Entry
OK


OK
OK

YES

Copy
Displaying, changing or deleting an entry
Open the directory/network access list.
Select the entry you want.
View all the information for the entry.
Open the input field and make the necessary changes.
Change the number if necessary.
Go to the name field and change the name.
For notes on entering letters and characters s. page 14.
For the directory enter an anniversary if necessary s. page 16.
Open the menu.
Confirm the changes.
Open the directory/network access list.
Select the relevant entry.
Open the menu.
You will hear a confirmation tone. The entry has been deleted.
Copying an entry to another handset
You can copy an entry to another Micro/Comfort handset.
Open the directory/network access list.
Select the required entry.
Open the menu.
Select the menu item and confirm.
Select the internal user (receiving handset) and confirm.
Copying a further entry:
Press.
Select the required number.
Initiate the copy process.
Press Keys:


Delete List
OK
YES


View
Change

Change


OK
Copying the directory/network access list
You can copy the entire directory/network access list to another Micro/Comfort handset.
See "Copying an entry to another handset."
Transmission is interrupted:
- if the memory of the receiving handset is full (the last entry is displayed on the sending handset).
- if you receive a call.
Copying of an entry is terminated.
Deleting the directory/network access list
Open the directory/network access list.
Select the required entry.
Open the menu.
Select the menu item and confirm.
Confirm delete all entries.
Entering anniversaries (birthdays and so on)
You can store the date and time of anniversaries so you can be reminded of them.
Open the directory.
Select and display the entry.
Open the input field.
Move the cursor into the birthday/anniversary field.
Confirm.
Enter or change the date (day/month).
Scroll forward one line and enter the time.
Scroll forward one line.
Choose the indicator for the alarm.
Store entries.
Use the display key Delete to delete the anniversary alarm.
Press Keys:

Calendar/Clock

Alarm Clock


Save

Calendar/Clock

Alarm Clock


Save
Settings
Setting the alarm clock
If activated, the alarm clock (icon) on your handset will ring every day at the time entered.
With the handset idle:
Open the menu.
Select the menu item and confirm.
Select the menu item and confirm.
The current setting is displayed.
Select On.
Scroll forward one line.
Enter the hours/minutes. The example here is 06.00.
Scroll forward one line.
Choose the ringer melody for the alarm call.
Save the settings.
An alarm call will not be made if room monitoring (babyphone) is activated or during automatic redialling.
Deactivating the alarm clock
The alarm clock is set but you do not want it to ring.
Open the menu.
Select the menu item and confirm.
Select the menu item and confirm.
Select Off.
Save the settings.
Turning off the alarm call
An alarm call is signalled like an incoming call. Press any key to turn it off.
Press Keys:

Calendar/Clock
Set Appoints.


Setting an appointment
Your handset is able to remind you of one appointment. If you have set an appointment, this is indicated by the 🔒 icon in the display.
With the handset idle.
Open the menu.
Select the menu item and confirm.
Select the menu item and confirm.
Select On to activate the appointment alarm.
Scroll forward one line.
Enter the day/month.
The example here is 20th May.
Scroll forward one line.
Enter the hours/minutes.
The example here is: 9.30.
Scroll forward one line.
Choosing the ringer melody for the appointment alarm.
Save the settings.
An appointment alarm will only ring when the handset is idle. An appointment alarm is not made when room monitoring is activated or during automatic redial.
Turning off the appointment alarm
An appointment alarm is signalled in the same way as an incoming call; press any key to turn it off.
Press Keys:

Calendar/Clock
Missed Dates


OK
OK
OK


Sound Settings
Handset Volume


Save


Sound Settings
Ringer Settings
OK
OK


Save
Missed appointments and anniversaries
An appointment and anniversaries that have been signalled on the handset but not been accepted are saved in a list.
A new missed appointment/anniversary is indicated by Appt.. Press the right display key to display the list Events list. Then select Missed Appoint. OK.
If you want to view your appointment again, proceed as follows:
Open the menu.
Select the menu item and confirm.
Select the menu item and confirm.
Select a missed appointment 📄 or anniversary 🌐 Information on this entry is displayed.
Use the display key Delete to delete the appointment/anniversary.
Handset and loudspeaker volume
Open the menu.
Select the submenu.
You will hear the current handset volume.
Set the required handsfree talking volume.
Scroll forward one line.
Select the required level for the handset volume and confirm.
Setting the ringer volume/melody
You can choose from five ringer volumes, "crescendo"ring (increasing volume), ringer off and any of ten ringer melodies:
Open the menu.
Select the menu item and confirm.
You will hear the current ringer volume and its level will be displayed.
Select the ringer volume.
Scroll forward one line.
Select the required ringer melody (1–10) and confirm.
Press Keys:


Sound Settings
Ringer Settings


Time C.


e. g.


Save Entry
Save
or

Time control for ringer volume
You can set a different ringer volume for a particular time of day.
Open the menu.
Select the menu item and confirm.
You will hear the current ringer volume and its level will be displayed.
Press.
Activate/deactivate time control.
Enter the period for the different ringer
from 11:00 to 15:00.
Scroll forward one line and select the ringer volume
Save the settings.
Press.
Activating/deactivating warning and signal tones
● Key beeps: Every keystroke is confirmed.
- Confirmation beeps: Confirmation beep (a rising tone sequence) when you make entries/settings and when you replace the handset in the charging station.
● Battery low beep: The battery must be recharged.
Open the menu.

Sound Settings

Advisory Tones

OK
OK


Save
Select the menu item and confirm.
Select the menu item and confirm.
Select the required function.
On, Off or select In Call (battery low beep in the call).
Save the settings.
Press Keys:

Sound Settings
Silent alert

OK
OK
Activating/deactivating the vibration alarm
If you do not wish to be disturbed by the ringing tone you can activate the handset's vibration alarm instead. This can also be activated in addition to the ringing tone (in noisy surroundings, for instance).
Open the menu.
Select and confirm.
Select and confirm.

The current setting is marked with a √
You can deactivate the ringing tone by keeping the ⭐key pressed down for a while. Only the vibration alarm will then be active.
Auto talk feature on/off
When this function is activated you can remove the handset from the charging unit without pressing the key to accept a call (factory setting).

H/Set Settings
Auto Answer

OK
OK
Open the menu.
Select the menu item and confirm.
Activate/deactivate with OK (√ = function on).
Press Keys:

H/Set Settings

Reset Handset


Resetting to the factory defaults
The directory, the network access list and the caller list are not deleted when you reset the handset. Registration at the base station is not affected.
Open the menu.
Select the menu item and confirm.
Select the menu item and confirm.
Confirm.
| Function | Factory setting |
| Handset volume | 1 |
| Ringer volume (“ring tone,”) | 5 |
| Ringer melody | 1 |
| Auto talk | On |
| Battery low beep | On |
| Handsfree volume | 3 |
| Room monitor level | high |
| Time control | off |
| Display language | local |
| Redialling list | deleted |
| Vibration alarm | off |
Room monitoring (babyphone)
You can use your handset as a baby monitor.
The handset should be placed at least 1 to 2 meters away from your baby. If a certain noise level is reached (for example if your baby is crying) the handset will automatically dial the number you stored (internal or external). When the room monitor is active, incoming calls are merely displayed.
Press Keys:

Family/Fun
Room Monitor.


Change


Save Entry


Save
Setting the room monitor
Open the menu.
Select the menu item and confirm.
Select the menu item and confirm.
Select On or Off.
Scroll forward one line.
Open the entry field for the telephone number.
Delete an existing external number with ←.
Delete an existing internal number with YES (you will be asked to confirm).
Open the list of internal users and select the internal number.
Save the number.
Open the directory.
Select an external user.
Open the menu.
Confirm the setting.
Go down one line.
Set sensitivity to "high" or "low".
Save the setting.
Room monitoring can be deactivated with the display key Off.
You can deactivate the room monitor from an external number (from your mobile phone for example).
Answer a call made from the room monitor.
Deactivate with 9 ^WXYZ #.
The room monitor is now deactivated. The room monitor will no longer call.
Press Keys:

Family/Fun
Walkie-Talkie

OK
OK

Silent


Walkie-talkie mode
Requirements:
The handsets must have the same base settings (e.g. best base station) or they must not be registered at any base station. (Walkie-talkie mode reduces the handset's talk time considerably).
In walkie-talkie mode, handsets are not available for incoming calls.
Activating walkie-talkie mode on the handset
Open the menu.
Select the function.
Activate Walkie-Talkie mode.
Walkie-talkie mode can be deactivated with the display key Off.
Using walkie-talkie mode
Two handsets are in walkie-talkie mode:
Calling handset:
Press.
Called handset:
The call is indicated by a message on the display.
Press.
Press.
The two handsets are connected to one another.
Press. The call is ended.
Appendix
Operating on base stations in the Gigaset family
Gigaset 1000/2000/3000
The following functions on your 4000 Micro/Comfort handset are not supported by base stations in this Gigaset family:
- Setting the time (the time is not transferred after the handset has been switched off)
● Changing the display language
● Room monitoring (cannot be switched off externally) - SMS transfer (SMS-compatible base stations only)*
Gigaset 4010/4015 Classic
The following functions on your 4000 Micro/Comfort handset are not supported by the above-mentioned base stations:
● Changing the display language
- SMS transfer*
- Setting authorisation stages
* Not available in all countries
Looking after your phone
Wipe the base station and handset with a damp cloth or an antistatic wipe. Never use a dry cloth as this can cause static discharge.
Recommended batteries:
Nickel-Metal-Hydride (NiMH), 500 mAh.
Order No. V30145-K1310-X125 or Order No. V30145-K1310-X229
The handset's operating times/charging time:
| Capacity (mAh) | Standby time (hours) | Talk time (hours) | Charging time (hours) |
| 500 | up to 250 | approx. 15 | approx. 5.5 |
Battery charging capacity falls after a number of years.
Range
The handset will operate away from the base station up to about 300 m outdoors and up to 50 m indoors.
Desktop charging station
The desktop charging station for Siemens mobile telephones can also be used to charge your handset.
(Accessory for Siemens C35, M35, S35 mobile telephones)
Order No. L36880-N4001-X109-A102

When a Gigaset handset is being charged in the desktop charging station, a spare battery will not be charged up while the handset is in the charging station.
The charge display LED is always lit.
Guarantee
If the telephone fails during the guarantee period because of poor workmanship or faulty materials Siemens AG will repair or replace it.
The guarantee period for Europe is at least 24 months (12 months up to 31.12.2001).
The guarantee does not cover damage caused by improper use, wear and tear or unauthorised repairs. The guarantee does not cover consumables or defects that have only a negligible effect on the value or operation of the telephone.
Service:
Siemens Service should be contacted if problems arise with the unit. Your specialist dealer will be happy to answer any questions on unit operation. Contact your network provider for questions concerning telephone connections.
The CE symbol indicates that the telephone complies with the essential requirements of the R&TTE directive.
Service telephone number see back cover.
The 4000 Micro handset is approved for use in Switzerland and throughout the EU.
SIEMENS
Be inspired
Gigaset Micro
4000
Mode d'emploi
- Acceptor communic.
-Composer un numéro
natural_image
Simple diagram of a curved object with a blue double-headed arrow indicating vertical motion (no text or symbols)Navigateur
natural_image
Two grayscale images of a mobile phone with labeled buttons and directional arrows indicating movement (no text or symbols beyond labels)Inscrire un combiné
Etape 1
Ouvrir le menu.
natural_image
3D rendering of a gray remote control device with a handle and scroll (no text or symbols visible)Activer/désactiver le service.
Tasto di controllo
natural_image
3D rendered image of a gray remote control device with a handle and scroll (no text or symbols visible)natural_image
Simple diagram of a curved structure with a blue double-headed arrow indicating vertical displacement (no text or symbols)Tecla de control

natural_image
Two grayscale images showing a device with labeled buttons and directional arrows indicating movement or change (no text or symbols present)natural_image
3D rendering of a gray remote control device with a scroll wheel and directional arrow (no text or symbols)*depende da base Gigaset utilizada
Programar a data e as horas 8
Modo Walky-Talky....24
Anexo 25
natural_image
Two grayscale images of a remote control device with labeled buttons and directional arrows indicating movement (no text or symbols beyond labels)natural_image
3D rendered image of a gray remote control device with a handle and scroll (no text or symbols visible)Programar a data e as horas
Activar o modo Walky-Talky.
natural_image
Simple diagram of a curved structure with a blue double-headed arrow indicating vertical motion (no text or symbols)Besturingstoets

natural_image
3D rendering of a gray remote control device with a handle and scroll (no text or symbols visible)We, Siemens AG, declare, that the above mentioned product is manufactured according to our Full Quality Assurance System certified by CETECOM ICT Services GmbH with the registration number „Q810820M“ in compliance with ANNEX V of the R&TTE-Directive 99/05/EC. The presumption of conformity with the essential requirements regarding Council Directive 99/05/EC is ensured.
Senior Approval Manager
The Declaration of Conformity (DoC) has been signed. In case of need, a copy of the original DoC can be made available via the company hotline.
C€ 0682

Issued by
Information and Communication mobile
Haidenauplatz 1
D-81667 München
© Siemens AG 2001
All rights reserved. Subject to availability.
Right of modification reserved.
Printed in Germany. (07/2001)
Siemens Aktiengesellschaft
http://www.my-siemens.com

- Mobilteil anmelden
- Schritt 1:
- Status LED (light-emitting diode)
- Reception strength
- Control key
- Talk key
- Open the directory
- Key 1
- Asterisk key
- Keypad protection
- Handsfree key
- Microphone
- Socket
- Display (display field)
- Charging status
- Current functions and display keys
- End call and On/Off key
- Caller list
- Sel Services key
- Interaction between control key and display keys
- Display keys
- Display symbols
- Safety precautions
- Contents
- Brief overview of the handset 2
- Safety precautions 4
- Preparing the handset....6
- Making calls 9
- Automatic redial....11
- Directory and network access list 12
- Settings 17
- Room monitoring (babyphone)....22
- Walkie-talkie mode 24
- Appendix 25
- Press Keys:
- Preparing the handset
- Delivery package
- Inserting the battery
- Registering the handset
- Step 1:
- Step 2:
- Charging the battery
- Attaching the belt clip
- Setting the date and time
- Enter the date
- Enter the time
- Select the display mode
- Changing the display language
- Dialling an emergency number
- Making calls
- Making an external call
- Making internal calls
- Answering a call
- Open caller list/message list\*
- Handsfree talking
- Handsfree talking when dialling
- Handsfree talking during a call
- To set the volume:
- Forwarding an external call, enquiry call
- If the internal user answers:
- Automatic redial
- Manual redial
- Deleting a number from the redialling list
- Copying a telephone number to the directory
- Directory and network access list
- Storing an entry
- Dialling with the directory
- Dialling with the network access list (Call-by-Call)
- Speed dialling from the network access list
- Dialling with speed dialling
- Character map
- Displaying, changing or deleting an entry
- Copying an entry to another handset
- Copying a further entry:
- Copying the directory/network access list
- Deleting the directory/network access list
- Entering anniversaries (birthdays and so on)
- Settings
- Setting the alarm clock
- Deactivating the alarm clock
- Turning off the alarm call
- Setting an appointment
- Turning off the appointment alarm
- Missed appointments and anniversaries
- Handset and loudspeaker volume
- Setting the ringer volume/melody
- Time control for ringer volume
- Activating/deactivating warning and signal tones
- Activating/deactivating the vibration alarm
- Auto talk feature on/off
- Resetting to the factory defaults
- Room monitoring (babyphone)
- Change
- Save
- Setting the room monitor
- Walkie-talkie mode
- Requirements:
- Activating walkie-talkie mode on the handset
- Using walkie-talkie mode
- Calling handset:
- Called handset:
- Appendix
- Operating on base stations in the Gigaset family
- Gigaset 1000/2000/3000
- Gigaset 4010/4015 Classic
- Looking after your phone
- Recommended batteries:
- Range
- Desktop charging station
- Guarantee
- Service:
- SIEMENS
- Be inspired
- Gigaset Micro
- 4000
- Navigateur
- Inscrire un combiné
- Etape 1
- Tasto di controllo
- Tecla de control
- Modo Walky-Talky....24
- Anexo 25
- Programar a data e as horas
- Besturingstoets
Brand : SIEMENS
Model : GIGASET 4000 MICRO
Category : Cordless phone