
EE400MP - Lawn mower MAKITA - Free user manual and instructions
Find the device manual for free EE400MP MAKITA in PDF.
| Product Type | Edger head (accessory for multifunction power head) |
| Brand | Makita |
| Model | EE400MP |
| Dimensions (L x W x H) | 878 x 131 x 291 mm (34.5 x 5.1 x 11.5 in) |
| Net weight (without guard or blade) | 2.4 kg (5.4 lb) |
| Blade diameter | 203 mm (8 in) |
| Gear ratio | 14/29 |
| Approved power heads | EX2650LH (multifunction tool), DUX60 (cordless multifunction power head, outside USA/Canada) |
| Adjustable cutting depth | Yes, by adjusting dial (recommended minimum depth: 13 mm) |
| Lubrication | Grease gear case and drive shaft every 30 hours of use |
| Recommended grease type | Shell Alvania 2 (or equivalent) for gear case; Shell Alvania N 2 (or equivalent) for shaft |
| Required protective equipment | Helmet, goggles, gloves, hearing protection, non-slip safety shoes |
| Safety zone | Keep people and animals at least 15 meters away during use |
| Intended use | Cutting and trimming lawn edges |
| Blade maintenance | Sharpening and balancing only by an authorized Makita service center |
| Pre-use check | Check blade condition, tightening of fasteners, and absence of damage |
| Storage | Dry, locked place, out of reach of children; remove battery or spark plug cap |
| Warranty | Refer to power head manual |
Frequently Asked Questions - EE400MP MAKITA
User questions about EE400MP MAKITA
0 question about this device. Answer the ones you know or ask your own.
Ask a new question about this device
Download the instructions for your Lawn mower in PDF format for free! Find your manual EE400MP - MAKITA and take your electronic device back in hand. On this page are published all the documents necessary for the use of your device. EE400MP by MAKITA.
USER MANUAL EE400MP MAKITA
Before use, read this booklet and the instruction manual of the power unit. Failure to follow the warnings and instructions may cause serious or fatal injury.

AVERTISSEMENT :
natural_image
Line drawing of a manual push tool with a cylindrical roller and two wheels (no text or symbols)English
(Original instructions)
Contents
Page
Contents 2
Foreword 2
Symbols 2
Approved power unit.... 3
Part description.... 3
Safety precautions 3
Assembly and adjustment 5
Operation 6
Inspection and maintenance....6
Storage 7
Maintenance schedule....8
Troubleshooting 8
Technical Data 8
Foreword
Thank you very much for purchasing Makita edger attachment. This attachment is designed to be mounted on Makita power unit mentioned in this instruction manual. Before use, please read this booklet and the instruction manual of the power unit. They will assist you to obtain the best possible result from your Makita edger attachment.
Symbols
The following symbols are used on the attachment and this instruction manual. Understand these definitions.

Take particular care and attention.

Read instruction manual.

Keep working area clear of persons

Wear a eye and ear protection.

Wear protective gloves.

Wear sturdy boots with nonslip soles. Steeltoed safety boots are recommended.

Forbidden!

First Aid
Approved power unit
This attachment is approved to use only with the following power unit(s):
EX2650LH Multi function power head
BUX360, BUX361, BUX362, UX360D, UX361D, UX362D
Cordless multi function power head
Only for countries other than the U.S. and Canada:
DUX60 Cordless multi function power head

WARNING:
Never use the attachment with non-approved power unit.
Non-approved combination may cause serious injury.
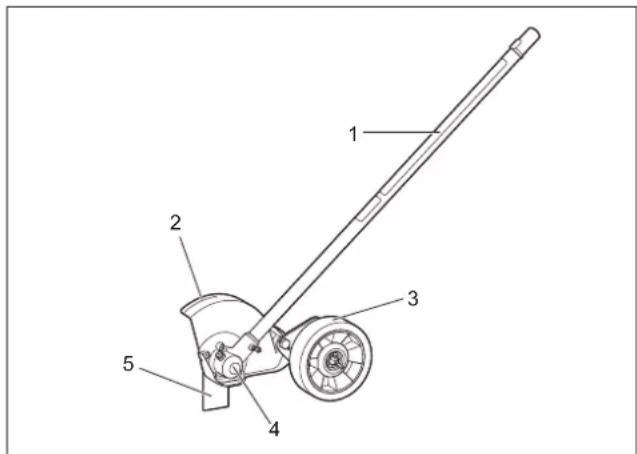
Part description
text_image
Technical diagram of a mechanical device with numbered components labeled 1 through 5The numbers below refer to the figure.
- Shaft
- Blade case
- Wheel
- Gear case
- Blade
Safety precautions

WARNING:
Read all safety warnings and all instructions in this booklet and the instruction manual of the power unit. Failure to follow the warnings and instructions may result in electric shock, fire and/or serious injury.
Save all warnings and instructions for future reference.
The term "edger" and "equipment" in the warnings and precautions refer to the combination of the attachment and the power unit.
The term "motor" in the warnings and precautions refers to the engine or electric motor of the power unit.
IMPORTANT SAFETY INSTRUCTIONS
DANGER – When using your edger, follow basic precautions, including the following:
a) READ AND FOLLOW ALL INSTRUCTIONS – Read the instruction manual carefully. Be thoroughly familiar with the controls and the proper use of the equipment. Know how to stop the unit and disengage the controls quickly.
b) DRESS PROPERLY – Wear safety glasses or goggles. Do not wear loose clothing or jewelry. They can be caught in moving parts. Use of sturdy gloves and safety footwear is recommended.
c) STAY ALERT – Watch what you are doing – use common sense. Do not operate product when fatigued or under the influence of alcohol or drugs.
d) CAUTION – To reduce the risk of fire, replace gasoline cap securely.
e) DANGER – ROTATING CUTTING TOOL –
Keep both hands on handles when blade is rotating. –
Keep feet away from cutting area. –
Do not attempt to remove cut material nor hold material to be – cut when motor is running or when cutting tool is moving.
Make sure spark plug is disconnected when clearing jammed – material from cutting tool.
CAUTION – Cutting tool coasts after turn off. –
f) KEEP OPERATING AREA CLEAR – Keep the area of operation clear of all persons, particularly small children and pets.
g) USE EDGER PROPERLY – Use only for edging the type of shrub, growth, and the like described in the operating instructions. Do not abuse product. Do not use product in rain or wet locations. Never allow children to operate the product. Never allow adults to operate the product without proper instruction.
h) DON'T OVERREACH OR STAND ON UNSTABLE SUPPORT – Keep good footing and balance at all times.
i) DISCONNECT (UNPLUG) SPARK PLUG LEAD –
When not in use. -
Before servicing, cleaning, and the like. —
Before changing accessories.
j) MAINTAIN PRODUCT WITH CARE –
-Follow maintenance instructions given in Manual.
To reduce the risk of fire, do not allow excessive grass,
leaves, or grease to accumulate on the product.
k) STORE PRODUCT INDOORS – When not in use, store product indoors in a dry place locked or otherwise inaccessible to children.
I) DO NOT ATTEMPT TO REPAIR PRODUCT –
Have repairs made by qualified dealer or repairman.
-See that only identical replacement parts are used.
Instructions pertaining to a risk of fire or injury to persons
a) Do not operate product when barefoot or wearing open sandals. Always wear safety footwear, and pants or slacks that cover your legs.
b) Do not use the product on graveled surfaces.
c) Never operate the product without visibility or light.
d) Start motor carefully. Make certain all attachments are disengaged before attempting to start. Keep hands, feet, and clothing away from cutting tool and moving parts.
e) Never attempt to make any adjustments while the motor is running (except where specifically recommended by the manufacturer).
f) Never direct discharge of material toward bystanders nor allow anyone near the area of operation. Use care in directing discharge to avoid glass enclosures, automobiles, and similar objects.
g) Stay alert for uneven sidewalks, holes in terrain or other similar conditions when using product. Always push slowly over rough ground.
h) Objects struck by the cutting tool can cause severe injuries to persons. The lawn should always be carefully examined and cleared of all objects prior to edging.
i) If product strikes a foreign object follow these steps: 1) Stop product.
2) Disconnect spark plug lead.
3) Inspect for damage.
4) Repair any damage before restarting and operating the product.
j) Disengage the cutting tool when the product is transported or not in use.
k) Take all possible precautions when leaving the product unattended. Disengage attachments, and stop the moto
I) When cleaning, repairing, or inspecting, make certain the cutting tool and all moving parts have stopped. Remove the battery, or disconnect the spark plug wire, and keep the wire away from the plug so that unintentional starting does not occur.
m) Never operate the product without guards, plates, or other protective devices in place.
n) Use only accessories and attachments supplied or specifically recommended for use with the product.
o) Do not operate product with a damaged or excessively worn cutting tool.
Intended use
- This equipment is only intended for edging the lawn in conjunction with an approved power unit. Never use the attachment for the other purpose. Abusing the attachment may cause serious injury.
General precautions
Before starting the equipment, read this booklet and the • instruction manual of the power unit to become familiar with the handling of the equipment.
Do not lend the attachment to a person with insufficient experience or knowledge regarding handling of the equipment.
When lending the attachment, always attach this instruction • manual.
Do not allow children or young persons under 18 years old to use the equipment. Keep them away from the equipment.
Handle the equipment with the utmost care and attention.
Never use the equipment after consuming alcohol or drugs, or if • feeling tired or ill.
Keep in mind that the operator or user is responsible for • accidents or hazards occurring to other people or their property. Never attempt to modify the attachment.
Follow the regulations about handling of the equipment in your country.
Keep guards in place and in working order. Keep blades sharp.
Keep hands and feet away from cutting area.
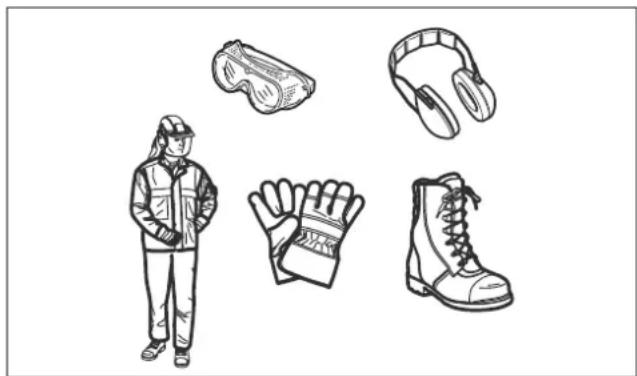
Personal protective equipment
Wear safety helmet, protective goggles and protective gloves to protect yourself from flying debris or falling objects.
natural_image
Illustration of a person wearing safety gear and four different types of gloves (stealth, helmet, glove, boot) arranged in a grid (no text or symbols)Wear ear protection such as ear muffs to prevent hearing loss.
- Wear proper clothing and shoes for safe operation, such as a work overall and sturdy, non-slip shoes. Do not wear loose clothing or jewelry. Loose clothes, jewelry or long hair can be caught in moving parts.
- When touching the cutting blade, wear protective gloves. Cutting blades can cut bare hands severely.
Work area safety
- Operate the equipment under good visibility and daylight conditions only. Do not operate the equipment in darkness or fog.
- Start and operate the engine only outdoors in a well ventilated area. Operation in a confined or poorly ventilated area can result in death due to suffocation or carbon monoxide poisoning.
- During operation, never stand on an unstable or slippery surface or a steep slope. During the cold season, beware of ice and snow and always ensure secure footing.
- During operation, keep bystanders or animals at least 15 m away from the equipment. Stop the motor as soon as someone approaches.
- Before operation, examine the work area for stones or other solid objects. They can be thrown or cause dangerous kickback and result in serious injury and/or property damage.
- WARNING: Use of this product can create dust containing chemicals which may cause respiratory or other illnesses. Some examples of these chemicals are compounds found in pesticides, insecticides, fertilizers and herbicides.
Your risk from these exposures varies, depending on how often you do this type of work. To reduce your exposure to these chemicals: work in a well ventilated area, and work with approved safety equipment, such as those dust masks that are specially designed to filter out microscopic particles.
Putting into operation
- Before assembling or adjusting the equipment, switch off the motor and remove the spark plug cap or the battery cartridge.
Before handling the cutter blade, wear protective gloves.
- Before starting the motor, inspect the equipment for damages, loose screws/nuts or improper assembly. If the cutter blade is bent or damaged, replace it. Check all control levers and switches for easy action. Clean and dry the handles.
Never attempt to start the motor if the equipment is damaged or not fully assembled. Otherwise serious injury may result.
Adjust the shoulder harness and hand grip to suit the operator's body size. - Check damaged parts - Before further use of the attachment, a guard or other part that is damaged should be carefully checked to determine that it will operate properly and perform its intended function. Check for alignment of moving parts, binding of moving parts, breakage of parts, mounting, and any other condition that may affect its operation. A guard or other part that is damaged should be properly repaired or replaced by an authorized service center unless indicated elsewhere in this manual.
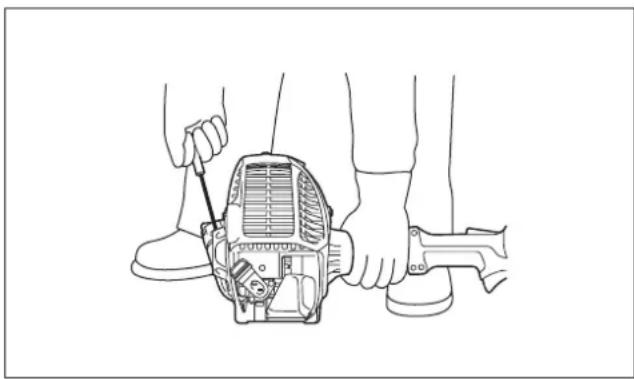
Starting motor
- Wear the personal equipments before starting the motor.
- Start the engine at least 3 meters (10 feet) away from the fueling spot.
Before starting the motor, make sure that there is no person or animal in the work area.
- When starting the engine or inserting a battery cartridge, keep the cutting tool clear of your body and other object, including the ground. It may rotate when starting and may cause injury or damage to the equipment and/or property.
- Place the equipment on firm ground. Maintain good balance and secure footing.
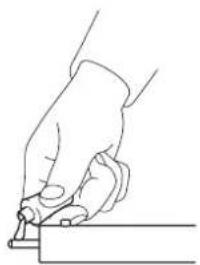
When pulling the starter knob, hold the power unit firmly against the ground by your left hand. Never step on the drive shaft of the power unit.
natural_image
Line drawing of a person using a handheld device to interact with another person (no text or symbols present)Follow the instruction manual of the power unit for starting the • motor.
If the cutting tool rotates at idle, stop the engine and adjust the • idle speed down.
Operation
- Do not change the engine governor settings or overspeed the engine.
- If the product vibrates abnormally, immediately stop the motor and check for the cause. Vibration is generally a warning of trouble.
- Stop the motor whenever you leave the operating position; remove the battery or disconnect the spark plug lead before unclogging the cutting tool guard, or when making a repair, adjustment, or inspection.
- Operate product from position where guards block the line of sight to the cutting tool.
- In the event of an emergency, switch off the motor immediately.
- If you feel any unusual condition (e.g. noise, vibration) during operation, switch off the motor. Do not use the equipment until the cause is recognized and solved.
- The cutting tool continues to rotate for a short period after releasing the throttle trigger or switch off the motor. Don't rush to contact the cutting tool.
- With the engine running only at idle, attach the shoulder harness.
- During operation, use the shoulder harness. Keep the equipment on your right side firmly.
natural_image
Line drawing of a person's neck and shoulder with a rope tied (no text or symbols)Hold the front handle with the left hand and the rear grip with the right hand, no matter you are right-hander or left-hander. Wrap your finger and thumbs around the handles.
Never attempt to operate the equipment with one hand. Loss of control may result in serious or fatal injury. To reduce the risk of injury, keep your hands and feet away from the cutting tool.
Do not overreach. Keep proper footing and balance at all times. • Watch for hidden obstacles such as tree stumps, roots and ditches to avoid stumbling.
Never work on a ladder or tree to avoid loss of control.
If the equipment gets heavy impact or fall, check the condition before continuing work. Check the fuel system for fuel leakage and the controls and safety devices for malfunction. If there is any damage or doubt, ask Makita authorized service center for the inspection and repair.
Do not touch the gear case. The gear case becomes hot during operation.
Take a rest to prevent loss of control caused by fatigue. We recommend taking a 10 to 20-minute rest every hour.
When you leave the equipment, even if it is a short time, always switch off the engine or remove the battery cartridge. The equipment unattended with the engine running may be used by unauthorized person and cause serious accident.
Follow the instruction manual of the power unit for proper use of the control lever and switch.
During or after operation, do not put the hot equipment onto dry grass or combustible materials.
If grass or branches get caught between the cutting tool and guard, always stop the motor and remove the spark plug cap or the battery cartridge before cleaning. Otherwise unintentional blade rotation may cause serious injury.
If the cutting tool hits stones or other hard objects, immediately switch off the motor and inspect the cutting tool.
Check the cutting tool frequently during operation for cracks or damages. Before the inspection, switch off the motor and wait until the cutting tool stops completely. Replace damaged cutting tool immediately, even if it has only superficial cracks.
Never cut above waist height.
Before starting the cutting operation, wait until the cutting tool reaches a constant speed after pulling the trigger.
• Always be sure of your footing on slopes.
- Walk, never run.
- Use extreme caution when reversing or pulling the edger toward you.
- Make sure the blade has stopped before crossing surfaces other than grass and when transporting the edger to and from the area to be edged.
- Stop the engine whenever you leave the edger.
Cutting tools
- Never use inappropriate blades including metal multi-piece pivoting chains and flail blades. It may result in serious injury.
- Always use the cutting tool guard properly suited for the cutting tool used.
Vibration
- People with poor circulation who are exposed to excessive vibration may experience injury to blood vessels or the nervous system. Vibration may cause the following symptoms to occur in the fingers, hands or wrists: "Falling asleep" (numbness), tingling, pain, stabbing sensation, alteration of skin color or of the skin. If any of these symptoms occur, see a physician!
- To reduce the risk of "white finger disease", keep your hands
warm during operation and well maintain the equipment and accessories.
Transport
- Before transporting the equipment, switch off the motor and remove the spark plug cap or battery cartridge. Remove the cutting tool.
- When transporting the equipment, carry it in a horizontal position by holding the shaft. Keep the hot muffler away from your body.
- When transporting the equipment in a vehicle, properly secure it to avoid turnover. Otherwise fuel spillage and damage to the equipment and other baggage may result.
Maintenance
Have your equipment serviced by our authorized service center, always using only genuine replacement parts. Incorrect repair and poor maintenance can shorten the life of the equipment and increase the risk of accidents.
- Before doing any maintenance or repair work or cleaning the equipment, always switch off the motor and remove the spark plug cap or the battery cartridge. Wait until the motor gets cold.
- To reduce the risk of fire, never service the equipment in the vicinity of fire.
Always wear protective gloves when handling the cutting blade. -
Always clean dust and dirt off the equipment. Never use gasoline, benzine, thinner, alcohol or the like for the purpose. Discoloration, deformation or cracks of the plastic components may result.
• After each use, tighten all screws and nuts, except for the carburetor adjustment screws. -
Do not attempt any maintenance or repair not described in this booklet or the instruction manual of the power unit. Ask Makita authorized service center for such work.
- Always use Makita genuine spare parts and accessories only. Using parts or accessories supplied by a third party may result in the equipment breakdown, property damage and/or serious injury.
- Request Makita authorized service center to inspect and maintain the equipment at regular interval.
Storage
- Before storing the equipment, perform full cleaning and maintenance. Remove the spark plug cap or the battery cartridge. Drain the fuel after the engine gets cold. Remove the cutting tool.
• If the fuel tank has to be drained, do this outdoors. - Store the equipment in a dry and high or locked location out of reach of children. Do not prop the equipment against something, such as a wall. Otherwise it may fall suddenly and cause an injury.
First aid
• Always have a first-aid kit close by. Immediately replace any item taken from the first aid kit.
- When asking for help, give the following information:
- Place of the accident
- What happened
– Number of injured persons
- Nature of the injury
-Your name
Assembly and adjustment
WARNING:
- Before assembling or adjusting the equipment, switch off the motor and remove the spark plug cap or battery cartridge. Otherwise the cutting tool or other parts may move and result in serious injury.
- Before handling cutting blade, wear protective gloves. During the assembly or adjustment, your fingers may contact with the cutting blade and it may cause serious injury.
- When assembling or adjusting the equipment, always put it down. Assembling or adjusting the equipment in an upright position may result in serious injury.
- Follow the warnings and precautions in the chapter "Safety precautions" and the instruction manual of the power unit.
Mounting the attachment to a power unit
text_image
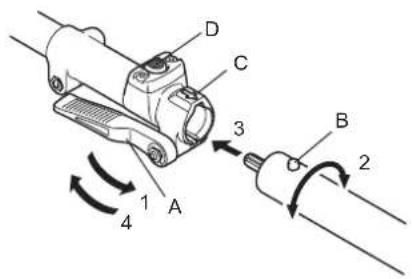
D C 3 B 2 1 A 4To mount the attachment to a power unit, follow the steps below. Make sure that the lock lever 1. (A) is not tightened.
Align the pin 2. (B) with the arrow mark (C).
Insert the shaft into the drive shaft of the power unit until the 3. release button (D) pops up.
Tighten the lock lever 4. (A) firmly as shown.
To remove the attachment, loosen the lock lever, press the lock button and withdraw the shaft.
NOTICE: Do not tighten the lock lever (A) without the shaft of the attachment inserted. Otherwise the lock lever may tighten the entrance of the drive shaft too much and damage it.
Installing and removing the blade

text_image
(1) (2) (3) (4) (5)Turn the receive washer (2) so that the hole on the receive 1. washer aligns with the hole on the gear case.
Insert the hex wrench (1) through the holes. Make sure the 2. receive washer does not turn.
Holding the hex wrench, turn the nut (5) clockwise with using a 3. socket wrench.
Remove the nut and the clamp (4). 4.
Place the blade (3).5.
Return the clamp and the nut. 6.
Holding the hex wrench, turn the nut counterclockwise to fasten 7. the blade.
To remove the blade, perform the above steps in reverse.
NOTE: The cutter blade-fastening nut (with spring washer) wears out in course of time. If there appears any wear or deformation on the nut, replace it.
Operation
WARNING:
- If the cutting tool moves at idle, adjust the idle speed of the engine down. Otherwise you cannot stop the cutting tool by throttle off and it may cause serious injury.
- Follow the warnings and precautions in the chapter "Safety precautions" and the instruction manual of the power unit.
Adjusting the blade depth
natural_image
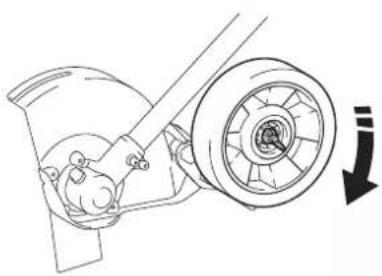
Mechanical diagram showing a wheel and gear assembly with a downward arrow indicating motion (no text or symbols)- Loosen the nut on the wheel.
- Move the wheel and adjust the height according to the operation, then tighten the nut.
Operation tips
- Before edging, water the area to soften the ground and make edging easier.
- Before edging, check the area and remove all obstacles and objects that could be thrown.
- Plan to edge regularly to make it easier to keep a neat edge and to avoid having to make more than one pass.
NOTE:
Blade depth may have to be adjusted due to differences in height between the hard surface and the top of the grass.
- Adjust the blades' depth of cut to produce a fine cut between sidewalk and grass using a minimum blade depth, usually with about 13 mm (1/2") of the blade into the ground.
Inspection and maintenance
WARNING:
- Before inspecting or maintaining the equipment, switch off the motor and remove the spark plug cap or battery cartridge. Otherwise the cutting tool or other parts may move and result in serious injury.
- When inspecting or maintaining the equipment, always put it down. Assembling or adjusting the equipment in an upright position may result in serious injury.
- Follow the warnings and precautions in the chapter "Safety precautions" and the instruction manual of the power unit.
Resharpening the cutting tool
WARNING:
Do not resharpen cutting blades by yourself. Manual resharpening unbalances a cutting blade and it can cause vibrations and damage to the equipment.
Ask Makita authorized service center to resharpen and rebalance blunt cutter blades.
Lubricating moving parts
NOTICE: Follow the instruction of the frequency and amount of grease supplied. Otherwise insufficient lubrication may damage moving parts.
Gear case:
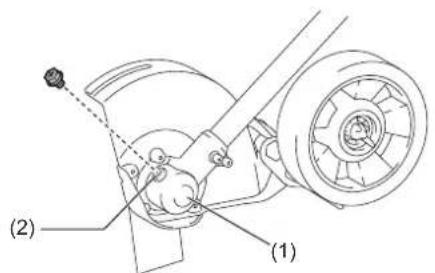
Supply grease (Shell Alvania 2 or equivalent) to the gear case (1) through the grease hole (2) every 30 hours of operation. (Genuine Makita grease may be purchased from your local Makita dealer.)
text_image
(2) (1)Drive axle:
Supply grease (Shell Alvania No.2 or equivalent) every 30 hours of operation.
natural_image
Line drawing of a hand holding a small object, possibly a tool or device, with no visible text or symbols.Overall inspection
Tighten loose bolts, nuts and screws.
Check for damaged parts. Ask Makita authorized service center to replace them.
Storage

WARNING:
Follow the warnings and precautions in the chapter "Safety precautions" and the instruction manual of the power unit.
natural_image
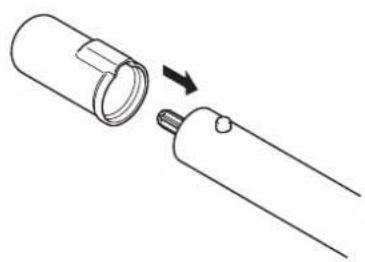
Diagram showing a cylindrical object being inserted into a plug, with an arrow indicating the process (no text or symbols present)When storing the edger attachment separated from the power unit, put the cap onto the end of the shaft.
Maintenance schedule
| Operating hour | Before Operation | Daily (10h) | 30h If required | Corresponding page | ||
| Whole unit Visually inspect for damaged parts | ○ | 7 | ||||
| All fixing screws and nuts Tighten | ○ | 7 | ||||
| Gear case Supply grease | ○ | 6 | ||||
| Drive axle Supply grease | ○ | 7 | ||||
| Cutter blade Visually inspect for damage | ○ | ○ | 6 | |||
| Power unit Refer to the instruction manual of the power unit | ||||||
Troubleshooting
| Problem Probable cause Solution | ||
| The engine does not start. Refer to the instruction manual of the power unit. | ||
| The engine stops soon after its start. | ||
| The maximum speed is limited. | ||
| The cutting tool does not rotate.→ Stop the motor immediately! | The cutting blade is not tightened securely. Tighten the cutting blade securely. | |
| A twig is caught between the cutting blade and the protector. | Remove the foreign matter. | |
| The drive system does not work properly. Ask Makita authorized service center to inspect and repair it. | ||
| The unit vibrates abnormally.→ Stop the motor immediately! | The cutting blade is bent, worn or broken. Replace the cutting blade with new one. | |
| The cutting blade is not tightened securely. Tighten the cutting blade securely. | ||
| The cutting blade is not fitted on the receive washer. | Install the cutting blade properly. | |
| The drive system does not work properly. Ask Makita authorized service center to inspect and repair it. | ||
| The cutting tool does not stop.→ Stop the motor immediately! | The power unit does not work properly. Refer to the instruction manual of the power unit. | |
Technical Data
| Model EE400MP | ||
| Dimensions (L x W x H) mm (inch) | 878 x 131 x 291 (34-1/2" x 5-1/8" x 11-1/2") | |
| Net weight (Not including protector and blade) | kg (lbs) | 2.4 (5.4) |
| Cutting blade diameter | mm (inch) | 203 (8") |
| Gear ratio | 14/29 | |
Français
BUX360, BUX361, BUX362, UX360D, UX361D, UX362D
text_image
Technical diagram of a manual push tool with numbered parts labeled 1 through 5natural_image
Illustration of a person wearing various winter gear and foot protection gloves (no text or symbols)natural_image
Line drawing of a person using a power tool to adjust or install a mechanical device (no text or symbols present)natural_image
Line drawing of a person's neck and shoulder being lifted with a rope (no text or symbols)natural_image
Mechanical diagram showing a wheel assembly with a rotating shaft and housing (no text or symbols)natural_image
Line drawing of a hand holding a tool, poised to write on paper (no text or symbols present)Inspection générale
natural_image
Diagram of a cylindrical device with a pointed tip inserted into a cylindrical body, showing an arrow indicating direction (no text or symbols present)BUX360, BUX361, BUX362, UX360D, UX361D, UX362D
text_image
Technical diagram of a mechanical device with numbered components labeled 1 through 5natural_image
Illustration of four different types of protective gear: hood, pair helmet, hand, and boot (no text or symbols)natural_image
Line drawing of a person using a power tool to adjust or install a mechanical device (no text or symbols present)natural_image
Line drawing of a person performing a rope knotting technique (no text or symbols)natural_image
Diagram of a mechanical assembly with a wheel and gear, showing a downward arrow (no text or symbols)natural_image
Line drawing of a hand holding a tool, poised to write on paper (no text or symbols present)Inspección general
natural_image
Diagram of a cylindrical device with a pointed tip inserted into a cylindrical body, showing a directional arrow (no text or symbols present)BUX360, BUX361, BUX362, UX360D, UX361D, UX362D
Ferramenta Multifuncional a Bateria
text_image
Technical diagram of a mechanical tool with numbered components labeled 1 through 5natural_image
Illustration of construction workers' safety gear including gloves, hard hats, and boots (no text or symbols)natural_image
Line drawing of a person using a power tool to adjust or install a mechanical device (no text or symbols present)natural_image
Line drawing of a person holding a rope or cable, no text or symbols presentnatural_image
Mechanical assembly diagram showing a wheel and gear assembly with a downward arrow indicating motion (no text or symbols)-Desaperte a poca na roda.
natural_image
Line drawing of a hand holding a small object, possibly a tool or component (no text or symbols present)Inspeção geral
natural_image
Diagram of a mechanical component with a cylindrical shaft and a pin inserted, showing an arrow indicating direction (no text or symbols present)text_image
Technical diagram of a manual push tool with numbered components labeled 1 through 5图中所指的编号如下。
- 轴
- 刀片箱
- 轮子
- 齿轮箱
- 刀片
安全注意事项

警告:
natural_image
Illustration of four different types of winter gear: jacket, glove, and boot (no text or symbols)配戴护耳装置如护耳套以防听力损伤。
natural_image
Line drawing of a person using a power tool on a mechanical device (no text or symbols)请遵照动力装置的指导手册启动电机。
natural_image
Line drawing of a person's rope being twisted with a string (no text or symbols)natural_image
Mechanical diagram showing a rotating component with a downward arrow indicating motion (no text or symbols)松开轮子上的螺母。
natural_image
Line drawing of a hand holding a small object, possibly a tool or component (no text or symbols present)全面检查
拧紧松动的螺栓、螺母和螺丝。
natural_image
Diagram of a cylindrical device being inserted into a rod, showing a change in the shaft (no text or symbols present)text_image
Technical diagram of a manual push tool with numbered parts labeled 1 through 5以下為圖中的數字編號。
- 傳動軸
- 刀片罩
- 輪子
- 變速器殼
- 刀片
安全注意事项
警告:
natural_image
Illustration of a person wearing safety gear and four different types of gloves (suit, pair, hand, boot) arranged around it, with no text or symbols present.natural_image
Line drawing of a person using a power tool to adjust or install a mechanical device (no text or symbols present)· 請依照動力裝置的說明手冊起動馬達。
natural_image
Line drawing of a person's rope being twisted (no text or symbols)natural_image
Mechanical diagram showing a gear and wheel assembly with a downward arrow indicating motion (no text or symbols)鬆開輪子上的螺帽。
natural_image
Line drawing of a hand holding a small object, possibly a tool or component (no text or symbols present)整體檢查
鎖緊鬆動螺栓、螺帽及螺絲。
natural_image
Diagram of a cylindrical device being inserted into a rod, showing a change in the shaft (no text or symbols present)text_image
Technical diagram of a manual push tool with numbered parts labeled 1 through 5아래의 번호는 그림을 참조하십시오.
natural_image
Illustration of a person wearing safety gear and three different footprints (sleeve, helmet, jacket) arranged around them (no text or symbols)natural_image
Line drawing of a person using a handheld device to interact with another person (no text or symbols present)natural_image
Line drawing of a person holding a rope tied with a cable (no text or symbols)natural_image
Mechanical diagram showing a wheel assembly with a gear and directional arrow (no text or symbols)월의 너트를 품니다.
natural_image
Line drawing of a hand holding a small object, possibly a tool or device, with no visible text or symbols.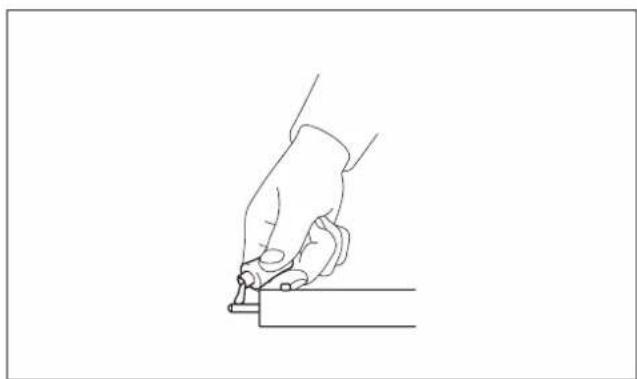
natural_image
Line drawing of a hand holding a small object, possibly a tool or device, with no visible text or symbols.종합 검사
볼트,너트 및 나사를 조입니다.
natural_image
Diagram of a mechanical component being inserted into a cylindrical housing (no text or symbols)BUX360, BUX361, BUX362, UX360D, UX361D, UX362D
Mesin Penggerak Multifungsi Nirkabel
text_image
Technical diagram of a manual push tool with numbered parts labeled 1 through 5natural_image
Illustration of four different types of footwear and gear: a worker in safety gear, hard hat, helmet, and boot (no text or symbols)natural_image
Line drawing of a person using a tool to adjust or install a mechanical device (no text or symbols present)natural_image
Line drawing of a person's neck and shoulder being tied with a rope (no text or symbols)natural_image
Mechanical diagram showing a wheel assembly with a rotating shaft and housing (no text or symbols)natural_image
Line drawing of a hand holding a tool, poised to write on paper (no text or symbols present)natural_image
Diagram of a cylindrical device with a bulb inserted, showing a change in the tip (no text or symbols present)BUX360, BUX361, BUX362, UX360D, UX361D, UX362D
text_image
Technical diagram of a mechanical tool with numbered parts labeled 1 through 5natural_image
Illustration of a worker in safety gear with four labeled objects: gloves, shoes, and boots (no text or symbols)natural_image
Line drawing of a person using a handheld device to interact with another person (no text or symbols present)natural_image
Line drawing of a person's rope being twisted, no text or symbols presentnatural_image
Mechanical assembly diagram showing a wheel and gear mechanism with a downward arrow indicating motion (no text or symbols)natural_image
Line drawing of a hand using a tool to press or install a component (no text or symbols present)Kiểm tra tổng thể
natural_image
Diagram of a cylindrical device being inserted into a rod, showing the process with an arrow indicating the insertion (no text or symbols present)BUX360, BUX361, BUX362, UX360D, UX361D, UX362D
text_image
Technical diagram of a manual push tool with numbered parts labeled 1 through 5natural_image
Illustration of a worker in safety gear with four labeled objects: helmet, pair of gloves, hard hat, and boot (no text or symbols)natural_image
Line drawing of a person using a power tool to adjust or install a mechanical component (no text or symbols present)natural_image
Line drawing of a person's rope being twisted (no text or symbols)natural_image
Mechanical diagram showing a wheel and gear assembly with a downward arrow indicating motion (no text or symbols)คลายนื้อตบนล้อ -