Disc Edge - Rangefinder BUSHNELL - Free user manual and instructions
Find the device manual for free Disc Edge BUSHNELL in PDF.

| Product Type | Disc Golf Laser Rangefinder |
| Brand | Bushnell |
| Model | Disc Edge |
| Dimensions (L x W x H) | 110 x 74 x 33 mm (4.3 x 2.9 x 1.3 inches) |
| Weight | 180 g (6.3 oz) |
| Power Source | 1 CR2 3V Lithium Battery |
| Max Range (Disc Golf Basket) | 275 m (900 feet) |
| Accuracy | ± 0.9 m (± 3 feet) |
| Magnification | 6x |
| Objective Lens Diameter | 24 mm |
| Optical Coating | Multi-coated |
| Main Functions | Z Mode (height measurement), auto scan, line of sight measurement, angle/slope indicator |
| Display | Vivid LCD Display with Reticle |
| Measurement Units | Meters or Feet (selectable) |
| Water Resistance | IPX4 (splash resistant) |
| Laser Safety | Class 1 Laser (eye safe) |
| Warranty | Bushnell Ironclad Lifetime Warranty |
| Repairability | Do not disassemble; contact customer service |
| Maintenance and Cleaning | Clean lenses with a microfiber cloth, avoid harsh solvents |
| Spare Parts | CR2 battery available commercially |
Frequently Asked Questions - Disc Edge BUSHNELL
User questions about Disc Edge BUSHNELL
0 question about this device. Answer the ones you know or ask your own.
Ask a new question about this device
Download the instructions for your Rangefinder in PDF format for free! Find your manual Disc Edge - BUSHNELL and take your electronic device back in hand. On this page are published all the documents necessary for the use of your device. Disc Edge by BUSHNELL.
USER MANUAL Disc Edge BUSHNELL
natural_image
Exterior view of a Bushnell binocular device (no additional text or symbols visible)EDGE ^TM
DISC GOLF RANGEFINDER
OWNER'S GUIDE
Thank you for purchasing your new Bushnell® Edge Disc Golf Rangefinder.
This manual will help you optimize your viewing experience by explaining how to utilize the rangefinder's features and how to care for it. Read the instructions carefully before using your rangefinder.

WARNING: As with any laser device, it is not recommended to directly view the emissions for long periods of time with magnified lenses.
INTRODUCTION
Your Bushnell® Edge is an ultra-compact, premium laser rangefinder with the latest Digital Technology, providing precise range readings from 15-2,550 feet (4.6-777 meters). Measuring 1.3 x 4.2 x 2.9 inches, the 6-ounce Edge delivers high-speed target acquisition, with +/- 3 feet accuracy to the maximum range. The Edge Disc Golf Rangefinder features Bushnell's Z-Mode Height Measurement, a new Ranging Engine for faster, more consistent response and readings, a Vivid LCD display with higher light transmission, and water-resistant (IPX4) construction.
*Note: You will get both longer and shorter maximum distances depending on the reflective properties of the particular target and the environmental conditions at the time the distance of an object is being measured. The color, surface finish, size, and shape of the target all affect reflectivity and range. The brighter the color, the longer the range. White is highly reflective, for example, and allows longer ranges than the color black, which is the least reflective color. A shiny finish provides more range than a dull one. A small target is more difficult to range than a larger target. The angle to the target also affects. Shooting to a target at a 70-degree angle (where the target surface is perpendicular to the flight path of the emitted energy pulses) provides a good range. In contrast, a steep angle, on the other hand, provides limited ranging. Also, lighting conditions (e.g., the amount of sunlight) will affect the ranging capabilities of the unit—the less light (e.g., overcast skies), the farther the unit's maximum range. Conversely, very sunny days will decrease the unit's maximum range.
HOW OUR DIGITAL TECHNOLOGY WORKS
The Edge Disc Golf Rangefinder emits invisible, eye-safe, infrared energy pulses. The Edge Rangefinder's microprocessor results in instantaneous and accurate readings every time. Sophisticated digital technology instantaneously calculates distances by measuring the time it takes for each pulse to travel from the rangefinder to the target and back.
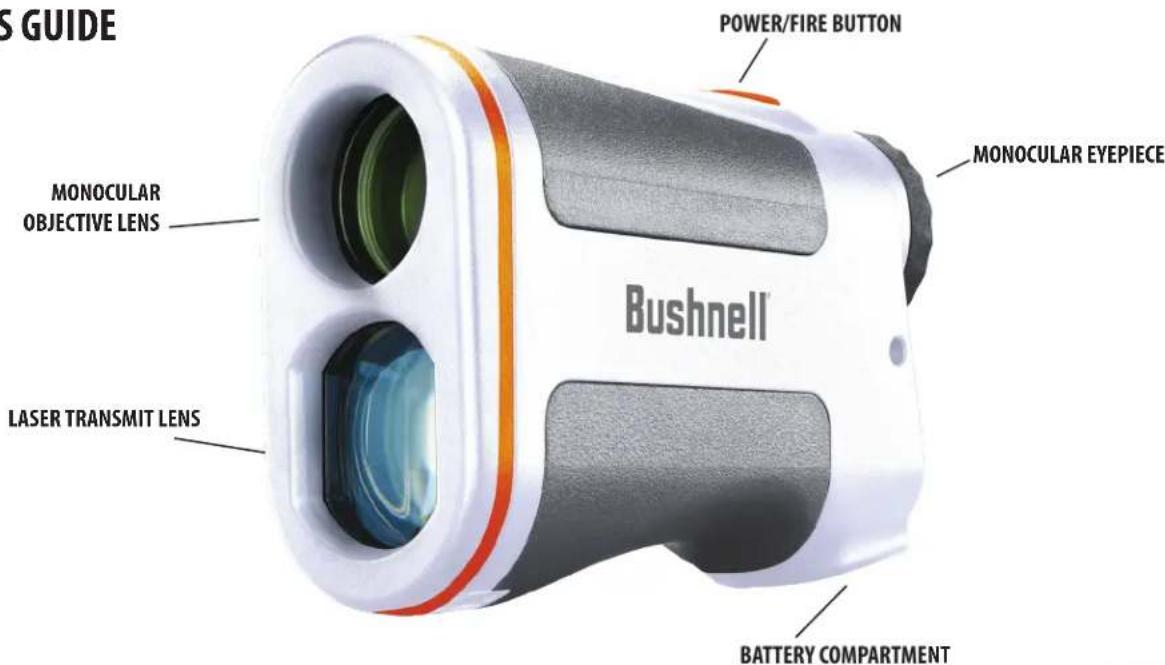
PARTS GUIDE
BATTERY ACTIVATION / BATTERY LIFE INDICATOR
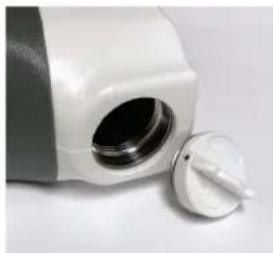
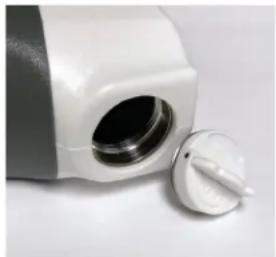
Before first use: Remove the battery compartment cover by lifting the battery cover tab and then rotating the cover counter-clockwise. Remove and discard the "Remove Battery Disk" sticker covering the positive battery terminal, then replace the battery cover. NOTE: It is recommended that the CR2 3-volt lithium battery be replaced at least once every 12 months. Please insert it into the negative end into the compartment first.
natural_image
Close-up of a white ceramic kitchen appliance with a circular vent and a side knob (no text or symbols visible)Battery Level Indicator Icon (1):
Full charge

3/4 battery level remaining

1/2 battery level remaining

1/4 battery level remaining

Battery icon blinks - battery needs to be replaced, and the unit will not be operable.
BASIC OPERATION
While looking through the laser rangefinder, press and release the Power/Fire button to activate the display.
If the display appears blurry, rotate the rubber eyecup/diopter adjustment in either direction until the display is sharp for your vision.
Placing the aiming circle (located in the center of the display) on a target at least 5-6 meters away, depress and hold the Fire button down until the range reading is displayed below the aiming circle.
Once a range has been acquired, you can release the Fire button. The four "crosshairs" just outside the aiming circle will go out, indicating the laser is no longer being transmitted. The display will remain on and display the last distance measurement for about 15 seconds until the display automatically switches off to extend battery life.
You can press the Fire button again at any time to check the range to a new target. To re-fire, press the button again.
To scan the laser across an area and get continuously updated range readings, continue to hold the Fire button down and sweep the rangefinder over multiple targets. The crosshairs outside the aiming circle will flash to indicate scan operation.
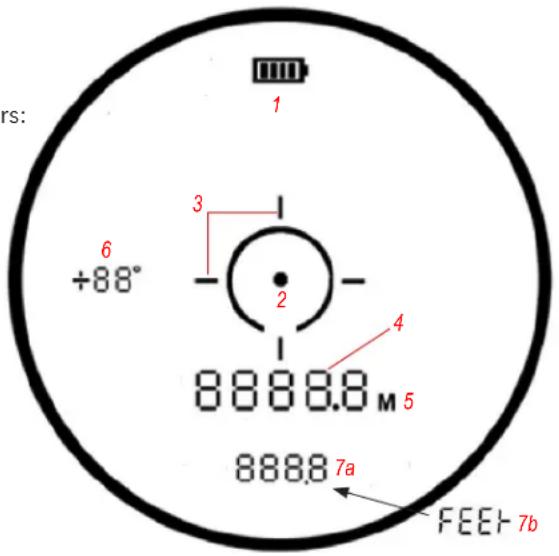
DISPLAY INDICATORS/ICONS
The Edge Rangefinder's display incorporates the following illuminated indicators:
Battery Level Indicator (1)
Aiming Circle/Dot (2)
Active/Scan Laser Indicator (3)
Standard "Line of Sight" Distance (4)
Distance Units Indicators (5): M=Meters (blank if Feet)
Angle Indicator-incline in degrees (6)
Z-Mode Elevation Measurement (7a) / FEEt (Feet) Distance Units Indicator (during setup only) (7b)
SELECTING UNITS OF MEASURE (METERS/FEET)
The Edge Disc Golf rangefinder measures distance in meters or feet. The unit of measure indicators for Meters (5) is located to the right of the Standard "Line of Sight" Distance (4). If "M" (5) highlighted when ranging, distances are in Feet (default).
To select a different unit of measure, start with the unit powered off. Press and continue to hold the Fire button. "M" or "FEEt" will begin flashing, with the display slowly cycling through these two unit options (5,7b). Release the Fire button when your desired display units are flashing. To select a different unit of measure, repeat this process.
AUTOMATIC SCAN
To use the Automatic SCAN feature, press and hold the Fire button, then move the rangefinder from object to object while keeping the Fire button depressed. Automatic SCAN will cause the standard line of sight distance readout (4) to be continuously updated as multiple objects are targeted. The Active/Scan indicator lines (3) flash while scanning.
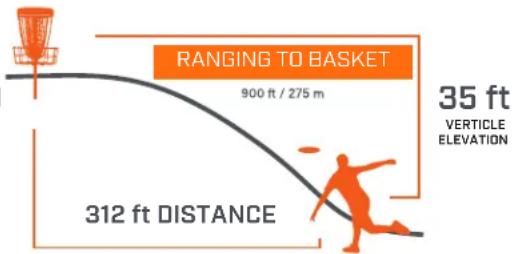
Z-MODE HEIGHT MEASUREMENT
Z-Mode displays the elevation of the target relative to where you are ranging from. This can help with elevated baskets or large uphill or downhill shots that can be tough to visually gauge.
CLEANING AND GENERAL CARE
The lenses of your Bushnell Edge Disc Golf Rangefinder are multi-coated for the highest light transmission. As with any multi-coated optics, special care must be taken in cleaning the lenses. Follow these tips for proper lens cleaning: Blow away any dust or debris on the lens (or use a soft lens brush).
To remove dirt or fingerprints, clean with a microfiber cloth rubbing in a circular motion. Use of coarse cloth or unnecessary rubbing may scratch the lens surface and eventually cause permanent damage. Breathe lightly on the lens to provide a slight amount of moisture, then gently rub the lens with the microfiber cloth.
For a more thorough cleaning, photographic lens tissue and photographic-type lens cleaning fluid or isopropyl alcohol may be used. Always apply the liquid to the cleaning cloth - never directly on the lens.
The rangefinder is manufactured and tested to withstand water exposure up to IPX4 standards. It is water-resistant but should not be submerged.
TROUBLESHOOTING
Never disassemble your laser rangefinder. Irreparable damage can result from unauthorized service attempts, which also void the warranty.
If the unit does not turn on, the display does not illuminate:
- Depress Power/Fire button.
- Check and, if necessary, replace the battery. If the unit does not respond to button presses, replace the battery with a good quality CR2 3-volt Lithium battery.
If unit powers down (display goes blank when attempting to power the laser):
- The battery is either weak or low quality. Replace the battery with a new 3 -volt lithium battery (CR2).
If target range cannot be obtained:
- Make sure the display is illuminated.
- Make sure that the Power/Fire button is being depressed.
- Ensure that nothing, such as your hand or finger, is blocking the lenses at the front of the rangefinder that emits and receive the laser pulses.
- Make sure the unit is being held steady while depressing the Power/Fire button.
NOTE: The last range reading does not need to be cleared before ranging another target. Aim at the new target using the display reticle, depress the power button, and hold until new range reading is displayed.
Technical Specifications
| SKU | Mag x Obj Lens Diam. | Max Range (F/M) (Disc Golf Basket) | Ranging Accuracy | Optical Coatings | Length (in/mm) | Weight (oz/g) |
| DG850SBL 6x | 24mm 900/27 | 5 +/- 3 ft Multicoated | 4.3/110 6 | 3/180 |

NO RECEIPT REQUIRED

FULLY TRANSFERABLE

WORKMANSHIP COVERED

MATERIALS COVERED
COVERAGE YOU CAN COUNT ON
All Bushnell products are engineered to deliver to your expectation and manufactured to withstand the rigors of the outdoors for the lifetime of the product. In the event that our product fails you, we will stand behind it and repair it at no cost to you. If we can't repair it then we will replace it with a product of equal or better value. No receipt required and fully transferable.
All Bushnell® products carry a product lifetime warranty against defects in workmanship or materials. Product lifetime is defined as 30 years for riflescopes, 20 years for binoculars and spotters, 5 years for electro-optics and electronic components (laser rangefinders, red dot sights, reflex sights, speed gun radars, night vision) and 2 years for trail cams. This warranty does not cover Bushnell Golf, please click here to view Bushnell Golf product warranty information. Coverage period start date is determined by proof of purchase or manufacturing date of the product. This warranty does not cover cosmetic damage; damage caused by failing to properly maintain the product; loss; theft; damage as a result of unauthorized repair, modification, or disassembly; intentional damage, misuses, or abuse. This Warranty will be void if the date stamp or other serialization codes have been removed from the Product. We may replace your product with a product of equal or better physical condition.
To view the full warranty and download the details of the warranty, click this link: https://www.bushnell.com/bu-warranty.html To submit a repair request or check the status of a repair ticket: https://service.bushnell.com/s/
For more information or questions regarding warranty, call toll free in the US: 1-800-423-3537 or Canada: (800)361-5702
For products purchased outside the United States or Canada, please contact your local dealer for applicable warranty information.
©2020 Bushnell Outdoor Products

WARNING: This product uses a Lithium based battery. Lithium batteries can overheat and cause damage if physically abused. Do not use batteries that are damaged or show signs of physical wear.
FCC Statement
This device complies with part 15 of the FCC Rules. Operation is subject to the following two conditions: (1) This device may not cause harmful interference, and (2) this device must accept any interference received, including interference that may cause undesired operation.
This equipment has been tested and found to comply with the limits for a Class B digital device, pursuant to Part 15 of the FCC Rules. These limits are designed to provide reasonable protection against harmful interference in a residential installation. This equipment generates, uses and can radiate radio frequency energy and, if not installed and used in accordance with the instructions, may cause harmful interference to radio communications. However, there is no guarantee that interference will not occur in a particular installation. If this equipment does cause harmful interference to radio or television reception, which can be determined by turning the equipment off and on, the user is encouraged to try to correct the interference by one or more of the following measures:
- Reorient or relocate the receiving antenna.
- Increase the separation between the equipment and receiver.
- Connect the equipment into an outlet on a circuit different from that to which the receiver is connected.
- Consult the dealer or an experienced radio/TV technician for help.
Shielded interface cable must be used with the equipment in order to comply with the limits for a digital device pursuant to Subpart B of Part 15 of FCC Rules. Specifications and designs are subject to change without any notice or obligation on the part of the manufacturer.
Important Note: Radiation Exposure Statement
- This equipment complies with FCC radiation exposure limits set forth for an uncontrolled environment. This equipment should be installed and operated with minimum distance 0cm between the radiator and your body.
- This transmitter must not be co-located or operating in conjunction with any other antenna or transmitter.

FDA SAFETY
Class 1 laser product in accordance with IEC 60825-1:2007.
Complies with 21 CFR 1040.10 and 1040.11 except for conformance with IEC 60825-1 Ed. 3., as described in Laser Notice No. 56, dated May 8, 2019.
Caution: There are no user controls, adjustments or procedures. Performance of procedures other than those specified herein may result in access to invisible laser light.
Industry Canada Statement :
This device complies with ISED's license-exempt RSSs. Operation is subject to the following two conditions: (1) This device may not cause harmful interference, and (2) this device must accept any interference received, including interference that may cause undesired operation.
This device complies with the Industry Canada portable RF exposure limit set forth for an uncontrolled environment and is safe for the intended operation as described in this manual. Further RF exposure reduction can be achieved if the product can be kept as far as possible from the user's body or if the device is set to a lower output power if such function is available.
Disposal of Electric and Electronic Equipment
(Applicable in the EU and other European countries with separate collection systems)
This equipment contains electric and/or electronic parts and must therefore not be disposed of as normal household waste. Instead, it should be disposed at the respective collection points for recycling provided by the communities. For you, this is free of charge.
If the equipment contains exchangeable (rechargeable) batteries, these too must be removed before and, if necessary, in turn be disposed of according to the relevant regulations (see also the respective comments in this unit's instructions).
Further information about the subject is available at your community administration, your local waste collection company, or in the store where you purchased this equipment.
natural_image
Simple line drawing of a trash bin with crossed lines indicating no waste or discharge (no text or symbols)Bushnell®
©2021 Bushnell Outdoor Products
Bushnell, ^TM , ^® , denote trademarks of Bushnell Outdoor Products
www.bushnell.com
9200 Cody, Overland Park, KS 66214
Before first use: Remove the battery compartment cover by lifting the battery cover tab and then rotating the cover counter-clockwise. Remove and discard the "Remove Battery Disk" sticker covering the positive battery terminal, then replace the battery cover. NOTE: It is recommended that the CR2 3-volt lithium battery be replaced at least once every 12 months. Please insert it into the negative end into the compartment first.
Battery Level Indicator Icon (1):
Full charge

3/4 battery level remaining

1/2 battery level remaining

1/4 battery level remaining

natural_image
Close-up of a white plastic container with a black lid and a white plastic lid, no visible text or symbols.Battery icon blinks - battery needs to be replaced, and the unit will not be operable.
BASIC OPERATION
While looking through the laser rangefinder, press and release the Power/Fire button to activate the display.
If the display appears blurry, rotate the rubber eyecup/diopter adjustment in either direction until the display is sharp for your vision.
Placing the aiming circle (located in the center of the display) on a target at least 5-6 meters away, depress and hold the Fire button down until the range reading is displayed below the aiming circle.
Once a range has been acquired, you can release the Fire button. The four "crosshairs" just outside the aiming circle will go out, indicating the laser is no longer being transmitted. The display will remain on and display the last distance measurement for about 15 seconds until the display automatically switches off to extend battery life.
You can press the Fire button again at any time to check the range to a new target. To re-fire, press the button again.
To scan the laser across an area and get continuously updated range readings, continue to hold the Fire button down and sweep the rangefinder over multiple targets. The crosshairs outside the aiming circle will flash to indicate scan operation.
INDICATEURS/ICÔNES SUR L'ÉCRAN
©2021 Bushnell Outdoor Products

This device complies with ISED's licence-exempt RSSs. Operation is subject to the following two conditions: (1) This device may not cause harmful interference, and (2) this device must accept any interference received, including interference that may cause undesired operation.
This device complies with the Industry Canada portable RF exposure limit set forth for an uncontrolled environment and is safe for the intended operation as described in this manual. Further RF exposure reduction can be achieved if the product can be kept as far as possible from the user's body or if the device is set to a lower output power if such function is available.
natural_image
Symbol of a trash bin crossed with two crossed lines and a solid rectangle below (no text or labels)WARNING: As with any laser device, it is not recommended to directly view the emissions for long periods of time with magnified lenses.
INTRODUCCIÓN
natural_image
Close-up of a white plastic container with a lid removed, no visible text or symbols©2021 Bushnell Outdoor Products

natural_image
Simple line drawing of a trash bin with crossed lines indicating no waste or discharge (no text or symbols)natural_image
Close-up of a white plastic container with a lid removed, no visible text or symbolsGARANTIE, AUF DIE SIE SICH VERLASSEN KÖNNEN
©2021 Bushnell Outdoor Products

natural_image
Symbol of a trash bin crossed out by two diagonal lines (no text or labels)
natural_image
Close-up of a white plastic container with a black lid and a metallic handle, partially removed by a white plastic clip (no text or symbols visible)©2021 Bushnell Outdoor Products

natural_image
Symbol of a trash bin crossed with two crossed lines, no text or labels presentnatural_image
Close-up of a white plastic container with a lid removed, no visible text or symbols©2021 Bushnell Outdoor Products