
PRO X7 SLOPE - Rangefinder BUSHNELL - Free user manual and instructions
Find the device manual for free PRO X7 SLOPE BUSHNELL in PDF.


| Product Type | Golf rangefinder with slope compensation |
| Brand | Bushnell |
| Model | PRO X7 SLOPE |
| Dimensions (L x W x H) | 4.3 x 7.6 x 3.0 cm |
| Weight | 230 g (with battery) |
| Battery | CR2 3V battery (included) |
| Magnification | 7x |
| Measurement range | 5 to 1300 yards (reflective) / 600 yards (tree) |
| Accuracy | ± 0.5 yards (up to 300 yards) |
| Display | Backlit LCD with viewfinder |
| Key features | Scan, PinSeeker, JOLT, slope compensator (SLOPE) |
| Slope mode | Yes, switchable (tournament legal with indicator) |
| Sealing | Moisture and fog protection (nitrogen purged) |
| Housing material | Aluminum and reinforced polymer |
| Tripod mount | Yes (1/4"-20 thread) |
| Warranty | 2 years (subject to conditions) |
| Maintenance and cleaning | Clean lenses with a microfiber cloth; avoid solvents |
| Safety | Do not look directly at the sun or an intense light source through the viewfinder |
| Spare parts and repairability | Replaceable CR2 battery; repair by Bushnell authorized center |
Frequently Asked Questions - PRO X7 SLOPE BUSHNELL
User questions about PRO X7 SLOPE BUSHNELL
0 question about this device. Answer the ones you know or ask your own.
Ask a new question about this device
Download the instructions for your Rangefinder in PDF format for free! Find your manual PRO X7 SLOPE - BUSHNELL and take your electronic device back in hand. On this page are published all the documents necessary for the use of your device. PRO X7 SLOPE by BUSHNELL.
USER MANUAL PRO X7 SLOPE BUSHNELL
Model: 201400, 201401
LIT. # 11-13


ENGLISH
CONTENTS
English 4 - 16
Français 17 - 30
Español 31 - 44
Deutsch 45 - 58
Italiano 59 - 72
Português 73 - 86
Congratulations on your purchase of the Bushnell® Pro X7™ Laser Rangefinder, our top of the line laser rangefinder for golfers and used by more golf professionals than any other brand. The Pro X7™ is a precision Laser Rangefinding optical instrument designed to provide many years of enjoyment. This booklet will help you achieve optimum performance by explaining its adjustments and features as well as how to care for this precise laser rangefinding optical instrument. To ensure optimal performance and longevity, please read these instructions before using your Pro X7™.
INTRODUCTION
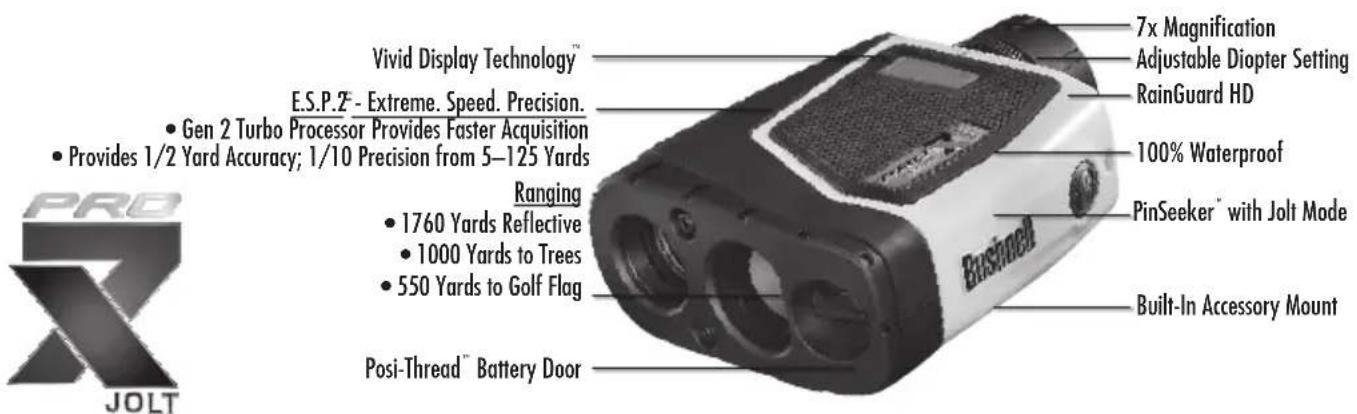
Your Bushnell ® Pro X7 ™ is an advanced premium laser rangefinder comprised of Digital Technology allowing range readings from 5-1760 yards/5-1609 meters, and combines the best of a compact monocular with the new Vivid Display Technology ™ . Measuring 1.7 x 5.1 x 3.7 inches, the 12-ounce Pro X7 ™ delivers superb and accurate range performance to +/- one yard. The Pro X7 ™ features PinSeeker ™ technology with JOLT, allowing the golfer to easily and quickly “zero” in on the flag without acquiring background targets, Superb Optical Quality, & 100% Waterproof Construction.
HOW OUR DIGITAL TECHNOLOGY WORKS
The Pro X7 ™ emits invisible, eye safe, infrared energy pulses. The Pro X7 ™ Advanced Digital microprocessor and ASIC chip (Application-Specific Integrated Circuit) results in instantaneous and accurate readings every time. Sophisticated digital technology instantaneously calculates distances by measuring the time it takes for each pulse to travel from the rangefinder, to the target, and back.
RANGING ACCURACY
The ranging accuracy of the Pro X7 ™ is plus or minus one yard / meter under most circumstances. The maximum range of the instrument depends on the reflectivity of the target. The maximum distance for most objects is 1000 yards/914 meters while for highly reflective objects the maximum is 1760 yards/1609 meters.
Note: You will get both longer and shorter maximum distances depending on the reflective properties of the particular target and the environmental conditions at the time the distance of an object is being measured. The color, surface finish, size and shape of the target all affect reflectivity and range. The brighter the color, the longer the range. Red is highly reflective, for example, and allows longer ranges than the color black, which is the least reflective color. A shiny finish provides more range than a dull one. A small target is more difficult to range than a larger target. The angle to the target also has an effect. Shooting to a target at a 90 degree angle (where the target surface is perpendicular to the flight path of the emitted energy pulses) provides good range while a steep angle on the other hand, provides limited ranging. In addition, lighting conditions (e.g. the amount of sunlight) will affect the ranging capabilities of the unit. The less light (e.g. overcast skies) the farther the unit's maximum range will be. Conversely, very sunny days will decrease the unit's maximum range.
E.S.P.2 ™ (Extreme. Speed. Precision. 2nd generation), our advanced second generation ranging technology, provides the fastest, most accurate ranging measurement based on target conditions. The laser analyzes multiple individual measurements to the target and calculates and displays the best possible result. Target variations such as reflectance, shape and color can affect the accuracy of a laser measurement, but E.S.P.2 ™ automatically assesses the conditions and improves the measurement up to 1/2 Yard Accuracy whenever possible from 5–125 yards. When this occurs, display readout precision will be refined to 1/10th yard.
GETTING STARTED
OPERATIONAL SUMMARY
While looking through the Pro X7 ™ , depress the power button once to activate the Vivid Display. Place the aiming circle (located in the center of the field of view) upon a target at least 5 yards away, depress and hold the power button down until the range reading is displayed near the bottom of the in-view display. Crosshairs surrounding the aiming circle indicate that the laser is being transmitted. Once a range has been acquired, you can release the power button. The crosshairs surrounding the aiming circle will disappear once the power button has been released (i.e. the laser is no longer being transmitted).
Note: Once activated, the display will remain active and display the last distance measurement for 10 seconds. You can depress the power button again at any time to distance to a new target. As with any laser device, it is not recommended to directly view the emissions for long periods of time with magnified lenses. The maximum time the laser is transmitted (fired) is 10 seconds. To re-fire, press the button down again.
ADJUSTING THE EYEPIECE
Your Pro X7 ™ is constructed with a twist-up eyepiece designed for comfort and to exclude extraneous light. For users without eyeglasses, rotate the eyecup counter clockwise while pulling up until it locks into the fully “up” position. The Pro X7 ™ provides extra-long eye-relief. If you wear glasses, make sure the eyecup is in the down position as this will bring your eye closer the eyepiece lens allowing you to see a full field of view. To lower the eyecup from the full “up” position, rotate clockwise while pushing down slightly. It is also possible to set the eyecup to positions “In between”, fully up and full down, which may suit some individuals better. The Pro X7 ™ is also equipped with an adjustable eyepiece (+/- 2 Diopter Adjustment) that allows one to focus the VDT ™ display relative to the image. Simply rotate the diopter setting until the VDT ™ is in focus.
VIVID DISPLAY INDICATORS
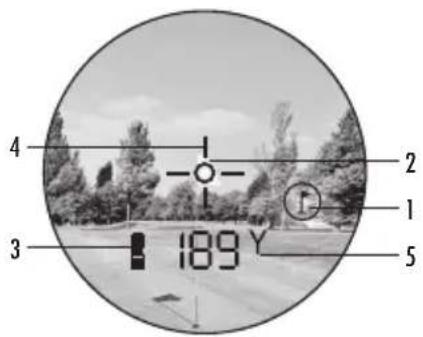
Your Pro X7™ Vivid Display™ incorporates the following illuminated indicators:
PinSeeker™ Indicator (1)
Aiming Reticle (2)
Battery Life Indicator (3)
Active Laser (4)
Distance Displayed in Yards/Meters (5)
BATTERY LIFE INDICATOR
Battery Indicator:
Full charge
2/3 battery life remaining
1/3 battery Life remaining
Battery Indicator Blinks - Battery needs to be replaced and unit will not be operable.
INSERTING THE BATTERY
Remove the Posi-Thread™ battery door by lifting the battery door tab and then rotating counter clockwise. Insert a (CR123) 3-volt lithium battery into the compartment negative end first, then replace battery cap.
Note: It is recommended that the battery be replaced at least once every 6 months.
ACTIVE LASER
Crosshairs surrounding the aiming circle indicate that the laser is being transmitted. Once a range has been acquired, you can release the power button. The crosshairs surrounding the circle will disappear once the power button has been released (i.e. the laser is no longer being transmitted).
PINSEEKER™
Ever have trouble getting distance to the flag? This advanced mode allows easy acquisition of the flag without inadvertently getting distances to background targets (i.e. trees) that have stronger signal strength.
For ease of use, the device will always be in PinSeeker™ Mode.
To use, align the aiming circle reticle onto the flag that you want distance to. Next, press and hold the POWER button and move the laser slowly over the flag or desired object until a circle surrounds the flag indicator. If the laser beam recognized more than one object (i.e. flag and background trees), distance of the flag will be displayed and a circle will surround the PinSeeker ™ indicator informing the user that distance to the flag (i.e. closer object) is being displayed in the VDT ™ (as seen below). There may be times when only the laser beam only sees one object in its path. In this case, the distance will be displayed, but because more than one object was not acquired, a circle will not surround the flag indicator. TIP: While pressing the POWER button, you can move the device slowly from object to object and intentionally force the laser to hit multiple objects to ensure that you are only displaying the closest of the objects recognized by the laser. Once the device has shut off, the unit will always default back to the last mode used.
PINSEEKER™ WITH SLOPE +/-
The advanced patented SLOPE mode is available only on model 201401 (Pro X7 ™ Slope +/- ™ ). This model features a built-in accelerometer-based inclinometer that digitally displays the exact slope angle from -20 to +20 degrees of elevation and is +/- 1.0 degree accurate. The Slope +/- ™ mode will automatically compute an angle compensated range based upon distance and slope angle determined by the laser rangefinder and built-in inclinometer. This data is then combined with internal algorithmic formulas dealing with average club use and ball trajectories. The angle compensated range provides direction on how to play the shot (i.e. add distance if an incline, subtract distance if a decline).
ACTIVATING SLOPE MODE (Model 201401 only)
The Pro X7 ™ Slope +/− ™ was especially designed with golfers in mind. The SLOPE mode allows you to display the angle and “Play-As” distance. To activate or deactivate this mode, press the POWER button once to turn the unit ON. Then while looking through the eyepiece, press the MODE button and quickly release.
HOW TO USE SLOPE +/-%
Once in this mode, you will see a “°” in the field of view informing you that you are in the Slope +/- Mode. Press the POWER button to obtain distance to the flag or other objects. Once the range is displayed, continue to hold the POWER button down for approximately 2 seconds while holding the aiming circle on the flag and keeping the unit as steady as possible so as to allow the inclinometer enough time to measure slope. Then release the POWER button. Once you have released the power button, a degree of angle and compensated range will be displayed beneath the standard distance as seen below.
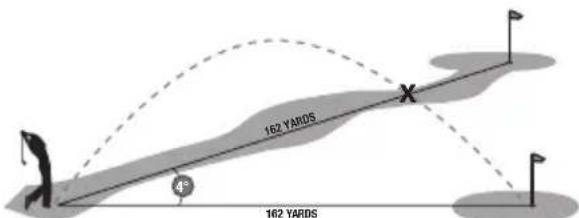
In this example, the true distance is 162 yards, slope is +4 degrees, and the compensated range is 173 yards. The “▶” symbol means “Play-As”, so instead of playing as 162 yards, “play-as” 173 yards.
THE ADVANTAGE OF SLOPE +/-%
The distance to flag A in the drawing below is 162 yards. It is also 162 yards to flag B although it is on a slope. However, if you were to play this hole as 162 yards, the ball (X) would fall short of the hole/flag because you did not take slope into account.
THE TRUTH ABOUT SLOPES
Trying to determine slope angle with the naked eye can be rather deceiving. Most are not well versed to accurately determine slope angle. For example, most golf courses average slope is approximately 4 degrees. A large slope at a golf course is generally no more than 8 degrees. Of course this can vary, and that is why this device will measure slope from -20 to 20 degrees.
Some real world examples may help clarify. A moderate roof pitch is 6/12, which means that the roof rises six inches for every 12 inch horizontal distance. That equates to 26.5 degrees. You can scramble up this pitch when hanging Christmas lights, but climbing that slope for the distance of a good golf shot on a course would be exhausting. To retrieve a 200 yards shot, you would climb 300 feet up!
Golf Example: Let's say you are a strong golfer with a 300 yard shot. At a 20 degree slope the Pin would be 50 feet above you. In other words, you be driving the ball to the top of a 5 story building!!!
NOTE: For your convenience, the Slope +/- Mode also contains the PinSeeker ® Mode/feature.
MENU SETUP
DISPLAY BRIGHTNESS
Vivid Display Technology™ dramatically improves contrast, clarity and light transmission while increasing brightness of the digital readout, making distance readings legible in low light environments. There are four intensity settings to choose from and this is the first setting within the SETUP menu. Press the MODE button for 5 seconds to get into the SETUP menu. The existing brightness setting will be flashing (i.e. BRT1, BRT2, BRT3, or BRT4), pressing the MODE button will toggle between the four brightness settings. “BRT1” is the lowest intensity while “BRT4” is the brightest. Simply press the MODE button until the desired brightness setting is displayed and select by pressing and releasing the POWER button.
UNIT OF MEASURE OPTIONS
The Pro X7 ™ can be used to measure distances in yards or meters. The unit of measure indicators are located in the lower right portion of the VDT ™ . There are two measuring settings to choose from and this is the second setting within the SETUP menu. Look through the eyepiece, depress the “MODE” button (left side of the eyepiece) and hold it down for approximately 5 seconds to get into the SETUP menu. Depressing the MODE button will toggle through the brightness settings. If you are changing from yards to meters, a change in unit of measure will be indicated by the illumination of the M for meter indicator while the Y for Yard indicator is turned off. If you are changing from meters to yards, the opposite will occur. The Pro X7 ™ will return to the last unit of measure setting used each time the unit is turned on.
ENABLING JOLT FEATURE
The Pro X7™ features PinSeeker™ technology with JOLT, allowing the golfer to easily and quickly “zero” in on the flag without acquiring background targets. The Jolt feature provides a short vibration to indicate when Pinseeker has triggered. This Jolt feature may be disabled in the setup menu. Holding the mode button will put the unit into the setup mode. The Jolt enable/disable is the third option, after the brightness setting and yard/meter selection. Pressing the fire button when the display indicates “JLT on” will enable the Jolt feature. Pressing the fire button when the display indicates “JLT off: will disable the Jolt feature. In the settings mode the mode button toggles between “JLT on” and “JLT off”.
ACCESSORY MOUNT
Molded into the bottom of the product is a threaded accessory mount that will allow you to attach the following Bushnell® Golf Accessories:
- Golf Cart Mount: Attaches the rangefinder to your golf cart for easy access. Quick release clamp attaches to golf cart and can be easily removed afterwards.
- Push/Pull Cart Monopod: Steady your hand with this telescoping monopod. Simply attach rangefinder to the monopod and insert into cart umbrella holder.
• 360R Retractor: Attaches the rangefinder to your golf bag for easy access while walking the course.
CLEANING
Gently blow away any dust or debris on the lenses (or use a soft lens brush). To remove dirt or fingerprints, clean with a soft cotton cloth, rubbing in a circular motion. Use of a coarse cloth or unnecessary rubbing may scratch the lens surface and eventually cause permanent damage. For a more thorough cleaning, photographic lens tissue and photographic-type lens cleaning fluid or isopropyl alcohol may be used. Always apply the fluid to the cleaning cloth – never directly on the lens.
TWO-YEAR LIMITED WARRANTY
Your Bushnell ® laser rangefinder is warranted to be free of defects in materials and workmanship for two years after the date of purchase. In the event of a defect under this warranty, we will, at our option, repair or replace the product, provided that you return the product postage prepaid. This warranty does not cover damages caused by misuse, improper handling, installation, or maintenance provided by someone other than a Bushnell ® Authorized Service Department.
Any return made under this warranty must be accompanied by the items listed below:
- A check/money order in the amount of \$ 10.00 to cover the cost of postage and handling
- Name and address for product return
- An explanation of the defect
-
Proof of Date Purchased
-
Product should be well packed in a sturdy outside shipping carton, to prevent damage in transit, with return postage prepaid to the address listed below:
IN U.S.A. Send To: IN CANADA Send To:
Bushnell ® Outdoor Products Bushnell ® Outdoor Products
Attn.: Repairs Attn.: Repairs
9200 Cody 140 Great Gulf Drive, Unit B
Overland Park, Kansas 66214 Vaughan, Ontario L4K 5Wt
For products purchased outside the United States or Canada, please contact your local dealer for applicable warranty information.
In Europe you may also contact Bushnell ® at:
| Bushnell | Germany | GmbH | |
| European | Service | Centre | |
| Mathias-Brüggen-Str. | 80 | ||
| D-50827 | Köln | ||
| GERMANY |
This warranty gives you specific legal rights.
You may have other rights which vary from country to country.
©2014 Bushnell® Outdoor Products
| SPECIFICATIONS | |
| Dimensions 1.7 x 5.1 x 3.7 inches | |
| Weight 12 oz. | |
| Ranging Accuracy Up to 1⁄2 yard accuracy from 5-125 Yards, +/-1 yard accuracy from 126-1760 Yards | |
| Range 5-1760 Yards / 5-1609 Meters | |
| Magnification 7x | |
| Objective Diameter 26 mm | |
| Optical Coatings Fully Multi-Co ated | |
| Display | Vivid Display Technology TM |
| Power Source 3-volt lithium | (CR123) |
| Field Of View 340 ft. @ 1000 yards | |
| Extra Long Eye Relief 19 mm | |
| Exit Pupil 3.7 mm | |
| 100% Waterproof Yes | |
| Built-In Accessory Mount Yes | |
| Includes | Carrying Case and Strap |
Patent #'s: 6,445,444 | 5,612,779 | 6,057,910 | 6,226,077 | 5,652,651 | 7,920,080 | 7,619,548 | 7,349,073 | 7,239,377 (201401 only) | 7,859,650 (201401 only) | 7,535,553 (201401 only)
TROUBLE SHOOTING TABLE
If unit does not turn on VDT ™ does not illuminate:
- Depress power button.
- Check and if necessary, replace battery. If unit does not respond to key presses, replace the battery with a good quality CR123 3-volt Lithium battery.
- Ensure the display is on the brightest setting while in sunlight. While pressing Power Button, cover the objective lenses to determine if the display is on. See the display brightness setting instructions on Page 10.
If unit powers down (display goes blank when attempting to power the laser):
- The battery is either weak or low quality. Replace the battery with a good quality CR123 3-volt Lithium battery.
If target range cannot be obtained:
• Make sure VDT ™ is illuminated.
- Make sure that the power button is being depressed.
- Make sure that nothing, such as your hand or finger, is blocking the objective lenses (lenses closest to the target) that emit and receive the laser pulses.
- Make sure unit is held steady while depressing power button.
NOTE: The last range reading does not need to be cleared before ranging another target. Simply aim at the new target using the VDT™'s reticle, depress the power button and hold until new range reading is displayed. Specifications, instructions, and the operation of these products are subject to change without notice.
FCC NOTE
This equipment has been tested and found to comply with the limits for a Class B digital device, pursuant to Part 15 of the FCC Rules. These limits are designed to provide reasonable protection against harmful interference in a residential installation. This equipment generates, uses and can radiate radio frequency energy and, if not installed and used in accordance with the instructions, may cause harmful interference to radio communications. However, there is no guarantee that interference will not occur in a particular installation. If this equipment does cause harmful interference to radio or television reception, which can be determined by turning the equipment off and on, the user is encouraged to try to correct the interference by one or more of the following measures:
- Reorient or relocate the receiving antenna.
- Increase the separation between the equipment and receiver.
- Connect the equipment into an outlet on a circuit different from that to which the receiver is connected.
- Consult the dealer or an experienced radio/TV technician for help.
Shielded interface cable must be used with the equipment in order to comply with the limits for a digital device pursuant to Subpart B of Part 15 of FCC Rules. Specifications and designs are subject to change without any notice or obligation on the part of the manufacturer.
FDA SAFETY
Class 1 laser product in accordance with IEC 60825-1:2007.
Complies with 21 CFR 1040.10 and 1040.11 for laser products except for deviations pursuant to Laser Notice No. 50, dated June 24, 2007.
Caution: There are no user controls, adjustments or procedures. Performance of procedures other than those specified herein may result in access to invisible laser light.
FC CE
Disposal of Electric and Electronic Equipment
(Applicable in the EU and other European countries with separate collection systems)
This equipment contains electric and/or electronic parts and must therefore not be disposed of as normal household waste. Instead, it should be disposed at the respective collection points for recycling provided by the communities. For you, this is free of charge.
If the equipment contains exchangeable (rechargeable) batteries, these too must be removed before and, if necessary, in turn be disposed of according to the relevant regulations (see also the respective comments in this unit's instructions).
Further information about the subject is available at your community administration, your local waste collection company, or in the store where you purchased this equipment.

Bushnell®
LASER RANGEFINDERS


9200 Cody 140 Great Gulf Drive, Unit B
Overland Park, Kansas 66214 Vaughan, Ontario L4K 5W1
Attn: Repairs
©2014 Bushnell® Outdoor Products
FC CE
SECURITE FDA
Bushnell Outdoor Products Bushnell Outdoor Products
Attn.: Repairs
9200 Cody 140 Great Gulf Drive, Unit B
Overland Park, Kansas 66214 Vaughan, Ontario L4K 5W19
Attn.: Repairs

FC CE
SEGURIDAD DE LA FDA
Bushnell ® Outdoor Products Bushnell ® Outdoor Products
Attn.: Repairs Attn.: Repairs
9200 Cody 140 Great Gulf Drive, Unit B
Overland Park, Kansas 66214 Vaughan, Ontario L4K 5W1
European Service Centre
Mathias-Brüggen-Str. 80
D-50827 Köln
GERMANY
Patent #'s: 6,445,444 | 5,612,779 | 6,057,910 | 6,226,077 | 5,652,651 | 7,920,080 | 7,619,548 | 7,349,073 |
7,239,377 (201401) | 7,859,650 (201401) | 7,535,553 (201401)
FC CE
N. brevetto: 6,445,444 | 5,612,779 | 6,057,910 | 6,226,077 | 5,652,651 | 7,920,080 | 7,619,548 | 7,349,073 | 7,239,377 (201401) | 7,859,650 (201401) | 7,535,553 (201401)
GARANZIA LIMITATA DI DUE ANNI
Bushnell ® Outdoor Products Bushnell ® Outdoor Products
Attn.: Repairs Attn.: Repairs
9200 Cody 140 Great Gulf Drive, Unit B
Overland Park, Kansas 66214 Vaughan, Ontario L4K 5Wt
©2014 Bushnell® Outdoor Products
GUIDA ALLA SOLUZIONE DEI PROBLEMI

FC CE
SICUREZZA FDA
Bushnell Outdoor Products Bushnell Outdoor Products
Attn.: Repairs Atn.: Repairs
9200 Cody 140 Great Gulf Drive, Unit B
Overland Park, Kansas 66214 Vaughan, Ontario L4K 5W1
©2014 Bushnell® Outdoor Products
FC CE
SEGURANÇA FDA
Bushnell® Outdoor Products
©2014


- CONTENTS
- INTRODUCTION
- HOW OUR DIGITAL TECHNOLOGY WORKS
- RANGING ACCURACY
- GETTING STARTED
- OPERATIONAL SUMMARY
- ADJUSTING THE EYEPIECE
- VIVID DISPLAY INDICATORS
- BATTERY LIFE INDICATOR
- INSERTING THE BATTERY
- ACTIVE LASER
- PINSEEKER™
- PINSEEKER™ WITH SLOPE
- ACTIVATING SLOPE MODE (MODEL 201401 ONLY)
- HOW TO USE SLOPE
- THE ADVANTAGE OF SLOPE
- THE TRUTH ABOUT SLOPES
- MENU SETUP
- DISPLAY BRIGHTNESS
- UNIT OF MEASURE OPTIONS
- ENABLING JOLT FEATURE
- ACCESSORY MOUNT
- CLEANING
- TWO-YEAR LIMITED WARRANTY
- IN U.S.A. SEND TO: IN CANADA SEND TO
- TROUBLE SHOOTING TABLE
- IF UNIT DOES NOT TURN ON VDT ™ DOES NOT ILLUMINATE
- IF UNIT POWERS DOWN (DISPLAY GOES BLANK WHEN ATTEMPTING TO POWER THE LASER)
- IF TARGET RANGE CANNOT BE OBTAINED
- FCC NOTE
- FDA SAFETY
- DISPOSAL OF ELECTRIC AND ELECTRONIC EQUIPMENT
- BUSHNELL®
- SECURITE FDA
- SEGURIDAD DE LA FDA
- GARANZIA LIMITATA DI DUE ANNI
- GUIDA ALLA SOLUZIONE DEI PROBLEMI
- SICUREZZA FDA
- SEGURANÇA FDA
Brand : BUSHNELL
Model : PRO X7 SLOPE
Category : Rangefinder