
Planeet Mix - Food Processor Zeegma - Free user manual and instructions
Find the device manual for free Planeet Mix Zeegma in PDF.
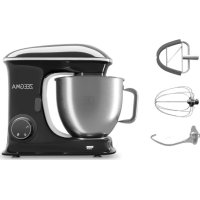
| Product type | Food processor |
| Brand | Zeegma |
| Model | Planeet Mix |
| Number of speeds | 8 speeds + pulse mode (P) |
| Included accessories | Dough hook, beater, stirrer for thin batters |
| Automatic functions | Dedicated programs for each accessory (kneading, mixing, whisking) |
| Maximum flour capacity (hard dough) | 600 g |
| Maximum cream capacity (whipping) | 500 ml |
| Control type | Touch panel and rotary speed control |
| Display | Touch screen |
| Safety | Arm lock, protection mode (E1), automatic stop |
| Maximum operation | 10 minutes with 10-minute pause |
| Power supply | Mains (household outlet) |
| Bowl and accessories cleaning | Dishwasher safe |
| Body cleaning | Damp cloth |
Frequently Asked Questions - Planeet Mix Zeegma
User questions about Planeet Mix Zeegma
0 question about this device. Answer the ones you know or ask your own.
Ask a new question about this device
Download the instructions for your Food Processor in PDF format for free! Find your manual Planeet Mix - Zeegma and take your electronic device back in hand. On this page are published all the documents necessary for the use of your device. Planeet Mix by Zeegma.
USER MANUAL Planeet Mix Zeegma
natural_image
Black and white photo of a ZEEGMA kitchen mixer with a whisk inside, no visible text or symbols on the main subject.ZEEGMA
4
5
natural_image
Line drawing of a kitchen mixer with a rotating knob and handle (no text or symbols)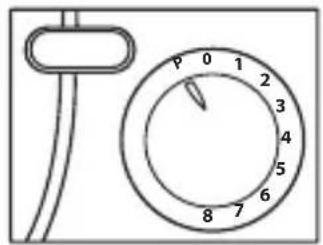
6
7
8
Introduction
Dear customer!
Thank you for placing trust in us and choosing Zeegma.
We provide you with a product perfect for everyday use thanks to the use of high-quality materials and modern solutions.
We are convinced that the product will satisfy your requirements as it has been designed with utmost care.
Before you use the product, please read this manual carefully.
Should you have any remarks or questions concerning the product, please do not hesitate to contact us:
support@zeegma.com
Important information
Please read this manual before using the device to familiarise yourself with its functions and use it as intended.
-
Before efore using the device, read the instruction manual and follow the instructions contained in it. The manufacturer shall not be liable for damage caused by the use of the device other than for its intended purpose or for damage caused by improper handling of the device. The instruction manual should be stored so that it can also be used in future use.
-
The device may be used by persons with reduced physical, sensory or mental capabilities, or persons without experience or knowledge, provided that supervision or instruction on the safe use of the device is provided and the associated risks are understood.
-
Children must not play with the device.
-
Children must not use the device. The device and the power cord must be kept out of the reach of children.
-
The device must be switched off and disconnected from the power source after use, during cleaning, when changing accessories and during assembly and disassembly. Disconnect the device from the power supply if it is left unattended.
-
The device is for domestic use only. It should not be used for other purposes incompatible with its intended use. The device is not intended for commercial use. The device should not be used outdoors.
-
Do not leave the running device unattended.
- Keep the device away from sharp edges and sources of heat and moisture. The device should not be exposed to direct sunlight.
- Do not immerse the device in water or other liquids.
- Do not operate the device with wet hands. If the device is wet or damp, immediately disconnect it from the power source.
- When pulling the plug out of the socket, never pull on the cord, only on the plug, while holding the mains socket with your other hand.
- Regularly check the device for damage. Do not use a damaged device. Do not attempt to repair the device yourself – contact an authorised repair centre. If the power cable becomes damaged, it should be replaced by the manufacturer to avoid danger.
- Do not make any modifications to the device.
- Use only original spare parts.
- Young children should not play with foil packaging. To prevent the child from suffocating, keep packaging (plastic bags, boxes, polystyrene) out of the child's reach.
- NOTE! To avoid the danger of inadvertently resetting the thermal fuse, this device must not be powered via external devices, i.e. a timer or a circuit that regularly switches on and off; this risks damaging the device.
- The surface on which the device is used should be flat, even and stable.
- Do not connect the device to the power supply before all necessary accessories have been installed.
- Ensure that the rated voltage of the device matches the specified voltage of the power socket.
- The device must be connected to a grounded electrical outlet.
- Do not use the device for more than 10 minutes. The pause before the next start-up should be about 10 minutes.
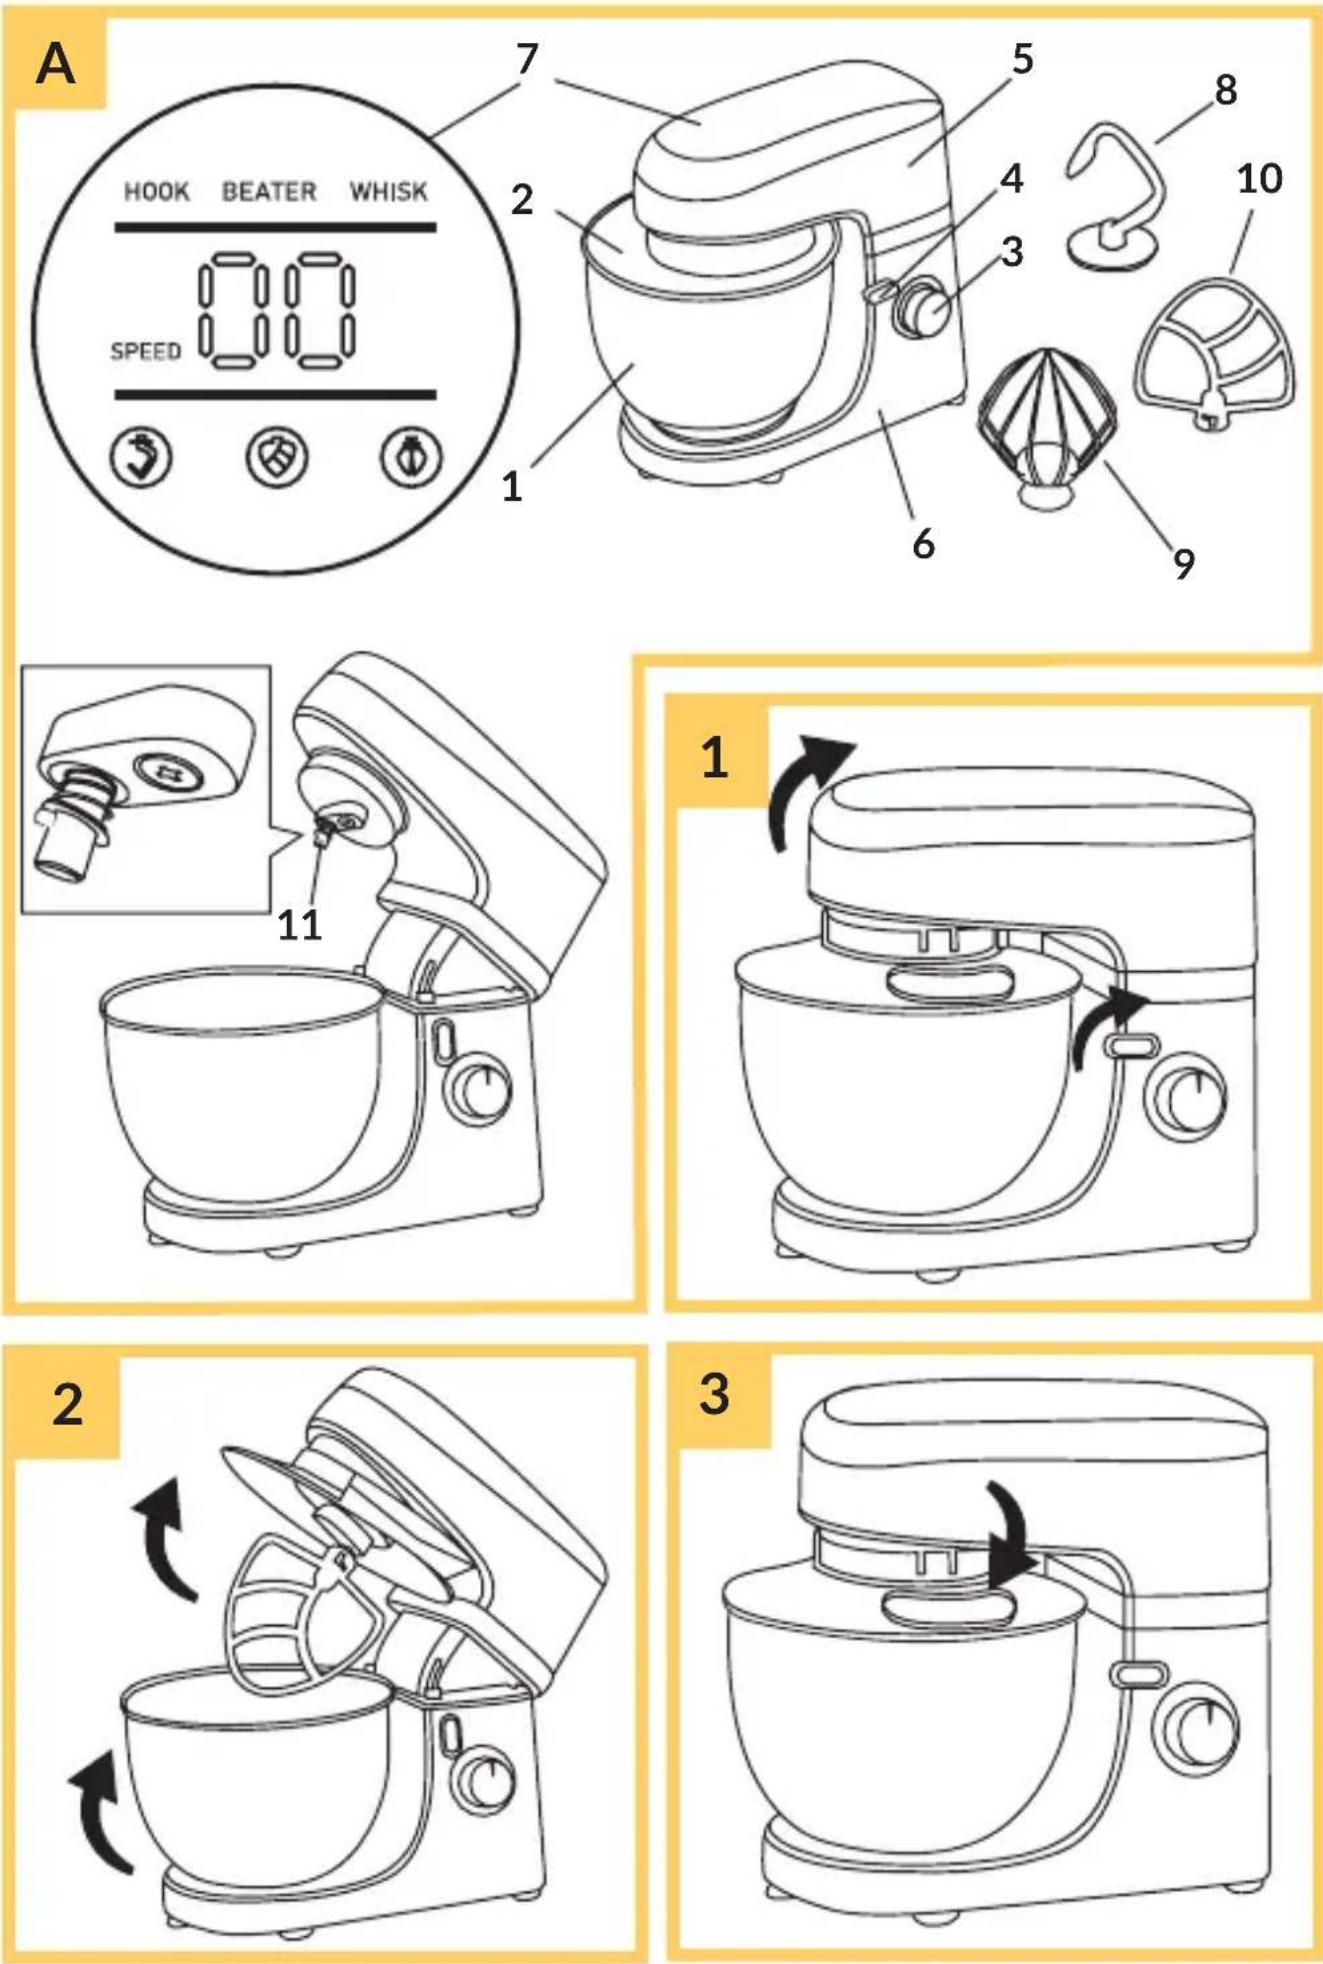
List of parts (fig. A)
- Bowl
- Bowl lid
- Speed controller
- Locking handle
- Upper part of the body
- Lower part of the body
-
Touch panel
-
Mixing hook for hard dough
- Beater
- Stirrer for flowing doughs
- Drive shaft
Before first use
Characteristic sounds may be coming out of the device, this is normal - they should stop after approx. 10 seconds of device operation.
Instruction manual
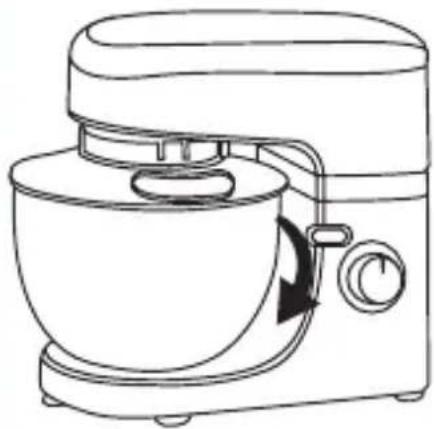
- To open the upper part of the device body, lift the locking handle (4, fig. A) and position the upper part vertically (fig. 1).
- Place the bowl in the lower body (6, fig. A) and turn clockwise to lock (fig. 2). Correct installation will be signalled by a click.
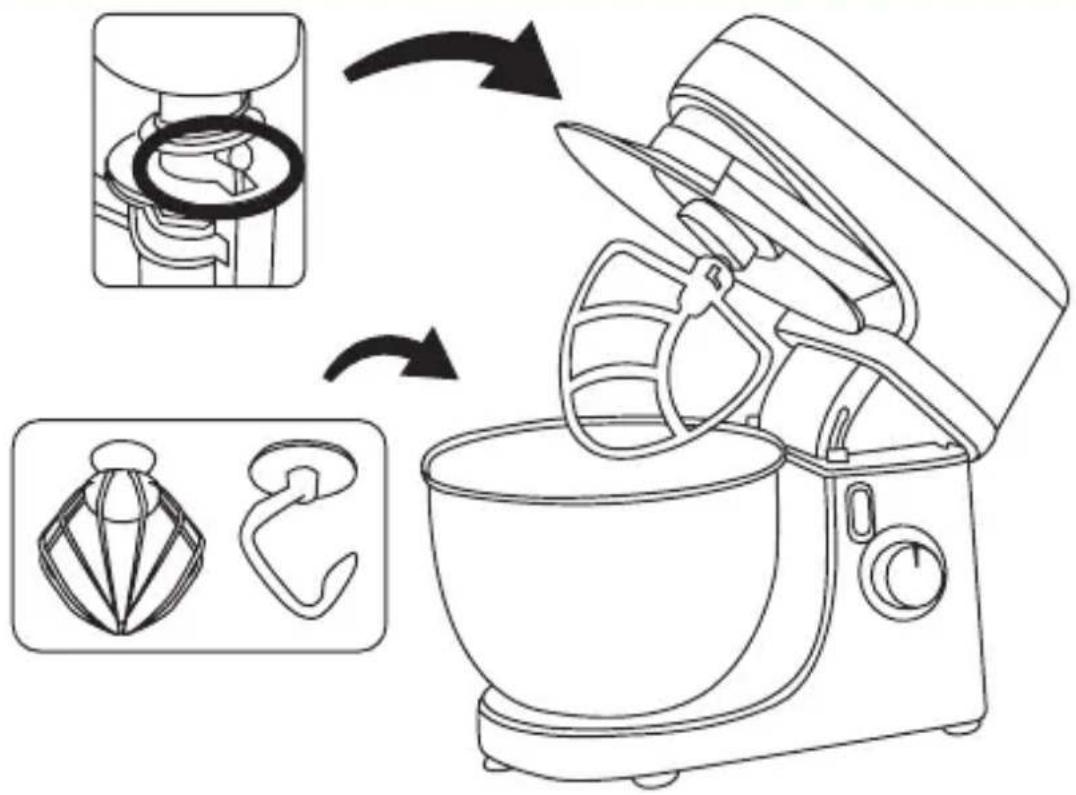
- Insert the ingredients and then place the lid (2, fig. A) on top of the body (fig. 2). Ingredients can also be added through the opening in the lid (fig. 3). Do not fill the bowl above the top line of the measure.
- Place the selected tip on the drive shaft (11, fig. A). Apply the tip so that the metal tab on the shaft (A, fig. 4) is in the corresponding hole on the tip. Twist to lock (fig. 4).
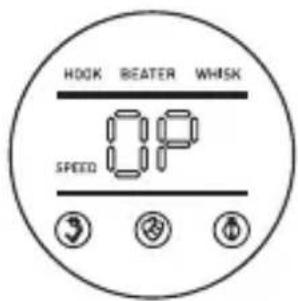
Speed controller
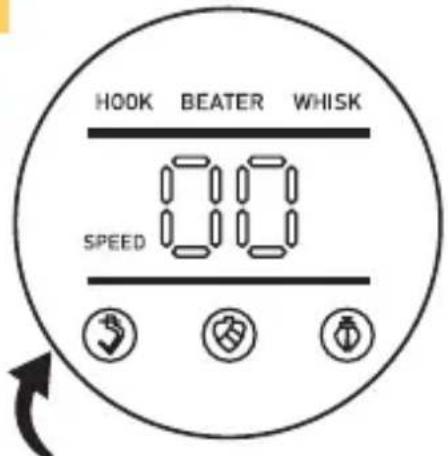
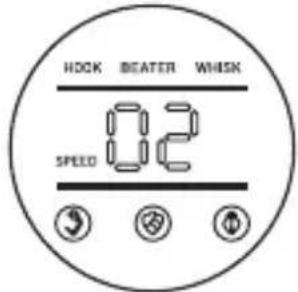
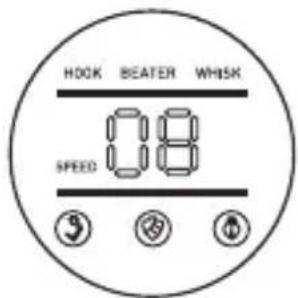
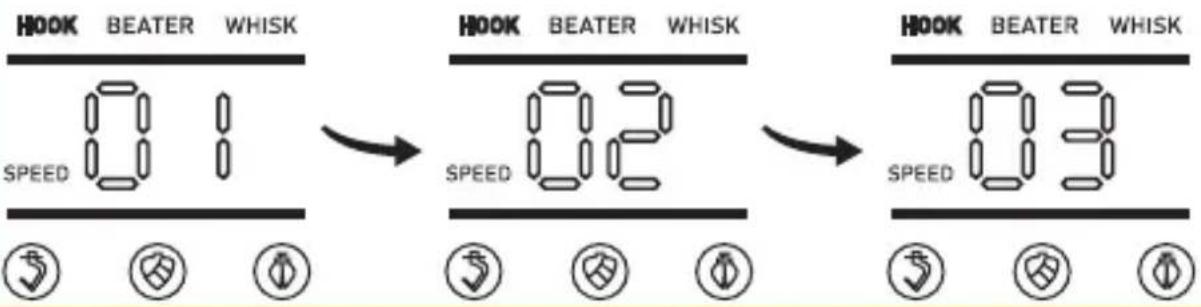
- Connect the device to a power source. Select one of the eight speeds by turning the speed controller (3, fig. A). The selected value will be displayed on the touch panel (fig. 5).
- Set the controller to position "P" to activate the pulse mode. Hold in this position for as long as you need. When released, the controller automatically returns to the "O" position.
- Turn the knob to the "O" position to stop the device.
Touch panel and automatic modes
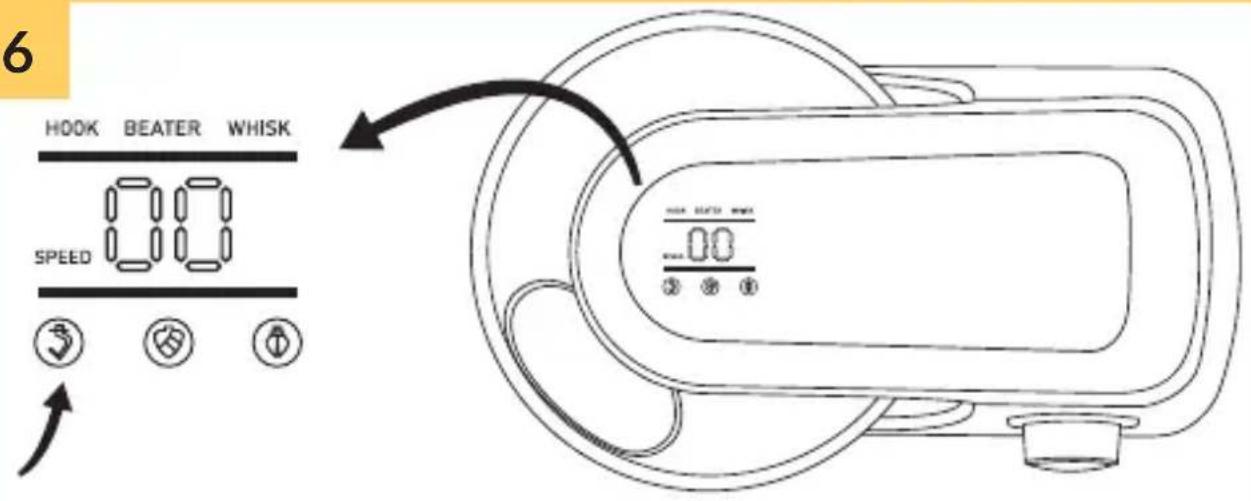
Connect the device to a power source. Start the device by double-tapping the icon with the symbol of the selected tip on the touch panel (7, fig. A). The device will switch off after about 5 minutes, thus ending the automatic mode and dough kneading.
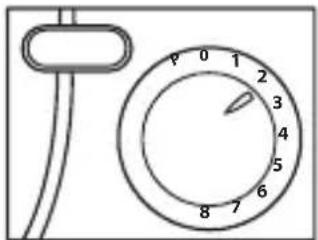
Mixing hook for hard dough
Press the icon with the hook symbol (fig. 6) twice. The device will start running at speed 1 to 3. The speed changes about every 30 seconds. Press again to stop the device.
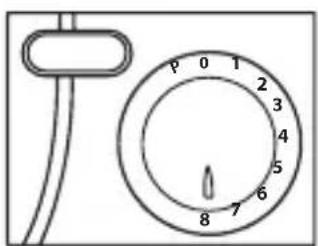
Stirrer for flowing doughs and light masses
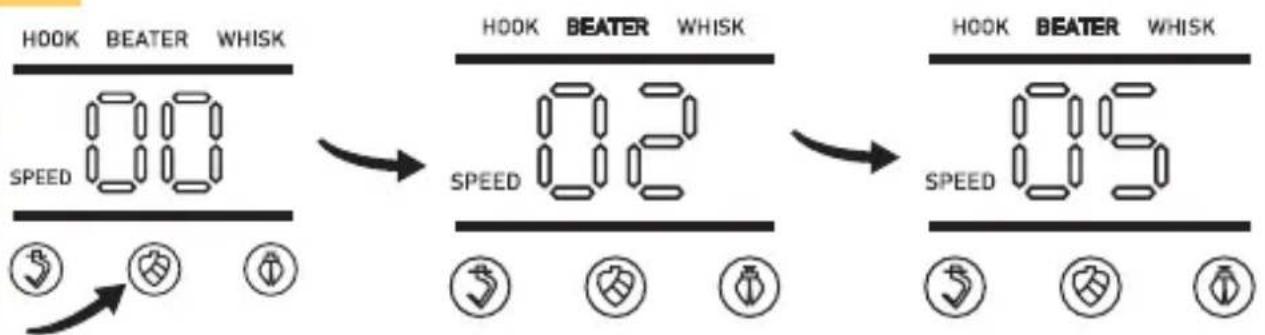
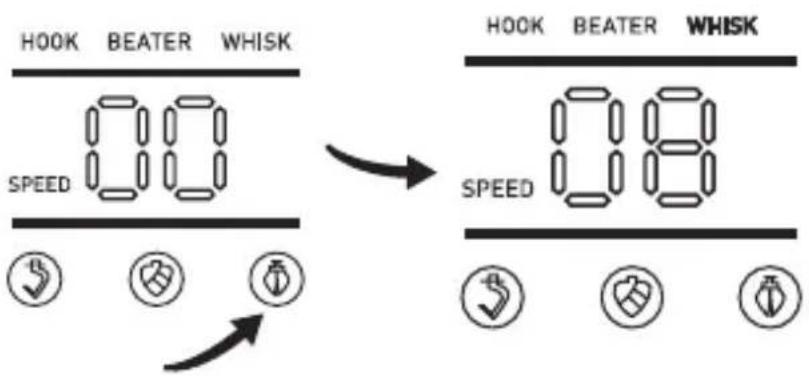
Press the icon with the stirrer symbol (fig. 7) twice. The device will start at speed 2 and increase to 5 after about 45 seconds. Press again to stop the device.
Beater
Press the icon with the beater symbol (fig. 8) twice. The device will start running at speed 8. Press again to stop the device.
Standby mode
After approximately 5 minutes of non-use, the device will enter standby mode. Tap the desired icon twice or turn the speed controller to resume operation.
Protection mode
If the locking handle is lifted while the device is in operation, the device will enter protection mode and “E1” will be displayed on the touch panel. The device will cease operation. Once the upper body is lowered again, the device can be resumed by pressing the selected icon twice or by setting the speed controller to the desired position. For smaller amounts of input than in the examples below, the automatic kneading/beating/mixing process can be stopped when pressed again.
| Tip Figure Speed Time | (min.) | Ingredients Maximum amount | |
| Mixing hook for hard dough |  | • 1-3 • 5 Flour 600 g | |
| Salt 10 g | |||
| Yeast 10 g | |||
| Sugar 10 g | |||
| Water 300 ml | |||
| Oil 20 g |
| Stirrer for flowing doughs |  | 1-5 5 Flour 150 g | |||
| Sugar 150 g | |||||
| Butter 150 g | |||||
| Eggs 3 pcs. | |||||
| Beater >6 5 Cre |  | ||||
| Sugar 50 g | |||||
| 3 Egg white 3-12 pcs. | |||||
Cleaning and maintenance
- Remove the power cord from the electrical socket before cleaning.
- Never immerse the body of the device in water.
- Do not use abrasive substances or strong cleaning agents.
Device body
Use only a damp cloth to clean the outside of the device body.
Bowl and accessories
NOTE! Under the influence of heat and corrosive agents, parts may become distorted or discoloured.
- The tips and the bowl can be washed in the dishwasher or by hand with dishwashing liquid.
- Special care should be taken when cleaning the tips due to the possibility of injury.
- Allow to dry before using again.
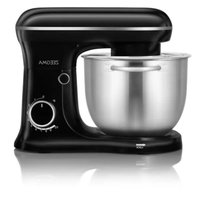
The photos are for reference only, the actual look of the products may differ from the ones shown in the pictures.
Einführung
EN: The product complies with requirements of EU directives. Pursuant to the Directive 2012/19/EU, this product is subject to selective collection. The product must not be disposed of along with domestic waste as it may pose a threat to the environment and human health. The worn-out product must be handed over to the electrics and electronics recycling center.
BrandLine Group Service – Support
www.zeegma.com/en/service
Szczegółowe warunki gwarancji dostępne są na stronie: Detailed warranty conditions are available on the website: Detaillierte Garantiebedingungen finden Sie auf der Website: Le condizioni di garanzia dettagliate sono disponibili sul sito web: Les conditions de garantie détaillées sont disponibles sur le site: Las condiciones de garantía detalladas están disponibles en el sitio web: Gedetailleerde garantievoorwaarden zijn beschikbaar op de website:
- Introduction
- Dear customer!
- Important information
- List of parts (fig. A)
- Before first use
- Instruction manual
- Speed controller
- Touch panel and automatic modes
- Mixing hook for hard dough
- Stirrer for flowing doughs and light masses
- Beater
- Standby mode
- Protection mode
- Cleaning and maintenance
- Device body
- Bowl and accessories
- Einführung
- BrandLine Group Service – Support
- www.zeegma.com/en/service
Brand : Zeegma
Model : Planeet Mix
Category : Food Processor