GO 2550 4K - Video camera Trevi - Free user manual and instructions
Find the device manual for free GO 2550 4K Trevi in PDF.

| Product type | Video camera |
| Brand | Trevi |
| Model | GO 2550 4K |
| Screen | 2.0" + 1.3" IPS |
| Lens | Wide angle 145° |
| Video resolution | 4K (30 fps), 2.7K (30 fps), 1080p (60 fps), 720p (120 fps) |
| Photo resolution | 16M, 12M, 8M, 5M, 2M |
| Video format | MP4 |
| Storage | Micro SDHC class 10 up to 64 GB |
| Connections | USB 2.0, Micro HDMI |
| Wi-Fi | 2.4 GHz (power 1.5 mW) |
| Battery | Li-ion 3.7 V, 900 mAh |
| Battery life | Approximately 90 minutes in 1080p |
| Charging time | Approximately 3 hours |
| Power supply | 5 V, 1 A |
| Weight | 61 g (with battery) |
| Waterproof | Up to 30 m with waterproof case |
| Main functions | Wi-Fi, slow motion, loop recording, front/rear view, remote control via XDV app |
| Safety | Do not expose to water without case; use with precautions |
| Maintenance and cleaning | Clean with soft damp cloth; rinse case after use in salt water |
| General information | Playback on TV via HDMI; compatible with iOS 7+ and Android 4.1+ |
Frequently Asked Questions - GO 2550 4K Trevi
User questions about GO 2550 4K Trevi
0 question about this device. Answer the ones you know or ask your own.
Ask a new question about this device
Download the instructions for your Video camera in PDF format for free! Find your manual GO 2550 4K - Trevi and take your electronic device back in hand. On this page are published all the documents necessary for the use of your device. GO 2550 4K by Trevi.
USER MANUAL GO 2550 4K Trevi
natural_image
Black 4K mini camera with a child floating in water, displayed on screen (no visible text or symbols on device body)Ita Manuale Utente
Eng User Manual
Scheda TF (Micro SD Card):
text_image
+ OK = + = + + = + + + = + + =ISTRUZIONI PER L'USO
natural_image
Skier in a snowy mountain slope under clear blue sky, no visible text or symbols
natural_image
Skier in a snowy landscape with trees and clear blue sky (no text or symbols visible)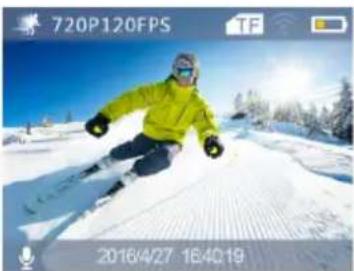
natural_image
Skier in a snowy slope with camera interface overlay (no readable text or symbols on the image itself)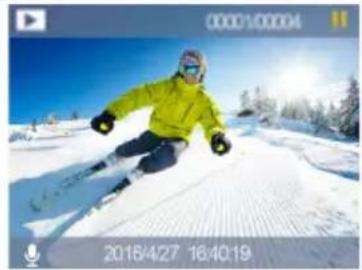
natural_image
Skier in a snowy slope under clear blue sky, no visible text or symbols
natural_image
Icon of a gear with camera and monitor icons (no text or symbols)text_image
QR code with a central logo featuring a blue eye and yellow starburst designiOS

text_image
QR code with a central logo, likely linking to a digital resource or website.Android
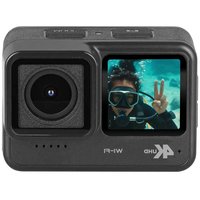
Thank you for purchasing this Wi-Fi camera. Thanks to the high-performance components, the device is capable of recording videos with excellent image quality. The camera has a unique and ultra-portable design that can be used in different situations, making your daily life comfortable, safe and full of color. Read this manual carefully and keep it for future reference. The screenshots and illustrations in this manual are intended to provide you with more detailed and straightforward information about your digital camera. There may be differences between the screenshots, illustrations contained in this manual and the current state of the digital camera, due to technological improvements and differences between production batches. In such a case, the actual functions of the camera should be considered as a priority.
SAFETY MEASURES
Waterproof casing:
- The permissible diving depth is 30 meters.
- Before applying the waterproof casing, make sure it is clean; a single hair or grain of sand can cause it to lose its hold.
- The casing can be tested by closing it without placing the camera inside. Submerge the wrap in water for about a minute. Remove the wrapper from the water, wipe the outside with a towel, then open it. If the inside is dry, it can be safely used underwater.
• After each use in salt water, rinse the exterior in fresh water and then dry. Failure to follow these instructions can cause the hinge pin to corrode, and salt buildup in the seal can cause severe damage to the finish. - To clean the seal, rinse it in cold water and shake it (using a cloth to dry may damage it). Reinsert the gasket into the grooves of the back cover of the waterproof housing.
TF Card:
- The camera supports high-speed (at least class 10) TF (Micro SD) cards with high capacity up to 64GB.
- Please format the card before using it for the first time or after using it on another device.
- Be sure to turn off the device before inserting or removing the card from the camera.
- During a long period of use, the card may overheat and its memory capacity may decrease over time.
- Remember that the card is a sensitive electronic device: protect it from humidity, twisting, falling, crushing and strong electromagnetic fields.
- It is possible to lose the data stored on the card if the device loses power during recording.
WARNINGS AND NOTES FOR USE
- When using the camera as a unit recorder, always follow the applicable local regulations. illegal use of the product will lead to legal consequences. In some countries, the use of recording units (or, in particular, posting recordings on the internet) may be illegal. We suggest that you familiarize yourself with the current regulations in force.
- The product must be used with an appropriate lighting level. Do not aim the camera directly at the sun or other strong light sources, as this could damage the optical system of the device.
- This product is a precision electronic device that cannot be exposed to strong vibrations and shocks. Cannot be used near strong magnetic or electric fields.
- The appliance must not be exposed to dripping or splashing water. No objects filled with liquid, such as vases, must be placed on the appliance.
- If liquids penetrate inside the device, disconnect the battery immediately and take the device to the nearest authorized TREVI service center.
- No naked flame sources, such as lighted candles, must be placed on the appliance.
- Instruct children and people with little knowledge of the product to use it correctly.
- Keep the following user manual.
CARE AND MAINTENANCE
For cleaning, we recommend using a soft, slightly damp cloth. Avoid solvents or abrasive substances.
COMMANDS DESCRIPTION
text_image
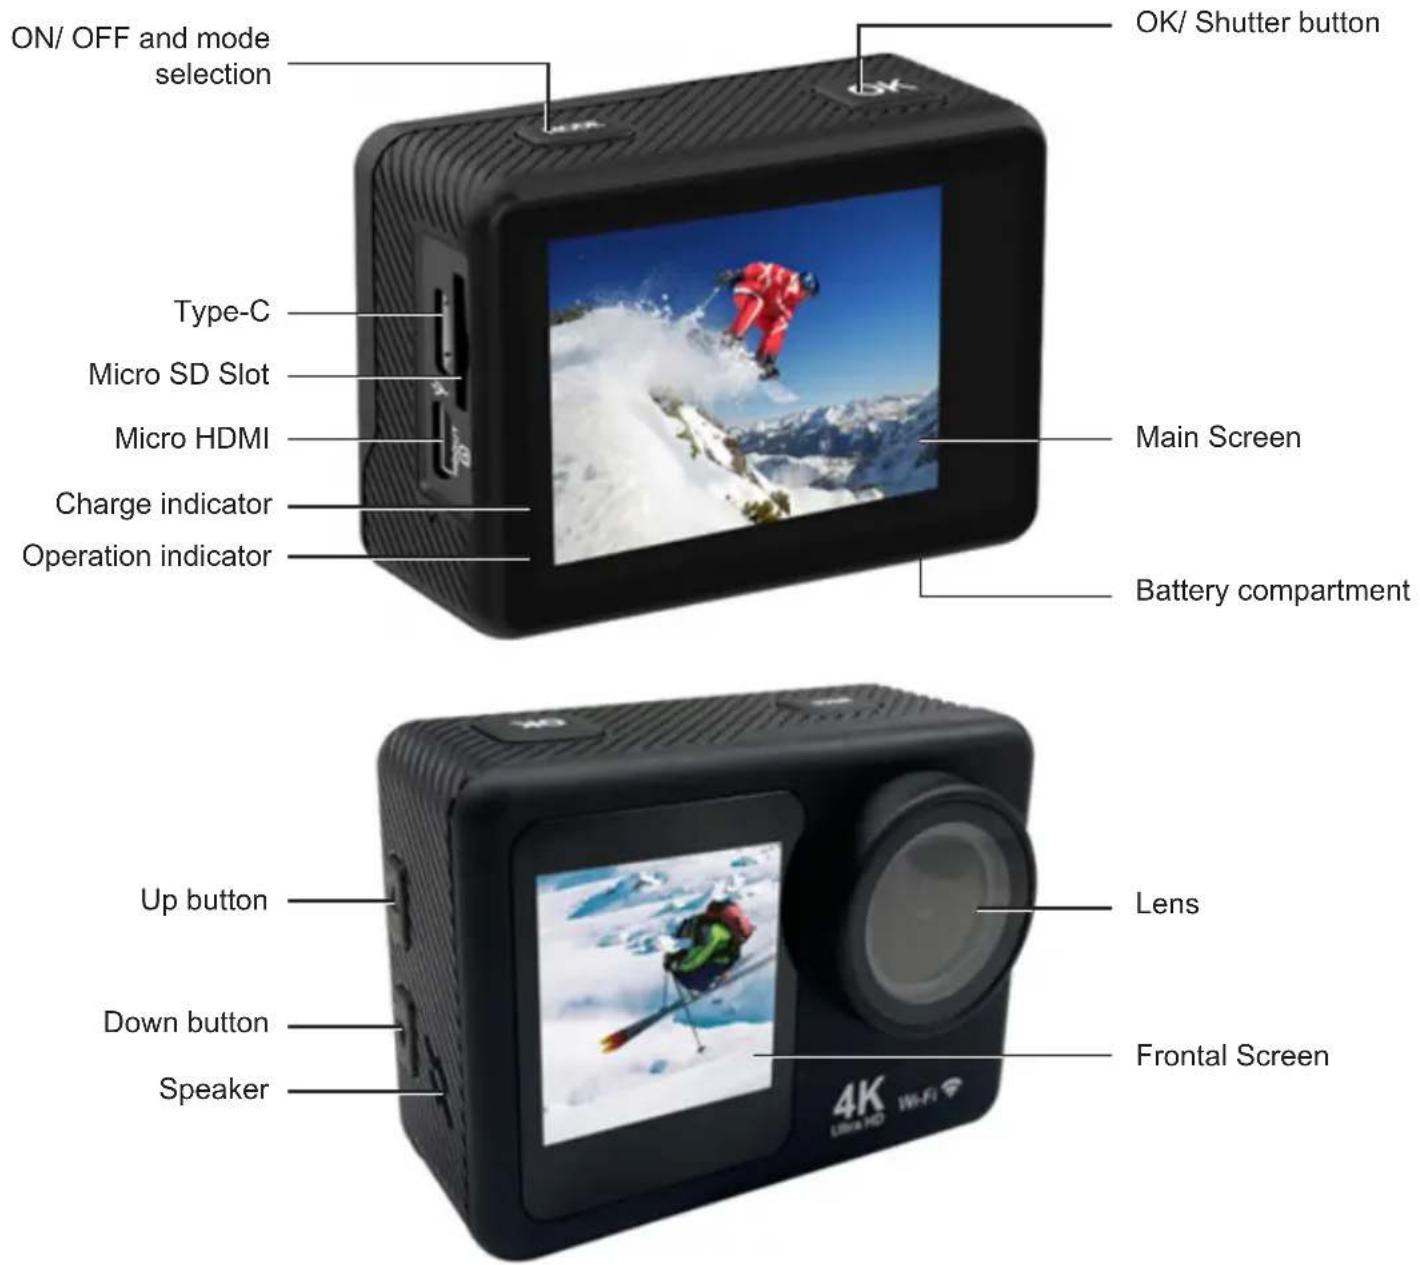
ON/ OFF and mode selection Type-C Micro SD Slot Micro HDMI Charge indicator Operation indicator OK/ Shutter button Main Screen Battery compartment Up button Down button Speaker Lens Frontal Screen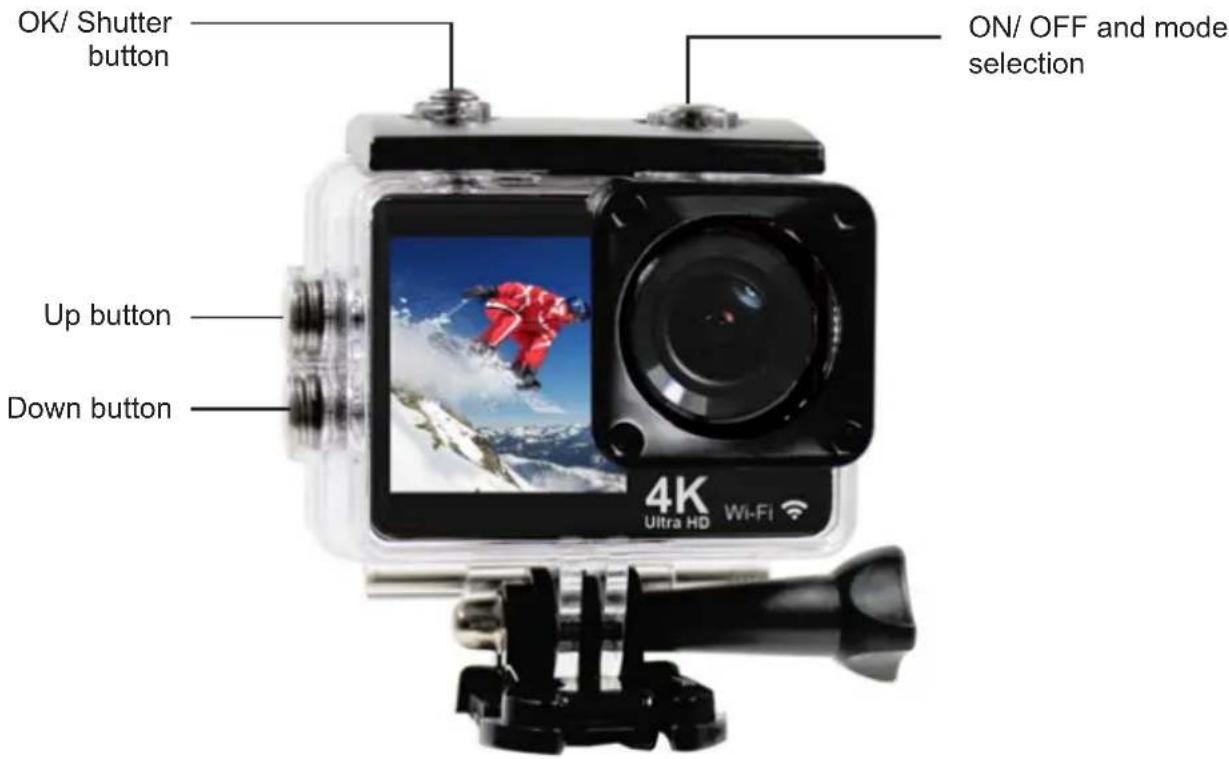
text_image
OK/ Shutter button ON/ OFF and mode selection Up button Down button 4K Ultra HD Wi-Fi
WARNING: Please lock the waterproof housing before putting it into water, otherwise it can result in leaks that may damage or destroy your camera. Water will damage both the camera and the battery, which could cause an explosion or fire. Your warranty does not cover water damage resulting from user error.
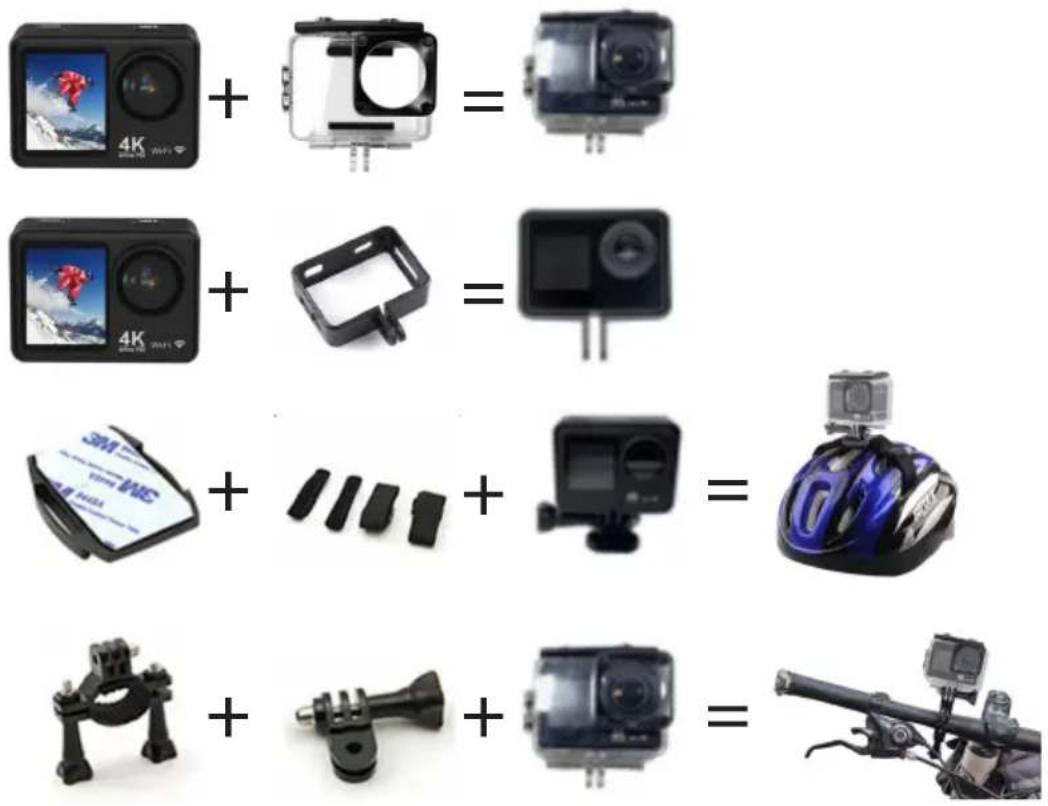
ACCESSORIES
 Waterproof case Waterproof case |  Bicycle bra-cket Bicycle bra-cket | 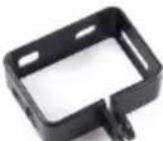 Back clip Switch Back clip Switch | 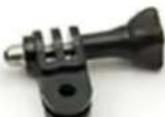 support Helmet support Helmet |  mount mount |
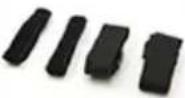 Bandage Adhesives Battery Bandage Adhesives Battery |  | 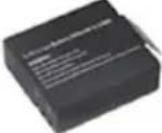 |  USB cable User manual USB cable User manual |  |
IMPORTANT
The good construction of this device guarantees its perfect functioning for a long time. However, should any problems arise, it will be advisable to consult the nearest TREVI Authorized Service Center.
TREVI pursues a policy of continuous research and development. Therefore the products may have characteristics different from those described.
SUGGESTED USES OF MOUNTS
Attach the camera to helmets, parts and equipment using the appropriate accessories.
text_image
+ OK = + = + + = + + + = + + =INSTRUCTIONS FOR USE
1. Insert micro SD card into the port:
Make sure to insert the card with the top side facing the screen. The bottom of the card with the connectors should be directed towards the front of the camera.
Note: Please choose branded Micro SD card and format it on your computer before use. Neutral cards are not guaranteed to work normally.
2. Installing and removing batteries
- Slide the cover and open the battery compartment.
- Insert the battery in the correct position so that the battery +/- battery terminals fit into the connectors on the camera. After inserting the battery, close the cover.
- The battery indicator on the screen shows the battery charge level.
- To replace the battery, open the battery compartment and remove the battery by pulling its strap. Insert a new battery and close the cover.
3. Charging
- The GO 2550 4K battery can be charged by connecting the device to any USB port on your computer via a USB cable.
- The camera can also be charged in a car using a 5V USB type-C plug charger (not supplied).
- The camera can be used for recording even while charging.
4. Turn ON/OFF
- Press and hold the MODE button for 3/5 seconds to turn the camera on or off.
- The screen will turn off automatically, according to the MENU settings. To turn the screen back on, press the OK key.
5. Switching modes
It is possible to switch from one mode to another: Video/ Photo/ Playback/ MENU by pressing MODE button. The active mode is displayed by the icons in the upper left corner of the screen.
In Playback mode, use "UP" and "DOWN" keys to select the file to be viewed and press "OK" key to start or stop playback.
6. Indicator light
Working LED light: Blue light.
Charging LED light: Red light will flash when in charging and keep constant red when charging full.
7. Functions
7.1. Video Mode
Select Video mode, the icon will appear:
- Press the "OK" key to start recording. A red icon will appear at the bottom of the screen indicating recording, along with an indication of the elapsed video recording time.
- Press the "OK" button again to stop recording completely.
Note: The default recording mode is loop. If there is insufficient storage space for recording, the new files will be overwritten on the old ones. Please choose and adjust your favorite modes within the Menu.
7.2. Picture Mode
Select Photo mode, the icon will appear:
- Press the "OK" key to take a photo. In the Menu mode of the camera, you can set the shooting mode: single shot/ self-timer (3S/5S/10S/20S)/ continuous shooting with various shutter speeds.
7.3. Slow Motion
Select Slow Motion mode, the icon will appear:
- Press "OK" key to start video recording, at the same time the blue light will flash;
- Press "OK" key again to stop video, the blue light will also stop flashing.
7.4. Time-lapse
- Enter the setting menu, activate this function and return to video mode;
- The icon ⏻ will show on the screen, press the "OK" key to start video recording, at the same time the blue light will flash, press the "OK" button again to stop the video, the blue light will also stop flashing.
7.5. Storage and playback of a file
After you finish recording, use a USB cable to export the videos to a computer for playback. Or take out the Micro SD card and access the image data via a card reader.
Connection to PC
Connect the camera to PC and turn on the camera, the screen will display 3 modes:
- USB mode;
- computer camera;
- charging mode.
Press the up and down button to choose the mode you want.
8. MENU
- Enter the MENU mode by pressing the MODE key several times;
- Press the "OK" button, the Video MENU will be displayed, press the MODE button again to go to the PHOTO MENU, then to the DEVICE MENU and finally to the SETTINGS MENU;
- Use the "UP" and "DOWN" keys to move between the various items;
- Press "OK" key to enter an item and confirm the setting.

natural_image
Skier in a snowy slope under clear blue sky, no visible text or symbols on the image itself.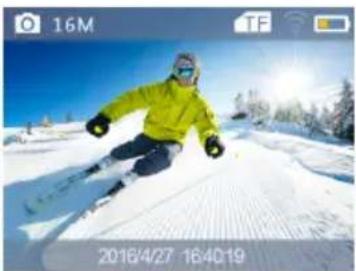
natural_image
Person skiing on a snowy slope under bright sunlight (no text or symbols visible)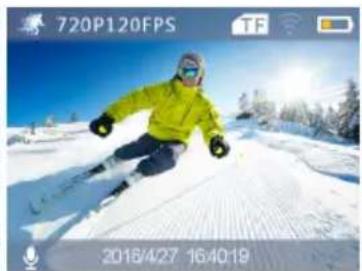
natural_image
Skier in a snowy slope under clear blue sky, no visible text or symbols on the image itself.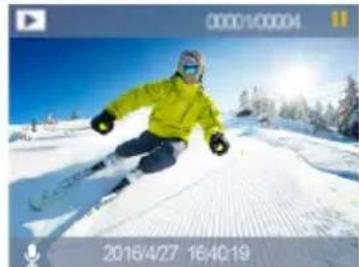
natural_image
Skier in a snowy slope with trees and clear blue sky (no text or symbols visible)
natural_image
Icon of a gear with camera and monitor icons (no text or symbols)9. Switching the front and rear screen
The rear screen and front screen can be switched to video and photo modes:
- Long press the Down button; the rear screen will turn off and the front screen will activate.
- Long press the Down button to wake up the rear screen and deactivate the front one.
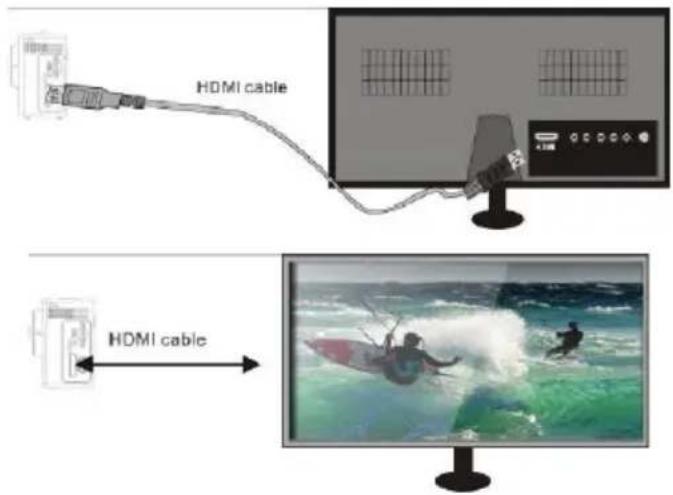
10. Connect to HDTV
Connect the camera to your TV via the HDMI/Micro HDMI cable (not supplied).
If you need to view photos or videos directly on your TV, go to playback mode in the camera and select the type of file to view (Video or JPG).
Then connect the Micro HDMI / HDMI cable to the TV as shown in the following figure:
text_image
HDMI cable HDMI cable11. Install APP and use of the Wi-Fi
The camera can connect via Wi-Fi to an iOS or Android tablet or smartphone.
To establish a connection, proceed as follows:
- Install the "XDV" application on your smartphone or tablet. It can be found on the Google Play store (for devices using Android) or on the APP Store (for iOS devices), or use the following QR Code:

text_image
QR code with a central logo featuring a blue eye and yellow starburst designiOS

text_image
QR code with a central logo, likely linking to a digital resource or website.Android
- Turn on the camera and hold down the "UP" key for a few seconds to start the Wi-Fi function, all the WiFi information will appear on the display;
- Activate the Wi-Fi network on your smartphone or tablet. Search for the network generated by the camera and connect to it. Enter the login password (default password 12345678);
- After establishing the connection, the appropriate information will be displayed on the screen. Recordings and Live Shooting cannot be viewed on the camera screen during a Wi-Fi connection;
- After establishing a Wi-Fi connection between the camera and a smartphone/tablet with the "XDV" app, you can change the camera settings and have a live preview of the recorded image. Also you can download the camera files to your smartphone/tablet, or delete or share the files.
To deactivate the Wi-Fi network, press and hold the "UP" key again for a few seconds
WARNING FOR A CORRECT USE OF RECHARGEABLE BATTERY
- Recharge the battery at a temperature between 5^ C and 35^ C.
- When charging is completed, the charge indicator LED will turn off.
- Do not extend the recharge beyond the indicated times to avoid the risk of overheating and bursting.
- Charging the battery beyond the indicated times or a prolonged period of inactivity can reduce its duration.
- The rechargeable battery is subject to wear and its capacity gradually decreases.
- To extend the life of the battery, use it when it is fully charged until it is completely discharged, then fully charge it again before using it again. Charging a battery that is not completely depleted will shorten its life. In this case, repeat the complete upload/download cycle several times.
- Avoid keeping the battery charging all night.
INFORMATION NOTE ON THE REMOVAL AND DISPOSAL OF BATTERIES
Whatever the type of exhausted battery, it must not be thrown away in household waste, in fire or water. Each type of exhausted battery must be recycled or disposed of at the appropriate dedicated collection centers.
How to remove the battery:
- Slide the cover and open the battery compartment;
- Remove the battery by pulling its strap;
- Insert a new battery and close the cover.
TECHNICAL SPECIFICATIONS
Display:
Lens: 145° Wide angle lens
Resolution Video recorder: ....
2.0" + 1.3" IPS
30FPS 4K - 30FPS 2.7K
60FPS 1080p - 30FPS 1080p
120FPS 720p - 60FPS 720p - 30FPS 720p
Video format: MP4
Picture resolution:
Storage:
Wi-Fi Frequency: 2,4GHz
Wi-Fi Power: 1,5mW
Wi-Fi support system:
Wi-Fi function:
and sharing albums
Frequency of Optical Source:......
Connections:
Power source Interface:
Battery Capacity:
Recording Time:
Charging Time:
Operating System(OS):
and Mac10.5 or above
Dimensions:
Weight:
16M/12M/8M/5M/2M
Micro SDHC class 10 64GB
iOS 7 and above, Android 4.1 and above
Image transmission, remote control, setting, sync
Auto/ 50Hz/ 60Hz
USB 2.0
5V, 1A
3,7V, 900mAh
1080P/ about 90 minutes
About 3 hours
Windows XP/Vista/Win7 or above
61x 44x 31.5mm
61 gr con batteria


Precautions for correct disposal of the product.
The symbol shown on the equipment indicates that waste must be disposed of in “separate collection” and so the product must not be disposed of together with urban waste.
The user must take the product to special “separate waste collection centres” provided by local government, or deliver it to the retailer against the purchase of a new product.
Separate collection of waste and subsequent treatment, recycling and disposal operations promotes the production of equipment with recycled materials and limits negative effects on the environment and on health caused by improper handling of waste.
Illegal disposal of the product leads to the enforcement of administrative penalties.
text_image
+ OK = + = + + = + + + = + + =MODE D'EMPLOI
natural_image
Skier in action on a snowy slope, wearing a yellow jacket and winter gear (no visible text or symbols)
natural_image
Person skiing on a snowy slope under clear blue sky, no visible text or symbols in the scene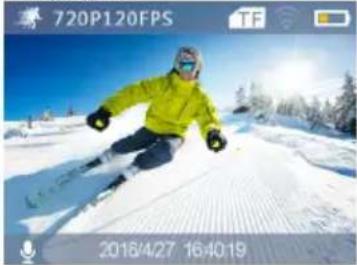
natural_image
Skier in action on snowy slope, wearing green jacket and winter gear (no visible text or symbols)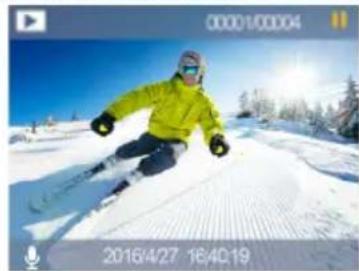
natural_image
Skier in a snowy landscape with trees and clear blue sky (no text or symbols visible)
natural_image
Icon of a gear with camera and monitor icons (no text or symbols)text_image
QR code with embedded logo and text 'Amaro' in the center
text_image
QR code with a central logo, likely linking to a digital resource or website.Dimensions: 61x 44x 31,5mm
text_image
+ OK = + = + + = + + + = + + =GEBRAUCHSANWEISUNG
natural_image
Skier in a snowy slope with trees and sun in the background (no visible text or symbols)
natural_image
Skier in a snowy slope with trees and clear blue sky (no text or symbols visible)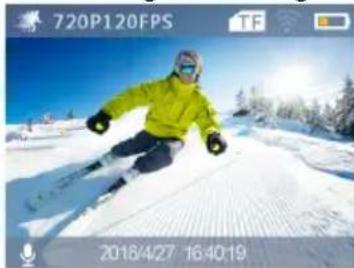
natural_image
Skier in yellow jacket on snowy slope under blue sky, no visible text or symbols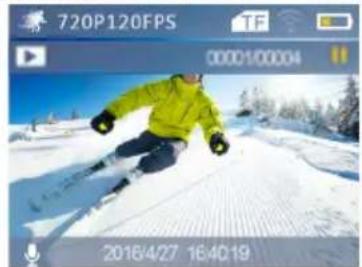
text_image
720P120FPS 0000100004 2016/4/27 16:4C19
natural_image
Icon of a gear with camera, monitor, and X icons (no text or symbols)text_image
QR code with a central logo featuring a camera lens designiOS

text_image
QR code with a central logo, likely linking to a digital resource or website.Android
text_image
+ OK = + = + + = + + + = + + =INSTRUCCIONES DE USO
natural_image
Skier in a snowy landscape with trees and clear blue sky (no text or symbols visible)
natural_image
Skier in a snowy landscape with snow-covered ground and trees in the background (no visible text or symbols)
natural_image
Skier in a snowy landscape with trees and clear blue sky (no text or symbols visible)
natural_image
Skier in a snowy slope under clear blue sky, no visible text or symbols
natural_image
Icon of a gear with control buttons at top (no text or symbols)text_image
QR code with a central logo featuring a camera lens designiOS

text_image
QR code with a central logo, likely linking to a digital resource or website.Android
Cartão TF (Micro SD Card)
text_image
Diagram showing the addition of various camera modules and accessories, including 4K units, camera bodies, and accessories.natural_image
Skier in a snowy mountain slope under clear blue sky, no visible text or symbols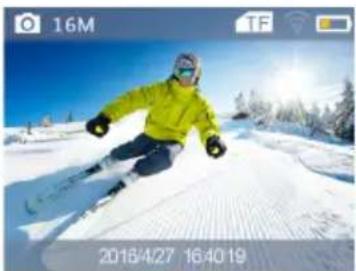
natural_image
Skier in a snowy landscape with trees and clear blue sky (no text or symbols visible)
natural_image
Skier in a snowy landscape with snow-covered slopes and trees, captured in action (no text or symbols on the skier or terrain)
natural_image
Skier in a snowy slope under clear blue sky, no visible text or symbols
natural_image
Icon of a gear with camera and monitor icons (no text or symbols)text_image
QR code with a central logo featuring a blue eye and yellow starburst designiOS

text_image
QR code with a central logo, likely linking to a digital resource or website.Android
SIMPLIFIED EU DECLARATION OF CONFORMITY
Hereby TREVI Spa declares that the radio equipment type GO 2550 4K is in compliance with directive 2014/53/EU.
The full text of the EU declaration of conformity is available at the following internet address https://www.trevi.it/dms/zidi/TREVI/DOCGO25504K.pdf

Strada Consolare Rimini-San Marino, 62, 47924 Rimini (RN) Italy Tel. 0541/756420 - Fax 0541/756430 - www.trevi.it - e-mail: info@trevi.it