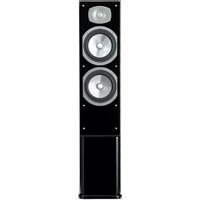
C-C100 - Speaker Energy - Free user manual and instructions
Find the device manual for free C-C100 Energy in PDF.
| Brand | Energy |
| Model | C-C100 |
| Product Type | Center speaker (central channel) |
| Recommended Use | Home theater system, music listening |
| Magnetic Shielding | Yes (compatible with CRT televisions, no issue with plasma/LCD screens) |
| Connection Terminals | Plated, accept cable up to 12 AWG, banana plugs, spade connectors or pins |
| Connection Methods | Traditional, bi-wiring, bi-amping |
| Recommended Break-in | 100 hours at moderate volume before high volume use |
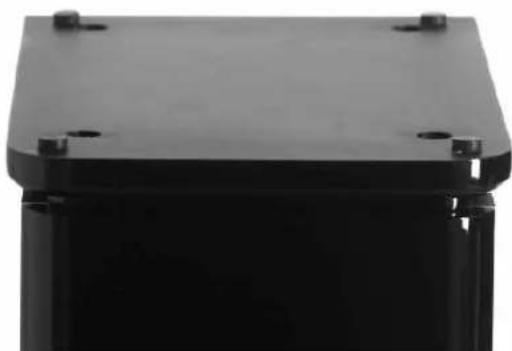
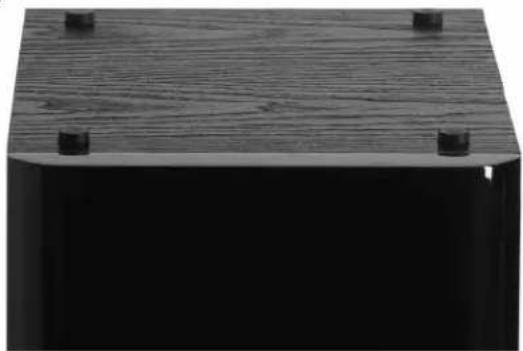
| Included Accessories | 4 self-adhesive rubber bumpers |
| Installation | On shelf, stand or wall mounting (optional Macromount bracket) |
| Maintenance | Damp cloth and warm water; do not use abrasive or ammonia-based cleaners |
| Warranty | 5 years (speaker) from date of purchase |
| Country of Manufacture | Not specified |
Frequently Asked Questions - C-C100 Energy
User questions about C-C100 Energy
0 question about this device. Answer the ones you know or ask your own.
Ask a new question about this device
Download the instructions for your Speaker in PDF format for free! Find your manual C-C100 - Energy and take your electronic device back in hand. On this page are published all the documents necessary for the use of your device. C-C100 by Energy.
USER MANUAL C-C100 Energy
IMPORTANT SAFETY INSTRUCTIONS - READ CAREFULLY!
We are proud to welcome you as an owner of ENERGY^品 Speaker Systems C-Series. ENERGY^品 Speakers are the result of extensive research into accurate sonic reproduction and represent the leading edge in speaker design and performance. The finest components and cabinet materials, combined with sophisticated manufacturing and quality control procedures, ensure many years of exceptional performance and listening pleasure.
Please take time to read all of the instructions contained in this manual to make certain your system is properly installed and set up for optimal sound reproduction. Be sure to unpack your system carefully. Retain the carton and all packing material for future use.
UNPACKING
Using a knife carefully cut the tape to open the package. Fold the carton flaps back and slide the speaker and packaging from the box. When removing the C-300 or C-500 floorstanding speaker, stand the box upright, cut the tape and slide the speaker from the box. Remove all inner packaging and parts.
IMPORTANT SAFETY INSTRUCTIONS
The C-Series floorstanding models C-300 or C-500 are designed to be used with spikes and feet for the speakers' bottom. It is important that these are installed properly as they provide stability and also add to the cosmetic look of the speakers.
CONTENTS:
4 - Self adhesive rubber bumpers
4 - Protective discs (C-300 or C-500 only)
4 - Spikes (C-300 or C-500 only)
4 - Nuts (C-300 or C-500 only)
1 - High gloss black plinth/base (C-300 or C-500 only)
BREAK-IN PROCEDURES
It is VITAL that your new C-Series speakers be allowed to break-in properly before you perform any precise set up procedures, system adjustments, and before you play them at higher volume levels. The best method of performing the break-in is to play a full range musical passage at a moderate level as long as possible. Utilizing the repeat function on your CD or DVD player can assist greatly. Optimum sound will not be achieved until approximately 100 hours of playing time. After break-in, the volume level can be increased. Do not play the speakers at high levels until the break-in process has been completed. The transducers need to "loosen up", and until this occurs, damage can result to the transducers.
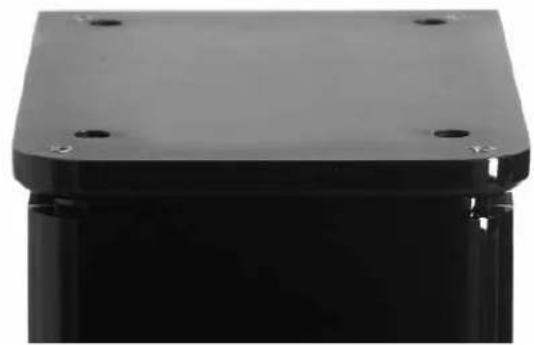
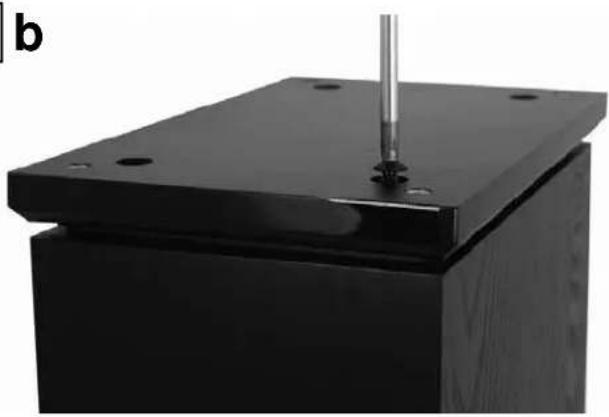
PLINTH/BASES
The C-300 or C-500 floorstanding speakers come out of the box with high gloss black plinth/bases attached to their bottom. The plinth/bases are removable if you so choose, by unscrewing the 4 round head machine bolts that attach the plinth/base to the cabinet. Care should be taken to not damage the speaker or plinth/base during removal. Plinth/bases ensure a larger surface area, and therefore provide greater stability to the speaker. Please see diagram 1.
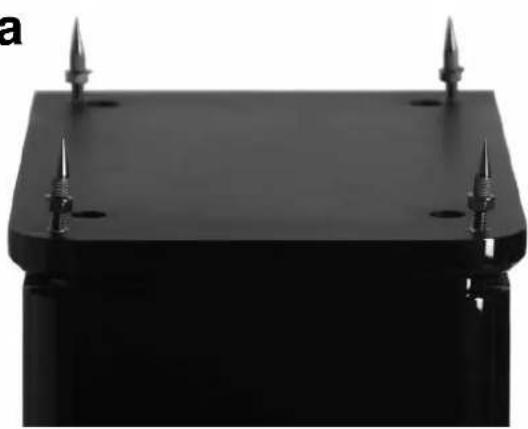
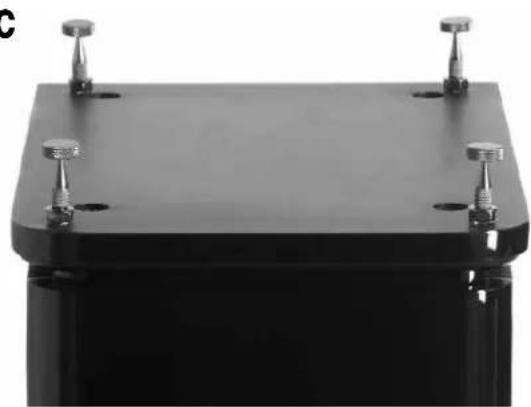
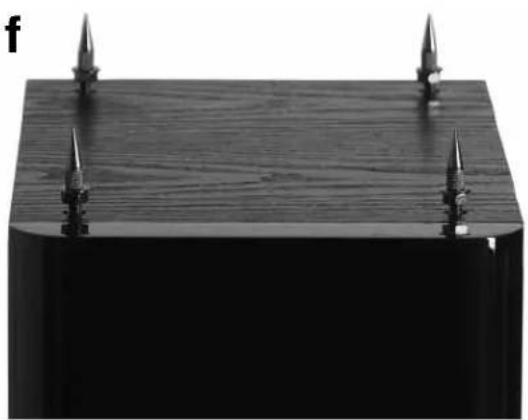
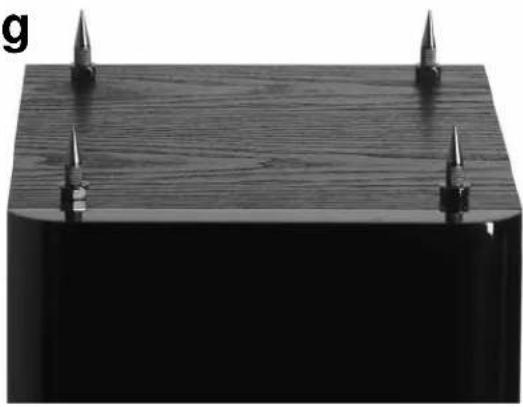
SPIKES
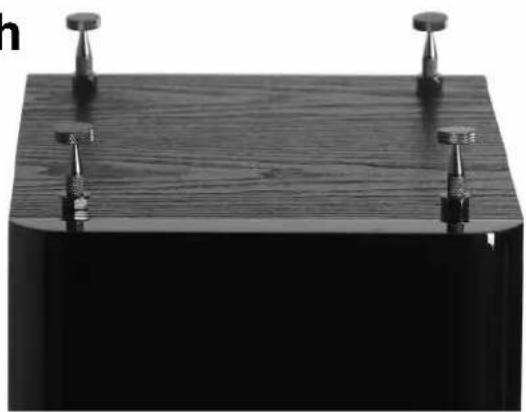
Spikes are included with every floorstanding speaker and are designed to decouple the speaker from the floor. With the speaker upside-down (be sure to protect the speaker surface when doing this), insert the spikes into the threaded insert in the plinth/base. Using the supplied wrench, tighten the nut on each spike, to ensure a sturdy and stable footing is established. The nuts also allow for the speaker balance to be fine tuned when the speaker is standing up, ensuring the speaker is level and plumb. If your flooring is hardwood or a hard surface like tile, laminate flooring, etc, the included protective discs are designed to be placed between the spike and the floor, with the padded side down, to protect your flooring. Simply lay the protective discs on the floor and position the speaker so the point of the spike fits into the hole in the top of the protective disc. If you have removed the plinth/base, spikes can be inserted directly into the threaded inserts in the bottom of the speaker. When using carpeting, ensure no wiring beneath the carpeting is pierced by the spike.
If you do not wish to use spikes or spikes with protective discs, self adhesive rubber bumpers are included, to protect hardwood or hard surface floors. DO NOT SLIDE THE SPEAKER WITH THE SPIKES INSTALLED, THIS WILL DAMAGE YOUR FLOORS AND YOUR SPEAKERS. Please see diagram 2.
MAGNETIC SHIELDING
While all C-Series speakers are magnetically shielded, stray magnetic fields can still exist. Placing your C-Series speakers on top or beside your CRT based television should not cause any interference. In the case where there is some minor discoloration, simply move the speaker forward or backwards or away from the television a few inches, this generally resolves the issue. Note: LCD, DLP and Plasma displays do not suffer from magnetic interference.
CONNECTING YOUR SPEAKERS
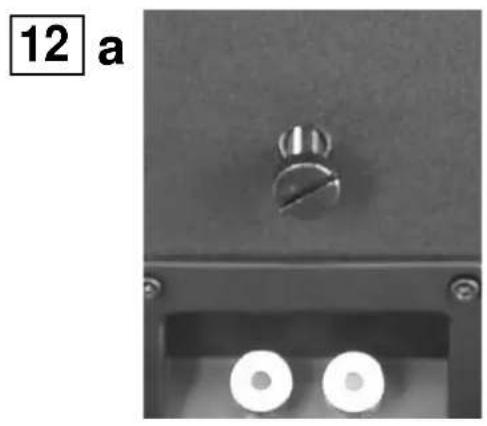
All of the models in the C-Series have the same high quality plated binding post connectors, so connection to each channel offers the same options. You should utilize high quality speaker cables, up to 12 gauge (AWG). The C-Series will accept a variety of connector types including spade lugs, banana jacks, or pin type connectors. The best connector in our opinion is the "Spade lug" as it provides more contact area with the terminal and allows the binding post to be tightened for a secure connection. Audiophiles and novices alike have preferences as to which connector type they favor, speak with your Authorized ENERGY® retainer as to which is the best for your Audio Video System. Rest assured, plain speaker wire is more than acceptable, you can always upgrade your wires and/or connectors later on.
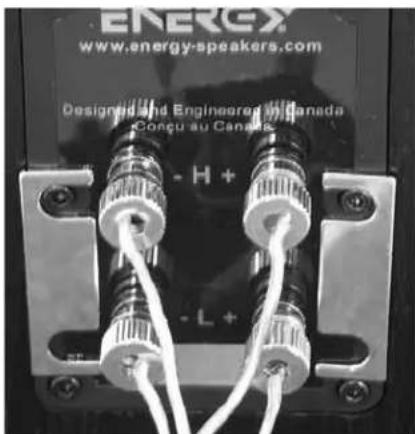
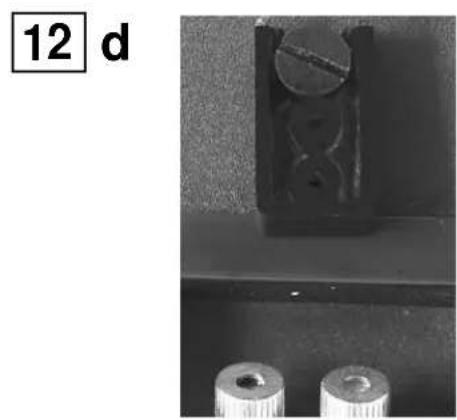
In the case where you wish to use banana type plugs, simply unscrew the binding post nut in a counter clock-wise fashion, until it comes completely off. Remove the plastic red or black insert and reconnect the binding post nut. The plastic insert is a mandatory security measure, as dictated by many local and federal government associations. Please see diagram 3.
To Connect your speaker system: Start at one speaker, and connect one channel at a time, starting with the front speakers. Always ensure that the entire A/V system is powered OFF before performing any connections. The positive and negative (red and black) sides of the speaker terminals MUST match the positive and negative (red and black) terminals of the receiver or amplifier. If they do not match, abnormal sound and a lack of bass response will result. After connecting the front speakers, connect the rest of the speakers to their appropriate channels of the receiver or amplifier. The three connection methods and their explanations include:
TRADITIONAL CONNECTION METHOD (PLEASE SEE DIAGRAM 4)
1) Using your choice of speaker wire and termination method, connect the speaker cable (minding the positive and negative polarities), to the lower set of connectors. Ensure the terminals are tight. The gold "shorting straps" that connect the lower and upper connections must remain in place.
2) Repeat the procedure for the second speaker.
BI-WIRE METHOD (PLEASE SEE DIAGRAM 5)
This method involves using multiple cables and connectors, to access both sets of terminals on the C-Series loudspeakers simultaneously. The benefit of biwiring is to reduce noise, and reduce the likelihood of grounding problems, as you will have twice the thickness of cable between the amp and speakers as the traditional method would provide. For more details on the benefits of biwiring, please discuss this with your authorized ENERGY® retailer.
NOTE: Before starting, remove the gold "shorting straps", which connect the top and bottom set of input terminals. To remove the straps, loosen all of the connectors and pull the straps away from the binding posts. Make sure you put them in a safe place for future use.
1) Using your choice of speaker wire and termination method, connect one speaker cable from the amplifier (minding the positive and negative polarities) to the top set of connectors. Ensure the terminals are tight.
2) Next, connect the second cable, from the same channel of your amplifier to the lower set of terminals.
3) Repeat the procedure for the second speaker.
BI-AMPLIFICATION METHOD
(Pleasesee diagram 6)
This connection system involves the use of two separate two channel amplifiers to power one set of speakers. The idea is to have one stereo amplifier connected to one speaker, and another identical amplifier powering the second speaker. This is often referred to as "Vertical" Bi-amplification. It is the only method ENERGY recommends.
NOTE: Before starting, remove the gold "shorting straps", which connect the top and bottom set of input terminals. To remove the straps, loosen all of the connectors and pull the straps away from the binding posts. Make sure you put them in a safe place for future use.
1) Using your choice of speaker wire and termination method, connect one speaker cable from the amplifier (minding the positive and negative polarities) to the top set of connectors. Ensure the terminals are tight.
2) Next, connect the second cable, from the amplifier's other channel to the bottom set of terminals, again ensuring a tight connection.
3) Repeat Steps 1 and 2 for the second speaker using the second amplifier.
POSITIONING AND INSTALLING YOUR SPEAKERS
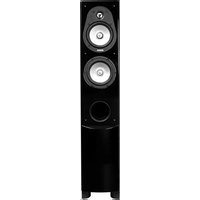
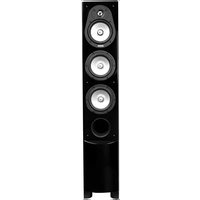
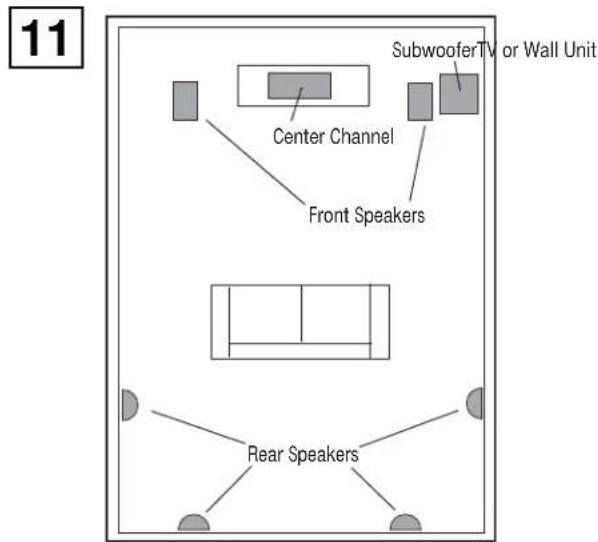
LEFT AND RIGHT MAIN SPEAKERS
(C-50,C-100,C-200,C-300,C-500)
The main speakers are usually placed in the front of the room, on either side of the TV or video projector. They should be placed a minimum of 6 feet apart, and if the furniture placement allows, keep them at least 12 inches from all walls. To calculate the best placement, measure the distance between the speakers themselves and the listening position. Your distance from the speakers should be roughly 1.5 times the distance the speakers are apart from each other. For example: If the distance between each speaker and the listening position is 9 feet, then the speakers should be 6 feet apart from one another. This will provide excellent stereo separation and imaging for music playback. This is just a starting point, the room's acoustics and furniture placement will vary the placement of the speaker. Use your best judgment and experiment with speaker placement. Slight adjustments can provide significant improvements in performance.
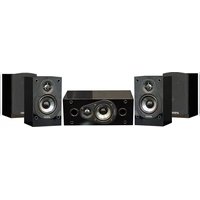
C-50, C-100, C-200
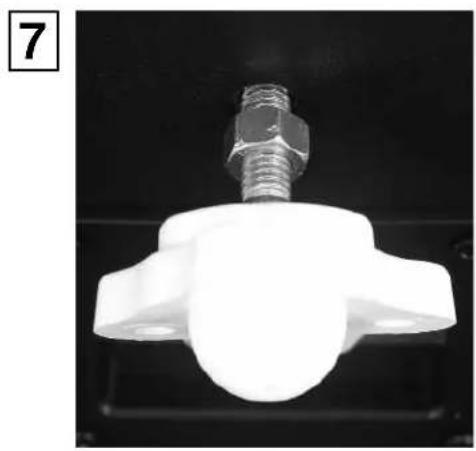
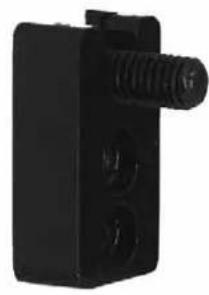
The C-50, C-100, C-200 are designed to be used as a front left or right speaker, or as a rear channel speaker. When installing the C-50, C-100 or C-200 bookshelf speakers to a wall, there is an insert built into the back of the speaker, located above the input terminals. The threaded insert is designed specifically for the ENERGY® Macromount™ bracket, which is available from your local authorized ENERGY® retailer. Please see diagram 7.
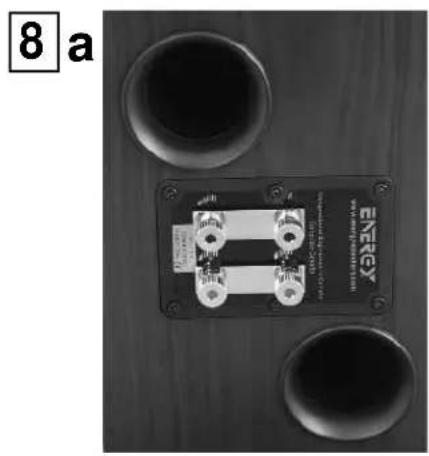
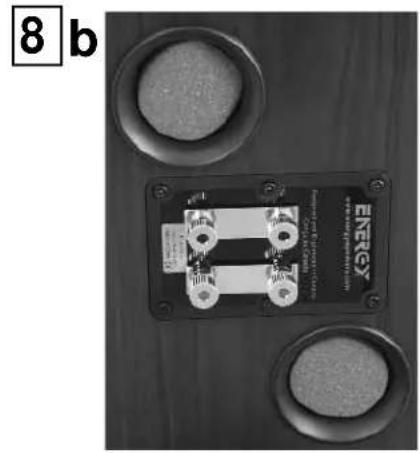
When the C-50, C-100 or C-200 are to be installed on a bookshelf or on a stand, please attach the 4 rubber bumpers to the bottom of the speaker, as this will protect both the mounting surface and the speaker from damage. Simply peel the bumper off its sheet and stick it in place on the bottom of the speaker, one bumper per corner. The rubber bumpers also help decouple the speaker from the bookshelf or stand. Please see diagram 8.
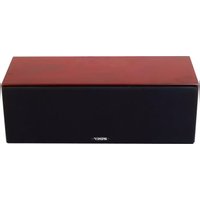
C-C50,C-C100
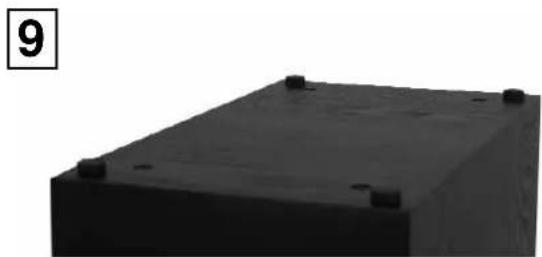
When the C-C50 or C-C100 is used as a center speaker, it is ideally placed as close to the center of the TV or video projector as possible. This is to ensure that voices and all sounds come from the performer's placement on screen. This may be on top, underneath, or on a shelf within a wall unit or other furniture. Use the position that provides the best sound quality, but keep in mind safety and room decor as well. The center channel works best when the front of the speaker is flush with the TV, or the shelf it rests on. If the center speaker is recessed in its placement, it will sound distant, and undefined in character. Please see diagram 9.
When the C-C50, C-C100 are to be installed on top of a television, in a cabinet or on a shelf, please attach the 4 rubber bumpers to the bottom of the speaker, as this will protect both the mounting surface and the speaker from damage. Simply peel the bumper off its sheet and stick one bumper in each corner on the speaker. Please see diagram 8.
C-R100
The rear speakers can vary greatly in position depending on the room layout, and the furniture placement. The ideal position is either on the side walls, or rear walls.
Side Wall: This position utilizes the rear walls of the room to reflect sound and create the "surround" effect.
Rear Wall: This is generally used when the side wall position is not available to you, due to furniture placement or room dimensions. It is also used in a 6.1 or 7.1 surround configuration.
Both mounting positions have their advantages and disadvantages, the position offering the best coverage of the entire room should be chosen. The goal of the surround speakers during movie reproduction is to create an "atmosphere" around you. The rear channel speakers are ideally placed an equal distance from you as compared to the front speakers. But this is not always possible in a home environment. The C-R100 will emit sound from both sides of the speaker, and is best placed where it can use the walls to reflect the sound around the listeners. The best mounting position for a 5.1 system is the Side Wall position, as it makes use of the rooms' rear walls, and side walls. It will create a lifelike surround effect and make the room sound larger than it is. In this position, try to mount the speaker so that it is beside you or slightly behind you. The height should be above ear level, at approximately 2/3 of the height of the wall. 6 feet off of the ground is typically a good starting point, and the speaker should be 2 feet above your head when seated. These general guidelines should aid in positioning choices. Please see diagram 9.
You can also achieve excellent results in the rear position. Try not to place the speakers directly into a corner. Leave 2 or more feet between the edge of the cabinet and the side wall, so the sound can reflect into the room environment. The rear position is usually chosen when your room will not accommodate the side wall position due to unequal walls, a doorway, or a large opening, etc. It is recommended that the rear center (6.1 system) or dual rear surrounds (7.1) be placed at the same height as the other two rear surround speakers wherever possible.
MOUNTING YOUR C-R100 SPEAKERS
NOTE:The C-R100 features a very simple wall mounting system. Careful attention must be made to mount it securely as the speaker is heavy and damage to the product and/or injury could result from improper mounting. Please follow the directions carefully! Please see diagram 10.
1) Select the mounting position best suited for your room.
2) Place the wall mounting bracket against the wall in the desired mounting location and mark the center of the two holes with a pencil. This is where you need to insert the appropriate mounting hardware to securely fasten a load of 15 lbs. Hardware is not included with the speaker, as building materials vary greatly in different countries, but the recommended screw head size is a #8. Screw length is to be determined by the wall material.
3) If you are mounting directly to drywall, please ensure that you use the appropriate anchors, as screws into drywall itself will not provide a secure mount. Insert the anchors, and then hold the mounting bracket up to the wall. Insert the screws until tight. Try to locate into wall studs wherever possible.
4) Screw the included bolt into the insert in the back of the C-R100 speaker, located above the terminal cup. Hand tighten the bolt all the way, and then loosen a few turns counter clockwise. Place the two included rubber bumpers on the back of the speaker, on either side of the back label.
5) Hold the speaker upright, and insert the bolt head into the large hole. Let the speaker slide down into place.
FINE TUNING
Before beginning any fine tuning, please ensure all connections are properly made and your speakers have had the chance to break-in for a minimum of 100 hours. This will ensure the proper results are achieved.
Your listening room is the final component of your audio system and will be the difference between mediocre sound and high quality sound. Reflections, which are a part of every recording and music playback, will have a major effect on your system's performance. If your room is too "live", meaning there are many bare surfaces like glass windows, hard floors and thin furnishings, you might find the sound overly bright. If your room is "dead", meaning there is thick pile carpeting, heavy furniture and a lot of wall coverings, you might find the sound lacks dynamic energy. To remedy these issues, small changes to your room should be considered as they generally lead to large improvements in sound quality. Most listening rooms must balance aesthetics and sound, but patience and small adjustments in positioning and settings can pay huge acoustic dividends.
The lower bass frequencies are typically the most influenced by your listening room. If you find the bass in your room to be uneven or exaggerated in certain frequencies, experimenting with placement of the front speakers or their orientation towards the listening position can alleviate some of these issues. The proximity of the speakers to room boundaries, like walls, will also affect the bass frequencies. If you find your system lacks bass, first check your connections to make sure your system is in phase, then experiment with placement. The further from the wall, the less overall bass output your system will have, but the bass will generally be better defined. If you position your speakers too close to a room boundary, the bass will typically be exaggerated and ill-defined. Adjusting your speakers to your room will generate the best results.
If you are experiencing issues with imaging, first ensure your speakers are in phase with each other. If this is the case and imaging is still an issue, moving the speakers closer together or toeing them in slightly (angling them towards the listening position) can aid in this respect.
When installing a surround sound system, all the above holds true. Calibration of your speaker distances, adjusting delays and balancing your levels with an SPL meter are necessary to extract the most out of your system.
CARE OF FINISH
The C-Series cabinets should be gently cleaned with only a damp cloth and warm water from time to time, in order to remove any dust or fingerprints. Do not use an abrasive cleaner, or any type of ammonia based cleaners, or window type cleaners. To remove the dust from the grille cloth, use the brush attachment on your vacuum cleaner or a slightly dampened sponge or dust free cloth. Do not touch the speaker cones directly or enter them in contact with water or cleaning materials, as this can cause irreparable damage.
IMPORTANTES CONSIGNES DE SECURITÉ - LIRE ATTENTIVEMENT!
MAGNEETISCHE AFSCHERMING
TRADITIONELE AANSLUITING METHODE (ZIE AFBEELDING 4)
BI-WIRE METHODE (ZIE AFBEELDING 5)
BI-AMPLIFICATIE METHODE (ZIE AFBEELDING 6)
Ecnn Bblb6paann KOthakTbI jack, OKpyTNTE 60NTB HnnpaBHeHn npoTINb YacBOBc TcpeKN. BblhTe KpachO-epHyIO BCTABky (3aRnykU) N BkpyTNTe 6bPAHO 60NT. PnaTkoBaa BCTABKa RnEeTc o83aTeNbHm Mepoi 6e3oNaCHOCTN, OROBOpEHNO MHOrIMM MeCTHBIMN I rOcydapCTBeHHbIMN accouNaJMaMN. CM. cxemy 3.
IodcoeHHeBaew akycTneckoCnTeMb:HaHHTe C oHOB KOLOHN,
noCoeHnHReTne OOnHomy KaHany, HauHnA C fpoHTaNbHbIX KONOHOK.
Y6eHITcB, YTO BcR CNTeMa OTKIOUHeHa OT JAEKTPoNTAHn BO BpEma
noCoeHnHn. IIOXHTeNBn HOpuATeNBn (KpaCHN a UpeHn)
KJIEMMb TepMNHaNA KOHOKN DONKHb CoBNaTaB c NIOXHTeNBbIM n
OTpuATeNBbIM (KpaCHN u cepHn) TepMNHaNAMPiMeHMnK n yCUNTEr.
Ecnn NOJARPHoCTb He CoBnAaET, Bbl NoNYtte NOMExn n OTCytCTBne 6acobbx
3BykOB. PnpcoeHINB fpoHTaNbHbIe KOHOHN, CoeHInTe OCTaNbHbIe KOLOHN
ccOBTBeCTBYOUsmKanAHaAMPiMeHMKn AYNyCUNTEr. Ectb Tpr Cnocoba
noCoeHnHHeNIA:
TPAINUHOHHbIMETOID (CM.cxemy4)
1) C nmoiBko Bb6paHHoro BaMn Ka6eIy N KOHNKTopoB, NOcOeINHITe Ka6eIy K0NHOH (coBIOJ4a IpAIBNO COBnAedHry NOnAPHOCTei), K HxHEMy HabOpY KOHNKTopoB. Y6eINTeCb, Yo TepMnHAlbI NIOTHO 3akpyHebl. P030NoCHHeIbe NepMbHKn, KOTOpBe CoEINHIAOT HxHHe N BepxHne KOHNKTopoBl DOnkHbOCTABbCa HA MecTe.
2)NobTOpIte npoceDpy co BToPoKolOnHkoJ.
BByXKABENbHbI (BI-WIRing) METOd (Cm. cxemy 5)
3Decb Bbl NcNoIb3yeTe HeckOblko KaBEn I KOHNHeKTopOB, YTObbl NOKIIIOuHTb OHOBpeMeHHo 06a TepMHana KOLOHOK C-Series. PpenMyeCTBO 3TOrO MeToDa 3aKNIOUaTcB TOM, YTO ChINKaETC yPOBeHb UJMA IN BO3MOXHOCTb BO3NtIKHOBHeN pObEm C 3a3eMJIeHnEM, TAK KAK MEKdy ycNITeEN M KOONHkAMn PpOraYBaETC DBOHON KaBEn, OTNIHNEOT PaDInuOHHO MeToDa. CePTINΦmIoPoBaHbN dCTPn6bHTOp ENERGY@ o6brcHTB Bam B DeTajxnpENMyueCTBa DaHHoro MeToDa.
PIMMEUHNE: PpeJe Yem Bbl NaHHe T NOcOeHnE HBeBbTe nepeMbIuKN, KOtOpBle coeHNrHOT BepxHne N HxNHe KOHKeTOpbl. 706bl BbHyTb nepeMbIuKN, Ocna6bTe KpENHeHnK OHKeTOpOB N BItaHTe INx n3 pa3bEmOB. CoXpaHNTe IN dAaBHeWero NCNoB3oBaHn.
1) C nOMOuBbIbpaHrO BAaM Ka6eJI N MeToA NoKnIOUeHn K TepMHAny, NOcOeHNHTe OINH Ka6eJIb KOJIOHKN OT YcNJInTeJIa (coBIOJaONIAPOHOCTb) K BepXHM KOHKeTOpAM. Y6eIITecb, QTO TepMHANbl IIOIOTHO 3aKpyHeHbl.
2)Далг, посоедингвторй кабель n3 toro ke KaHana BaWero yCnInTeJЯ
К HIXKHM KOHKeTOpam.
3)NobotnpTe npoceDpy co Btpoi KOJOnHkoI.
METOD BBOHHO YCNINTEN (BI-AMPING) (CM. cxemy 6)
3To MeTOp npenonarae nCnObn3oBaHne DByx ycInnTeNe dnn ODHOROMKINNEKTA KONOHOK. To eBt, K KaKdoN KOLOHKe NOdkIIOUHO NO ODHOMYcYNITeIO. 3ToTMeTOp TaKke Ha3bIaBeTcra "BepTNKaJIbHBIM" DBOHNbIMycINHeHem (Bi-amping). 3To EDNHCTBeHHbM TeOp, KOToPbI peKOMeHdyETcnpomBoNTeHem ENERGY@.
INPIMEUYAHNE: PpeKJe Qem npHcTynHb, BbHbTe No30IoueHHbIe nepEMbIKn, KOTOpBie CoeINHHOT HIXHHe N BepXHe BVxOJIbIe pa3BeMbI. YTO6bl bHyTB nepeMbIcN, ocNa6bTe KpenIeHHa KOHNKeKTopOB IN BbTAUHTe Ix n3 pa3bEmOB. CoxpaHnte Ix dIra DaIbHeJWero NCNOIL3OBAHNA.
1) C nomoBIO Bb6paHHO BAaM Ka6eI N MeToA NoKIIIOueHn K TepMHAny, NOcOeHNHTe OINH Ka6eIb KOJIOHKN OT YcNJInTeIa (coBIOaIa NOIpaHocTb) K BepXHM KOHKeTOpAM. Y6eINTecb, YTO TepMHAnbl IIOTHO 3akpyHebl.
2) Danee, noCoeHNHe BToPOI KaBb n3 DpyrO raKaHnTa YcHInTea K HxHmKOHKeTOpam, y6eNTecB INTOCTn COeHNHeHn.
3) NOBTOPHTE 3TANbI 1 n 2 co BTOPOI KOIOHKO IN BTOPBIM yCNINTEm.
PA3MEUEHNE KOJIOHOK
OCHOBHbIe NBeBIE npaBbIe KOHOHN (MOeJIIN C-50,C-100,C-200,C-300,C-500)
OchOBHbke KOJONKn O6bHuO yctaHaBnBaHOT NcIOM K KomHate No oBe cTOpOHbTeNeBn30pa HIN BInDeo npoeKToPA. EcnN no3BoJraT pacNOJoxHe Me6JI, To MEJy KOJONKAMn DoJXHO 6bITb paCtOHNHe He MeHee 1.8 MeTpA, a MeJy KOJONKAMn I CTHeO - He MeHee 30 caHTmMetPOB. YTObIpaPCHNTaB ONHMnBHe PaCNOJoxHe, INMepbTe paCCTOHNHe MEXdy KOJONKAMn IMcTOM, rIe 6yDet paCnONaratbcra CnyuataNs. PaCCTOHNr ot CnyuataNdo KOJONHKoDJIHXo 6bITb B NoToppa 5a3 BoJIbSe, CHEpacCTOHNHe MEXdy KOJONKAMn. HanPImep: ecn PpaCtOHNHe MEXdy KOJONKAMn i CnyuataNem 2.7 MeTPa, To paCtOHNHe MEXdy KOJONKAMn DOJIHXo 6bITb 1.8 MeTpA. TaKoe paCNOJoxHe rapaHTnpye Bam OTMNHbI cTepeo3BYk. 3To TOnbKO HaalnbHbe peKOMeHdaaN, AkyCTNa KOMHaTb I paCNOJoxHe MEXbl MoKeT TaKe NOBnTb Ha paeMeJeHne KOJONOK. IOnKcNEpIMeHTnpYte Cnx pa3MeueHem, INorDa He6BJuWe nepeCTaHOBN MOYr OKa3aTb CyUecTBeHHoe BnHHe Na KaeeCTBO 3Byka.
MODEJIIN C-50, C-100, C-200
Moden C-50, C-100, C-200 nnonb3yotc B kaectbe neboi npaboi
foHTaBHO KOONHn IIN B KaeCTBE KOONK TblOBoro KaHAp. Pnp
yctAHOBke nnonOHKOONHc C-50, C-100 nn C-200 Ha CTeHy, nnonb3yTe
BCTABKyHa 3aDne HaneHN KOONHn Hd BXoDHm pa3bEmbl. Hape3Hoe
OTBPCTNE Co3aHO cneuaNBo DN pKoHsTeHOB Energy MacromountTM,
KOTOpBle MOHXn pno6pctn y BaWero cepTnPhiuropBaHORo MeCHTORO dInepa
Energy.CM.CXMy7.
EcnnMoennC-50,C-100,C-200 yctaHabnBaHOTcHa nonKe iinn noCTabKe, npknKeIte 4 pe3HOBBe npKNaJKn K dHInu KoONKn, YTO npDeoxpAHIT ee n NOBepXHOCTb NOKN OT nobpeXdHeN. PPOCTO CHMMTE 3aunHTyU pNeHKy C npKNaJKn I npKneTBe e K dHInu KOONKn, no OHDn npKNaJKe Ha kaxdbI yOrn. Pe3HOBBe npKNaJTe TaKe npDeoxpAHRT KOONKn OT npKNaENBAHIN K NOBepXHOCTn NOKN INI NOCTABKn.CM.Cxemy8.
MODEEN C-C50, C-C100
MoJIeN C-C50,C-C100 YBnIeTcra IeBOU, ZENTPOBoH ININ npaBoH KOIOHKO, 3TO 3HaHT, YTO ee MOxHO NcONb3OBAb T B rOp3oHTaNbHOM ININ BEPTNKaJIbHOM NOIOKeHN. DImaH ee No3BOJrE YCTAHOBky B IIO6o IIIOCKocTN pIn COxpaHeHN 3ByKOBbIX xapAKTePNCtMK.
KneKaanenta c lorotnom Energy He npknneeHa ha peWetky, taK ka 3Ta KOONHKA MoKET bIty cTahOBnEHa Bpa3NHybIX NonoXeHHx. IocNe TOrO, KaN ONoXeHHe KOnOHKn Bb6pHo, onpeJeInte Heo6xoDmOE NONoXeHHe peWetKn n pInKpeNTe KneKyIO neHTy c lorotnom Ha ceTky. Cm. cxemy 9.
Pn yctahOBKe moDen C-C50 nn C-C100 Ha TeNeBnOpe, B uKafty nn Ha nonKe, npKneIe 4 peHOBBe npKnaKn K dnNtu KoONKn, TTO npDeoxpAHt ee n NobepxHOCTb noNk ot NobpeKdEni. PnOcTo ChmMITE 3aunTHyoo pnnKc H npKnaKn n npKneIe ee K dnNtu KoONKn, NOoHOn npKNaKe Ha Kaekdb yron. PeHHOBBe npKnaKn Taakce npDeoxpAHr KOONKn OT npKneBnAHn K nobepxHOCTn noNkn nn noNDCTABKn.CM. cxemy 8.
MOEINB C-R100
EcTb MHO BapnAHTOB yCTaHOBKn TbIIOBx KOnOHK B 3aBNCIMOCTN OT pacNONOKeHm Me6eN B KOMHaTe. NdeaIbHoe paCNOJKeHne - Ha 6OKOBbx CTehax INI Na 3aDHei CTHe.
Bokobar cTeHa:B 3ToI no3nui 3aHra cTeHa nCnoJIb3yETcra dIra OtpaKeHHa 3Byka Nco3aHHa OKpyKaHOJero 3Byka.
3aHna cTeHa: 3Ta no3nua O6bHuHO nCnObl3yeTcB CnUyax, KOrDa HET BO3MOXHOCTn pa3MeCTnTB KOJONHKn Ha 60KOBbIX cTeHax N3-3a pa3Mepa KOMHaTb IIN paNtNoIoxeHn Me6eHN. 3To TaKKe nCnObl3yeTcB KOnHfpyaun DomaUnn KNHOteApT 6.1 nn 7.1.
O6a Tnna pa3meueHn HmEOT cBON DOCTOHCTBa N HeDcctAKn, B KaKdOM INININbUdYbHOM cNyae HxKHO Bbl6paTb ONIMAbHHy DnR 3ByaHnna
no3nIO. Bawa CenB - DocTHb ATMocCepb KInHOe Ta3MeueHne TbIOBbIX KOLOHOK - Ha PAbHM paccToHnN OT CNyWATEI NO
cpabHeHIO CΦpOHTaBbHM KOnOHKAMn, YTO He BCerda DoCTXnMo B
KBaPTpe. MoJIb C-R100 npOn3BODIT 3Byk C O6Exn CTOpON KOLOHNI, NO3Tomy
nyuwe Bcero pa3MeCTNb ee Tam, rDe CTHe bdyUT oPaxaTb 3Byk K
cNyuaTeIIO. LyuWaa No3nUa DNr CnCTeMb 5.1 - No 6OKOBbIM CTeHAM, TAK KAK
dIra OtpaxeHHN IcNOJbYOTc N 3aDnRA N 6OKOBbIE CTeHI KOMHaTb. 3To
co3dAct OuyuHHe XIKBOrO OKpyXaIOoEro 3Byka N KOMHaTa 6yDet Ka3aTbCR
6bnIbe, YEm eTb. PnT TakOM paCnONoXeHHN IOCTaPaNTecb pa3MeCTNb
KOLOHNI TAK, YTObI OHn HAXoDNiBC PdOM CO cNYuATeEH MII CNrKa 3a ERO
CnIHoH Na yOboye YX, Yo KaK npABINO - Pnp6nImTeHbHO Ha 2/3 Bicotbl
CTHeN. Blicota B 1.8 MeTpA OT yOboH N oBaYho YOdbNeTBOPaReT 3TM
Tpe6OBaHNM, TAK KAC KOLOHKA 6yDet Ha NOnIMeTa BA IIe UPOBHA RONOBI
cNYaTeIe B CnIDAHem NONoXeHHN. TaKobI OCHOBHBe IpabINA no
pa3meueHIO KOLOHOK. CM. cxemy 9.
Pn pa3MeueHm Ha 3aHHe CTHe TaKe MoXHO DoCTNb XopoUHXpe3yIbTaTOB.CtapaTBeCb He CTaBbT KOnOHKn B YrIy,OTcTaBbTe KOHOHNHaONMeTpA HIN60bnJeOT 6KoBOH CTbH,UT6b3 BYK OTPKaJIcB KOMHaTy.TakoepacnoJooKeHne HcNOrb3yeTcB KOMHaTcX pa3HOrO pKaHMe pCeHAMn C apKn C bXIOdOB K KopIDOp, T n. M peKoMeHdyEm, DRe BO3MOxHO,pa3MecNTb CEHTpAlbHotbIOBle (CnCTema 6.1) HIN dBOHbIE TBIOBble KOHOHN (CnCTema 7.1) HA ToH Jx BeICote, TTO N OCTaJIbHbIE TBIOBble KOHOHN
YCTAHOBKA KOJIOHOK C-R100
INPMUEAHHE:Modenb-C-R100 npednojaraet ouhe npocTyO cnCTeMy yctahOBKn Ha cTeHe. O6paTHTe BnHMaHHe Ha ycToUHBOcT b KpeIJIeHHa, TAK KAK KOJOnHka DocTaTOHo TReKeJa H HenpaBnHbHa YcTaHOBA KaMOKET npJBecTH K TpaMe NoIb3ObaTeN Hn NOBpeXdeHIO KOJOnHKn. BHMaTeNbHo cJeDyTe HHCTpyKuHN! CM. cxemy 10.
1) OnpeJeHte ontImaIbHoe dner BaWeJ KOMHaTbMeCTo yCTaHOBKn.
2)Пиюхпte кронштн Кпрднояmaemomy Mectу pa3meцья ha CTHe nOTMeTbTe kapaHdawOM ueHTp oboxx OTBepCTn. 3Decb 6ydt MeTo yCTaHOKnNoDCTaBKn, KOtopaДоNkHa 6ydt HAdEKNO ydepKNaBt b OKo 5 Kt.
Co0TBeCTByIOUe 6oNTbI He BXOaR T KOMnJIeKT NocTaBKN, KaK TaK B pa3HbIX cTpaHax nCNoIb3yOTcra p3aMnHbIe I3dEINr. Mbl peKOMeHNyEM nCNoIb3OBaTb Wpynb #8. DmHy Wypyna onpeJeIeT MaTePnaI, IN3 KOtOPO rN3roTOBHeA cTeHa.
3) EcnB bI yctaHabnBaTe kpoHtMeH npMa H oWtkyatpeHHy CTeHy,
ncNb3yIe COOTBETCTByIOUne ycNITHe bIhBe 3NeMeHTb, TAK KAK 60NTb CAMn no Cebe He AEBNIOCTc HAdEeXHBIM CpeCDTbOM KpenENHHa TAKOI CTeHE.
BCTaBBTe KpEnK, 3aTeM, PnIOXKB KPOHtTeH K CTeHe, NIOTHO BKpyTHTe
60NTb. Ige Bo3MOxHO, YcTAHOBtE KoHOtMeH B DEpeBraHHbIe 6pycbr BHTpn CTeHbI.
4) BkpyTne npnaraembIe 60ntbl B OTBepcTna Ha 3aHHe nHaHeIn MoEIn RC- R, paCnoNKeHbIe HAD KpbIkwO C pa3bEmamn. BpyHyIO 3akpEnITE NOKpye 60ntbl, a 3aTeM OcNa6Be TIX NOBepyHB Na Hecklonko 6OpOTB npOTNB acBOoB CTpeKINs. Pa3MeCTnBE o6e npnaraembIX Pe3iHOBbIX pOKnAdKn Ha 3aHHe N aHHeN KOLOHKN, no 06e CTopoHbI OT HEPHOI 3tIKeTKN.
5)ДержколонkyВергтkaNBOMNoLOXeHIM,BCTaBteTOnOBKy60NTA B 6OЛьшоеOTBepCTNeNnO3BOJIbTeKOLOHKe CNOI3TNBDONbOTBepCTNINBCaTB HaMecTo.
HACTPOKKAKAECTBEHHORO3BYKA
Ito toro, Ka npctyntb K hactpoKe, y6eintecb, yTO BCE coedHene Hpn3BedeHb npabnblHo, IV BCE KOONOHn PpOShn NO KpaHHe Mepe cTo YacOBn nporpeB.3To No3BOJNT Bam DoobntcOnTmAbhBx pe3yNbTaTOB.
KauecTBO BaIeero NOMEUHIN -OIMN H3 KOMIOHEHTOB BaaeY ayDIONCCTMbI,OT KOToPOro 3aBnCIT KaueCTBO 3Byka.5oJIe Bcero Ha 3TO BnIeRr OPAKeHne 3Byka.ECN B BaaeM NOMEUHIN CNIUKOM MHORO rAaIX NOBepXHOCTe: OKHa, napKET, IerKaar Me6bI, To 3BYK MOKeT KA3aTbC RNIUKOM pe3kIM.B NOMEUHIN C KOBPOBbIM NOKpbTHeM Ha NOny, TReKeIo ME6bIbO, C KOBpaMn/0bOAMn HA CTHe, 3BYK 6yDeT PnIRNuJeH. YTObI CBecTN K MNHMMy IOoBHOE BnIAHHe, BHCNTe NocINbHbIe INMeHEHIN B BAWe NOMEUHIne, 3TO yLyuHHT KaueCTBO 3Byka. IOnpO6yIte DoCTNu b 3CTeTNUeCKoro n 3BYKOBO 6baHca.
KaueCTBO Baaero NOMEHIN60JIbwe BCERO BNIAET Ha HN3KNE YACTOTbl. EcnB bI cHTaTe, YTO HN3KNE YACToTB HeC6banaHCnPOBaHHbI, NO3KcEPnmeHTpynte Cpa3MeUHEM FpOHTaIbHbIX KONOHOK INI INX HANPABINEHNOCTbO B CTOPHY cIyWATeJbIIOCTb KONOHK K pKaAM NOMEUHEN, CTHeAM, HAnPIMep, TOKe MOEET NOBNIbT bAOCpONBDEHNE HN3KHX YACTOT. EcnB bI HAXOITTE, YTO HN3KNE YACToTB HeOCTaTOHbI, PNOBEpBT Ce COeHNHEHNN I y6eNTbc, YTO BAaCbNCtEma pa6oTaB T PhaOBoOM COOTBETCTBNI, 3aTEM NO3KcEPnmeHTpyne C pa3MeUHem. Yem DaJIbWe OT CTHeBI, TEM HN3KNE YACTOTbl 6dyT CbIbHIb MEHSe, XOTI INuIe. EcnN KOLOHKN paCNOLOXeHb CIINIKOM 5bn3KO K KPAAM NOMEUHEN, HN3KNE YACToTB 6dyUT 3ByuATb pe3Ye n MeHee ONpeDeneHNo. PnCnOCo6bTe KONOHK K BAwEMy NOMEUHNO DnI DOCTNXHIN HAIIyUHXx pe3YbTAtoB.
Ecni Bo3HnKn np6bnbI C n3o6paKeHHem, y6eIntecb, YTO KOHOHN pa6OtaIOB V paoOBm COOTBeTCTBm Dpyr C dpYROM. Ecni np6bnema C n3o6paKeHHem He peWHe, NOBnHbTe KONOHKn 6bnke Dpyr K dpYry NIN HAKNOHIne IN cNerKa B CTOpOHy cnlywataTna.
Pn yctahOBke CnCTeMbI OKpykaHooze 3ByKa, npObyTe BCE BbIepeueHCNEHoe. HAcTPOKa paCtOaHNI O KOnoHOK, NcNoB3ObaHne FyHKuINB PBeMeHHOH 3aepKKn 3ByKOBOrO cInHaHa npeylnpoBaHne 3ByKa C NOMOJIb DaTHKa 3ByKOBOrO daBHeNHe (SPL)-Bce 3To Heo6xOdMlbie onepauin dna 13BNeueHn ONTMMaNbHorO 3ByKa N3 BaWei CnCTeMbI.
YXOД 3A CNTTEMОI
PONK C-Series hxyxho octopoxho Bpemr OT Bpemehn npotnpaBbnaXHO TANK,CMOeHHoB TENTNO BOye, YTO6bI M36abNTcBcOT bNJN IN OTNeYATKOB PYK. He nCnONbEyte Hn abpaunHBbE, Hn OCHOBAHbHe HAAMMOHN cpeCTBA, Hn CTekNoOHcHTeTIEN. YTO6bI ydAnITbNJN CcTKe, NcONb3yTe 8eToHHy HacAky BaWero PbIEcoCA nn CnERKa YbNAxEHNYO rSyk, Hn TpRKy. He DOpTARMaHTecb Do camIX KOHueCEKHX DNHAMKOB Hne DOYNCKaTE NOJaADHNA HA HNX BOBy IIN YNCCTAAHX BEeCTB, YTO MOKET PnBeCTN KNX NOBPEXDeHIO.
DIAGRAMS/FIGURES/DIAGRAMAS
owners manual
1 a
1 b
2 a

2 b
2c
2d
DIAGRAMS/FIGURES/DIAGRAMAS
2 e
2f
2g
2h
2 i


DIAGRAMS/FIGURES/DIAGRAMAS


WARRANTY
GARANTIE
LIMITED WARRANTY POLICY IN THE UNITED STATES AND CANADA
ENERGY® warrants this product to the retail purchaser against any failure resulting from original manufacturing defects in workmanship or materials. The warranty is in effect for a period of: Speaker Section-five (5) years, Subwoofer Section-one (1) year from date of purchase from an authorized ENERGY® dealer and is valid only if the original dated bill of sale is presented when service is required.
The warranty does not cover damage caused during shipment, by accident, misuse, abuse, neglect, unauthorized product modification, failure to follow the instructions outlined in the owner's manual, failure to perform routine maintenance, damage resulting from unauthorized repairs or claims based upon misrepresentations of the warranty by the seller.
WARRANTY SERVICE
If you require service for your ENERGY® speaker(s) at any time during the warranty period, please contact:
1) the dealer from whom you purchased the product(s),
2) ENERGY NATIONAL SERVICE, 203 Eggert Road, Buffalo, N.Y. 14215
Tel: 716-896-9801 or
3) ENERGY, a division of Audio Products International Corp., 3641 McNicoll Avenue, Toronto, Ontario, Canada, M1X 1G5, Tel: 416-321-1800.
4) Additional service centers can be found by checking the ENERGY website: www.energy-speakers.com or, by calling either of the above numbers.
You will be responsible for transporting the speakers in adequate packaging to protect them from damage in transit and for the shipping costs to an authorized ENERGY® service center or to ENERGY®. If the product is returned for repair to ENERGY® in Toronto or Buffalo, the costs of the return shipment to you will be paid by ENERGY® provided the repairs concerned fall within the Limited Warranty. The ENERGY® Warranty is limited to repair or replacement of ENERGY® products. It does not cover any incidental or consequential damage of any kind. If the provisions in any advertisement, packing cartons or literature differ from those specified in this warranty, the terms of the Limited Warranty prevail.