BT 450 - Sander Alpha Tools - Free user manual and instructions
Find the device manual for free BT 450 Alpha Tools in PDF.

User questions about BT 450 Alpha Tools
0 question about this device. Answer the ones you know or ask your own.
Ask a new question about this device
Download the instructions for your Sander in PDF format for free! Find your manual BT 450 - Alpha Tools and take your electronic device back in hand. On this page are published all the documents necessary for the use of your device. BT 450 by Alpha Tools.
USER MANUAL BT 450 Alpha Tools
natural_image
Mechanical machine with circular blade and workpiece (no visible text or symbols)BT 450

© Bitte vor Montage und Inbetrlebnahme die Betriebsanleitung aufmerksam lesen
☑ Please read the operating Instructions carefully before assembling and using.
⑤ Veulliez lire attentivement le mode d'emploi avant le montage et la mise en service.
FN Lue käyttöohje huolellisesti läpi ennen laitteen asennusta ja käyttöönottoa.
① Prima del montaggio e della messa in esercizio si prega di leggere attentamente le istruzioni per l'uso.
© Az összeszerelés és használatba vétel előtt kérjük a használati utasítást figyelmesen átolvasnl.
Před montáží a uvedením do provozu si prosím pečlivě přečtěte návod k použití
SLO Pred montažo in uporabo stroja dobro preberite navodila za uporabo!
HN Molimo da prije montaže i puštanja u funkciju pažljivo pročitate naputak za uporabu
⑤ Läs igenom bruksanvisningen noggrant innan du monterar och använder maskinen.
DK Læs betjeningsvejledningen grundigt igennem, inden du tager maskinen i brug første gang.
© Seite 6 - 8
GB Page 9 - 11
© Page 12-14
Sivu 15 - 17
① Pagine 18 - 20
© Oldal 21 - 23
Strana
Strani 27 -29
Stranice 30 -32
⑤ Sida 33-35
④ Side 36-38
24
2
text_image
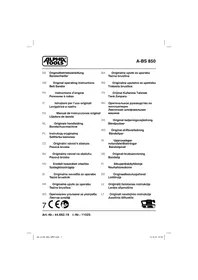
Labeled diagram of a mechanical device with numbered parts for identification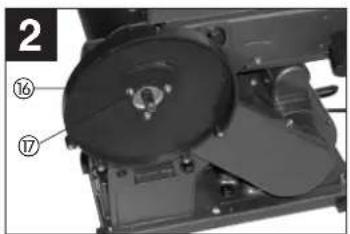
text_image
2 ⑯ ⑰ ⑰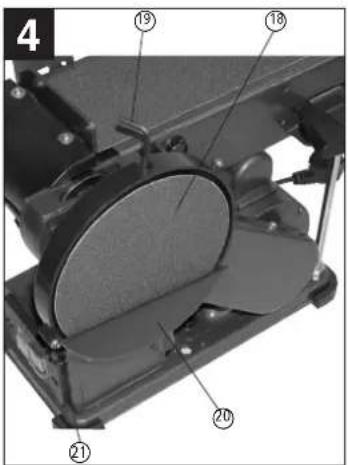
text_image
4 19 18 20 21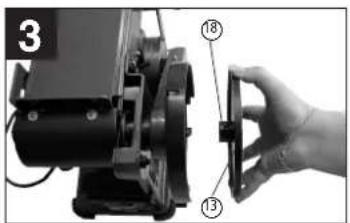
text_image
3 ⑱ ⑬3

text_image
5 ① ⑦ ⑫ ② ② ③ ②2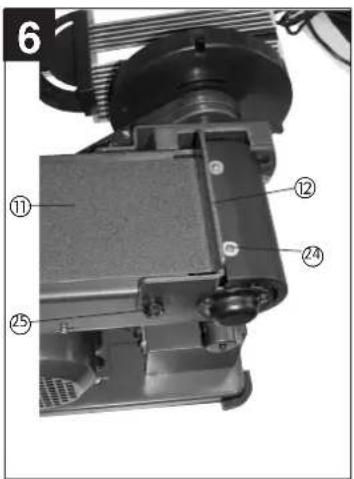
text_image
6 ⑪ ⑫ ⑳ ⑳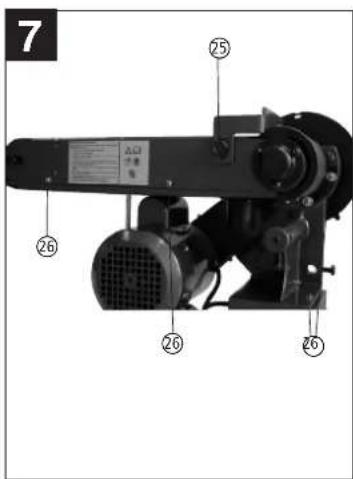
text_image
7 25 26 26 26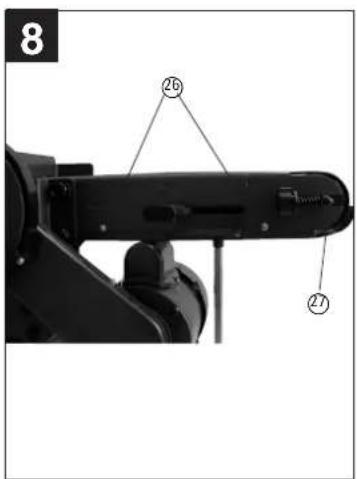
text_image
8 26 27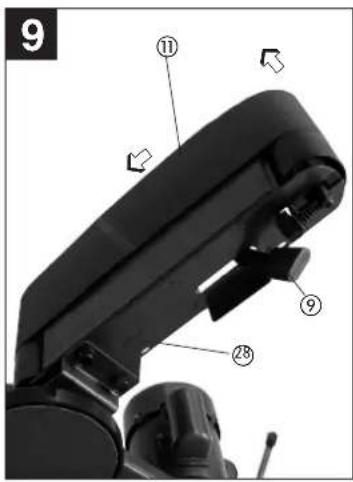
text_image
9 ⑪ ⑨ ⑲ ⑳
natural_image
Mechanical assembly diagram showing a shaft and housing with numbered components (no readable text or symbols)
text_image
11 ① ⑭ ③ ③05
D
- On/Off switch
- Rubber feet
- Thumb screw
- Angle scale
- Base
- Sanding/grinding section
- Cross stop
- Leg support
- Sanding/grinding belt clamp
- Knurled screw for sanding/grinding belt adjustment
- Sanding/grinding belt
- Stop rail
- Sanding/grinding disk
- Sanding/grinding table
- Lock screw for sanding/grinding table
- Plastic guard
2. Items supplied
● Belt and disk sander/grinder
● Sanding/grinding disk
● Adhesive sanding/grinding disks
● Sanding/grinding belt
- Socket-wrench
3. Proper use
The belt and disk sander/grinder is designed for sanding/grinding all types of timber, commensurate with the size of the machine.
The machine is to be used only for its prescribed purpose.
Any use other than that mentioned is considered to be a case of misuse. The user/operator and not the manufacturer shall be liable for any damage or injury resulting such cases of misuse.
The machine is to be operated only with suitable sanding/grinding belts which comply with the specifications contained in these operating instructions.
To use the machine properly you must also observe the safety regulations, the assembly instructions and the operating instructions to be found in this manual. All persons who use and service the machine have to be acquainted with this manual and must be informed about its potential hazards.
It is also imperative to observe the accident prevention regulations in force in your area.
The same applies for the general rules of occupational health and safety.
The manufacturer shall not be liable for any changes made to the machine nor for any damage resulting from such changes.
Even when the machine is used as prescribed it is still impossible to eliminate certain residual risk factors. The following hazards may arise in
connection with the machine's construction and design:
● Harmful emissions of wood dust when the machine is used in closed rooms.
- For functional reasons the rotating parts in the device cannot be covered. It is therefore imperative that you proceed with caution and hold the workpiece firmly to prevent slippage, as this may result in your hands coming into contact with the sanding/grinding belt.
4. Important notes
Please read this manual carefully and pay attention to the information provided. Use this manual to familiarize yourself with the machine, its correct use and safety regulations.

Safety regulations
- Caution! When using electric tools it is imperative to take the following basic safety precautions in order to reduce the risk of electric shock, injury and fire. Read and take note of these instructions before you use this tool.
- Follow all these safety regulations before and while working with the belt and disk sander/grinder.
● Do not lose these safety regulations. - When working outdoors, use only extension cables that are approved for outdoor use and which are marked accordingly.
- Concentrate on what you are doing. Take a sensible attitude to your work. Never use the tool when you are tired.
● Never use a tool with a switch that cannot be turned on and off.
● Caution! The use of plug-in tools and accessories other than those intended may put you at risk of injury.
● Always pull the plug out of the power socket before adjusting or servicing the machine.
● Give these safety regulations to all persons who work on the machine.
● Never use tools or attachments with insufficient power for the job in hand.
● Never use tools on jobs for which they were not intended!

GB
● Make sure you stand squarely and keep your balance at all times.
- Check the tool for possible damage!
● Each time before re-using the tool, carefully check that the guards or any slightly damaged parts are working as intended.
- Check that the moving parts are in good working order, that they do not jam, and that no parts are damaged. Make sure that all parts are fitted correctly and that all other operating conditions are properly fulfilled.
● Unless otherwise stated in the operating instructions, damaged guards and parts have to be repaired or replaced by an authorized service center.
● Have damaged switches replaced by a customer service workshop.
● This tool complies with the pertinent safety regulations.
● The maximum gap between the sanding/grinding disk (13) and the sanding/grinding table (14) must not be allowed to exceed 1.6 mm.
● Always use the stop rail (12) or sanding/grinding table (14) when working.
Please also comply with the general safety instructions contained in the supplementary sheet!

Caution!

Read the operating instructions before using for the first time

Protect from the rain and damp or wet conditions

Wear work gloves

Wear goggles

Wear a breathing mask
5. Technical data
Voltage: 230V \~ 50Hz
Power rating: 350 W S2 20 min
Sanding/grinding disk:
n_0
1450
Diameter:
150
Swivel range: 0°-45°
Cross stop: -60° to +60°
Belt sanding/grinding unit:
Vo:
4.6
Size: 914 x 100 mm
Sound pressure level LPA: 80db(A)
- Load factor:
A load factor of S2 20 min (intermittent periodic duty) means that you may operate the motor continuously at its nominal power level (320 W) for no longer than the time stipulated on the specifications label (20 minutes ON period). If you fail to observe this time limit the motor will overheat. During the OFF period the motor will cool again to its starting temperature.
6. Before putting the machine into operation
● The machine has to be set up where it can stand firmly, e.g. on a work bench, or it must be bolted to a strong stand.
● All the covers and safety devices have to be properly fitted before the machine is switched on.
● The sanding/grinding belt and sanding/grinding disk must be able to run freely.
- When working with wood that has been processed before, watch out for foreign bodies such as nails or screws etc.
- Before you actuate the On/Off switch, make sure that the sanding/grinding paper is correctly fitted and that the machine's moving parts run smoothly.
● Before you connect the machine to the power supply, make sure the data on the rating plate is the same as that for your mains.
GB
7. Assembly
Caution! Always pull out the power plug before carrying out any maintenance or conversion work.
7.1 Assembling the machine (Fig. 1 - 6)
● Fit the rubber feet (2) to the base (5).
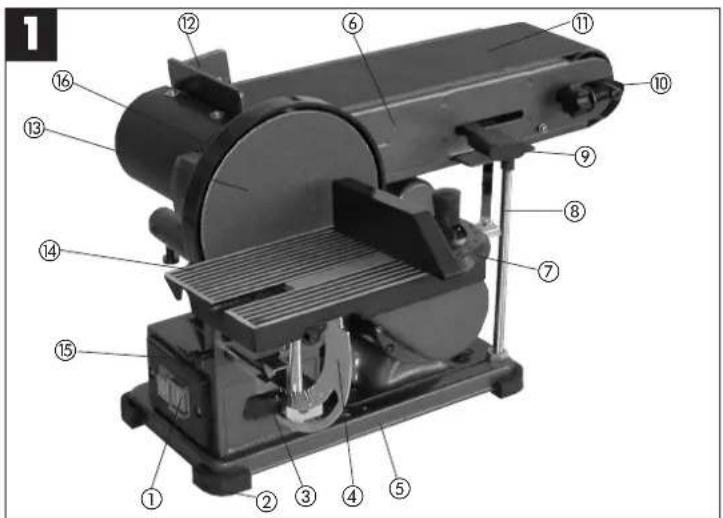
● Fasten the plastic guard (16) using the screws (17) (Fig. 2).
● Mount the sanding/grinding disk (13) on the shaft (Fig. 3).
● Tighten the screw (18) with the socket-wrench (19) to fasten the sanding/grinding disk (13) (Fig. 3/4).
● Mount the bottom disk guard (20) using the screws (21) (Fig. 4).
- Mount the sanding/grinding table (14) and fasten using the screw (22) (Fig. 5). The sanding/grinding table (14) can be infinitely adjusted to any angle between 0^ and 45^ using the mitre scale (23) and the knurled screw (2).
The adjustable cross stop (7) is for ensuring that the workpiece is guided properly. Caution! The sanding/grinding disk (13) must be able to run freely. However, the gap between the sanding/grinding table (14) and the sanding/grinding disk (13) must not exceed 1.6 mm.
- Mount the stop rail (12) and fasten with the screws (24) and (25) (Fig. 6). Caution! The sanding/grinding belt (11) must be able to run freely.
7.2. Changing the sanding/grinding belt (11) (Fig. 7 - 9)
● Pull out the power plug.
- Remove the screws (25) and (26).
- Remove the sanding/grinding belt guard (27).
● Turn the sanding/grinding belt clamp to the right (9) to unclamp the sanding/grinding belt (11).
- Remove the sanding/grinding belt (11) by lifting out towards the back.
● Mount the new sanding/grinding belt by proceeding in reverse order. Caution! Check the running direction: On the casing (28) and on the inside of the sanding/grinding belt!
7.3. Adjust the sanding/grinding belt (11) (Fig. 1)
- Move the sanding/grinding belt (11) slowly by hand in the direction of running.
● The sanding/grinding belt (11) must run dead-center on the sanding/grinding section (6). If it does not do so, readjust it using the knurled screw (10).
7.4. Adjusting the sanding/grinding position of the sanding/grinding belt (11) (Fig. 10/11)
● Slacken the two nuts (29).
● Push the sanding/grinding belt (11) upwards to the desired position.
● Re-tighten the nuts (29) to fix the belt in this position.
- In this position the sanding/grinding table can be used to support the workpiece. To do this, insert the table in the hole in the stay tube (31) and fasten using the screw (30).
7.5. Replacing the sanding/grinding paper on the sanding/grinding disk (13)
● The sanding/grinding paper for the disk sander/grinder (13) is self-adhesive, i.e. it is only for sticking to/removing from the sanding/grinding disk (13).
8. Using the machine
8.1. On/Off switch (1)
- The machine can be switched on by pressing the green pushbutton „1“.
- The red pushbutton „0“ has to be pushed to switch off the machine again.
8.2. Sanding/Grinding
● Always hold the workpiece very firmly while sanding/grinding.
● Do not apply excessive pressure.
● To prevent the sanding paper becoming worn on just one side, move the workpiece backwards and forwards during sanding/grinding on the sanding/grinding belt or sanding/grinding plate!
- Important! To prevent pieces coming off in splinters, timber workpieces should always be sanded along the direction of the grain.
9. Maintenance
- Remove dust and dirt regularly from the machine. Cleaning is best done with compressed air or a rag.
● Never use caustic agents to clean plastic parts.
- Ordering replacement parts
You can order replacement parts from ISC GmbH (see the guarantee certificate for the address). When doing so, please provide the following information:
● Device type
● Article number of the device
● Identification number of the device
● Replacement part number of the required replacement part
F
Dimensions: 914 x 100 mm
The undersigned declares in the name of the company that the product is in compliance with the following guidelines and standards.
The image contains no text or characters.
97/23/EG
□
R&TTED 1999/5/EG
×
89/336/EWG
The image contains a single, solid horizontal line. According to the instructions, specifically the rule for ignoring such lines and not stylistic lines, these must be ignored.
Therefore, the corrected OCR text is:
```text [Empty]
2000/14/EG: L_WM dB(A); L_WA dB(A)
The image contains no text or characters.
90/396/EWG
EN 61029-1; EN 55014; EN 55104; EN 61000-3-2; EN 61000-3-3
The product described in those instructions comes with a 6-year warranty covering defects. This 5-year warranty period begins with the passing of risk or other, the customer receives the product.
For warranty claims to be accepted, the product has to receive the correct maintenance and be put to the proper use as described in the operating instructions.
Your statutory rights of warranty are naturally unaffected during these 5 years.
This warranty applies in Germany, or in the respective country of the manufacturer's main regional sales partner, as a supplement to local regulations. Please note the details for contacting the customer service center responsible for your region or the service address listed below.
FIN TAKUUTODISTUS
Eschenstraße 6 - D-94405 Landau/Isar (Germany)
Info-Tel. 0180-5 120 509 • Telefax 0180-5 835 830
E Commercial Finbells S.A
Commercial Einnell, S.A. Travorsia Villa Esler, 9 B
Deliseno Industrial El Nogal
E-28119 Algete-Madrid
P Einhell Portugal Ltda
Aparlado 2100
Bus da Aldeia 225 Anartado 2100
P-4405-017 Arcozelo VNG
Tel. 022 0917500 Fax 022
① Einhell Italia e r.l
Via Marconi, 16
H. Einbeil Hungary Ltd
Vaida, Peter u. 12
H-1089 Budapest
Tel 01 3039401 E
TR Remok
berlak makina licarpl vo sanavi lkl. eli
Alloy Ceema mab Yasemin Sek. No: 19
Alay, Cosine Indn. Tuzelnin SBC. No. 16 TR 34843 Malteno - Istanbul
Tel. 0216 4594865. Fax 0216 4429325
Vobler s.r.c
Zupná 4
SK-95301 Zlate Moravce
Tel. 37 6428255, Fax 37 26256
K2 Turkestan
Sc. A. AP 9 Sector 1
RO-75121 Bucuresti
Tel. 021 4104800, Fax 021 4103568
Amer Plus S.H.O. Amal yu Berbwire
Budava 10 B
CZ-19011 Prahe - Bechovice 911
⑥ Slow GmbH
Miheil Koloni str. 18 W
BG-9000 Varna
Tel. 052 605254
© Einhell Croatia d.o.o.
Velika Ves 2
HR-49224 Lepa|cl
Tel 049 342 444, Fax 049 342 392
(SW) GMA-Elektromechanika d.o.o
Cesta Andreja Bitenca 115
SLO 1000 Ljubljana
Tel 01/5838304, Fax 01/5163603
GR An Mayofidopoulas S.A
Technical & Commercial Company
12, Papastratou & Askipiou Str.
GR 18545 Pirăus
Tel 0210 4136155, Fax 0210 4137692
⑪3 Bermas
Altufyevskoe shosse, 2A
BUS-127273 Moscow
Tel 095 7870179, Fax 095 5401750
LT Dirbita
Metalo str. 23
LT-02190 Vilnius
Tel 05 2395769. Fax 05 2395770
EST AS Retail
Vo Bellon Boiu alex
Heasleva yield
FF-62102 Tartu
Tel 07 301 700. Fax 07 301 701
Halai Trading Co. LLC
POB 9282, Nakheel Rd, Deira, Shop No. 15
UAE-Dubai
16.04 2275334, Fc
Vaporz Abzar Co. Ltd.
No. 111. Baslan Passage, İnamı Khomeini Ave.
IR-11146 Teheran
Tel 021 6716072. Fax 021 6727177
(8) ElSdoc
15 d.o.o
Poslovni Centar 96 P. 87000 Mites
(24) Eurasia Industrial and Automotive Supply
Passimar S
Duncanville
ZA-Versenjzing 1930
Tel 16 455 5712, Fax 16 455 571 6
D
The reprinting or reproduction by any other means, in whole or in part, of documentation and papers accompanying products is permitted only with the express consent of ISC GmbH.