
POP 80-4 - Cooker Airforce - Free user manual and instructions
Find the device manual for free POP 80-4 Airforce in PDF.

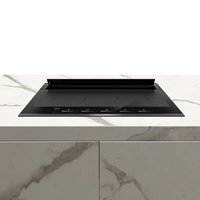
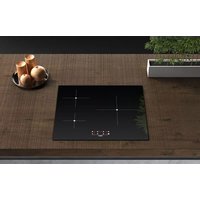
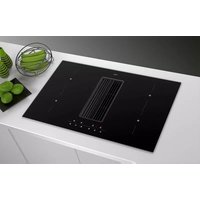
| Product type | Built-in induction cooktop |
| Brand | Airforce |
| Model | POP 80-4 |
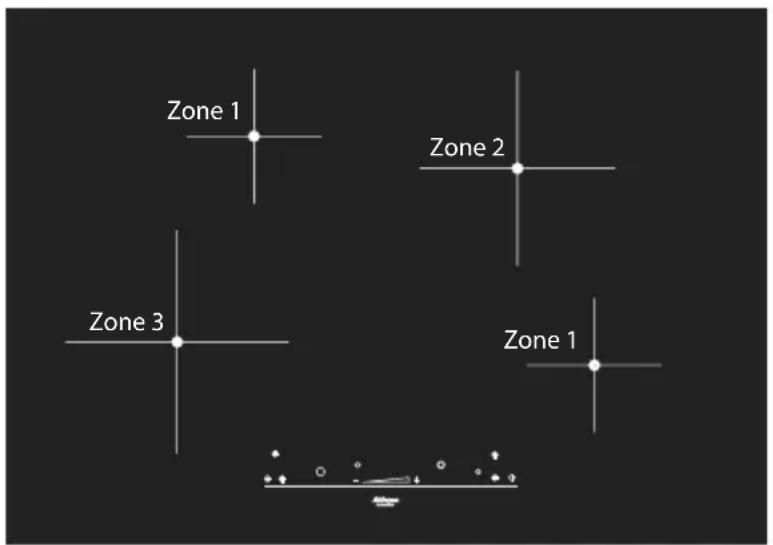
| Number of cooking zones | 3 |
| Zone diameters | Zone 1: 145 mm, Zone 2: 210 mm, Zone 3: 240 mm |
| Power per zone (max) | Zone 1: 1200 W (1600 W Booster), Zone 2: 1500 W (2000 W Booster), Zone 3: 1500 W (3000 W Booster) |
| Total nominal power | 4200 W (6200 W with Boosters) |
| Supply voltage | 230 V ~ 50 Hz |
| Control type | Touch controls with slider |
| Functions | Booster, Pause, Timer (1-99 min), Control lock, Automatic emergency stop |
| Residual heat indicator | Yes |
| Child safety | Control lock |
| Surface material | Ceramic glass |
| Dimensions (W x D x H) | 560 x 490 x 55 mm (estimated) |
| Weight | Approximately 8 kg (estimated) |
| Cleaning | Damp cloth, no steam cleaner |
| Installation instructions | Built-in, 20 mm clearance at rear, 65 mm if drawer |
| Warranty | 2 years (standard, not specified) |
| Repairability | Original parts, intervention by qualified personnel |
Frequently Asked Questions - POP 80-4 Airforce
User questions about POP 80-4 Airforce
0 question about this device. Answer the ones you know or ask your own.
Ask a new question about this device
Download the instructions for your Cooker in PDF format for free! Find your manual POP 80-4 - Airforce and take your electronic device back in hand. On this page are published all the documents necessary for the use of your device. POP 80-4 by Airforce.
USER MANUAL POP 80-4 Airforce
POP 80-4
| D | MONTAGE- UND GEBRAUCHSANWEISUNG |
| GB | INSTRUCTIONS ON MOUNTING AND USE |
| F | PRESCRIPTIONS DE MONTAGE ET MODE D'EMPLOI |
| NL | MONTAGEVOORSCHRIFTEN EN GEBRUIKSAANWIIZING |
| ES | MONTAJE Y MODO DE EMPLEO |
| I | ISTRUZIONI DI MONTAGGIO E D'USO |
natural_image
Illustration of two gloves with bandages and straps (no text or symbols)IT Per tutte le operazioni di installazione e manutenzione utilizzare guanti da lavoro
EN Always wear work gloves for all installation and maintenance operations
DE Bei allen Installations- und Instandhaltungsarbeiten immer Schutzhandschuhe tragen.
FR Munissez-vous de gants de travail avant d'effectuer toute opération d'installation et d'entretien.
NL Draag bij alle installatie- en onderhoudswerkzaamheden werkhandschoenen.
ES Todas las operaciones de instalación y mantenimiento se deben realizar utilizando guantes de trabajo.
PT Para todas as operações de instalação e manutenção, utilize luvas adequadas para este tipo de atividade
GR Πάντοτε να φοράτε γάντια εργασίας για όλες τις επεμβάσεις εγκατάστασης και συντήρησης.
SV Använd alltid skyddshandskar vid installation och underhåll.
FI Käytä asennus- ja huoltotöissä suojakäsineitä.
NO Ved alle installasjonsprosedyrer og alt vedlikehold av ventilatoren må man bruke arbeidshansker
DA Ved alle installations- og vedligeholdelsesindgreb skal der bæres arbejdshandsker.
PL Wszelkie czynności montażowe i konserwacyjne wykonywać w rękawicach ochronnych.
CZ Při všech instalačních a údržbových pracích používejte pracovní rukavice
SK Pri všetkých inštalačných a údržbárskych prácach používajte ochranné pracovné rukavice.
HU Valamennyi üzembe helyezési és karbantartási müvelethez használjon védőkesztyűt
BG за всички операции по инсталиране и техническо обслужване използвайте работни ръкавици.
RO Pentru toate operațiile de instalare și întreținere utilizați mănuși de protecție.
RU Для выполнения всех операций по установке и уходу используйте рабочие перчатки.
ET Kasutage paigaldus- ja hooldustöödel kaitsekindaid.
natural_image
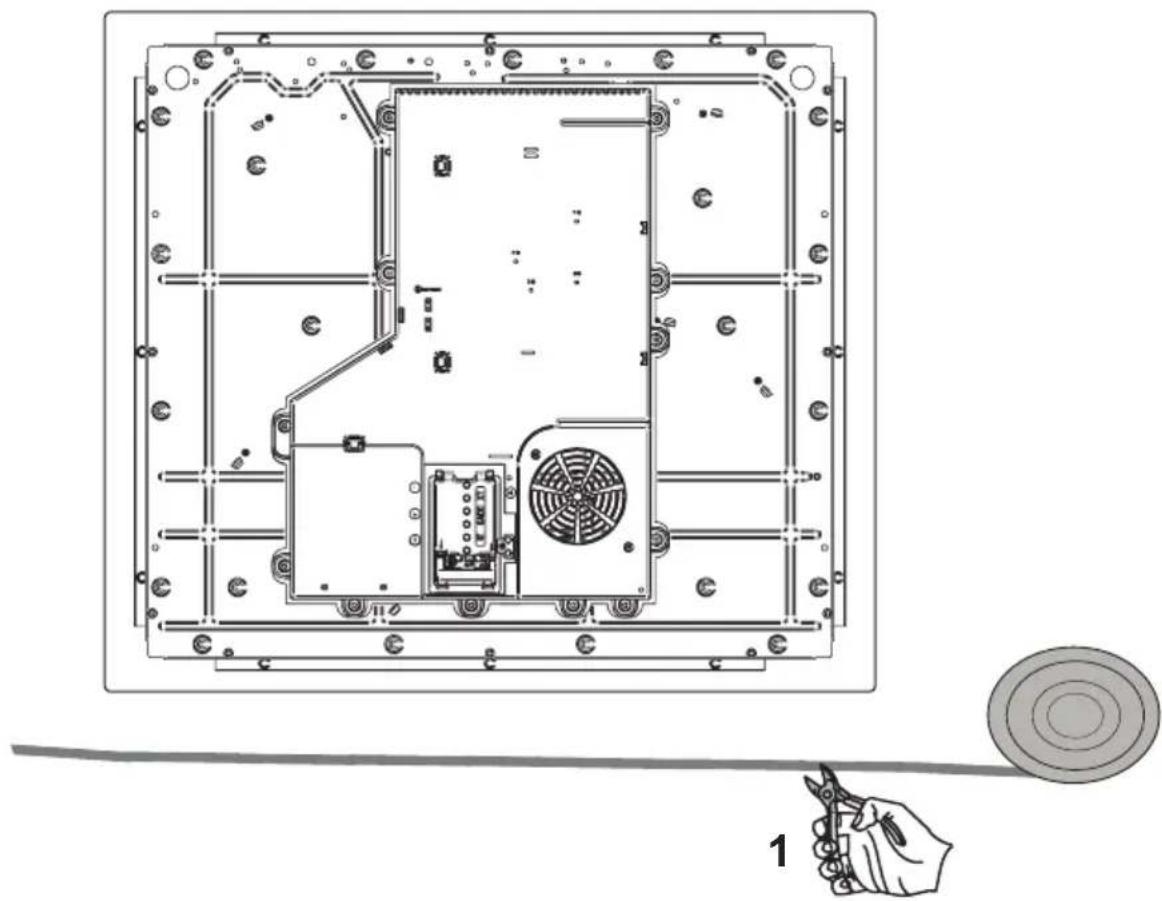
Technical line drawing of a mechanical assembly with a hand holding a tool, showing internal components and mounting holes (no text or symbols)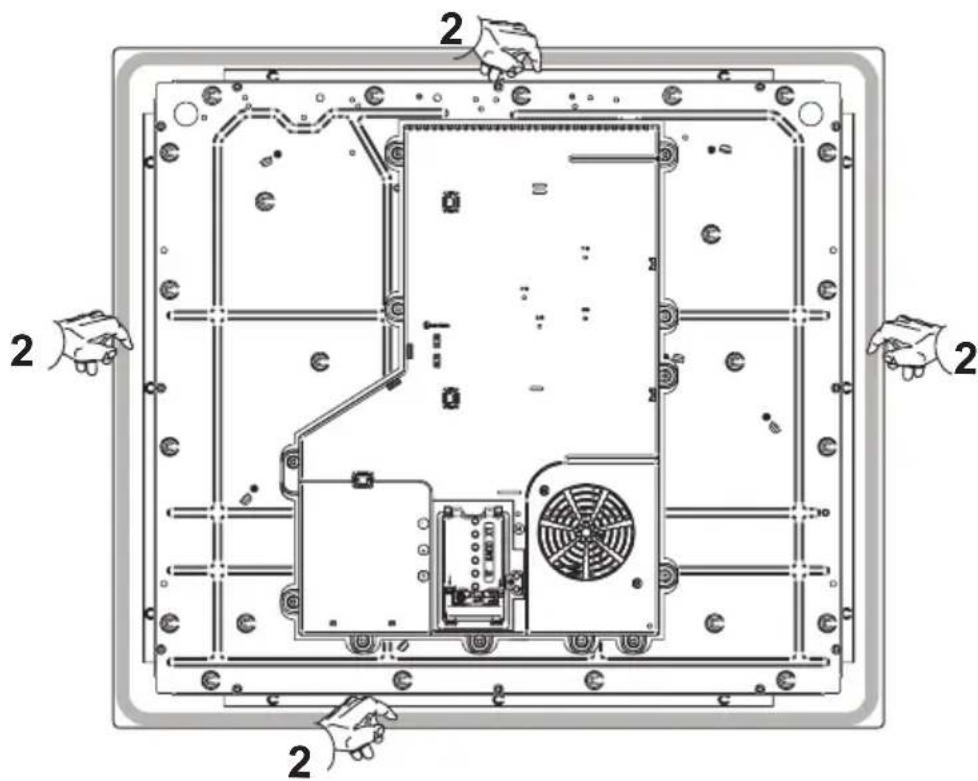
natural_image
Isometric diagram of a 3D box with a downward arrow indicating compression or disassembly (no text or symbols)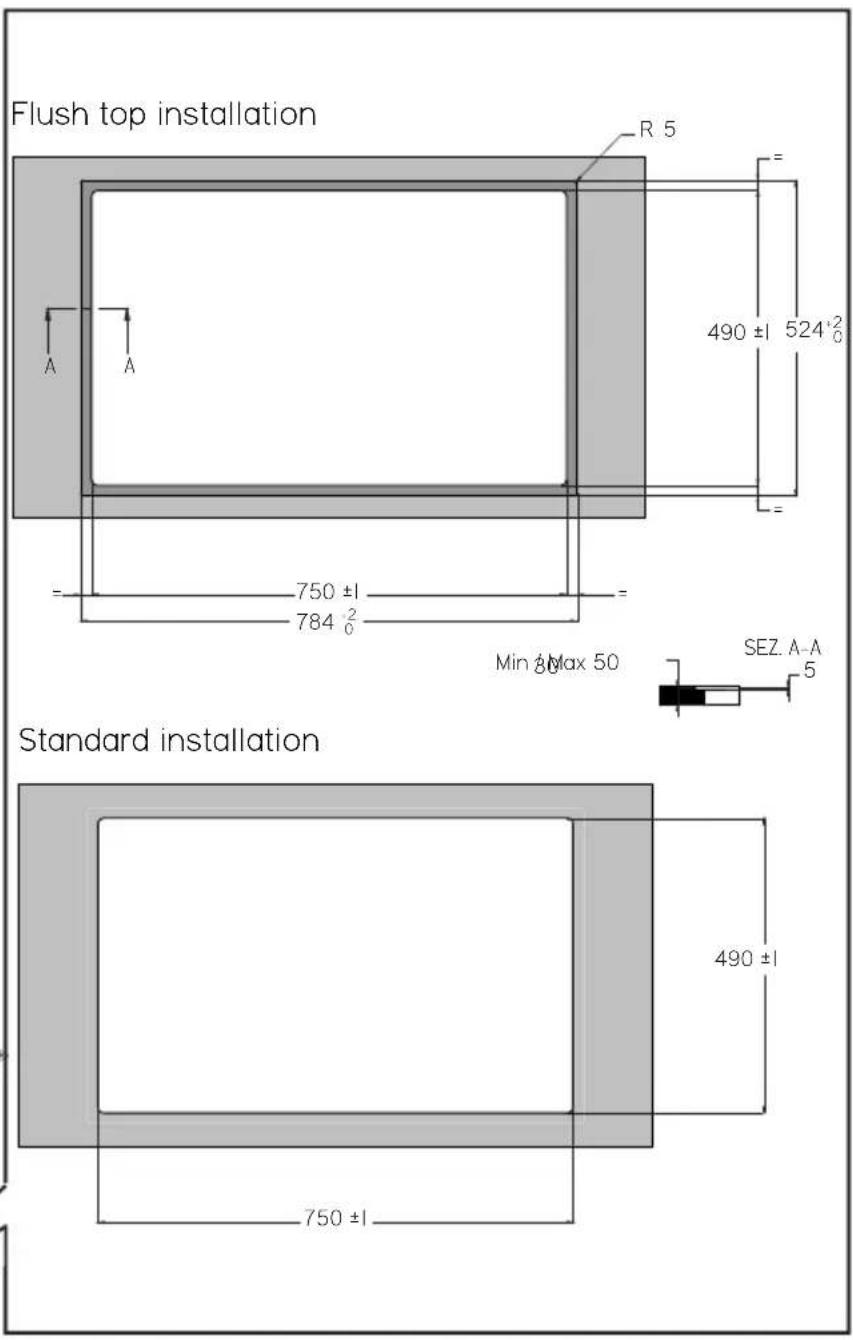
3

or
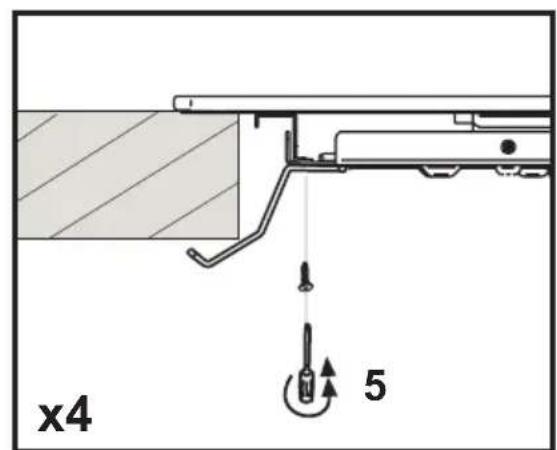
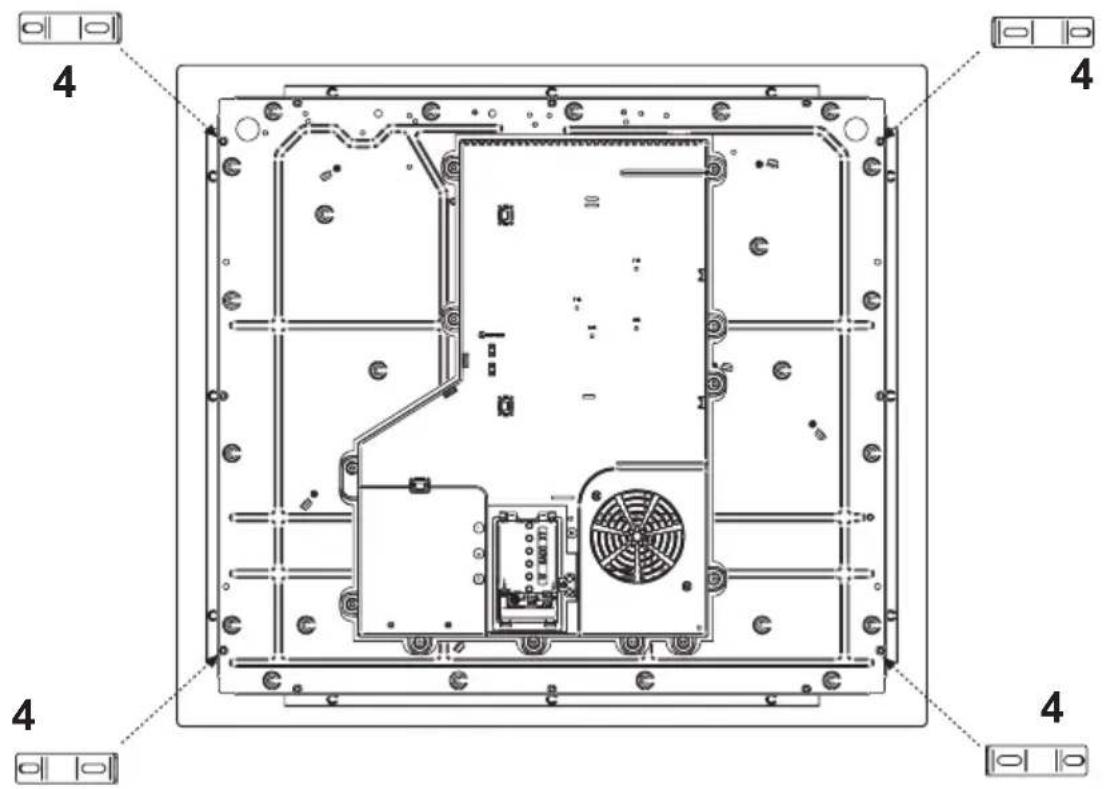
NOTES: Regardless of the selected hob fixing method, the screws indicated in point 5 must always be installed.
X : Schublade
X : Drawer
X : Tiroir
X : Schuif
X : Cajón
X : Cassetto
Fig.2
Y : Einbauküche / Einbauofen
Y : Built-in cooker / built-in oven
Y : Cuisine encastrable / four encastrable
Y : Inbouwformuis/ inbouwoven
Y : Cocina empotrada/ horno empotrado
Y : Cucina da incasso / forno da incasso
Electrical connection
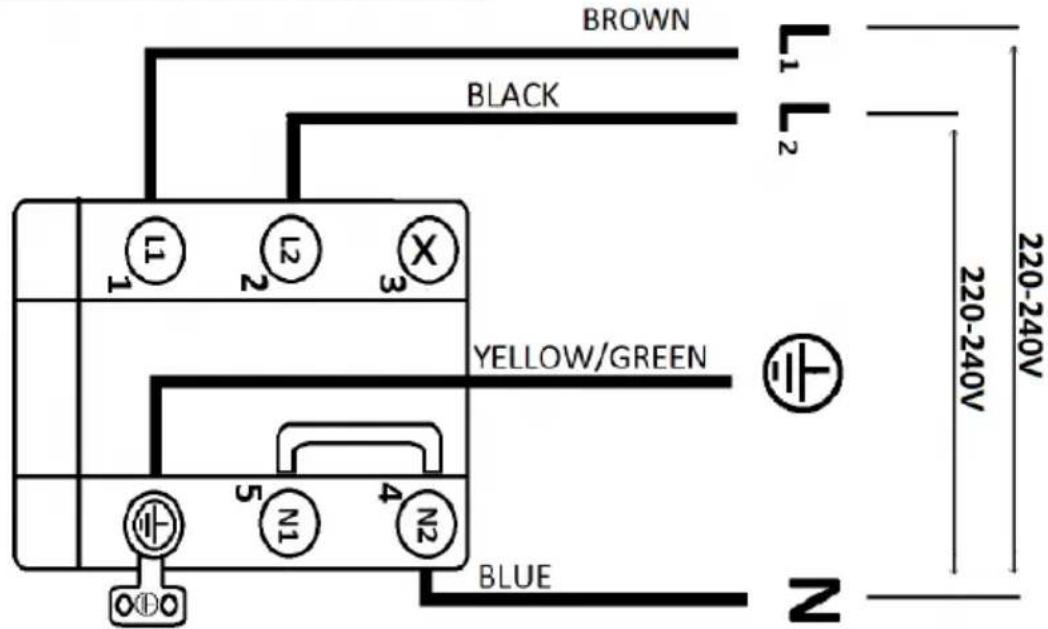
220-240V 50/60Hz
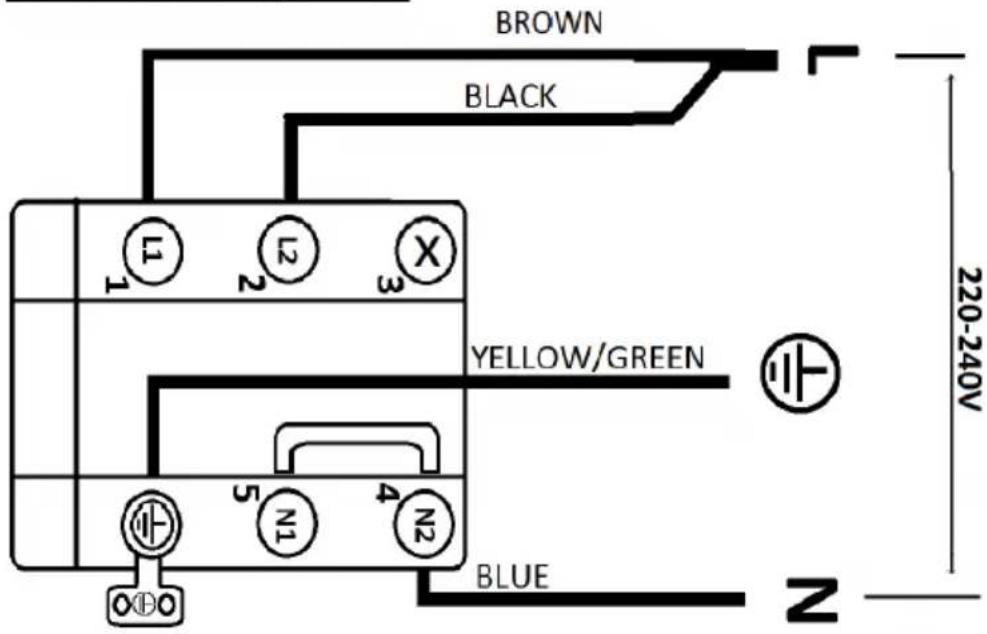
380-415V 2N 50/60HZ
Attenzione
natural_image
Illustration of kitchenware including a stove, pan, and pot (no text or symbols)
natural_image
Two grayscale illustrations of cooking utensils, one with a side panel and the other showing a pan with a lid (no text or symbols)
natural_image
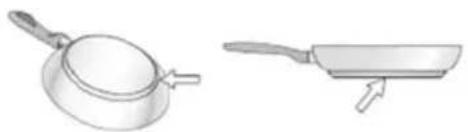
Illustration of a frying pan and its side view showing the lid and pan (no text or symbols)
| ZONE Diametro min. pentola | |
| 1 90 mm | |
| 2 130 mm | |
| 3 130 mm | |
DESCRIZIONE COMANDI "TOUCH-CONTROL"
natural_image
Illustration of kitchenware including a stove, pot, and lid (no text or symbols)
natural_image
Two grayscale illustrations of cooking utensils, one with a side panel and the other with a lid (no text or symbols)
natural_image
Illustration of a frying pan and its side view showing the exterior (no text or symbols)
It is very important that this instruction manual be kept together with POP 80-4 for any future reference. If the appliance is sold or transferred to another person, make sure that the booklet is supplied with it, so that the new user can be made aware of the operation of the hood and its warnings. These warnings have been drawn up for your safety and the safety of others, so please read them carefully before installing and using the device. Please also refer to the drawings on the first pages with alphabetical and numerical references in the explanatory text. Strictly follow the instructions in this manual. No liability is accepted for any inconvenience, damage or fire caused to the appliance as a result of failure to observe the instructions in this manual. Installation and electrical connection must be carried out by a specialised technician. The supplier will not be liable for any warranty for damage resulting from incorrect installation or incorrect use of the device. Never modify or attempt to modify the characteristics of this device.
The hob must always be used within the limits of normal household use, not for professional use, to prepare and keep food warm. Any other use is not permitted. During operation, the device must not be left unattended.
This appliance may be used by children from the age of 8 years and by persons with reduced physical, sensory or mental capabilities or lack of experience and knowledge if they are under appropriate supervision or if they have been instructed in the use of the device in a safe manner and if they realise the dangers involved.
Children must not play with the device. Cleaning and maintenance must not be carried out by children without supervision.
Use the control lock to prevent children from inadvertently switching on the device or changing its functions. During operation, the device must never be left unattended.
Do not control the hob via an external timer.
During operation, the device must not be left unattended.
Make sure that any children in the house do not have the possibility of spilling hot pots and pans on the floor. Turn the handles of pots and pans sideways on the work surface so that they are above the work surface to prevent the risk of burns.
For safety issues, the hob should only be used after it has been built-in.
Before embedding, check the hob for visible damage. Never operate a damaged appliance, it can be a safety hazard.
The built-in and electrical connection of the appliance to the mains may only be carried out by trained personnel. Electrical safety is only guaranteed if the hob is connected to a regular earth connection. If in doubt, have the electrical system checked by a qualified electrician. If the power cable is damaged, it should only be replaced by a service centre or qualified personnel.
Do not connect the hob to the mains with extension cords or multiple sockets, as these do not guarantee the necessary safety (e.g. risk of overheating).
Before connecting the hob, the connection data (voltage and frequency) on the rating plate must be compared with those of the mains supply.
These data must absolutely match, otherwise the machine may be damaged. If in doubt, consult an electrician.
To carry out installation, maintenance and repair work, disconnect the appliance from the mains.
It is necessary to comply with all regulations for exhaust air
CAUTION: If the surface is cracked, switch off the appliance to avoid the possibility of electric shock.
Never open the casing of the device. Any contact with live parts or modification of electrical or mechanical structures may cause malfunctions.
The induction hob must not be used as a worktop. The rough bases of receptacles can scratch the cooking surface.
Always keep the cooking zones and the base of the receptacles perfectly dry.
Fire hazard
The oil and grease that are too hot ignite quickly. Do not leave overheated oil or grease unattended. Should the oil or grease ignite, do not attempt to extinguish the flames with water. Extinguish the flames with a lid or plate with a fireproof blanket. Switch off the cooking zone. Never place flammable objects on the hob.
CAUTION: Fire hazard: do not leave objects on the cooking surfaces.
Danger of burns
CAUTION: This appliance and its accessible parts become very hot during use. Care must be taken to avoid touching the heating elements. Keep children under 8 years of age away unless continuously supervised.
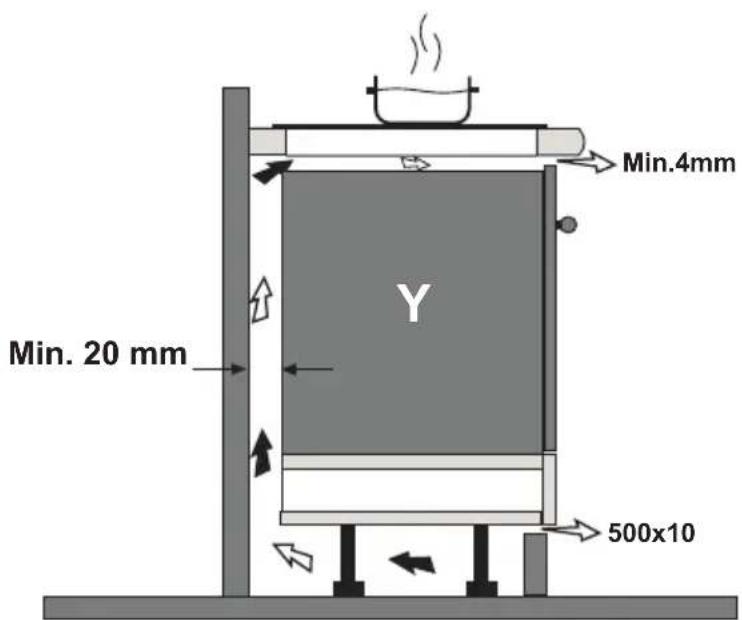
The device is equipped with a cooling fan. If there is a drawer under the built-in hob, an adequate distance between the contents of the drawer and the underside of the appliance must be ensured in order not to impair ventilation.
Do not store small objects or sheets of paper in the drawer under the hob, if any, which, if sucked in, could break the fan and impair the cooling of the appliance, nor flammable or metal objects, which could become incandescent or catch fire.
The work surface must be flat and horizontal. Cabinet cut-outs must be made before installing the unit. Remove swarf to avoid impairing the function of electrical components.
Considering the ventilation of the hob, the following is necessary:
- a distance of 20 mm between the rear of the cabinet and the kitchen wall (Fig. 1-2).
- if the worktop is installed on a drawer, leave 65 mm between the drawer and the top of the worktop (fig.1).
If the hob is mounted behind a cabinet door, operate it only when the door is open.
Only close the cabinet door when the appliance and residual heat indicators are switched off.
If the appliance is installed above an oven or an electric cooker equipped with a pyrolytic system, it should not be operated while the pyrolytic process is in progress, as the cooker overheating protection may be triggered.
The hob must not be installed above the dishwasher, as the steam emitted by the dishwasher could cause the hob's electronic circuit to malfunction.
Do not use any steam appliance, as steam could reach live parts and cause a short circuit.
Any work on or repairs to the appliance during the warranty period must only be carried out by the manufacturer's authorised service centre, otherwise the warranty will be invalidated and immediately void. Under no circumstances will the manufacturer's guarantee be acknowledged for any subsequent problems.
Replace any faulty or defective parts with original spare parts: only these guarantee compliance with safety standards.
Warning for persons with pacemakers: be aware that an electromagnetic field is generated in the immediate vicinity of the device in operation.
The possibility that the functioning of the pacemaker will be affected is very remote. If in doubt, contact the pacemaker manufacturer or your doctor.
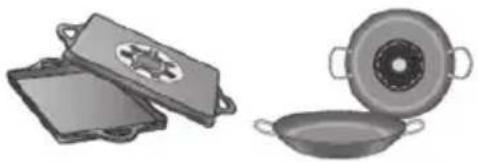
Suitable receptacles

Only use pans bearing the symbol.
Important:
to avoid permanent damage to the surface of the table, do not use:
- receptacles with an imperfectly flat base;
- metal receptacles with enamelled bases;
- receptacles with a rough base to avoid scratching the surface of the hob;
- never place hot pots and pans on the surface of the hob control panel.
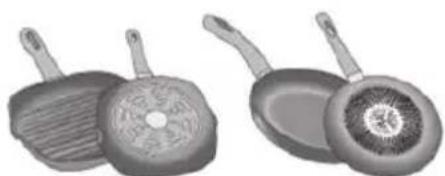
Not all cookware suitable for induction works efficiently due to bases partly made of ferromagnetic material! When purchasing pots or pans, check that:
- the base is completely made of ferromagnetic material. Otherwise, both heat transmission efficiency and heat uniformity are lowered, resulting in unsuitable pan/pot surface temperatures for cooking.
natural_image
Illustration of kitchenware including a pot, lid, and cooking pan (no text or symbols)
- The Base does not contain aluminium: it does not heat up and may not even be recognised by the inductors.
natural_image
Two grayscale illustrations of frying panes with handles, one showing a circular pattern and the other showing a square (no text or symbols)
- Bases that are not flat or have a rough surface.
They subtract from the contact surface between inductor and dish, lowering its efficiency and worsening the firing experience.
natural_image
Illustration of a frying pan and its side view showing the exterior (no text or symbols)
Important: never place hot pots and pans on the surface of the hob control panel, drawn on the hob.
Never use receptacles made of: normal fine steel, glass, terracotta, copper and aluminium.
Do not place any empty receptacles on the cooking zone. It could cause damage.
Pans from which liquids completely evaporate can cause damage to the glass-ceramic hob, for which the manufacturer accepts no liability. Existing receptacles
You can check whether the pan material is magnetic with a simple magnet. Pans are not suitable if they are not magnetically detectable. The indications given in the previous paragraph also apply in this case
Do not place objects such as knives, forks, spoons or lids on the induction hob because they can overheat.
Do not heat closed containers, e.g. tinplate, on cooking zones. The overpressure generated could burst the container.
Inadequate receptacles
Never use receptacles made of: normal fine steel, glass, terracotta, copper and aluminium. Do not place any empty receptacles on the cooking zone. It could cause damage.
Do not place any hot receptacles on the control panel, in the indicator area or on the hob frame. It could cause damage
Danger of failure
P ans from which liquids completely evaporate can cause damage to the glass-ceramic top, for which the manufacturer accepts no liability.
Noise
Induction can generate a slight noise; this is variable depending on the material, the type of pan and the power selected.
When the hob is used frequently, the cooling fan turns on to safeguard the life of the electronics, generating a hum: this is perfectly normal.
First Use
Clean with a damp cloth and dry the hob before using it for the first time. It is advisable to dry the appliance after cleaning it with a damp cloth to avoid lime residue.
When switching on the appliance for the first time, it is possible that odours or fumes may be generated. With each further use, the odour fades until it disappears completely. Odours and possible fumes are not indicative of incorrect connection or damage to the appliance and are not harmful to health.
| ZONES Min. pot diameter |
| 1 90 mm |
| 2 130 mm |
| 3 130 mm |
DESCRIPTION OF COOKING ZONES
- Induction cooking zone ∅ 145 mm - 1200 W (1600 W in Booster function)
- Induction cooking zone ∅ 210 mm - 1500 W (2000 W in Booster function)
- Induction cooking zone ∅ 240 mm - 1500 W (3000 W in Booster function)
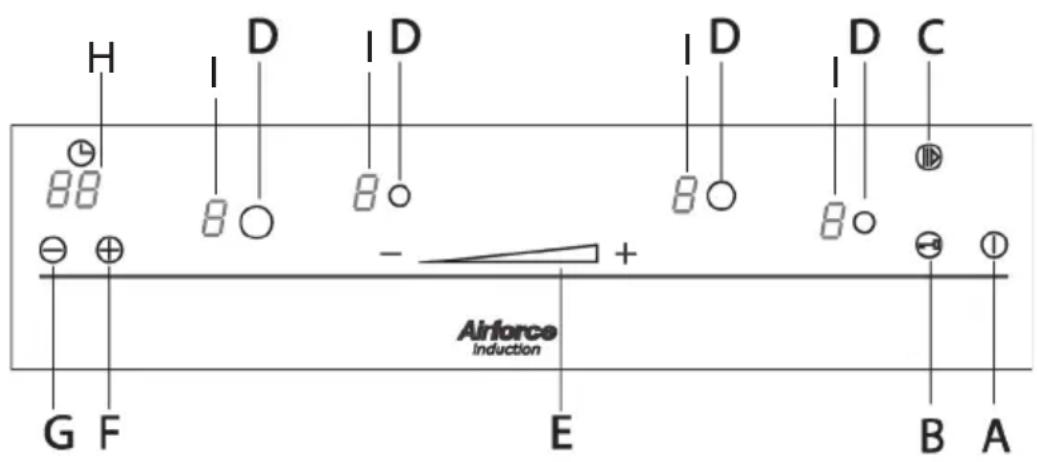
TOUCH-CONTROL DESCRIPTION
A - On/Off key
B - Keypad lock key
C - Pause key
D - Cooking zone selection keys
E - Power selection slider
F - "+" increase key
G - Decrement key "-"
H - Timer display
I - Cooking zone display
TOUCH CALIBRATION
The F / L error can be generated within about 3s of the initial power up. The user is advised to switch off the hood lights and direct lighting towards the hob. After the touch control has conducted the initial calibration process, (about 3s) any hood or other lighting can be turned on normally and will no longer affect the operation of the touch control.
COMMAND BLOCK
Button B blocks hob operation in its current state, preventing any unintentional operation (e.g. by children). In this state, no action on the keys has any effect. To activate the safety function, press button B until the warning light comes on. When the command lock is active, the hob can still be switched off. In this case the command block remains active even when the hob is switched on again. To deactivate the control lock, press button B until the warning light goes off.
SWITCHING ON THE HOB
To turn on the appliance, press key A, the displays will turn on in the standby position. The control unit will remain active for 10 seconds. If no cooking zone is selected within this period, the hob will switch off automatically.
To select the desired cooking zone, press the relative key D and press the slider E within 10 seconds to adjust its power. The power of the individual cooking zone can be adjusted in 9 different positions, and will be shown on the relative luminous display with a number from "1 to 9".
BOOSTER
This function further reduces the cooking time of a given zone by bringing the temperature to maximum power for a 10-minute interval. At the end of this interval, the power of the cooking zone automatically returns to level 9. The use of this function is indicated for heating large quantities of liquids (e.g. water for cooking pasta) or dishes in a very short time. To activate this function, select the cooking zone and act on slider E up to level 9. Act on slider E again, the symbol P will be shown on the display relating to the zone.
PAUSE/RECALL
The function is activated by pressing the C key and allows for a temporary pause in cooking, allowing users to answer the door or the telephone without worrying about boiling water. This function is also useful for cleaning the user interface surface without changing the set cooking. The evidence that the interruption has taken place is because all the displays light up with a message that rotates continuously. To restore cooking, press the button again C, the hob will return to the original settings. 10 minutes after setting the pause, if cooking is not restored, the hob will switch off.
pot recognition
If the symbol appears on one of the displays of a cooking zone, it means that: 1) the container used is not suitable for cooking with 2) the diameter of the pan used is smaller than that permitted by the appliance. 3) there is no saucepan on the plate.
TIMER
This function allows you to automatically switch off a cooking zone after a certain time. Select a cooking zone then press one of the two buttons G or F of the timer and set from 1 to 99 minutes. The led of the selected zone flashes and the time starts, when it reaches zero the led of the selected zone turns off and an intermittent acoustic signal is emitted. To deactivate the acoustic sound, press any button on the hob.
RESIDUAL HEAT

If the temperature of a cooking zone is still high (above 50^ ) after having been switched off, the display relating to that zone shows the symbol (residual heat). The indication disappears only when there is no longer any risk of burns.
POT RECOGNITION
To turn off a cooking zone, select it by pressing the relative key D then move the slider E up to the position.
SWITCHING OFF THE HOB
To switch off the hob completely, press button A.
SAFETY SHUT OFF
The appliance is equipped with a safety system which automatically switches off the cooking zone once the switch-on time limit has elapsed at a given power.
| Power | Operating time limit |
| 1 10 hours | |
| 2 5 hours | |
| 3 5 hours | |
| 4 4 hours | |
| 5 3 hours | |
| 6 2 hours | |
| 7 2 hours | |
| 8 2 hours | |
| 9 1 hours | |
| P 10 minutes |
| Power level of the cooking zone | Zone 1 Zone | Zone 2 Zone | 3 |
| 1 75 W 1 | 00 W 100 W | ||
| 2 175 W | 200 W 200 W | ||
| 3 225 W | 300 W 300 W | ||
| 4 350 W | 500 W 500 W | ||
| 5 500 W | 700 W 700 W | ||
| 6 650 W | 900 W 900 W | ||
| 7 800 W | 1100 W 1100 W | ||
| 8 | 1000 W | 1300 W 1600 W | |
| 9 | 1200 W | 1500 W 2200 W | |
| P | 1600 W | 2000 W 3000 W |
Attention :
natural_image
Illustration of kitchenware including a stove, pan, and lid (no text or symbols)
natural_image
Two grayscale illustrations of cooking utensils, one with a side panel and the other showing a pan with a lid (no text or symbols)
natural_image
Illustration of a frying pan and its side view showing the exterior (no text or symbols)
natural_image
Illustration of kitchenware including a stove, pan, and pot (no text or symbols)
natural_image
Two grayscale illustrations of frying panes with handles, one showing a side dish and the other showing a pan (no text or symbols)
- Fondos no planos o superficies rugosas.
natural_image
Illustration of a frying pan and its side view showing the lid and pan (no text or symbols)
| Fault / Error | Heater | Effect in the |
| Display | Appliance | |
| Microcontroller fault | F0 | Appliance off |
| On/Off key emitter fault | FA | Appliance off |
| On/Off key receiver fault | FC | Appliance off |
| User interface temp. sensor short-circuit | FE | Appliance off |
| User interface temp. sensor open-circuit | Ft | Appliance off |
| User interface overtemperature | fc | Appliance off |
| EEPROM fault | FH | Appliance off |
| Microcontroller A/D convert multiplexer fault | FJ | Appliance off |
| Ambient light fault | FL | Appliance off |
| Microcontroller A/D convert conversion fault | FU | Appliance off |
| Comunication fault | F5 | Heater off |
| Heater temperature sensor short-circuit | F1 | Heater off |
| Heater temperature sensor open-circuit | F2 | Heater off |
| Heater temperature sensor error-1 | F7 | Heater off |
| Heater temperature sensor error-2 | F8 | Heater off |
| Heater voltage fault | F9 | Heater off |
| Power unit temperature sensor short-circuit | F3 | Heater off |
| Power unit temperature sensor open-circuit | F4 | Heater off |
| Mains zero crossing loss | F6 | Heater off |
natural_image
Abstract white spiral logo design on gray background (no text or symbols)Airforce
made in Italy

- Electrical connection
- Attenzione
- DESCRIZIONE COMANDI "TOUCH-CONTROL"
- Fire hazard
- Danger of burns
- Suitable receptacles
- Inadequate receptacles
- Danger of failure
- Noise
- First Use
- DESCRIPTION OF COOKING ZONES
- TOUCH-CONTROL DESCRIPTION
- TOUCH CALIBRATION
- COMMAND BLOCK
- SWITCHING ON THE HOB
- BOOSTER
- PAUSE/RECALL
- pot recognition
- TIMER
- RESIDUAL HEAT
- SWITCHING OFF THE HOB
- SAFETY SHUT OFF
- Attention :
- Airforce
- made in Italy
Brand : Airforce
Model : POP 80-4
Category : Cooker