
NR90GC2 - Stapler HiKOKI - Free user manual and instructions
Find the device manual for free NR90GC2 HiKOKI in PDF.
| Product type | Cordless gas wood nailer |
| Brand | HiKOKI |
| Model | NR90GC2 |
| Dimensions (L × H × W) | 347 mm × 353 mm × 108 mm |
| Weight (without accessories) | 3.4 kg |
| Power source | Li-ion battery 7.2 V (BCL715G) + gas fuel cell |
| Operating temperature | 0 °C to 40 °C |
| Applicable nails | Diameter 3.0 – 3.3 mm, length 50 – 90 mm, smooth, indented shank, or ring shank |
| Magazine capacity | 25 to 37 nails per strip |
| Mechanism type | Full sequential (contact + trigger) |
| Depth adjustment | Yes, by moving the contact arm |
| Charger | UC18YG (230 V, 50 Hz, charging time ~30 min at 20 °C) |
| Recommended lubricant | HiKOKI pneumatic tool lubricant |
| Applications | Wood framing, floors, walls, trusses, formwork, etc. |
| Sound level (L_WA) | 108 dB(A) (power), 99 dB(A) (ear pressure) |
| Vibration level | 3.5 m/s² (uncertainty K = 1.5 m/s²) |
| Safety | Safety glasses and hearing protection mandatory, keep children away, do not use in explosive atmosphere |
| Maintenance | Regularly clean the magazine and lubricate; check the pusher lever |
| Storage | Out of direct sunlight, temperature < 40 °C, out of reach of children |
Frequently Asked Questions - NR90GC2 HiKOKI
User questions about NR90GC2 HiKOKI
0 question about this device. Answer the ones you know or ask your own.
Ask a new question about this device
Download the instructions for your Stapler in PDF format for free! Find your manual NR90GC2 - HiKOKI and take your electronic device back in hand. On this page are published all the documents necessary for the use of your device. NR90GC2 by HiKOKI.
USER MANUAL NR90GC2 HiKOKI
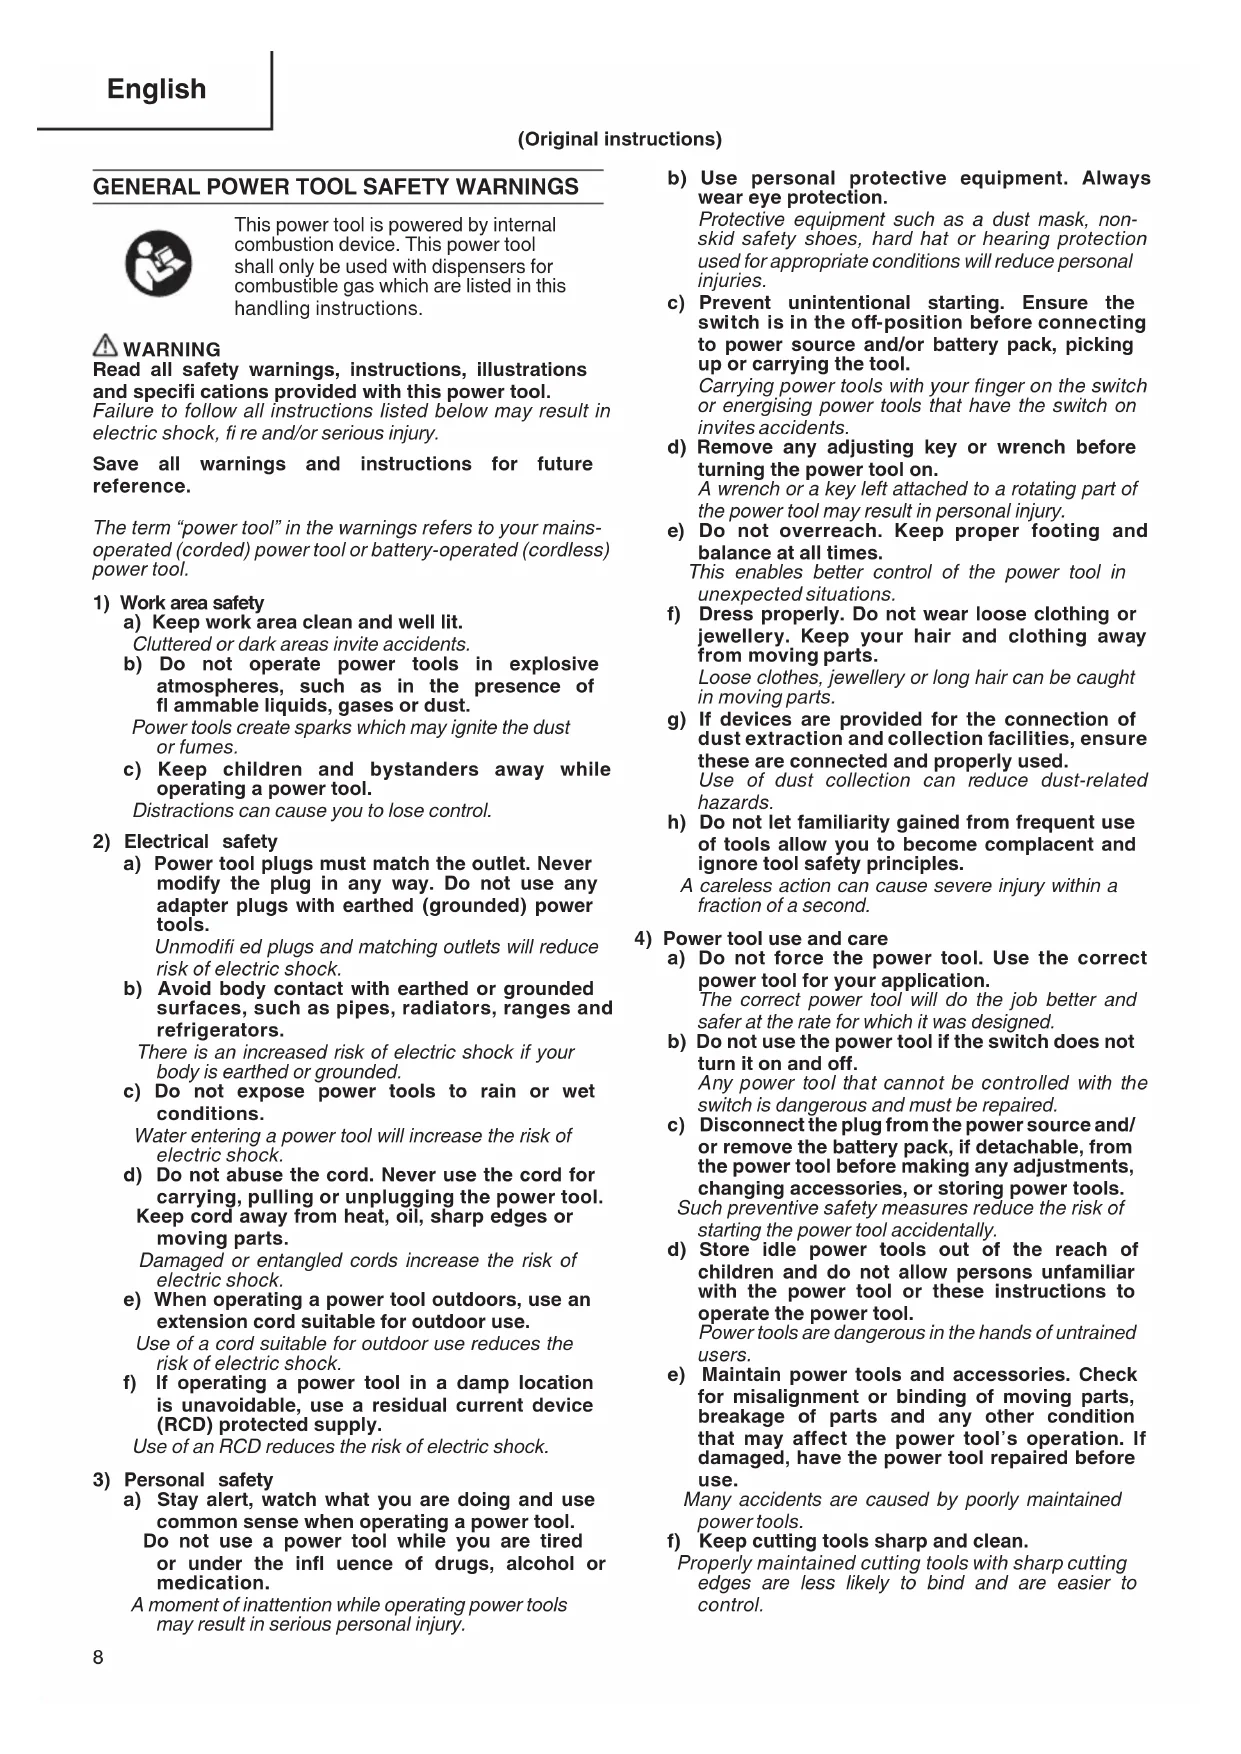
Gas Strip Nailer
Gas Streifen Nagler
Cloueur gaz bois
Chiodatrice a barra a gas
Gas nailer
Clavadora a gas
Pistola de pregos a gás
NR 90GC2 • NR 90GR2

NR90GC2 NR90GR2
Read through carefully and understand these instructions before use.
These Anleitung vor Benutzung des Werkzeugs sorgfältig durchlesen und verstehen.
Lire soigneusement et bien assimiler ces instructions avant usage.
Prima dell'uso leggere attendamente e comprendere queste instruzioni.
Deze gelebruiksaanwijzing s.v.p. voor gelebruik zorgvuldig doorlezen.
Leerstraints y comprender estas instrucciones antes del uso.
Antes de usar, leia com cuidado para assimilar estas instruções.
Handling instructions Bedienungsanleitung Mode d'emploi Istruzioni per l'uso Gebruiksaanwijzing Instrucciones de manejo Instruções de uso

1

2

4

6
7


8

9
10

11
12 13


14 15

16 17

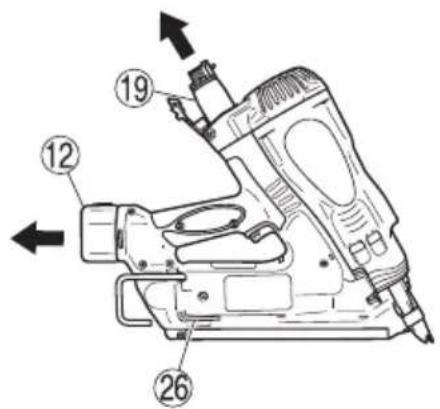
18 19

20 21


22
| English Deutsch français Italiano | ||||
| 1 | Top cover Obere Abdeckung | Couvercle supérieur Coperchio anteriore | ||
| 2 | Housing Gehäuse Logement | Sede | ||
| 3 | Chamber Kammer Chambre | Camera | ||
| 4 | Piston Kolben Piston Pistone | |||
| 5 | Driver blade Schraubenzieherklinge Lame d'entrainment | Lama | ||
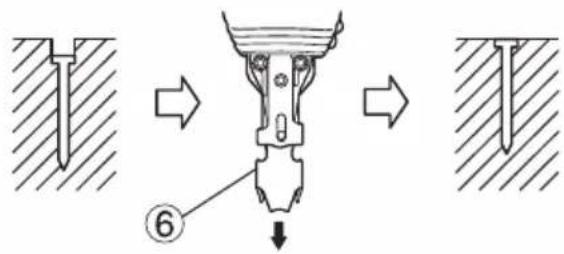
| 6 | Push lever Auslösesicherung | Bras. de contact | Leva di spinta | |
| 7 | Firing head (Outlet) | Schusskopf (Auslass) | Tête de clouage (sortie) | Testata di sparo (uscita) |
| 8 | Nail feeder (B) | Nagelschieber (B) | Alimenteur de clous (B) | Alimentatore chiodi (B) |
| 9 | Feeder Knob | Zuführungsknopf | Bouton de l'alimenteur | Pulsante alimentatore |
| 10 | Magazine | Magazin Magasin Contenitore | ||
| 11 | Hook | Haken | Crocket | Gancio |
| 12 | Battery Akku | Batterie | Batteria | |
| 13 | Trigger Auslöser Détente | Grilletto | ||
| 14 | Handle | Handgriff | Poinée | Manopola |
| 15 | Cell Cover Zellenabdeckung | Couvercle de la pile | Coperchiocella | |
| 16 | Latch | Riegel | Languette Nottolino | |
| 17 | Charger Ladegerät | Chargeur | Caricatore | |
| 18 | Pilot lamp | Kontrollleuchte | Lampe témoin | Luce pilota |
| 19 | Fuel cell | Brennstoffzelle | Pile à combustible | Cella carburante |
| 20 | Metering valve | Dosierventil | Soupape de réglage | Valvola di misurazione |
| 21 | Stem | Stift | Tige | Supporto |
| 22 | Cap | Kappe | Capuchon | Tappo |
| 23 | Latch (Battery) | Riegel (Akku) | Verrou (Batterie) | Bloccaggio (battery) |
| 24 | Indicator light | Anzeigeleuchte | Témoin | Luce di indicazione |
| 25 | Adapter | Adapter | Adaptateur | Adattatore |
| 26 | Hexagonal bar wrench | Sechskantschlüssel | Clé hexagonale | Chiave a barra esagonal |
| 27 | Convex side | Konvexe Seite | Côté convexe | Lato convesso |
| Nederland Espanol Português | ||
| 1 | Kap Protector superior Tampa superior | |
| 2 | Omhulsel Alojamento Caixa | |
| 3 | Magazijn Cárma Cárma | |
| 4 | Zuiger Pistón Pistão | |
| 5 | Aandrijfblad Cuchilla impulsora Lámina de controlo | |
| 6 | Veiligheidshendel Palanca de empuje Alavanca de pressão | |
| 7 | Afvuurkop (uitlaat) | Cabezal de disparo (salida) |
| 8 | Spijkertoevoer (B) | Alimentador de clavos (B) |
| 9 | Toevoerknop | Botón del alimentador |
| 10 | Magazijn Cargador | Depósito |
| 11 | Haak | Gancho Gancho |
| 12 | Batterij | Batería |
| 13 | Trekker | Gatillo Gatilho |
| 14 | Greep Mango | Punho |
| 15 | Gaspatroonafdekking | Protector de laCELula |
| 16 | Klink | Cierre Retentor |
| 17 | Oplader | Cargador |
| 18 | Controlelampje | Luz del piloto |
| 19 | Gaspatroon | Celda de combustible |
| 20 | Meetklep Válvula de medicación | Válvula regulatora |
| 21 | Steel | Vástago |
| 22 | Kap Tapa | Tampa |
| 23 | Klink (Batterij) | Cierre (Batería) |
| 24 | Indicatielampje | Luz indicadora |
| 25 | Adapter Adaptador | Adaptador |
| 26 | Imbus-steelsleutel | Llave de barra hexagonal |
| 27 | Bolle zijde | Lado convexo |
GENERAL POWER TOOL SAFETY WARNINGS

This power tool is powered by internal combustion device. This power tool shall only be used with dispensers for combustible gas which are listed in this handling instructions.
WARNING
Read all safety warnings, instructions, illustrations and specifi cations provided with this power tool.
Failure to follow all instructions listed below may result in electric shock, fire and/or serious injury.
Save all warnings and instructions for future reference.
The term "power tool" in the warnings refers to your mains-operated (corded) power tool or battery-operated (cordless) power tool.
1) Work area safety
a) Keep work area clean and well lit. Cluttered or dark areas invite accidents
b) Do not operate power tools in explosive atmospheres, such as in the presence of flammable liquids, gases or dust.
Power tools create sparks which may ignite the dust or fumes.
c) Keep children and bystanders away while operating a power tool.
Distractions can cause you to lose control.
2) Electrical safety
a) Power tool plugs must match the outlet. Never modify the plug in any way. Do not use any adapter plugs with earthed (grounded) power tools.
Unmodified plugs and matching outlets will reduce risk of electric shock.
b) Avoid body contact with earthed or grounded surfaces, such as pipes, radiators, ranges and refrigerators.
There is an increased risk of electric shock if your body is earthed or grounded.
c) Do not expose power tools to rain or wet conditions.
Water entering a power tool will increase the risk of electric shock.
d) Do not abuse the cord. Never use the cord for carrying, pulling or unplugging the power tool.
Keep cord away from heat, oil, sharp edges or moving parts.
Damaged or entangled cords increase the risk of electric shock.
e) When operating a power tool outdoors, use an extension cord suitable for outdoor use.
Use of a cord suitable for outdoor use reduces the risk of electric shock.
f) If operating a power tool in a damp location is unavoidable, use a residual current device (RCD) protected supply.
Use of an RCD reduces the risk of electric shock.
3) Personal safety
a) Stay alert, watch what you are doing and use common sense when operating a power tool. Do not use a power tool while you are tired or under the influence of drugs, alcohol or medication.
A moment of inattention while operating power tools may result in serious personal injury.
b) Use personal protective equipment. Always wear eye protection.
Protective equipment such as a dust mask, nonskid safety shoes, hard hat or hearing protection used for appropriate conditions will reduce personal injuries.
c) Prevent unintentional starting. Ensure the switch is in the off-position before connecting to power source and/or battery pack, picking up or carrying the tool.
Carrying power tools with your finger on the switch or energising power tools that have the switch on invites accidents.
d) Remove any adjusting key or wrench before turning the power tool on.
A wrench or a key left attached to a rotating part of the power tool may result in personal injury.
e) Do not overreach. Keep proper footing and balance at all times.
This enables better control of the power tool in unexpected situations.
f) Dress properly. Do not wear loose clothing or jewellery. Keep your hair and clothing away from moving parts.
Loose clothes, jewellery or long hair can be caught in moving parts.
g) If devices are provided for the connection of dust extraction and collection facilities, ensure these are connected and properly used.
Use of dust collection can reduce dust-related hazards.
h) Do not let familiarity gained from frequent use of tools allow you to become complacent and ignore tool safety principles.
A careless action can cause severe injury within a fraction of a second.
4) Power tool use and care
a) Do not force the power tool. Use the correct power tool for your application.
The correct power tool will do the job better and safer at the rate for which it was designed.
b) Do not use the power tool if the switch does not turn it on and off.
Any power tool that cannot be controlled with the switch is dangerous and must be repaired.
c) Disconnect the plug from the power source and/ or remove the battery pack, if detachable, from the power tool before making any adjustments, changing accessories, or storing power tools.
Such preventive safety measures reduce the risk of starting the power tool accidentally.
d) Store idle power tools out of the reach of children and do not allow persons unfamiliar with the power tool or these instructions to operate the power tool.
Power tools are dangerous in the hands of untrained users.
e) Maintain power tools and accessories. Check for misalignment or binding of moving parts, breakage of parts and any other condition that may affect the power tool's operation. If damaged, have the power tool repaired before use.
Many accidents are caused by poorly maintained power tools.
f) Keep cutting tools sharp and clean.
Properly maintained cutting tools with sharp cutting edges are less likely to bind and are easier to control.
g) Use the power tool, accessories and tool bits etc. in accordance with these instructions, taking into account the working conditions and the work to be performed.
Use of the power tool for operations diff erent from those intended could result in a hazardous situation.
h) Keep handles and grasping surfaces dry, clean and free from oil and grease.
Slippery handles and grasping surfaces do not allow for safe handling and control of the tool in unexpected situations.
5) Battery tool use and care
a) Recharge only with the charger specified by the manufacturer.
A charger that is suitable for one type of battery pack may create a risk of fire when used with another battery pack.
b) Use power tools only with specifically designated battery packs.
Use of any other battery packs may create a risk of injury and fire.
c) When battery pack is not in use, keep it from other metal objects, like paper clips, coins, keys, nails, screws or other small metal objects, that can make a connection from one terminal to another.
Shorting the battery terminals together may cause burns or a fire.
d) Under abusive conditions, liquid may be ejected from the battery; avoid contact. If contact accidentally occurs, fl ush with water. If liquid contacts eyes, additionally seek medical help.
Liquid ejected from the battery may cause irritation or burns.
e) Do not use a battery pack or tool that is damaged or modified.
Damaged or modified batteries may exhibit unpredictable behaviour resulting in fire, explosion or risk of injury.
f) Do not expose a battery pack or tool to fire or excessive temperature.
Exposure to fire or temperature above 130^ may cause explosion.
g) Follow all charging instructions and do not charge the battery pack or tool outside the temperature range specified in the instructions.
Charging improperly or at temperatures outside the specified range may damage the battery and increase the risk of fire.
6) Service
a) Have your power tool serviced by a qualified repair person using only identical replacement parts.
This will ensure that the safety of the power tool is maintained.
b) Never service damaged battery packs.
Service of battery packs should only be performed by the manufacturer or authorized service providers.
PRECAUTIONS ON USING GAS STRIP NAILER
- Safe operation through correct usage.
This tool was designed for driving nails into wood and similar materials. Use it for its intended purpose only.
- Be careful of ignition and explosions.

This tool must not be combustible environment or in presence of flammable liquids or gases. This tool produces hot exhaust gases that may ignite flammable
materials and produces sparks. Since sparks may fly during nailing, it is dangerous to use this tool near lacquer, paint, benzine, thinner, gasoline, gas, adhesives and similar inflammable substances as they may ignite or explode. Under no circumstances should this tool therefore be used in the vicinity of such infl ammable material.
- Explosion and fire hazard.
The fuel cell is an aerosol dispensers with flammable contents.
Pressured container and the propellant will remain in the fuel cell.
Failure to follow instructions may result in explosion or fire.
Keep the power tool, fuel cells and battery away from sunshine and from temperature exceeding 50^ (120^) . Fuel cell and/or battery may burst, releasing flammable gas.
Do not pierce or burn the container, even after use.
Do not incinerate, refill, reclaim or recycle the fuel cell.
Do not spray to a naked flame or any incandescent material.
Keep away from ignition sources - No smoking.
Keep out of the reach of children.
- Always wear eye protection (protective goggles).

When operating the power tool, always wear eye protection, and ensure that surrounding people wear eye protection too.
The possibility of fragments of the nails that were not properly hit entering the
eye is a threat to sight. Eye protection can be bought at any hardware store. Always wear eye protection while operating this tool. Use either eye protection or a wide vision mask over prescription glasses.
Employers should always enforce the use of eye protection equipment.
- Protect your ears and head.

When engaged in nailing work please wear ear mufflers and head protection. Also, depending on condition, ensure that surrounding people also wear ear mufflers and head protection.
Unprotected exposure to high noise levels can cause permanent, disabling, hearing loss and other problems such as tinnitus (ringing, buzzing, whistling or humming in the ears).
Risk assessment and implementation of appropriate controls for these hazards are essential.
Appropriate controls to reduce the risk may include actions such as damping materials to prevent workpieces from "ringing".
Operate and maintain the tool as recommended in these instructions, to prevent an unnecessary increase in noise levels.
6. Use outside or well-ventilated areas.

This tool exhausts carbon which are a danger to health when inhaled. This tool shall not be used in enclosed
Do not inhale.
7. Pay attention to those working close to you.
It would be very dangerous if nails that were not properly driven in should hit other people. Therefore, always pay attention to the safety of the people around you when using this tool. Always make sure that nobody's body, hands or feet are close to the nail outlet.
8. Never point the nail outlet towards people.

Always assume the tool contains fasteners. I outlet is pointed toward people, serious accidents may be caused if you mistakenly discharge the
tool. When connecting and disconnecting the battery or fuel cell, during nail loading or similar operations, be sure the nail outlet is not pointed towards anyone (including yourself). Even when no nails are loaded at all, it is dangerous to discharge the tool while pointing it at someone, so never attempt to do so. No horseplay. Respect the tool as a working implement.
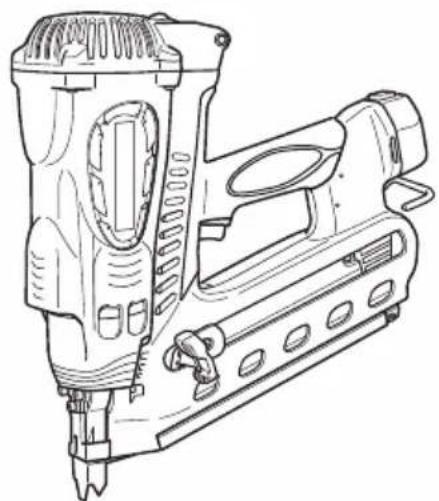
9. Before using the power tool, check the push lever.
You may rest the tool on a level surface as shown in Fig. 14.
Be sure not to apply the force downward onto the tool to the extent that the push lever is engaged.
The Push Lever and Chamber operate in conjunction for this device.
Before using the power tool make sure to check that the push lever operate properly. Without nails, fuel cell and battery loaded into the power tool, check the following.
If abnormal operation occurs, do not use the power tool until it has been inspected and repaired.
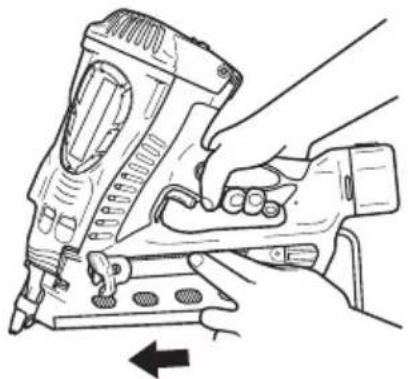
Pull the Feeder knob with the device facing upward and press down the Push lever then confirm that the Push lever securely returns to its original position. The Push lever operation becomes especially heavy in low temperatures and drive operations may not function.
With pulling back the feeder knob, the push lever must move smoothly.
- O With pulling back the feeder knob, the trigger must move smoothly. Furthermore, with regard to the push lever, please note that it must never be modified or removed.
10. Use specified nails only.
Never use nails other than those specified and described in these instructions.
11. Do not modify the fastener driving tool.
Modifications may reduce the effectiveness of safety measures and increase the risks to the operator and/or bystander.
12. Be careful when connecting the battery.
When connecting the battery and loading nails in order not to fire the tool by mistake, make sure of the followings.
Do not touch the trigger.
Do not allow the firing head to contact with any surface.
- Keep the firing head down.
Strictly observe the above instructions, and always make sure that no part of the body, hands or legs is ever in front of the nail outlet.
13. Be careful when handling fasteners, especially when loading and unloading, as the fasteners have sharp points which could cause injury.
- Do not carelessly place your finger on the trigger. Do not place your finger on the trigger except when actually nailing. If you carry this tool or hand it to someone while having your finger on the trigger, you may inadvertently discharge a nail and thus cause an accident.
15. Press the nail outlet firmly against the material to be nailed.
When driving in nails, press the nail outlet firmly against the material to be nailed. If the outlet is not applied properly, the nails may rebound.
16. Keep hands and feet away from the firing head when using.
ds

It is very dangerous for a nail to hit the hands or feet by mistake.
17. During operation, debris from workpiece and fastening/collation system may be discharged.
18. Do not touch around the exhaust outlet.

This tool produces hot exhaust gases that may flammable materials. The push lever and nose will become hot and get heated up after prolonged or rapid use.
Do not touch with bare hands.
19. Beware of the tool's kickback.
Do not approach the top of the tool with your head etc. during operation. This is dangerous because the tool may recoil violently if the nail currently being driven in comes into contact with a previous nail or a knot in the wood.
20. Take care when nailing thin boards or the corners of wood.
When nailing thin boards, the nails may pass right through, as may also be the case when n corners of wood due to deviation of the nails. In such cases, always make sure that there is no nobody's hands or feet; etc.) behind the thin board or next to the wood you are going to nail.
21. Simultaneous nailing on both sides of the same wall is dangerous.
Under no circumstances should nailing be performed on both sides of a wall at the same time. This would be very dangerous since the nails might pass through the wall and thus cause injuries.
22. Do not use the power tool on scaffoldings, ladders.
The power tool shall not be used for specific application for example:
- when changing one driving location to another involves the use of scaffoldings, stairs, ladders or ladder alike constructions, e.g. roof laths,
closing boxes or crates, - fitting transportation safety systems e.g. on vehicles and wagons
23. Disconnect the battery and fuel cell and take out any nails left in the magazine after use.
Disconnect the battery and fuel cell from the tool before doing tool maintenance, cleaning a jammed fastener, leaving work area, moving tool to another location, or after use. It is very dangerous for a nail to be fired by mistake.
24. When removing a nail which has become stuck, make sure to first of all disconnect the battery and fuel cell.
When removing a nail which has become stuck in the nail outlet, first of all make sure to disconnect the battery and fuel cell inside the power tool.
Accidental firing of the nail could be very dangerous.
- The operating environment for this device is between 0^ (32^) and 40^ (104^) so ensure use within this temperature range. The device may fail to operate below 0^ (32^) or above 40^ (104^) .
- Always charge the battery at an ambient temperature of 0 - 40^
A temperature of less than 0^ will result in over charging which is dangerous. The battery cannot be charged at a temperature greater than 40^ .
The most suitable temperature for charging is that of 20 - 25^
- Do not use the charger continuously.
When one charging is completed, leave the charger for about 15 minutes before the next charging of battery. - Do not allow foreign matter to enter the hole for connecting the rechargeable battery.
- Never disassemble the rechargeable battery or charger.
- Never short-circuit the rechargeable battery.
Short-circuiting the battery will cause a great electric current and overheat. It results in burn or damage to the battery.
- Do not dispose of the battery in fire.
If the battery is burnt, it may explode. - Using an exhausted battery will damage the charger.
- Bring the battery to the shop from which it was purchased as soon as the post-charging battery life becomes too short for practical use.
Do not dispose of the exhausted battery.
- Do not insert objects into the air ventilation slots of the charger.
Inserting metal objects or flammable into the charger air ventilation slots will result in an electrical shock hazard or damage to the charger.
- Do not inhale its contents.

In case of being inhaled; the person affected should be taken into the open air and brought into a comfortable position.
- Expanding gases cause low temperatures.
Fluid gases might cause injuries when getting in touch with skin or eyes.
In case of contact with skin; wash the contact surface carefully with warm water and soap and apply a skin cream when dry.
In case of contact with eyes; rinse the open eyes under running water.
Contact a doctor if necessary.
- Fuel cells.

Store in well-ventilated area.
Do not store above 50^ (120^) (e.g. direct sunlight or in a vehicle).
Do not expose to an open flame and sparks.
Do not puncture or open the fuel cell.
Do not refill, reclaim or recycle the fuel cell.
Dispose of according to local regulations for aerosol products.
Do not dispose of fuel cell with other scrap for recycling. Keep out of reach of children.
- Transportation/Storage.
Transportation
Shipment per mail is not allowed.
- Transportation of small quantities for own use in private car is allowed without shipping papers and emergency card.
- Observe temperature limit of 50^ (120^)
Storage
- Do not store in passages, entry halls, near doors/exit or attic.
Sales booths should not be close exits.
A fire extinguisher of 6kg class A,B,C must be available. - Packages should be stacked up not to fall to the ground.
- Store rooms must not take more than 20m^2 of room surface.
- Do not store together with pyrotechnical goods.
- The quantity stored in sales rooms should not exceed daily sales.
-
Tools with an open flame or high temperature must not be operated near fuel cells.
Fuel cells must not be displayed in shop windows. -
While using a tool, the operator shall adopt a suitable but ergonomic posture.
Maintain secure footing and avoid awkward or offbalanced postures.
- If the operator experiences symptoms such as persistent or recurring discomfort, pain, throbbing, aching, tingling, numbness, burning sensation, or stiff ness, do not ignore these warning signs.
The operator shall consult a qualified health professional regarding overall activities.
- Long time continuous and repetitive work may lead to muscular-skeletal disorders.
Do not keep working with a same posture or by applying excessive force for a long time.
And take some rest regularly and especially when you feel tired.
- Slips, trips and falls are major causes of workplace injury.
Be aware of slippery surfaces caused by use of the tool and also of trip hazards caused by the airline hose.
- Proceed with additional care in unfamiliar surroundings.
Hidden hazards may exist, such as electricity or other utility lines.
- Make sure there are no electrical cables, gas pipes etc. that could cause a hazard if damaged by use of the tool.
- Risk assessment should include dust created by the use of the tool and the potential for disturbing existing dust.
- Direct the exhaust so as to minimize disturbance of dust in a dust filled environment.
- Where dust or exhaust hazards are created, the priority shall be to control them at the point of emission.
- Information to conduct a risk assessment of these hazards and implementation of appropriate controls is essential.
- Exposure to vibration can cause disabling damage to the nerves and blood supply of the hands and arms.
- Wear warm clothing when working in cold conditions, keep your hands warm and dry.
-
If you experience numbness, tingling, pain or whitening of the skin in your fingers or hands, seek medical advice from a qualified occupational health professional regarding overall activities.
-
Operate and maintain the tool as recommended in these instructions, to prevent an unnecessary increase in vibration levels.
- Hold the tool with a light, but safe, grip because the risk from vibration is generally greater when the grip force is higher.
- Make sure to securely hold the tool during operation. Failure to do so can result in accidents or injuries. (Fig. 22)
CAUTION ON LITHIUM-ION BATTERY
To extend the lifetime, the lithium-ion battery equips with the protection function to stop the output.
In the cases of 1 to 3 described below, when using this product, even if you are pulling the switch, the motor may stop. This is not the trouble but the result of protection function.
- When the battery power remaining runs out, the motor stops.
In such a case, charge it up immediately. - If the tool is overloaded, the motor may stop. In this case, release the switch of tool and eliminate causes of overloading. After that, you can use it again.
- If the battery is overheated under overload work, the battery power may stop.
In this case, stop using the battery and let the battery cool. After that, you can use it again.
Furthermore, please heed the following warning and caution.
WARNING
In order to prevent any battery leakage, heat generation, smoke emission, explosion and ignition beforehand, please be sure to heed the following precautions.
- Make sure that swarf and dust do not collect on the battery.
During work make sure that swarf and dust do not fall on the battery. - Make sure that any swarf and dust falling on the power tool during work do not collect on the battery.
- Do not store an unused battery in a location exposed to swarm and dust.
Before storing a battery, remove any swarf and dust that may adhere to it and do not store it together with metal parts (screws, nails, etc.). - Do not pierce battery with a sharp object such as a nail, strike with a hammer, step on, throw or subject the battery to severe physical shock.
- Do not use an apparently damaged or deformed battery.
- Do not use the battery in reverse polarity.
- Do not connect directly to an electrical outlets or car cigarette lighter sockets.
- Do not use the battery for a purpose other than those specified.
- If the battery charging fails to complete even when a specified recharging time has elapsed, immediately stop further recharging.
- Do not put or subject the battery to high temperatures or high pressure such as into a microwave oven, dryer, or high pressure container.
- Keep away from fire immediately when leakage or foul odor are detected.
- Do not use in a location where strong static electricity generates.
-
If there is battery leakage, foul odor, heat generated, discolored or deformed, or in any way appears abnormal during use, recharging or storage, immediately remove it from the equipment or battery charger, and stop use.
-
Do not immerse the battery or allow any fluids to flow inside. Conductive liquid ingress, such as water, can cause damage resulting in fire or explosion. Store your battery in a cool, dry place, away from combustible and flammable items. Corrosive gas atmospheres must be avoided.
CAUTION
- If liquid leaking from the battery gets into your eyes, do not rub your eyes and wash them well with fresh clean water such as tap water and contact a doctor immediately.
If left untreated, the liquid may cause eye-problems. - If liquid leaks onto your skin or clothes, wash well with clean water such as tap water immediately.
There is a possibility that this can cause skin irritation. - If you find rust, foul odor, overheating, discolor, deformation, and/or other irregularities when using the battery for the first time, do not use and return it to your supplier or vendor.
WARNING
If a conductive foreign matter enters in the terminal of lithium ion battery, the battery may be shorted, causing fire. When storing the lithium ion battery, obey surely the rules of following contents.
- Do not place conductive debris, nail and wires such as iron wire and copper wire in the storage case.
To prevent shorting from occurring, load the battery in the tool or insert securely the battery cover for storing until the ventilator is not seen.
CAUTION
Do not charge using anything other than the included charger.
REGARDING LITHIUM-ION BATTERY
TRANSPORTATION
When transporting a lithium-ion battery, please observe the following precautions.
WARNING
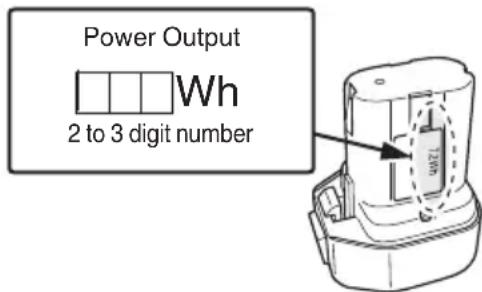
Notify the transporting company that a package contains a lithium-ion battery, inform the company of its power output and follow the instructions of the transportation company when arranging transport.
Lithium-ion batteries that exceed a power output of 100Wh are considered to be in the freight classification of Dangerous Goods and will require special application procedures.
For transportation abroad, you must comply with international law and the rules and regulations of the destination country.
SPECIFICATIONS
- Gas Strip Nailer
| Model NR90GC2 NR90GR2 | ||
| Type of power Piston reciprocating | ||
| Applicable nailsø 3.0 - 3.3 mm (.120" - .131") See Fig.ø 2.9 - 3.3 mm (.113" - .131") See Fig. | ||
| Numbers of loadable nails 25 - 37 nails (1 strips) 32 - 35 nails (1 strips) | ||
| Size | 347 mm (L) x 353 mm (H) x 108 mm (W) (13-21/32" x 13-29/32" x 4-1/4") | 362 mm (L) x 353 mm (H) x 108 mm (W) (14-1/4" x 13-29/32" x 4-1/4") |
| Weight* 3.4 kg 3.5 kg | ||
| Nail-feeding method Piston reciprocation | ||
| Ambient temperature 0°C to 40°C (32°F to 104°F) | ||
| Battery | BCL715G (1.5 Ah 2 cells) Li-ion battery, 7.2 V | |
| Fuel cell | Type No. 753-600 ...... sold separately Liquid hydrocarbon; propane, butane 40 g / 80 ml | |
-
According to EPTA-Procedure 01/2014
-
Charger (UC18YG)
| Input power source | Single phase: AC 230 V 50 Hz |
| Charging time | Approx. 30 minutes (At temperature of 20°C (70°F)) |
| Charging voltage | 7.2 V – 18 V |
| Charging current | 2.6 A |
| Weight | 0.3 kg (0.7 lbs) |
NAIL SELECTION
Choose a suitable nail from Fig. Nails which are not shown in Fig. can not be driven with this tool.
[INR90GC2]
Only smooth, barbed and ring type nails are used. Do not use screw nails. Nails are formed into strips which consist of 25-37 nails.
[NR90GR2]
The use of any other nails can result in tool malfunction and/or nail breakdown, leading to serious injuries.
| NR90GC2 | NR90GR2 | ||||
| Paper collated strip nails Clipped-head nails | Min. | Max. Plastic | Collated strip nails Full-head nails | Min. | Max. |
| 6.8 mm (.266") | 7.7 mm (.303") | 7 mm (.286") | 7.6 mm (.3") | ||
| 50 mm (2") | 90 mm (3-1/2") | 50 mm (2") | 90 mm (3-1/2") | ||
| 3.0 mm (.120") | 3.3 mm (.131") | 21° | 2.9 mm (.113") | 3.3 mm (.131") | |
- This Nailer is not recommended for use with from 75 mm (3") to 90 mm (3-1/2") ring shank nails in pressured-treated lumber.
STANDARD ACCESSORIES
(1) Eye protector 1
(2)Charger 1
(3) Case 1
(4) Hexagonal bar wrench for M5 screw 1
(attached to body) (5)Oiler 1
OPTIONAL ACCESSORIES ......sold separately
Fuel Cell Code No. 753-600
Gas Strip Nailer Lubricant 250 cc (8 oz.) oil feeder ......... (Code No. 885-246)
APPLICATIONS
Floor and wall framing.
O Truss build-up, Window build-up.
Subflooring and roof decking.
Wall sheathing.
- Mobile home and modular housing construction.
CHARGING
Before using the power tool, charge the battery as follows.
1. Insert the battery into the charger
Insert the battery fi rmly while observing its direction, until it contacts the bottom of the charger (See Fig. 2).
CAUTION
The UC18YG model is the exclusively designed charger. These cannot charge batteries except the specified batteries. It is possible to i batteries other than the specifi ed into the charger and some of them may light up the pilot lamps. However, you are requested to exercise utmost caution not to charge batteries other than specifi ed ones because these can not only be charged but also such actions can result in the malfunction of chargers.
2. Connect the charger power cord to the receptacle
Connecting the power cord will turn on the charger (the pilot lamp lights up).
CAUTION
If the pilot lamp does not light up, pull out the power cord from the receptacle and check the battery mounting condition.
About 30 minutes is required to fully charge the battery at a temperature of about 20^ . The pilot lamp goes off to indicate that the battery is fully charged.
The battery charging time becomes longer when a temperature is low or the voltage of the power source is too low.
When the pilot lamp does not go off even if m than 120 minutes have elapsed after starting of the charging, stop the charging and contact your HiKOKI AUTHORIZED SERVICE CENTER.
3. Regarding the temperature of the rechargeable battery.
The temperatures for rechargeable batteries are as shown in the Table 1, and batteries that have become hot should be cooled for a while before being recharged.
Table 1
| Temperatures at which the battery can be recharged |
| 0°C – 50°C |
CAUTION
If the battery is heated due to direct sunlight, etc., just after operation, the charger pilot lamp may not light up. At that time, cool the battery first, then start charging.
4. Disconnect the charger power cord from the receptacle
5. Hold the charger firmly and pull out the battery NOTE
After charging, pull out batteries from the charger first, and then keep the batteries properly.
How to make the batteries perform longer.
(1) Recharge the batteries before they become completely exhausted.
When you feel that the power of the tool becomes weaker, stop using the tool and recharge its battery. If you continue to use the tool and exhaust the electric current, the battery may be damaged and its life will become shorter.
(2) Avoid recharging at high temperatures.
A rechargeable battery will be hot immediately after use. If such a battery is recharged immediately after use, its internal chemical substance will deteriorate, and the battery life will be shortened. Leave the battery and recharge it after it has cooled for a while.
No flammable gas, liquid or other flammable objects at worksite.
Use outside or well-ventilated areas.
sao notenhale.
- Keep the tool, fuel cell and battery away from sunshine and from temperature exceeding 50^ (120^) .
- Keep away from ignition sources. No smoking.
Clear the area of children or unauthorized personnel.
Do not store the tool, fuel cell and battery in a cold weather environment. Keep the tool, fuel cell and battery in a warm area until beginning the work.
If the tool, fuel cell and battery are already cold, bring it in a warm area and allow the tool to warm up before use.
Observe temperature limit of max. 50^ (120^) Do not expose to an open flame and sparks!
- This tool may not drive completely below when;
- at low temperature fuel cell loose the required propellant force,
- at high temperature fuel cell overdose.
Do not use the tool in the rain or where excessive moisture is present.
O This tool is not recommended for use at altitudes above 1500m (5000 feet), or in temperature below 0^ (30^)
1. Fuel cell
- attach the metering valve to a fuel cell:
(1) Separate the metering valve and the cap from the gas cartridge (See Fig. 3 (1)).
(2) Press forward (stem side) and downward on the front side of the metering valve (See Fig. 3 (2)).
(3) Press downward on the rear of the metering valve until it seals (See Fig. 3 (3)).
Check the metering valve:
Press the metering valve stem on fuel cell two or three times against a stationary object and release.
If gas is not dispersed, fuel cell is empty. Replace it.
Observe Safety Regulations
CAUTION
If the gas leaks from the metering valve or the gas cartridge after attached the metering valve, replace with the new metering valve.
- Do not attempt to reuse the metering valve. Replace with the new metering valve.
2. Battery
You must charge the battery before use. The charging method of battery is shown in page 14.
3. Check on safety
CAUTION
Unauthorized persons (including children) must be kept away from the equipment.
O Wear eye protector.
Check the retaining screws which fix the top cover, etc. for tightness.
Check the tool for defective or rusty parts.
Check whether or not the push lever works correctly without nails, fuel cell and battery. Also check whether or not any dirt has adhered to the moving parts of the push lever.
Recheck on operational safety.
BEFORE USE
1. Insert battery into the tool (See Fig. 4)
Do not operate the push lever or trigger while installing the battery. Make sure the battery indicator light is flashing GREEN (See Fig. 5). If the battery indicator light is flashing RED, the battery doesn't have enough power and it needs to be charged. BATTERY INDICATOR LIGHT
- Flashing GREEN: Enough power remaining (The light turns steady during operation).
- Flashing RED: Insufficient power remaining (The light turns steady during operation).
- OFF: The battery is extremely empty. Charge the battery.
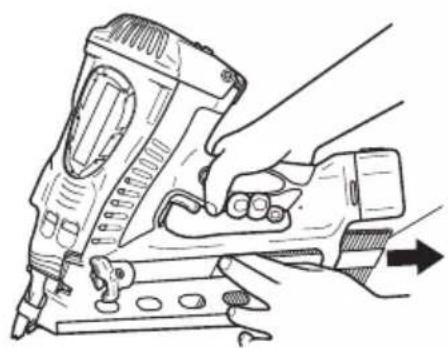
2. Insert fuel cell into the tool
(1) Pulling the latch and open the cell cover (See Fig. 6).
(2) Insert the fuel cell into the tool (See Fig. 7).
(3) Insert the stem of fuel cell into the hole of adaptor (See Fig. 8).
(4) Close the cell cover.
3. Load nails
(1) Insert nail strip into rear of magazine (See Fig. 9).
(2) Slide the nail strip forward in the magazine (See Fig. 10).
(3) Pull the nail feeder (B) back to engage the feeder knob to the nail strip (See Fig. 11).
NOTE
Use nail strip of more than 10 nails.
The Nailer is now ready to operate.
Removing the nails:
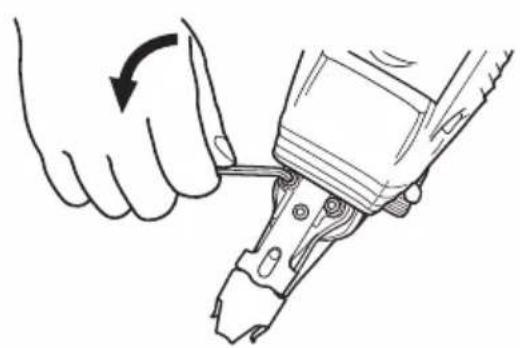
① Pull the feeder knob backward (See Fig. 12).
② Return the feeder knob forward quietly while pushing the nail feeder (B).
③ Pull out nails from the back of the magazine (See Fig. 13).
CAUTION
To prevent unintentional operation, never touch the trigger or place the top end of the push lever on a work bench on floor. Also, never face the nail outlet toward any part of a person.
Do not use the housing or any portion of the tool as a hammer as nails may be discharged unexpectedly or the tool may become damaged and serious injury could occur.
Take precautions to ensure the safety of persons in the vicinity during operation.
- Squeeze the trigger when drive a nail, otherwise the piston can not return correctly.
Make sure the nailing depth when the temperature is above 40^ or below 0^ .
Ensure tool is always safely engaged on the workpiece and cannot slip.
1. Nailing procedures
This power tool is equipped with a FULLSEQUENTIAL ACTUATION MECHANISM.
(1) Intermittent nailing
Depress the nail outlet onto the desired point; then pull the trigger to drive a nail in a single shot (See Fig. 15). After nailing once, nailing will not be possible again until the trigger is released and pressed again.
(2) Push lever
When depressing the nail outlet, be sure to fully lift the push lever (See Fig. 15) to release the safety lock. Thus, nails cannot be driven without releasing the safety lock even though the trigger is pulled.
The machine employs a preventive mechanism for unloaded operation.
The machine enters a state where the push lever cannot be pushed up. This takes place when the magazine is not loaded with nails or when the remaining number of nails becomes less than 8 or 9 (NR90GC2), 5 or 6 (NR90GR2).
CAUTION
Exercise care when nailing corners of lumber. When continuous nailing corners of lumber, a nail may go astray or break through the corner.
Do not drive a nail on another nail.
Do not drive a nail on metal parts
Use caution not to throw the push lever tip onto wood when the push lever cannot be pushed up.
NOTE
Under low temperature conditions, the tool sometimes does not operate correctly. Always operate the tool at the appropriate ambient temperature.
2. Adjusting the nailing depth (See Fig. 17, 18)
To assure that each nail penetrates to the same depth, be sure that the tool is always held firmly against the workpiece.
If nails are driven too deep or shallow into the workpiece, adjust the nailing in the following order.
① Remove the fuel cell and the battery from the nailer (See Fig. 16).
② If nails are driven too deep, move the push lever to forward (See Fig. 17). If nails are driven too shallow, move the push lever to backward (See Fig. 18).
③ Stop moving the push lever when a suitable position is reached for a nailing test.
④ Connect the fuel cell and the battery to the nailer. ALWAYS WEAR EYE PROTECTOR.
Perform a nailing test.
⑤ Remove the fuel cell and the battery from the nailer.
Choose a suitable position for the push lever.
3. Clearing a jam
If nails are jammed in firing head, remove it, and adjust the nailing in the following order.
1 Remove the fuel cell and the battery from the Nailer. (See Fig. 16)
② Lock following back in man fasteners.
③ Remove the bolts with wrench. (See Fig. 19)
4 Pull magazine away from the fi ring head, and clear jam. (See Fig. 20)
⑤ Connect the fuel cell and the battery to the Nailer. ALWAYS WEAR SAFETY GLASSES.
NOTE
Hook can be used as a hanger.
INSPECTION AND MAINTENANCE
CAUTION
Be sure to remove the battery and fuel cell during clearing jams, inspection, maintenance and cleaning.
1. Inspecting the magazine
① DISCONNECT BATTERY and FUEL CELL.
② Clean the magazine. Remove paper chips or wooden chips which may have accumulated in the magazine. Lubricate it with HiKOKI gas strip nailer lubricant.
2. Check on mounting screws for each part
At regular intervals check every part for loose mounting screws. Retighten any loose screws. Operating the equipment with loose screws untightened will incur a hazard.
3. Inspecting the push lever
Check if the push lever can slide smoothly.
Clean up the sliding area of the push lever and use the provided oil for lubrication from time to time. Lubrication enables smooth sliding and simultaneously serves to prevent the formation of rust.
4. Storing (See page 11)
- When not in use for an extended period, apply a thin coat of the lubricant to the steel parts to avoid rust.
- Do not store the Nailer in a cold weather environment. Keep the tool in a warm area.
- When not in use, the tool should be stored in a dry place.
Keep out of reach of children.
- Store the Nailer in a place in which the temperature is less than 40^ and out of reach of children.
NOTE
Storing lithium-ion batteries.
Make sure the lithium-ion batteries have been fully charged before storing them.
Prolonged storage (3 months or more) of batteries with a low charge may result in performance deterioration, signifi cantly reducing battery usage time or rendering the batteries incapable of holding a charge.
However, significantly reduced battery usage time may be recovered by repeatedly charging and using the batteries two to five times.
If the battery usage time is extremely short despite repeated charging and use, consider the batteries dead and purchase new batteries.
CAUTION
In the operation and maintenance of power tools, the safety regulations and standards prescribed in each country must be observed.
Important notice on the batteries for the HiKOKI cordless power tools
Please always use one of our designated genuine batteries. We cannot guarantee the safety and performance of our cordless power tool when used with batteries other than these designated by us, or when the battery is disassembled and modified (such as disassembly and replacement of cells or other internal parts).
APPLICABLE LUBRICANTS
Use HiKOKI Gas Nailer lubricant.
Do not use detergent oil or additives.
These lubricants will harm the O-rings and other rubber parts. This will cause the tool malfunction.
Noise Information
Noise characteristic values in accordance with EN ISO 11148-13:2018
The typical A-weighted single-event sound power level
LWA,1s,d = 108 dB
The typical A-weighted single-event emission sound pressure level at work station L_pA,1s,d = 99 dB
Uncertainty K: 2.5 dB (A).
These values are tool-related characteristic values and do not represent the noise development at the point of use. Noise development at the point of use will for example depend on the working environment, the workpiece, the workpiece support and the number of driving operations, etc.
Depending on the conditions at the workplace and the form of the workpiece, individual noise attenuation measures may need to be carried out, such as placing workpieces on sound-damping supports, preventing workpiece vibration by means of clamping or covering, etc.
warm
In special cases it is necessary to wear hearing protection equipment.
Vibration Information
The typical vibration characteristic value in accordance with EN ISO 11148-13:2018: 3.5m / s^2
Uncertainty K = 1.5m / s^2
The declared vibration total value and the declared noise emission value have been measured in accordance with a standard test method and may be used for comparing one tool with another.
They may also be used in a preliminary assessment of exposure.
WARNING
The vibration and noise emission during actual use of the power tool can differ from the declared total value depending on the ways in which the tool is used especially what kind of workpiece is processed; and
- Identify safety measures to protect the operator that are based on an estimation of exposure in the actual conditions of use (taking account of all parts of the operating cycle such as the times when the tool is switched off and when it is running idle in addition to the trigger time).
NOTE
Due to HiKOKI's continuing program of research and development, the specific cations herein are subject to change without prior notice.
Maintenance chart
| ACTION WHY HOW | ||
| Clean magazine and feeder mechanism. | Prevent a jam. Blow clean daily. | |
| Keep push lever working properly. | Promote operator safety and efficient Nailer operation. | Blow clean daily. |
Operator troubleshooting
| ACTION CHECK METHOD CORRECTION | ||
| Nailer operates, but no nail is driven. Check for a jam. Clear a jam. | ||
| Check function of nail feeder. Clean and lubricate. | ||
| Ribbon spring weakened or damaged? | Replace ribbon spring. | |
| Check for proper nails. Use only recommended nails. | ||
| Check if the driver blade piston is down or not. | Push the driver blade with a slotted-head screwdriver, and put back the piston to the highest position. | |
| Skipping nails. Intermittent feed. | Check for proper nails. Use only recommended nails. | |
| Check function of nail feeder. Clean and lubricate. | ||
| Ribbon spring weakened or damaged? | Replace ribbon spring. | |
| Nail feeder (B) worn or damaged? | Replace nail feeder (B). | |
| Check for returning of piston. | Pull the trigger all the way. | |
| Too low temperature, warm up fuel cell under 50°C (120°F). | ||
| Check for moving of piston smoothly. | Contact HiKOKI for replacement. | |
| Replace piston ring. | ||
| Replace piston. | ||
| Replace cylinder o-ring. | ||
| Nails jam. Driven nail is bent. | Check for proper nails. Use only recommended nails. | |
| Driver blade worn? | Contact HiKOKI for replacement. | |
| Nail feeder (B) worn or damaged? | Replace nail feeder (B). | |
| The operation of the push lever not smooth. | Push lever bent? | Contact HiKOKI for replacement. |
| Check push lever's moving track, debris? | Contact HiKOKI for replacement. | |
| Fan is working, light indicator shows GREEN yet it doesn't drive a nail or operation unstable. | Check for returning of piston. | Pull the trigger all the way. |
| Too low temperature, warm up fuel cell under 50°C (120°F). | ||
| Check fuel cell, insufficient? | Exchange it with a new fuel cell. | |
| Check spark plug wire, worn out? | Contact HiKOKI for replacement. | |
| Check spark plug, grease or debris? | Contact HiKOKI for replacement. | |
| Check filter, clogged? | Contact HiKOKI for replacement. | |
| Fan does not operate when push lever is pressed. | Magazine empty. | Load more nails in the magazine. |
| Note the color of the light indicator. | If red: charge the battery. If green: Contact HiKOKI for replacement. | |
| Unable to charge battery. | —— | Check the electrical cord. |
ACCESSIONS STANDARDS
INSPECTION ET MANUTENTION
ATTENTION
Se先进技术 in the field of robotics, such as robots and robots with sensors, are becoming increasingly popular. The use of these technologies has been increasing rapidly, especially in the automotive industry.
Non tentate di riutilizzare la valvola di misurazione. Sostituitela con una nuova.
2. Batteria
Kortsluiting kan resulted in oververhitting.
STANDAARD ACCESSORIES
No实用性 dextreme u other aditives.
Respeite as Regras de Seguranca
PRECAUCAO aterasao
Only for EU countries
Do not dispose of electric tools together with household waste material!
In observance of European Directive 2012/19/EU on waste electrical and electronic equipment and its implementation in accordance with national law, electric to reached the end of their life must be collected separately and returned to an environmentally compatible recycling facility.
Deutsch
Nur für EU-Länder


- NR 90GC2 • NR 90GR2
- GENERAL POWER TOOL SAFETY WARNINGS
- WARNING
- 1) Work area safety
- 2) Electrical safety
- 3) Personal safety
- 4) Power tool use and care
- PRECAUTIONS ON USING GAS STRIP NAILER
- Use outside or well-ventilated areas.
- Pay attention to those working close to you.
- Never point the nail outlet towards people.
- Before using the power tool, check the push lever.
- Use specified nails only.
- Do not modify the fastener driving tool.
- Be careful when connecting the battery.
- Be careful when handling fasteners, especially when loading and unloading, as the fasteners have sharp points which could cause injury.
- Press the nail outlet firmly against the material to be nailed.
- Keep hands and feet away from the firing head when using.
- During operation, debris from workpiece and fastening/collation system may be discharged.
- Do not touch around the exhaust outlet.
- Beware of the tool's kickback.
- Take care when nailing thin boards or the corners of wood.
- Simultaneous nailing on both sides of the same wall is dangerous.
- Do not use the power tool on scaffoldings, ladders.
- Disconnect the battery and fuel cell and take out any nails left in the magazine after use.
- When removing a nail which has become stuck, make sure to first of all disconnect the battery and fuel cell.
- Fluid gases might cause injuries when getting in touch with skin or eyes.
- Transportation
- CAUTION ON LITHIUM-ION BATTERY
- CAUTION
- REGARDING LITHIUM-ION BATTERY
- SPECIFICATIONS
- NAIL SELECTION
- STANDARD ACCESSORIES
- OPTIONAL ACCESSORIES ......sold separately
- APPLICATIONS
- CHARGING
- Insert the battery into the charger
- Connect the charger power cord to the receptacle
- Regarding the temperature of the rechargeable battery.
- Disconnect the charger power cord from the receptacle
- Hold the charger firmly and pull out the battery NOTE
- How to make the batteries perform longer.
- Fuel cell
- Observe Safety Regulations
- Battery
- Check on safety
- BEFORE USE
- Insert battery into the tool (See Fig. 4)
- Insert fuel cell into the tool
- Load nails
- NOTE
- Removing the nails:
- Nailing procedures
- Adjusting the nailing depth (See Fig. 17, 18)
- Clearing a jam
- INSPECTION AND MAINTENANCE
- Inspecting the magazine
- Check on mounting screws for each part
- Inspecting the push lever
- Storing (See page 11)
- Important notice on the batteries for the HiKOKI cordless power tools
- APPLICABLE LUBRICANTS
- Noise Information
- Vibration Information
- ACCESSIONS STANDARDS
- INSPECTION ET MANUTENTION
- ATTENTION
- Batteria
- STANDAARD ACCESSORIES
- Respeite as Regras de Seguranca
- PRECAUCAO aterasao
- Only for EU countries
- Deutsch
- Nur für EU-Länder
Brand : HiKOKI
Model : NR90GC2
Category : Stapler