
223109 - Oven Hendi - Free user manual and instructions
Find the device manual for free 223109 Hendi in PDF.
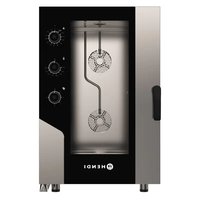
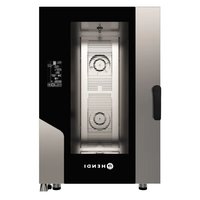
| Product type | Digital convection steam oven |
| Brand | Hendi |
| Model | 223109 |
| Intended use | Commercial use (restaurant kitchens, canteens, hospitals, bakeries, butcheries) |
| Control type | Digital with touch control panel and rotary encoder |
| Main functions | Steam cooking, convection, steam+heat combination, Delta T cooking, core probe, multi-step programming |
| Cooking programs | Up to 4 steps per program, memorization of multiple programs |
| Core probe | Yes, with dedicated input and automatic stop at target temperature |
| Steam adjustment | 0 to 10 (in 10% steps) |
| Chimney exhaust | Adjustable in opening/closing percentage |
| Fan speed control | Min / Max |
| Timer | Yes, with infinity function for preheating |
| Preheating | Automatic with audible signal |
| Automatic cleaning | 3 cycles: short (45 min), medium (56 min), long (65 min) |
| Protection class | I (grounding mandatory) |
| Safety | Safety thermostat, overheat shutdown, burn protection (hot surfaces) |
| Power supply | See label (three-phase connection possible) |
| Water inlet | Max temperature 30°C, max hardness 5°f, pressure 1.5-2 bar |
| Warranty | 1 year (operational defects) |
Frequently Asked Questions - 223109 Hendi
User questions about 223109 Hendi
0 question about this device. Answer the ones you know or ask your own.
Ask a new question about this device
Download the instructions for your Oven in PDF format for free! Find your manual 223109 - Hendi and take your electronic device back in hand. On this page are published all the documents necessary for the use of your device. 223109 by Hendi.
USER MANUAL 223109 Hendi
DIGITALNA KONVEKCIJSKA PARNA PEČICA
SI
KONVEKTIONSÅNGUGN DIGITAL
SE
КОНВЕКТОРНА ФУРНА НА ПАРА ЦИФРОВА
BG
ПАРОКОНВЕКТОМАТ

GB: Read user manual and keep this with the appliance.
GB: For indoor use only.
natural_image
Simple line drawing of a wine glass with a fork (no text or symbols)
natural_image
Symbol of a trash bin with crossed lines indicating no waste or discharge, enclosed in a rectangular frame (no text or labels)

GB: NOTE: This manual is translated from original English manual using AI and machine translations.
GB: Remark: Technical specification is subjected to change without prior notification.
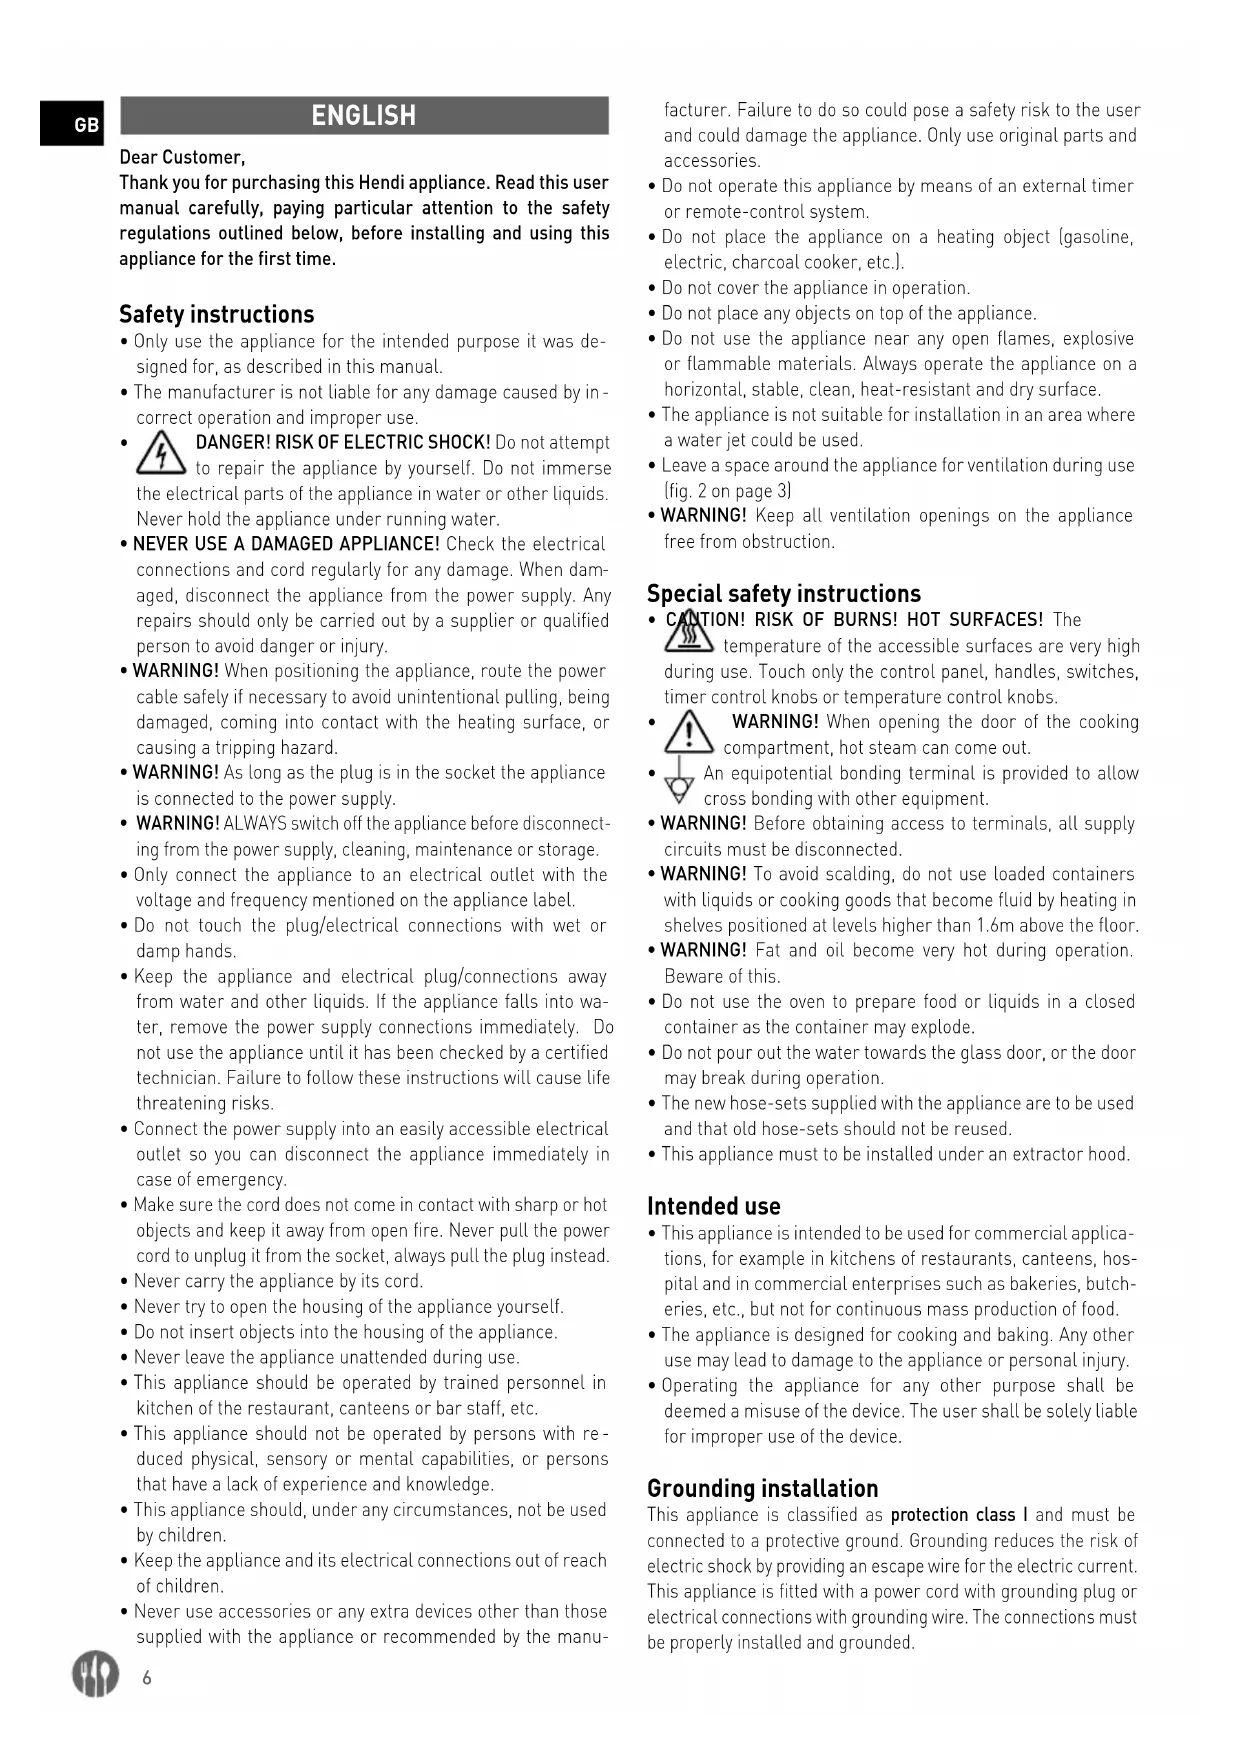
Thank you for purchasing this Hendi appliance. Read this user manual carefully, paying particular attention to the safety regulations outlined below, before installing and using this appliance for the first time.
Safety instructions
- Only use the appliance for the intended purpose it was designed for, as described in this manual.
- The manufacturer is not liable for any damage caused by incorrect operation and improper use.
- DANGER! RISK OF ELECTRIC SHOCK! Do not attempt to repair the appliance by yourself. Do not immerse the electrical parts of the appliance in water or other liquids. Never hold the appliance under running water.
- NEVER USE A DAMAGED APPLIANCE! Check the electrical connections and cord regularly for any damage. When damaged, disconnect the appliance from the power supply. Any repairs should only be carried out by a supplier or qualified person to avoid danger or injury.
- WARNING! When positioning the appliance, route the power cable safely if necessary to avoid unintentional pulling, being damaged, coming into contact with the heating surface, or causing a tripping hazard.
- WARNING! As long as the plug is in the socket the appliance is connected to the power supply.
- WARNING! ALWAYS switch off the appliance before disconnecting from the power supply, cleaning, maintenance or storage.
- Only connect the appliance to an electrical outlet with the voltage and frequency mentioned on the appliance label.
- Do not touch the plug/electrical connections with wet or damp hands.
- Keep the appliance and electrical plug/connections away from water and other liquids. If the appliance falls into water, remove the power supply connections immediately. Do not use the appliance until it has been checked by a certified technician. Failure to follow these instructions will cause life threatening risks.
- Connect the power supply into an easily accessible electrical outlet so you can disconnect the appliance immediately in case of emergency.
- Make sure the cord does not come in contact with sharp or hot objects and keep it away from open fire. Never pull the power cord to unplug it from the socket, always pull the plug instead.
- Never carry the appliance by its cord.
- Never try to open the housing of the appliance yourself.
- Do not insert objects into the housing of the appliance.
- Never leave the appliance unattended during use.
- This appliance should be operated by trained personnel in kitchen of the restaurant, canteens or bar staff, etc.
- This appliance should not be operated by persons with reduced physical, sensory or mental capabilities, or persons that have a lack of experience and knowledge.
- This appliance should, under any circumstances, not be used by children.
- Keep the appliance and its electrical connections out of reach of children.
- Never use accessories or any extra devices other than those supplied with the appliance or recommended by the manu-
facturer. Failure to do so could pose a safety risk to the user and could damage the appliance. Only use original parts and accessories.
- Do not operate this appliance by means of an external timer or remote-control system.
- Do not place the appliance on a heating object (gasoline, electric, charcoal cooker, etc.).
- Do not cover the appliance in operation.
- Do not place any objects on top of the appliance.
- Do not use the appliance near any open flames, explosive or flammable materials. Always operate the appliance on a horizontal, stable, clean, heat-resistant and dry surface.
- The appliance is not suitable for installation in an area where a water jet could be used.
- Leave a space around the appliance for ventilation during use (fig. 2 on page 3)
- WARNING! Keep all ventilation openings on the appliance free from obstruction.
Special safety instructions
- CANTION! RISK OF BURNS! HOT SURFACES! The temperature of the accessible surfaces are very high during use. Touch only the control panel, handles, switches, timer control knobs or temperature control knobs.
WARNING! When opening the door of the cooking compartment, hot steam can come out.
• An equipotential bonding terminal is provided to allow cross bonding with other equipment. - WARNING! Before obtaining access to terminals, all supply circuits must be disconnected.
- WARNING! To avoid scalding, do not use loaded containers with liquids or cooking goods that become fluid by heating in shelves positioned at levels higher than 1.6m above the floor.
- WARNING! Fat and oil become very hot during operation. Beware of this.
- Do not use the oven to prepare food or liquids in a closed container as the container may explode.
- Do not pour out the water towards the glass door, or the door may break during operation.
- The new hose-sets supplied with the appliance are to be used and that old hose-sets should not be reused.
- This appliance must to be installed under an extractor hood.
Intended use
- This appliance is intended to be used for commercial applications, for example in kitchens of restaurants, canteens, hospital and in commercial enterprises such as bakeries, butcheries, etc., but not for continuous mass production of food.
- The appliance is designed for cooking and baking. Any other use may lead to damage to the appliance or personal injury.
- Operating the appliance for any other purpose shall be deemed a misuse of the device. The user shall be solely liable for improper use of the device.
Grounding installation
This appliance is classified as protection class I and must be connected to a protective ground. Grounding reduces the risk of electric shock by providing an escape wire for the electric current. This appliance is fitted with a power cord with grounding plug or electrical connections with grounding wire. The connections must be properly installed and grounded.
Digital control panel
(Fig. 1 on page 3)
- ON/OFF button
- DELTA T selector
- Core probe selector
- Temperature selector
- Steam selector
- Chimney exhaust selector
- Timer selection
- START/STOP cooking
- Speed regulation
- Cooking programs
- Encoder for regulation "+/-"
- Core probe inlet
Remark: The content of this manual applies for all listed items unless specified otherwise. The appearance may vary from the shown illustrations.
Power connection
(Fig. 2 on page 3)
- Open the back of the appliance and locate the terminal block.
- Loosen the cable entry and insert the power cord through it.
- Connect the cable conductors following the diagram on the external adhesive plate: make ONLY the links indicated without changing them. The yellow/green earth conductor shall be at least 3 cm longer than the others.
- PE (yellow/green): earth protection conductor.
• N (blue): neutral conductor.
• L1/2/3 (brown/grey/black): phase conductors. - Incorrect connection coul cause overheating to the terminal block leading to fusion and an electric shock risk.
- Check the absence of electrical dispersion between phases and earth. Check the electrical continuity between the external carcass and the ground wire of the net. It is recommended to use a multimeter to perform these operations.
- Close the back with screws and lock the cable by screwing the nut of the cable presser.
Detergent inlet
(Fig. 3 on page 3)
- Place the tube inside the detergent container. Always keep the detergent container on the ground, not above the appliance.
- Keep the tube away from the exhaust pipe to prevent damage.
Water characteristics
• Maximum temperature of 30^ C.
• Maximum hardness of 5^ f (french degrees).
• Pressure values between 150-200 kPa (1,5-2 bar).
- In case of excessively hard water (>5^) use demineralisers to prevent accumulation of limestone inside the cooking chamber and internal pipes damage etc.
Preparation before use
- Remove all protective packaging and wrapping.
- Check that the device is in good condition and with all accessories. In case of incomplete or damaged delivery, please contact the supplier immediately. In this case, do not use the device.
- Before use ensure that no non-proper objects (instruction
booklets, plastic bags or anything else) or residues of detergents are present in the chamber of the equipment; likewise, make sure that the smoke discharge is free of obstruction and there are no flammable materials in its vicinity.
- Clean the accessories and the appliance before use (See ==> Cleaning & Maintenance).
- Make sure the appliance is completely dry.
- Place the appliance on a horizontal, stable and heat resistant surface that is safe against water splashes.
- Keep the packaging if you intend to store your appliance in the future.
- Keep the user manual for future reference.
NOTE! Due to manufacturing residues, the appliance may emit a light odor during the first few uses. This is normal and does not indicate any defect or hazard. Make sure the appliance is well ventilated.
Operating instructions
Turning the appliance on and off
- If the appliance is properly connected to the electric mains, press the ON/OFF button (fig. 1/pos. 3). The control panel will then light up.
Setting up the temperature
- Press the temperature button (fig. 1/pos. 4) and set the temperature to desired value by rotating the encoder (fig. 1/pos. 11). The selected value will be shown on the display.
- Press the encoder knob to confirm selected value.
- While operating the temperature display will show current temperature inside the cooking chamber. Press the temperature button to check the set temperature value.
Cooking with core probe
- Place the core probe and plug it into the core probe inlet (fig. 1/pos. 12).
- Press the core probe button (fig. 1/pos. 3) and set the desired temperature using encoder knob. Press the knob to confirm.
- The appliance switches off when the inserted core probe detects the desired temperature inside the cooked product.
Cooking with Delta T
- Press the Delta T button (fig. 1/pos. 2).
- Set the desired core probe temperature using encoding knob. Press the knob to confirm.
- Set the desired cooking chamber temperature (the desired difference between core probe and cooking chamber temperatures) by using encoder knob. Press the knob to confirm.
- Remember to install the core probe before starting the process.
Chimney exhaust
- Press the exhaust button (fig. 1/pos. 6). Use the encoder knob to set the open/close percentage for the chimney. Press the knob to confirm.
Steam regulation
- Press the steam button (fig. 1/pos. 5). Use the encoder knob to set the percentage amount of steam used. Select value between 0-10, each step increases the value by 10% . Press the knob to confirm.
Cooking programs
- Press the cooking programs button (fig. 1/pos. 10) and use the encoder knob to select a desired program's number. The selected number will flash, meaning that it is an empty program ready to be set.
- Press the knob to enable selected program.
- To memorize new program, press the cooking programs button and use the encoder knob to select the first flashing number. Press the knob to proceed.
- Insert all settings desired for the new program (time, temperature, steam settings etc.) in the first step. The first LED light will turn on on the control panel. Press the programs button (pos. 10) to save and proceed to step 2.
- Repeat the procedure above to adjust all cooking steps (up to 4). Saving each step will indicate another LED light, and adjusting step's 4 parameters will turn on all the LEDs.
- After setting the desires amount of steps, press and hold the programs button for 5 seconds until the display shows "MEM", informing that the new program was saved.
Return to manual mode
- To return to manual mode simply press the encoder knob until the display shows "MAN".
Preheating
- To preheat the cooking chamber press the programs button (fig. 1/pos. 10) and use the encoder knob to select the first flashing number available. Press the knob to confirm.
- Press the timer button (fig. 1/pos. 7) and use the encoder knob to select "infin" (meaning running without time limit). Press the knob to confirm.
- Add other steps if necessary and memorize the program.
- The appliance will now preheat the cooking chamber to a temperature about 20% above the cooking temperature. When the desired preheating temperature is reached, the "beep" signal will occur. To stop the signal simply open the door or press the START/STOP button (fig. 1/pos. 8)
- After closing the door the next cooking step will automatically start. The next step will not start if the signal is stopped by pressing the START/STOP button.
Fan speed regulation
- Press the speed button (fig. 1/pos. 9) and use the encoder knob to select desired fan speed value: minimum (MIN) or maximum (MAX). Press the knob to confirm.
START/STOP
- Press the START/STOP button (fig. 1/pos. 8) to either start or stop previously set cooking program.
Automatic cooling cooking chamber
- Press the temperature button (fig. 1/pos. 4) and use the encoder knob to reduce the temperature to desired level, then open the door and press the knob to confirm. The cooking chamber will automatically reduce temperature inside.
Cleaning & maintenance
- ATTENTION! Always disconnect the appliance from the power supply and cool down before storage, cleaning & maintenance.
- Do not use water jet or steam cleaner for cleaning and do not push the appliance under the water as the parts will get wet and electric shock might be resulted.
- If the appliance is not kept in a good state of cleanliness, this can adversely affect the life of the appliance and result in a dangerous situation.
- Food residues should be regularly cleaned and removed from the appliance. If the appliance is not cleaned properly, it will reduce its lifespan and may result in a dangerous condition during use.
Cleaning
- Clean the cooled exterior surface with a cloth or sponge slightly dampened with a mild soap solution.
- For reasons of hygiene, the appliance should be cleaned before and after use.
- To clean the glass inside the door, open the door and unscrew the upper and lower screws to release the glass. The entire door can be cleaned in that position, with glass still hinged to the door.
- Avoid water contacting the electrical components.
- Never immerse the appliance in water or other liquids.
- Never use aggressive cleaning agents, abrasive sponges, or cleaning agents containing chlorine. Do not use steel wool, metallic utensils, or any sharp or pointed objects for cleaning. Do not use petrol or solvents!
- No parts are dishwasher safe.
Automatic cleaning programs
- When the control panel is OFF, press the encoder knob and select the desired cleaning option from the list below.
- CLN_01: short cleaning cycle (45 minutes).
- CLN_02: medium cleaning cycle (56 minutes).
- CLN_03: long cleaning cycle (65 minutes).
- CHr____: detergent pump refill (3 minutes).
- Press the encoder knob to confirm. Cleaning system is fully automatic.
- The detergent pump refill program must be carried out upon first start after installation, after long time of inactivity or whenever the detergent container runs out.
- For the most efficient use of automatic cleaning make sure the temperature inside the cooking chamber is between 90 to 140^ . Cleaning with higher temperature is not recommended.
- To prevent flooding the cooking chamber, check if the water drain on the bottom of the chamber is not obstructed.
- Never open the cooking chamber during cleaning operation. Chemical substances and hot air might cause burns and corrosion.
• After each cleaning cycle make sure there is no cleaning detergent inside the chamber left.
Maintenance
- Check the operation of the appliance regularly to prevent serious accidents.
- If you see that the appliance is not working properly or that there is a problem, stop using it, switch it off and contact the supplier.
- All maintenance, installation and repair work must be carried out by specialised and authorised technicians, or recommended by the manufacturer.
Transportation and Storage
- Before storage, always make sure that the appliance has been
disconnected from the power supply and completely cooled down.
- Store the appliance in a cool, clean and dry place.
- Never place heavy objects on the appliance as this could damage it.
- Do not move the appliance while it is under operation. Disconnect the appliance from power supply when moving and hold it at the bottom.
- Special care must be taken when moving or transporting the machine due to its heavy weight. Move with at least 2 persons or using a cart. Move the appliance slowly, carefully, and never incline more than 45^ .
Troubleshooting
If the appliance does not function properly, please check the below table for the solution. If you are still unable to solve the problem, please contact the supplier/service provider.
| Problems Possible cause Possible solution | ||
| The appliance does not start. | The door are open. Close | the door. |
| Micro switch doesn't indicate closed door. | Contact the supplier. | |
| The fan stops when the appliance is on. | The safety thermostat indicated. | Turn the appliance off and wait until the thermostat reset itself. |
| The safety thermostat broke. | Contact the supplier. | |
| The internal light does not work. | The lamp is loose. Fit the lamp correctly. | |
| The lamp is blown. Replace the lamp. | ||
| There is no water inflow from the humidifier pipes. | Water inlet is closed. Open the water inlet. | |
| The water supply is not connected correctly. | Check the water connection. | |
| The water filter is obstructed by impurities. | Clean the water filter. | |
| The cooking is not uniform. | Fans do not invert the rotation's direction. | Contact the supplier. |
| One of the fans do not operate (specific models only). | ||
| Heating elements are broken. | ||
| The appliance is completely OFF. | There is lack of power. Restore the power supply. | |
| The power supply is not connected correctly. | Check the power connection. | |
| The safety thermostat indicated. | Contact the supplier. | |
| Water leaks from the door gasket. | The surface touching the gasket is dirty.. | Clean the surface. |
| The gasket is damaged. | Contact the supplier. | |
| The door can not be closed properly. | ||
| The appliance is completely OFF except for the light. The warning signal is ON. | The motor is over-heated. | Press the ON/OFF button for 1s to reset the alarm. |
| Contact the supplier. | ||
Error code identification
| Error codes | Possible cause Possible solution | |
| Er1 The chamber probe failed. | Contact the supplier. | |
| Er2 The core probe failed. | ||
| H-t The control board overheated. | Press the ON/OFF button for 1s to reset the alarm. | |
Warranty
Any defect affecting the functionality of the appliance which becomes apparent within one year after purchase will be repaired by free repair or replacement provided the appliance has been used and maintained in accordance with the instructions and has not been abused or misused in any way. Your statutory rights are not affected. If the appliance is claimed under warranty, state where and when it was purchased and include proof of purchase (e.g. receipt).
In line with our policy of continuous product development we reserve the right to change the product, packaging and documentation specifications without notice.
Discarding & Environment
When decommissioning the appliance, the product must not be disposed of with other household waste. Instead, it is your responsibility to dispose to your waste equipment by handing it over to a designated collection point. Failure to follow this rule may be penalized in accordance with applicable regulations on waste disposal. The separate collection and recycling of your waste equipment at the time of disposal will help conserve natural resources and ensure that it is recycled in a manner that protects human health and the environment.
For more information about where you can drop off your waste for recycling, please contact your local waste collection company. The manufacturers and importers do not take responsibility for recycling, treatment and ecological disposal, either directly or through a public system.
DEUTSCH


- Safety instructions
- Special safety instructions
- Intended use
- Grounding installation
- Digital control panel
- (Fig. 1 on page 3)
- Power connection
- (Fig. 2 on page 3)
- Detergent inlet
- (Fig. 3 on page 3)
- Water characteristics
- Preparation before use
- Operating instructions
- Turning the appliance on and off
- Setting up the temperature
- Cooking with core probe
- Cooking with Delta T
- Chimney exhaust
- Steam regulation
- Cooking programs
- Return to manual mode
- Preheating
- Fan speed regulation
- START/STOP
- Automatic cooling cooking chamber
- Cleaning & maintenance
- Cleaning
- Automatic cleaning programs
- Maintenance
- Transportation and Storage
- Troubleshooting
- Warranty
- Discarding & Environment
- DEUTSCH
Brand : Hendi
Model : 223109
Category : Oven