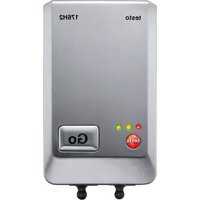
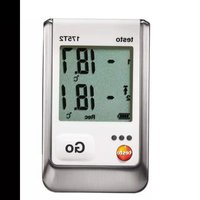
830-T4 - Thermometer Testo - Free user manual and instructions
Find the device manual for free 830-T4 Testo in PDF.
| Product type | Infrared thermometer with contact probe |
| Brand | Testo |
| Model | 830-T4 |
| Infrared measuring range | -30 to +400 °C |
| Infrared resolution | 0.1 °C |
| Infrared accuracy | ±1.0 °C or 1.0 % (0.1 to 400 °C) |
| Emissivity | 0.1 to 1.0 adjustable |
| Optics (distance-to-spot ratio) | 30:1 |
| Contact probe measuring range (type K) | -50 to +500 °C |
| Contact probe resolution | 0.1 °C |
| Laser | 2 lasers class 2, < 1 mW |
| Power supply | 9 V battery |
| Battery life | Approx. 15 h |
| Operating temperature | -20 to +50 °C |
| Dimensions (L x W x H) | 190 x 75 x 38 mm |
| Weight (with battery) | Approx. 200 g |
| Housing | ABS |
| Warranty | 2 years |
| Main functions | Infrared and contact measurement, min/max display, high/low alarm, backlight, auto power off, HOLD |
| Care and cleaning | Clean the lens with a cotton swab moistened with medical alcohol or water; housing with a damp cloth |
| Safety | Do not expose to electromagnetic radiation; do not look into the laser; observe safety distances for live measurements |
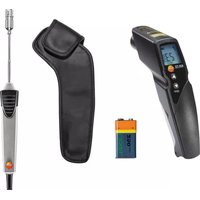
| Spare parts and accessories | Type K probes (ref. 0602 1293, 0602 0393, 0602 1793), protective sleeve (0516 8302), emissivity adhesive tape (0554 0051) |
| Standards | CE (2004/108/EC), DIN EN 60825-1:2001-11 (laser) |
Frequently Asked Questions - 830-T4 Testo
User questions about 830-T4 Testo
0 question about this device. Answer the ones you know or ask your own.
Ask a new question about this device
Download the instructions for your Thermometer in PDF format for free! Find your manual 830-T4 - Testo and take your electronic device back in hand. On this page are published all the documents necessary for the use of your device. 830-T4 by Testo.
USER MANUAL 830-T4 Testo
natural_image
Black-and-white photo of a handheld device with a small electronic device and two metallic components (no visible text or symbols)Please read this document through carefully and familiarise yourself with the operation of the product before putting it to use. Keep this documentation to hand so that you can refer to it when necessary.
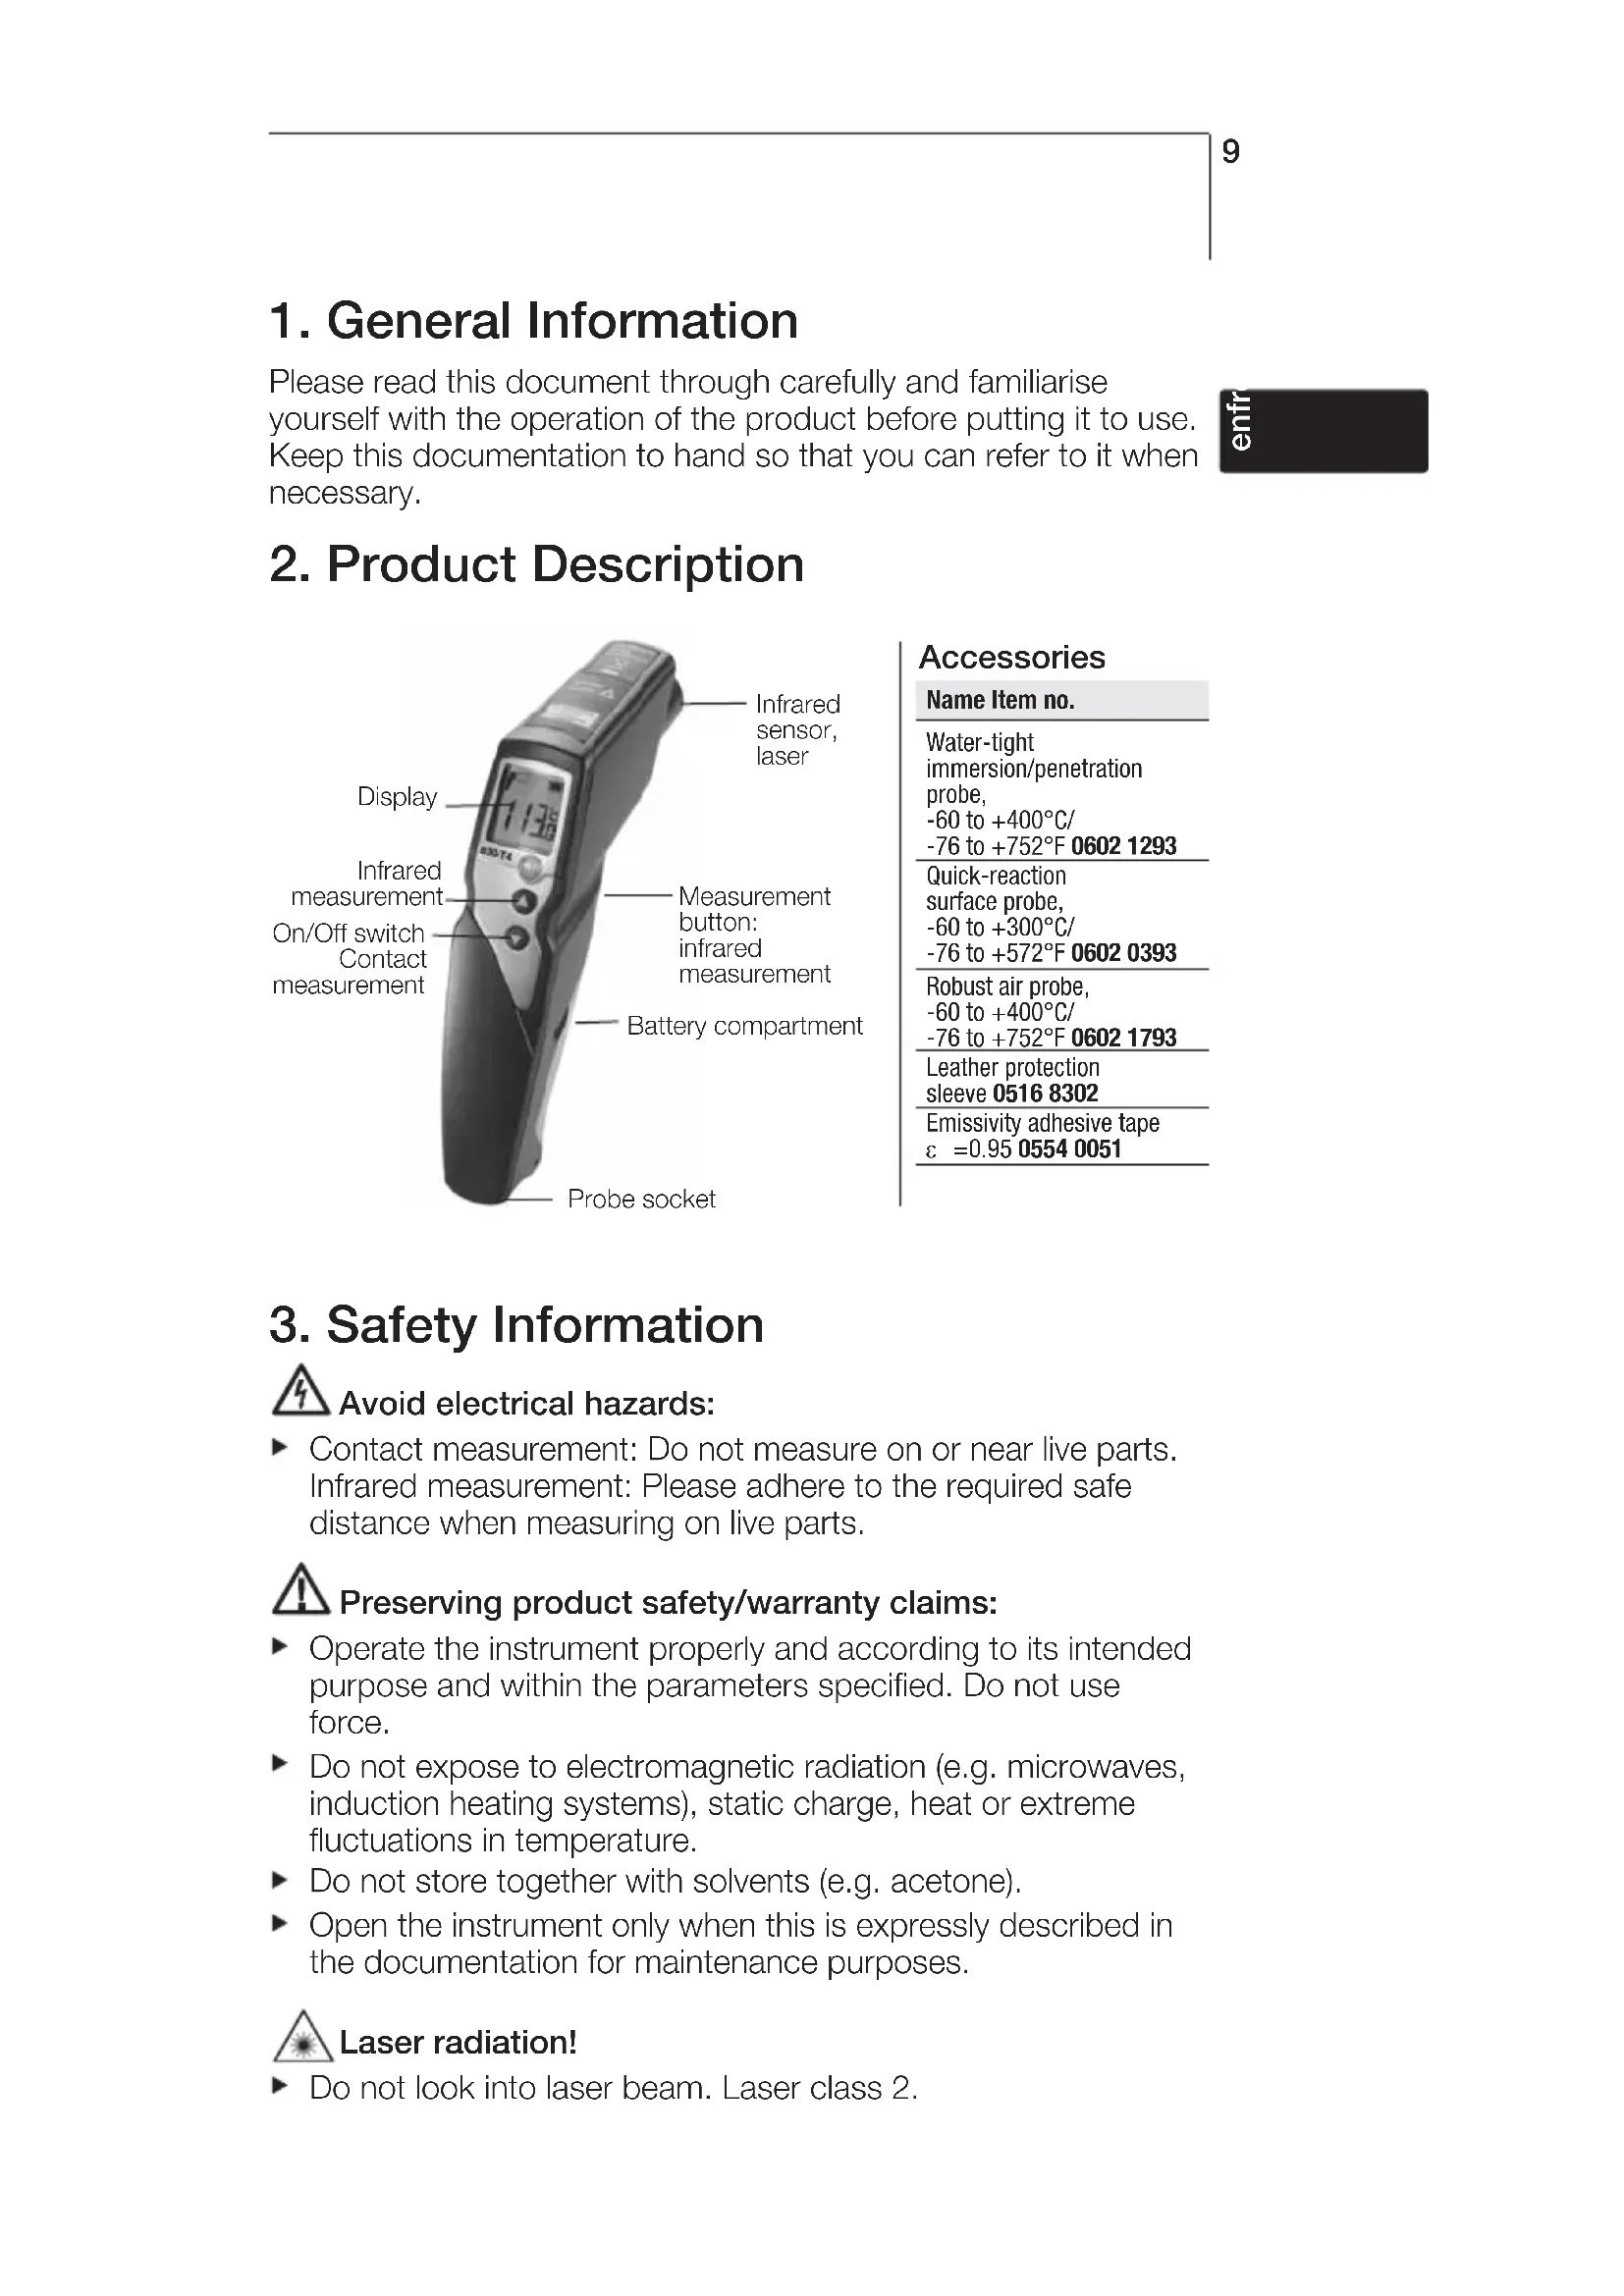
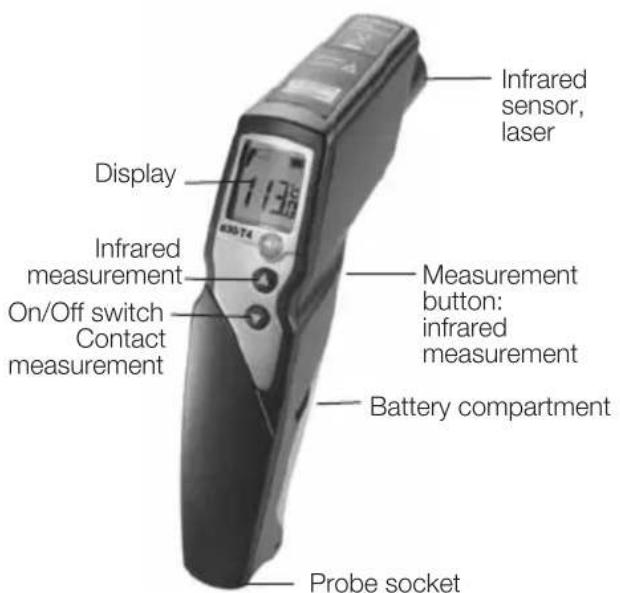
2. Product Description
text_image
Infrared sensor, laser Display Infrared measurement On/Off switch Contact measurement Measurement button: infrared measurement Battery compartment Probe socketAccessories
Name Item no.
Water-tight immersion/penetration probe, -60 to +400°C/ -76 to +752°F 0602 1293
Quick-reaction surface probe, -60 to +300°C/ -76 to +572°F 0602 0393
Robust air probe, -60 to +400°C/ -76 to +752°F 0602 1793
Leather protection sleeve 0516 8302 Emissivity adhesive tape ε =0.95 0554 0051
3. Safety Information

Avoid electrical hazards:
▶ Contact measurement: Do not measure on or near live parts. Infrared measurement: Please adhere to the required safe distance when measuring on live parts.

Preserving product safety/warranty claims:
▶ Operate the instrument properly and according to its intended purpose and within the parameters specified. Do not use force.
Do not expose to electromagnetic radiation (e.g. microwaves, induction heating systems), static charge, heat or extreme fluctuations in temperature.
▶ Do not store together with solvents (e.g. acetone).
▶ Open the instrument only when this is expressly described in the documentation for maintenance purposes.

Laser radiation!
▶ Do not look into laser beam. Laser class 2.

Ensure correct disposal:
▶ Dispose of defective rechargeable batteries and spent batteries at the collection points provided.
▶ Send the instrument directly to us at the end of its life cycle. We will ensure that it is disposed of in an environmentally friendly manner.
4. Intended Use
testo 830 is a compact infrared thermometer for the non-contact measurement of surface temperatures. A contact measurement can additionally be made with a connected probe.

Not suitable for diagnostic measurements in the medical sector!
5. Technical Data
| Feature testo 830-T4 | |
| Parameter °C/°F | |
| Infrared measurement range -30 to +400°C/-22 to +752°F | |
| Infrared resolution 0.1°C/0.1°F | |
| Infrared accuracy ±1.0°C/ 1.8°F or 1.0% of reading (+0.1 to +400°C/+32 to +752°F) (at 23°C/73°F) ±1.5°C/2.7°F or 1.5% of reading (-20 to 0°C/-4 to +32°F) +/- 1 digit ±2.0°C/3.6°F or 2.0% of reading (-30 to -20°C/-22 to -4°F) | 1;1;1 |
| Emissivity 0.1 to 1.0 adjustable | |
| Infrared measurement rate 0.5s | |
| Temp. sensor Thermocouple Type K (attachable) | |
| Measurement range of temp sensor -50 to +500°C/-58 to +932°F | |
| Resolution of temp. sensor | 0.1°C/ 0.1°F |
| Accuracy of temp. sensor ±0.5°C/0.9°F+0.5% of reading (±1 digit) | at rated temperature 22°C/ 72°F |
| Measuring rate of temp. sensor | 1.75s |
| Optics (90% value) | 30:1 (regarding the distance of 1,0 m to measuring object typically)2 |
| Operating temperature | -20 to +50°C/-4 to +122°F |
| Transport / Storage temperature | -40 to +70°C/-40 to +158°F |
| Power supply | 9V block battery |
| Battery life | 15 h |
| Housing | ABS |
| Dimensions (LxHxB) | 190 x 75 x 38mm/ 7.5 x 3.0 x 1.5in |
| CE guideline | 2004/108/EEC |
| Warranty | 2 years |
| Laser | |
| Laser type | 2 x laser |
| Power | < 1 mW |
| Wavelength 645 to 660 nm | |
| Class | 2 |
| Standard | DIN NE 60825-1:2001-11 |
^1 the larger value applies
2 + Opening diameter of the sensor (16mm/ 0.6in)
6. Initial Operation
▶ Insert battery: See 9.1 Changing the battery.
7. Operation
7.1 Connecting probe
▶ Connect temperature probe to probe socket. Observe +/-!
7.2 Switching on/off
▶ Switch on instrument: Press measurement button.
- All display segments light up briefly. The instrument changes to the infrared mode (lights up). The display light remains for 10 seconds every time a button is activated.
▶ Switch off instrument: Keep pressed until display darkens.
The device switches off automatically after 1 min (IR measure - ment view) or 10 mins (contact measurement view) without the button being pressed.
7.3 Measuring
! Observe information on infrared measurement (chapter 11) / contact measurement (chapter 12).
! With IR measurement, the min./max. values are reset by pressing the measurement button, and with contact measurement, this is done when the device is switched off or when you switch to the IR measurement view.
- The instrument is switched on.
Infrared measurement
1 Start measurement: Hold down measurement button.
2 Locate object to be measured using laser point: Laser marks the upper and lower end of the measurement spot (at distance to measurement object from 1,0 m; see chapter 11.3 measurement spot, distance).
- The current reading is shown (2 measurements per second)
3 End measurement: Release button.
- HOLD lights up. The last measured value and min./max. value are saved until the next measurement.
▶ Switch between min., max. and recorded value: Press
▶ Restart measurement: Press measurement button.
Contact measurement
- Temperature probe was connected before the measuring instrument was switched on.
1 Position contact thermometer in/on the measurement object and activate the measurement: Press ▼
- The instrument changes to the contact measurement mode (lights up). The current reading is shown.
2 End the measurement: Press
- HOLD lights up. The last measured value and min./max. value are saved until the next measurement.
▶ Switch between min., max. and recorded value: Press
▶ Restart measurement: Press
▶ Back to infrared measurement view: Press measurement button.
Setting the emissivity
- Instrument is in the infrared measurement mode.
! If no button is pressed for 3 s in the emissivity mode, the instrument switches to the infrared measurement mode.
1 Press for 3 s.
2 Set emissivity: Press or .
- The instrument switches to the infrared measurement mode.
8. Settings
- Instrument is switched off
! If no button is activated in the setting mode for 3 s, the instrument changes to the next mode.
1 Press for 3 s.
- The device switches to settings mode.
2 Set lower alarm value (↓ALARM): Press ▲ or ▼. Hold the button down to go forward quickly.
3 Set upper alarm value ( ALARM): Press of ▲. Hold the button down to go forward quickly.
4 Set alarm function on / oFF: Press △ or ▽.
5 Select parameter (°C / °F) : Press △ or ▽.
- The device returns to IR measurement view.
! The alarm function is only available for IR measurement. If the set alarm values are exceeded/not reached, a visual and acoustic alarm is output.
9. Service and Maintenance
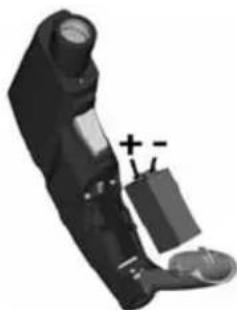
9.1 Changing the battery
natural_image
Black-and-white photo of a handheld device with a battery and two labeled terminals (no visible text or symbols)Instrument must be switched off!
1 Open battery compartment: Open up cover.
2 Remove used battery and insert new one. Observe +/- . The minus should be visible once the battery is inserted.
3 Close battery compartment: Close cover.
9.2 Clean instrument
Do not use abrasive cleaning agents or solutions.
▶ Clean the housing with a damp cloth (soap water).
- Carefully clean the lens with water or cotton buds dipped in water or medical alcohol.
en
10. Questions and Answers
| Query Possible causes Possible solution | |
| Display is no longer illuminated - Low battery. Change battery. | ▶ |
| lights up. - Battery empty. Change battery. | ▶ |
| Instrument cannot be - Battery empty. Change battery. switched on | ▶ |
| Infrared measurement mode: - Readings outside - - - lights up. measurement range. | |
| Contact measurement mode: - Readings outside - - - lights up. measurement range.- No probe connected. Connect probe.- Probe damaged. Change probe. ▶ | |
If we have not answered your question, please contact your local distributor or Testo's Customer Service.
11. Information on infrared measurement
11.1 Measurement method
Infrared measurement is an optical measurement
▶ Keep lens clean.
▶ Do not measure with clouded lens.
- Keep measurement field (area between instrument and object being measured) free of interferences: no dust and dirt particles, no moisture (rain, steam) or gases.
Infrared measurement is a surface measurement
If there is dirt, dust, frost etc. on the surface, only the top layer will be measured, i.e. the dirt.
In the case of shrinkwrapped foodstuffs, do not measure in air pockets.
If values are critical, always subsequently measure using a contact thermometer. Particularly in the food sector, the core temperature should be measured with a penetration/immersion thermometer.
Adaptation time
If the ambient temperature changes (change of location, e.g. inside/outside measurement) the instrument needs an adaptation time of 15 minutes for infrared measurement.
11.2 Emissivity
Materials have different emissivities, i.e. they emit different levels of electromagnetic radiation. The emissivity of testo 830 is set in the factory to 0.95. This is the ideal value for measuring non-metals (paper, ceramics, plaster, wood, paints and varnishes), plastics and food.
Bright metals and metal oxides are only suited to a limited extent to infrared measurement on account of their low or nonuniform emissivity.
▶ Apply emissivity enhancing layers such as varnish or emission adhesive tape (Item no. 0554 0051) to the object being measured. If this is not possible, measure with the contact thermometer.
Emissivity table of the most important materials (typical values)
| Material (Temperature) | |
| Aluminium, bright-rolled (170°C/ 338°F) 0.04 | |
| Cotton (20°C/ 68°F) 0.77 | |
| Concrete (25°C/ 77°F) 0.93 | |
| Ice, smooth (0°C/ 32°F) 0.97 | |
| Iron, polished (20°C/ 68°F) 0.24 | |
| Iron with cast skin (100°C/ 212°F) 0.80 | |
| Iron with rolled skin (20°C/ 68°F) 0.77 | |
| Plaster (20°C/ 68°F) 0.90 | |
| Glass (90°C/ 194°F) 0.94 | |
| Rubber, hard (23°C/ 73°F) 0.94 | |
| Rubber, soft grey (23°C/ 73°F) 0.89 | |
| Wood (70°C/ 158°F) 0.94 | |
| Cork (20°C/ 68°F) | 0.70 |
| Material (Temperature) | |
| Heat sink, black anodised (50°C/ 122°F) | 0.98 |
| Copper, lightly tarnished (20°C/ 68°F) | 0.04 |
| Copper, oxidised (130°C/ 266°F) | 0.76 |
| Plastics: PE, PP, PVC (20°C/ 68°F) | 0.94 |
| Brass, oxidised (200°C/ 392°F) | 0.61 |
| Paper (20°C/ 68°F) | 0.97 |
| Porcelain (20°C/ 68°F) | 0.92 |
| Black paint, matt (80°C/ 176°F) | 0.97 |
| Steel,heat-treated surface (200°C/ 392°F) | 0.52 |
| Steel, oxidised (200°C/ 392°F) 0.79 | |
| Clay, fired (70°C/ 158°F) | 0.91 |
| Transformer paint (70°C/ 158°F) | 0.94 |
| Brick, mortar, plaster (20°C/ 68°F) | 0.93 |
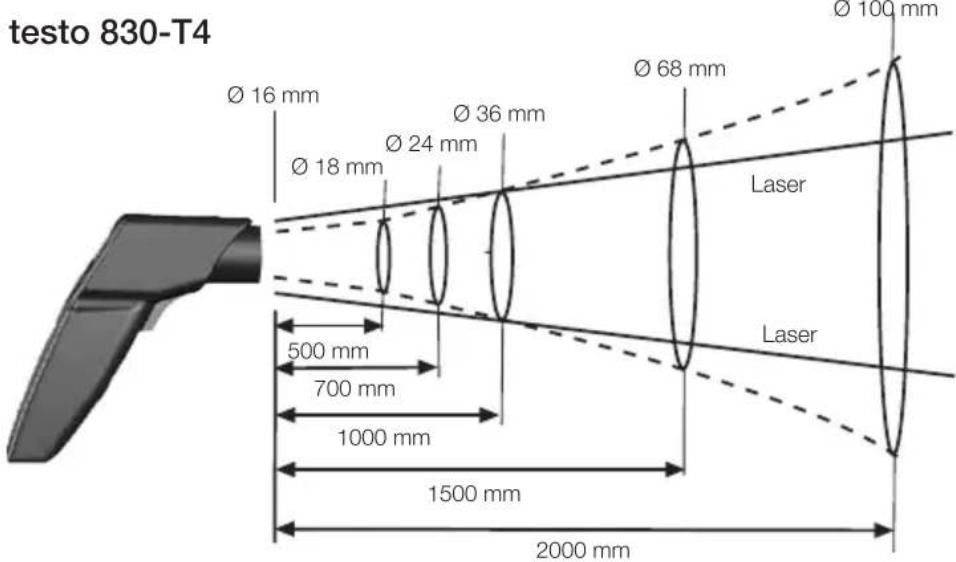
11.3 Measurement spot, Distance
A specific spot is determined depending on the distance from the measuring instrument to the object being measured.
Measurement optics (Ratio Distance : Measurement spot)
text_image
testo 830-T4 Ø 16 mm Ø 18 mm Ø 24 mm Ø 36 mm Ø 68 mm Ø 100 mm 500 mm 700 mm 1000 mm 1500 mm 2000 mm Laser Laseren
12. Information on contact measurement
▶ Observe minimum penetration depth in immersion/penetration probes: 10 x probe diameter
- Avoid applications in corrosive acids or bases.
▶ Do not use spring-loaded surface probes on sharp edges.