
513629 - Weather Station THOMSON - Free user manual and instructions
Find the device manual for free 513629 THOMSON in PDF.

| Product type | Weather station |
| Brand | Thomson |
| Model | 513629 |
| Station dimensions | 137 × 82 × 21 mm |
| Probe dimensions | 92 × 40 × 23 mm |
| Material | ABS |
| Station power supply | 2 LR6 (AA) 1.5 V batteries |
| Probe power supply | 2 LR03 (AAA) 1.5 V batteries |
| Battery life | 1 to 2 years in normal use |
| Frequency | 433.92 MHz |
| Range between station and probe | 60 m in open field |
| Indoor temperature range | 0 °C to 50 °C |
| Outdoor temperature range | -20 °C to 60 °C |
| Humidity range | 20 %RH to 95 %RH |
| Temperature unit | Celsius (°C) or Fahrenheit (°F) |
| Time display | 12 h or 24 h |
| Time signal | Radio-controlled DCF77 |
| Main functions | Indoor/outdoor temperature and humidity, trends, time, calendar, alarm clock, comfort index, outdoor temperature alert |
| Warranty | 2 years parts and labor |
| Maintenance and cleaning | Disconnect, soft slightly damp cloth, no abrasive products |
| Safety and recycling | Do not dispose with household waste, used batteries to be recycled |
Frequently Asked Questions - 513629 THOMSON
User questions about 513629 THOMSON
0 question about this device. Answer the ones you know or ask your own.
Ask a new question about this device
Download the instructions for your Weather Station in PDF format for free! Find your manual 513629 - THOMSON and take your electronic device back in hand. On this page are published all the documents necessary for the use of your device. 513629 by THOMSON.
USER MANUAL 513629 THOMSON
natural_image
White rectangular electronic device with ventilation slots and indicator lights (no visible text or symbols)SOMMAIRE
A - CONSIGNES DE SÉCURITÉ 05
1 - PRÉCAUTIONS D'UTILISATION 05
2 - ENTRETIEN ET NETTOYAGE 05
3 - RECYCLAGE 05
B - DESCRIPTION DU PRODUIT 06
1 - CONTENU DU KIT 06
2 - STATION MÉTÉO 06
3 - FONCTIONS PRINCIPALES 07
1 Station météo

natural_image
Simple line drawing of a rectangular device with horizontal lines and a label '2 x 1' above it (no text or symbols on the device itself)natural_image
Simple line drawing of a device panel with a light bulb and a base, labeled with number 17 (no text or symbols on the diagram itself)
EN Wireless weather station

12h/24h

Calendar

Alarm clock


natural_image
White rectangular electronic device with ventilation slots and indicator lights (no visible text or symbols)TABLE OF CONTENTS
A - SAFETY INSTRUCTIONS 05
1 - OPERATING PRECAUTIONS 05
2 - MAINTENANCE AND CLEANING 05
3 - RECYCLING 05
B-PRODUCTDESCRIPTION06
1 - CONTENTS OF THE KIT 06
2 - WEATHER STATION 06
3 - MAIN FUNCTIONS 07
- The weather station must not be installed where the screen may be vulnerable to scratching and dirt.
- The weather station is not designed for outside use and should not be installed in locations that are subject to extremes of humidity or temperature.
- Do not expose the sensor to direct sunlight or any reflected light source.
- Do not daisy-chain extension cords and/or multi-socket adapters.
- Do not install near acidic chemicals, ammonia or sources of toxic gases.
2 - MAINTENANCE AND CLEANING
• Always unplug the product from the mains before carrying out any maintenance.
- Never use abrasive or corrosive substances to clean the products.
• Use a soft, slightly damp cloth.
- Never use an aerosol to spray the product as this may damage the internal workings.
3 - RECYCLING
This logo indicates that electrical and electronic waste must not be disposed of with household waste. They are likely to contain hazardous substances which are dangerous to both health and the environment. Return the equipment to your local distributor or use the recycling collection service provided by your local council.
A - SAFETY INSTRUCTIONS

It is forbidden to throw used batteries into the dustbin. Batteries/accumulators containing harmful substances are marked with symbols (shown opposite) which indicate that they cannot be thrown away as ordinary waste. The corresponding heavy metals are referred to as follows: Cd = cadmium, Hg = mercury, Pb = lead. You can dispose of these batteries/accumulators at local recycling amenities (centres for sorting recyclable materials) which are required to accept them. Keep batteries/button cells/accumulators out of reach of children and store them in a safe place not accessible to them. as they could be swallowed by children or pets. May be fatal if swallowed! In the event that a battery is swallowed, consult a doctor or go to A&E immediately. Never short-circuit the batteries, and do not burn or recharge them. They may explode!

B - PRODUCT DESCRIPTION
1 - CONTENTS OF THE KIT
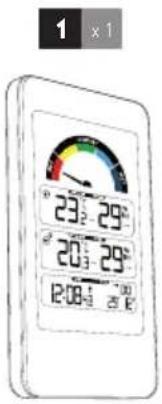
1 Weather station
natural_image
Simple line drawing of a rectangular device with three horizontal lines and a base, no text or symbols present.2 Temperature sensor
2 - WEATHER STATION
natural_image
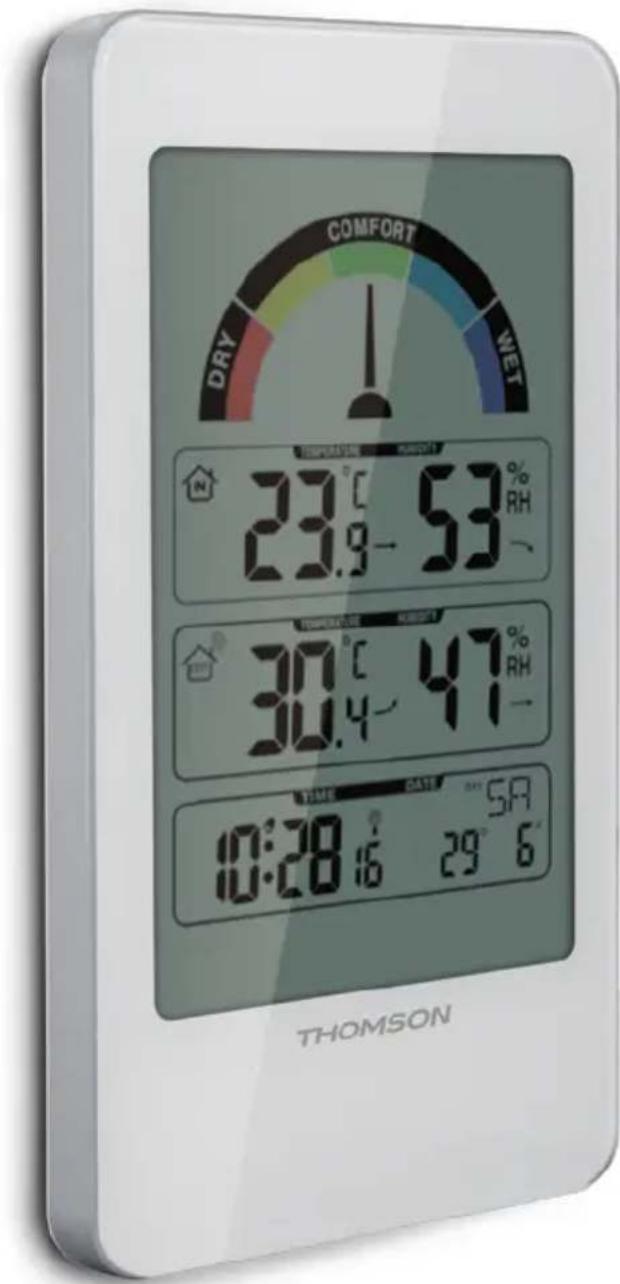
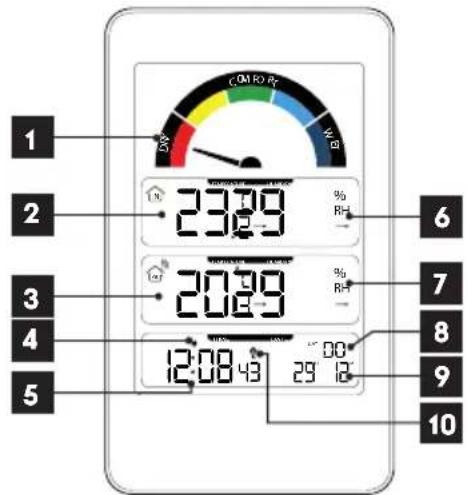
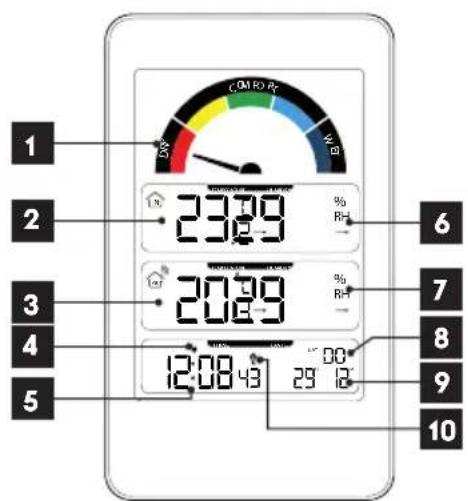
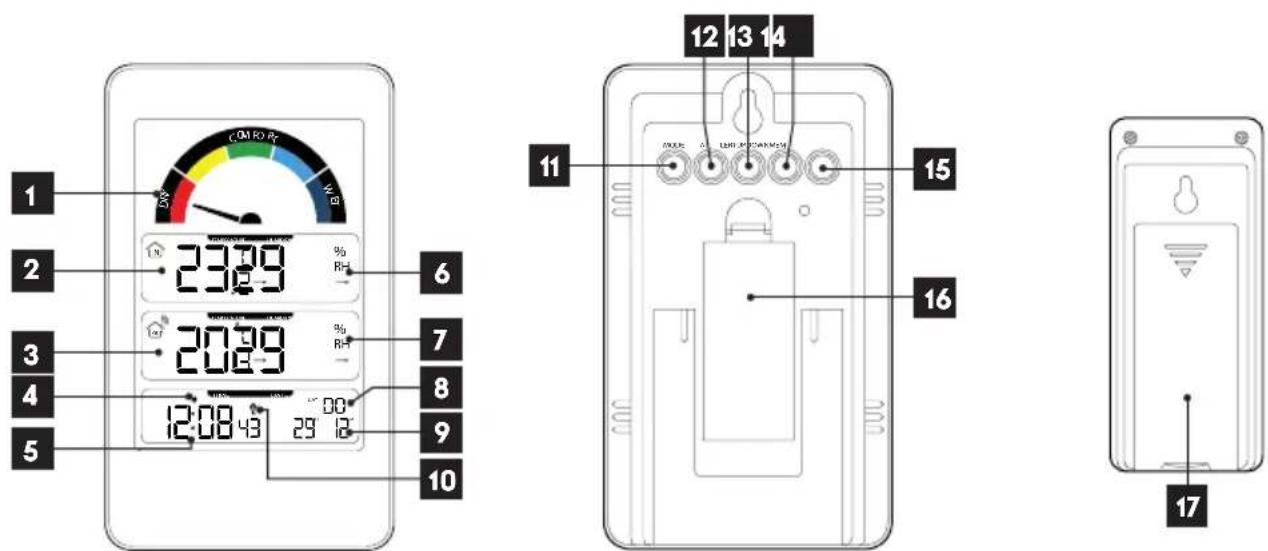
Diagram of a device front panel with a lamp and indicator lights, labeled with number 17 (no text or symbols on the diagram itself)| 1 | Comfort indicator |
| 2 | Inside temperature |
| 3 | Outside temperature |
| 4 | Alarm icon |
| 5 | Time |
| 6 | Indoor humidity indicator |
| 7 | Outside humidity indicator |
| 8 | Day of Week |
| 9 | Date |
| 10 | Radio-control LED |
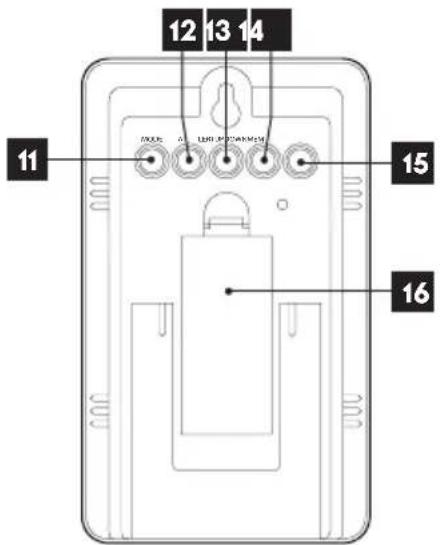
| 11 | MODE button |
| 12 | ALERT button |
| 13 | UP button |
| 14 | DOWN button |
| 15 | MEM button |
| 16 | Battery compartment (2 x LR03 AAA) |
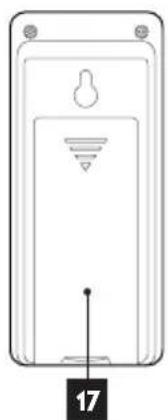
| 17 | Battery compartment (2 x LR03 AAA) |
3 - MAIN FUNCTIONS
- Displays the indoor and outdoor temperatures and humidity rates
- Indoor and outdoor temperatures and humidity rates pattern
- Displays the time in 12 and 24-hour format
- Radio clock (DCF77)
- Daily alarm
- Comfort indicator
- Calendar
- Wireless external sensor
- Outdoor temperature alert
C - CONFIGURATION
1 - QUICK START-UP
These steps must be followed in order.
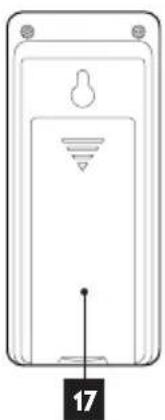
Insert 3 AAA LR03 batteries (not supplied) into the station 16. Then insert the 2 AAA LR03 batteries (not supplied) into the outdoor sensor, ensuring that the polarity is respected 17.
PAIRING THE SENSOR TO THE STATION
Pairing is automatic once the batteries are inserted. To force pairing, if required:
- On the station, press and hold the button for 5 seconds
DOWN, the indicator OUT starts blinking
- On the outdoor sensor, remove then reinsert the batteries, positioning yourself near the weather station
TIME AND DATE SETTING
- Press and hold the MODE button until the year starts flashing.
- Set the year using the UP and DOWN buttons
- Press the MODE button to confirm. The figure under M flashes on the lower right side of the screen, set the month using the UP and DOWN buttons
- Press the MODE button to confirm. The figure under D flashes on the lower right side of the screen, set the Day using the UP and DOWN buttons
- Press the MODE button to confirm. The letters M and D flash on the lower right side of the screen. Set the display order using the UP and DOWN buttons (month/day or day/month)
- Press the MODE button to confirm. The two letters to the right of DAY flash. Set the calendar language using the UP and DOWN buttons (GE = German / EN = English / RU = Russian / FR = French / IS Italian / ES = Spanish / NE = Netherlands / DA = Danish)
- Press the MODE button to confirm. The two figures under Time: 00 flashes. Set the time zone using the UP and DOWN buttons.
- Press the MODE button to confirm. 24h or 12h flashes. Set the time display format using the UP and DOWN buttons
- Press the MODE button to confirm then set the hour using the UP and DOWN buttons.
- Press the MODE button to confirm then set the minutes using the UP and DOWN buttons.
- Press the MODE button again to confirm the settings.
ALARM SETTING
- Press the Mode button once: the letters AL appear on the hour side.
- Press and hold the Mode button for 3 seconds: The hour flashes
- Set the hour of the alarm using the UP and DOWN buttons.
- Press the MODE button to confirm. The minutes flash.
- Set the minutes of the alarm using the UP and DOWN buttons.
- Finish the configuration by pressing quickly on the MODE button
To set the alarm, press the UP button once. A bell (4) appears between the hour and minutes
To turn off the alarm, press the UP button once. The bell (4) disappears.
AUTOMATIC TIME SETTING
To launch the automatic time setting for the station, press and hold the UP button until the LED flashes (10). The station switches to radio reception (for 7 minutes) and attempts to pick up the DCF77 time signal to automatically update the time and date.
Note: the time zone must be set correctly for a correct display. If reception is insufficient, please set the station near a window.
Ensure that you leave a gap of 2.5 m between the station and any source of interference (television, router, microwaves, etc.)
The signal search can be cut off at any point by pressing the UP button, if the signal is not available.
SETTING THE MEASUREMENT UNIT/MIN-MAX/TEMPERATURE ALARM
- Press the DOWN button to alternate between Celsius and Fahrenheit
- Quickly pressing on MEM displays the maximum values measured; Pressing MEM again displays the minimum values measured.
Pressing MEM a third time returns to the current value display. Pressing and holding for 3 seconds on MEM erases the MIN/MAX values saved.
- Pressing the ALERT button turns the alarm on or off, depending on the temperature.
To programme the trigger thresholds: press and hold for 3 seconds on the ALERT button. When the "TEMP" warning light flashes, set the alarm's top value using the UP and DOWN buttons. Press the ALERT button again. The "TIME" warning light flashes and you can set the alarm's low value using the UP and DOWN buttons.
COMFORT INDICATOR
A comfort indication is available on the upper display (A.1) depending on indoor humidity and temperature readings.
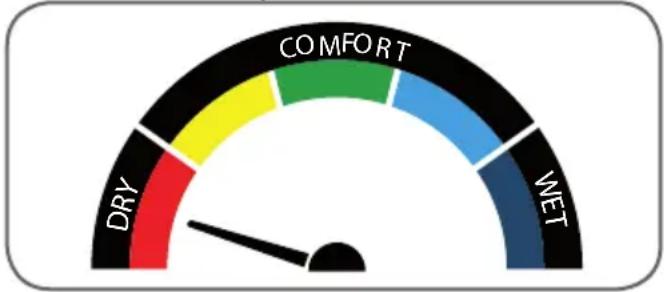
gauge
| Category | Value | | ---------- | ----- | | DRY | 1 | | COMFORT | 2 | | WET | 3 | | Other | 4 |DRY: dry
COMFORT: ok
WET: Humid
D - TECHNICAL AND LEGAL INFORMATION
1 - TECHNICAL CHARACTERISTICS
| Weather station | |
| Power supply | - The station operates with 2 LR3 batteries (not included) - The sensor operates with 2 LR3 batteries (not included) |
| Battery life | 1 to 2 years under normal operating conditions. |
| Frequency | 433.92 MHz |
| Range between the sensor and the station | 60 m in open air. |
| Range of indoor temperatures | 0°C (32°F) ~ 50°C (122°F) |
| Range of outdoor temperatures | -20°C (-4°F) ~ 60°C (140°F) |
| Humidity measurement range | 20% RH ~ 95% RH |
| Temperature measurement unit | Celsius (°C) or Fahrenheit (°F). |
| Station dimensions | 137 x 82 x 21 mm |
| Sensor dimensions | 92 x 40 x 23 mm |
| Materials | ABS |
2 - REPLACING THE BATTERIES
The battery life is one to two years under normal operation.
Use 2 alkaline LR06 AA 1.5V batteries for the station and 2 alkaline LR03 AAA 1.5 V batteries for the outdoor sensor, ensuring that you comply with the indicated polarity.
3 - WARRANTY
- This product is under warranty for parts and labour for 2 years from the date of purchase. Proof of purchase must be retained for the duration of the warranty period.
- The warranty does not cover damage caused by negligence, knocks or accidents.
• to be opened or replaced by non-Avidsen employees. - The warranty will be void if the device is tampered with.
4 - HELP AND ADVICE
- If, despite the care we have taken in designing our products and drafting these instructions, you do encounter difficulties when installing your product or you have any questions, we recommend you contact one of our specialists who will be glad to help.
- If you encounter operating problems during the installation or a few days afterwards, it is essential that you are in front of your installation when contacting us, so that one of our technicians can diagnose the source of the problem, as it will probably be the result of a setting that is incorrect or an installation that is not to specification. If the problem is caused by the product itself, the technician will give you an RMA number so that you can return the unit to the shop. Without this RMA number, the shop may refuse to exchange the product.
D - TECHNICAL AND LEGAL INFORMATION
Contact our After Sales Service team technicians on:
0 892 701 369 Service 0,35 €/min + prix appel
Monday to Friday, 9AM to 12PM and 2PM to 6PM.
Avidsen undertakes to keep a stock of spare parts for this product throughout the contractual warranty period.
5 - DECLARATION OF CONFORMITY
Per the RED directive
Avidsen declares that the following equipment: Weather station 513629
Complies with the 2014/53/EU directive and its conformity has been assessed pursuant to the applicable standards in force:
EN62479:2010
EN301 489-1 V1.9.2:2011-09
EN301 489-3 V1.6.1:2013-08
EN300 220-1 V2.4.1:2012-05
EN300 220-2 V2.4.1:2012-05
Chambray les Tours, date: 01/03/2017 Alexandre Chaverot, CEO

natural_image
Simple hand-drawn sketch of a line with two overlapping ovals (no text or symbols)513629
NL Draadloos weerstation

12h/24h

Calendar

Alarm clock


natural_image
White rectangular electronic device with ventilation slots and indicator lights (no visible text or symbols)INHOUDSOPGAVE
A - VEILIGHEIDSVOORSCHRIFTEN 05
1 - GEBRUIKSVOORSCHRIFTEN 05
2 - ONDERHOUD EN REINIGING 05
3 - RECYCLAGE 05
B - BESCHRIJVING VAN HET PRODUCT 06
1 - INHOUD VAN DE KIT 06
2 - WEERSTATION 06
3 - BELANGRIJKSTE FUNCTIES 07
C - CONFIGURATIE 08
1 - SNELLE INGEBRUIKNEMING 08
VERBINDING VAN DE SONDE MET HET STATION 08
INSTELLING DATUM EN TIJD 08
INSTELLING WEKKER 08
AUTOMATISCHE TIJDINSTELLING 08
INSTELLING MEETEENHEID / MIN-MAX / ALARMTEMPERATUUR 09
COMFORTINDICATOR 09
D - TECHNISCHE EN WETTELIJKE INFORMATIE 10
1 - TECHNISCHE EIGENSCHAPPEN 10
2 - BATTERIJEN VERVANGEN 10
3 - GARANTIE 10
4 - HULP EN TIPS 10
5 - CONFORMITEITSVERKLARING 11
1 - GEBRUIKSVOORSCHRIFTEN

natural_image
Simple line drawing of a rectangular device with three horizontal lines and a base, no text or symbols present.1 Weerstation
2 Temperatuursonde
WEERSTATION

natural_image
Diagram of a device panel with a light bulb and a labeled pin (17), no text or symbols present.513629
DE Drahtlose Wetterstation

12h/24h

Calendar

Alarm clock


natural_image
White rectangular electronic device with ventilation slots and indicator lights (no visible text or symbols)INHALT
1 Wetterstation
natural_image
Simple line drawing of a rectangular device with horizontal lines and a label '2 x 1' above it (no text or symbols on the device itself)2 Temperatursonde
2 - WETTERSTATION
natural_image
Simple line drawing of a hand holding a pen or stylus (no text or symbols)
513629
ES
natural_image
White rectangular electronic device with ventilation slots and indicator lights (no visible text or symbols)ÍNDICE
natural_image
Simple line drawing of a rectangular device with horizontal lines and a label '2 x 1' above it (no text or symbols on the device itself)2 Sonda de temperatura
natural_image
Diagram of a device panel with a light bulb and a labeled pin (17), no text or symbols present.natural_image
White rectangular electronic device with ventilation slots and indicator lights (no visible text or symbols)ÍNDICE
A - INSTRUÇÕES DE SEGURANÇA 05
natural_image
Simple line drawing of a rectangular device with horizontal lines and a label '2 x 1' above it (no text or symbols on the device itself)2 Sonda de temperatura
natural_image
Simple line drawing of a device panel with a light bulb and a small mark, labeled with number 17 (no text or symbols on the diagram itself)De segunda a sexta-feiran entre as 9h e as 13h e entre as 14h e as 18h.
513629
natural_image
White rectangular electronic device with ventilation slots and indicator lights (no visible text or symbols)INDICE
natural_image
Simple line drawing of a rectangular device with horizontal lines and a label '2 x 1' above it (no text or symbols on the device itself)2 Sonda temperatura
natural_image
Diagram of a device front panel with a light bulb and a labeled pin (17), no text or symbols present.
- SOMMAIRE
- A - CONSIGNES DE SÉCURITÉ 05
- B - DESCRIPTION DU PRODUIT 06
- EN Wireless weather station
- TABLE OF CONTENTS
- A - SAFETY INSTRUCTIONS 05
- B-PRODUCTDESCRIPTION06
- - MAINTENANCE AND CLEANING
- - RECYCLING
- A - SAFETY INSTRUCTIONS
- B - PRODUCT DESCRIPTION
- - CONTENTS OF THE KIT
- - WEATHER STATION
- - MAIN FUNCTIONS
- C - CONFIGURATION
- - QUICK START-UP
- PAIRING THE SENSOR TO THE STATION
- TIME AND DATE SETTING
- ALARM SETTING
- AUTOMATIC TIME SETTING
- SETTING THE MEASUREMENT UNIT/MIN-MAX/TEMPERATURE ALARM
- COMFORT INDICATOR
- D - TECHNICAL AND LEGAL INFORMATION
- - TECHNICAL CHARACTERISTICS
- - REPLACING THE BATTERIES
- - WARRANTY
- - HELP AND ADVICE
- - DECLARATION OF CONFORMITY
- NL Draadloos weerstation
- INHOUDSOPGAVE
- A - VEILIGHEIDSVOORSCHRIFTEN 05
- B - BESCHRIJVING VAN HET PRODUCT 06
- C - CONFIGURATIE 08
- D - TECHNISCHE EN WETTELIJKE INFORMATIE 10
- - GEBRUIKSVOORSCHRIFTEN
- WEERSTATION
- DE Drahtlose Wetterstation
- INHALT
- - WETTERSTATION
- ÍNDICE
- A - INSTRUÇÕES DE SEGURANÇA 05
- INDICE
Brand : THOMSON
Model : 513629
Category : Weather Station