USER MANUAL NUBI 2 Kinderkraft
text_image
WATCH OUR
PRODUCT FILMS!
natural_image
Line drawing of a stroller with four wheels and a canopy cover (no text or symbols)

kinderkraft.com

/kinderkraftofficial

kinderkraft

@kinderkraftofficial
(AR) عربة أطفال
(CS) Kočárek
(DE) Buggy
(EN) Stroller
(ES) Silla de paseo
(FR) Pousette
(HU) Babakocsi
(IT) Passeggino
دليل الاستخدام
NÁVÓD K OBSLUZE
BEDIENUNGSANLEITUNG
USER MANUAL
MANUAL DE USARIO
GUIDE D'UTILISATION
HASZNÁLATI UTASÍTÁS
ISTRUZIONI PER UTENTE
(NL) Kinderwagen
(PL) Wózek
(PT) Carrinho de bebé
(RO) Cărucior
MANUAL DE INSTRUÇÕES
MANUAL DE UTILIZARE
ВО ПО ЭКСПЛУАТАЦИИ
NÁVOD NA POUŽÍVANIE
ANVÄNDARMANUAL
للمنتج. الأشكال هي لأغراض توضي kidneyه افط وانجز
zobrazení produktu./Die gezeigten Bilder dienen nur als Referenz, das tatsächliche Produkt kann von der Abbildung abweichen./The illustrations are for illustration only and do not represent the product./Las ilustraciones son meramente orientativas y no constituyen una representación completa del producto./Les illustrations sont données à titre indicatif et ne constituent pas une représentation complète du produit./Az illusztrációk csak tájékoztató jellegűek és eltérhetnek a valós terméktől./Le immagini sono inserite a scopo dimostrativo e non rispecchiano appieno le caratteristiche del prodotto./De afbeeldingen dienen uitsluitend ter illustratie en geven geen volledig beeld van het product./Ilustracje mają charakter pogladowy i nie stanowią pełnego odwzorowania produktu./As ilustrações têm uma função informativa e não são uma representação fiel do produto./ Ilustrațiile sunt doar pentru referință și nu reprezintă produsul complet./Иллюстрации приведены только для справки и не представляют весь продукт./Obrázky slúžia len na ilustráciu a nie sú úplným predstavením produktu./Illustrationer är endast för referens och representerar inte hela produkten
AR....10
CS....13
DE....15
EN....18
ES....20
FR....23
HU....25
IT 28
NL....30
PL....33
PT....35
RO....38
RU....40
SK....43
SV....45
1
2

text_image
Labeled diagram of a stroller with numbered parts for identification

text_image
Technical diagram of a stroller with numbered parts labeled for identification.
natural_image
Simple line drawing of a device with a handle and internal components, no text or symbols present

natural_image
Line drawing of a stroller with wheels and seat, labeled with number 16 (no text or symbols on the diagram itself)

AR
الأعزاء، عملانا
Thank you for purchasing a Kinderkraft product. Our products have been designed for your child's safety and comfort. The buggy is an ideal solution for those who value quality, modernity and functionality. Please read the manual carefully and follow its recommendations.
IMPORTANT - READ CAREFULLY AND KEEP FOR FUTURE REFERENCE.
WARNING!
- Never leave the child unattended.
- Ensure that all the locking devices are engaged before use.
- To avoid injury ensure that the child is kept away when unfolding and folding this product.
- Do not let the child play with this product.
- Always use the restraint system.
- Check that the pram body or seat unit or car seat attachment devices are correctly engaged before use.
- This product is not suitable for running or skating.
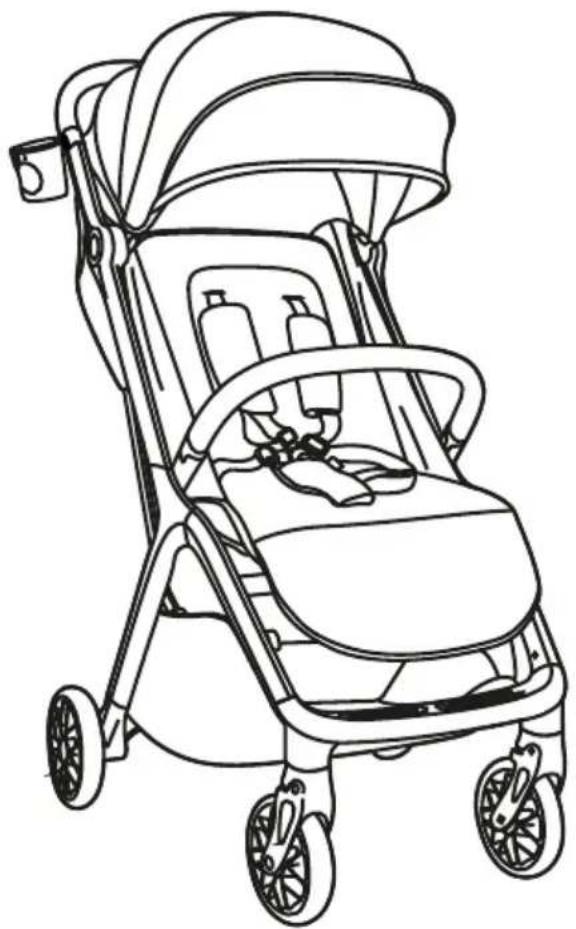
I. STROLLER'S ELEMENTS (PICPIC. 1)
| 1. Hood |
| 2. Seat with a safety harness(3) |
| 4. Bumper bar |
| 5. Footrest |
| 6. Bumper |
| 7. Front wheels |
| 8. Parent handle |
| 9. Cover/Harness pads |
| 10. Rear wheels |
I. STROLLER'S ELEMENTS (PIC. 2)
| 11. Lock button |
| 12. Backrest adjustment lever |
| 13. Basket |
| 14. Brake |
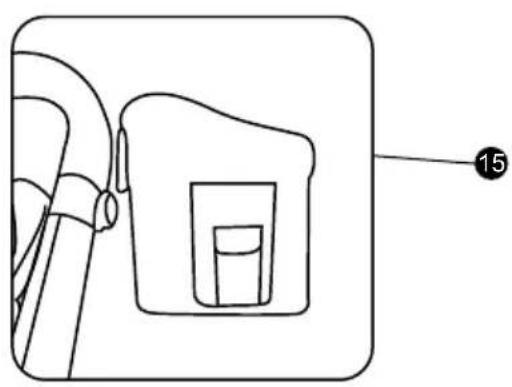
| 15. Cup |
| 16. Mosquito net |
| 17. Fold button |
III. ASSEMBLY OF STROLLERR'S FRAME
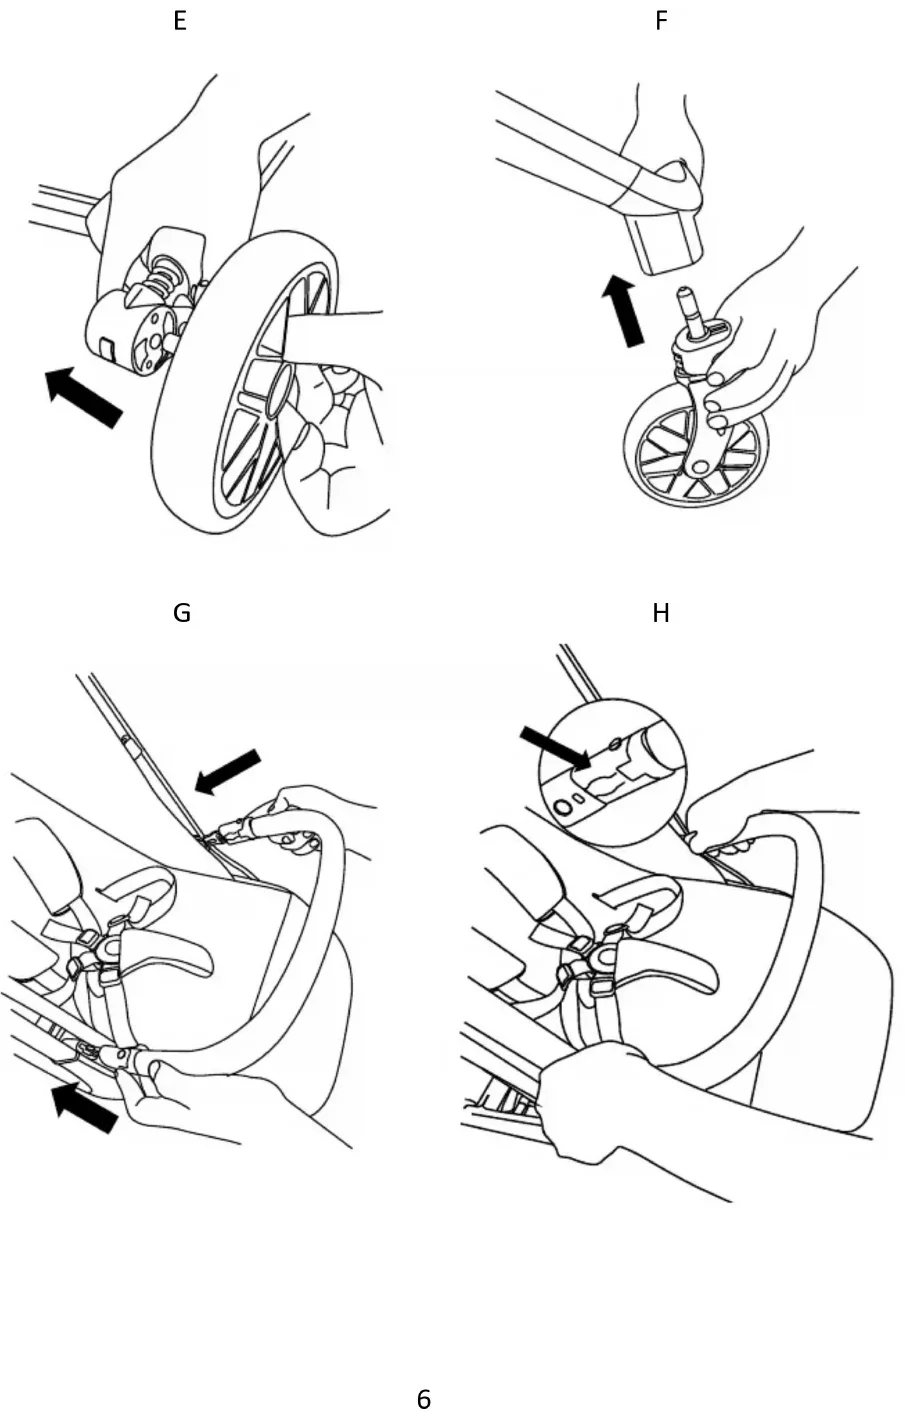
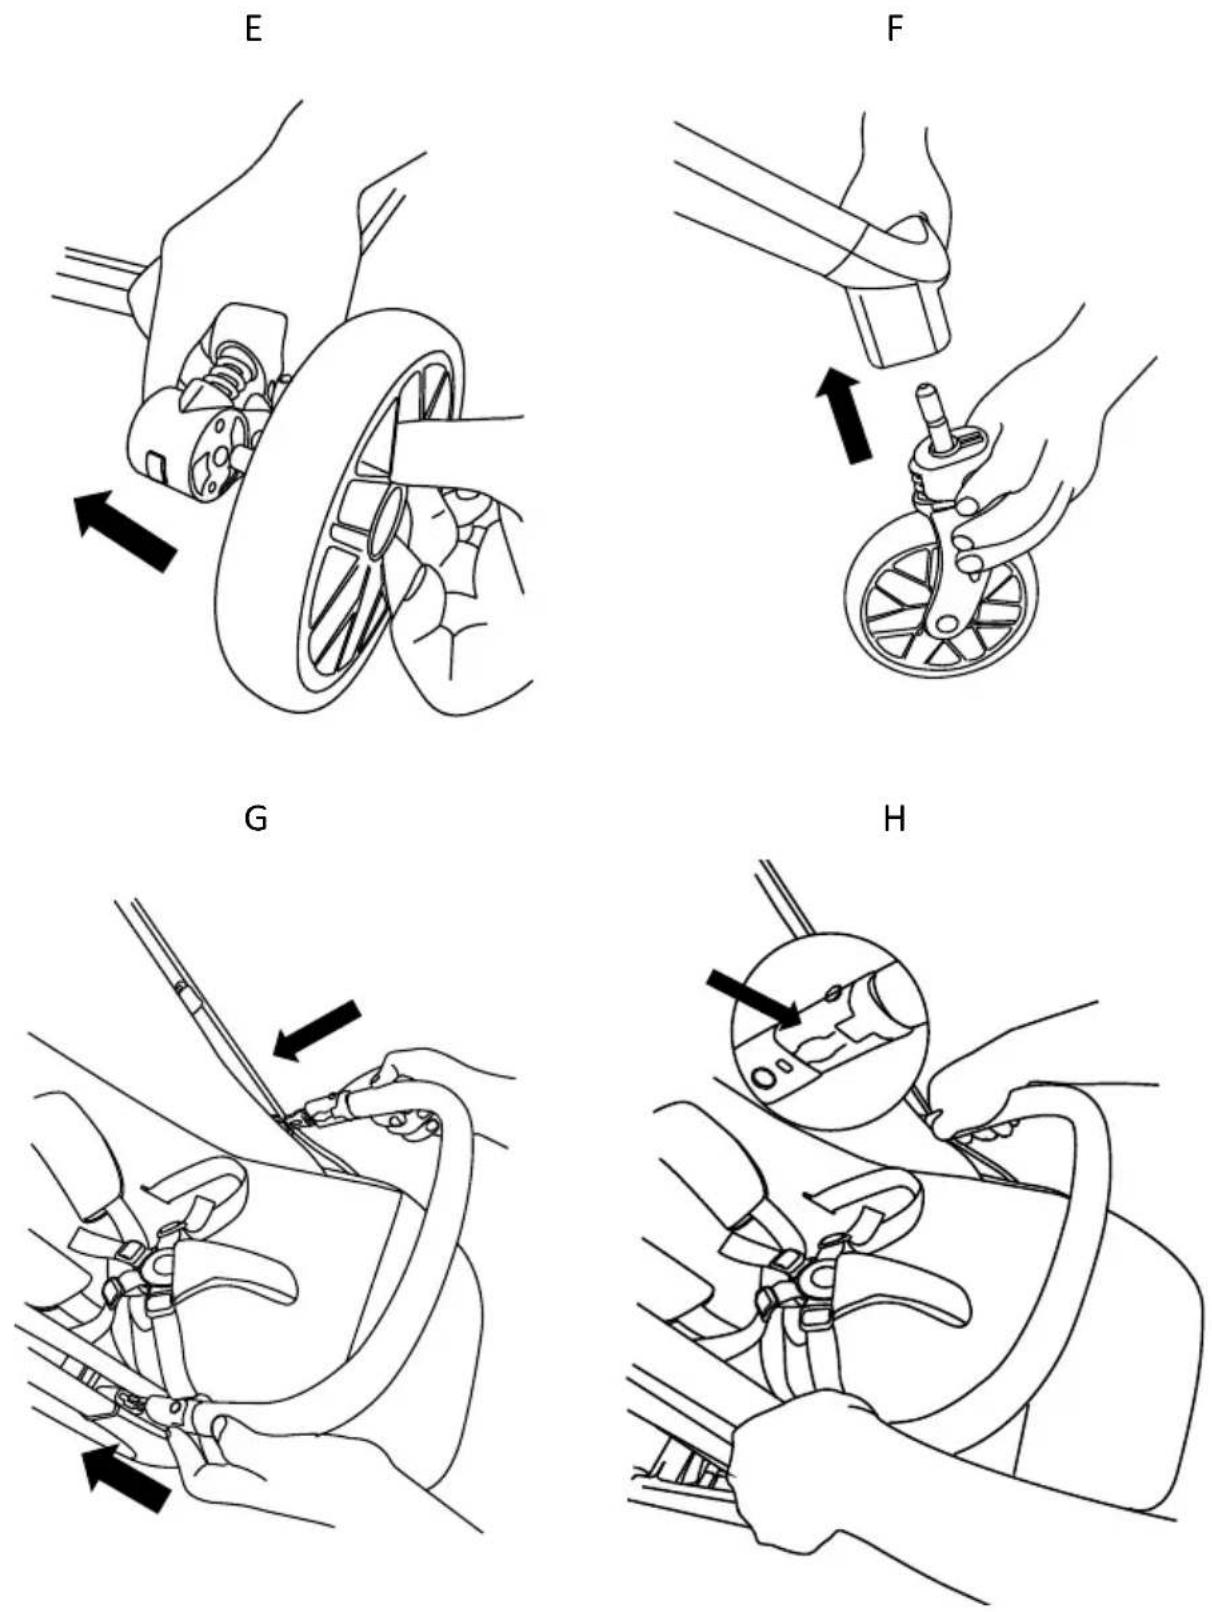
Place the frame on a flat surface with the handle directed upwards (PIC. A). To unfold the stroller, begin by pressing the parent handle to the stroller's frame to make all elements strictly adhere to each other, and then press the lock button located on a handle (PIC. B.I), simultaneously pressing the fold button (PIC. B.II) and lift the frame up according to the arrows on the picture (PIC. C), until hearing a lock sound (PIC. D). Slide in the rear wheels (10) into the designated slots until you hear a lock sound (PIC. E). Slide in the front wheels (7) into the designated slots until you hear a lock sound (PIC. F).
IV. ASSEMBLY /DISASSEMBLY OF THE BUMPER BAR, HOOD ADJUSTMENT, CUP HOLDER, MOSQUITO NET
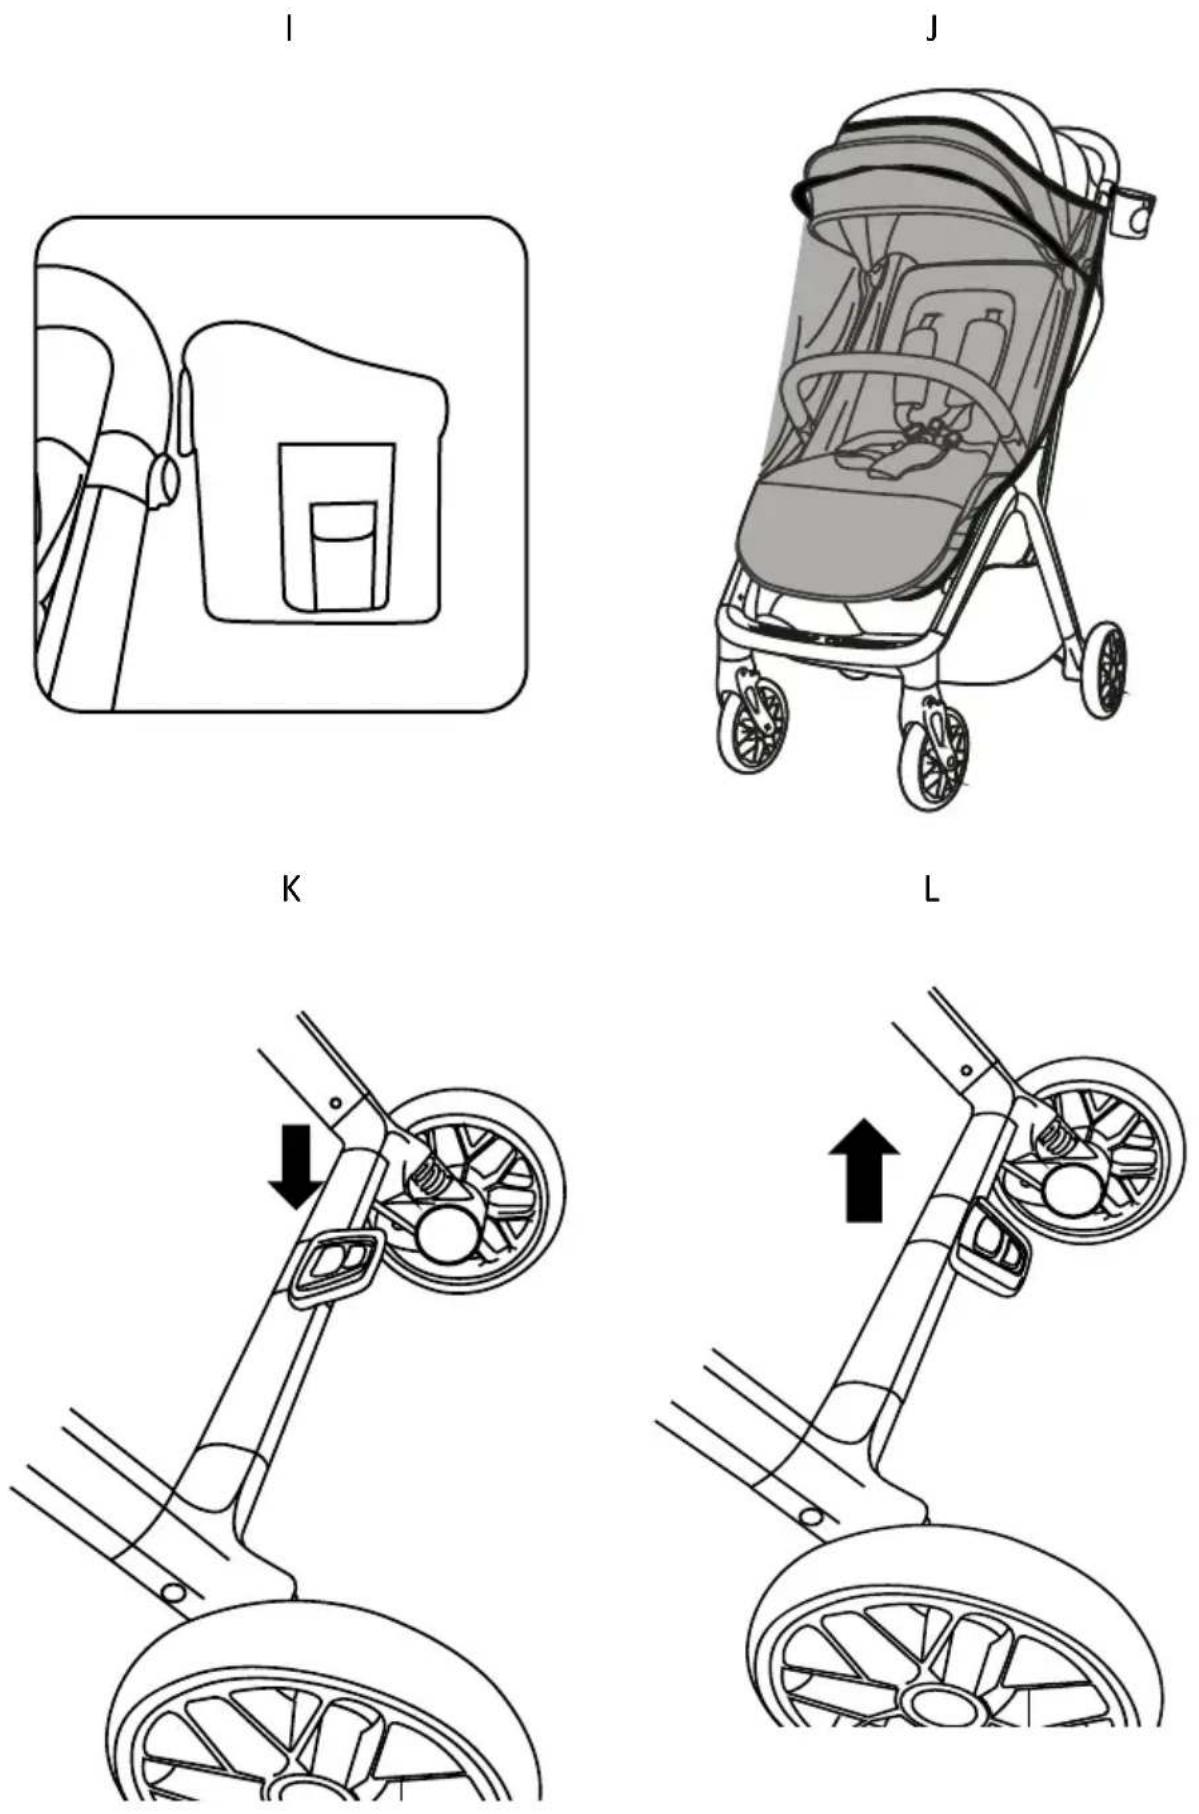
Insert the bumper bar into the appropriate slot in the frame (PIC. G). To disassemble, press the buttons and remove the bumper bar (PIC. H). To adjust the hood and unfold another fabric layer, unzip the zipper located on the hood. Attaching the stroller's fabric layer located on the backrest is possible. To do this, put a loop on the clasp located on the hood. The cup holder (15) can be attached to the right or left side of the stroller on its stem (PIC. I).
The mosquito net is hidden in the footrest, unzip the zipper under the footrest, put on, and secure by putting the buttons through the loops (PIC.J).
V. USING THE BRAKE
The stroller is equipped with a foot-operated parking brake located on the rear axis. Press down the lower part of the brake, the brake will be activated after hearing the lock sound (PIC. K). To unlock, lift the lower part of the brake upwards (PIC. L).
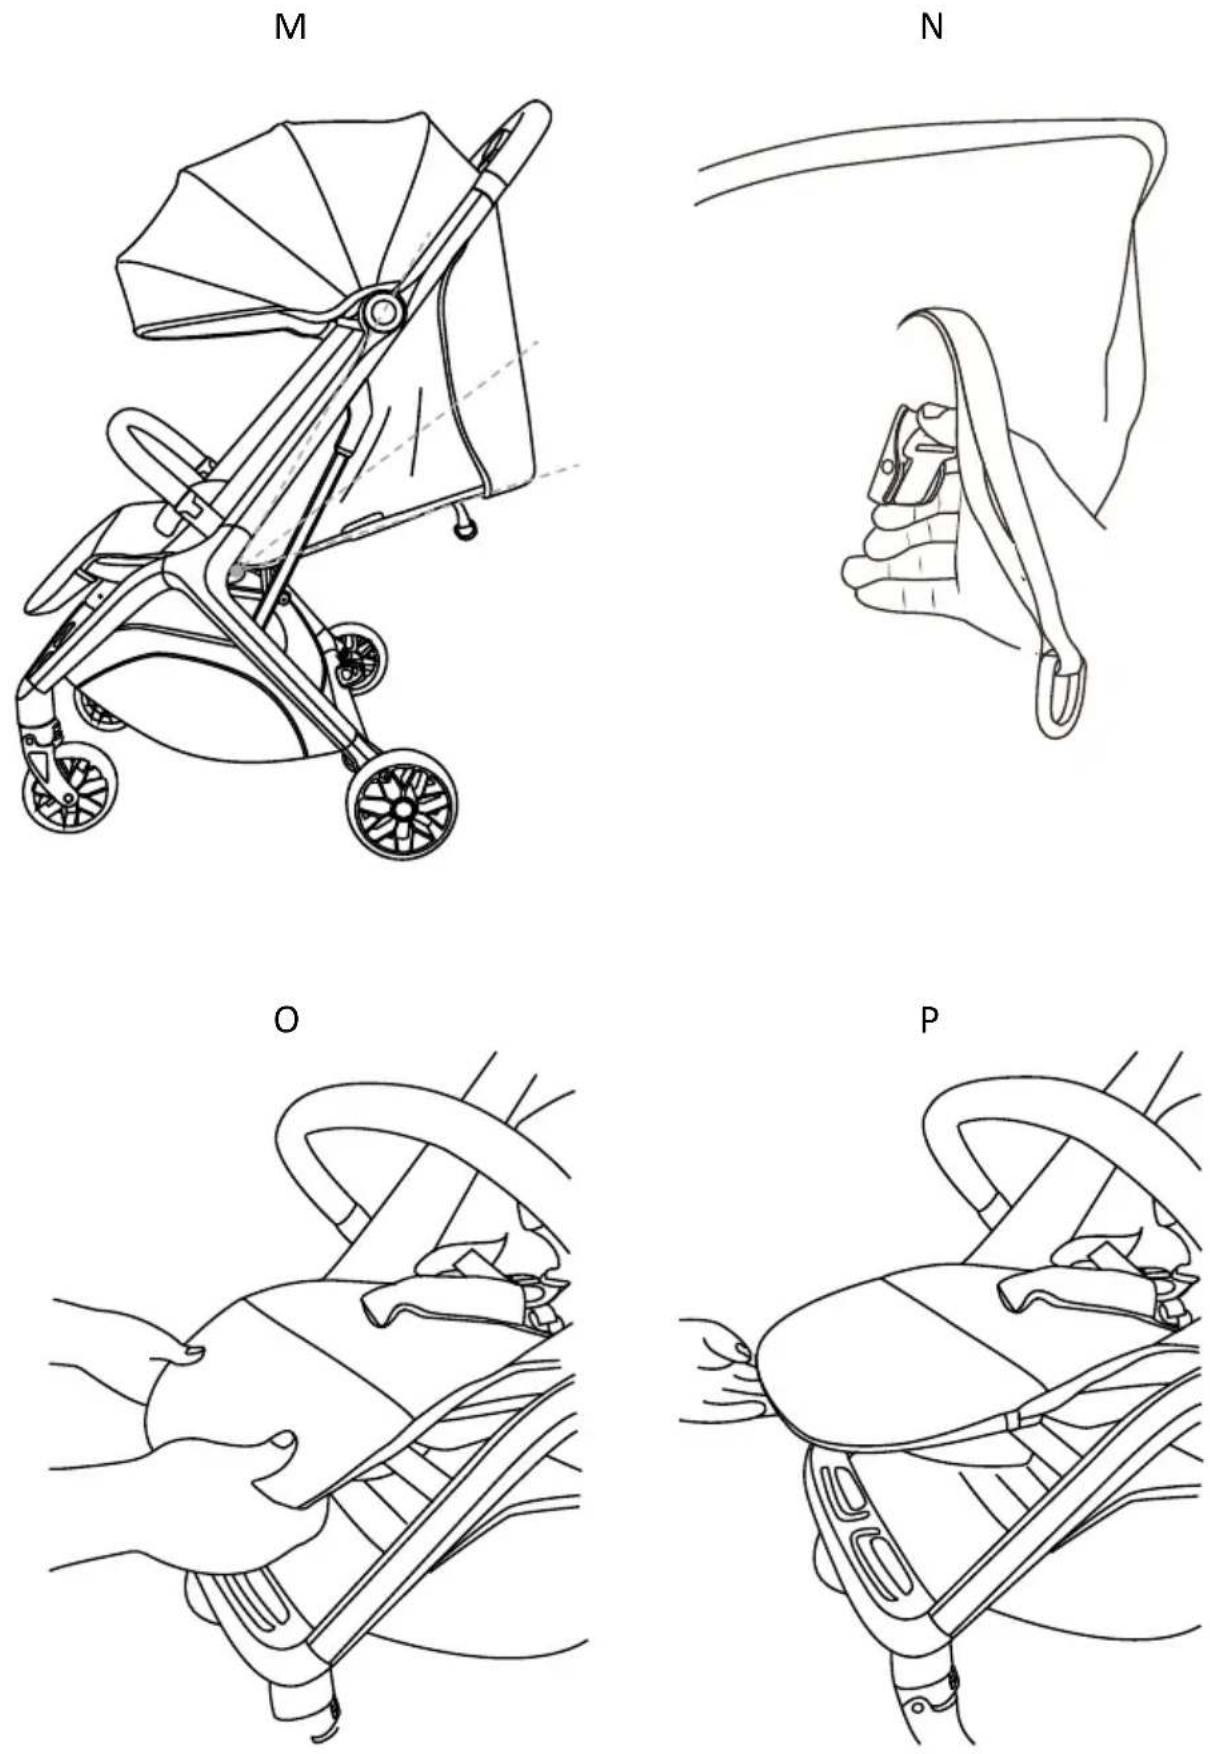
The seat has a smooth regulation from lie-flat to the sitting position (PIC. M), by using the buckle (PIC. N). The footrest has 2 adjustment levels. Pull the levers located on the bottom of the footrest (PIC. O) to change its position (PIC. P).
VII. SAFETY HARNESS
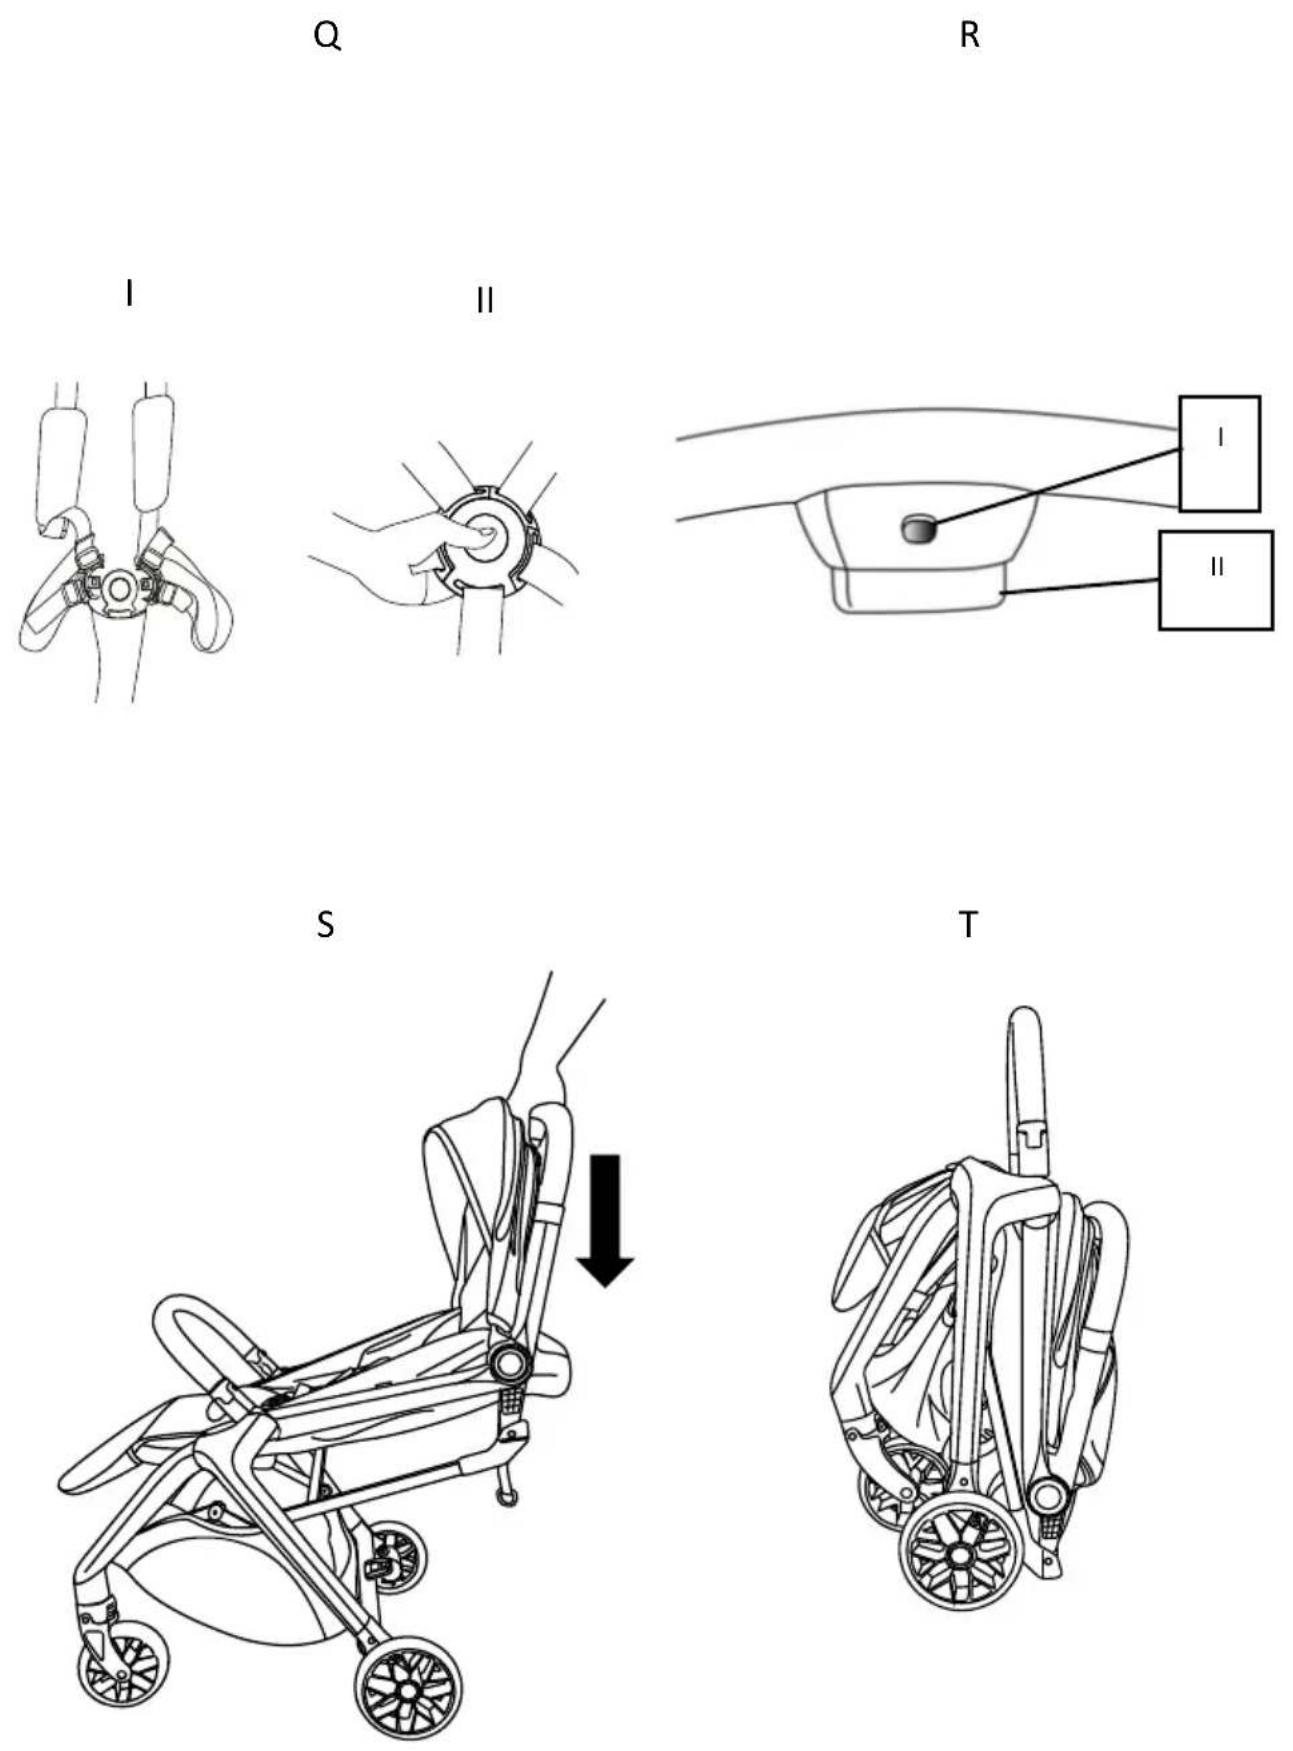
This stroller's safety harness is suitable for newborns. Make sure you always use the fastening system. To secure the child, first place the shoulder strap's buckle part on the hip belt buckle part and slide them into the central buckle until it locks (PIC. Q. I). Press the buckle to unfasten the harness (PIC. Q.II). Adjust the straps each time.
VIII. FOLDING THE STROLLER
Hold the handle and press the lock button (PIC. R.I) and fold button (PIC. R.II) and push downwards at the same time (PIC. S).
After folding, the stroller is locked automatically, as shown on (PIC. T).
IX. CARE AND MAINTENANCE The buyer is responsible for proper installation of all functional elements as well as for carrying out all required maintenance and adjustments in order to keep the buggy in good technical condition. The buggy must be periodically checked for potential problems. Significant measures to be applied to ensure the child's safety and prevent shortening of the product life have been presented below:
- Check the strength and safety of all rivets and connections.
- Check all wheel locking equipment and tyres. If necessary, replace or repair.
- Check if all safety devices work properly, particularly the main and additional fasteners that should move freely at any time.
If the wheels squeak, apply a thin layer of silicone. Do not use oil or grease based products as they attract dirt, which makes buggy movement difficult.
X. CLEANING

Wash at max. 30°C, gentle process.

Do not bleach

Do not dry in a tumble dryer

Do not wash. Clean the product gently with a damp cloth and a mild detergent.

Do not iron

Do not dry clean
If the elements of the buggy chassis have been exposed to saltwater, rinse with tap water as soon as possible.
Basket, Seat canopy, seat sheathing: Do not wash. Clean the product gently with a damp cloth and a mild detergent, Do not bleach, Do not iron, Do not dry in a tumble dryer, Do not dry clean.
Do not fold or store the product when it is wet and never store it in wet conditions, as it can lead to mould growth.
XI. Warranty
- All Kinderkraft products are covered by a 24-month warranty. The warranty period starts from the date the product is handed over to the Buyer.
- The warranty is only valid in the member states of the European Union, excluding overseas territories and the territory of the United Kingdom of Great Britain and Northern Ireland excluding the British Overseas Territories.
- The manufacturer's warranty does not apply to countries not listed above. The conditions of the additional warranty may be determined by the Seller.
- In some countries, it is possible to extend the warranty to a limited period of 120 months (10 years). The complete terms and conditions and the warranty extension registration form are available at WWW.KINDERKRAFT.COM
- Claims must be made by completing the form available at WWW.RMA.KINDERKRAFT.COM
- The warranty does not cover:
A. Cosmetic damage, Including but not limited to: scratches, dents and cracks in plastic, unless the failure is due to a material or manufacturing defect;
B. Damage resulting from misuse or poor maintenance - including but not limited to: mechanical damage to products caused by misuse or poor maintenance. Refer to the Instructions for use and installation of the product contained in the user manual;
C. Damage caused by improper assembly, installation or disassembly of products and/or accessories. Refer to the instructions for use and installation of the product contained in the user manual;
D. Damage caused by corrosion, mould or rust, resulting from improper maintenance, care and storage;
E. Damage caused by normal wear and tear or otherwise resulting from the normal passage of time. This includes: tears or punctures in inner tubes; tyre damage; tyre tread damage; fading of fabrics resulting from mechanical use (e.g. on joints and covering of moving parts);
F. Damage or erosion caused by sun, perspiration, detergents, storage conditions or frequent washing, etc;
G. Damage caused by accident, abuse, misuse, fire, contact with liquid, earthquake or other external causes;
H. Products that have been modified to change functionality without 4Kraft's written consent;
- Products from which the serial number or lot number has been removed or tampered with in any way;
J. Damage caused by the use of third party components or products - Including but not limited to: cup holders, umbrellas, reflectors, bells;
K. Damage caused by transport or by ground handling service providers.
- The warranty period for accessories included with the product is 6 months from the date of sale, excluding the faults described above.
- These warranty conditions are complementary to the Customer's statutory rights with respect to 4KRAFT sp. z o.o. The warranty does not exclude, limit or suspend the Customer's rights under warranty for defects in goods sold.
- The full text of the Terms and Conditions of the Warranty is available on the website WWW.KINDERKRAFT.COM
ES
Estimado Cliente!
(EN) In the interests of our Clients - we are at your disposal! If you have a problem with the product you received, contact us in the most convenient way for you!