238-P - Slicer RIDGID - Free user manual and instructions
Find the device manual for free 238-P RIDGID in PDF.
| Product type | Chain pipe cutter |
| Brand | Ridgid |
| Model | 238-P |
| Cutting capacity (cast iron, clay) | Up to 8 in (200 mm) nominal diameter |
| Cutting capacity (concrete) | 4 to 6 in (100 to 150 mm) |
| Weight | 13.5 lb (6.1 kg) without handle or wrench |
| Length | 11.5 in (292 mm) without handle, wrench or chain |
| Cutting roller diameter | 1.25 in (32 mm) |
| Chain pin length | 2 in (51 mm) |
| Drive method | Manual or via impact wrench (pneumatic, electric or battery) |
| Torque required for impact wrench | Minimum 200 ft·lb (271 N·m), maximum 400 ft·lb (542 N·m) |
| Materials cut | Gray cast iron, no-hub cast iron, clay, concrete |
| Primary use | Cutting drain pipes in confined spaces |
| Required safety equipment | Full safety glasses required |
| Maintenance | Clean after use, lubricate pins and chain with light oil, grease internal parts annually |
| Repairability | Have serviced by a RIDGID authorized repair center, use only genuine replacement parts |
| Warranty | Lifetime warranty against defects in material and workmanship |
| Included accessories | Ratchet wrench with 1/2 in square drive, removable side handle |
| Safety symbols | Read manual, wear safety glasses, crushing hazard |
Frequently Asked Questions - 238-P RIDGID
User questions about 238-P RIDGID
0 question about this device. Answer the ones you know or ask your own.
Ask a new question about this device
Download the instructions for your Slicer in PDF format for free! Find your manual 238-P - RIDGID and take your electronic device back in hand. On this page are published all the documents necessary for the use of your device. 238-P by RIDGID.
USER MANUAL 238-P RIDGID
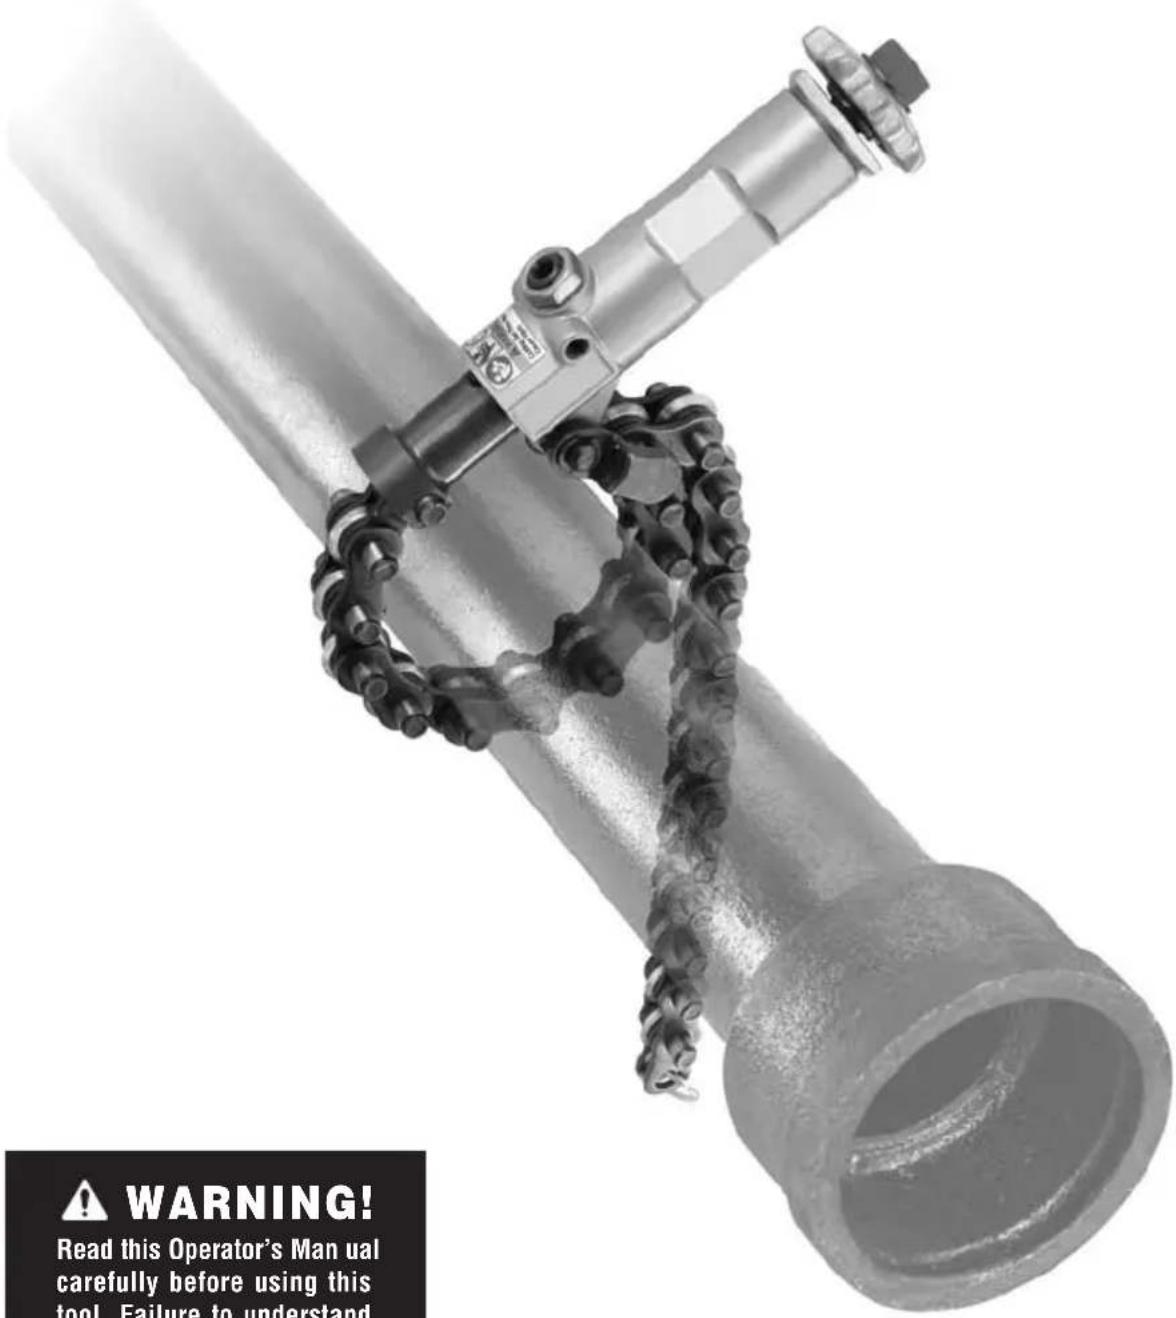
238-P Powered Soil Pipe Cutter
text_image
WARNING! Read this Operator's Man ual carefully before using this tool. Failure to understand.
WARNING!
Read this Operator's Manual carefully before using this tool. Failure to understand and follow the contents of this manual may result in electrical shock, fire and/or serious personal injury.
- Français – 7
Safety Symbols....ii
General Safety Rules
Work Area Safety....1
Personal Safety....1
Tool Use and Care ....1
Service....1
Specific Safety Information....1
Description and Specifications
Description....2
Specifications....2
Pre-Operation Inspection/Maintenance 2
Tool Set-Up and Operation....3
Cutting Tips ....5
Lifetime Warranty....Back Cover
*Original Instructions - English
Safety Symbols
In this operator's manual and on the product, safety symbols and signal words are used to communicate important safety information. This section is provided to improve understanding of these signal words and symbols.

This is the safety alert symbol. It is used to alert you to potential personal injury hazards. Obey all safety messages that follow this symbol to avoid possible injury or death.

DANGER
DANGER indicates a hazardous situation which, if not avoided, will result in death or serious injury.

WARNING
WARNING indicates a hazardous situation which, if not avoided, could result in death or serious injury.

CAUTION
CAUTION indicates a hazardous situation which, if not avoided, could result in minor or moderate injury.
NOTICE
NOTICE indicates information that relates to the protection of property.

This symbol means read the operator's manual carefully before using the equipment. The operator's manual contains important information on the safe and proper operation of the equipment.

This symbol means always wear safety glasses with side shields or goggles when handling or using this equipment to reduce the risk of eye injury.

This symbol indicates the risk of hands, fingers or other body parts being crushed.
General Safety Rules
WARNING
Read and understand all warnings and instructions. Failure to follow all warnings and instructions may result in electric shock, fire, and/or serious personal injury.
SAVE THESE INSTRUCTIONS!
Work Area Safety
- Keep your work area clean and well lit. Cluttered or dark areas invite accidents.
- Do not operate tools in explosive atmospheres, such as in the presence of flam mable liquids, gases, or dust. Tools can create sparks which may ignite the dust or fumes.
- Keep children and by-standers away while operating tools. Distractions can cause you to lose control.
- Keep floors dry and free of slippery materials such as oil. Slippery floors invite accidents.
Personal Safety
- Stay alert, watch what you are doing and use common sense when operating tools. Do not use tools while you are tired or under the influence of drugs, alcohol, or medication. A moment of inattention while operating tools may result in serious personal injury.
- Use personal protective equipment. Always wear eye protection. Protective equipment such as dust mask, non-skid safety shoes, hard hat, or hearing protection used for appropriate conditions will reduce personal injuries.
- Do not overreach. Keep proper footing and balance at all times. Proper footing and balance enables better control of the tool in unexpected situations.
Tool Use and Care
- Do not force tool. Use the correct tool for your application. The correct tool will do the job better and safer at the rate for which it is designed.
- Store idle tools out of the reach of children and do not allow persons unfamiliar with the tool or these instructions to
operate the tool. Tools can be dangerous in the hands of untrained users.
- Maintain tools. Check for misalignment or binding of moving parts, breakage of parts and any other condition that may affect the tool's operation. If damaged, have the tool repaired before use. Many accidents are caused by poorly maintained tools.
- Keep handles dry and clean; free from oil and grease. Allows for better control of the tool.
Service
- Have your tool serviced by a qualified repair person using only identical replacement parts. This will ensure that the safety of the tool is maintained.
Specific Safety Information
WARNING
This section contains important safety information that is specific to this tool.
Read these precautions carefully before using the 238-P Powered Soil Pipe Cutter to reduce the risk of serious personal injury.
SAVE THESE INSTRUCTIONS!
- Keep others out of work area while cut ting. Stand clear of the pipe. Cutting can cause pieces of pipe to be thrown with considerable force. This can cause striking injuries, eye injuries, or other serious personal injury.
• Always wear Safety Glasses. Reduces the risk of eye injury. - Do not exceed the recommended cutting capacity of the tool. Cutting pipe that is too large or the wrong type could overload the soil pipe cutter and cause tool failure and or serious personal injury. Do not extend the chain to cut soil pipe greater than 8" (200 mm) nominal size.
- Do not use handle extensions to activate the soil pipe cutter. Handle extensions (cheaters) can slip and cause serious injury. Extended handles can overload the soil pipe cutter and cause tool failure and or serious personal injury.
- Keep your fingers and hands away
from the cutting chain during the cutting cycle. They can be crushed, fractured or amputated if they become caught between the pipe and cutter or other objects.
- Read and understand this operator's manual, the impact tool operator's manual and the warnings and instructions for all equipment being used with this tool before operating. Failure to follow all warnings and instructions may result in serious personal injury.
The EC Declaration of conformity (890-011-320.10) will accompany this manual as a separate booklet when required.
If you have any question concerning this RIDGID® product:
- Contact your local RIDGID distributor.
- Visit www.RIDGID.com to find your local RIDGID contact point.
- Contact RIDGID Technical Services Department at rtctechservices@emerson.com, or in the U.S. and Canada call (800) 519-3456.
Description and Specifications
Description
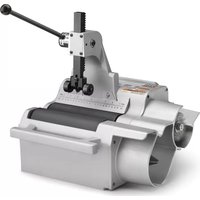
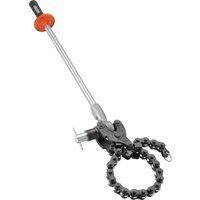
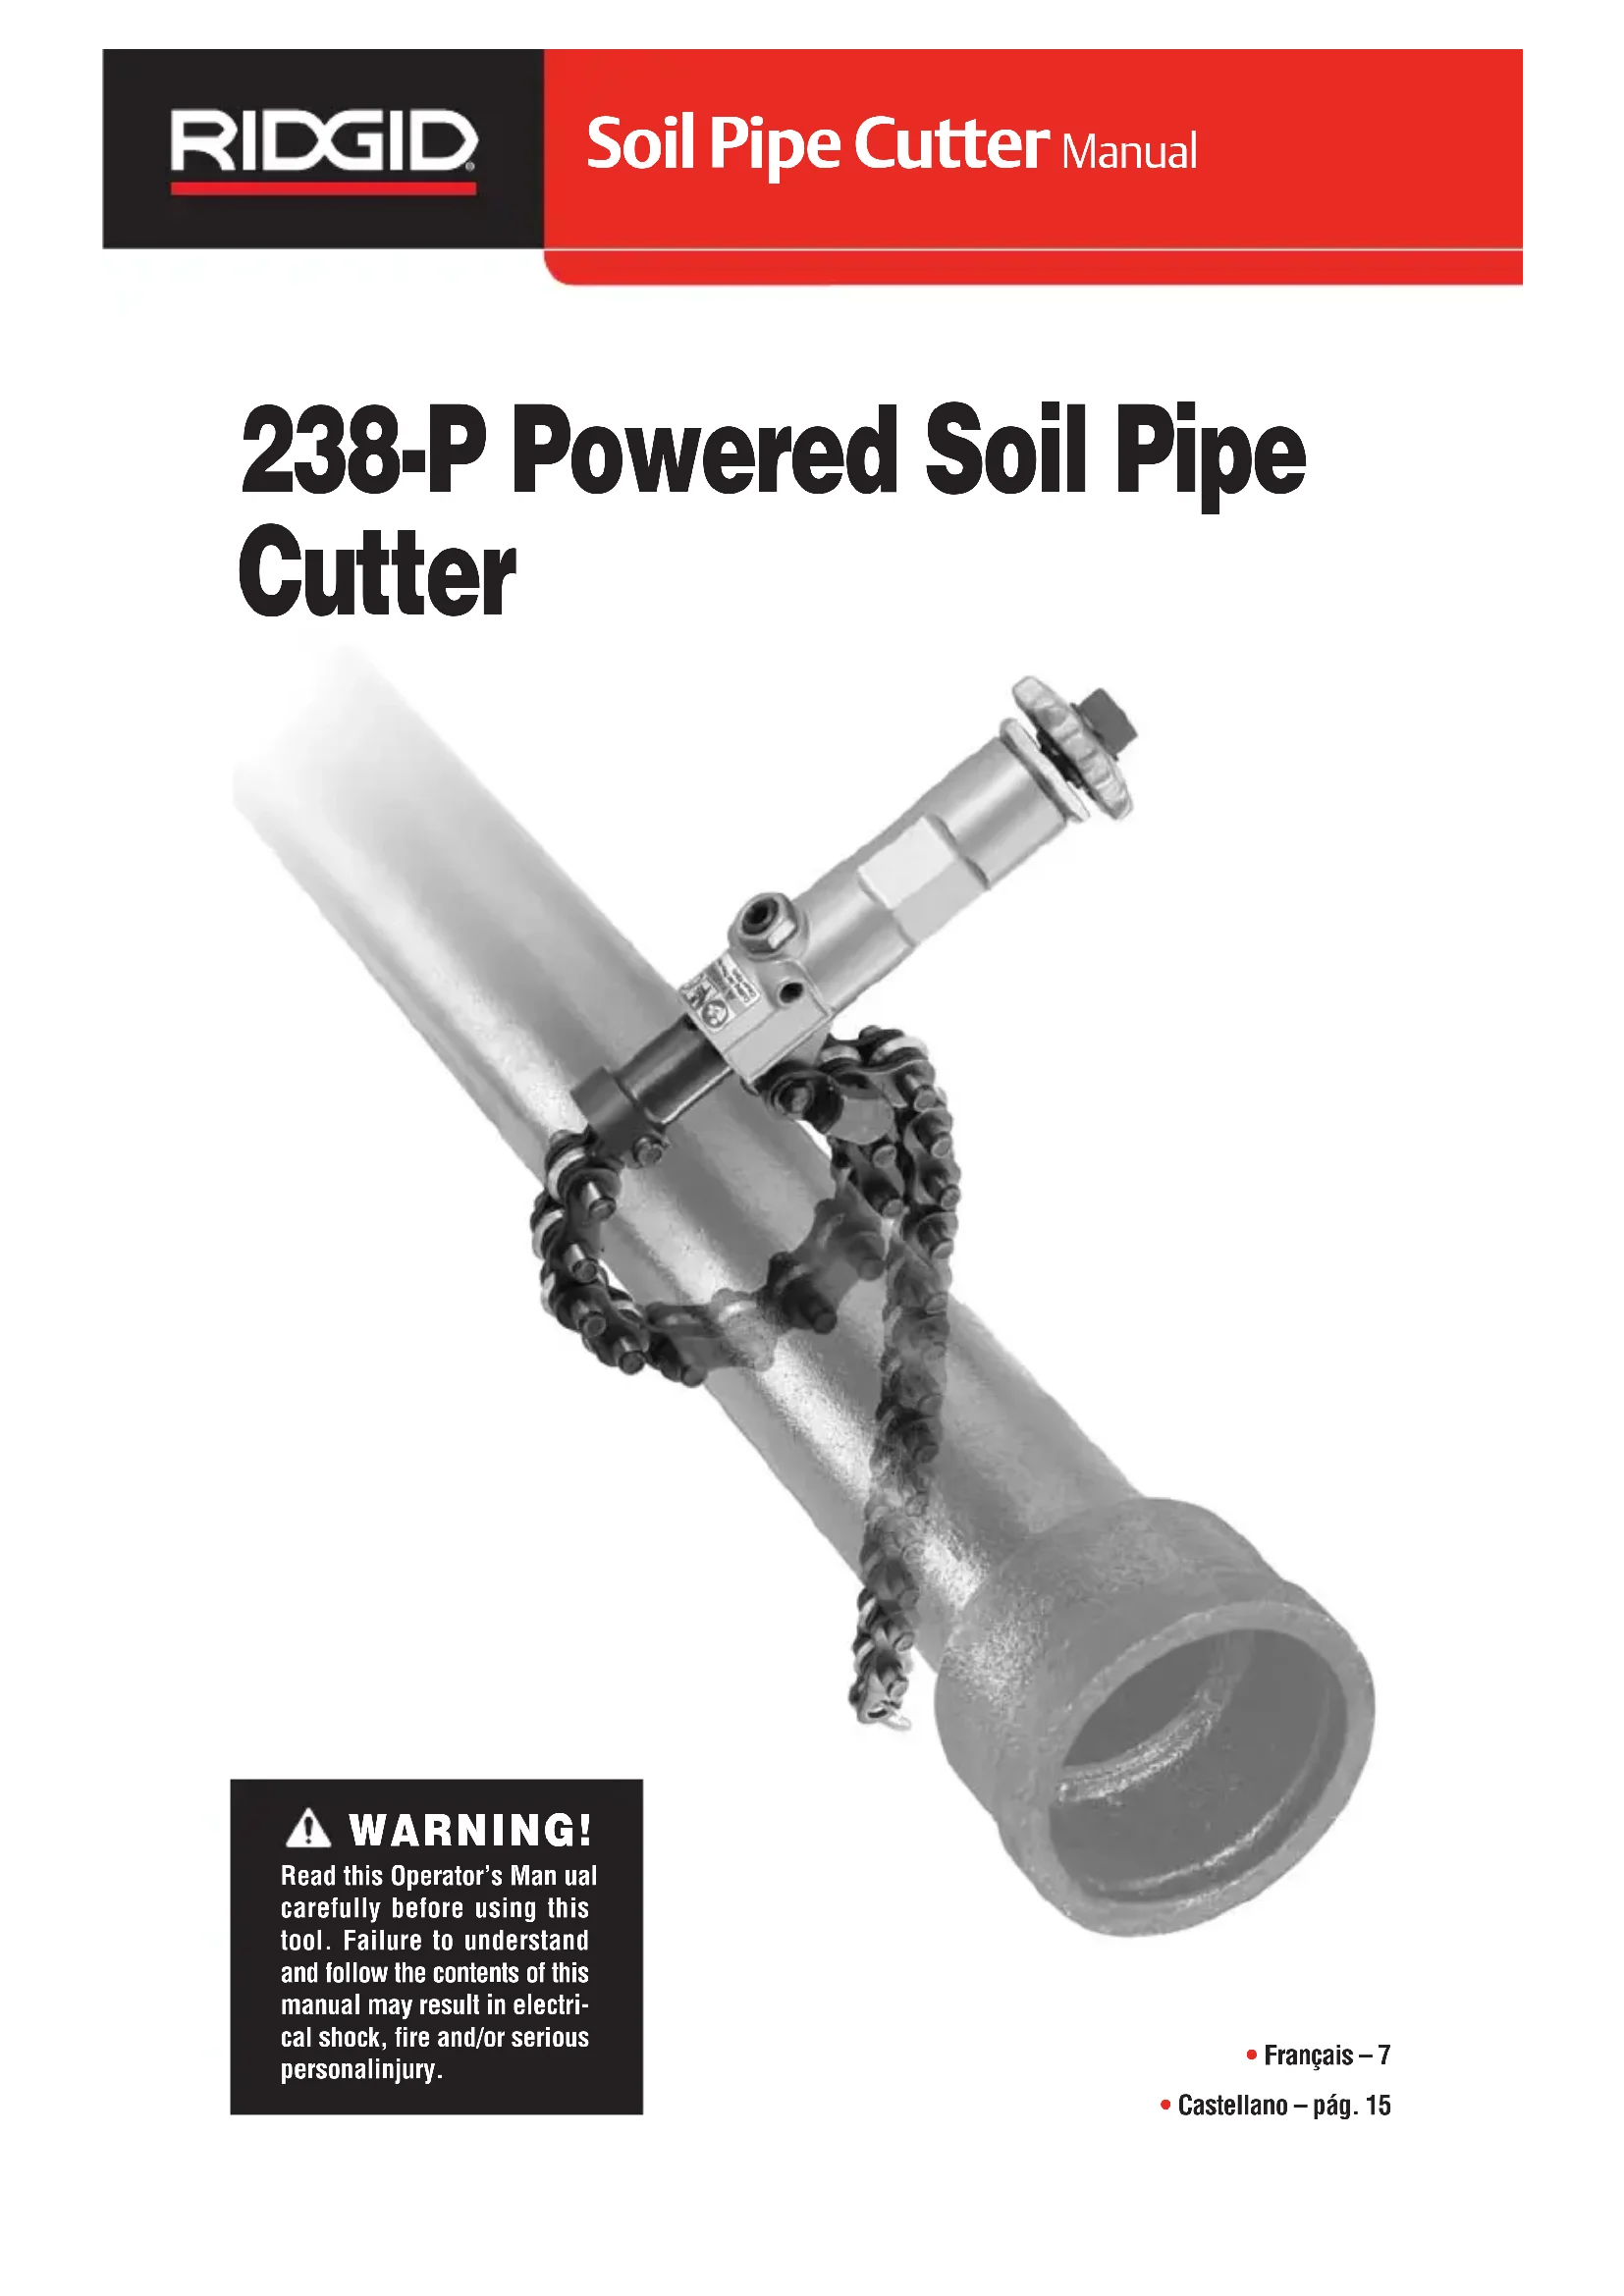
The RIDGID® 238-P Soil Pipe Cutter is used to cut a variety of cast iron soil pipe, concrete and clay pipe. It is a compact unit for use in close quarters. The 238-P Soil Pipe Cutter is designed to be actuated by a battery powered, corded or pneumatic 1/2'' drive impact tool. It can also be used manually with the included 1/2'' drive ratchet or a 118'' wrench for up to 4" (100 mm) nominal pipe. The 238-P uses a chain equipped with cutter wheels that is tightened around the pipe until the pipe breaks. The 238-P will cut service weight and no-hub cast iron soil pipe up to 8" (200 mm) nominal diameter. The feedscrew is equipped with a hand knob for fast manual adjustment. A unique hooking mechanism makes connecting the chain easier.
Specifications
Capacity
Service Weight Cast
Iron Soil Pipe.....up to 8" (200 mm) nominal
No-Hub Cast Iron
Soil Pipe ....up to 8" (200 mm) nominal
Clay Pipe.....up to 8" (200 mm) nominal
Concrete Pipe.....4" to 6" (100 mm to 150 mm) nominal
Weight....13.5 lbs (6.1 kg) (without handle or ratchet)
Size....11.5" (292 mm) long (fully open, not including handle, ratchet or chain)
Cutter Wheel
Diameter 1.25" (32 mm)
Chain Pin Length.....2" (51 mm)
An impact tool must have a torque rating of at least 200 Foot-pounds (271 N-m) for proper operation. Impacts with lower ratings may not cut all sizes and types of pipe. Do not use with impacts rated at over 400 Foot-pounds (542 N-m) of torque – this can damage the cutter.
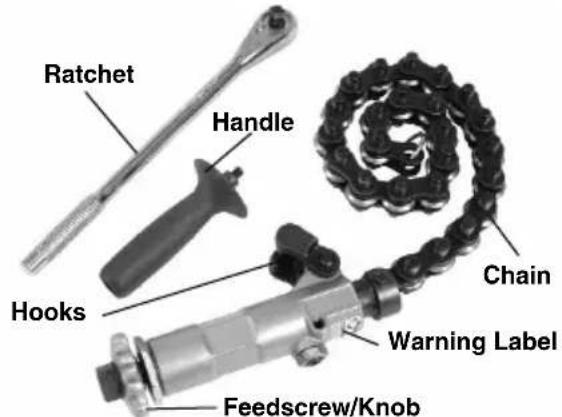
text_image
Ratchet Handle Hooks Chain Warning Label Feedscrew/KnobFigure 1 - 238-P Soil Pipe Cutter
Pre-Operation Inspection/Maintenance
WARNING
Before each use, inspect and maintain your soil pipe cutter and correct any problems to reduce the risk of serious injury from striking or impact injuries and other causes and to prevent soil pipe cutter damage.
- Clean the soil pipe cutter and remove all dirt, oil, grease and debris. If needed,
the chain can be cleaned with a wire brush. This aids in inspection and helps prevent the tool from slipping from your grip during use.
- Inspect the soil pipe cutter for the following items:
• Proper assembly and completeness
- Broken, cracked, missing, bent or binding parts
- Excessive corrosion and wear
- Smooth, free movement of screws, chain and linkages
- Presence and readability of the warning label (See Figure 1.)
- Inspect the chain for signs of overload or other damage. There should be no significant gaps between the plates of the chain. If there are large gaps between the links of the chain or other damage, the chain should be replaced. Check the cutter wheels for wear and damage. Worn and damaged cutter wheels increase cut force and can cause poor quality cuts.
- Inspect the impact tool and any other equipment being used as directed in their instructions.
- If any problems are found, do not use the soil pipe cutter until corrected.
- If needed, lubricate pivot points and the chain with a light lubricating oil. Wipe any excess oil off.
- Yearly (or more often under heavy use), disassemble the cutter by turning the hand flange clockwise (left hand thread). Remove the C-washer and unscrew the feedscrew from the cutter. Clean the feed-screw and washers and apply a good quality extreme pressure (EP designation) grease to points of relative motion when reassembling. See Figure 2.
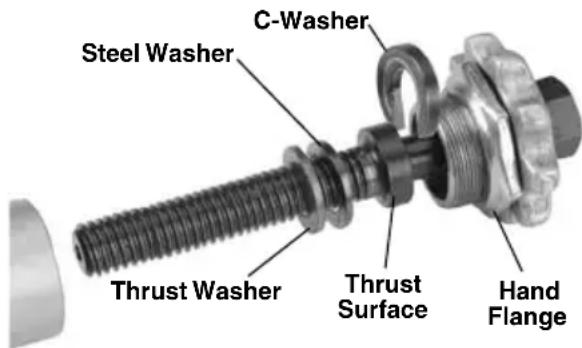
text_image
Steel Washer C-Washer Thrust Washer Thrust Surface Hand FlangeFigure 2 – Unit Assembly: Orient C-Washer and Steel Washer With Chamfer Towards Thrust Surface
Tool Set-Up and Operation
WARNING

Follow set up and operating instructions to reduce the risk of serious injury from striking or impact injuries and other causes and prevent machine damage.
Keep others out of work area while cutting. Stand clear of the pipe. Cutting can cause pieces of pipe to be thrown with considerable force. This can cause striking injuries, eye injuries, or other serious personal injury.
Always wear eye protection to protect your eyes against dirt and other foreign objects.
Keep your fingers and hands away from the cutting chain during the cutting cycle. They can be crushed, fractured or amputated if they become caught between the pipe and cutter or other objects.
- Check work area for:
- Adequate lighting
- Clear, level, stable place to work.
- Inspect the pipe to be cut. Determine the size and type of material. If cutting pipe that is already in service, determine the pipe contents.
- Determine the correct soil pipe cutter for the application. See the information in the Specification section. Other pipe cutters can be found in the RIDGID Catalog at www.RIDGID.com
-
Make sure that the soil pipe cutter has been properly inspected.
-
Prepare the pipe to be cut.
- Take any appropriate steps required to drain the pipe and/or deal with any potential spillage.
- Clean mud or corrosion off of the pipe. Excessive corrosion or mud can cause poor quality cuts and damage cutter wheels.
- Make sure there is enough room to get the chain around the pipe. Approxi mate - ly 1^1/2 (38 mm) of clearance is needed
around the pipe. If cutting loose pipe, to protect the cutter wheels from damage against concrete or other hard surfaces, place the pipe on short stands or wood block to get the pipe off the floor or work on a softer surface like a piece of plywood.
- When cutting short sections of pipe, if possible, restrain the pipe to prevent it from being thrown when cut. This can be done by placing a smaller piece of pipe or lumber through the center of the pipe, or by other methods.
-
For convenience, the side handle can be installed on either side of the cutter or removed from the cutter as needed.
-
Grip the adjusting knob of the soil pipe cutter and turn counter clockwise to fully open (Figure 3).
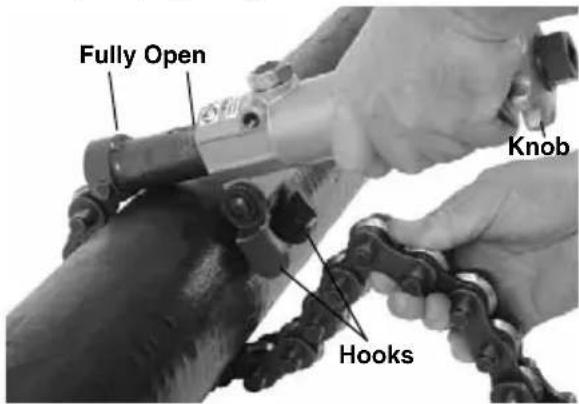
text_image
Fully Open Knob HooksFigure 3 – Cutter Fully Open, Hooking the Chain
-
Place the soil pipe cutter on the pipe so the cutter wheels line up with the desired cut point. Make sure both hooks are lying on the pipe with the open side up.
-
Wrap the chain snugly around the pipe and place the nearest chain pin into the hooks. The tool must be fully opened and the chain snugly wrapped around the pipe before hooking the chain. If not, the wrong pin may be hooked and the cut may not be able to be completed. This can also cause the cutter to jam. If that happens, fully open the tool and move the chain to the next tighter chain pin and continue operation as described.
-
Make sure that the cutter wheels are square to the pipe and at the desired location. Turn the adjusting knob clockwise to firmly tighten the chain around the pipe.
-
Choose a spot to operate the cutter from. Keep in mind that when the pipe is cut,
parts of it may be thrown. Make sure that the area is clear of others or objects that could be struck by pipe. Be aware that when the pipe is cut the soil pipe cutter and pipe could drop or fall.
natural_image
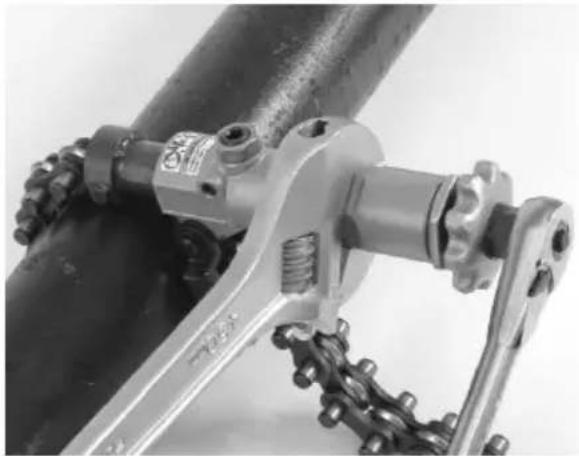
Close-up of mechanical linkage components with no visible text or symbolsFigure 4 – Operating the Powered Soil Pipe Cut - ter – Manual Operation
- If operating manually, (for up to 4" (100 mm) pipe) the ratchet used should lock firmly into place in the square drive. If using a different wrench, it may not lock in place and may come loose during operation. If needed, an adjustable wrench can be used to hold the body of the cutter. Do not use a pipe wrench to hold the cutter, this can damage the wrench teeth or cutter. Do not use the handle to hold the cutter while manually ratcheting, this can damage the handle.
natural_image
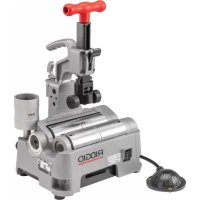
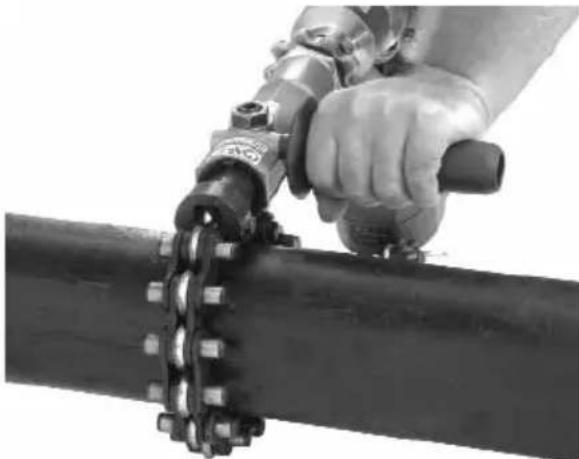
Close-up of a hand using a tool to lift a black pipe with chains attached (no visible text or symbols)Figure 5 – Operating the Powered Soil Pipe Cutter – Using Impact Tool
-
If using an impact tool, either insert the square drive into the end of the feed-screw, or using a 1^1/8 " impact socket, place the socket over the head of the feedscrew.
-
Assume a stable stance, and with a firm grip on the equipment, tighten the feed-
screw. Continue tightening until the pipe is cut.
Cutting Tips
Once the appropriate pin for a given size pipe has been determined; marking the pin can save time setting up subsequent cuts of the same size.
For cleaner cuts, instead of tightening the chain until the pipe is cut, tighten the chain enough to mark the pipe. Then loosen the chain and slightly rotate the pipe or the tool and make another set of marks. Do this several times to create marks all the way around the pipe, then tighten the chain and break the pipe.
When carrying your soil pipe cutter, do not drag the chain. This can wear and damage the cutter wheels, increasing cut force and cause poor cut quality.
Corroded pipe can crush during cutting. Try not to cut pipe where corroded.
Cutting off short sections of pipe (less than one pipe diameter) can cause the pipe to cut unevenly, crack or break.
natural_image
Close-up of a metallic pipe fitting with a coiled chain and attached bracket (no visible text or symbols)
AVERTISSEMENT
natural_image
Close-up of a mechanical linkage assembly with chains and components (no visible text or symbols)natural_image
Close-up of a hand using a tool to connect a pipe fitting with a black valve (no text or symbols visible)natural_image
Close-up of a metallic pipe fitting with a coiled black rope and bolt, no visible text or symbols
ADVERTENCIA!
natural_image
Close-up of a mechanical linkage assembly with chain links and bolts (no visible text or symbols)natural_image
Close-up of a hand using a tool to adjust or install a black pipe fitting with metal fittings (no visible text or symbols)RIDGID®tools are warranted to be free of defects in workmanship and material.
How long coverage lasts
This warranty lasts for the lifetime of the RIDGID® tool. Warranty coverage ends when the product becomes unusable for reasons other than defects in workmanship or material.
How you can get service
To obtain the benefit of this warranty, deliver via prepaid transportation the complete product to RIDGE TOOL COMPANY, Elyria, Ohio, or any authorized RIDGID INDEPENDENT SERVICE CENTER. Pipe wrenches and other hand tools should be returned to the place of purchase.
What we will do to correct problems
Warranted products will be repaired or replaced, at RIDGE TOOL'S option, and returned at no charge; or, if after three attempts to repair or replace during the warranty period the product is still defective, you can elect to receive a full refund of your purchase price.
What is not covered
Failures due to misuse, abuse or normal wear and tear are not covered by this warranty. RIDGE TOOL shall not be responsible for any incidental or consequential damages.
How local law relates to the warranty
Some states do not allow the exclusion or limitation of incidental or consequential damages, so the above limitation or exclusion may not apply to you. This warranty gives you specific rights, and you may also have other rights, which vary, from state to state, province to province, or country to country.
No other express warranty applies
This FULL LIFETIME WARRANTY is the sole and exclusive warranty for RIDGID® products. No employee, agent, dealer, or other person is authorized to alter this warranty or make any other warranty on behalf of the RIDGE TOOL COMPANY.

text_image
RIDGID FULL LIFETIME WARRANTY Against Material Defects & WorkmanshipParts are available online at RIDGIDParts.com

Ridge Tool Company
400 Clark Street
Elyria, Ohio 44035-6001
U.S.A.
Ce qui est couvert
We Build Reputations™ RIDGID

EMERSON.
Commercial & Residential Solutions