
VL100 - Vacuum Cleaner NILFISK - Free user manual and instructions
Find the device manual for free VL100 NILFISK in PDF.
| Product type | Wet and dry vacuum cleaner |
| Brand | Nilfisk |
| Model | VL100 |
| Tank capacity | 35 L, 55 L, 75 L |
| Usage | Commercial |
| Supply voltage | 230 V (depending on model) |
| Nominal power | Approximately 1200 W |
| Main filter | Stainless steel filter |
| Secondary filter | Washable cloth filter |
| Dust bag | Cloth, reusable |
| Automatic shut-off system | Float for wet suction |
| Suction regulator | Yes, on the hose |
| Suction hose | With Multi-fit connector |
| Drain hose | Yes (55L and 75L models) |
| Included nozzles | Round brush, angled nozzle, tools for wet and dry |
| Power cord length | Approximately 6 m |
| Weight | Approximately 12 kg |
| Maintenance | Regularly clean filters and tank |
| Safety | Do not vacuum hazardous materials, unplug before maintenance |
| Spare parts and repairability | Carbon brushes replaceable by authorized center |
| Warranty | Contact local Nilfisk center |
Frequently Asked Questions - VL100 NILFISK
User questions about VL100 NILFISK
0 question about this device. Answer the ones you know or ask your own.
Ask a new question about this device
Download the instructions for your Vacuum Cleaner in PDF format for free! Find your manual VL100 - NILFISK and take your electronic device back in hand. On this page are published all the documents necessary for the use of your device. VL100 by NILFISK.
USER MANUAL VL100 NILFISK
Wet & Dry Vacuum Cleaner
Instruction for use

Rev. 2021/09/26
Form No. VA81941
natural_image
Line drawings of three different vacuum cleaner units with wheels and control panels (no text or symbols)Models:
VL100 35L/VL100 55L/VL100 75L
Manufacturer / Výrobce / Hersteller / Fabrikant / Fabricante / Κατασκευαστής / Gyártó / Proizvođač / Fabbricante / Gamintojas / Ražotājs / Produsent / Fabrikant / Fabricante / Producent / Producător / производитель / Tillverkaren / Výrobca / Proizvajalec/ Üretici firma:
Nilfisk A/S, Kornmarksvej 1
DK-2605 Broendby, DENMARK
Product / Produkt / Producto, Toode, Produit, Tuote/ Produkt / Ppoïov / Termék / Proizvod / Prodotto / Produktas / Produkts / Artikel / Produtos / Produs / Izdelek / Ürün
VL100 35L, -55L, -75L
Description / Popis / Beschreibung / Beskrivelse / Descripción / Kirjeldus / La description / Kuvaus / Описание / Пεριγραφή / Leirás / Opis / Descrizione / Aprašymas / Apraksts / Beschrijving / Descrição / Descriere / Beskrivning / Popis / Açıklama
VAC - Commercial - Wet/Dry 220-240V 50/60Hz, IP44

We, Nilfisk hereby declare under our sole responsibility, that the above mentioned product(s) is/are in conformity with the following directives and standards.

Authorized signatory:
Lars Gjødsbøl, Executive Vice President Global Products & Services
Aug 7, 2018
UK Declaration of Conformity
We,
Nilfisk Ltd
Nilfisk House, Bowerbank Way Gilwilly Industrial Estate
Penrith Cumbria
CA11 9BQ UK
Hereby declare under our sole responsibility that the
Products: VAC - Commercial - Wet/Dry
Description: 220-240V 50-60Hz, IP44
Type: VL100 35L, -55L, -75L
Are in compliance with the following standards:
EN 60335-1:2012+A11:2014+A13:2017
EN 60335-2-69:2012
EN 55014-1:2017+A11:2020
EN 55014-2:2015
EN 61000-3-2:2014
EN 61000-3-3:2013
EN 63000:2018
Following the provisions of:
Supply of Machinery (Safety) Regulations 2008/1597
Electromagnetic Compatibility Regulations 2016/1091
The Restriction of the Use of Certain Hazardous Substances in Electrical and Electronic Equipment Regulations 2012/3032
Penrith, 11-1-2021
Stewart
Dennett
GM/MD
TABLE OF CONTENTS
ENGLISH ---- OPERATING INSTRUCTIONS ---- 3-6,7-9
F1
F2
F3
natural_image
Line drawing of a vacuum cleaner with attached hose and push button, labeled F5 (no text or symbols on the device itself)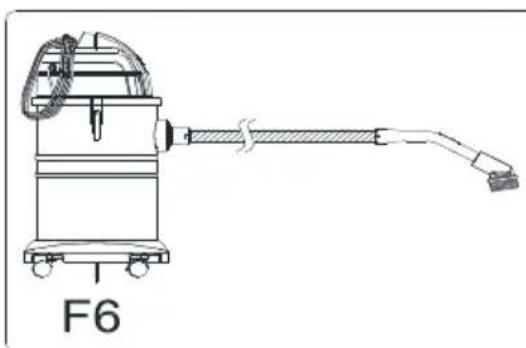
natural_image
Technical line drawing of a mechanical device labeled F6, showing a shaft and housing assembly (no text or symbols beyond label)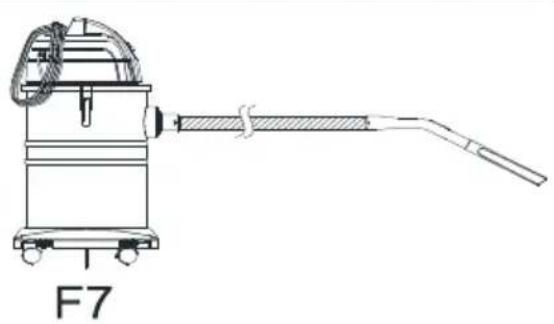
natural_image
Technical line drawing of a mechanical device labeled F7, showing a shaft and housing assembly (no text or symbols beyond label)

Product Specicaon Parameter 规格参数 (Form 1/表 1)
| Model No. | Capacity (L) | Voltage (V) | Frequency (Hz) | Power (W) | Vacuum (mmH2O) | Air Flow (ltr/min) | Noise (dBA) |
| VL100 35L | 35 | 220~240V | 50/60 | 1000 | 1840 | 1869 | 74 |
| VL100 55L | 55 | 220~240V | 50/60 | 2000 | 2005 | 3115 | 78 |
| VL100 75L | 75 | 220~240V | 50/60 | 2000 | 2005 | 3115 | 78 |
SAFETY PRECAUTION
- This appliance can be used by children aged from 8 years and above and persons with reduced physical, sensory or mental capabilities or lack of experience and knowledge if they have been given supervision or instruction concerning use of the appliance in a safe way and understand the hazards involved.
- Children shall not play with the appliance.
- Cleaning and user maintenance shall not be made by children without supervision.
INTRODUCTION
This manual will help you get the most from your Nilfisk wet & dry vacuum cleaner. Read it thoroughly before operating the machine.
This is a wet and dry vacuum cleaner, used for water and dust suction from the floor. It is recommended for commercial use.
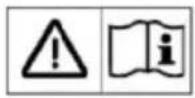
MACHINE STRUCTURE DESCRIPTION
VL100 35L Structure Description (Refer to page 1 "F1")
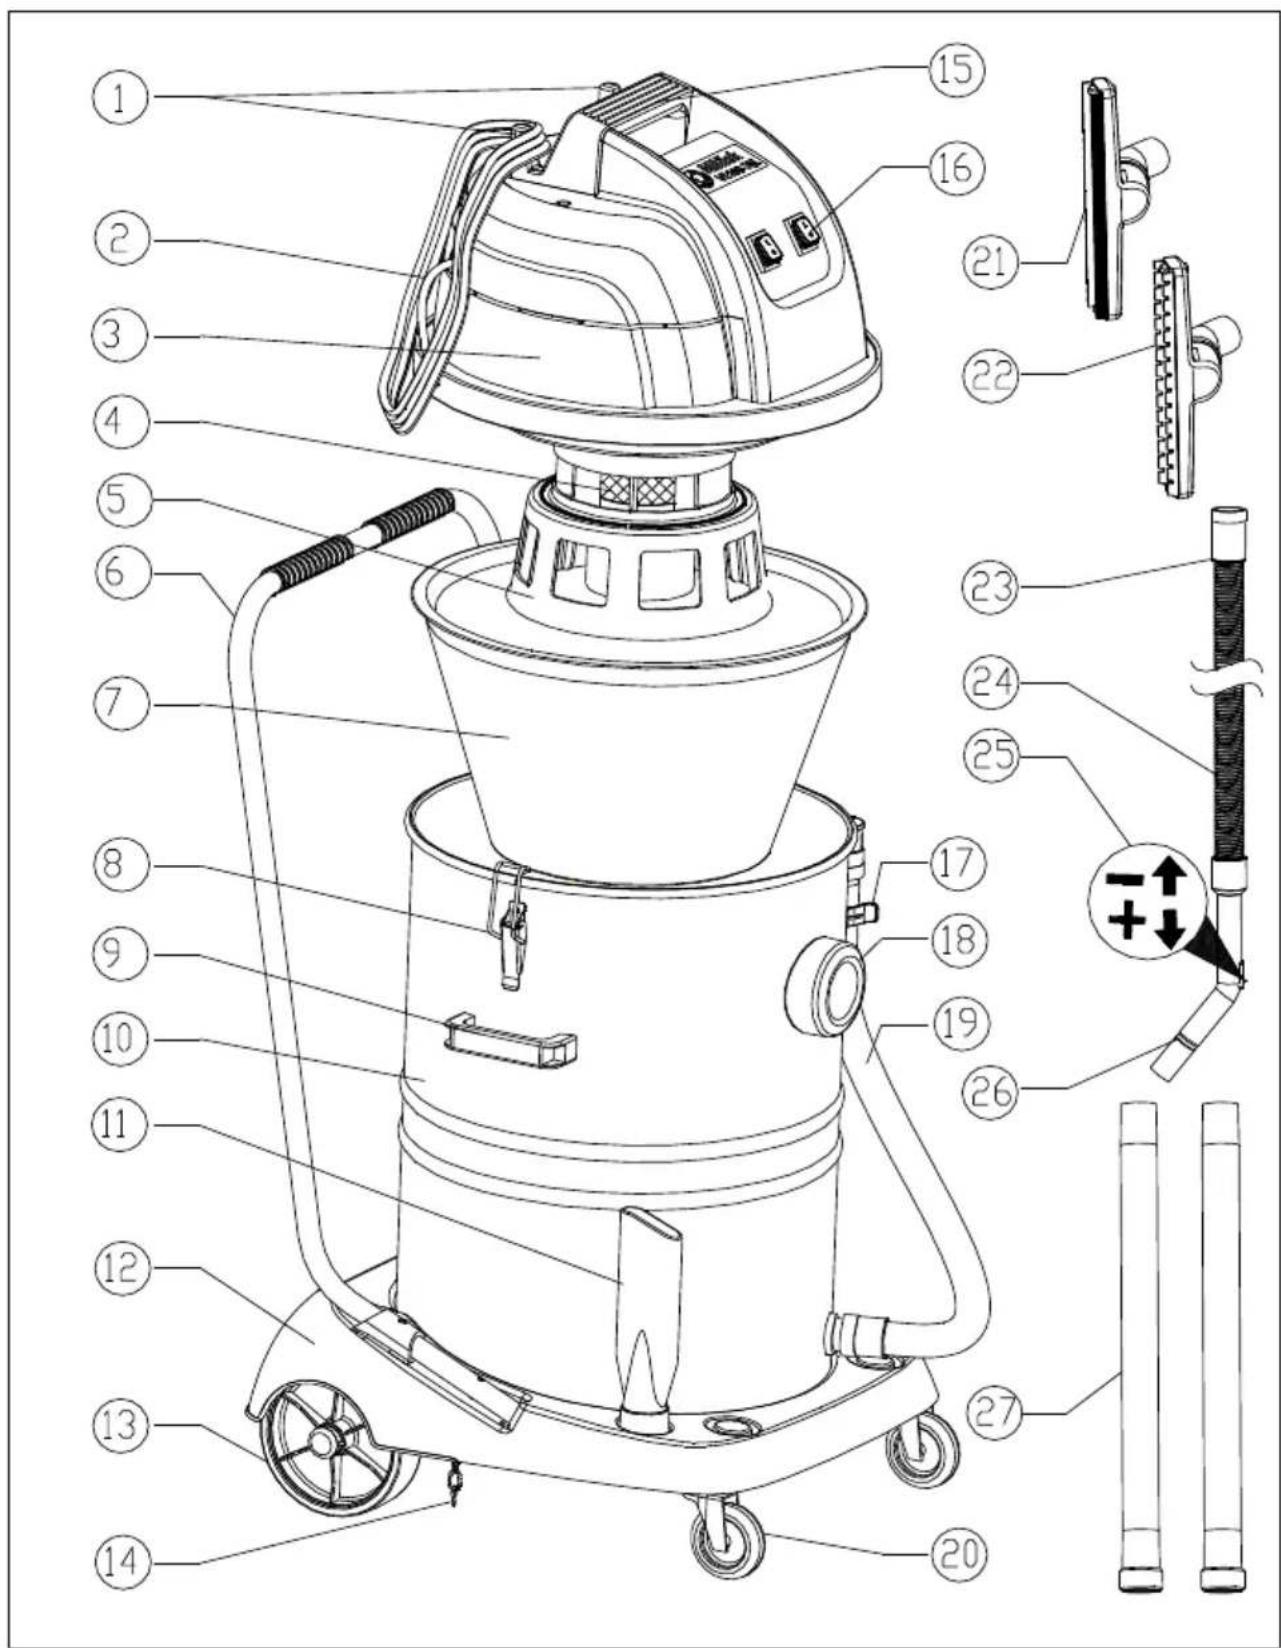
- Cable Storage Holder 2. Power Cord 3. Motor Head Assembly 4. Stainless Steel Filter 5. Float Cup Holder 6. Cloth Filter 7. Container Catch 8. Container 9. Container Base 10. Caster 11. Ground Chain 12. Machine Head handle 13. Power Switch 14. Hose Inlet 15. Dusting Tool 16. Crevice Tool 17. Wet Pick-up Tool 18. Dry Pick-up Tool 19. Extension Tube 20. Multi-fit Hose Connector 21. Suction Hose 22. Bent End 23. Suction Force Regulator
VL100 55/75L Structure Description (Refer to page 2 "F2")
- Cable Storage holder 2.Power Cord 3.Motor head Assembly 4.Stainless Steel Filter 5.Float Cup Holder 6.Push Handle 7.Cloth Filter 8.Container Catch 9.Container Lifting Handle 10.Container 11.Crevice Tool 12. Container Base 13.Rear Wheel 14.Ground Chain 15.Motor Head Handle 16.Power Switch 17.Drain Hose Clamp 18.Hose Inlet 19.Drain Hose 20.Caster 21.Wet Pick-up Tool 22.Dry Pick-up Tool 23.Multi-fit Hose Connector 24.Suction Hose 25.Suction Force Regulator 26.Bent End 27.Extension Tube
Operation Instructions
Starting and operating of the machine
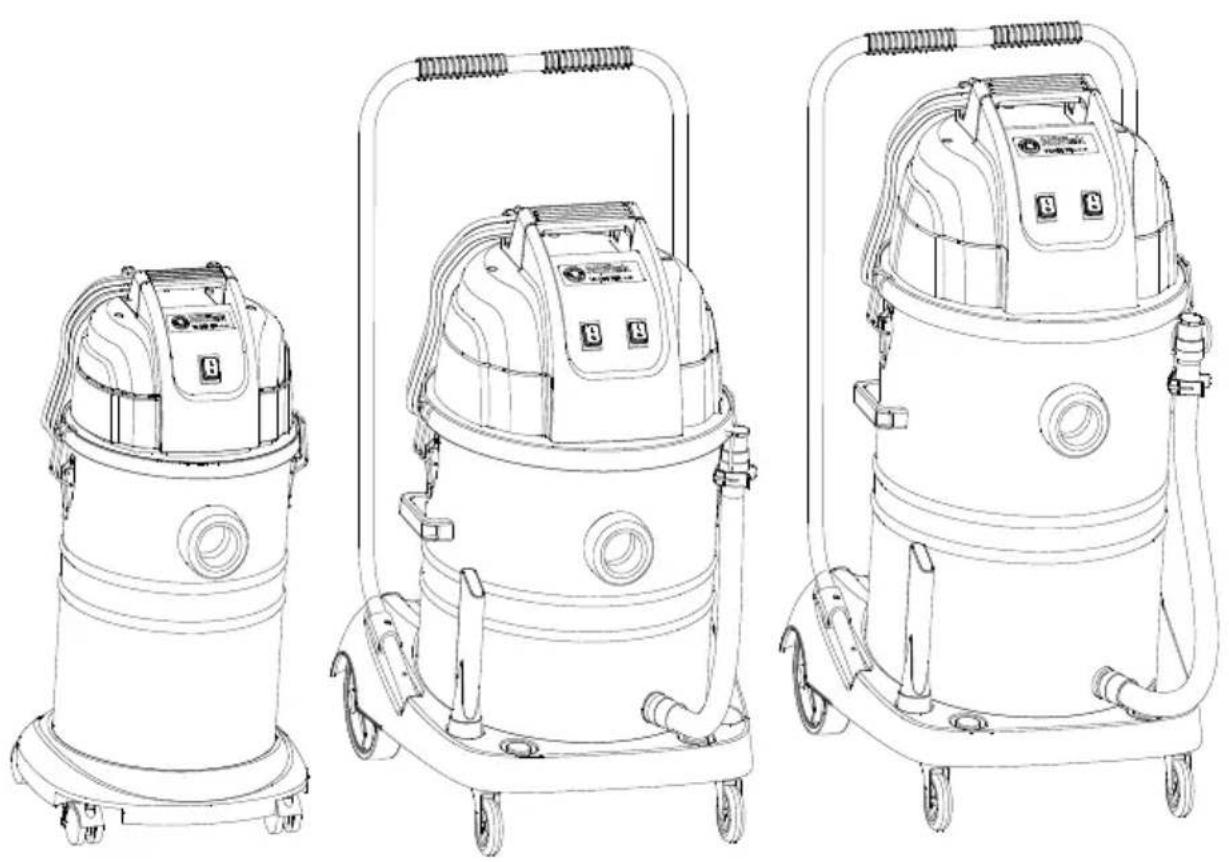
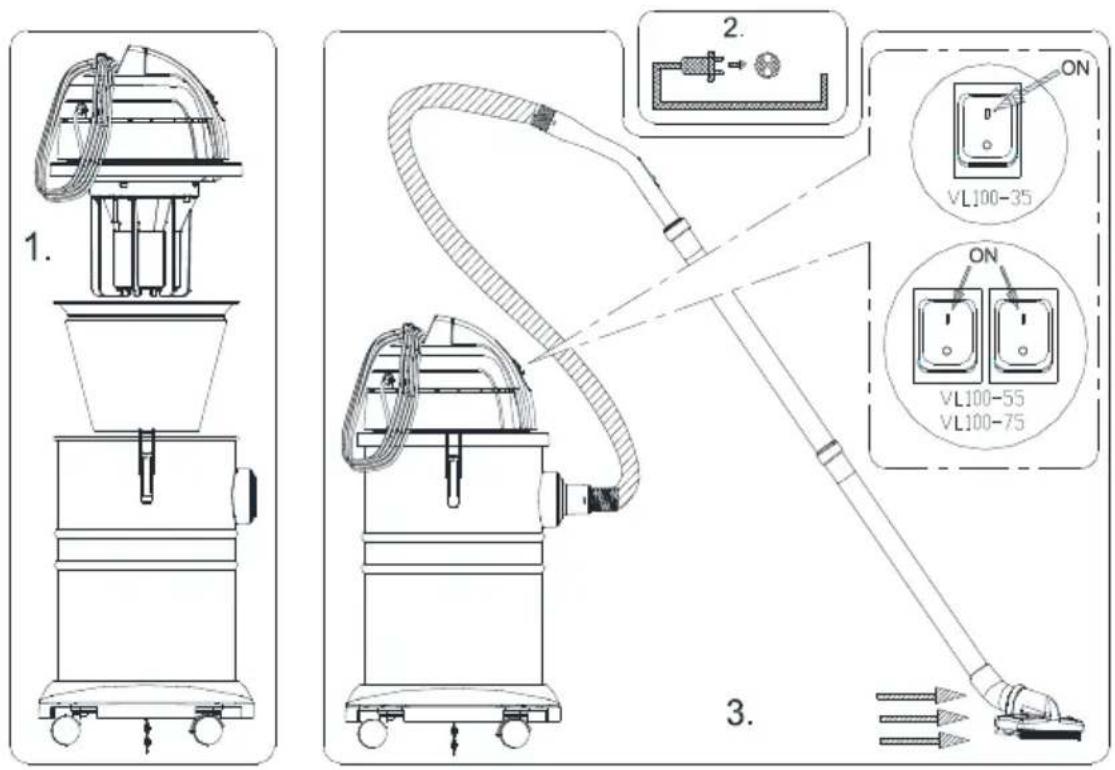
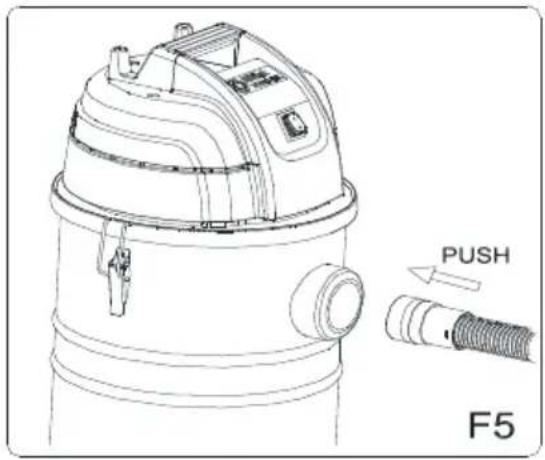
Check that suitable filters are installed in the machine. Then connect the suction hose into the Multi-fit inlet on the container by pushing the hose forward until is fits firmly in place (This Operation is referred to in Page 3 “F5”). Then assemble the drain hose with hoop (This Operation is referred to in Page 4 “F8”; Olny the VL100 55/75L need this operation). Then connect the two tubes and suitable nozzle.
Dry Operation
The dry filter assembly and dust collection bag must always be used. Ensure that the container is emptied of any liquid before using for dry pick-up and that the cloth filter is in a clean and dry condition.
When the suction force is reduced or the machine noise is becomes louder, switch off the machine and remove the power cord plug. Loosen the container catchesand
remove the motor head assembly. Shake and clean the filter assembly into the container. This should be done while the hose is still connected to avoid dust exiting from the open hose connection. Having shaken the filter, allow a few moments for the dust to settle. Remove the dust filter assembly from machine and empty the container. If the filter's surface appears to be heavily contaminated, it is advisable to brush the filter material clean with an ordinary soft household brush. This ensures continued peak performance. Having emptied the container, replace the dust filter assembly, replace the motor head assembly and lock tank catches. You are now ready to start again. If the above procedure does not resolve the low suction, please check if the suction hose is blocked.
(Dry Control and Operation is referred to in Page 3 "F3")
Use crevice tool for narrow spaces eg narrow gaps and corners (Control and Operation is referred to in Page 3 "F7")
Use Dusting tool to clean more sensitive or fabric surfaces e.g. curtains (Control and Operation is referred to in Page 3 “F6”)
Wet Operation
Ensure to empty any dry dust from the container before using the machine for wet pick-up.
Always be sure to use wet pick-up tool with rubber blades.
Take out dust bag for wet applications, If the fluid is likely to generate foam, we suggest use the Dry Filter Assembly, which will help prevent foam entering the motor head. When the container fills to its maximum, the suction will stop and the sound of the machine will increase. Switch off the machine and remove the power cord. Remove the motor head and float valve assembly.
Move the machine to the drain and empty the liquid from the container via the drain hose.
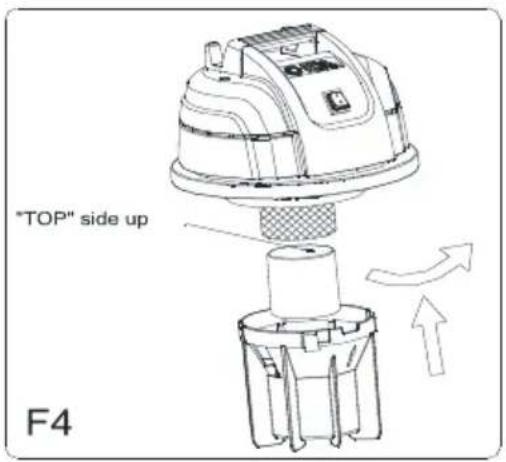
If the suction power becomes lower, the float and filter system may require cleaning. Switch off the machine, remove the power cord and loosen the float basket by turning the basket to the left. A filter is located in the float basket. Check and clean the filter, then reinstall the float system, and make sure that the cup's “TOP” side is installed upwards in the direction towards the motor top. To mount the float basket-align the arrow on the basket to the arrow on the housing. Then secure the float basket by turning it to the right. (Control and Operation can be referred Page 3 “F4”)
Warranty
For your warranty terms, please contact your local Nilfisk Service Centre
Attention!!! Before performing any cleaning and maintenance on the vacuum cleaner, always disconnect the plug from the power source.
- Make sure that the cable is not broken or damaged.
- Clean the container, do not let it stand for a long time with dust or dirty water.
- The cloth dust bag can be washed and must be dried again before re-use
- The motor is built for maintenance-free operation and does not need any particular
service. The carbon brushes may need to be replaced due to normal wear and tear caused by using the vacuum cleaner over time, and they can be replaced only by our authorized service centers.
WARNING
As with all electrical equipment, care and attention must be exercised at all times during its use and operation. In addition, ensure that routine and preventative maintenance is carried out periodically in order to ensure safe operation.
Failure to carry out maintenance as necessary, including the replacement of parts to the correct standard could render this equipment unsafe and the manufacturer can accept no responsibility or liability in this respect.
The following material must not be picked up by the vacuum cleaner:
Hazardous dust, hot materials (burning cigarettes, hot ash ,etc.), flammable,explosive, aggressive liquids(e.g. Petrol, solvents, acids, alkalis ,etc.), flammable explosive dust(e.g. magnesium or aluminum dust, etc.)
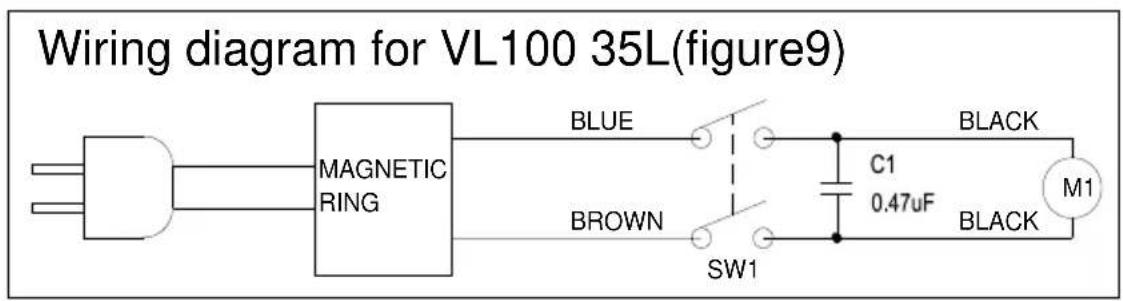
For wiring diagrams, refer to page 5 "Figure9/figure10".
Product Specification Parameter, refer to Page 5 "Form1".
EINFÜHRUNG


- Wet & Dry Vacuum Cleaner
- Instruction for use
- UK Declaration of Conformity
- TABLE OF CONTENTS
- SAFETY PRECAUTION
- INTRODUCTION
- MACHINE STRUCTURE DESCRIPTION
- VL100 35L Structure Description (Refer to page 1 "F1")
- VL100 55/75L Structure Description (Refer to page 2 "F2")
- Operation Instructions
- Starting and operating of the machine
- Dry Operation
- (Dry Control and Operation is referred to in Page 3 "F3")
- Wet Operation
- Warranty
- WARNING
- EINFÜHRUNG
Brand : NILFISK
Model : VL100
Category : Vacuum Cleaner