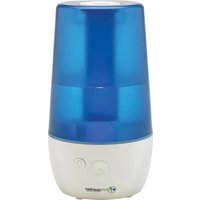
H8000B - Humidifier PureGuardian - Free user manual and instructions
Find the device manual for free H8000B PureGuardian in PDF.

| Product Type | Ultrasonic Cool/Warm Mist Humidifier |
| Brand | PureGuardian |
| Model | H8000B |
| Power Supply | 120 V, 60 Hz |
| Power Consumption | 30 W (cool mist), 130 W (warm mist) |
| Tank Capacity | 7.5 L (2.0 gal) |
| Maximum Runtime | Up to 120 hours |
| Dimensions (L x W x H) | 16 cm x 16 cm x 33 cm |
| Weight | 2.7 kg (6.0 lb) |
| Functions | Cool and warm mist, automatic humidistat (50%), adjustable humidistat (40%–75%), timer (1-12 hrs), 3 mist levels, nightlight |
| Anti-Mold Technology | Silver Clean™ integrated in tank |
| Safety | Automatic shut-off when water level is low |
| Cleaning | Cleaning brush included; descaling with white vinegar if needed |
| Included Spare Parts | Mist nozzle, cap, mist extenders, cleaning brush |
| Optional Accessory | FLTDC Anti-Scale Cartridge |
| Warranty | 3-year limited |
| Recommended Water | Soft or distilled water to reduce white dust |
Frequently Asked Questions - H8000B PureGuardian
User questions about H8000B PureGuardian
0 question about this device. Answer the ones you know or ask your own.
Ask a new question about this device
Download the instructions for your Humidifier in PDF format for free! Find your manual H8000B - PureGuardian and take your electronic device back in hand. On this page are published all the documents necessary for the use of your device. H8000B by PureGuardian.
USER MANUAL H8000B PureGuardian
guardian technologies™
USE & CARE INSTRUCTIONS
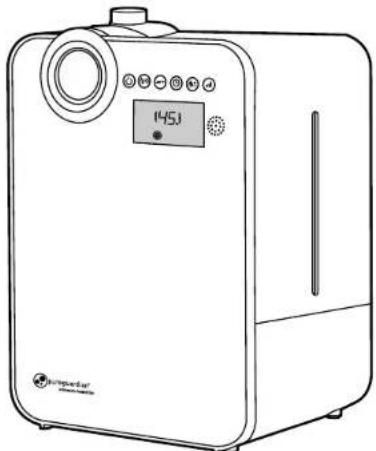
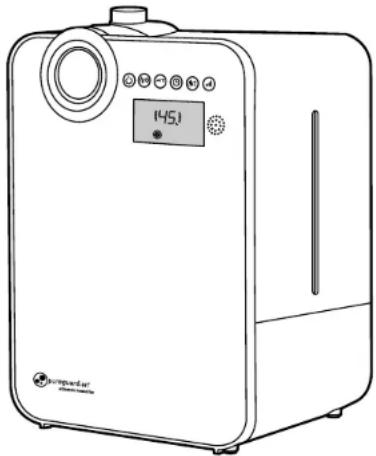
natural_image
Line drawing of a portable water purifier with control panel and digital display (no text or symbols)
pureguardian®

guardian technologies™
Guardian Technologies LLC 26251 Bluestone Blvd. | Euclid, Ohio 44132 1.866.603.5900 | www.guardiantechnologies.com
Ultrasonic Humidifier
Model No. H8000
3-Year Limited Warranty www.guardiantechnologies.com 1.866.603.5900 REV0516
English E-1 French F-1 Spanish S-1
Date Purchased month ____ year ____
READ AND SAVE THESE INSTRUCTIONS WARNINGS
Failure to comply with the warnings listed below may result in electric shock or serious injury.

This product should be used only in accordance with the specifications outlined in this manual. Usage other than what has been specified here may result in serious injury.
- CAUTION: To reduce the risk of severe burns, keep this product out of the reach of children and pets.
- Disassembly, repair or remodeling by an unauthorized person may result in serious harm and will void the manufactures warranty.
- Always place this humidifier on a firm, flat & level surface. This humidifier may not work properly on an uneven surface.
- Do not place this product on cloth, carpet or an absorbent surface. This may block air inlet.
- This product releases mist. Do not place this humidifier directly on wood furniture, flooring or any surfaces that could be damaged by water. Manufacturer does not accept any liability for damage in the case of the unit being placed incorrectly.
- Do not use if the plug is damaged or loose.
- Before filling or cleaning the unit, make sure it is unplugged.
- Once the humidifier has been plugged in, do not tilt or move the unit.
- Do not remove the water tank from the unit while it is on.
- Do not handle the plug with wet hands.
- Do not excessively bend, twist, pull or damage the power cord.
- Avoid placing this product where the humidity spout is pointed directly at an object or person.
- Do not inhale the mist/vapor expelled from the product or drink water from the tank.
- Do not fill the water tank with hot or boiling water.
- Do not use this product in direct sunlight or near a heat source such as a stove, heater or radiator.
- If the water tank becomes cracked or damaged, do not use.
- Do not keep this product running for an extended period of time.
- Unplug the cord when unit is not in use for an extended period of time and/or when no one is home.
- Do not keep water in the tank when not in use for an extended period of time.
WARNING: The cords, wires and/or cables supplied with this product contain chemicals, including lead or lead compounds, known to the state of California to cause cancer and birth defects or other reproductive harm. Wash hands after using.
(California code of regulations Proposition 65)
READ AND SAVE THESE INSTRUCTIONS WARNINGS
Failure to comply with the warnings listed below may result in electric shock or serious injury.
- Do not clean the unit, water tank or water reservoir with detergents or chemicals of any kind.
- The use of water additives including ethereal/essential oils, fragrances, eucalyptus, water conditioners, etc. will damage the appliance materials and as a consequence the whole unit. Any use of such additives will void the manufactures warranty.
- Do not use this product near any other electronic device.
- Do not cover the spray spout at any time during use. Do not put anything on or in the tank.
- IMPORTANT: Neither humans nor animals can hear the high frequency vibrations.
- When unplugging from outlet hold humidifier securely.
- Do not place cord over objects.
- Do not get water in or on the power cord or where it connects to the product. Do not use near a sink.
- Do not touch the water tank during operation.
- Do not submerse the unit in water or pour water on the unit or in the humidity spout.
- When emptying water from water tank, pour on drain side.
- Do not cover the spout with cloth or hand and do not use without the spout.
- Use clean or distilled water in tank. Hard water areas will require more frequent cleaning.
PRODUCT SPECIFICATIONS AND PARTS
SPECIFICATIONS
MODEL NUMBER: H8000
HUMIDIFYING MODE: Cool/Warm Ultrasonic Mist
POWER SUPPLY: 120V, 60Hz
POWER CONSUMPTION: 30W (Cool Mist); 130W (Warm Mist)
TANK CAPACITY: 2.0 gallons
SUCCESSIVE HUMIDITY HOURS: Up to 120 hours depending on environmental conditions
DIMENSIONS: 7.25"L x 9.76"W x 13.98"H
WEIGHT: 6.0 pounds
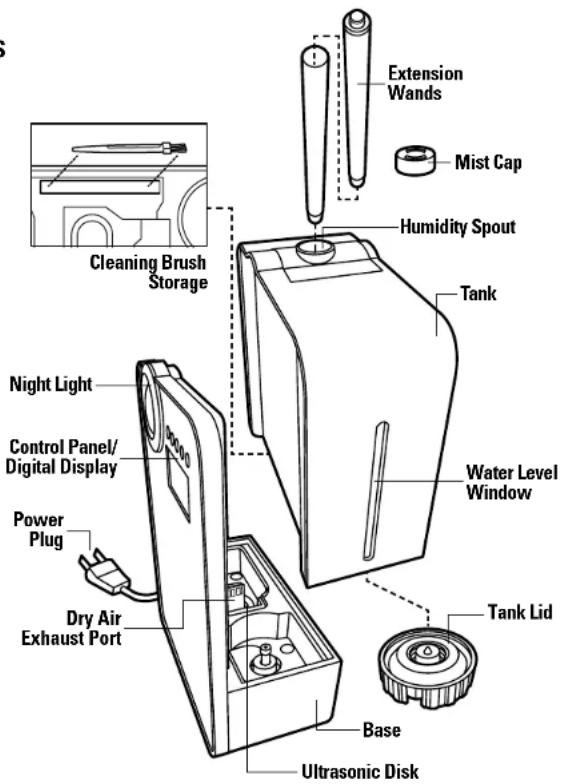
PARTS
CONTROL PANEL TOUCH FUNCTIONS
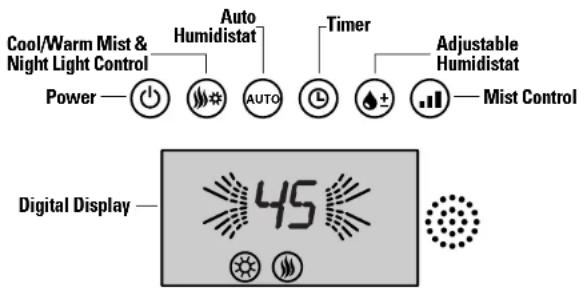
FEATURE HIGHLIGHTS
POWER
Turns humidifier ON/OFF.
Select humidifying temperature based on need. Warm humidity will use more power but will humidify your room quicker. Turns night light on/off.
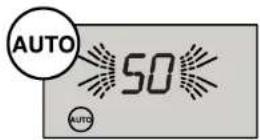
AUTO HUMIDISTAT
Monitors the humidity in the room and adjusts output to maintain an ideal humidity of 50%.
TIMER
Preset the humidifier to automatically turn off in 1 to 12 hours.
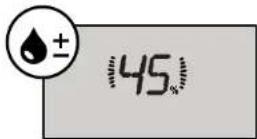
ADJUSTABLE HUMIDISTAT
Preset the humidifier to run at necessary time and mist control setting to reach desired humidity.
MIST CONTROL
The spray volume or amount of mist that is produced by the unit can be adjusted to three levels based on need.
SILVER CLEAN TECHNOLOGY
Unlike other humidifiers that grow slimy mold and mildew, the pureguardian™ Ultrasonic Humidifier uses Silver Clean™ technology embedded in the tank to fight the growth of mildew and mold on the surface of the water tank.
DIRECTIONS FOR USE DIRECTIONS FOR USE
SET UP
Select a firm, level, flat location - at least six inches (15 cm) from any wall or object for proper air flow. Place the humidifier on a water-resistant surface, as water can damage furniture and some flooring. Do not place unit directly on carpet, towels, blankets or other absorbent surfaces.
Guardian Technologies will not accept responsibility for damage caused by water spillage.
FILLING
Make sure unit is unplugged.
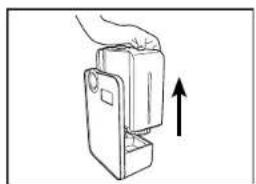
natural_image
Line drawing of a hand holding a device with an upward arrow indicating motion (no text or symbols)- Separate the tank from the base of the unit.
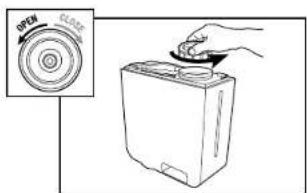
- Flip over water tank and open the tank lid, turning it to the left.
natural_image
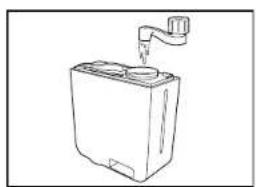
Line drawing of a mechanical device with a lever and base (no text or symbols)- Pour cool, clean water directly into the tank. Do not pour anything but water into the tank.
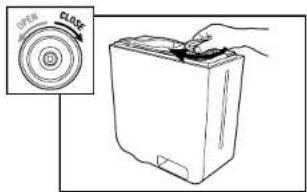
- Close the tank lid, turning it to the right. It is important to FIRMLY secure cap after filling the tank with water.
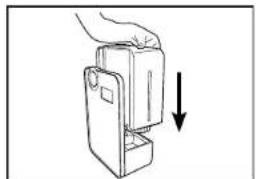
natural_image
Line drawing of a hand holding a device with a downward arrow indicating compression or disassembly (no text or symbols)- Attach the tank to the base of the unit and plug in.
natural_image
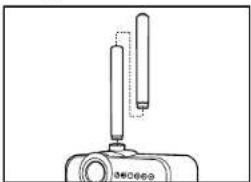
Simple line drawing of a mechanical device with two vertical rods and a base (no text or symbols)- Extension Wands
If desired, assemble extension wands by fitting ends together. Remove mist cap and store for use without wands. Then attach wands to humidity spout. The wands will extend the mist to a higher level in the air to help disperse throughout the room.
natural_image
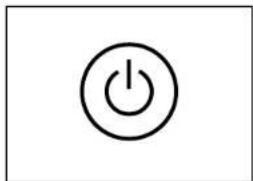
Simple black circular icon with a power button symbol on white background (no text or labels)7. Power Button
Before turning on make sure there is water in the unit. Press the Power button.
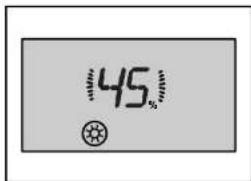
8. Select Desired Settings
See "Control Operation" section for available unit functions. Note: When you power "on" the humidistat reading range is from 15% to 90%. If the room humidity is below 15%, the display reading will flash.
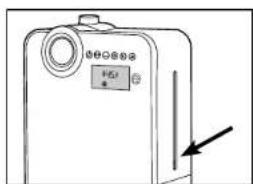
9. Water Level Window & Auto Shut Off Feature
The tank includes a water level window so you can easily see when it is time to refill with water. The unit will automatically shut off and a low water icon will blink on the display panel if the water level is too low. If this happens, unplug the unit, remove the tank and refill.
DIRECTIONS FOR USE
CONTROL OPERATION
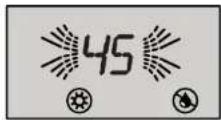
1. Cool/Warm Mist & Night Light Control
Turns night light on/off. Selects cool or warm mist. Water temperature is maintained at room temperature for cool setting and 80 degrees for warm. Allow 15 minutes for water to warm.
Follow instructions for desired combination. The images show the screen display for the combination of the cool/warm mist and night light settings.
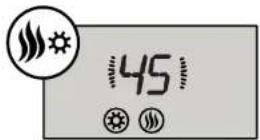
Default: Night light/Warm mist control on.
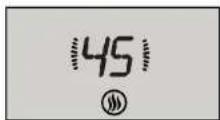
press 1 time: Night light OFF. Warm mist ON.
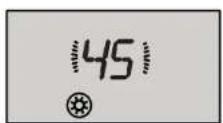
press 2 times: Night light ON.
Cool mist ON.

press 3 times: Night light OFF. Cool mist ON.
2. Auto Humidistat
Press the Auto button to activate the automatic humidity function, then the ideal humidity of 50% is maintained. When the humidity level in the room is less than the auto humidity level (50%), the humidifier will continue to produce moisture automatically. Once the room level is met, the humidifier will turn itself off.
3. Timer
Press the Timer button to determine the operating time, it can be regulated between 1 and 12 hours or for continuous operation.

E-8 E-9
DIRECTIONS FOR USE
CONTROL OPERATION
4. Adjustable Humidistat
Set the desired humidity in % by pressing the Adjustable Humidistat button. We recommend a relative humidity of between 40% and 50%. The appliance can be regulated from 40% to 75% in 5% increments. If the humidity exceeds the desired setting, the appliance will turn itself off. The appliance will not turn itself off if it has been set for Continuous Operation ("Co"). The desired value is shown while you are making the selection. After a few seconds, the display automatically switches to the current value. Note: If the room humidity is below 15% then the display will flash.
5. Mist Control
When you press the Mist Control button there are three options:

Press once for LOW. Press twice for MEDIUM. Press three times for HIGH
(no icons will be displayed for this combination).
6. Low/No Water
When it is time to refill, the low water indicator will blink on the display.
CLEANING CLEANING
CLEANING
• Always unplug the unit before servicing in any way.
- The water temperature of the water remaining in the unit after use may be high, allow time for it to cool.
GENERAL CLEANING
- Inside the base of the unit. Pour excess water out of the unit. Wash out the unit with fresh water using the cleaning brush and a soft cloth as needed. Do not submerse the base of the unit into water, or allow water to enter inside the dry air exhaust port of the unit.
- Water tank. Empty water tank. Remove mist nozzle and clean the mist tube with fresh water and a light brush (bottle cleaning brush is recommended).
- Outer surface of the unit. Wipe the surface of the unit with a soft, damp cloth if needed. If you notice an accumulation of water during usage, reduce humidity and dry outer surface with a cloth.
DESCALING
- Depending on usage and water type, cleaning to remove scale may be required weekly or every other week to optimize unit performance.
- If you live in a hardwater area, we recommend the use of distilled water for your humidifier. This will help reduce the precipitation of minerals or 'white dust'.
- Do not clean the unit or water tank with detergents or cleaning chemicals of any kind.
ULTRASONIC DISK
- Unplug unit.
- Remove the tank and empty all water from unit base and tank.
- Locate the ultrasonic disk on the inside center of the base unit. (see pg. E-4)
- Use ONLY the enclosed cleaning brush to gently clean disk and remove build up and deposits Do not scrub or scrape the ultrasonic disk.
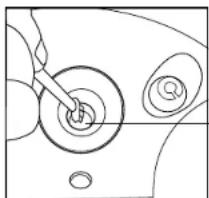
natural_image
Diagram of a mechanical component with two circular features and a tool inserted (no text or symbols)*Clean the disk with the brush only. No other cleaning tool should be used. BRUSH ONLY.
Ultrasonic Disk
If scale becomes difficult to remove with brush:
- Fill the Base with: mixture of 1 tsp. white vinegar and 1 tsp. water.
- Let solution stand for 5 minutes.
- With the vinegar in the Base, clean all interior surfaces with a soft cloth or brush to help remove scale.
- Also check mist nozzle and mist tube in water tank. Clean as needed.
- Rinse the Base thoroughly with water to remove scale and vinegar solution.
Are minerals in your water producing white dust? Try Decalcification Cartridge FLTDC
Look for cartridge 1 at your local retailer or visit www.guardiantechnologies.com
END OF SEASON STORAGE
- Follow the Cleaning and Descaling instructions when the humidifier will be stored at the end of the season.
- Dry the humidifier completely before storing. DO NOT store with water inside the Base or Water Tank.
- Pack the unit in its original carton and store in a cool, dry location.
NOTE: IF YOU EXPERIENCE A PROBLEM DO NOT ATTEMPT TO OPEN THE MOTOR HOUSING YOURSELF. DOING SO MAY VOID YOUR WARRANTY AND CAUSE DAMAGE TO THE HUMIDIFIER OR PERSONAL INJURY.
TROUBLESHOOTING GUIDE
| pRObLEM SOLUTION | |
| Water vapor and humidity are not produced. | Power Plug: Unplug and then try again.Power Failure: When the power is returned, try again.Tank Installation: Make sure the tank is correctly attached.The surface of the ultrasonic disk is dirty: Clean ultrasonic disk.(see pg. E-10) |
| Air blows but water vapor is not produced. | Excessive Water: Remove a certain amount of water from the tank.The desired humidity is lower than the current temperature: Increase the desired humidity.The surface of the ultrasonic disk is dirty: Clean ultrasonic disk.(see pg. E-10)If you use hard water, replace with softer water. |
| Humidity level is low. The surface of the ultrasonic disk is dirty: Clean ultrasonic disk.(see pg. E-10)The water in the unit is too cold: Replace with cool, but not cold water.Damage on the ultrasonic disk: Contact Customer Service 1.866.603.5900 | |
| Warm humidity is not produced. It may take 10-15 minutes before warm humidity is created. The mist may not feel warm due to the fact it is so fine and is cooled rather quickly from the air in your home. Test by either feeling the base of the unit which should be warm to the touch or by allowing the unit to run for approximately 30 minutes on warm setting in a closed 200 sq. fool room or smaller. The room should feel moderately warmer if the unit is working properly. | |
| The humidity has a bad smell. Poor maintenance or dirty water: Clean the product thoroughly, and fill it with fresh water.(see pg. E-10) | |
| White dust is forming on nearby furniture. | Hard water may deposit a certain amount of dust. Dust in the air also settles because of added humidity in the room. Use distilled water if this becomes a nuisance.* Decalcification Filter (FLTDC) available at www.guardiantechnologies.com or through Customer Service 1.866.603.5900. |
| Unit has stopped working. No or low water. Unplug unit and refill tank. | |
| Water is accumulating outside of unit or area surrounding unit. | Saturation of humidity. Lower mist control setting.Unit not level and water is accumulating. Unplug and place on level surface, Point spray away from objects. Raise unit on a water-resistant level surface 2-3 feet off of floor. |
| Water dripping when refilling.Cap not tight. | Water remaining on bottom of tank. Wipe tank or tilt to drain before transporting.Twist to firmly secure cap after filling tank with water. |
| Increased noise level. Unit must be placed on a flat, level, hard surface. Make sure it is NOT placed on a soft or absorbent surface. | |
TROUbLESHOOTING GUIDE
| pRObLEM SOLUTION | |
| Humidifier display not reaching "auto" or desired humidity level. | There are a few things that can affect the reading.The climate (example - if in a very cold climate, the furnace will run frequently, letting dry air into the room).The room may be too large and may be open to other spaces.Try warm humidification, sometimes this increases the humidity faster.Also, unplugging it for a period of 5-8 minutes. Sometimes it is possible to overload the unit when first getting the product and trying out all the buttons. |
LIMITED WARRANTY
To the consumer, Guardian Technologies LLC warrants this product to be free of defects in materials or workmanship commencing upon the date of the original purchase. Save your original sales receipt to validate start of warranty period. Warranty is not valid without receipt.
If this product should become defective within the warranty period, we will repair or replace any defective parts free of charge. All warranty repairs must be completed by Guardian Technologies LLC. This warranty does not cover unauthorized repairs. The warranty does not include unusual wear, damage resulting from accident, or unreasonable use of the product. This warranty only covers the product when used with genuine Guardian Technologies accessories. This warranty covers product that was purchased from authorized distributors. This warranty gives you specific legal rights and you may also have other rights (other rights may vary from state to state in the U.S.A.)
The product warranty registration can be completed online at
www.guardiantechnologies.com. We consider the registration process important to ensuring superior service to our customers, however submitting the warranty registration is optional and does not affect your rights to utilize this warranty according to the conditions stated above. To submit product under warranty the complete machine must be delivered pre-paid to Guardian Technologies LLC. Please include complete information including: the problem, the model number of the product, the day of purchase, and a copy of the original sales receipt along with your name, address, and telephone (email optional). Address returns to the attention of: Customer Service, at the address below. Additional questions or comments can be made toll free to the number listed below.
Guardian Technologies LLC
26251 Bluestone Blvd.
Euclid, Ohio 44132
1.866.603.5900
www.guardiantechnologies.com

This product has been tested and complies with the requirements for Federal Communications Commission, Part 18 for Radio/TV/Communication interference. Although tested, it may affect these devices. If the humidifier is found to interfere, separate the device and/or the humidifier. Conduct only the user maintenance found in this manual. Other maintenance and servicing can cause harmful interference and can void the required FCC compliance.
©2007 Guardian Technologies LLC

guardian technologies™
UTILISATION ET INSTRUCTIONS D'ENTRETIEN
natural_image
Line drawing of a portable water purifier with control panel and digital display (no text or symbols)
pureguardian®
natural_image
Illustration of a hand holding a device with an upward arrow indicating motion (no text or symbols)natural_image
Line drawing of a rectangular container with a piping bag inserted (no text or symbols)natural_image
Line drawing of a hand inserting a device into a box, with no visible text or symbolsnatural_image
Line drawing of a hand holding a device with a downward arrow indicating compression or disassembly (no text or symbols)natural_image
Simple line drawing of a mechanical device with two vertical components and a base (no text or symbols)natural_image
Simple black-and-white icon of a power button symbol (no text or labels)natural_image
Line drawing of a mechanical component with a tool inserted into a circular feature (no text or symbols)Guardian Technologies LLC
26251 bluestone blvd.
Euclid, Ohio 44132
1.866.603.5900
www.guardiantechnologies.com

©2007 Guardian Technologies LLC
F-14

guardian technologies™
natural_image
Line drawing of a portable water purifier with control panel and digital display (no text or symbols)
pureguardian®
natural_image
Line drawing of a hand holding a device with an upward arrow indicating motion (no text or symbols)natural_image
Line drawing of a mechanical device with a handle and base plate (no text or symbols)natural_image
Line drawing of a hand holding a device with a downward arrow indicating compression or disassembly (no text or symbols)natural_image
Simple line drawing of a mechanical device with two vertical components and a base (no text or symbols)natural_image
Simple black-and-white electrical button symbol with a circular outline (no text or labels)natural_image
Line drawing of a mechanical component with a tool inserted into a circular feature (no text or symbols)Guardian Technologies LLC
26251 Bluestone Blvd.
Euclid, Ohio 44132
1.866.603.5900
www.guardiantechnologies.com

©2007 Guardian Technologies LLC