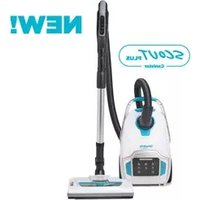
Scout Plus - Vacuum Cleaner Simplicity - Free user manual and instructions
Find the device manual for free Scout Plus Simplicity in PDF.


| Product Type | Bagged vacuum cleaner with motorized head |
| Brand | Simplicity |
| Model | Scout Plus |
| Bag type | Disposable dust bag (ref. SSH-6) |
| Pre-motor filter | Replace every 6 months |
| Exhaust HEPA filter | Washable, replace every 6 months |
| Suction power | Digital adjustment (low, medium, high) |
| Motorized head | Whirlwind Power Pulse technology, overload protection, replaceable brush and belt |
| Control handle | Wireless, with replaceable button batteries |
| Power cord | With yellow (recommended length) and red (limit) markers, automatic rewind |
| Full bag indicator | Flashing red light |
| Included accessories | Motorized head, multi-use floor tool, 3-in-1 tool (crevice tool, brush, upholstery tool), crevice tool, dusting brush |
| Safety | Polarized plug, motor overload protection, automatic shutoff in case of obstruction |
| Maintenance | Regular replacement of bag and filters, cleaning of the agitator brush |
| Warranty | 1 year (90 days for commercial use) |
Frequently Asked Questions - Scout Plus Simplicity
User questions about Scout Plus Simplicity
0 question about this device. Answer the ones you know or ask your own.
Ask a new question about this device
Download the instructions for your Vacuum Cleaner in PDF format for free! Find your manual Scout Plus - Simplicity and take your electronic device back in hand. On this page are published all the documents necessary for the use of your device. Scout Plus by Simplicity.
USER MANUAL Scout Plus Simplicity
natural_image
Line drawing of a vacuum cleaner with attached circuit board (no text or symbols)SCOUTPLUS
Getting Started
Important Safety Instructions 2
Polarization Instructions 3
Vacuum Cleaner with Powerhead 3
Parts Identification 4
Assembly
Flexible Hose 5
Handle 5
Accessories
Powerhead 6
Combination Floor Tool 6
3-in-1 Cleaning Tool 6
Upholstery Tool 7
Crevice Tool 7
Dusting Brush 7
Controls
Controls 8
Instructions
Using the Cord Rewind Button and Standby On/Off Button 9
Wireless Control Handle 10
Synchronizing the Wireless Control Handle 11
Maintenance
Vacuum Cleaner Storage 12
Replacing the Dust Bag 12
Pre-Motor Filter Replacement 13
Exhaust HEPA Filter Replacement 14
Cleaning the Motorized Powerhead 14
Replacing the Powerhead Agitator Brush & Drive Belt 15
Changing the Remote Control Battery 16
Troubleshooting
Troubleshooting 17
For Best Performance 17
Warranty Information
Register Online 18
IMPORTANT SAFETY INSTRUCTIONS
READ AND UNDERSTAND ALL INSTRUCTIONS BEFORE USING THIS UNIT.
This vacuum must be operated in accordance with these instructions and used only for domestic household cleaning to remove DRY dirt and dust from household carpets, flooring, walls, and fabrics. This cleaner is not fit to be used as an industrial cleaner and will void the manufacturer's warranty if used inappropriately.
Please read these instructions thoroughly. This will ensure you obtain full benefit from your new vacuum. Keep this Owner's Manual in a convenient and safe place for future reference.
IMPORTANT:
The manufacturer cannot accept responsibility for damage caused when the appliance is not used according to the instructions, or for uses other than those for which it was intended.
WARNING:
To reduce the risk of fire, electric shock, damage or injury:
- Empty the bag when the full bag indicator turns red. Over-filling the bag may cause dirt and debris to clog the vacuum and cause loss of suction.
- Always unplug the vacuum from the electrical outlet before replacing the bag or filters.
- Do not leave appliance when plugged in. Unplug from outlet when not in use and before servicing.
- WARNING: ELECTRIC SHOCK COULD OCCUR IF USED OUTDOORS OR ON WET SURFACES.
- Do not allow to be used as a toy. Close attention is necessary when used by or near children.
- Use only as described in this manual. Use only manufacturer's recommended attachments.
- Do not use with damaged cord or plug. Or if appliance is not working as it should, has been dropped, damaged, left outdoors, or dropped into water, return it to your Authorized Simplicity Retailer for service.
- Do not unplug by pulling on cord. To unplug, grasp the plug, not the cord.
- Do not handle plug or appliance with wet hands.
- Do not pull or carry by cord, use cord as a handle, close a door on the cord, or pull cord around sharp edges or corners. Do not run appliance over cord.
Keep cord away from heated surfaces.
- Do not put any object into openings. Do not use with any opening blocked; keep free of dust, lint, hair and anything that may reduce air flow.
- Keep hair, loose clothing, fingers and all parts of body away from openings and moving parts.
- Do not pick up anything that is burning or smoking, such as cigarettes, matches or hot ashes.
- Do not use without bag or filters in place.
- Turn off all controls before unplugging.
- Do not use to pick up flammable or combustible liquids such as gasoline or use in areas where they may be present.
- Do not attempt to service the unit while appliance is plugged in.
- Do not use vacuum to pick up water or any wet materials.
- Use extra care when cleaning on stairs
- The Scout Plus hose contains electrical wires. Do not use when damaged, cut, or punctured. Replace if cut or worn. Do not pick up sharp objects.
• Always turn off and unplug vacuum cleaner before connecting or disconnecting either hose, wand or motorized nozzle.
- Hold plug when rewinding cord reel. Do not allow plug to whip when rewinding.
SAVE THESE INSTRUCTIONS
Power Cord, 2-Wire Polarized Cord
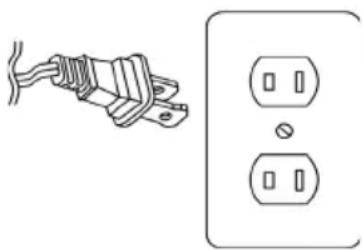
To reduce the risk of electric shock, the vacuum is equipped with a polarized alternating current line plug (a plug having one blade wider than the other). This plug will fit into the power outlet only one way. This is a safety feature. If you are unable to insert the plug fully into the outlet, try reversing the plug. If the plug should still fail to fit, contact a qualified electrician to replace the obsolete outlet. Do not defeat the safety purpose of the polarized plug.
natural_image
Simple line drawing of a cable and two separate electrical outlets (no text or symbols)VACUUM CLEANER WITH POWERHEAD
-
The electric hose contains electrical connections; - Do not immerse in water. - The hose should be checked regularly and must not be used if damaged. - The vacuum cleaner handle contains electrical connections. The handle is not a serviceable part. - The vacuum cleaner wand contains electrical connections. The wand is not a serviceable part. - The vacuum cleaner powerhead contains electrical connections. The powerhead is not a serviceable part.
-
Use the powerhead only for vacuuming dust and dry substances in the home.
-
To avoid damage to the power cord never run over the power cord with the powerhead.
-
Never touch the brush roller while the vacuum cleaner is connected to the power supply.
-
To prevent unnecessary wear on the powerhead, keep the powerhead moving while in operation.
-
Keep hair, hands and feet away from the rotating brush while the powerhead is running.
-
Warning: This product requires/contains button batteries to operate. Button Batteries are hazardous to young children if swallowed. Keep out of reach of children at all times.
natural_image
Line drawing of a key-like tool with a loop handle and lever (no text or symbols)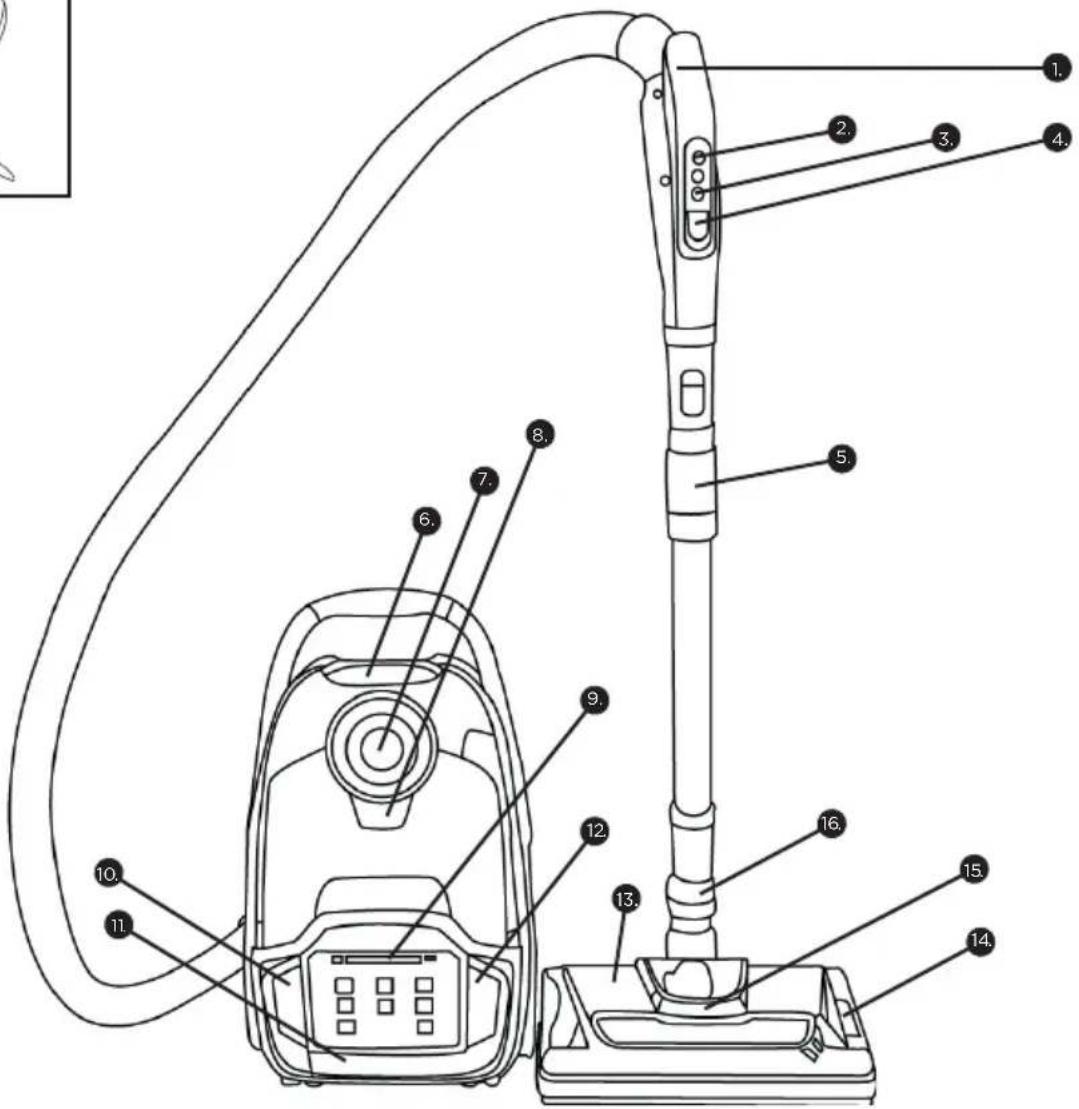
(1) Control Handle
(2) Handle On/Off Button
(3) Handle Suction Control Buttons
(4) Handle On/Off Button (Powerhead)
(5) TelescopicWand
(6) Dust Bag Cover Latch
(7) Air Inlet
(8) Accessory Cover Release Button
(9) Full Dust Bag Indicator
(10) Standby On/Off Button
(11) Exhaust Filter Release Button Nozzle
(12) Cord Rewind Button
(13) Powerhead
(14) Powerhead Belt Window
(15) Powerhead LED Lights
(16) Wand Quick Release
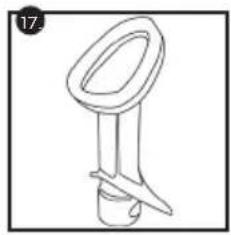
(17) 3-in-1 Cleaning Tool
IMPORTANT! Always remove the power cord from the power supply before fitting or removing accessories!
Flexible Hose
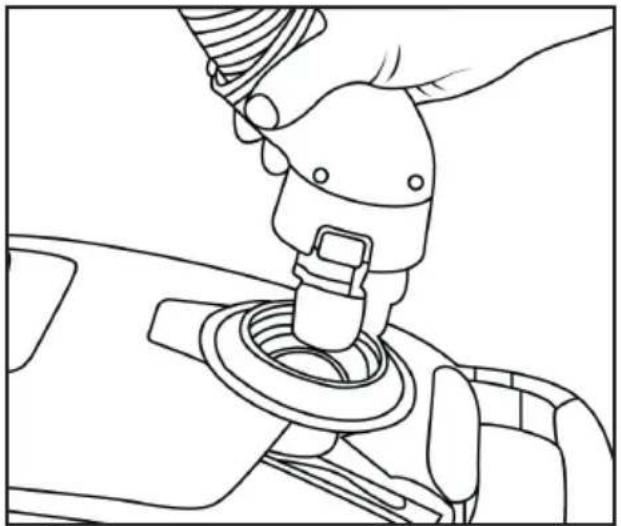
- Fitting: Insert the flexible hose into the air inlet of the vacuum. Press until it clicks into position. (Fig 1)
- Removing: Press the two buttons and gently pull to release the flexible hose. (Fig 1)
natural_image
Line drawing of a hand using a mechanical switch to adjust a car's seatbelt (no text or symbols present)(Fig 1)
Handle
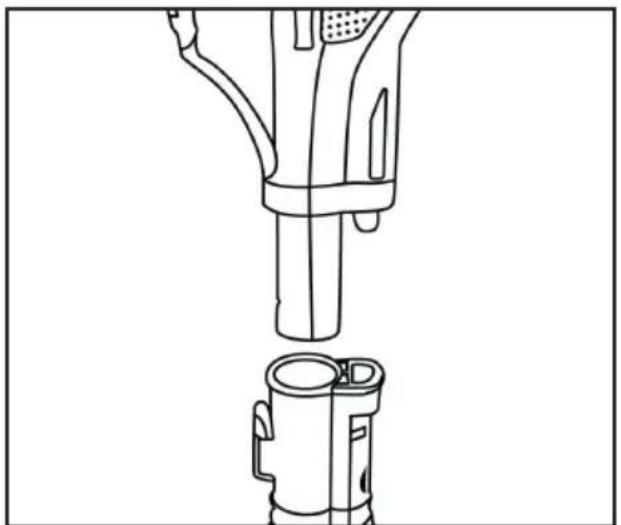
• Gently insert the handle into the telescopic wand and push until it clicks into place. (Fig 2)
natural_image
Technical line drawing of a mechanical device with two views (top and side), no text or symbols present.(Fig 2)
- Place the powerhead onto the floor and gently insert the telescopic wand into the powerhead. Push until it clicks into place. (Fig 3)
Note: The powerhead has a quick release button to remove the wand for easy and convenient access. Simply press the wand Quick Release to remove the wand from the powerhead.

natural_image
Line drawing of a mechanical device with no visible text or symbols(Fig 3)
ACCESSORIES
IMPORTANT! Seek advice from carpet manufacturers before using the motorized powerhead on woolen or delicate carpets.
Powerhead
Whirlwind Power Pulse technology deeply cleans carpets by effectively lifting and removing deeply embedded dust and dirt.
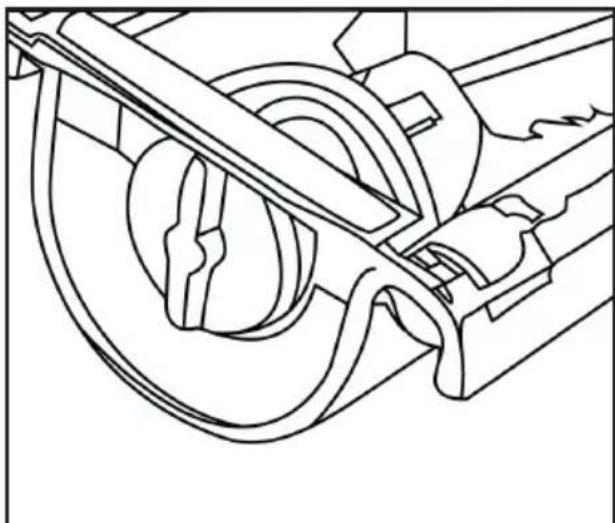
Tip: The Powerhead Belt Window can be used to check the health of the powerhead belt or whether the agitator brush is rotating. (Fig 4)
natural_image
Technical line drawing of a mechanical assembly with no visible text or symbols(Fig 4)
3-in-1 Cleaning Tool
Combines a crevice tool, upholstery tool & dusting brush all in the one tool for convenient cleaning. To use the 3-in-1 Cleaning Tool as an upholstery tool or as a dusting brush simply remove the crevice tool and insert the crevice tool into the opposite end of the tool you would like to use. (Fig 5)

natural_image
Line drawing of a mechanical tool or clamp with a handle and base (no text or symbols)(Fig 5)
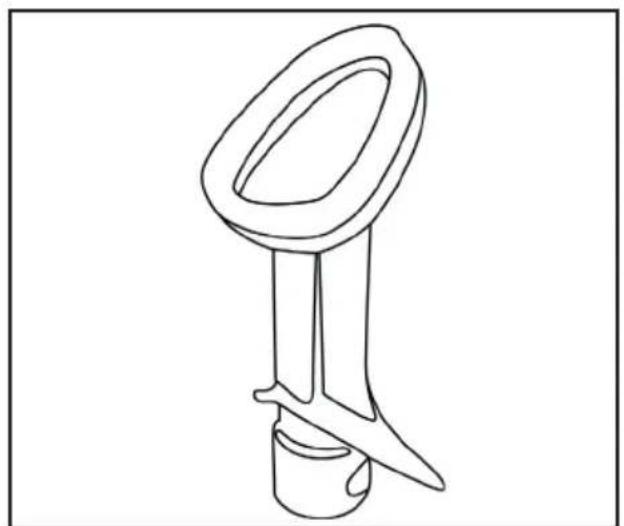
Upholstery Tool
For Vacuuming furniture and upholstery. (Fig 6)
natural_image
Line drawing of a mechanical tool or tool with a handle and base (no text or symbols)(Fig 6)
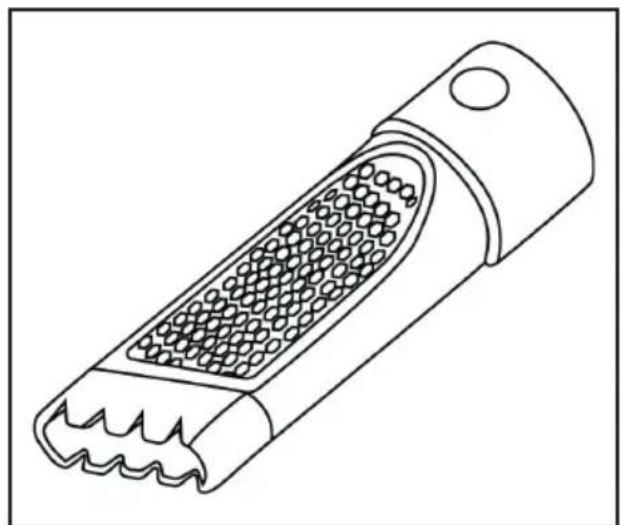
Crevice Tool
Eliminate dust from hard to reach places. (Fig 7)
natural_image
Line drawing of a grater with mesh contents and a handle (no text or symbols)(Fig 7)
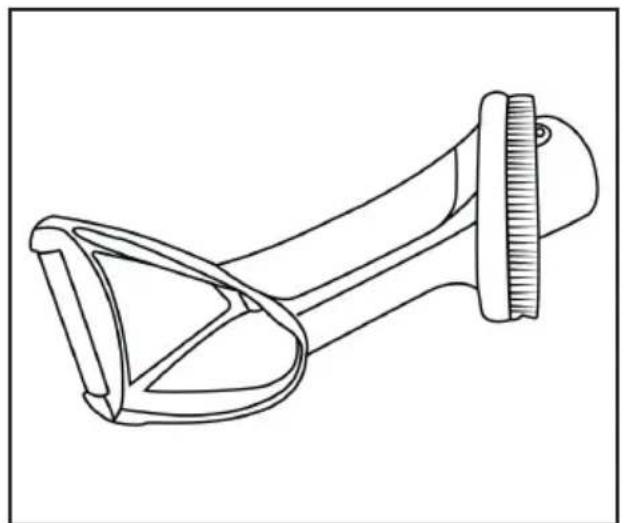
Dusting Brush
Ideal for cleaning blinds, bookshelves and lampshades. (Fig 8)
natural_image
Line drawing of a mechanical tool or clamp with a handle and base (no text or symbols)(Fig 8)
The suction power can be regulated by using the Digital Power Control to achieve optimal cleaning results. To change the suction power to suit a particular cleaning task, press the Power Increase Button to increase the suction power, and to reduce the suction power, press the Power Decrease Button.
The Dust Bag Indicator will continually flash red to indicate that the dust bag requires replacement or to indicate that there is a blockage. (Fig 9)
- Low Power Suction (Hard Floor and upholstery) ____
• Medium Power Suction (Hard Floor and upholstery)
• High Power Suction (Hard Floor and upholstery) - Low Power Suction (Lampshades/Drapes)-
• Medium Power Suction (Lampshades/Drapes)....
• High Power Suction (Lampshades/Drapes)
• Power Decrease Button
• Power Increase Button
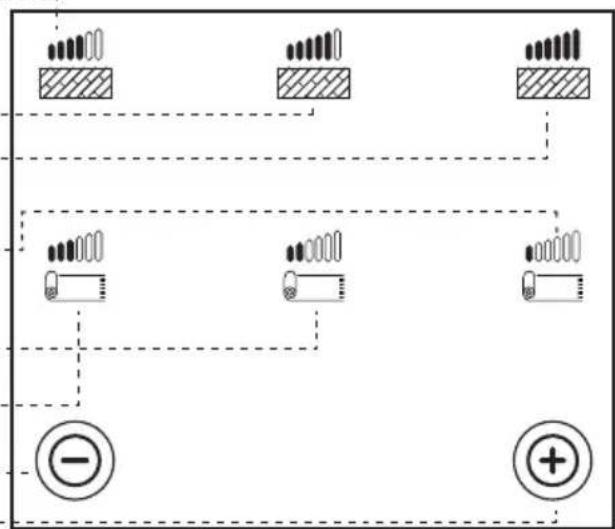
(Fig 9)
Note: In the two lowest settings, the dust bag indicator will not flash.
Tip: If the powerhead is too difficult to push on the carpet, reduce the suction by pressing the power decrease button or the control panel on the handle
Using the Cord Rewind Button and Standby On/Off Button
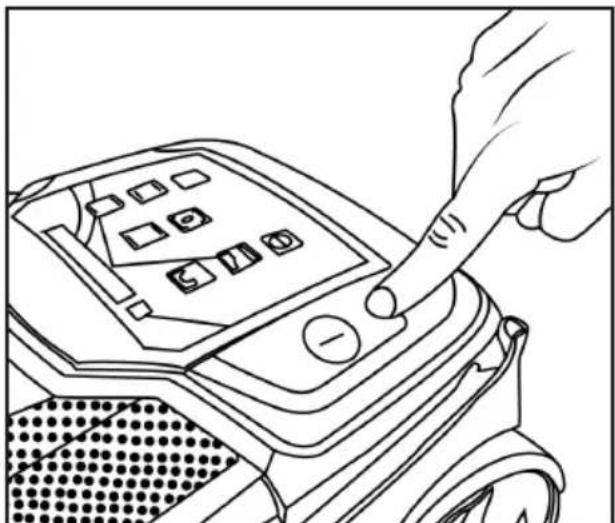
Standby On/Off Button (Fig 10)
- Unwind a sufficient length of power cord. The yellow mark on the power cord shows the recommended cord length. DO NOT extend the cord beyond the red mark.
- Insert the cord into the outlet.
- Press the Standby On/Off button to put the vacuum into Standby Mode.
-
To switch On the cleaner either:
-
Press the On/Off Button on the Control Handle.
• Alternatively, press the Power Decrease or Power Increase buttons on the Digital Power Control panel.
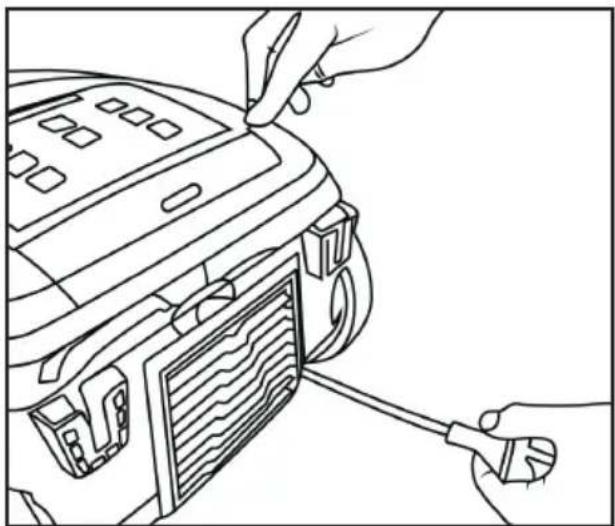
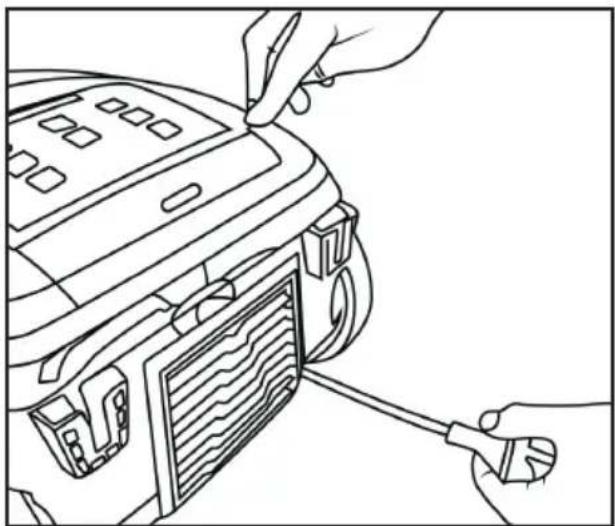
Rewind (Fig 11)
- Press the On/Off button to switch off the vacuum.
- Unplug the cord from the power outlet.
- To rewind the power cord, press the rewind button with one hand and guide the cord with the other hand to ensure that the power cord does not whip.
Note: Do not unplug by pulling on the power cord. To unplug, grasp the power plug not the power cord and gently pull the power plug from the power outlet
natural_image
Line drawing of a hand inserting a device into a control panel (no text or symbols visible)(Fig 10)
natural_image
Line drawing of hands connecting a device to a fan panel (no text or symbols)(Fig 11)
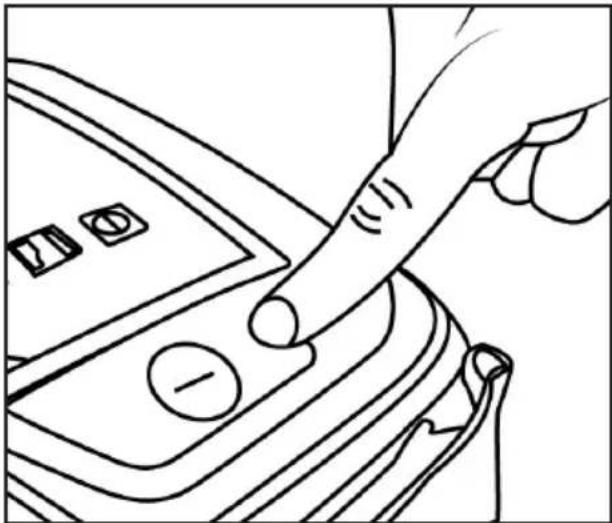
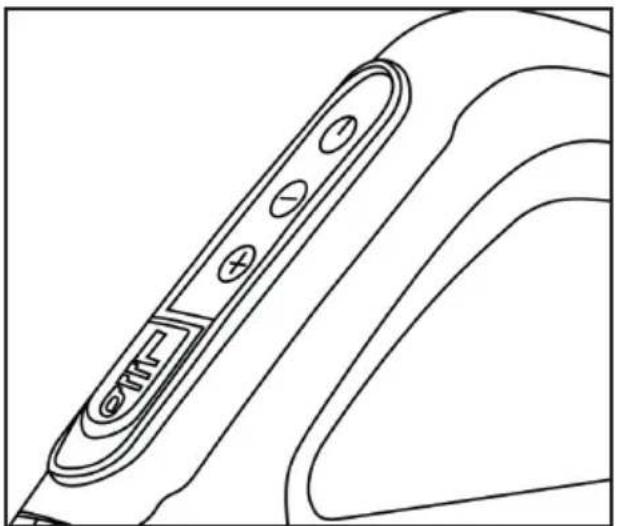
- To switch on or off the vacuum cleaner press the button. (Fig 12)
natural_image
Line drawing of a hand pressing down on a device panel with buttons and a minus symbol (no text or labels)(Fig 12)
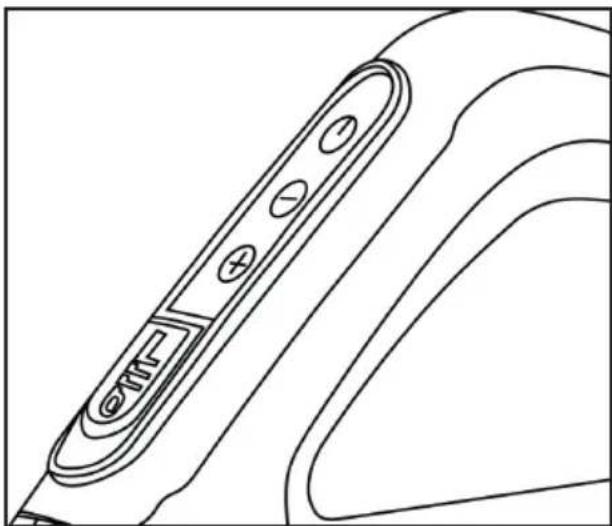
- To manually increase or decrease the suction power level, press the + or - buttons. (Fig 13)
natural_image
Line drawing of a handheld electronic device with a stylus and control buttons (no text or symbols)(Fig 13)
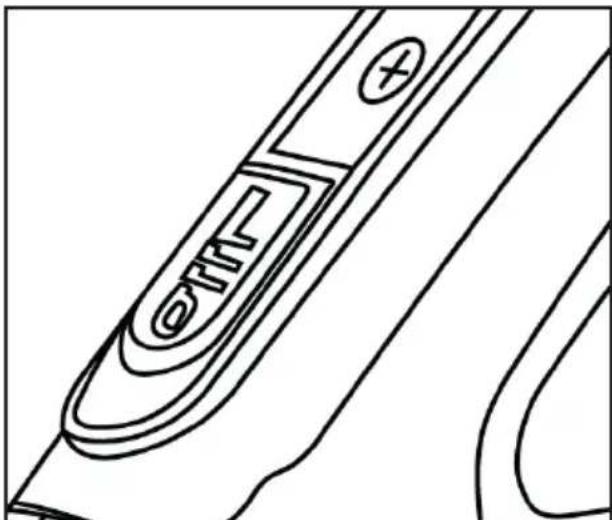
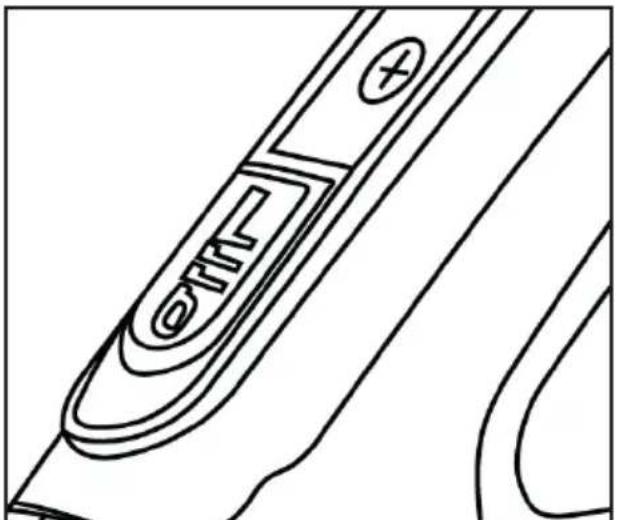
- To switch on the powerhead, slide the On/ Off Button (Powerhead) button backward. To switch off the powerhead, slide the On/Off Button (Powerhead) button forward. (Fig 14)
natural_image
Line drawing of a steam iron with no text or symbols(Fig 14)
SYNCHRONIZING THE WIRELESS CONTROL HANDLE
IMPORTANT! If the cleaner is unresponsive after placing the cleaner into standby mode and switching on the cleaner via the Control Handle, please follow the below steps to synchronize the handle to the vacuum.
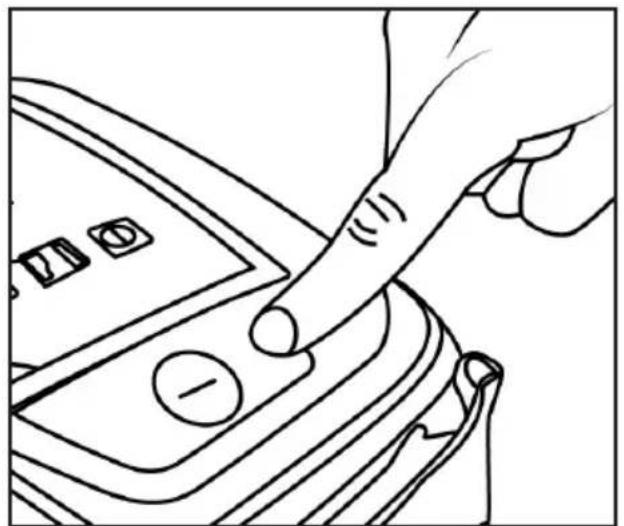
- Press the Standby On/Off Button. The cleaner will be in standby mode. (Fig 15)
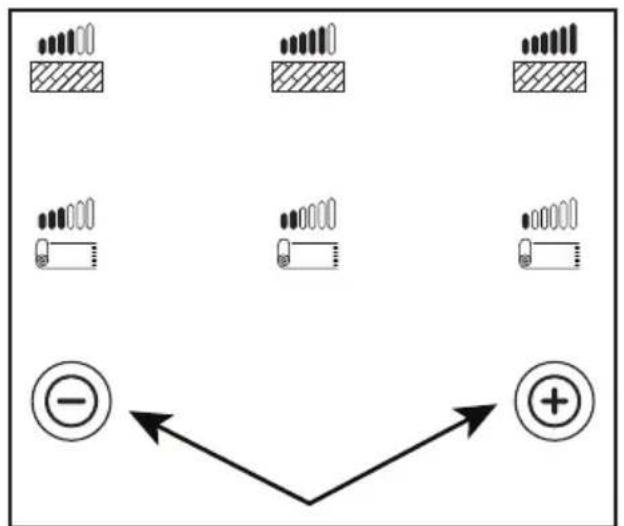
- Simultaneously press and hold for 20 seconds the Power Decrease and Power Increase buttons on the Digital Power Control panel. If preformed correctly, the icons on the Digital Power Control panel will blink and the Dust Bag Indicator light will be switched off. (Fig 16)
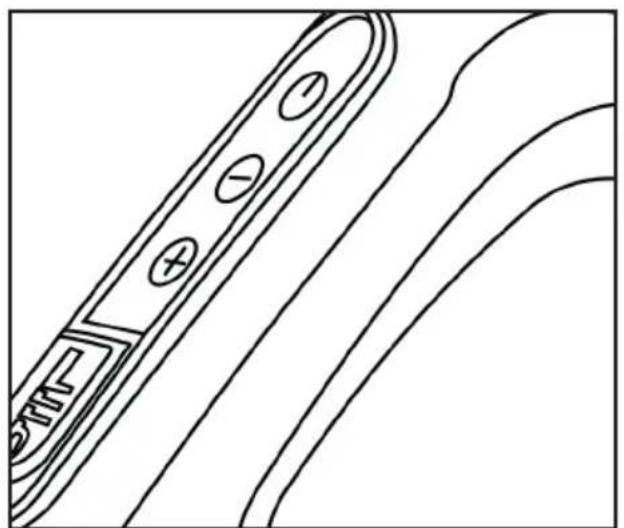
- Press the “+” button on the Wireless Control Handle to synchronize the Wireless Control Handle to the vacuum. If preformed correctly the Dust Bag Indicator light will blink and the icons lights on the Digital Power Control panel will turn off. (Fig 17)
Note: Please ensure that the dust bag is fully inserted into the dust bag bracket before closing the cover to avoid dust leaking from the dust bag.
natural_image
Line drawing of a hand pressing down on a device panel with buttons and a minus symbol (no text or symbols present)(Fig 15)
flowchart
graph TD
    A["Block 1"] --> B["Bar Pattern"]
    C["Block 2"] --> D["Bar Pattern"]
    E["Block 3"] --> F["Bar Pattern"]
    G["Block 4"] --> H["Bar Pattern"]
    I["Block 5"] --> J["Bar Pattern"]
    K["Block 6"] --> L["Bar Pattern"]
    M["Block 7"] --> N["Bar Pattern"]
    O["Block 8"] --> P["Bar Pattern"]
    Q["Block 9"] --> R["Bar Pattern"]
    S["Block 10"] --> T["Bar Pattern"]
    U["Block 11"] --> V["Bar Pattern"]
    W["Block 12"] --> X["Bar Pattern"]
    Y["Block 13"] --> Z["Bar Pattern"]
    AA["Block 14"] --> AB["Bar Pattern"]
    AC["Block 15"] --> AD["Bar Pattern"]
    AE["Block 16"] --> AF["Bar Pattern"]
    AG["Block 17"] --> AH["Bar Pattern"]
    AI["Block 18"] --> AJ["Bar Pattern"]
    AK["Block 19"] --> AL["Bar Pattern"]
    AM["Block 20"] --> AN["Bar Pattern"]
    AO["Block 21"] --> AP["Bar Pattern"]
    AQ["Block 22"] --> AR["Bar Pattern"]
    AS["Block 23"] --> AT["Bar Pattern"]
    AU["Block 24"] --> AV["Bar Pattern"]
    AW["Block 25"] --> AX["Bar Pattern"]
    AY["○"] --> Z
    AZ["⊕"] --> AA
    BA["-"] --> AA
    BB["-"] --> AA
    BC["-"] --> AA
    BD["-"] --> AA
    BE["-"] --> AA
    BF["-"] --> AA
    BG["-"] --> AA
    BH["-"] --> AA
    BI["-"] --> AA
    BJ["-"] --> AA
    BK["-"] --> AA
    BL["-"] --> AA
    BM["-"] --> AA
    BN["-"] --> AA
    BO["-"] --> AA
    BP["-"] --> AA
    BQ["-"] --> AA
    CA["-"] --> AA
    CB["-"] --> AA
    CC["-"] --> AA
    CD["-"] --> AA
    DD["-"] --> AA
    EE["-"] --> AA
    FF["-"] --> AA
    GG["-"] --> AA
    BH["-"] --> AA
    BI["-"] --> AA
    BJ["-"] --> AA
    BK["-"] --> AA
    BL["-"] --> AA
    BM["-"] --> AA
    BN["-"] --> AA
    BB["-"] --> AA
    BC["-"] --> AA
    BD["-"] --> AA
    BE["-"] --> AA
    BF["-"] --> AA
    BG["-"] --> AA
    BH["-"] --> AA
    BI["-"] --> AA
    BJ["-"] --> AA
    BK["-"] --> AA
    BL["-"] --> AA
    BN["-"] --> AA
    BB["-"] --> AA
    BC["-"] --> AA
    BJ["-"] --> AA
    BK["-"] --> AA
    BL["-"] --> AA
    BN["-"] --> AA
    BB["-"] --> AA
    BC["-"] --> AA
    BJ["-"] --> AA
    BK["-"] --> AA
    BL["-"] --> AA
    BN["-"] --> AA
    BB["-"] --> AA
    BC["-"] --> AA
    BJ["-"] --> AA
    BK["-"]
(Fig 16)
natural_image
Line drawing of a mechanical component with multiple curved surfaces and mounting holes (no text or symbols)(Fig 17)
Vacuum Cleaner Storage
When not in use, ensure that the cleaner is disconnected from the power supply and that the cable is fully retracted. The combination floor tool can be stored in the floor tool holders. Other floor tools must be stored separately.
Replacing the Dust Bag
IMPORTANT! Ensure that the cleaner is disconnected from the power supply when installing or removing the dust bag.
Note: Only use the dust bag supplied or recommend by the manufacturer to avoid causing damage to the machine and voiding the warranty.
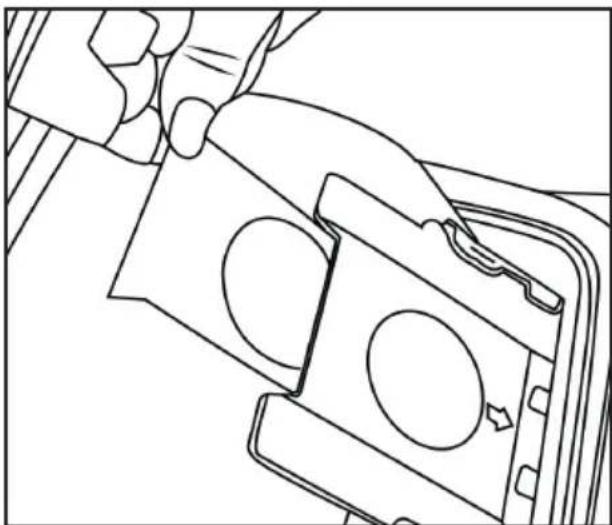
(Fig 18)
Always operate the cleaner with the dust bag installed. If you forget to install the dust bag or the dust bag is installed incorrectly, the dust bag cover may not close completely.
- Remove the hose from the air inlet.
- Open the cover by pulling on the Dust Bag Cover Latch.
- To stop dust and debris from escaping when removing the dust bag from the machine, firmly hold the dust bag in the dust bag holder and gently pull the dust bag seal.
- Refit a new dust bag by inserting the dust bag collar into the dust bag bracket. Ensure that the arrow on the dust bag collar is facing downwards
natural_image
Line drawing of a hand holding a small object with circular features, no text or symbols present(Fig 18)
when being inserted into the dust bag bracket.
Note: The dust bag has been designed with a seal to prevent dust and debris from escaping when the dust bag is removed from the cleaner.
- Gently close the cover, you will hear a 'click' when closed properly.
Note: Please ensure that the dust bag is fully inserted into the dust bag bracket before closing the cover to avoid dust leaking from the dust bag.
Pre-Motor Filter Replacement
IMPORTANT! Ensure the cleaner is disconnected from the power supply before performing any maintenance procedures.
The pre-motor filter should be replaced every six months or when it becomes visibly dirty. Always operate the cleaner with clean filters; otherwise, there may be a reduction in the suction power or motor damage may result.
Note: Do not use a washing machine to wash the filter or a hair drier to dry the filter.
- Pull out the filter bracket assembly.
- Replace with a new filter.
(Fig 19)
natural_image
Line drawing of a hand inserting a card into a storage cabinet (no text or symbols)(Fig 19)
Exhaust HEPA Type Filter Replacement
IMPORTANT! Ensure that the cleaner is disconnected from the power supply before performing any maintenance procedures.
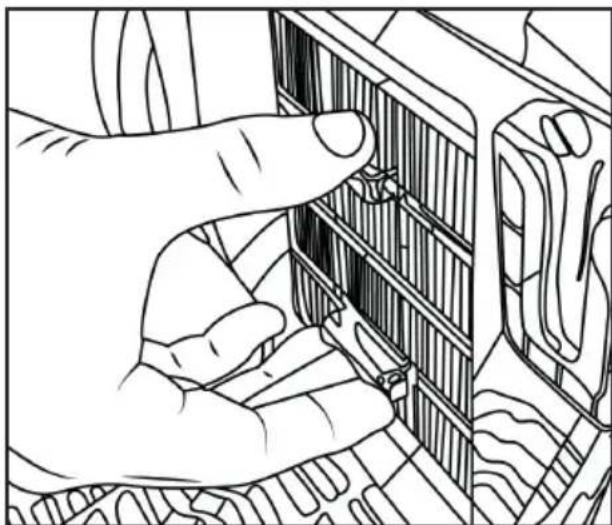
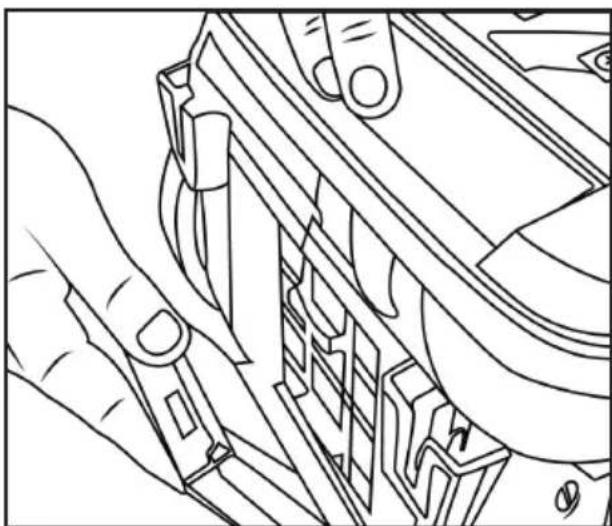
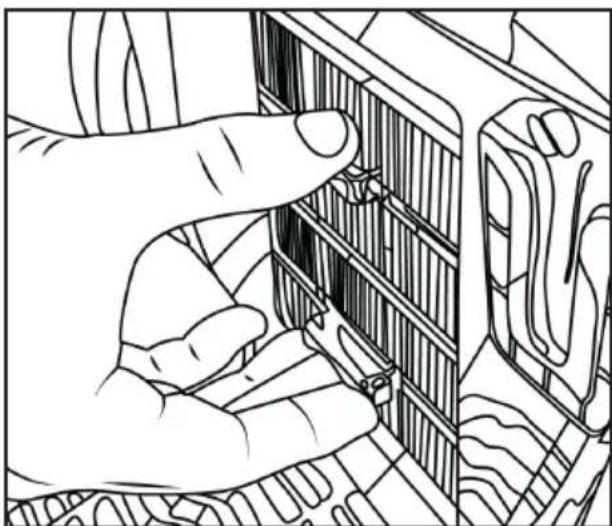
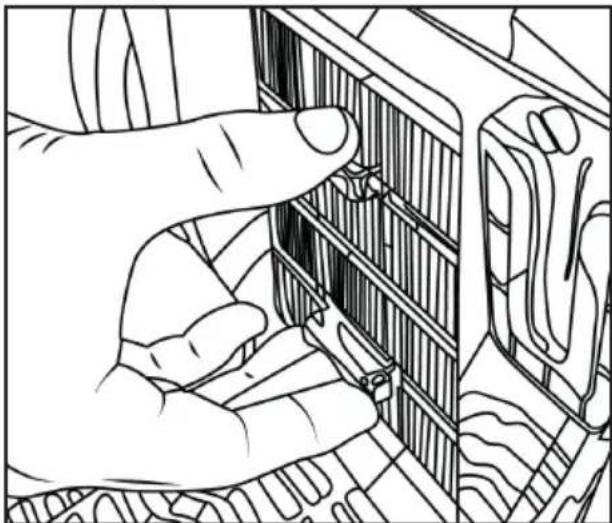
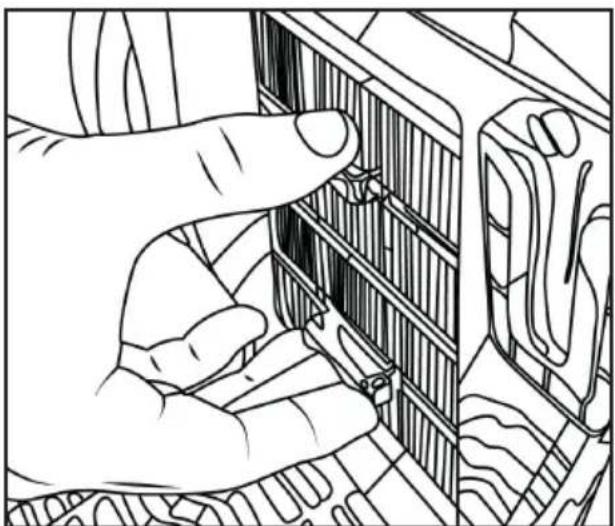
The Exhaust HEPA Type filter is installed behind the air outlet grill. This filter is washable. When dust or dirt is visible on the surface of the filter, the filter should be replaced or washed with warm water to maintain optimal performance. It is recommended to replace the filter every 6 months or when it becomes visibly dirty. This may vary depending on frequency of use. Please ensure all filters have been correctly installed into the machine before use.
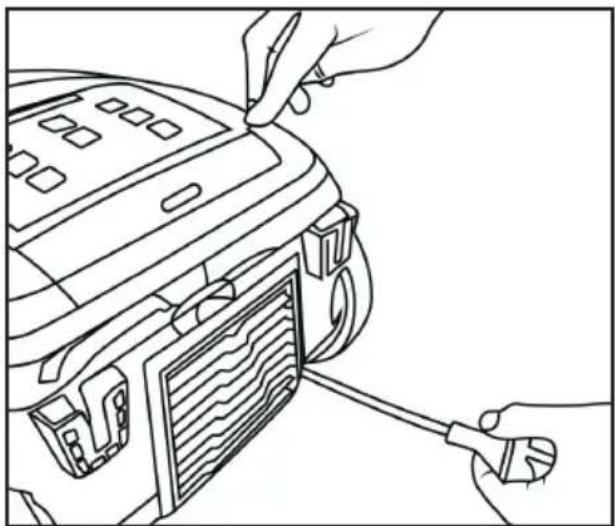
- Press the Exhaust Filter Release Button to access the Exhaust HEPA type filter. (Fig 20)
- Remove the filter by pulling on the filter tabs as shown. (Fig 21)
Cleaning the Motorized Powerhead
IMPORTANT! Ensure that the cleaner is disconnected from the power supply and the powerhead is disconnected from the wand before performing any maintenance procedures.
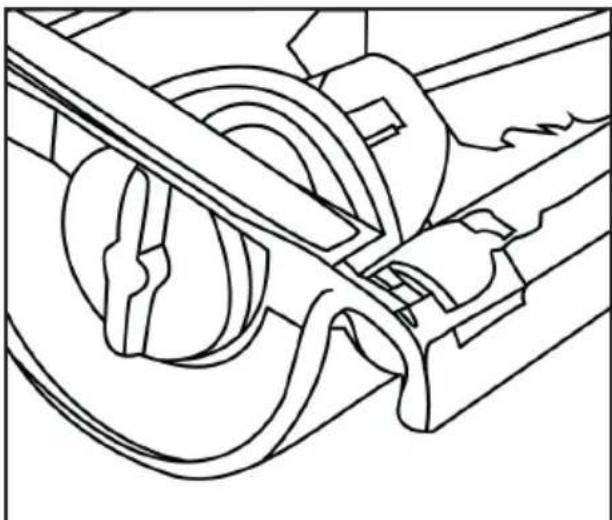
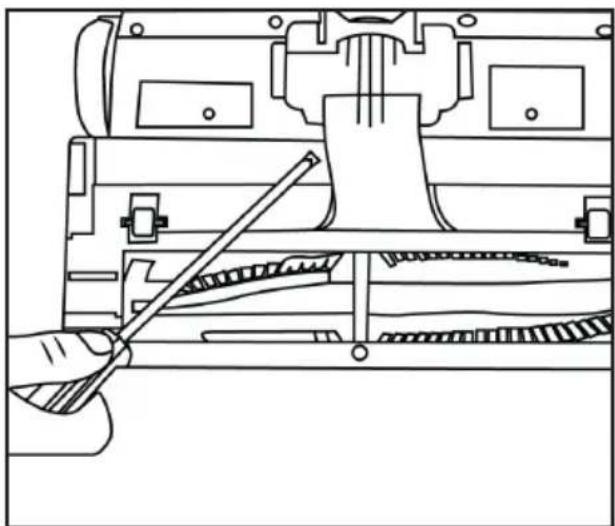
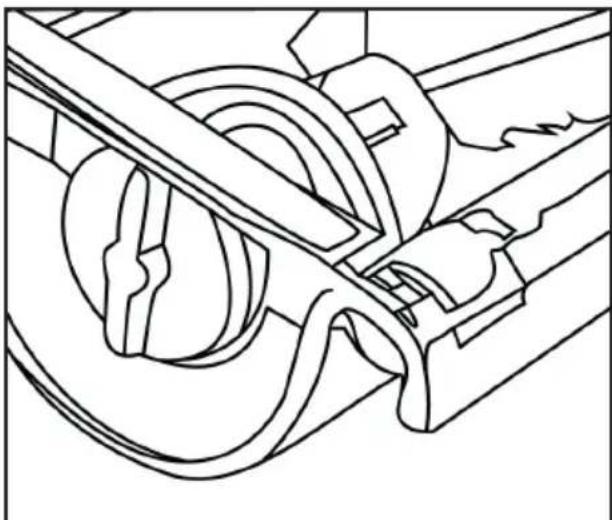
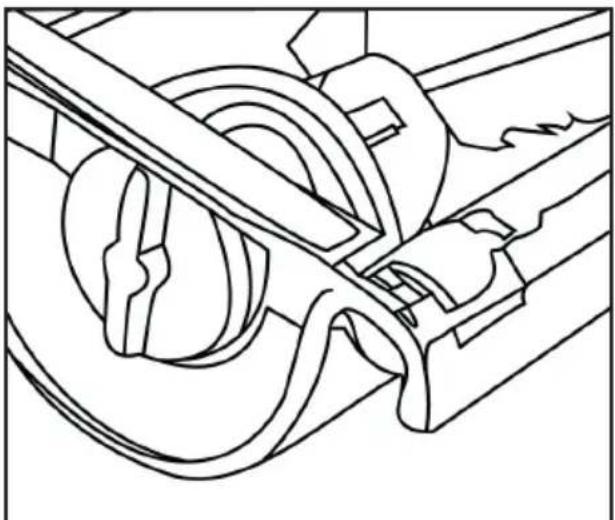
The agitator brush must be free of debris for effective cleaning and for maximum suction. (Fig 22)
- Disconnect the motorized powerhead from the vacuum wand and turn it over to inspect the agitator brush.
- If a build-up of debris is wound around the agitator brush, remove by carefully cutting hair or debris with scissors. Avoid damaging or cutting the bristles.
The powerhead has an overload
natural_image
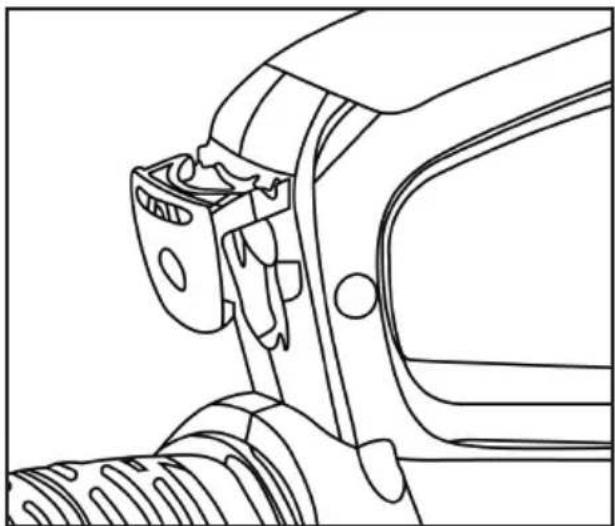
Technical line drawing of a mechanical component with no visible text or symbols(Fig 20)
natural_image
Line drawing of a hand inserting a component into a device panel (no text or symbols)(Fig 21)
natural_image
Technical line drawing of a mechanical assembly with no visible text or symbols(Fig 22)
protection feature to protect the motor in the powerhead. The powerhead will turn off if the powerhead is clogged. To reset the powerhead once it has automatically turned off, clean the rotating brush, and then press the Overload Protection button to reset the powerhead. (Fig 23)
Replacing the Powerhead Agitator Brush & Drive Belt
IMPORTANT! Ensure that the cleaner is disconnected from the power supply and the powerhead is disconnected from the wand before performing any maintenance procedures.
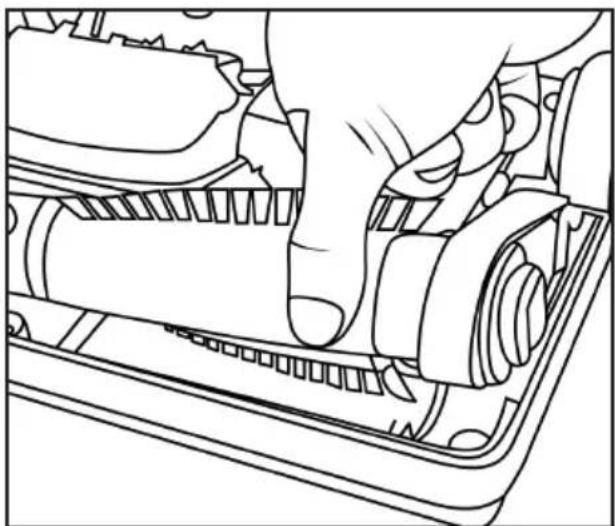
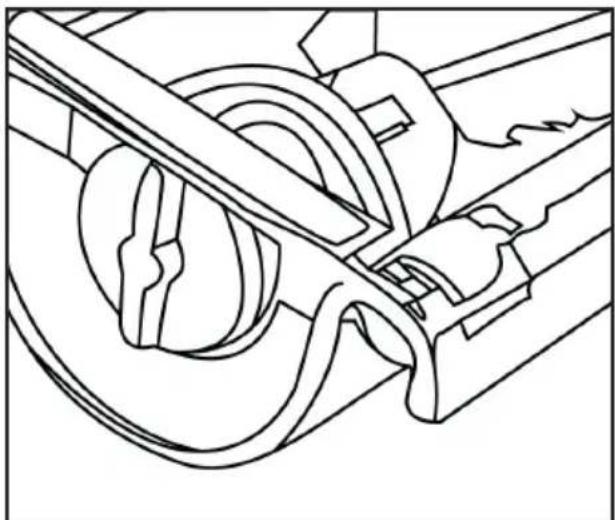
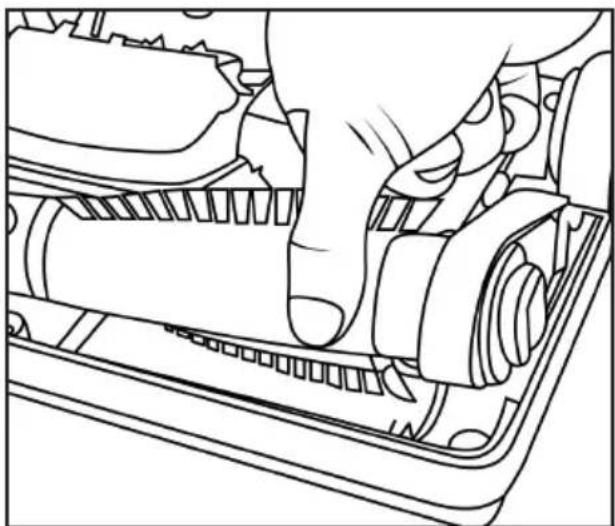
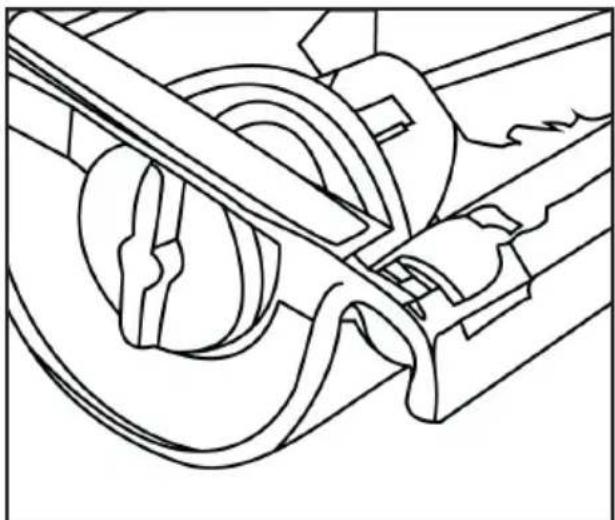
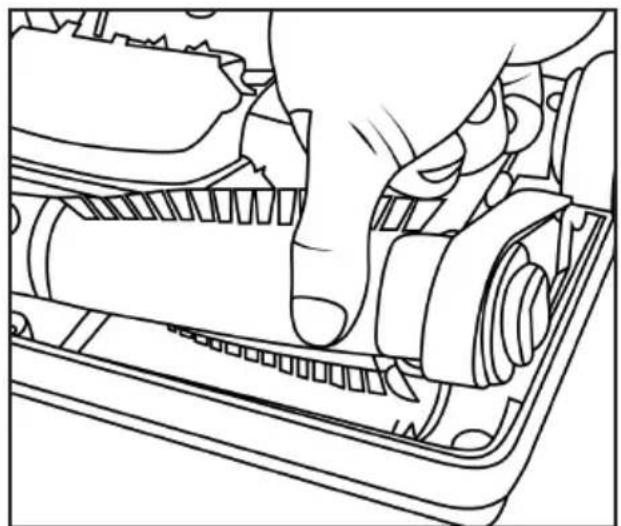
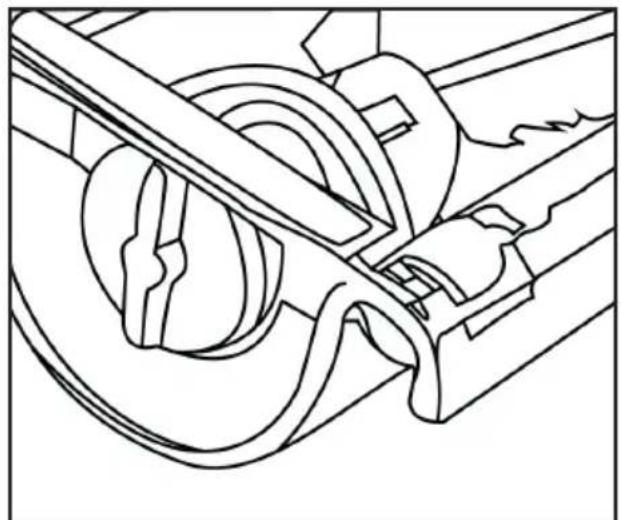
Depending on frequency of use, the powerhead agitator brush & drive belt will occasionally require changing. (Fig 24 and 25)
- Disconnect the motorized powerhead from the vacuum wand and turn it over. With a Phillips head screwdriver unscrew the eight screws.
- Remove the powerhead cover to access the agitator brush and belt.
- Lift the side of the agitator brush with the belt attached and slide the belt off the end cap. The agitator brush can now be removed for cleaning or replacement.
- Slide the belt off the drive shaft to remove the belt. If the belt is broken, remove all the broken pieces. To replace the belt, install the new belt over the drive shaft first and then the end cap. Make sure the lettering on the belt is outward facing.
- Reinstall the agitator brush securely back into place. Then install the powerhead cover and screws.
natural_image
Technical line drawing of a mechanical assembly with a hand operating a tool (no text or symbols present)(Fig 23)
natural_image
Line drawing of a hand pressing down on a mechanical component (no text or symbols)(Fig 24)
natural_image
Technical line drawing of a mechanical assembly with no visible text or symbols(Fig 25)
Changing the Remote Control Battery
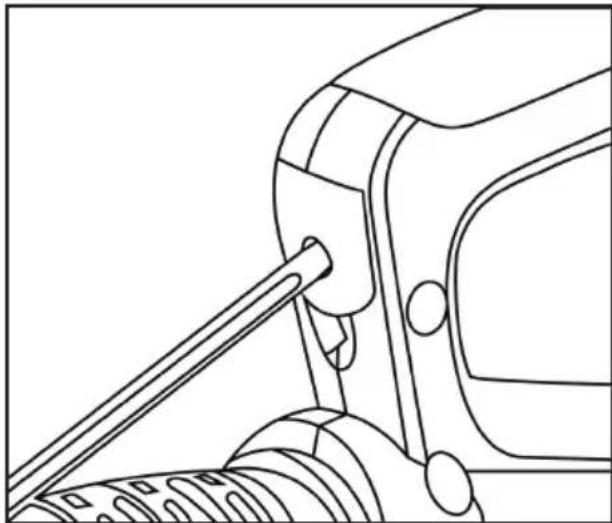
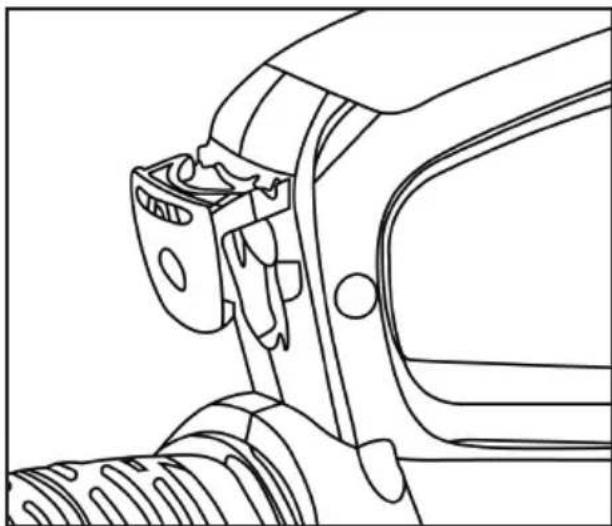
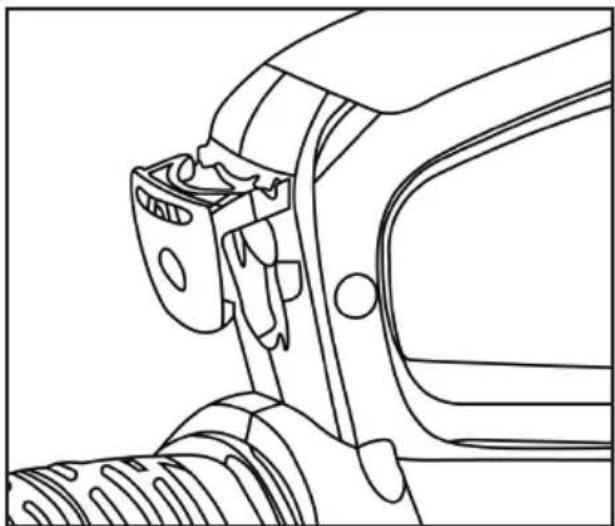
IMPORTANT! Ensure that the cleaner is disconnected from the power supply before performing any maintenance procedures. (Fig 26 and 27)
- Unscrew the battery holder with a screwdriver. The battery holder can now be pulled out from the handle.
- Replace the battery and reinsert the battery into the handle. Ensure the battery holder is screwed securely with a screwdriver.
IMPORTANT! - Keep battery out of reach of children and ensure the battery holder is secure. If you suspect your child has swallowed or inserted a button battery immediately call the Poison Control Center at 1-800-222-1222.
natural_image
Technical line drawing of a mechanical assembly with a rod inserted into a housing (no text or symbols)(Fig 26)
natural_image
Technical line drawing of a mechanical component with no visible text or symbols(Fig 27)
| Problem Check | Point Possible | Solution |
| The vacuum does not power on. | Power cord | Insert the power plug firmly into an electrical outlet |
| Suction power is weak. | BagBlocked hose or wand | Replace if the bag is full.Remove obstruction. |
| Vacuum makes an abnormal sound when on. | PowerheadBrush rollerBlocked hose | Turn off immediately.Check to ensure there are no blockages. Clear any blockages that may be found. Check that powerhead is installed securely. |
| Powerhead not working | On/Off ButtonAgitator BrushBelt | Check that the on/off button is in the “ON” position.Replace batteryCheck installation of the powerhead is correct.Remove rotating brush and clean any big objects trapped around roller bar.Check there is no object pressing top of powerhead.Check through powerhead belt window that powerhead belt is not broken.Clean rotating brush and then press Overload Protection button to reset powerhead. |
| Any other service should be performed by an Authorized Simplicity Vacuum Retailer. To locate your nearest Authorized Retailer, visit our website at www.SimplicityVac.com or call 888-974-6759. | ||
FOR BEST PERFORMANCE
- Use machine with a bag, pre-motor filter, and pleated filter.
- Keep machine and all accessories clean and in good operating condition.
- Replace bag when it's 2/3 full. The replacement bag number is SSH-6.
- Check and replace filters every 6 months or more frequently if vacuuming fine powders such as flour or drywall dust.
- Always use genuine filters and parts, as use of other products may result in poor cleaning or filtration performance. Genuine Simplicity filtration products are designed for maximum performance.
- Store machine in a clean, dry area indoors.
- For optimum cleaning performance and safety, follow this owner's manual.
What is Covered:
This warranty covers any defects in material and workmanship in your new Simplicity vacuum.
How Long Coverage Lasts:
Warranty coverage for this Simplicity vacuum lasts one year. Household models used commercially are only warranted for 90 days.

What's the best way to be a part of the in crowd?
It's simple: register your Simplicity vacuum today and activate your warranty.
How do you like your vacuum?
Once you've had some time to try out your new Simplicity vacuum, we want to know what you think — leave a product review. It only takes a few minutes and it helps us make our products better... and your home simply cleaner.
Simplicity® VACUUMS
888-974-6759
1760 Gilsinn Lane
Fenton, MO 63026
Simplicity® VACUUMS
Scout Plus
natural_image
Line drawing of a vacuum cleaner with attached arm and control panel (no text or symbols)SCOUT PLUS
Pour commencer
natural_image
Electrical outlet diagram showing two socket plugs connected by wires (no text or labels)ASPIRATEUR AVEC TÊTE MOTORISÉE
natural_image
Line drawing of a stylized tool or device with a looped handle and base (no text or symbols)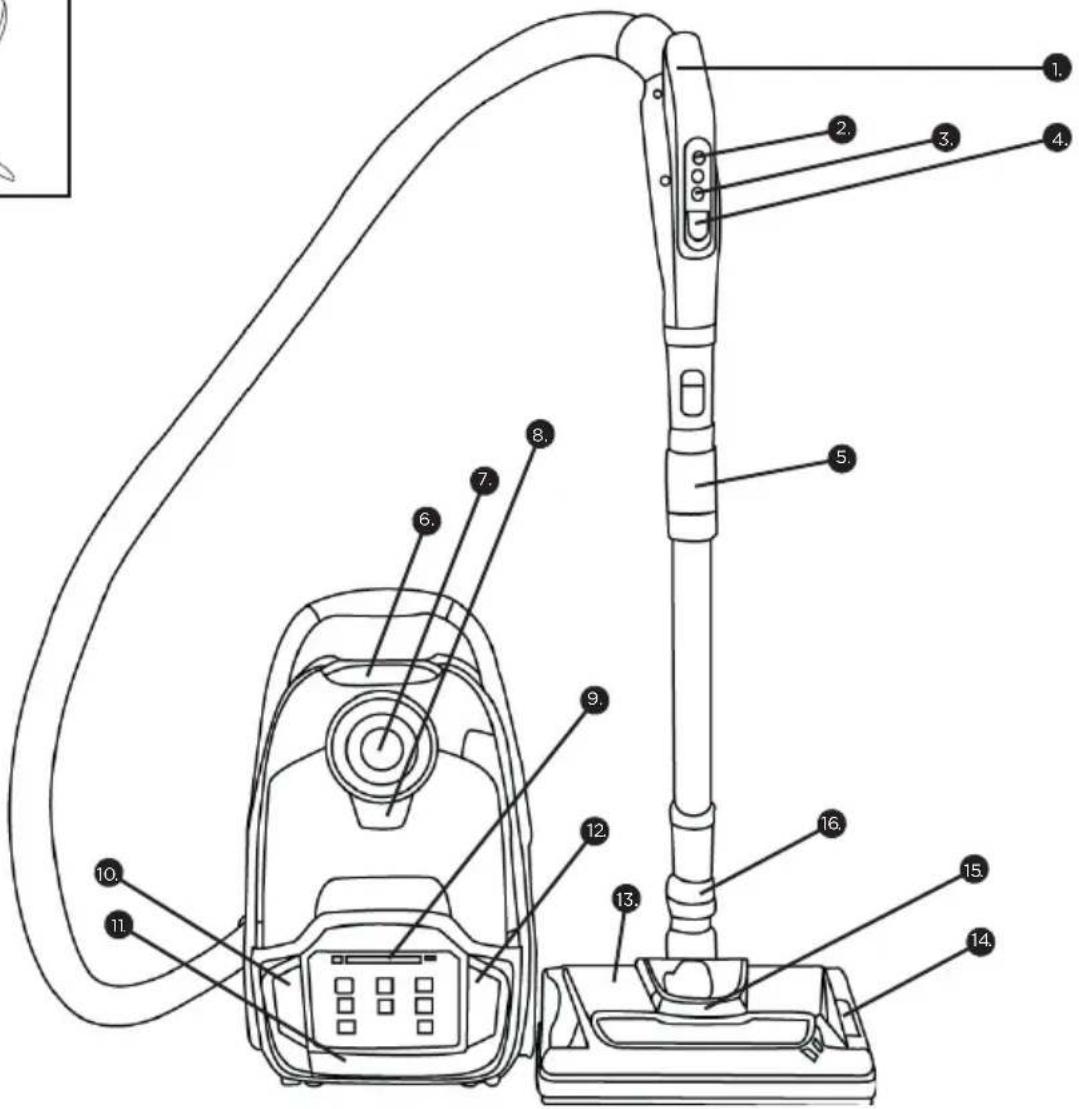
natural_image
Line drawing of a hand adjusting a car seatbelt component (no text or symbols)(Fig. 1)
Poignée
natural_image
Technical line drawing of a mechanical device with two views (top and side), no text or symbols present.(Fig. 2)
natural_image
Line drawing of a mechanical device with no visible text or symbols(Fig. 3)
ACCESSOIRES
natural_image
Technical line drawing of a mechanical assembly with no visible text or symbols(Fig. 4)
natural_image
Line drawing of a mechanical tool or clamp with a handle and base (no text or symbols)(Fig. 5)
natural_image
Line drawing of a mechanical tool or tool with a handle and base (no text or symbols)(Fig. 6)
Suceur plat
natural_image
Line drawing of a grater with mesh contents and handle (no text or symbols)(Fig. 7)
natural_image
Line drawing of a mechanical tool or clamp with a handle and base (no text or symbols)(Fig. 8)
(Fig. 9)
natural_image
Line drawing of a hand inserting a device into a control panel (no text or symbols visible)(Fig. 10)
natural_image
Line drawing of hands installing or adjusting a device component with a wrench (no text or symbols present)(Fig. 11)
natural_image
Line drawing of a hand pressing down on a device panel with buttons and a minus symbol (no text or labels)(Fig. 12)
natural_image
Line drawing of a handheld electronic device with a stylus and control buttons (no text or symbols)(Fig. 13)
natural_image
Line drawing of a steam iron with no text or symbols(Fig. 14)
SYNCHRONISATION DE LA POIGNÉE DE COMMANDE SANS FIL
natural_image
Line drawing of a hand pressing down on a device panel with buttons and a minus symbol (no text or labels)(Fig. 15)
natural_image
Pure technical line drawing of a mechanical component with no text or symbols(Fig. 17)
natural_image
Line drawing of a hand holding a small object with circular features, no text or symbols present(Fig. 18)
natural_image
Line drawing of a hand inserting a card into a storage cabinet (no text or symbols)(Fig. 19)
natural_image
Technical line drawing of a mechanical component with no visible text or symbols(Fig. 20)
natural_image
Line drawing of a hand inserting a component into a device panel (no text or symbols)(Fig. 21)
natural_image
Pure mechanical diagram showing gear and shaft assembly without any text, numbers, or symbols(Fig. 22)
natural_image
Technical line drawing of a mechanical assembly with a hand operating a tool (no text or symbols present)(Fig. 23)
natural_image
Line drawing of a hand pressing down on a mechanical component (no text or symbols)(Fig. 24)
natural_image
Technical line drawing of a mechanical assembly with no visible text or symbols(Fig. 25)
natural_image
Technical line drawing of a mechanical assembly with a rod inserted into a housing (no text or symbols)(Fig. 26)
natural_image
Technical line drawing of a mechanical component with no visible text or symbols(Fig. 27)
Simplicityvac.com/register-warranty
natural_image
Line drawing of a vacuum cleaner with attached circuit board (no text or symbols)SCOUT PLUS
Pasos iniciales
natural_image
Simple line drawing of an electrical outlet with two socket (no text or symbols)ASPIRADORA CON CABEZAL MOTORIZADO
natural_image
Line drawing of a mechanical tool or tool with a looped handle and base (no text or symbols)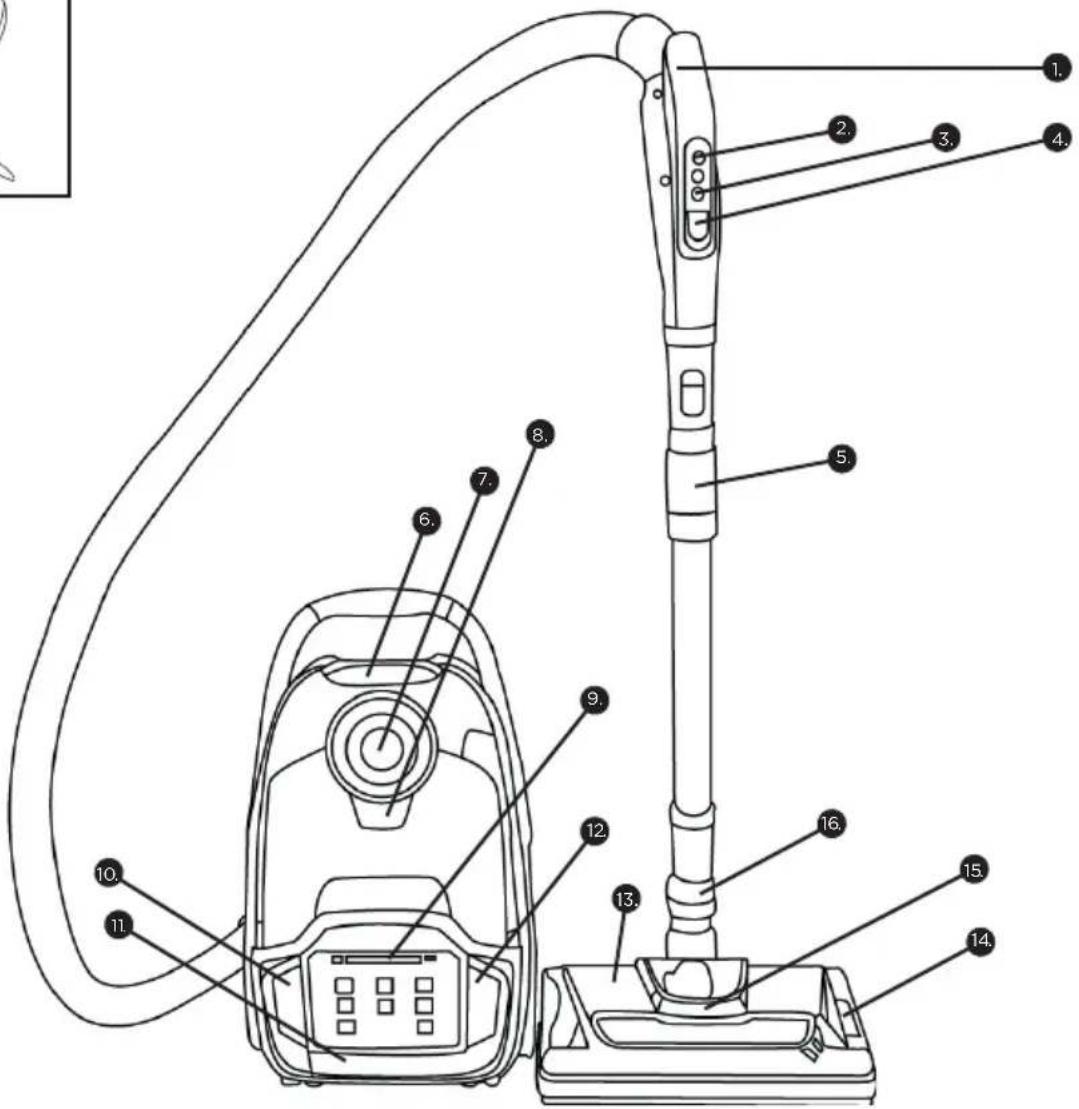
natural_image
Line drawing of a hand using a mechanical switch to adjust a car's seatbelt (no text or symbols present)(Fig. 1)
Mango
natural_image
Technical line drawing of a mechanical device with two views (top and side), no text or symbols present.(Fig. 2)
natural_image
Line drawing of a mechanical device with no visible text or symbols(Fig. 3)
ACCESORIOS
natural_image
Technical line drawing of a mechanical assembly with no visible text or symbols(Fig. 4)
natural_image
Line drawing of a mechanical tool or clamp with a handle and base (no text or symbols)(Fig. 5)
natural_image
Line drawing of a mechanical tool or tool with a handle and base (no text or symbols)(Fig. 6)
Boquilla para rendijas
natural_image
Line drawing of a grater with mesh contents and handle (no text or symbols)(Fig. 7)
Cepillo para polvo
natural_image
Line drawing of a mechanical tool or clamp with a handle and base (no text or symbols)(Fig. 8)
natural_image
Line drawing of a hand inserting a device into a control panel (no text or symbols visible)(Fig. 10)
natural_image
Line drawing of hands connecting a device to a fan panel (no text or symbols)(Fig. 11)
natural_image
Line drawing of a hand pressing down on a device panel with buttons and a minus symbol (no text or labels)(Fig. 12)
natural_image
Line drawing of a handheld electronic device with a stylus and control buttons (no text or symbols)(Fig. 13)
natural_image
Line drawing of a mechanical component with no visible text or symbols(Fig. 14)
natural_image
Line drawing of a hand pressing down on a device panel with buttons and a minus symbol (no text or labels)(Fig. 15)
natural_image
Line drawing of a mechanical component with multiple curved lines and circular features (no text or symbols)(Fig. 17)
natural_image
Line drawing of a hand holding a small object with circular features, no text or symbols present(Fig. 18)
natural_image
Line drawing of a hand inserting a card into a storage cabinet (no text or symbols)(Fig. 19)
natural_image
Technical line drawing of a mechanical component with no visible text or symbols(Fig. 20)
natural_image
Line drawing of a hand inserting a component into a server rack (no text or symbols)(Fig. 21)
natural_image
Technical line drawing of a mechanical assembly with no visible text or symbols(Fig. 22)
natural_image
Technical line drawing of a mechanical assembly with a hand operating a tool (no text or symbols present)(Fig. 23)
natural_image
Line drawing of a hand pressing down on a mechanical component (no text or symbols)(Fig. 24)
natural_image
Technical line drawing of a mechanical assembly with hoses and components (no text or symbols)(Fig. 25)
natural_image
Technical line drawing of a mechanical assembly with a rod inserted into a housing (no text or symbols)(Fig. 26)
natural_image
Technical line drawing of a mechanical component with no visible text or symbols(Fig. 27)
Simplicityvac.com/register-warranty

- Getting Started
- Assembly
- Accessories
- Controls
- Instructions
- Maintenance
- Troubleshooting
- Warranty Information
- IMPORTANT SAFETY INSTRUCTIONS
- READ AND UNDERSTAND ALL INSTRUCTIONS BEFORE USING THIS UNIT.
- IMPORTANT:
- WARNING:
- SAVE THESE INSTRUCTIONS
- Power Cord, 2-Wire Polarized Cord
- VACUUM CLEANER WITH POWERHEAD
- IMPORTANT! Always remove the power cord from the power supply before fitting or removing accessories!
- Flexible Hose
- Handle
- Powerhead
- 3-in-1 Cleaning Tool
- Upholstery Tool
- Crevice Tool
- Dusting Brush
- Using the Cord Rewind Button and Standby On/Off Button
- SYNCHRONIZING THE WIRELESS CONTROL HANDLE
- Vacuum Cleaner Storage
- Replacing the Dust Bag
- Pre-Motor Filter Replacement
- Exhaust HEPA Type Filter Replacement
- Cleaning the Motorized Powerhead
- Replacing the Powerhead Agitator Brush & Drive Belt
- Changing the Remote Control Battery
- FOR BEST PERFORMANCE
- What is Covered:
- How Long Coverage Lasts:
- What's the best way to be a part of the in crowd?
- How do you like your vacuum?
- Simplicity® VACUUMS
- Scout Plus
- Pour commencer
- ASPIRATEUR AVEC TÊTE MOTORISÉE
- Poignée
- ACCESSOIRES
- Suceur plat
- SYNCHRONISATION DE LA POIGNÉE DE COMMANDE SANS FIL
- Pasos iniciales
- ASPIRADORA CON CABEZAL MOTORIZADO
- Mango
- ACCESORIOS
- Boquilla para rendijas
- Cepillo para polvo
Brand : Simplicity
Model : Scout Plus
Category : Vacuum Cleaner