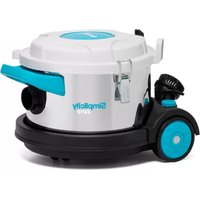
Brio - Vacuum Cleaner Simplicity - Free user manual and instructions
Find the device manual for free Brio Simplicity in PDF.


| Product type | Bagless canister vacuum |
| Brand | Simplicity |
| Model | Brio |
| Dimensions (L x W x H) | 30 x 25 x 105 cm |
| Weight | 5.2 kg |
| Maximum power | 700 W |
| Power supply | Mains, 220-240 V, 50 Hz |
| Power cord length | 8 m |
| Cleaning range | 12 m |
| Container capacity | 1.5 L |
| Filtration | Washable HEPA filter |
| Noise level | 78 dB(A) |
| Brush type | Motorized brush with height adjustment |
| Included accessories | Crevice nozzle, dusting brush, upholstery nozzle |
| Filter maintenance | Wash with water every 3 months |
| Container cleaning | Empty after each use |
| Spare parts available | Filters, brushes, belts, bag (if applicable) |
| Repairability | Repairability score 7.5/10 |
| Warranty | 2 years |
Frequently Asked Questions - Brio Simplicity
User questions about Brio Simplicity
0 question about this device. Answer the ones you know or ask your own.
Ask a new question about this device
Download the instructions for your Vacuum Cleaner in PDF format for free! Find your manual Brio - Simplicity and take your electronic device back in hand. On this page are published all the documents necessary for the use of your device. Brio by Simplicity.
USER MANUAL Brio Simplicity
Important Safety Instructions 2
Grounding Instructions 3
Parts Identification 4
Assembly 5
Controls 6
Operation 7
Using the Tools 8
Storage 9
Maintaining The Vacuum
Replacing the Dust Bag 10
Maintaining and Replacing the Filters 10
Troubleshooting
Troubleshooting 11
Key Replacement Parts 11
For Best Performance 11
Warranty Information
Register Online 12
IMPORTANT SAFETY INSTRUCTIONS
READ AND UNDERSTAND ALL INSTRUCTIONS BEFORE USING THIS UNIT.
READ AND UNDERSTAND THIS OWNER'S MANUAL AND ALL LABELS ON THE UNIT BEFORE OPERATING. SAFETY IS A COMBINATION OF COMMON SENSE, STAYING ALERT AND KNOWING HOW YOUR UNIT WORKS. USE THIS UNIT ONLY AS DESCRIBED IN THIS MANUAL. USE ONLY MANUFACTURER'S RECOMMENDED ATTACHMENTS. TO REDUCE THE RISK OF PERSONAL INJURY OR DAMAGE TO YOUR UNIT USE ONLY SIMPLICITY RECOMMENDED ACCESSORIES.
THIS MACHINE IS INTENDED FOR COMMERCIAL USE ONLY. IT IS DESIGNED EXCLUSIVELY TO PICK UP DIRT, DRY DEBRIS AND DUST IN AN INDOOR ENVIRONMENT AND IS NOT CONSTRUCTED FOR ANY OTHER USE. THE PICK UP OF ANY TYPE OF FLUID OR DANGEROUS/TOXIC MATERIALS IS PROHIBITED. USE ONLY RECOMMENDED ACCESSORIES.
• WARNING! To reduce the risk of fire, electric shock, or injury:
- Do not leave appliance unattended when plugged in. Unplug from outlet when not in use and before servicing
- WARNING: ELECTRIC SHOCK COULD OCCUR IF USED OUTDOORS OR ON WET SURFACES.
- Do not allow to be used as a toy
- Close attention is necessary when used by or near children.
- Use only as described in this manual.
- Use only manufacturer's recommended attachments.
- Do not use with damaged cord or plug. If appliance is not working as it should, has been dropped, damaged, left outdoors, or dropped into water, return it to a service center.
- Do not pull or carry by cord, use cord as handle, close a door on cord, or pull cord around sharp edges or corners.
- Do not run appliance over cord. Keep cord away from heated surfaces.
- Do not unplug by pulling on cord. To unplug, grasp the plug, not the cord.
- Do not handle plug or appliance with wet hands.
- Turn off all controls before unplugging.
- Do not put any object into openings.
- Do not use with any opening blocked, keep free of dust, lint, hair, and anything that may reduce air flow.
- Keep hair, loose clothing, fingers and all parts of body away from openings and moving parts.
- Do not pick up anything that is burning or smoking, such as cigarettes, matches or hot ashes.
- Do not use without vacuum bag and / or filters in place.
- Do not use to pick up flammable or combustible liquids such as gasoline or use in areas where they may be present.
- Do not attempt to service the unit while appliance is plugged in.
- For grounded models, connect to a properly grounded outlet only. See Grounding Instructions.
- Do not use outdoors or on wet surfaces.
- This machine is not intended for use by persons (including children) with reduced physical, sensory or mental capabilities, or lack of experience and knowledge, unless they have been given supervision or instruction concerning use of the machine by a person responsible for their safety.
- Keep children and unauthorized persons away from the machine when in use.
If using an extension cord, make sure your extension cord is in good condition and is the correct size for your appliance.
SAVE THESE INSTRUCTIONS
This appliance must be grounded. If it should malfunction or breakdown, grounding provides a path of least resistance for electric current to reduce the risk electric shock. This machine is equipped with a cord having an equipment-grounding conductor and grounding plug. The plug must be inserted into an appropriate outlet that is properly installed and grounded in accordance with all local codes and ordinances.
WARNING: Improper connection of the equipment-grounding conductor can result in a risk of electric shock. Check with a qualified electrician or service person if you are in doubt as to whether the outlet is properly grounded. Do not modify the plug provided with the appliance - if it will not fit the outlet, have a proper outlet installed by a qualified electrician.
This appliance is for use on a nominal 120-volt circuit and has a grounding plug that looks like the plug illustrated below.
Make sure the appliance is connected to an outlet having the same configuration as the plug. No adaptor should be used with this appliance.

WHEN USING ELECTRICAL EQUIPMENT BASIC SAFETY PRECAUTIONS SHOULD BE FOLLOWED INCLUDING THE FOLLOWING.
IMPORTANT SAFETY INSTRUCTIONS
READ AND UNDERSTAND ALL INSTRUCTIONS CAREFULLY BEFORE USE.
- Switch off the machine before removing the plug.
- Keep the power supply cord clear of moving parts. During operation hazard may occur when running the machine over the power supply cord.
- The power supply cord must be regularly inspected for signs of damage. If the power supply cord is damaged, it shall only be replaced by the manufacturer, its service agent or a similar qualified person in order to avoid a hazard.
- Only replace the supply cord with the type specified in the instruction manual.
- Do not operate the machine with a damaged supply cord or plug, or after the machine malfunctions or is damaged in any way. Contact an authorized Service Center for repair or adjustment.
- The plug of the power supply cord must be removed from the socket-outlet before commencing cleaning of the machine or undertaking maintenance operations.
- Do not kink or twist the power cord.
WARNING
Operators must be fully trained in the use of the machine in accordance with these instructions, able to perform user maintenance and the correct selection of accessories.
Operators should be physically capable to maneuver, transport and operate the machine.
- Operators should be able to recognize unusual operation of the machine and report any problems.
- Only use the machine on firm level surfaces.
- Wear suitable footwear to avoid slipping.
- Wear suitable clothing to keep dry and warm.
- Where possible implement job rotation and adequate rest periods to avoid continuous use of the same muscles.
- Do not leave machine running unattended.
- Do not smoke when using the machine.
CAUTION - This machine is for indoor dry use only and should not be used or stored outdoors or in wet conditions.
CAUTION - If it is suspected that there is hazardous dust or flammable materials stop cleaning the area immediately and consult your superior.
WARNING Only use accessories and spare parts provided with the machine or those approved by the manufacturer. The use of other accessories may impair the safety of the machine.
- Ensure the machine is switched off before adding or changing accessories
Transporting the machine
CAUTION - Incorrect lifting techniques may result in personal injury, where applicable do not lift large and heavy machines without assistance. We advise that the manual handling regulations are followed.
When transporting the machine, ensure that all components, tanks and removable parts are securely fastened, and that the supply cord and plug are not trailing. Detach hose and wand from machine where applicable.
Take extreme care when moving the machine up or down steps or stairs.
Preparing for use
Electrical connection
Before connecting the machine to the power supply, check that your supply voltage corresponds with that marked on the rating label.
The power supply cord plus any extension leads should not exceed 100 ft. (30 m) in total, otherwise you may experience problems starting up the machine. The cross-section of any extension cable wiring must be at least AWG 13 (2,5 mm ^2 ).
Should an extension cord be used, ensure cord rating is adequate for the equipment. Do not use extension cord in coiled condition as this could result in overheating of the cord.
IMPORTANT - If the supply cord is damaged, it must only be replaced by a special cord available from the manufacturer or an authorized service agent.

(1) Top cover
(2) Top latches
(3) Handle
(4) Hose inlet
(5) Wand dock
(6) Wands
(7) DockingClip
(8) Floor tool
(9) Dusting brush
(10) Crevice tool
(11) On/Off switch
(12) Suction control dial
(13) Tool storage
(14) Power cord
(15) Suction airflow adjuster (on handle)
Inside
(16) Cloth bag
(17) Pleated High-Efficiency Filter
(18) Foam filter
WARNING - before assembling, transporting or changing accessories tools, switch the vacuum off and unplug from the electrical outlet.
- Insert the hose into the dust intake socket on the front of the vacuum cleaner (Fig. 1)
- Twist in a clockwise direction until locked into position.

natural_image
Technical line drawing of a mechanical assembly with a curved arrow indicating rotation (no text or symbols)(Fig. 1)
- Fit the handle to the wand connection (Fig. 2)

natural_image
Simple line drawing of a pen or tool with a downward arrow indicating compression or disassembly (no text or symbols)(Fig. 2)
- Fit the wand to the floor tool. (Fig. 3)

natural_image
Technical line drawing of a mechanical device with no visible text or symbols(Fig. 3)
- The on/off switch is positioned at the rear of the machine (Fig. 4)
- To turn the machine on, press the button.
- To turn the machine off, press the button again.
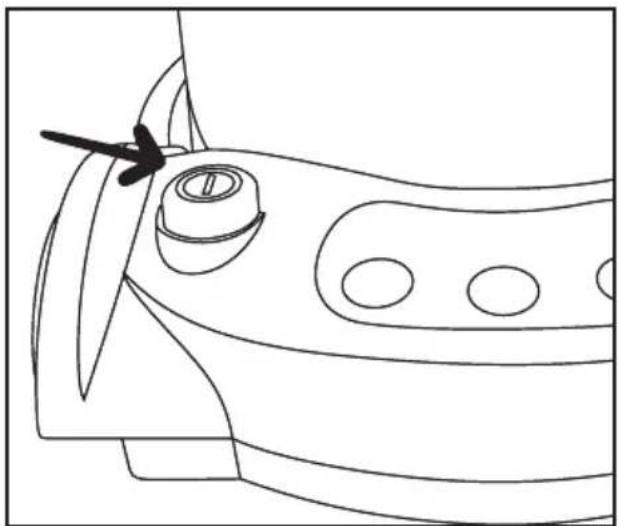
natural_image
Technical line drawing of a mechanical component with no visible text or symbols(Fig. 4)
Tip: When operating the unit in a noise-sensitive area, the unit may be adjusted with the knob on the right rear of the unit.
(Fig. 5)
This will also decrease the suction power.

natural_image
Line drawing of a mechanical component with a tool and arrow indicating direction (no text or symbols)(Fig. 5)
- Ensure the power cord is fully extended before use.
- Ensure a cloth bag is fitted before use.
- Press the on/off button to turn the vacuum cleaner on.
- Adjust suction by sliding the airflow adjuster located on the hose handle (Fig. 6)
Tip: For maximum suction, keep the adjuster closed.
- After you finish cleaning, turn the vacuum cleaner off by pressing the on/off button.
- Unplug the power cord from the electrical outlet.
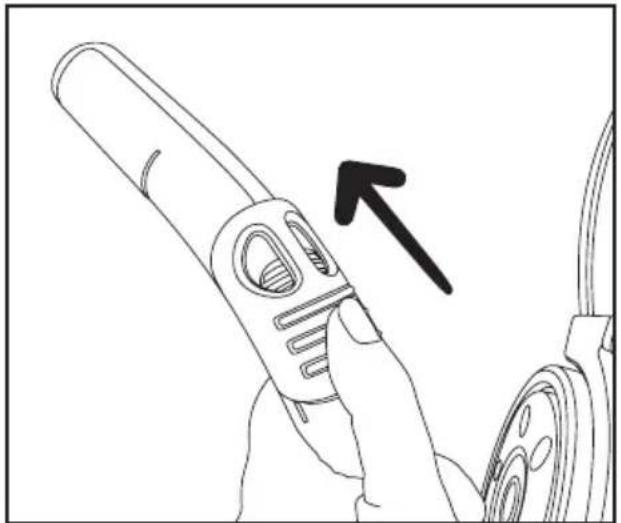
natural_image
Line drawing of a hand holding a cylindrical device with an arrow pointing to it, next to a curved cable or wire (no text or symbols)(Fig. 6)
STORAGE
• Always unplug the vacuum after use.
- Check the bag. If full, replace the bag.
• Wind the power cord ensuring the plug is not trailing on the floor.
- Store the machine in a dry indoor area only.
The floor tool can be used for cleaning carpets, rugs and hard floors.
- Press the floor heads pedal down when cleaning hard floors. (Fig. 7)

(Fig. 7)
- Press the floor heads pedal up when cleaning carpet or rugs. (Fig. 8)
Two other tools slide onto the vacuum wand or hose handle for above-the-floor cleaning.
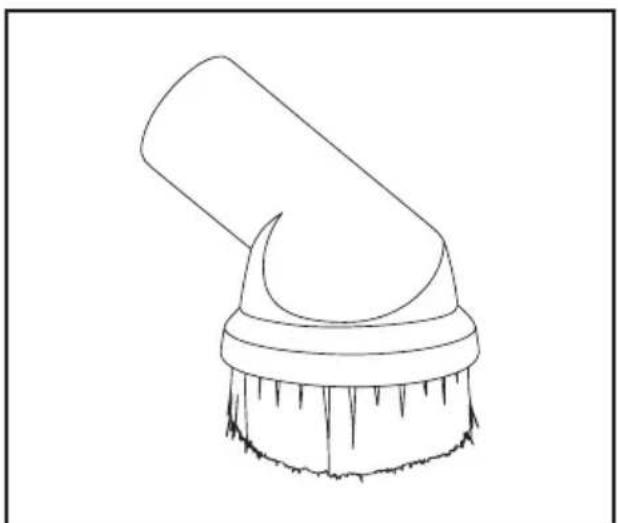
- The dusting brush is ideal for cleaning baseboards, blinds and upholstery. (Fig. 9)
- The crevice tool is handy for cleaning crevices and corners. (Fig. 10)

natural_image
Diagram showing a device with a magnified circular view of a rolled paper or plastic sheet and a downward arrow indicating action (no text or symbols present)(Fig. 8)
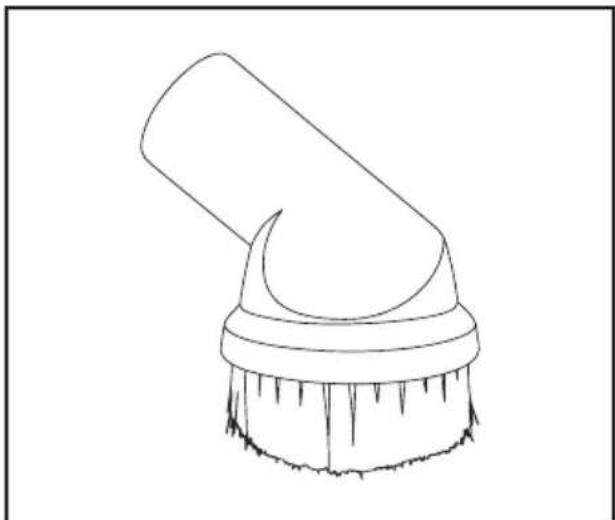
natural_image
Line drawing of a brushstroke with a circular head and textured base (no text or symbols)
natural_image
Line drawing of a cylindrical object with a curved top and flange (no text or symbols)(Fig. 9) (Fig. 10)
Replacing the Dust Bag
- Lift the latches on the lid of the machine to release and open the top cover. (Fig. A)
- Remove the dust bag and discard.
- Position the new dust bag and push the bag collar on to the dust inlet.
- Replace the top cover by aligning the lid latch indentations with the lid latches and securing the latches.
Maintaining and Replacing the Filters
For maximum performance, it's important to keep the filters clean. Not cleaning and replacing your filters regularly with genuine Simplicity replacement filters can reduce the suction power and cause overheating.
To replace the pleated high-efficiency filter and foam filter:
- Lift the latches on the lid of the vacuum to release and open the top cover. (Fig. A)
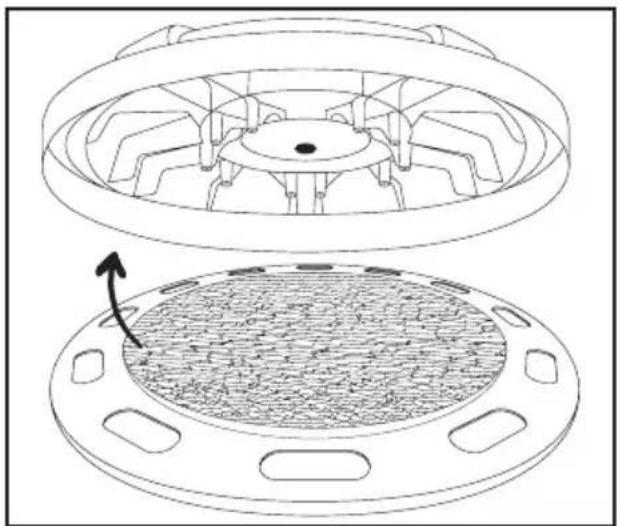
- Pull the black lid cover away from the lid. (Fig. B)
- Remove the used foam filter and replace with the new foam filter.
- Press the black lid cover back into the white lid.
- On the canister body, remove the pleated high-efficiency filter. (Fig. C)
• Install the new filter.
- Replace the top cover by lining up the lid markings up with the lid latches, then securing the latches.

natural_image
Line drawing of a mechanical device with rotating components and directional arrows indicating rotation (no text or symbols)(Fig. A)

natural_image
Technical line drawing of a mechanical component with top and side views, showing internal gear-like structure (no text or symbols)(Fig. B)

natural_image
Technical line drawing of a mechanical fan or impeller assembly with internal blades and a rotation arrow (no text or symbols)(Fig. C)
| Problem Check Point Possible Solution | ||
| The vacuum does not power on. | Power cord | Insert the power plug firmly into an electrical outlet |
| Suction power is weak. | Bag Replace if the bag is full. | |
| Blocked hose or wand Remove obstruction. | ||
| Suction power is too strong. | Suction control dial (on body | Rotate the dial in the direction of the “—” |
| Suction airflow adjuster (on handle) | Pull back on the slide to increase airflow. | |
Any other service should be performed by an Authorized Simplicity Service Center. To locate your nearest service center, visit our website at Simplicityvac.com, or call 888-974-6759.
KEY REPLACEMENT PARTS
• Brio Cloth Bags: SBCH-3
• Brio High-Efficiency Filter Set: SFBRIO
FOR BEST PERFORMANCE
- Use machine with a bag.
- Keep machine and all accessories clean and in good operating condition.
- Replace bag when it's 2/3 full.
- Check and replace filters every 12 months or more frequently if vacuuming fine powders such as flour or drywall dust.
- Always use genuine filters and parts, as use of other products may result in poor cleaning or filtration performance. Genuine Simplicity filtration products are designed for maximum performance.
- Store machine carefully in a dry area.
- For optimum cleaning performance and safety, follow this owner's manual.
What is Covered:
Simplicity vacuums are covered by a Limited Warranty.
For details, see Simplicityvac.com/warranty-information
Register online


Simplicityvac.com/register-warranty
What's the best way to be a part of the in crowd?
It's simple: register your Simplicity vacuum today and activate your warranty
How do you like your vacuum?
Once you've had some time to try out your new
Simplicity vacuum, we want to know what you think — leave a product review. It only takes a few minutes and it helps us make our products better... and your home simply cleaner.
Simplicity® VACUUMS
888-9-SIMPLY
(888-974-6759)
1760 Gilsinn Lane
Fenton, MO 63026
Simplicity® VACUUMS
VACUUMS

natural_image
Technical line drawing of a mechanical assembly with a hand holding a curved component (no text or symbols)(Fig. 1)
natural_image
Simple line drawing of a pen-like object with a downward arrow indicating compression or disassembly (no text or symbols)(Fig. 2)
natural_image
Technical line drawing of a mechanical device with no visible text or symbols(Fig. 3)
natural_image
Technical line drawing of a mechanical component with no visible text or symbols(Fig. 4)
natural_image
Line drawing of a mechanical component with a tool and arrow indicating direction (no text or symbols)(Fig. 5)
natural_image
Line drawing of a hand holding a cylindrical device with an arrow pointing to it, next to a curved cable (no text or symbols)(Fig. 6)
RANGEMENT
(Fig. 7)
(Fig. 8)
natural_image
Line drawing of a brush with a circular tip and textured base (no text or symbols)
natural_image
Line drawing of a cylindrical object with a curved top and flange (no text or symbols)(Fig. 9) (Fig. 10)
natural_image
Line drawing of a mechanical device with rotating ports and a handle (no text or symbols)(Fig. A)
natural_image
Technical line drawing of a mechanical component with top and side views, showing internal structure and movement (no text or symbols)(Fig.B)

natural_image
Technical line drawing of a mechanical fan or impeller assembly with internal blades and a rotation arrow (no text or symbols)(Fig. C)
Simplicityvac.com/register-warranty
natural_image
Technical line drawing of a mechanical assembly with a hand holding a curved component (no text or symbols)(Fig. 1)
natural_image
Simple line drawing of a tool with an arrow indicating downward motion (no text or symbols)(Fig. 2)
natural_image
Technical line drawing of a mechanical device with no visible text or symbols(Fig. 3)
natural_image
Technical line drawing of a mechanical component with no visible text or symbols(Fig. 4)
natural_image
Line drawing of a mechanical component with a tool and arrow indicating direction (no text or symbols)(Fig. 5)
natural_image
Line drawing of a hand holding a cylindrical device with an arrow pointing to it, next to a curved cable (no text or symbols)(Fig. 6)
ALMACENAMIENTO
(Fig. 7)
(Fig. 8)

natural_image
Line drawing of a brush with a circular tip and textured base (no text or symbols)
natural_image
Line drawing of a cylindrical object with a curved top and flange (no text or symbols)(Fig. 9) (Fig. 10)
natural_image
Line drawing of a mechanical device with rotating ports and a handle, no text or symbols present(Fig. A)
natural_image
Technical line drawing of a mechanical component with top and side views, showing internal structure and movement (no text or symbols)(Fig. B)

natural_image
Technical line drawing of a mechanical fan or impeller assembly with internal blades and a rotation arrow (no text or symbols)(Fig. C)
Simplicityvac.com/register-warranty


- Maintaining The Vacuum
- Troubleshooting
- Warranty Information
- IMPORTANT SAFETY INSTRUCTIONS
- READ AND UNDERSTAND ALL INSTRUCTIONS BEFORE USING THIS UNIT.
- SAVE THESE INSTRUCTIONS
- READ AND UNDERSTAND ALL INSTRUCTIONS CAREFULLY BEFORE USE.
- WARNING
- Transporting the machine
- Preparing for use
- Inside
- WARNING - before assembling, transporting or changing accessories tools, switch the vacuum off and unplug from the electrical outlet.
- STORAGE
- Replacing the Dust Bag
- Maintaining and Replacing the Filters
- KEY REPLACEMENT PARTS
- FOR BEST PERFORMANCE
- What is Covered:
- Register online
- What's the best way to be a part of the in crowd?
- How do you like your vacuum?
- Simplicity® VACUUMS
- RANGEMENT
- ALMACENAMIENTO
Brand : Simplicity
Model : Brio
Category : Vacuum Cleaner