
S65P - Vacuum Cleaner Simplicity - Free user manual and instructions
Find the device manual for free S65P Simplicity in PDF.


| Product Type | Canister Vacuum |
| Brand | Simplicity |
| Model | S65P |
| Dimensions (L x W x H) | 40 x 30 x 30 cm |
| Weight | 7 kg |
| Suction Power | 800 W |
| Bag Type | Disposable dust bag (capacity 3 L) |
| Filtration | HEPA Filter |
| Cord Length | 10 m |
| Action Radius | 12 m |
| Noise Level | 75 dB |
| Power Adjustment | Electronic speed control |
| Included Accessories | Crevice tool, upholstery brush, dusting brush |
| Floor Type | Carpet, tile, hardwood |
| Maintenance | Replace bag regularly, washable HEPA filter |
| Safety | Automatic shut-off in case of overheating |
| Spare Parts | Bags, filters, belts available |
| Repairability | Repairability index: 7/10 |
| Warranty | 2 years |
Frequently Asked Questions - S65P Simplicity
User questions about S65P Simplicity
0 question about this device. Answer the ones you know or ask your own.
Ask a new question about this device
Download the instructions for your Vacuum Cleaner in PDF format for free! Find your manual S65P - Simplicity and take your electronic device back in hand. On this page are published all the documents necessary for the use of your device. S65P by Simplicity.
USER MANUAL S65P Simplicity
Getting Started
Important Safety Instructions 2
Description of the Vacuum 3
Assembling the Vacuum
Attaching the Wand and Floor Nozzles 4
Installing/Removing/Charging the Battery (S65S and S65D) 5
Installing/Removing/Charging the Battery (S65P) 6
Storing the Vacuum 7
Operating the Vacuum
On/Off Switch 8
2-Speed Switch 8
Attachment Cleaning
Carpet/Bare Floor Nozzle 9
Bare Floor Soft Nozzle 9
Pet Tool Turbo Brush 10
Crevice/Dusting Combo Tool 10
Upholstery Tool 10
Angle Adapter 10
Maintenance and Care
Emptying the Dust Cup 11
Removing and Replacing the Dust Cup (for Cleaning) 11
Replacing the Filter 12
Removing the Brushroll 13
Cleaning the Brushroll 13
Problem Solving Guide
Troubleshooting 14
How to Contact Your Authorized Retailer 14
Key Replacement Parts 14
For Best Performance 14
Warranty 15
IMPORTANT SAFETY INSTRUCTIONS
When using an electrical appliance, basic precautions should always be followed, including the following:
READ ALL INSTRUCTIONS BEFORE USING THIS APPLIANCE. FOR HOUSEHOLD USE ONLY.
IMPORTANT:
IMPORTANT. The manufacturer cannot accept responsibility for damage caused when the appliance is not used according to the instructions, or for uses other than those for which it was intended.
WARNING:
To reduce the risk of fire, electric shock, damage or injury:
- Fully assemble vacuum before operating.
- Use and store in a dry location.
- Do not use outdoors or on wet surfaces.
- Do not allow to be used as a toy. Close attention is necessary when used by or near children or when used near pets. Do not use on pets.
- Use only as described in this manual.
- Do not use charger with damaged cord or plug. If appliance or charger is not working as it should, has been dropped, damaged, left outdoors, or dropped into water, return it to an Authorized Retailer for service.
- Do not pull or carry charger by cord, use cord as a handle, close a door on the cord, or pull cord around sharp edges or corners. Do not run appliance over cord. Keep cord away from heated surfaces.
- Do not unplug charger by pulling on cord. To unplug charger, grasp the plug, not the cord.
- Do not handle charger, including charger plug, and charger terminals with wet hands.
- Do not put any object into openings. Do not use with any opening blocked; keep free of dust, lint, hair and anything that may reduce air flow.
- Keep hair, loose clothing, fingers and all parts of the body away from openings and moving parts.
- Do not pick up anything that is burning or smoking, such as cigarettes, matches or hot ashes.
- Use extra care when cleaning on stairs.
- Do not use to pick up flammable or combustible liquids such as gasoline or use in areas where they may be present.
- Do not attempt to service the unit while charger is plugged in.
- Do not charge the unit outdoors.
- Recharge only with the charger specified by the manufacturer. A charger that is suitable for one type of appliance may create a risk of fire when used with another appliance; Charger part # C240-0900 from Simplicity, Use appliances only with specifically designated battery packs. Use of any other battery packs may create a risk of injury and fire. Battery Pack part# C240-0100 from Simplicity.
- Do not open, crush, expose to heat above 100^ C ( 212^ F) or incinerate the battery even if it is severely damaged. The battery can explode in a fire.
- The appliance should be stored only in the temperature range of -20-35°C and used and charged only in the range of 0-40°C.
- Batteries must be disposed of responsibly. Contact an Authorized Retailer for information on battery disposal. To find battery recycle pickup sites near you, please visit www.call2recycle.org.
- Remove the battery before performing any service on the vacuum.
- Under abusive conditions, liquid may be ejected from the battery; avoid contact. If contact accidentally occurs, flush with water. If liquid contacts eyes, seek medical help. Liquid ejected from the battery may cause irritation or burns.

1 On/Off Switch
2 2-Speed Switch
3 Filter Release Knob
4 Battery Compartment
5 Dust Cup
6 Dust Cup Release Button
7 Wand Release Button
8 Metal Wand
9 Floor Nozzle Release Button
10 Nozzle Storage Hook
11 Carpet/Bare Floor Nozzle
12 Bare Floor Soft Nozzle (S65P)
13 Storage Wall Mount
14 Crevice/Dusting Combo Tool
15 Pet Tool Turbo Brush (S65D/S65P)
16 Upholstery Tool (S65D/S65P)
17 Angle Adapter (S65P)
18Storage/ChargingStation (S65S/S65D)
19Storage/Dual-ChargingStation (S65P)
20 Power Adapter
21Battery
(S65S/S65D x 1)
(S65P x 2)
Attaching the Wand and Floor Nozzles
NOTE: Do not operate the vacuum until it is completely assembled.
The vacuum, floor nozzles, wand and accessories are packed separately.
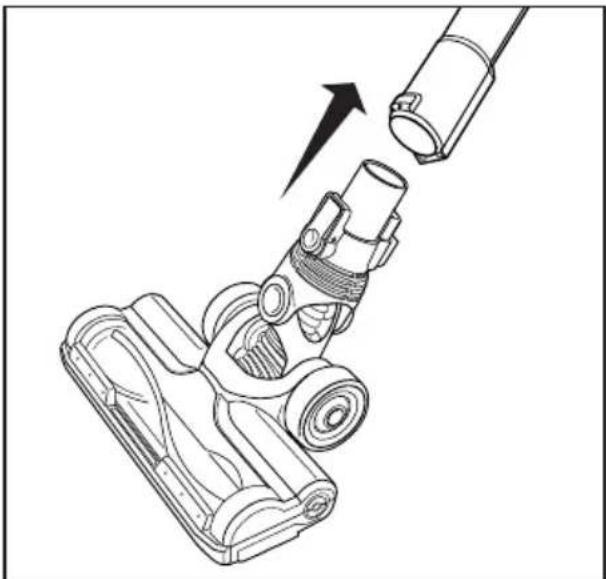
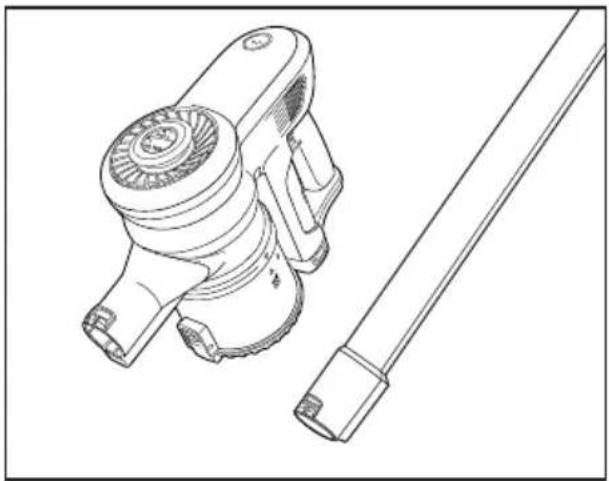
- Connect the male end of the metal wand to the vacuum (Fig. 1).
- Connect the female end of the metal wand to either floor nozzle or tools as required (Fig. 2).
- Place the other tools on the Storage/Charging Station (Fig. 3).

natural_image
Line drawing of a mechanical device with an arrow pointing to a component (no text or symbols present)Fig. 1

natural_image
Line drawing of a vacuum cleaner's handle assembly with an arrow indicating motion (no text or symbols)Fig. 2

natural_image
Line drawing of a mechanical pump or motor assembly (no text or symbols)Fig. 3
WARNING: The S65 battery included can only be used with the S65 model as intended.
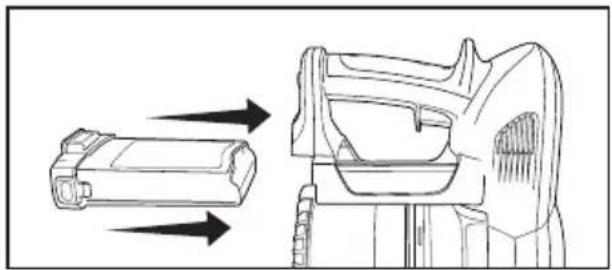
Installing the Battery
Push the battery into the battery compartment until it clicks into place (Fig. 1).
Removing the Battery
Press the two battery release buttons and pull the battery pack out of the vacuum (Fig. 1).
Charging the Battery (S65S and S65D)
The battery is partially charged and will run for a short time.
- Set the vacuum onto the Storage/Charging Station, ensuring the connection between points on vacuum with Storage/Charging Station (Fig. 2).
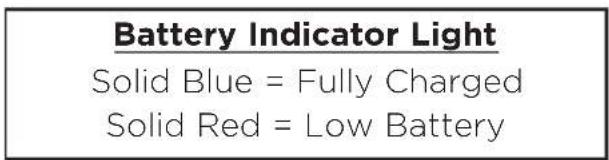
- Plug the battery charger into the Storage/Charging Station and into an electrical outlet (Fig. 3). The indicator light on the battery will be red while the battery is charging. When the indicator light is blue, the battery is fully charged (Fig. 4). Charging time is approximately 4-5 hours.
- Remove the battery charger from the vacuum and begin vacuuming.
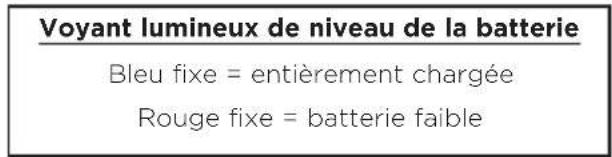
Battery Indicator Light
Solid Blue = Fully Charged
Solid Red = Low Battery
natural_image
Technical line drawing of a mechanical component with arrows indicating direction (no text or symbols)Fig. 1

natural_image
Line drawing of a mechanical electric motor with a cable and head-mounted base (no text or symbols)Fig. 2

natural_image
Line drawing of a mechanical electric motor with a power cord and base mount (no text or symbols)Fig. 3

natural_image
Technical line drawing of a mechanical device with a black arrow indicating a specific component (no text or symbols present)Fig. 4
WARNING: The S65 battery included can only be used with the S65 model as intended.
Installing the Battery
Push the battery into the battery compartment until it clicks into place (Fig. 1). Push the second battery into the charging dock on the base of the Storage Charging Station until it clicks. (Fig. 2a)
Removing the Battery
Press the two battery release buttons and pull the battery pack out of the vacuum (Fig. 1) or the charging dock (Fig. 2a).
Charging the Battery (S65P)
The battery is partially charged and will run for a short time.
-
Set the vacuum onto the Storage/Charging Station, ensuring the connection between points on vacuum with Storage/Charging Station (Fig. 2b).
-
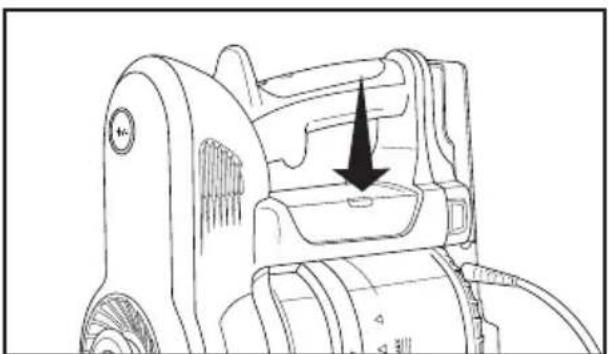
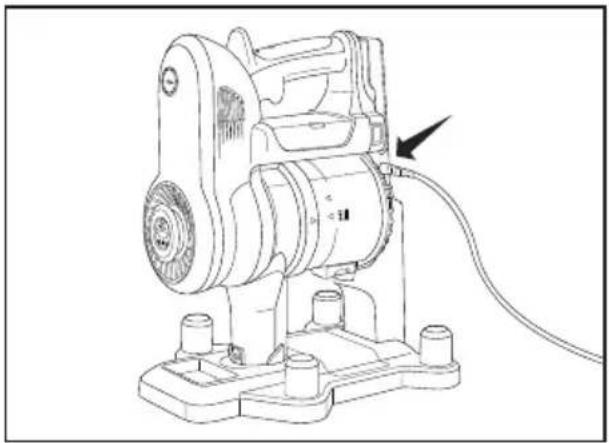
Plug the battery charger into the Storage/Charging Station and into an electrical outlet (Fig. 2c). The indicator light on the battery will be red while the battery is charging. When the indicator light is blue, the battery is fully charged (Fig. 3). Charging time is approximately 4-5 hours.
-
The second battery will charge whether the vacuum is on the Storage/Charging Station or not. The charging dock indicator light is on top of the Storage Charging Station arm (Fig. 2d)

natural_image
Technical line drawing of a mechanical component with directional arrows indicating movement (no text or symbols)Fig. 1

Fig. 2
natural_image
Technical line drawing of a mechanical device with a black arrow indicating a directional change or movement (no text or symbols present)Fig. 3
Storing the Vacuum
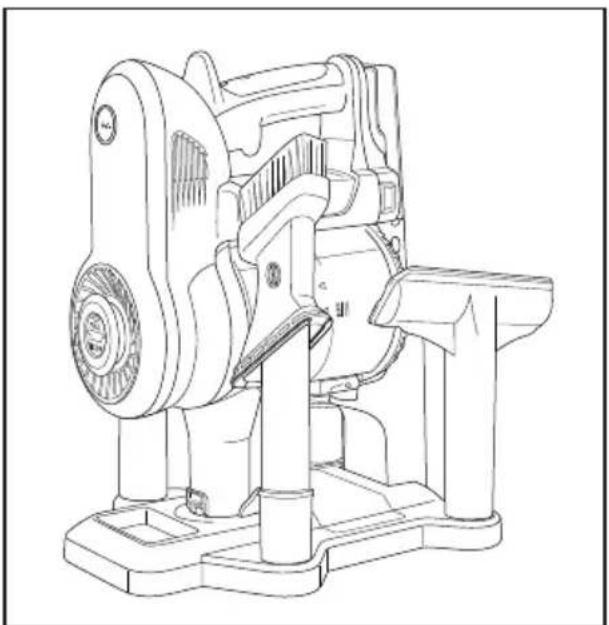
The vacuum can be conveniently stored on the Storage/Charging Station, as well as the wand and cleaning tools when not in use (Fig. 1).
Both floor nozzles have a storage hook on the back for convenient storage on the Storage/Charging Station (Fig. 2).
The vacuum can also be stored on the wall mount for easy access. Attach the mount to a wall for convenient storage (Fig. 3a). A template and screws are provided to help you affix the wall mount to the wall.
The vacuum can be charged on the wall mount by plugging the charger into the vacuum handle (Fig. 3b).

natural_image
Line drawing of a mechanical pump or motor assembly (no text or symbols)Fig. 1

natural_image
Line drawing of a vacuum cleaner's side view showing mechanical components and a downward arrow indicating motion (no text or symbols)Fig. 2

Fig. 3
On/Off Switch
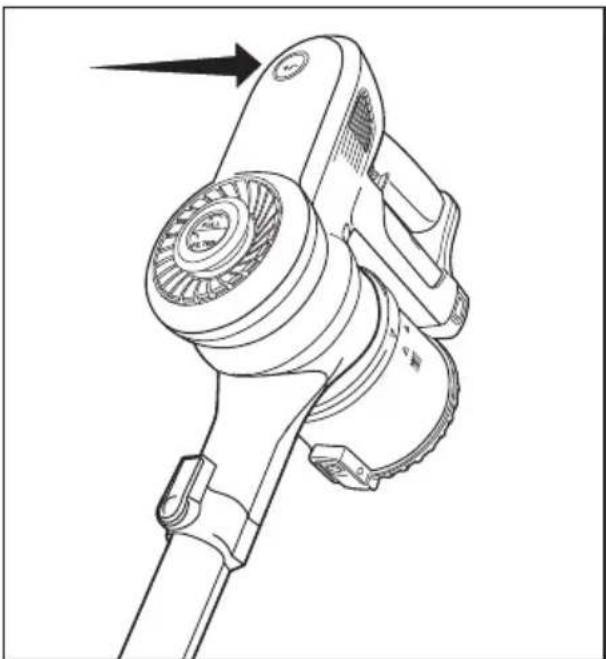
To turn vacuum on or off, pull the trigger switch inside the handle (Fig. 1).
2-Speed Switch
Low Speed
The vacuum automatically starts on low speed for cleaning bare floors and rugs.
High Speed
Push the 2-speed switch on top of the vacuum for high speed cleaning rugs and carpet (Fig. 2). The switch will light up blue.
NOTE: The vacuum has a slow start feature and will take a moment to start after you pull the trigger. This is normal.
Using the vacuum on high speeds reduces the runtime of the battery. Runtimes may vary based on floor surface, charge level and age of battery.

natural_image
Technical line drawing of a mechanical device with a highlighted component (no text or symbols)Fig. 1

natural_image
Technical line drawing of a mechanical component with no visible text or symbolsFig. 2
Floor Nozzles
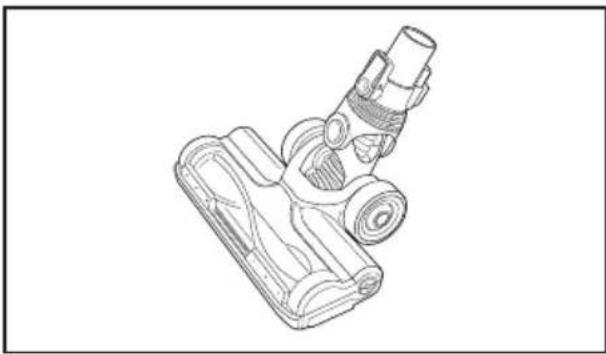
Floor nozzles can be attached to the end of the wand for floor cleaning or directly to the vacuum to clean stairs or small spaces.
Carpet/Bare Floor Nozzle
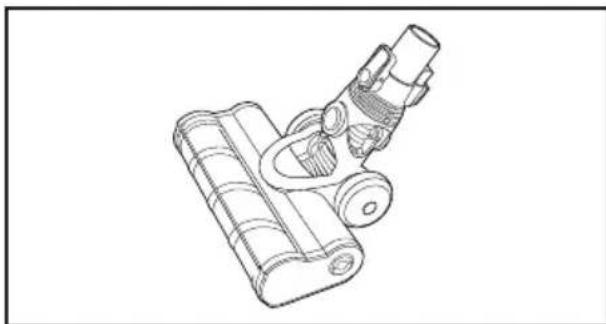
Ideal for cleaning carpets, rugs and bare floors (Fig. 1).
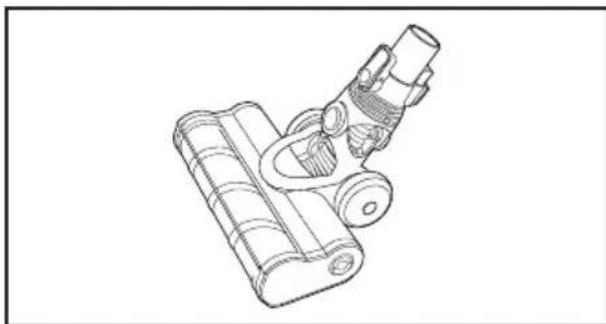
Bare Floor Soft Nozzle (S65P)
Ideal for all hard floor surfaces, wood, vinyl and tile. Gently buffs while it cleans (Fig. 2).
natural_image
Technical line drawing of a handheld vacuum cleaner (no text or symbols)Fig. 1
natural_image
Technical line drawing of a mechanical device with cylindrical components and a curved arm (no text or symbols)Fig. 2
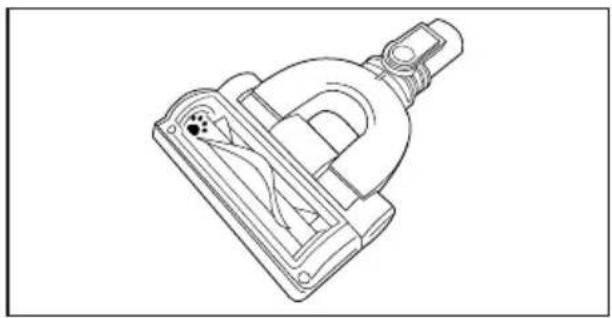
The vacuum is equipped with a pet tool turbo brush, crevice/dusting combo tool, upholstery tool and angle adapter. Attach any of the tools onto the vacuum or the end of the wand (Fig. 1).
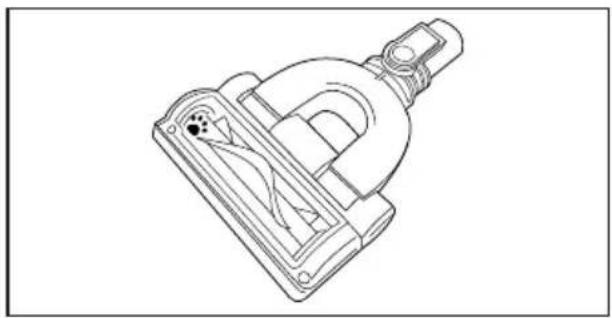
Pet Tool Turbo Brush (S65D and S65P)
Ideal for removing pet hair from upholstery and vehicles (Fig. 2).
NOTE: Do not use pet tool on pets.
C revice/Dusting Combo Tool
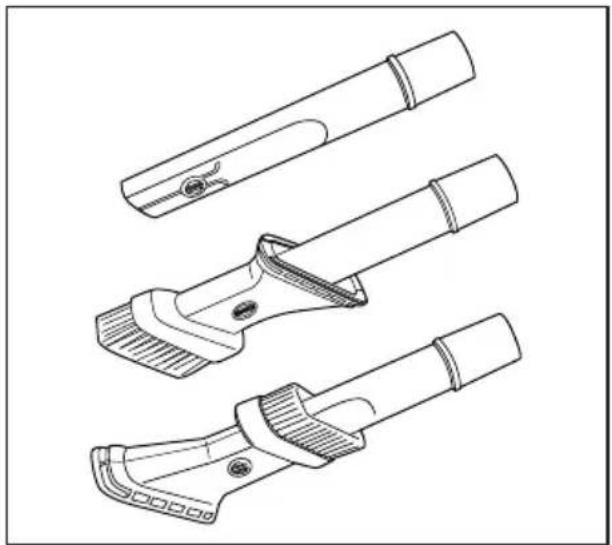
Ideal for tight places, between seat cushions or corners. Remove the attachment to use as a crevice tool. Add the attachment with brushes exposed to use as a dusting brush. Add the attachment with felt exposed to use as upholstery tool (Fig. 3).
Upholstery Tool (S65D and S65P)
Ideal for soft surfaces and furniture (Fig. 4).
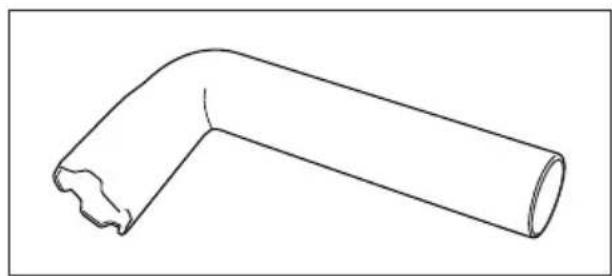
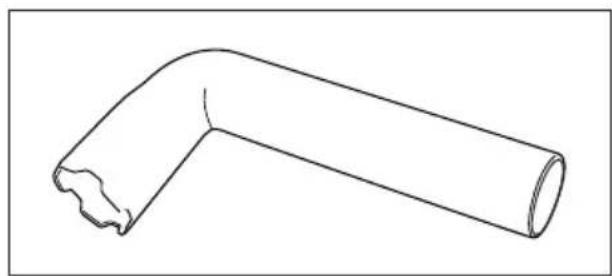
Angle Adapter (S65P)
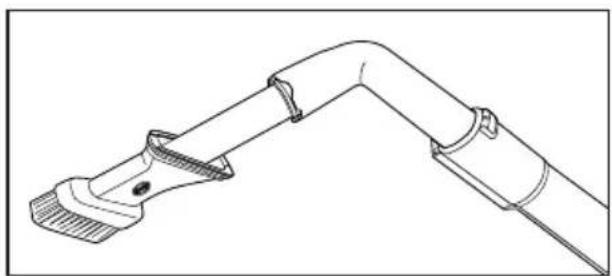
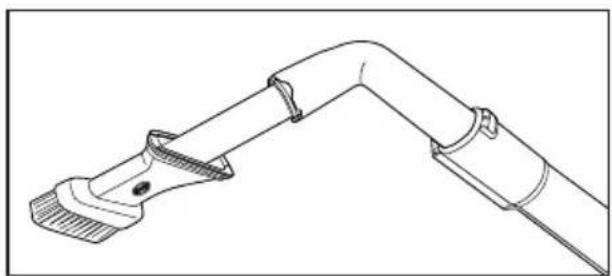
Attach to the end of the wand. Then attach any tool for cleaning hard to reach areas (Figs. 5 & 6)

natural_image
Line drawing of a mechanical tool or bracket component (no text or symbols)Fig. 4

natural_image
Technical line drawing of a mechanical device with a separate rod (no text or symbols)Fig. 1
natural_image
Technical line drawing of a mechanical clamp or bracket component (no text or symbols)Fig. 2
natural_image
Technical line drawing of a mechanical tool with multiple views (top, front, side, and close-up) showing different designs without any text or symbols.Fig. 3
natural_image
Line drawing of a bent pipe or duct with a visible crack at one end (no text or symbols)Fig. 5
natural_image
Technical line drawing of a mechanical clamp or bracket assembly (no text or symbols)Fig. 6
NOTE: Always turn off the vacuum and remove the battery before performing any service.
Emptying the Dust Cup
- Press the wand release button and remove the wand from the vacuum.
- Hold the dust cup over a trash container.
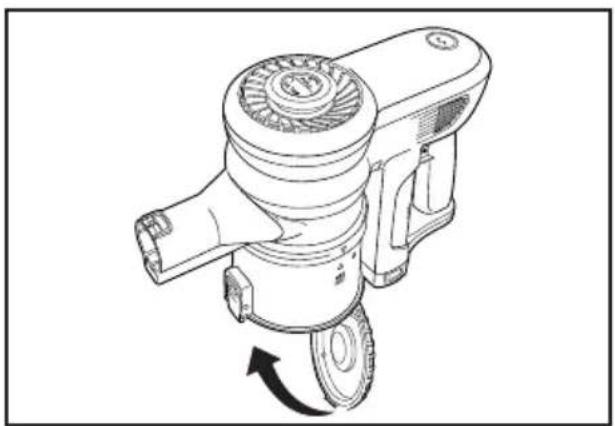
- Push the dust cup release button to release the bottom of the dust cup (Fig. 1). The base will drop down and the debris will fall into the trash container.
- Shake the dust cup to release any debris that might be inside the dust cup.
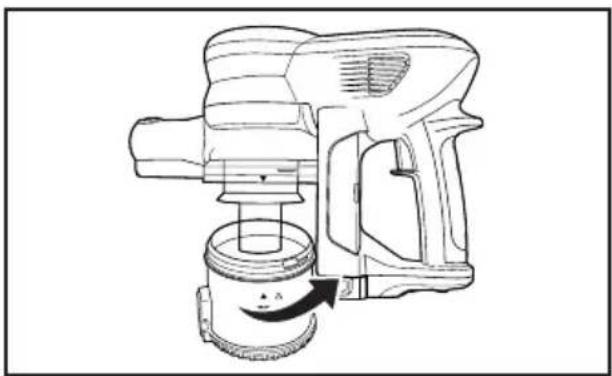
- When the dust cup is empty of debris, firmly push the base onto the dust cup until it clicks and is fully latched (Fig. 2).
Removing and Replacing the Dust Cup (for Cleaning)
- Turn the dust cup counter-clockwise to line-up the arrows and remove from the vacuum (Fig. 3).
- Turn the internal cylinder clockwise to remove from the vacuum (Fig. 4).
- Rinse the dust cup and internal cylinder with warm water and allow to dry thoroughly before re-attaching to the vacuum.
- Replace the internal cylinder and dust cup onto the vacuum.

natural_image
Technical line drawing of a mechanical device with no visible text or symbolsFig. 1
natural_image
Technical line drawing of a mechanical device with rotational arrow indicating motion (no text or symbols)Fig. 2
natural_image
Technical line drawing of a spray gun with internal components and directional arrow (no text or symbols)Fig. 3

natural_image
Technical line drawing of a hairdryer with a circular component inserted (no text or symbols)Fig. 4
NOTE: Always turn off the vacuum and remove the battery before performing any service.
Replacing the Filter
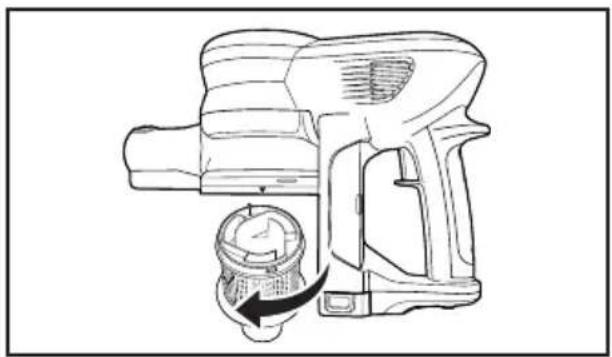
- Lift up the filter release knob and remove the filter holder from the vacuum (Fig. 1).
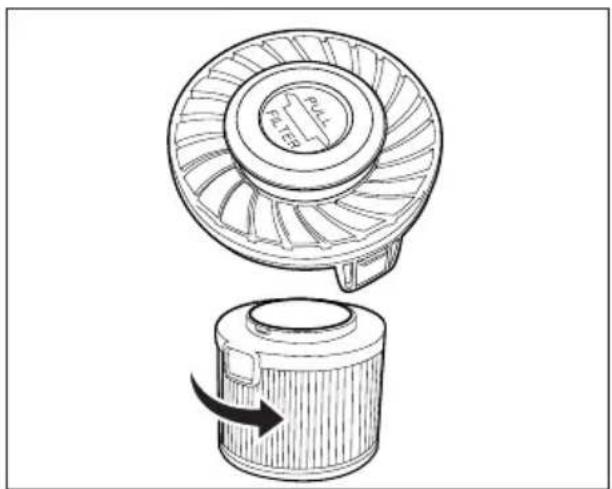
- Turn the filter counter-clockwise to remove from the filter holder (Fig. 2).
- Replace with a new filter turning it clockwise until it snaps into the filter holder.
- Replace the filter holder into the vacuum (Fig. 3).
NOTE: Filter cannot be washed and reused.
When to Change the filters
If someone in your household suffers from allergies, it is recommended you change the filter every six months. Otherwise, the filter should be replaced every year.

Fig. 1
natural_image
Technical line drawing of a fan and rotor components (no text or symbols)Fig. 2

Fig. 3
Removing the Brushroll
NOTE: Always turn off the vacuum and remove the battery before performing any service.
- Remove the floor nozzle from the wand. Turn the floor nozzle over (Fig. 1).
- Use a coin or screwdriver to turn the screw counter-clockwise (Fig. 2). Then lift off the brushroll cover.
- Remove the brushroll to clean.
- Replace the brushroll then replace the brushroll cover. Tighten the screw by turning once clockwise.
- Re-attach the floor nozzle to the wand and continue to vacuum.
Cleaning the Brushroll
NOTE: Always turn off the vacuum and remove the battery before performing any service.
-
To maintain efficient cleaning, the brushroll must be kept free of carpet fiber, string, or hair buildup. After every 7 to 10 uses, remove the battery and turn the vacuum cleaner over and check the brushroll for fiber and hair buildup.
-
Use scissors to remove any buildup entangled around the brushroll (Fig. 3).

natural_image
Technical line drawing of a mechanical assembly with a magnified inset showing a component detail (no text or symbols)Fig. 1

natural_image
Technical line drawing of a mechanical assembly with a magnified inset showing a component detail (no text or symbols)Fig. 2

natural_image
Technical line drawing of a mechanical device with internal components and scissors (no text or symbols)Fig. 3
Troubleshooting
WARNING! To reduce the risk of electrical shock or injury from moving parts, turn off the vacuum and remove battery before servicing or cleaning.
CAUTION! To reduce the risk of electric shock, do not handle plug or appliance with wet hands.
| PROBLEM CHECK POINT POSSIBLE SOLUTION | ||
| Vacuum will not operate | Batterycharge Charge the | battery |
| Battery installation Install | battery correctly | |
| Vacuum, wand and floor nozzle connection | Assemble wand and floor nozzle correctly to vacuum | |
| Vacuum will not pick-up dirt or suction power is weak | Full or clogged dust cup | Empty dust cup |
| Worn brushroll Replace brushroll | ||
| Clogged floor nozzle Check for clogs | ||
| Clogged wand Check for clogs | ||
| Wand not inserted fully to vacuum | Insert wand fully to vacuum | |
| Dirty Filter Replace filter | ||
| Brushroll does not turn | Brushroll Clean the brushroll | |
| Dirt escaping from vacuum | Full or clogged dust cup | Empty dust cup |
| Filter not installed correctly | Install filter correctly | |
| Puncture in filter Replace filter | ||
How to Contact Your Authorized Retailer
Any other service should be performed by an Authorized Retailer. To locate your nearest Authorized Retailer, visit SimplicityVac.com or call 888-974-6759.
Key Replacement Parts
• Genuine HEPA Media Filter: SF65
For Best Performance
- Keep machine and all accessories clean and in good operating condition.
- Empty dust cup frequently and clean or replace the filter routinely.
- Always use genuine filters and parts, as use of other products may result in poor cleaning or filtration performance. Simplicity Vacuum filtration products are designed for maximum performance.
- Store machine carefully in a dry area.
- For optimum cleaning performance and safety, follow your owner's manual.
What is Covered:
This warranty covers any defects in material and workmanship in the vacuum and applies exclusively to the original purchaser.
How Long Coverage Lasts:
Visit Simplicityvac.com for warranty information.
What is Not Covered:
- Damage to the vacuum which occurs from neglect, abuse, alterations, accident, misuse or improper maintenance.
- Normal replacement items: disposable filters.
What We Will Do:
This warranty provides, at no cost to you, all labor and parts to keep this vacuum in correct operating condition during the warranted period.
How to Get Service:
Warranty service can only be obtained by presenting the vacuum to an Authorized Retailer. A proof-of-purchase and product serial number will be required before service is rendered. To locate your nearest service center, please call 888-974-6759 or visit SimplicityVac.com.
THIS WARRANTY IS EXCLUSIVE AND IN LIEU OF ANY AND ALL OTHER WARRANTIES WHETHER WRITTEN, ORAL, EXPRESSED OR IMPLIED, (INCLUDING ANY WARRANTY OF MERCHANTABILITY OR FITNESS FOR A PARTICULAR PURPOSE). THIS WARRANTY DISCLAIMS LIABILITY FOR INCIDENTAL OR CONSEQUENTIAL DAMAGES.
How State Law Applies:
This warranty gives you specific legal rights, and you may also have other rights which vary from state to state.
Owner's Warranty Information (keep this for your records...)
Store Name
Store Address
City
State Zip
Telephone Date of Purchase
Serial Number Model Number
Register your warranty online at SimplicityVac.com


Simplicityvac.com/register-warranty
What's the best way to be a part of the in crowd?
It's simple: register your Simplicity vacuum today and activate your warranty.
How do you like your vacuum?
Once you've had some time to try out your new Simplicity vacuum, we want to know what you think — leave a product review. It only takes a few minutes and it helps us make our products better... and your home simply cleaner.

Simplicity® VAGUUMS
VACUUMS
Simplicity® VACUUMS
VACUUMS
Manual del Usuario
S65S S65D S65P

natural_image
Line drawing of a mechanical device with an arrow pointing to a component (no text or symbols present)Fig. 1
natural_image
Line drawing of a vacuum cleaner's handle assembly with an arrow indicating motion (no text or symbols)Fig. 2

natural_image
Line drawing of a mechanical pump or motor assembly (no text or symbols)Fig. 3
natural_image
Technical line drawing of a mechanical component with directional arrows indicating movement (no text or symbols)Fig. 1

natural_image
Line drawing of a mechanical electric motor with a cable and head-mounted base (no text or symbols)Fig. 2

natural_image
Line drawing of a mechanical electric motor with a power cord and base mount (no text or symbols)Fig. 3

natural_image
Technical line drawing of a mechanical device with a black arrow indicating a specific component (no text or symbols present)Fig. 4
natural_image
Technical line drawing of a mechanical component with directional arrows indicating movement (no text or symbols)Fig. 1

Fig. 2

natural_image
Technical line drawing of a mechanical device with a black arrow indicating a specific component (no text or symbols present)Fig. 3

natural_image
Line drawing of a mechanical pump or motor assembly (no text or symbols)Fig. 1

natural_image
Line drawing of a vacuum cleaner's side view showing mechanical components and a downward arrow indicating motion (no text or symbols)Fig. 2

Fig. 3
Interruptor de Encendido/ Apagado (On/Off)
Para encender o apagar la aspiradora, jale del gatillo interruptor dentro del mango (Fig. 1).
Interruptor de Dos Velocidades
Velocidad Baja
natural_image
Technical line drawing of a mechanical device with a highlighted component (no text or symbols)Fig. 1
natural_image
Technical line drawing of a mechanical device with a circular component and an arrow indicating direction (no text or symbols)Fig. 2
Boquillas de Suelo
natural_image
Technical line drawing of a handheld vacuum cleaner (no text or symbols)Fig. 1
natural_image
Technical line drawing of a mechanical device with cylindrical components and a curved arm (no text or symbols)Fig. 2
natural_image
Line drawing of a mechanical tool or bracket (no text or symbols)Fig. 4
natural_image
Technical line drawing of a mechanical device with a separate rod (no text or symbols)Fig. 1

natural_image
Technical line drawing of a mechanical clamp or bracket component (no text or symbols)Fig. 2

natural_image
Technical line drawing of a mechanical tool with multiple views (top, front, side, and close-up) showing different designs without any text or symbols.Fig. 3

natural_image
Line drawing of a bent pipe or duct with a visible crack at one end (no text or symbols)Fig. 5

natural_image
Technical line drawing of a mechanical clamp or bracket assembly (no text or symbols)Fig. 6
natural_image
Technical line drawing of a mechanical device with no visible text or symbolsFig. 1

natural_image
Technical line drawing of a mechanical device with rotational arrow indicating motion (no text or symbols)Fig. 2

natural_image
Technical line drawing of a spray gun with internal components and directional arrow (no text or symbols)Fig. 3
natural_image
Technical line drawing of a handheld electric shaver with internal components and a rotating arrow indicating motion (no text or symbols)Fig. 4
natural_image
Technical line drawing of a fan and rotor components (no text or symbols)Fig. 2
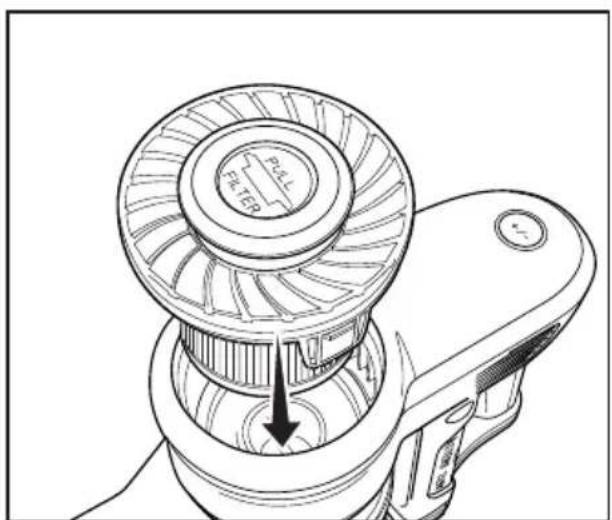
Fig. 3
natural_image
Technical line drawing of a mechanical assembly with a magnified inset showing a component detail (no text or symbols)Fig. 1

natural_image
Technical line drawing of a mechanical assembly with a magnified inset showing a component detail (no text or symbols)Fig. 2
natural_image
Technical line drawing of a mechanical assembly with gears and a tool, no text or symbols presentFig. 3
Simplicityvac.com/register-warranty
natural_image
Technical line drawing of a mechanical device with an arrow indicating direction (no text or symbols present)Fig. 1

natural_image
Line drawing of a vacuum cleaner's internal structure with an arrow indicating assembly (no text or symbols)Fig. 2
natural_image
Line drawing of a mechanical pump or motor assembly (no text or symbols)Fig. 3
natural_image
Technical line drawing of a mechanical component with arrows indicating direction (no text or symbols)Fig. 1

natural_image
Line drawing of a mechanical electric motor with a cable and head-mounted base (no text or symbols)Fig. 2
natural_image
Line drawing of a mechanical electric motor with a power cord and base mount (no text or symbols)Fig. 3

natural_image
Technical line drawing of a mechanical device with a black arrow indicating a component or feature (no text or symbols present)Fig. 4
natural_image
Technical line drawing of a mechanical component with directional arrows indicating movement (no text or symbols)Fig. 1
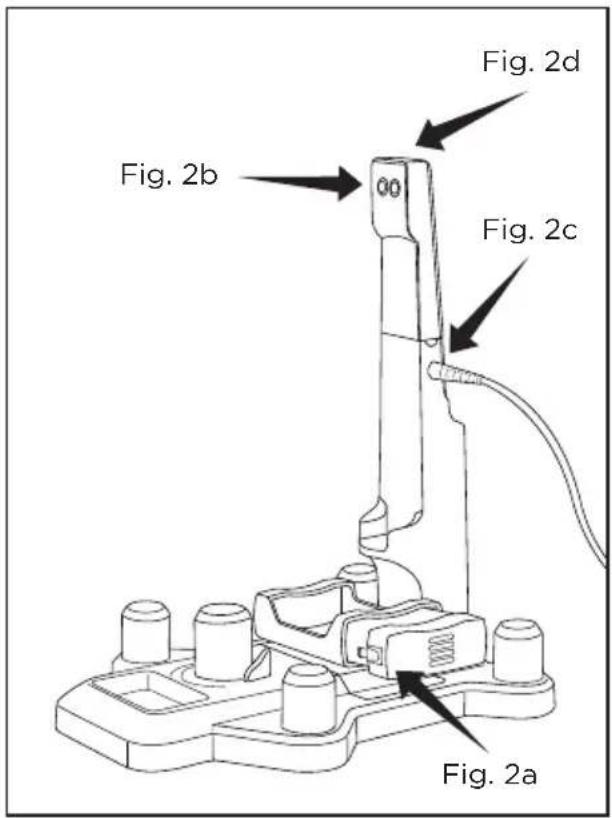
Fig. 2

natural_image
Technical line drawing of a mechanical device with a black arrow indicating a specific component (no text or symbols present)Fig. 3
natural_image
Line drawing of a mechanical pump or motor assembly (no text or symbols)Fig. 1

natural_image
Line drawing of a vacuum cleaner's side view showing mechanical components and a downward arrow indicating motion (no text or symbols)Fig. 2

Fig. 3
natural_image
Technical line drawing of a mechanical device with a highlighted component (no text or symbols)Fig. 1

natural_image
Technical line drawing of a mechanical device with a circular component and an arrow indicating direction (no text or symbols)Fig. 2
Suceurs pour sol
natural_image
Technical line drawing of a handheld vacuum cleaner (no text or symbols)Fig. 1

natural_image
Technical line drawing of a mechanical device with cylindrical components and a curved arm (no text or symbols)Fig. 2
natural_image
Line drawing of a mechanical tool or bracket (no text or symbols)Fig. 4

natural_image
Technical line drawing of a mechanical device with a separate rod (no text or symbols)Fig. 1
natural_image
Technical line drawing of a mechanical clamp or bracket component (no text or symbols)Fig. 2

natural_image
Technical line drawing of a mechanical tool with multiple views (top, front, side, and close-up) showing different designs without any text or symbols.Fig. 3
natural_image
Line drawing of a bent pipe or duct with a visible crack at one end (no text or symbols)Fig. 5
natural_image
Technical line drawing of a mechanical clamp or bracket assembly (no text or symbols)Fig. 6
natural_image
Technical line drawing of a mechanical device with no visible text or symbolsFig. 1

natural_image
Technical line drawing of a mechanical device with rotational arrow indicating motion (no text or symbols)Fig. 2

natural_image
Technical line drawing of a spray gun with internal components and directional arrow (no text or symbols)Fig. 3

natural_image
Technical line drawing of a handheld device with internal components and directional arrow (no text or symbols)Fig. 4
natural_image
Technical line drawing of a mechanical fan assembly with a handle and internal gear (no text or symbols)Fig. 3
natural_image
Technical line drawing of a mechanical assembly with a magnified inset showing a component detail (no text or symbols)Fig. 1

natural_image
Technical line drawing of a mechanical assembly with a magnified inset showing a component detail (no text or symbols)Fig. 2
natural_image
Technical line drawing of a mechanical clamp or tool assembly with no visible text or symbolsFig. 3
Dépannage
Simplicityvac.com/register-warranty

- Getting Started
- Assembling the Vacuum
- Operating the Vacuum
- Attachment Cleaning
- Maintenance and Care
- Problem Solving Guide
- IMPORTANT SAFETY INSTRUCTIONS
- READ ALL INSTRUCTIONS BEFORE USING THIS APPLIANCE. FOR HOUSEHOLD USE ONLY.
- IMPORTANT:
- WARNING:
- Attaching the Wand and Floor Nozzles
- Installing the Battery
- Removing the Battery
- Charging the Battery (S65S and S65D)
- Battery Indicator Light
- Charging the Battery (S65P)
- Storing the Vacuum
- On/Off Switch
- 2-Speed Switch
- Low Speed
- High Speed
- Floor Nozzles
- Carpet/Bare Floor Nozzle
- Bare Floor Soft Nozzle (S65P)
- Pet Tool Turbo Brush (S65D and S65P)
- C revice/Dusting Combo Tool
- Upholstery Tool (S65D and S65P)
- Angle Adapter (S65P)
- Emptying the Dust Cup
- Removing and Replacing the Dust Cup (for Cleaning)
- Replacing the Filter
- When to Change the filters
- Removing the Brushroll
- Cleaning the Brushroll
- Troubleshooting
- How to Contact Your Authorized Retailer
- Key Replacement Parts
- For Best Performance
- What is Covered:
- How Long Coverage Lasts:
- What is Not Covered:
- What We Will Do:
- How to Get Service:
- How State Law Applies:
- What's the best way to be a part of the in crowd?
- How do you like your vacuum?
- Simplicity® VACUUMS
- Manual del Usuario
- Interruptor de Encendido/ Apagado (On/Off)
- Interruptor de Dos Velocidades
- Velocidad Baja
- Boquillas de Suelo
- Suceurs pour sol
- Dépannage
Brand : Simplicity
Model : S65P
Category : Vacuum Cleaner