
S20EZM - Vacuum Cleaner Simplicity - Free user manual and instructions
Find the device manual for free S20EZM Simplicity in PDF.


| Product type | Canister vacuum |
| Brand | Simplicity |
| Model | S20EZM |
| Dimensions (L x W x H) | Approximately 30 x 25 x 45 cm |
| Weight | Approximately 4.5 kg |
| Power supply | Mains, 220-240 V, 50 Hz |
| Rated power | 800 W |
| Filter type | Washable HEPA filter |
| Tank capacity | 1.5 L |
| Cable length | 6 m |
| Operating range | 8 m |
| Noise level | 78 dB |
| Main functions | Vacuuming floors and carpets, motorized brush, power adjustment |
| Included accessories | Crevice tool, dusting brush, upholstery nozzle |
| Maintenance and cleaning | Empty the tank after each use, wash the filter every month |
| Safety | Automatic shutdown in case of overheating, plug with fuse |
| Spare parts and repairability | Filters, belts, brushes available online |
| Warranty | 2 years |
Frequently Asked Questions - S20EZM Simplicity
User questions about S20EZM Simplicity
0 question about this device. Answer the ones you know or ask your own.
Ask a new question about this device
Download the instructions for your Vacuum Cleaner in PDF format for free! Find your manual S20EZM - Simplicity and take your electronic device back in hand. On this page are published all the documents necessary for the use of your device. S20EZM by Simplicity.
USER MANUAL S20EZM Simplicity
natural_image
Line drawing of a vacuum cleaner with attached blades and base (no text or symbols)Important Safety Instructions....2
Two-Wire Polarized Cord 3
Parts Identification .... 4
Replacement Bags, Belts and Filters....4
How to Assemble and Operate the Vacuum....5
How to Adjust the Handle....5
How to Adjust the Height of the Nozzle ....6
Edge Cleaning Feature....6
Full Bag Indicator 6
How to Change the Vacuum Bag 6
How to Change the Filters 7
Cleaning with On-Board Tools 7
How to Replace the Vacuum Belt and the Headlight Bulb 8
Thermal Motor Protection....9
Troubleshooting....10
For Best Performance ...... 10
Warranty....11
IMPORTANT SAFETY INSTRUCTIONS
When using an electrical appliance, basic precautions should always be followed, including the following:
READ ALL INSTRUCTIONS BEFORE USING THIS APPLIANCE. FOR HOUSEHOLD USE ONLY.
IMPORTANT:
IMPORTANT. The manufacturer cannot accept responsibility for damage caused when the appliance is not used according to the instructions, or for uses other than those for which it was intended.
WARNING:
To reduce the risk of fire, electric shock, damage or injury:
- Empty the dust cup before the contents reach the “fill line” on the dust cup. Over-filling the dust cup may cause dirt and debris to clog the filter and cause loss of suction.
- Always unplug the vacuum from the electrical outlet before removing the dust cup.
- Do not leave appliance when plugged in. Unplug from outlet when not in use and before servicing.
- WARNING: ELECTRIC SHOCK COULD OCCUR IF USED OUTDOORS OR ON WET SURFACES.
- Do not allow to be used as a toy. Close attention is necessary when used by or near children.
- Use only as described in this manual. Use only manufacturer's recommended attachments.
- Do not use with damaged cord or plug. Or if appliance is not working as it should, has been dropped, damaged, left outdoors, or dropped into water, return it to your Authorized Simplicity Retailer for service.
- Do not unplug by pulling on cord. To unplug, grasp the plug, not the cord.
- Do not pull or carry by cord, use cord as a handle, close a door on the cord, or pull cord around sharp edges or corners. Do not run appliance over cord. Keep cord away from heated surfaces.
- Do not handle plug or appliance with wet hands.
- Do not put any object into openings. Do not use with any opening blocked; keep free of dust, lint, hair and anything that may reduce air flow.
- Keep hair, loose clothing, fingers and all parts of body away from openings and moving parts.
- Do not pick up anything that is burning or smoking, such as cigarettes, matches or hot ashes.
- Do not use without filters in place.
- Turn off all controls before unplugging.
- Do not use to pick up flammable or combustible liquids such as gasoline or use in areas where they may be present.
- Do not attempt to service the unit while appliance is plugged in.
- Do not use vacuum to pick up water or any wet materials.
- Use extra care when cleaning on stairs.
Power Cord, 2-Wire Polarized Cord
To reduce the risk of electric shock, the charger is equipped with a polarized alternating current line plug (a plug having one blade wider than the other). This plug will fit into the power outlet only one way. This is a safety feature. If you are unable to insert the plug fully into the outlet, try reversing the plug. If the plug should still fail to fit, contact a qualified electrician to replace the obsolete outlet. Do not defeat the safety purpose of the polarized plug.

natural_image
Line drawing of an electrical outlet with two socket terminals (no text or symbols)
REPLACEMENT BAGS, BELT AND FILTER
• Genuine HEPA Media Bags Part # SAH-6, 6 per package
• Genuine Belt
Part # EZM-B2, 2 per package
• Genuine HEPA Media & Secondary Filter Set Part # SF20EZM
HOW TO ASSEMBLE AND OPERATE THE VACUUM
How to Attach the Handle to the Vacuum Cleaner
The vacuum and the handle are packed separately.
- Remove the handle screw and slide the handle into the slots on top of the vacuum.
- Line up the hole on the handle with the hole on top of the vacuum and insert the screw. Make sure the screw is tightened securely (Fig. 1).
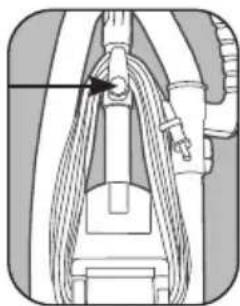
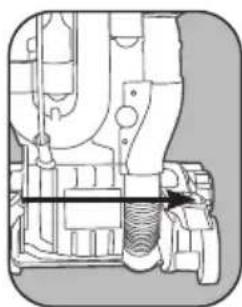
- Turn the upper cord hook to the upright position and wind the power cord around the cord hooks when storing the vacuum cleaner (Fig. 2).
How to Release the Power Cord
- The upper cord hook has a quick-release. To release the cord, rotate the hook downward (Fig. 2).
- Return the cord hook to the upright position before rewinding the cord.
On/Off Pedal
- To turn the vacuum on, push the power pedal on the right side of the vacuum nozzle from the user's perspective (Fig. 3).
- To turn the vacuum off, push the pedal again.

natural_image
Diagram of a mechanical component with an arrow indicating direction (no text or symbols)Fig. 1
natural_image
Diagram of a mechanical lifting or lifting device with rope and lever components (no text or symbols)Fig. 2
natural_image
Technical diagram of a mechanical assembly with no visible text or symbolsFig. 3
HOW TO ADJUST THE HANDLE
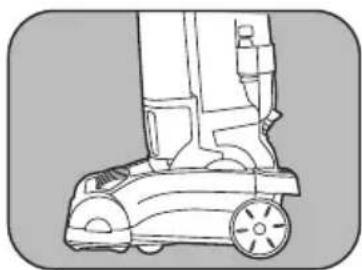
The handle has two positions – upright for storage and reclined for cleaning.
- To release the handle, step on the handle release pedal on the left side of the vacuum nozzle from the user's perspective and pull back the handle (Fig. 1).
- Upright position - for storage or when cleaning tools are used (Fig. 2). The handle locks in this position.
- Cleaning position - for normal cleaning (Fig. 3) and for cleaning under furniture (Fig. 4).

natural_image
Line drawing of a small robotic vacuum cleaner with a foot and blade, no text or symbols presentFig. 1
natural_image
Line drawing of a person using a vacuum cleaner on a wheeled cart (no text or symbols)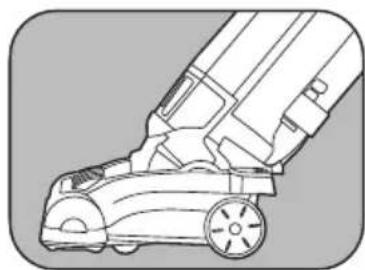
natural_image
Line drawing of a car with wheels and a handle, no text or symbols present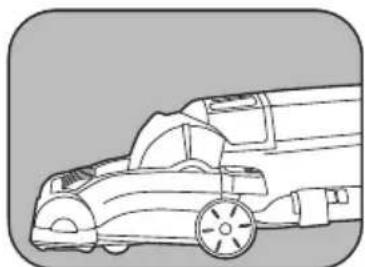
natural_image
Line drawing of a car with extended cargo or tank (no text or symbols)How to Adjust the Nozzle Height
When the vacuum handle is reclined, rotate the height adjustment dial to the type of floor being vacuumed (Fig. 1).

Fig. 1
EDGE CLEANING FEATURE
The edge cleaning feature provides improved cleaning of carpets near walls and stationary furniture. For maximum edge cleaning, position the right side of the vacuum from the user's perspective near walls or stationary furniture.
FULL BAG INDICATOR
The full bag indicator changes to red when the bag is full or when there is a clog in the vacuum.
• If the red indicator appears:
- Change the vacuum bag.
- If the vacuum bag is not full check the hose for a clog.
- When cleaning with a tool (dusting brush or crevice tool), the red indicator may appear. In this case, continue cleaning.

natural_image
Pure diagram of a curved mechanical or architectural component with no text, numbers, or symbolsFig. 1
HOW TO CHANGE THE VACUUM BAG
Always operate the vacuum with a vacuum bag installed. Bags should be changed when they are 2/3 full.
- Unplug the vacuum. Remove the bag compartment cover (Fig.1).
- Remove the bag by grasping the sides of the bag collar and pulling straight off. Attach a new vacuum bag by pushing the collar onto the inlet (Fig. 2).
- Pull out the bottom corners of the new bag to expand the bag capacity (Fig. 3).
- Insert the bottom of the bag compartment cover into the groove on the bag compartment housing. Press the bag compartment cover into place, closing it tightly.

natural_image
Illustration of a hand holding a tool over concentric curved lines (no text or symbols)Fig. 1

natural_image
Illustration of a hand holding a bag over a surface, with no visible text or symbolsFig. 2

natural_image
Simple line drawing of a folded garment with two arrows indicating measurement or direction (no text or symbols)Fig. 3
This vacuum is equipped with a HEPA media filter and a secondary filter. These filters capture fine dust particles and protect the motor from dirt. Accumulated dirt in the bag compartment will be collected on the filters and may restrict motor performance. It is important to change the filters regularly.
How to Change the HEPA Media Filter
- Unplug the vacuum. Remove the filter cover below the dust compartment cover (Fig. 1).
- Remove the HEPA media filter by pushing in the tab on the left and rotating out (Fig. 2).
- Insert a new filter and replace the filter cover.
How to Change the Secondary Filter
- Unplug the vacuum. Remove the bag compartment cover and remove the vacuum bag.
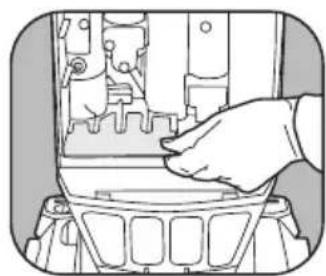
- Remove the secondary filter by sliding it out from under the bag supporter (Fig. 3).
- Insert a new filter, replace the bag and bag compartment cover.
Note: Filters cannot be washed or re-used.

natural_image
Line drawing of a hand pressing down on a mechanical component (no text or symbols)Fig. 1

natural_image
Line drawing of a hand inserting a component into a device (no text or symbols)Fig. 2
natural_image
Illustration of a hand operating a mechanical component (no text or symbols visible)Fig. 3
CLEANING WITH ON-BOARD TOOLS
This vacuum is equipped with on-board cleaning tools, including a metal telescopic wand, stretch hose, dusting brush and crevice tool.
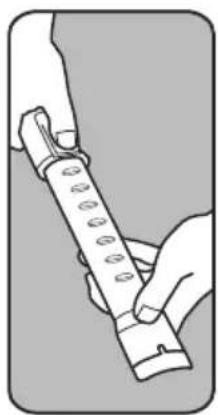
- To use the cleaning tools, lift the hose handle straight up from the vacuum (Fig. 1).
- Extend the wand by pulling the button back and pulling the smaller wand out of the larger wand (Fig. 2).
- Attach any of the tools to the end of the wand, or directly onto the hose handle.

natural_image
Diagram of a mechanical assembly with a labeled component (no text or symbols present)Fig. 1

natural_image
Illustration of hands holding a traditional flute (no text or symbols)Fig. 2
HOW TO REPLACE THE VACUUM BELT AND HEADLIGHT BULB
CAUTION: Unplug the vacuum cleaner.
How to Remove the Bottom Plate
- Place the vacuum in the lowest position by stepping on the handle release pedal (see "How to Adjust the Handle" on page 5). Turn the vacuum over on a flat surface, exposing the bottom plate.
- Remove the five screws holding the bottom plate in place (Fig. 1).
- Remove the bottom plate.
How to Replace the Belt
- Turn the vacuum over and remove the bottom plate as described above.
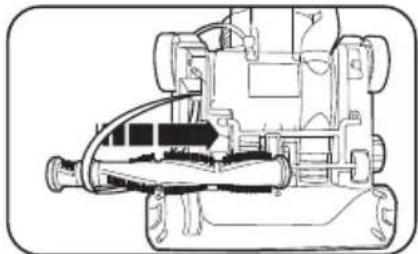
- Lift out the brushroll and remove the belt (Fig. 2).
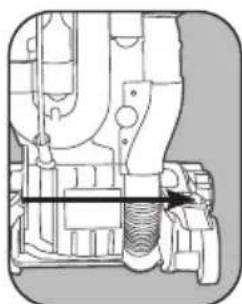
- Loop a new belt around the drive shaft (Fig. 3) and the raised ring between the bristles on the brushroll (Fig. 4).
- Pull the brushroll forward (against the pull of the belt) and reinsert the ends back into the nozzle (Fig. 5) making sure to line up the end opposite the belt so the flat edges slide down properly.
- Turn the brushroll by hand, making sure the belt is not twisted and all rotating parts move smoothly.
- Replace the bottom plate and the five screws.
How to Replace the Bulb
- Place the vacuum in the lowest position by stepping on the handle release pedal (see "How to Adjust the Handle" on page 5).
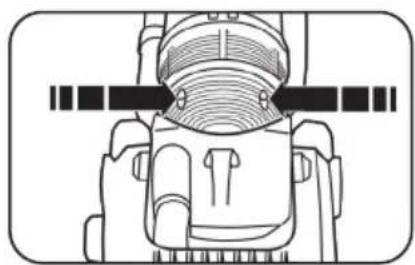
- Remove the two screws from the headlight lens (Fig. 6).
- Remove the lens and replace the bulb (Fig. 7).
- Replace the headlight lens and the two screws.
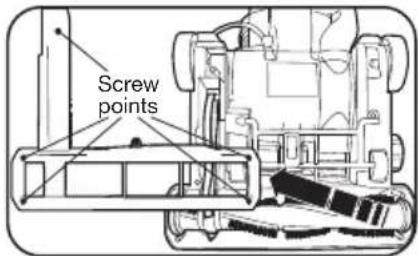
Fig. 1

natural_image
Technical line drawing of a mechanical device with no visible text or symbolsFig. 2
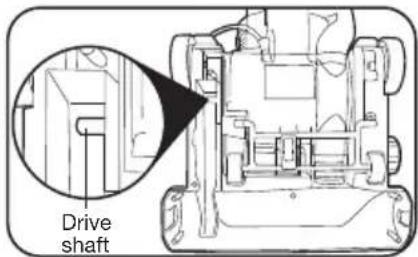
Fig. 3
natural_image
Technical line drawing of a mechanical device with no visible text or symbolsFig. 4

natural_image
Technical line drawing of a mechanical device with no visible text or symbolsFig. 5
natural_image
Top-down schematic of a mechanical component with no visible text or symbols
natural_image
Diagram of a mechanical device with internal components and directional arrow (no text or symbols)Fig. 7 Fig. 6
This vacuum is equipped with a thermal protector designed to protect it from overheating due to restricted airflow (i.e. clogged hose). Should this situation occur, the thermal protector will automatically shut off the motor to prevent damage.
NOTE: To determine if the thermal protector turned off the vacuum, check the headlight. If the headlight is on and the motor is off, the thermal protector safety shut off the motor. If both the headlight and motor are off, there is another reason (i.e. unplugged) the vacuum shut off.
How to Reset the Thermal Protector
- Unplug the vacuum.
- Allow the vacuum to cool at least 30 minutes.
- Check for blockages, change the vacuum bag and replace the filters.
- Plug in the vacuum and begin using.
If the vacuum fails to turn on, return it to an Authorized Simplicity Retailer for service.
| Problem Check | Point Possible Solution | |
| Suction power is weak. | Vacuum bagWand or hoseFilters | If the vacuum bag is 2/3 full, replace it.If clogged or blocked, remove the object.Replace filters. |
| The vacuum does not work. | Power cord Insert the power plug firmly into an electrical outlet. | |
| Sudden loss of power. | Thermal reset Turn | off vacuum and unplug from electrical outlet. Let vacuum cool down for 30 minutes before turning back on. Check for clogs. Replace vacuum bag. |
| Dirt and debris are blowing through exhaust vent. | Filters Make sure filters are clean, dry and installed correctly. | |
| Any other service should be performed by an Authorized Simplicity Vacuum Retailer. To locate your nearest Authorized Retailer, visit our website at www.SimplicityVac.com or call 888-974-6759. | ||
FOR BEST PERFORMANCE
- Keep machine and all accessories clean and in good operating condition.
- Replace the bag when it is 2/3 full.
- Replace the filters once a year or as needed.
- Always use genuine bags, filters and parts, as use of other products may result in poor cleaning or filtration performance. Filtration products are designed for maximum performance.
- Store machine carefully in a dry area.
- For optimum cleaning performance and safety, follow your owner's manual.
What is Covered:
This warranty covers any defects in material and workmanship in your new vacuum and applies exclusively to the original purchaser.
How Long Coverage Lasts:
Visit Simplicityvac.com for warranty information.
What is Not Covered:
- Damage to the vacuum which occurs from neglect, abuse, alterations, accident, misuse or improper maintenance.
- Normal replacement items: disposable filters, bags and belts.
- Damage associated with or resulting from the use of non-genuine parts including normal replacement items.
What We Will Do:
This warranty provides, at no cost to you, all labor and parts to keep this vacuum in correct operating condition during the warranted period.
How to Get Service:
Warranty service can only be obtained by presenting the vacuum to an Authorized Simplicity Retailer. A proof-of-purchase and product serial number will be required before service is rendered. To locate your nearest service center, please call 888-974-6759 or visit www.SimplicityVac.com.
THIS WARRANTY IS EXCLUSIVE AND IN LIEU OF ANY AND ALL OTHER WARRANTIES WHETHER WRITTEN, ORAL, EXPRESSED OR IMPLIED, (INCLUDING ANY WARRANTY OF MERCHANTABILITY OR FITNESS FOR A PARTICULAR PURPOSE). THIS WARRANTY DISCLAIMS LIABILITY FOR INCIDENTAL OR CONSEQUENTIAL DAMAGES.
How State Law Applies:
This warranty gives you specific legal rights, and you may also have other rights which vary from state to state.
Owner's Warranty Information (keep this for your records...)
Store name
Store Address
City
State Zip
Telephone Date of purchase
Serial number Model number
Register your warranty online at SimplicityVac.com


Simplicityvac.com/register-warranty
What's the best way to be a part of the in crowd?
It's simple: register your Simplicity vacuum today and activate your warranty.
How do you like your vacuum?
Once you've had some time to try out your new Simplicity vacuum, we want to know what you think — leave a product review. It only takes a few minutes and it helps us make our products better... and your home simply cleaner.

Simplicity® VAGUHMS
VACUUMS
ASPIRATEURS
Simplicity®
natural_image
Line drawing of a vacuum cleaner with attached blades and base (no text or symbols)natural_image
Line drawing of an electrical plug and its corresponding socket (no text or symbols)
natural_image
Diagram of a mechanical component with an arrow indicating direction (no text or symbols)Fig. 1

natural_image
Mechanical diagram showing a rope tied to a cable with a valve (no text or symbols)Fig. 2
natural_image
Technical diagram of a mechanical assembly with no visible text or symbolsFig. 3
COMMENT AJUSTER LA POIGNÉE
natural_image
Line drawing of a small robotic vacuum cleaner with a foot adjusting the wheel (no text or symbols)Fig. 1

natural_image
Line drawing of a person using a vacuum cleaner on a wheeled cart (no text or symbols)
natural_image
Line drawing of a car with wheels and a handle, no text or symbols present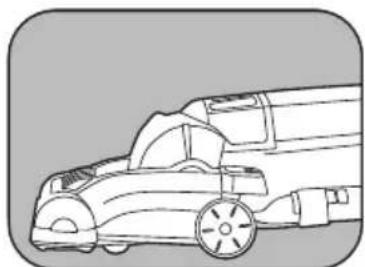
natural_image
Line drawing of a car in motion, no text or symbols presentnatural_image
Pure diagram of a curved mechanical or architectural component with no text, numbers, or symbolsFig. 1
COMMENT REMPLACER LE SAC DE L'ASPIRATEUR
natural_image
Illustration of a hand holding a small object over curved layered surfaces (no text or symbols)Fig. 1

natural_image
Illustration of a hand holding a wrapped object inside a container (no text or symbols)Fig. 2

natural_image
Diagram of a folded garment with two arrows indicating measurement or direction (no text or symbols)Fig. 3
natural_image
Illustration of a hand adjusting a mechanical component with spring-like teeth (no text or symbols)Fig. 1

natural_image
Line drawing of a hand inserting a device into a computer keyboard (no text or symbols)Fig. 2

natural_image
Illustration of a hand placing components into a vehicle chassis (no text or symbols visible)Fig. 3
NETTOYAGE AVEC LES OUTILS EMBARQUÉS
natural_image
Diagram of a mechanical assembly with a labeled component (no text or symbols present)Fig. 1
natural_image
Illustration of hands holding a traditional flute (no text or symbols)Fig. 2
COMMENT REMPLACER L'AMPOULE DU TÉMOIN LUMINEUX ET LA COURROIE DE L'ASPIRATEUR
natural_image
Technical line drawing of a mechanical device with no visible text or symbolsFig. 2

Fig. 3

natural_image
Technical line drawing of a mechanical assembly with no visible text or symbolsFig. 4

natural_image
Technical line drawing of a mechanical device with no visible text or symbolsFig. 5

natural_image
Top-down schematic of a mechanical component with no visible text or symbols
natural_image
Diagram of a mechanical device with internal components and an arrow indicating direction (no text or symbols)Fig. 7 Fig. 6
- IMPORTANT SAFETY INSTRUCTIONS
- READ ALL INSTRUCTIONS BEFORE USING THIS APPLIANCE. FOR HOUSEHOLD USE ONLY.
- IMPORTANT:
- WARNING:
- Power Cord, 2-Wire Polarized Cord
- REPLACEMENT BAGS, BELT AND FILTER
- HOW TO ASSEMBLE AND OPERATE THE VACUUM
- How to Attach the Handle to the Vacuum Cleaner
- How to Release the Power Cord
- On/Off Pedal
- HOW TO ADJUST THE HANDLE
- How to Adjust the Nozzle Height
- EDGE CLEANING FEATURE
- FULL BAG INDICATOR
- HOW TO CHANGE THE VACUUM BAG
- How to Change the HEPA Media Filter
- How to Change the Secondary Filter
- CLEANING WITH ON-BOARD TOOLS
- HOW TO REPLACE THE VACUUM BELT AND HEADLIGHT BULB
- How to Remove the Bottom Plate
- How to Replace the Belt
- How to Replace the Bulb
- How to Reset the Thermal Protector
- FOR BEST PERFORMANCE
- What is Covered:
- How Long Coverage Lasts:
- What is Not Covered:
- What We Will Do:
- How to Get Service:
- How State Law Applies:
- Owner's Warranty Information (keep this for your records...)
- Register your warranty online at SimplicityVac.com
- What's the best way to be a part of the in crowd?
- How do you like your vacuum?
- ASPIRATEURS
- Simplicity®
- COMMENT AJUSTER LA POIGNÉE
- COMMENT REMPLACER LE SAC DE L'ASPIRATEUR
- NETTOYAGE AVEC LES OUTILS EMBARQUÉS
- COMMENT REMPLACER L'AMPOULE DU TÉMOIN LUMINEUX ET LA COURROIE DE L'ASPIRATEUR
Brand : Simplicity
Model : S20EZM
Category : Vacuum Cleaner