
BLK 65 - Air Conditioning Bavaria - Free user manual and instructions
Find the device manual for free BLK 65 Bavaria in PDF.

| Product type | Evaporative air cooler (air conditioning) |
| Brand | Bavaria |
| Model | BLK 65 |
| Dimensions (L x W x H) | 28 x 33 x 70.5 cm |
| Weight | Approximately 5 kg |
| Power supply | 220-240 V ~ 50 Hz |
| Power consumption | 65 W |
| Protection class | II |
| Water tank capacity | 6.5 L (max marking) |
| Humidification performance | 1 L/h |
| Airflow | 380 m³/h |
| Negative ions | 3 × 10^6 n/cm³ |
| Fan speeds | 3 (Low, Medium, High) |
| Operating modes | Normal, Natural, Sleep (programmable) |
| Timer | 0.5 to 7.5 hours |
| Main functions | Evaporative cooling, ionizer, automatic louver oscillation, remote control |
| Filters | Air intake filter (washable), honeycomb insert, foam filter |
| Included accessories | Remote control, 2 ice packs, ice cube bowl, foam filter |
| Maintenance and cleaning | Clean the tank every 2 weeks, the air filter every week, the honeycomb insert every 2 weeks |
| Safety | Automatic shut-off when tank is empty, overheat protection, disconnect before cleaning |
| Spare parts and repairability | Wear parts: honeycomb filter, foam filter. Repair by authorized after-sales service |
| General information | Manual available in several languages; 24-month warranty |
Frequently Asked Questions - BLK 65 Bavaria
User questions about BLK 65 Bavaria
0 question about this device. Answer the ones you know or ask your own.
Ask a new question about this device
Download the instructions for your Air Conditioning in PDF format for free! Find your manual BLK 65 - Bavaria and take your electronic device back in hand. On this page are published all the documents necessary for the use of your device. BLK 65 by Bavaria.
USER MANUAL BLK 65 Bavaria
GB Original operating instructions Air Cooler
natural_image
Exterior view of a vertical industrial air conditioner unit with labeled components (no text or symbols on the device itself)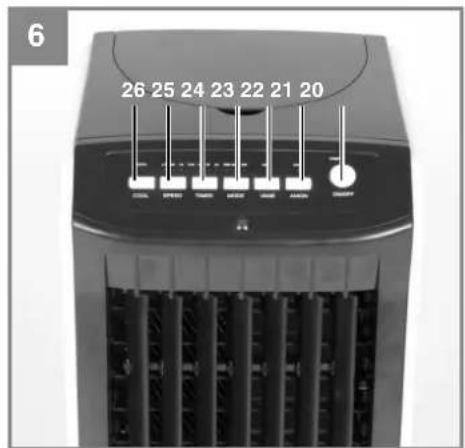
text_image
6 26 25 24 23 22 21 20 ON/OFF SPRING TURB LPGS MINT ON/OFF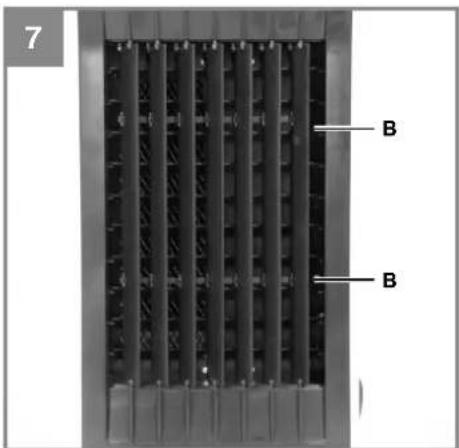
text_image
7 B B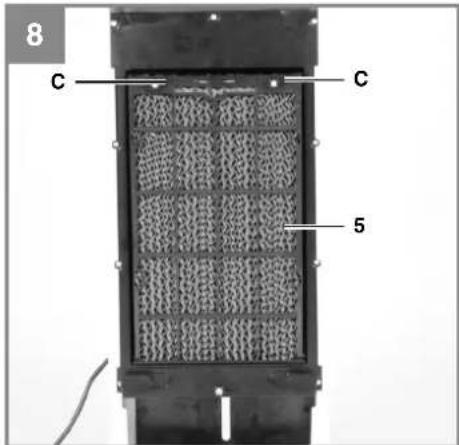
text_image
8 C C 5D
Gefahr!
When using the equipment, a few safety precautions must be observed to avoid injuries and damage. Please read the complete operating instructions and safety regulations with due care. Keep this manual in a safe place, so that the information is available at all times. If you give the equipment to any other person, hand over these operating instructions and safety regulations as well. We cannot accept any liability for damage or accidents which arise due to a failure to follow these instructions and the safety instructions.
1. Safety regulations
The corresponding safety information can be found in the enclosed booklet.
Danger!
Read all safety regulations and instructions. Any errors made in following the safety regulations and instructions may result in an electric shock, fi re and/or serious injury.
Keep all safety regulations and instructions in a safe place for future use.
This equipment can be used by children of 8 years and older and by people with limited physical, sensory or mental capacities or those with no experience and knowledge if they are supervised or have received instruction in how to use the equipment safely and understand the dangers which result from such use. Children are not allowed to play with the equipment. Unless supervised, children are not allowed to clean the equipment and carry out user-level maintenance work.
- Position the equipment in such a way that the mains plug is accessible at all times.
- Check the mains lead at regular intervals
for signs of defects or damage. A damaged mains lead may only be replaced by an electrician or ISC GmbH in compliance with the relevant regulations.
- This equipment is not designed for commercial use.
- The equipment must never be used in bathrooms.
• Children or infirm persons may use the equipment only under supervision. - Children are not allowed to use the equipment as a toy.
- Check that the actual mains voltage is the same as the mains voltage specified on the rating plate.
- The equipment may only be operated from a properly earthed shock-proof socket.
- For electrical safety purposes we recommend that you install a residual current device circuit-breaker (earth-leakage circuit-breaker).
- Important! Do not extend the cable and never use multiple plugs. Otherwise there is a risk that electrical safety can no longer be guaranteed.
- Never pull the mains plug out of the socket while the equipment is running.
- In the event of any abnormalities in the operation of the equipment (e.g. smell of burning), immediately switch off the equipment and pull the plug. There is a risk of electric shock or fire damage if the equipment is allowed to continue running with possible defects.
- Never pull the plug out of the socket by pulling the cable. Hold the mains plug firmly to pull it out of the socket. Otherwise there is a risk of damaging the cable.
- Never actuate any switches with wet hands. Otherwise there is a danger of an electric shock.
- Never allow the cool air to blow directly at you.
- Never place and plants or animals directly in the path of the flow of cool air. Plants or animals may suffer under the effect of the flow of cool air.
- Never poke fingers or objects in the air outlet vents. The rotating fan can cause injuries.
- Never attempt to repair the air cooler yourself. Improper repair and maintenance work can result in damage to the equipment and cause fires.
• Always switch off the equipment and pull the plug before you start to clean it (risk of injury). - Never clean the air cooler with water. This could result in an electric shock or fire.
GB
- Do not use any inflammable agents for cleaning purposes as they could cause a fire or deformation.
- Never install the equipment in a room in which combustible gases can be emitted. Emitted gases may collect and cause an explosion.
- Never hold any burning objects close to the equipment if they could be directly affected by the emitted air. This may result in their not being completely burnt.
- Pull the mains plug out of the socket if the equipment is not going to be used for some time.
• Always switch off the equipment and pull out the power plug during a storm. Electrical parts may get damaged as a result of overvoltage.
• To avoid electromagnetic interference the equipment should be kept away from televisions and radios.
• Never cover the air outlet.
2. Layout and items supplied
2.1 Layout (Fig. 1/2)
1 Flap
2 Indicator panel
3 Air outlet
4 Air intake filter
5 Honeycomb insert
6 Power cable
7 Water tank
8 Guide roller
2.2 Items supplied
Please check that the article is complete as specified in the scope of delivery. If parts are missing, please contact our service center or the sales outlet where you made your purchase at the latest within 5 working days after purchasing the product and upon presentation of a valid bill of purchase. Also, refer to the warranty table in the service information at the end of the operating instructions.
- Open the packaging and take out the equipment with care.
- Remove the packaging material and any packaging and/or transportation braces (if available).
• Check to see if all items are supplied. - Inspect the equipment and accessories for transport damage.
• If possible, please keep the packaging until
the end of the guarantee period.
Danger!
The equipment and packaging material are not toys. Do not let children play with plastic bags, foils or small parts. There is a danger of swallowing or suff ocating!
Air cooler
• Remote control (9)
• 2x cooling elements (10)
• Ice cube tray (11)
- Foam filter (12)
• Original operating instructions
3. Proper use
The equipment is designed for cooling the air in enclosed rooms. The blown-out air is cooled by the evaporation of cooled water from the equipment's water tank.
The equipment is to be used only for its prescribed purpose. Any other use is deemed to be a case of misuse. The user / operator and not the manufacturer will be liable for any damage or injuries of any kind caused as a result of this.
Please note that our equipment has not been designed for use in commercial, trade or industrial applications. Our warranty will be voided if the machine is used in commercial, trade or industrial businesses or for equivalent purposes.
Tips on saving energy when cooling
Close all windows, doors and venetian blinds in order to reduce incoming sunlight as far as possible.
4. Technical data
Mains voltage: 220-240 V \~ 50 Hz
Nominal power rating: 65 W
Water tank volume (max. mark): ......6,5 liters
Humidification output: 1 l/h
Air throughput: 380 m³/h
Negative ions: 3x10 ^5 n/cm ^3
Fan settings: 3
Dimensions (WxDxH): 28 x 33 x 70.5 cm
Protection class:
GB
5. Before starting the equipment
Before you connect the equipment to the mains supply make sure that the data on the rating plate are identical to the mains data.
Warning!
Always pull the power plug before making adjustments to the equipment.
5.1 Information
- Remove all adhesive retention tapes before putting the equipment into operation. There are accessories in the water container or/ and under the fl ap.
- Please note that the minimum distance between the equipment and the wall to the side and rear must be 40cm. The minimum distance to other objects at the front must be 1m.
- The device must never be tilted, moved or emptied while switched on or while connected to the power supply.
- Only ever move the device when the water tank is empty and the device has been disconnected from the power supply.
- Use only clean, cold tap water or distilled water.
- Never add any scents or fragrances to the water.
- Ionizer: Ionization of the air can create a climate which can otherwise only be found at the sea or in mountainous regions. It reduces the concentration of microorganisms in the air and helps with the oxygen enrichment of the blood and with the development of resistance to germs and allergies.
- The negative ions which are generated may cause a small electrostatic charge on the air outlet fins. This is normal and is not dangerous.
- Never use the device in rooms with excessive concentrations of oxygen (e.g. in laboratory rooms or in rooms in which oxygen-producing devices are used).
- The settings which have been made are shown on the LED display. The applicable LEDs shine.
5.2 Filling in water (Fig. 3/4)
- Turn the lock (A) into the horizontal position and pull out the water container (7) from the back of the equipment.
• Plug in the ice cube tray (11). - Fill up the water container (7). Make sure that the water level lies between the „min“ and
„max“ marks.
- To improve the cooling effect you can place normal ice cubes in the ice cube tray (11) and frozen cooling elements (Fig. 2/Item 10) in the water container (7).
- Make sure that the foam filter (12) is inserted. Push the water container (7) back into the housing. Turn the lock (A) back into the vertical position.
- Replace the water once a week.
5.3 Installing the air fi Iter (Fig. 5)
Push the air filter (4) into its guides from above.
6. Operation (Fig. 6)
Insert the power plug into a live socket outlet. The "Power" LED will light up.
6.1 Switching the equipment on/off (Item 20) Press the ON/OFF button to switch on the equipment. Air will then be blown out at medium, uniform fan speed. Press the button again to switch off the equipment.
6.2 Switching on the ionizer (Item 21)
Press the „ANION“ button to switch on the ionizer. The „ANION“ LED will light up.
6.3 Switching on the vertical slat adjustment (Item 22)
Press the „VANE“ button for the vertical slats to swing automatically back and forth. Press the button again to switch off this function. The horizontal slats can be adjusted by hand with the levers (Fig. 7/Item B).
6.4 Switching on fan mode (Item 23)
The fan is set to „Normal“ as standard. Press the „MODE“ button to change the setting in the following order: Normal – Natural – Sleep. The LEDs will light up accordingly.
Sleep: The fan speed slows down in accordance with a timed sequence until the fan stops.
HI/SLEEP = 1h high -> 1h medium -> 1h low -> stop
MI/SLEEP = 1h medium -> 1h low -> stop
LO/SLEEP = 1h low -> stop
GB
6.5 Switching on the timer (Item 24)
Press the „TIMER“ button to limit the ON time to 0.5 – 7.5 hours. One press of the button equals 0.5 hours; the LEDs for 0.5h – 4h will light up according to the set time.
6.6 Setting the fan speed (Item 25)
Press the „SPEED“ button to set the fan speed in the following order: Medium – Fast – Slow – Medium. The LEDs „MI – HI – LO – MI“ will light up accordingly.
6.7 Switching on cooling mode (Item 26)
Note: Make sure that the water level in the water container lies between the „min“ and „max“ marks. Otherwise cooling mode will not work and the „COOL“ LED will blink (see 5.2). If you switch off the equipment in cooling mode or if the preselected time has expired, the fan will continue to run for approx. 5 minutes in order to discharge any residual moisture.
Press the „COOL“ button. The „COOL“ LED will light up. The integrated pump will convey the (ice-cooled) water up and out of the container so that it then flows down over the honeycomb insert. The air which is suctioned in will be blown out cooler and with a higher air humidity than when it was suctioned in. The cooler the water in the water tank, the cooler the air which is blown out.
All modes and functions can also be set using the supplied remote control (with a range of approx. 5 m). The remote control requires two MICRO (AAA) batteries (not supplied). Make sure that the poles are not reversed when you insert the batteries. Both batteries should be new and of the same make. Please dispose of your old batteries in accordance with regulations by bringing them to designated public drop-off points.
7. Replacing the power cable
Danger!
If the power cable for this equipment is damaged, it must be replaced by the manufacturer or its after-sales service or similarly trained personnel to avoid danger.
8. Cleaning, maintenance and ordering of spare parts
Danger!
Always pull out the mains power plug before starting any cleaning work.
8.1 Cleaning
- Keep all safety devices, air vents and the motor housing free of dirt and dust as far as possible. Wipe the equipment with a clean cloth or blow it with compressed air at low pressure.
• We recommend that you clean the device immediately each time you have finished using it. - Clean the equipment regularly with a moist cloth and some soft soap. Do not use cleaning agents or solvents; these could attack the plastic parts of the equipment. Ensure that no water can seep into the device. The ingress of water into an electric tool increases the risk of an electric shock.
8.1.1 Cleaning during non-use / minimum intervals
The following minimum times tell you when various parts must be cleaned. If the parts become dirty sooner, cleaning must be performed more often.
• Emptying and cleaning the water container
The water container must be cleaned every 2 weeks. Remove the water container (see 5.2), clean it with soapy water and allow it to dry. You can then fill the water container again (see 5.2).
• Cleaning the air intake filter
The air filter (Fig. 1/Item 4) must be cleaned every week. Pull the air filter up and out of its guides and push it back in again after cleaning (Fig. 5).
Note: Never use the equipment without air filter. Use a vacuum cleaner or tap the dust filter gently to remove the dust. If the filter is very dirty, wash it carefully with warm water. Then allow to dry thoroughly and fasten to the equipment when dry.
• Cleaning the honeycomb insert (Fig. 8)
The honeycomb insert must also be cleaned every 2 weeks. You must again remove the air intake filter as previously described. Turn the two locks (Item C) to the side such that you can remove the honeycomb insert (5). Clean
GB
it with soapy water and then allow it to dry.
Reinsert the honeycomb insert (5) and secure it by turning up the holders (C) again.
• Foam filter (Fig. 2/ Item 12)
Clean the foam fi Iter every 2 weeks with soapy water and allow it to dry.
8.2 Maintenance
There are no parts inside the equipment which require additional maintenance.
8.3 Ordering replacement parts:
Please quote the following data when ordering replacement parts:
• Type of machine
• Article number of the machine
• Identification number of the machine
• Replacement part number of the part required
For our latest prices and information please go to www.isc-gmbh.info
9. Disposal and recycling
The equipment is supplied in packaging to prevent it from being damaged in transit. The raw materials in this packaging can be reused or recycled. The equipment and its accessories are made of various types of material, such as metal and plastic. Never place defective equipment in your household refuse. The equipment should be taken to a suitable collection center for proper disposal. If you do not know the whereabouts of such a collection point, you should ask in your local council offices.
10. Storage
Store the equipment and accessories in a dark and dry place at above freezing temperature. The ideal storage temperature is between 5 and 30 °C. Store the electric tool in its original packaging.
GB
11. Troubleshooting
If the equipment is operated properly you should experience no problems with malfunctions or faults. In the event of any malfunctions or faults, please check the following before you contact your customer services.
| Problem | Check |
| Air cooler does not work Is the mains plug properly connected?Is there a voltage supply at the mains socket outlet?Has the On/Off switch been pressed? | |
| The fan speed changes of its own accord Has the “MODE” function been set? | |
| Remote control does not work Have the batteries been inserted, are they working and are the poles the right way around?Is there visual contact between the remote control and the device? |
GB

For EU countries only
Never place any electric power tools in your household refuse.
To comply with European Directive 2012/19/EC concerning old electric and electronic equipment and its implementation in national laws, old electric power tools have to be separated from other waste and disposed of in an environment-friendly fashion, e.g. by taking to a recycling depot.
Recycling alternative to the return request:
As an alternative to returning the equipment to the manufacturer, the owner of the electrical equipment must make sure that the equipment is properly disposed of if he no longer wants to keep the equipment. The old equipment can be returned to a suitable collection point that will dispose of the equipment in accordance with the national recycling and waste disposal regulations. This does not apply to any accessories or aids without electrical components supplied with the old equipment.
The reprinting or reproduction by any other means, in whole or in part, of documentation and papers accompanying products is permitted only with the express consent of the iSC GmbH.
Subject to technical changes
GB
Service information
We have competent service partners in all countries named on the guarantee certificate whose contact details can also be found on the guarantee certificate. These partners will help you with all service requests such as repairs, spare and wearing part orders or the purchase of consumables.
Please note that the following parts of this product are subject to normal or natural wear and that the following parts are therefore also required for use as consumables.
| Category Example | |
| Wear parts* | Honeycomb filter, foam filter |
| Consumables* | |
| Missing parts |
* Not necessarily included in the scope of delivery!
In the effect of defects or faults, please register the problem on the internet at www.isc-gmbh.info. Please ensure that you provide a precise description of the problem and answer the following questions in all cases:
• Did the equipment work at all or was it defective from the beginning?
• Did you notice anything (symptom or defect) prior to the failure?
• What malfunction does the equipment have in your opinion (main symptom)?
Describe this malfunction.
GB
Warranty certifi cate
Dear Customer,
All of our products undergo strict quality checks to ensure that they reach you in perfect condition. In the unlikely event that your device develops a fault, please contact our service department at the address shown on this guarantee card. You can also contact us by telephone using the service number shown. Please note the following terms under which guarantee claims can be made:
- These guarantee conditions regulate additional guarantee services. Your statutory guarantee claims are not affected by this guarantee. Our guarantee is free of charge to you.
-
Our guarantee only covers defects suffered by the device which have been verifiably caused by a material or manufacturing fault and is limited to the rectification of such defects or the replacement of the device at our discretion.
Please note that our devices are not designed for use in commercial, trade or professional applications. A guarantee contract will not be created if the device has been used by commercial, trade or industrial business or has been exposed to similar stresses during the guarantee period. -
The following are not covered by our guarantee:
- Damage to the device caused by a failure to follow the assembly instructions or due to incorrect installation, a failure to follow the operating instructions (for example connecting it to an incorrect mains voltage or current type) or a failure to follow the maintenance and safety instructions or by exposing the device to abnormal environmental conditions or by lack of care and maintenance.
- Damage to the device caused by abuse or incorrect use (for example overloading the device or the use or unapproved tools or accessories), ingress of foreign bodies into the device (such as sand, stones or dust, transport damage), the use of force or damage caused by external forces (for example by dropping it). - Damage to the device or parts of the device caused by normal or natural wear or tear or by normal use of the device.
-
The guarantee is valid for a period of 24 months starting from the purchase date of the device. Guarantee claims should be submitted before the end of the guarantee period within two weeks of the defect being noticed. No guarantee claims will be accepted after the end of the guarantee period. The original guarantee period remains applicable to the device even if repairs are carried out or parts are replaced. In such cases, the work performed or parts fitted will not result in an extension of the guarantee period, and no new guarantee will become active for the work performed or parts fitted. This also applies if an on-site service is used.
-
Please report the defective device on the following internet address to register your guarantee claim: www.isc-gmbh.info. If the defect is covered by our guarantee, then the item in question will either be repaired immediately and returned to you or we will send you a new replacement device.
Of course, we are also happy offer a chargeable repair service for any defects which are not covered by the scope of this guarantee or for units which are no longer covered. To take advantage of this service, please send the device to our service address.
Also refer to the restrictions of this warranty concerning wear parts, consumables and missing parts as set out in the service information in these operating instructions.
F
Danger!
MI/SLEEP = 1h moyen -> 1h lent -> Stop LO/SLEEP = 1h lent -> Stop
6.5 Mettre la minuterie en service (pos. 24)
MI/SLEEP = 1h medio -> 1h lento -> Stop LO/SLEEP = 1h lento -> Stop
MI/SLEEP = 1h gennemsnitlig -> 1h lav -> stop LO/SLEEP = 1h lav -> stop
HI/SLEEP = 1h brzo -> 1h srednje -> 1h sporo -> stop
MI/SLEEP = 1h srednje -> 1h sporo -> stop LO/SLEEP = 1h sporo -> stop
6.5 Podešavanje uklopnog sata (poz. 24)
HI/SLEEP = 1h brzo -> 1h srednje -> 1h sporo -> stop
MI/SLEEP = 1h srednje -> 1h sporo -> stop LO/SLEEP = 1h sporo -> stop
RS
6. 5 Podešavanje uklopnog sata (poz. 24)
Pritiskom na taster „TIMER“ vreme rada može se ograničiti na 0,5 – 7,5 časova. Jedan pritisak na taster odgovara radu od 0,5 časa, LE diode svetle 0,5 – 4 časa u skladu sa podešenim vremenom.
2006/42/EC
Annex IV
Notified Body:
Notified Body No.:
Reg. No.
□ 2000/14/EC_2005/88/EC
□ Annex V
Annex VI
P = KW; L/∅ = cm
Notified Body:
2004/26/EC
Emission No.:
Noise: measured L_ = dB (A); guaranteed L_ = dB (A)
Standard references: EN 60335-1; EN 60335-2-98; EN 60335-2-80; EN 62233; EN 55014-1; EN 55014-2; EN 61000-3-2; EN 61000-3-3
Subject to change without notice
Archive-File/Record: NAPR09428
Documents registrar: Landauer Josef
Wiesenweg 22, D-94405 Landau/Isar
EH 11/2014 (01)