
GD 30 TRI - Heating Güde - Free user manual and instructions
Find the device manual for free GD 30 TRI Güde in PDF.

| Product type | Oil fan heater (air heater) |
| Brand | Güde |
| Model | GD 30 TRI |
| Heating power | 30 kW (25 800 kcal/h) |
| Air flow | 720 m³/h |
| Tank capacity | 38 L |
| Fuel consumption | Approx. 2,4 L/h |
| Recommended fuel | Diesel (gas oil) |
| Power supply | 230 V / 50 Hz |
| Cable length | 1,6 m |
| Weight | 35,5 kg |
| Ignition | Electronic |
| Thermostat | Adjustable, automatic stop and restart |
| Protection | Electronic flame control, overheat thermostat |
| Intended use | Heating and drying in well-ventilated rooms, buildings, agriculture, storage |
| Regular maintenance | Cleaning tank, air filter, fuel filter, electrodes, fins |
| Safety distance | 3,5 m from flammable materials |
| Repairability | Spare parts available through after-sales service |
| Order number | 85109 |
Frequently Asked Questions - GD 30 TRI Güde
User questions about GD 30 TRI Güde
0 question about this device. Answer the ones you know or ask your own.
Ask a new question about this device
Download the instructions for your Heating in PDF format for free! Find your manual GD 30 TRI - Güde and take your electronic device back in hand. On this page are published all the documents necessary for the use of your device. GD 30 TRI by Güde.
USER MANUAL GD 30 TRI Güde
natural_image
Icon of an open book inside a black circle (no text or symbols)D - Deutsch 4
Translation of original operating instructions
natural_image
Exterior view of a portable electric heater with black frame and wheels (no visible text or symbols)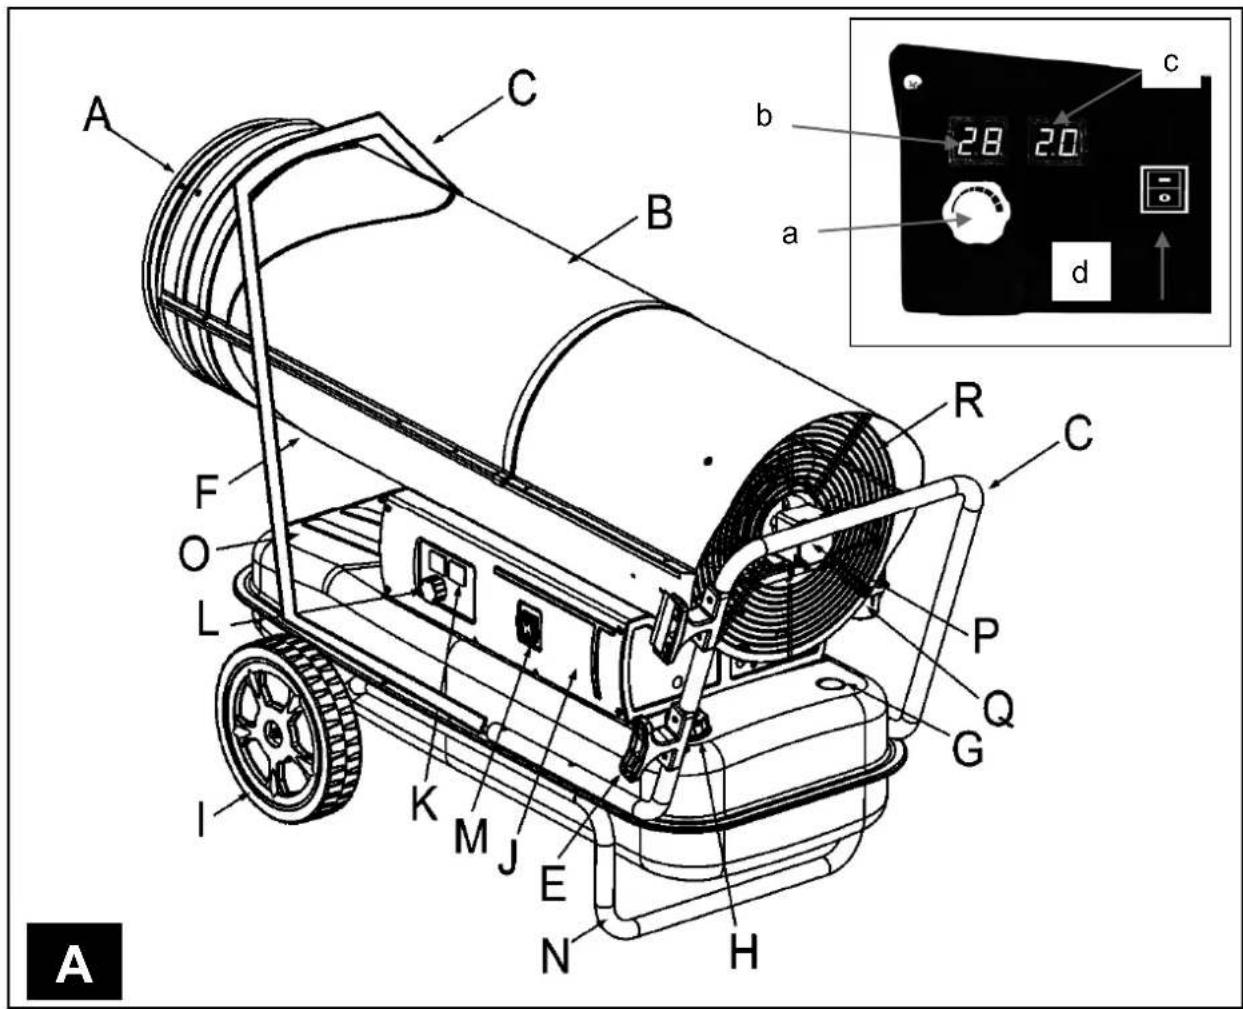
natural_image
Line drawing of a mechanical device with a labeled section 'F' (no text or symbols on the device itself)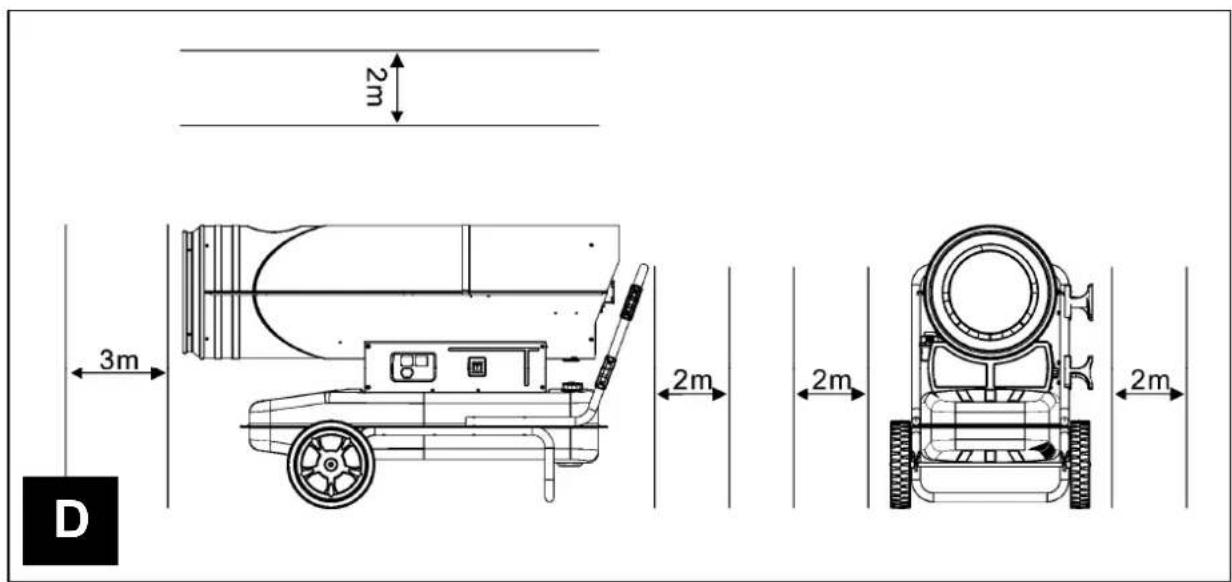
natural_image
Technical line drawing of a mechanical device with a wrench and rotating arm (no text or symbols)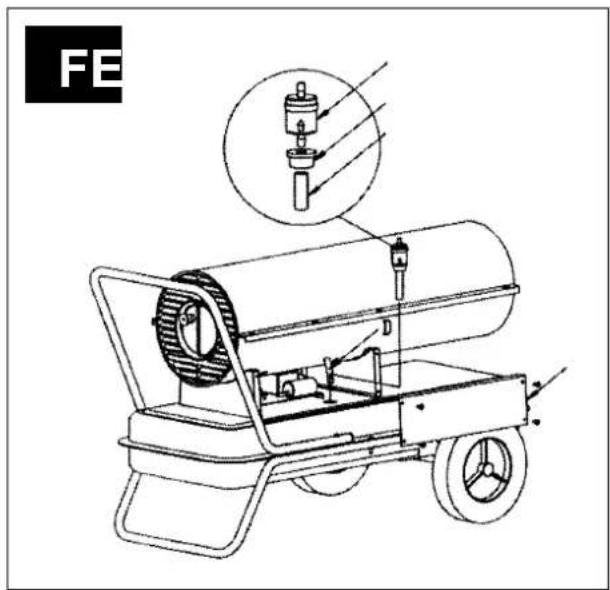
natural_image
Technical line drawing of a portable water heater with labeled components and an inset showing internal components (no text or symbols present)
natural_image
Diagram of a mechanical assembly showing a moving gear and fan components (no text or symbols)
Einleitung
To enjoy your new appliance as long as possible, please read carefully the Operating Instructions and the attached safety instructions before putting it into operation. Further, we recommend keeping the Operating Instructions in order to recall the product features in the future. To follow the continuous product development, we reserve the right to make technical changes for any further improvement.
This document represents the original Operating Instructions.
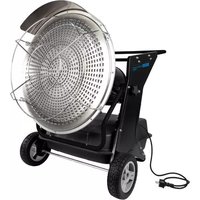
Appliance description
Professional and high-performance hot-air turbine for heating and drying in the building industry, agriculture and storage spaces.
To be used in well ventilated spaces only!
Heating system using oil. The appliance is fitted with an electronic ignition system. High-quality steel body with robust chassis and light run.
Unpacking
Remove all the packing materials that have been used to pack the heating unit for transport purposes.
Take the heating unit out of the box.
Check the heating unit for any damage caused during transport. If the heating unit is damaged, contact immediately the seller where the appliance has been bought.
Appliance description (pic. A)
A. Hot air outlet
B. Appliance body
C. Handle
D. -
E. Cable winding-up
F. Bottom cover
G. Tank level indicator
H. Fuel tank
- Wheel
J. Side cover
K. Digital temperature indicator
L. Temperature controller/thermostat
M. ON/OFF switch
N. Bottom tube frame
O. Fuel tank
P. Fuel filter
Q. Pump with geared wheel
R. Fan with protective grid
a. Thermostat controller
b. Required temperature indicator
c. Actual/room temperature indicator
d. ON/OFF switch
Technical specifications
GD 30 TRI
Voltage/frequency: 230 V / 50 Hz
Heating output: 30 kW/25,800 kcal per hour
Fan output: 720 m ^3 per hour
Tank capacity: 38 l
Fuel consumption: App. 2.4 l per hour
Gas type: Oil
Feeder cable length: 1.6 m
Weight: 35.5 kg
Art. No. 85109
safety instructions

Please read carefully these Operating Instructions. Familiarise with the control elements and appropriate appliance using. Keep the Operating Instructions for future reference.
Safe working
Keep the place of your work clean!
Mess in the place of your work may result in injuries.
Consider the environment influences
Do not expose the appliance to rain.
Do not use the appliance in a wet or moist environment. Provide appropriate lighting.
Do not use the appliance near flammable liquids or gases.
Keep other persons in safe distance!
Do not let other persons, especially children, touch the appliance and the cable. Keep them in a sufficient distance from the place of your work.
Store the appliance properly!
An appliance that is not used should be stored in a dry, locked place out of reach of children.
Do not overload the appliance!
Work in the specified output limits.
Use the right appliance!
Do not use the appliance for purposes for which it has not been designed.
Look after your appliance!
Follow the maintenance regulations and instructions. Check regularly the appliance cable and have it replaced by an authorised professional if damaged. Check regularly the extension cable and replace it if damaged.
Be careful!
Pay attention to what you are doing. Use common sense when working. Do not use the appliance when you are tired.
WARNING!
Use of any other accessories may pose a risk of injury.
Your appliance should be repaired by an electrician only!
This appliance meets the appropriate safety provisions. Repairs may only be executed by an electrician and original spare parts must be used, otherwise the user may face a risk of injury.
Appliance-specific safety instructions

WARNINGS
IMPORTANT: Please read carefully the complete Operating Instructions before assembling, handling and maintaining this heating unit. Any unauthorised use of this heating unit may result in serious injuries or death as a result of burn, fire, explosion, electric shock and carbon monoxide poisoning.
! CAUTION: Carbon monoxide poisoning may be fatal!
Carbon monoxide poisoning: Early symptoms of carbon monoxide poisoning are similar to those experienced at flu, i.e. headache, giddiness and/or indisposition. If such
symptoms are experienced, it may be possible your heating body is not working properly. Get out immediately! Have your heating unit inspected. Some persons are more sensitive to carbon monoxide than other ones, e.g. pregnant women, persons with cardiac or pulmonary diseases or anaemia, persons under the influence of alcohol and persons at heights. Make sure you have read all the maintenance instructions and have understood them. Keep these Operating Instructions for future reference. They are your guide for safe and professional handling of this heating unit.
- Use only oil to prevent fire and risk of explosion. Petrol, crude oil, paint thinners, alcohol and other highly flammable fuels must not be used in any case.
Fuel:
a) Staff providing refuelling must be trained and fully familiarised with the manufacturer's instructions and applicable directives for safe refuelling of heating units.
b) Only oil may be used for refuelling.
c) Any flame including the pilot flame must be blown out to allow the heating unit to cool down before refuelling.
d) Fuel lines and connections must be checked for leaking when refuelling takes place. Any leaking must be repaired before putting the heating unit back into operation.
e) The maximum fuel daily dose should only be stored in buildings near the heating unit. Large fuel reserves to be stored outside the building.
f) All fuel storages must be at least 7 m from heating units, burners, welders and similar inflammable sources (exception being a fuel tank integrated in the heating unit).
g) If applicable, fuel storage should only be limited to spaces where the flooring design prevents leaked fuel accumulation and the fuel cannot catch fire as a result of deeply stored inflammable sources.
h) Fuel must be stored in accordance with the local official regulations.
General information:
- Never use the heating unit near petrol, paint thinners or other easily combustible fumes.
- Follow all local provisions and regulations when using this heating unit.
- Heating units used near reinforcement grids, canvases or other coverings must be placed in a safe distance from these materials. The recommended minimum distance is 3.5 m. Moreover, using fireproof coverings is recommended. Fireproof coverings must be safely attached to be protected against catching fire and prevent heating unit being touched and turned over due to wind gust.
- To be used in well ventilated spaces only. Before putting the appliance into operation, make sure air vent of at least 2,800 cm ^2 for fresh external air is provided for heating output of 100,000 BTU per hour.
- To be used in spaces with no flammable vapours or high dust levels only.
- To be used at voltage and frequency specified on the type label only.
- A properly earthed extension cable with a three-pin plug to be used at all times.
- Minimum distance from flammable materials and persons: exhaust: 3 m at sides, upper and rear side: 2 m. (see pic. D)
- To prevent a risk of fire, the hot heating unit or heating unit just being operated must be placed on a safe and level surface.
- The heating unit must be transferred or stored in a horizontal position to prevent fuel leaking.
- Keep children and pets in a sufficient distance from the heating unit.
- Unplug the heating unit if not being operated.
- Never use the heating unit in residential rooms and sleeping rooms.
- Never block the air inlet (rear side) and air outlet (front side) of the heating unit.
- If the heating unit is hot, being operated or plugged, it must never be transferred, handled, refuelled or maintained.
- Do not fit any piping on the front and rear side of the heating unit.

CAUTION:
Oil to be used only to prevent fire or explosion.

Using the appliance as a heat source for events parties or operating the appliance in stables is strictly prohibited!
Use as designated
GD-series oil driven fan heaters are to be exclusively used for indirect heating and drying out in well-ventilated rooms or in dry outdoor areas, in a safe distance from flammable materials and persons and animals. A stable and horizontal surface must be provided for operation. Oil only is allowed as fuel.
(As far as safety, functionality and service life are concerned, the GD series follows the latest criteria: the safety equipment guarantees appropriate working of the appliance; operating noise have been reduced to minimum levels and the careful material selection makes it as much reliable as possible.)
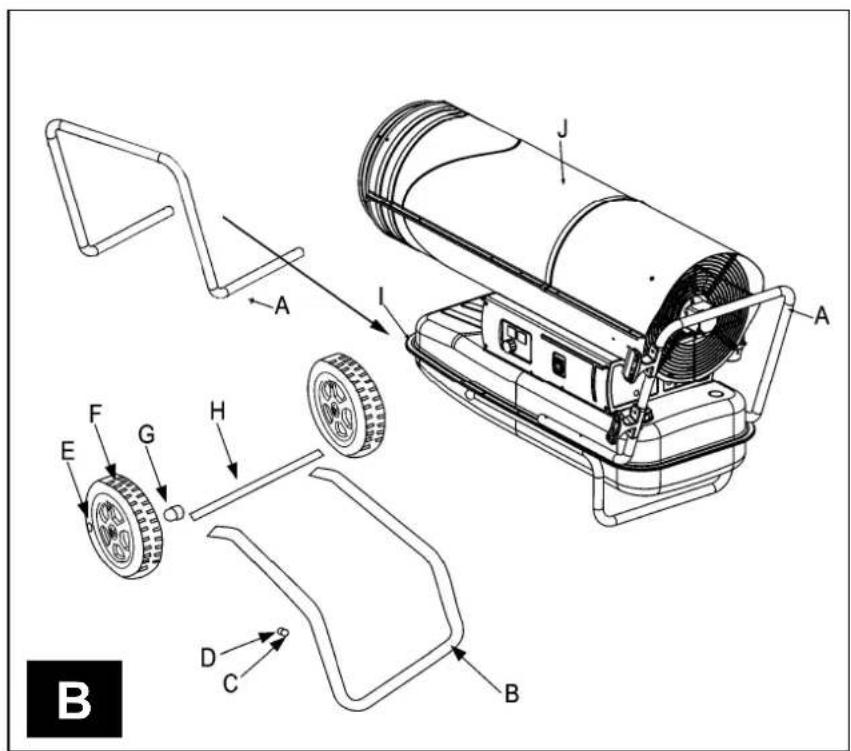
Assembly, pic. B
Description, pic. B
- Frame
- Screw
- Washer
- Wheel cover
- Wheel
- Case
- Axis
These models are supplied including wheels and handles. Wheels, handles and the respective fixing components can be found in the shipment cardboard.
Necessary tools:
- PH 2 cross-head screwdriver
- Forked wrench
- Hammer
-
Put the axis through the supporting wheel frame. Attach the wheels to the axis. IMPORTANT: During installation, the extended wheel hub must point in the supporting wheel frame direction (see picture B)
-
Apply a cap nut on each axis end and fix it by slight tapping with a hammer.
-
Put the fan heater on the supporting wheel frame. Make sure the fan heater air inlet (at the back) is above the wheels. The holes on the fuel tank flange must match the holes on the supporting wheel frame.
- Put the front and back handle on the fuel tank flange. Put the screws through the handles, fuel tank flange and supporting wheel frame. After inserting the screw, tighten the given nut by hand.
- Tighten the nuts if all screws are inserted.
Safety equipment
The oil hot-air turbine is fitted with an electronic flame control. The appliance is stopped in case of operating failure. If the oil hot-air turbine is overheated, thermostat preventing overheating is activated, which interrupts the fuel supply; the thermostat is automatically deactivated if the combustion chamber temperature drops below the accepted maximum value. The overheating cause must be identified and removed (e.g. air inlet and outlet blocking or fan stopping) before putting the oil hot-air turbine back into operation. To start the appliance again, please follow the instructions included under "PUTTING THE APPLIANCE INTO OPERATION".
Behaviour in case of emergency
Provide necessary first aid treatment corresponding to the injury nature and seek qualified medical help as soon as possible.
Protect the injured person from other injuries and calm him/her down.
First aid kit must always be available in the place of your work in case of accident in accordance with DIN 13164. Material taken out of the first aid kit needs to be supplemented right away. If help is needed,
please provide the following details:
- Place of accident
- Accident nature
- Number of injured persons
- Injury type
Operating staff requirements
The operator must carefully read the Operating Instructions before using the appliance.
Qualification
No special qualification is necessary for using the appliance apart from detailed instruction by a qualified person.
Minimum age
The appliance may only be operated by persons over 16 years of age. An exception includes youngsters operating the appliance within their professional education to achieve necessary skills under teacher's supervision.
Training
Using the appliance only requires appropriate instructions by a professional or reading the Operating Instructions. No special training necessary.
Putting the appliance into operation
Before putting the oil driven fan heater into operation and plugging it, check if the network characteristics correspond to the values specified on the type label.
WARNING:
RCD 30mA (safety switch against stray current) must be integrated to the electrical circuit to which the oil driven fan heater is connected.
Follow all safety measures.
Add oil to the fuel tank. Close the fuel tank lid again.
Connect the fan heater feeder cable to a standardised outlet with a protective pin.
To put the appliance into operation, the following is needed:
Putting ON/OFF to the ON symbol position ("I"): The fan starts and combustion gets switched on after several seconds.
Thermostat:
Use the thermostat to set the required room temperature. The required value on the left display (pic. A/b) will change by turning the thermostat controller (pic. (A/a). A/b). The right display (pic. A/c) shows the approximate current room temperature measured on the fan wheel.
After reaching the set temperature, the oil driven fan heater is automatically switched off. If it gets below the set temperature, the oil driven fan heater is automatically switched on again.
Example of use:
"II" (pic. A/d) 15°C actual temperature (pic. (A/b)) 20°C temperature required (pic. A/c).
The oil driven fan heater is now able to heat the "space" to 20^ and then is automatically switched off. If the appliance remains in the emergency position, the oil driven fan heater is automatically switched on again when it is below the required temperature.
Example of use:
18°C actual temperature (pic. A/c) 45°C temperature required (pic. A/b). The oil driven fan heater now gets switched off. If the appliance remains in the emergency position, the gas heating fan is automatically switched on when it is below 15°C.
It may take a few seconds before combustion is started in case of the first starting or after the oil driven fan heater has not been used for a long time.
To switch the appliance off, the following is needed:
Put ON/OFF (pic. A/d) to the OFF symbol position ("0"). Or the set temperature (pic. A/b) must be set lower than the current room temperature (pic. A/c).
Marking
Product safety:
| CE | |
| Product corresponds to appropriate EU standards |
Prohibitions:
| Not to be used in residential area! | No fire, open light and smoking! |
| No covering |
Warning:
 |  | ||||
| Caution! Hot surface! | Warning against dangerous voltage | ||||
 |  | ||||
| Do not use the appliance in closed spaces! | Warning against flammable materials | ||||
 |  | ||||
| Caution! Dangerous electric voltage! | Health warning / hazardous substances | ||||
Commands:
 |  | ||
| General prohibition sign | Read operation manual before use | ||
Environment protection:
 |  | ||
| Dispose waste not to harm your environment. | Packaging material from cardboard can be recycled in a collection point. | ||
| [047X] | |||
| Defective and/or disposed electric or electronic devices must be delivered to relevant collection points. | |||
Packaging:
 |  |
| Protect against moisture | Packaging must direct upwards |
| Interseroh-Recycling |
Technische Daten:
 |  | ||
| Connection | Weight | ||
 |  | ||
| Heating power Turbine capacity | |||
 |  | ||
| Tank capacity Fuel consumption | |||
EU DECLARATION OF CONFORMITY
We,
Güde GmbH & Co. KG
Birkichstrasse 6
D-74549 Wolpertshausen
Deutschland
herewith declare that the following appliance complies with the appropriate basic safety and health requirements of the EU Directives based on its design and type, as brought into circulation by us.
In case of alternation of the machine, not agreed upon by us, this declaration will lose its validity.
Machine description: GD 30 TRI
Article No. #85109
Applicable EU Directives:
2006/95 EG
2004/108 EG
Applicable harmonised standards:
EN 13842:2004
EN 60335-1:2002+A11+A1+A12+A2+A13+A14
EN 60335-2-102:2006
EN 13842:2004
EN 55014-1:2006+A1
EN 55014-2:1997+A1+A2
EN 61000-3-2:2006+A1+A2
EN 61000-3-3:2008
Date/authorised signature: 02.03.2012

Title of signatory: Managing Director
Mr
Technical documentation: J. Bürkle FBL; QS
Arnold
Disposal
The disposal instructions are based on icons placed on the appliance or its package. The description of the meanings can be found in the "Marking" chapter.
Transport package disposal
The package protects the appliance against damage during transport. Packing materials are usually chosen depending on their environmental friendliness and disposal method and can therefore be recycled.
Returning the package to material circulation saves raw materials and reduces waste disposal costs.
Parts of packages (e.g. foils, styropor) can be dangerous to children. Risk of suffocation!
Keep parts of packages away from children and dispose them as soon as possible.
Servicing
Do you have any technical questions? A claim? Do you need spare parts or the Operating Instructions?
You will be helped quickly and without needless bureaucracy at our webpage www.guede.com in the Service part. Please help us be able to assist you. To be able to identify your appliance when claimed, we need to know its serial No., order No. and year of production. All these details can be found on the type label. Enter the details below for future reference.
Serial No.
Order No.
Year of production:
Tel.: +49 (0) 79 04 / 700-360
Fax: +49 (0) 79 04 / 700-51999
E-Mail: support@ts.guede.com
Guarantee
The guarantee exclusively applies to material or manufacturing defects. The original proof of purchase with the purchase date must be submitted when lodging a claim in the guarantee period.
The guarantee does not include any unauthorised use, e.g. appliance overloading, violent use, damage by a third party or foreign item. The failure to follow the Operating Instructions and assembly instructions and common wear and tear are not covered by the guarantee either.
Transport

CAUTION
Before transporting the appliance:
Switch the appliance off as instructed in the previous paragraph; unplug it and let the hot-air generator cool down.
Make sure the tank lid has been closed safely before lifting or transferring the appliance.
The appliance can easily be transferred by the handle and drawn forward.
Troubleshooting
| Failure Possible cause | Removal |
| Fan not starting and flame not beginning to burn. | 1. No power supply2. Engine winding is burnt out or broken1. Check the power supply properties.Check the switch functionality and position.Check the safety fuse.Switch off the engine. |
| Fan starting and flame not beginning to burn or going out immediately. | 1. Ignition system is not working.2. Flame control is faulty.3. Photocell is not working.4. No or insufficient amount of oil getting to the burner.5. Electric valve is not working.1. Check the ignition cabling to the electrodes and transformer. Check the position of the electrodes. Check whether the electrodes are clean. Replace the ignition transformer.2. Replace the appliance.3. Clean or replace the photocell.4. Check the pump-engine connection. Check whether there is air in the fuel |
| piping. Check the hoses and filter sealing. Clean the nozzle and replace it if necessary.5. Check the plugging. Clean the electric valve and replace it if necessary. | ||
| Fan starting and flame beginning to burn but smoking. | 1. Combustion air is not sufficient.2. The fuel used is dirty or contains water.3. Air in the fuel piping.4. Oil volume in the burner is insufficient.5. Too much oil in the burner. | 1. Remove all possible obstacles and obstruction at the air inlet or outlet. Check the air inlet ring gauge position. Clean the screen.2. Replace the used oil with fresh oil. Clean the oil filter.3. Check the tightness of hoses and the oil filter.4. Check the pump pressure value. Clean or replace the nozzle.5. Check the pump pressure value. Replace the nozzle. |
| Generator not pausing. | 1. Electric valve sealing is defective.2. Fan thermostat is defective. | 1. Replace the electric valve body.2. Replace the fan thermostat. |
| Flame blasting off the appliance in the front. | 1. Insufficient air inlet in the combustion chamber. | 1. Check the fan. Check the air inlet. |
Maintenance and storing
Keep the air slot and body with no dust and dirt.
For cleaning purposes, use a soft cloth and fine soap solution. Prevent direct appliance contact with aggressive cleaning agents. Aggressive, volatile and caustic cleaning agents must not be used.
The appliance needs to be protected against moisture and dust.
If the appliance is not used for a long time, store it in a covered state in a dry, safe place inapproachable to children.

Caution:
Do not service the appliance when plugged, being operated or hot. The failure to do so could lead to serious burns and electric shock.
Regular maintenance:
| Part Frequency | |
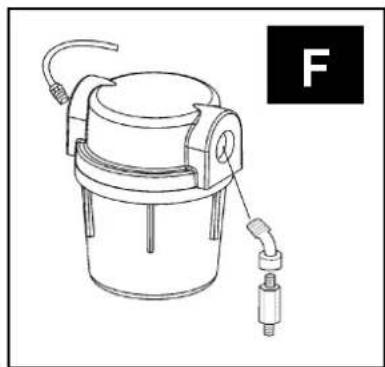
| Fuel tank (pic. F) | To be rinsed out every 150 – 200 running hours or as needed |
| Air filter (pic. G) | To be washed with water and soap and let dry out every 500 running hours or as needed. |
| Fuel filter (pic. E) | To be cleaned two times during the heating season or as needed. |
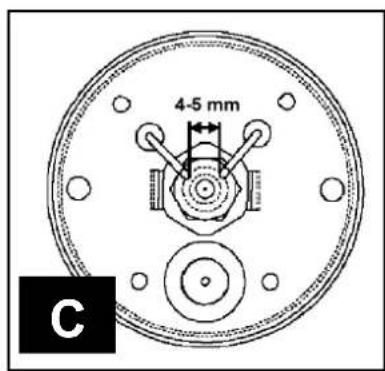
| Ignition electrodes (pic. C) | To be checked every 500 running hours; distance 4-5 mm. |
| Fan blades | To be cleaned every season or as needed; fan wheel screw to be tightened with hand. |
| Engine | Maintenance-free, with permanent lubrication. |
Introduction
Interseroh-Recycling
DÉCLARATION DE CONFORMITÉ CE
Nous,
Güde GmbH & Co. KG
Birkichstrasse 6
D-74549 Wolpertshausen
Deutschland
L. Regulator temperature/termostat
M. Stikalo ON/OFF
N. Spodnji cevni okvir
O. Rezervoar za gorivo
P. Filter za gorivo
Q. Črpalka z nazobčanim kolesom
c. Indkator dejanske/sobne temperature
d. Stikalo ON/OFF
Tehnični podatki
GD 30 TRI
Napetost in frekvenca: 230 V, 50 Hz
Zmogljivost ogrevanja: 30 kW (25.800 kcal/h)
L. Regulator temperature/termostat
M. Gumb ON/OFF
N. Donji okvir cijevi
O. Rezervoar za gorivo
P. Filtar za gorivo
Q. Crpka sa nazupčanim kotačem
L. Regulator temperature/termostat
M. Gumb ON/OFF
N. Donji okvir cijevi
O. Rezervoar za gorivo
P. Filtar za gorivo
Q. Pumpa sa nazupčanim kolutom
 | |||
| Interseroh-Recycling | |||
Tehnički podaci:
 |  | ||
| Priključak | Težina | ||
 |  | ||
| Snaga grijanja | Snaga ventilatora | ||
 |  | ||
| Sadržaj rezervoara Sadržaj rezervoara | |||
Izjava o sukladnosti EU
Temeljem ove izjave, mi,
Güde GmbH & Co. KG
Birkichstraße 6
D-74549 Wolpertshausen
Njemačka
proglašavamo, da dolje navedeni uređaji, u smislu njihove koncepcije i konstrukcije kao i u pogledu izvedbi koje smo uveli u promet, ispunjavaju odgovarajuće osnovne direktive bezbjednosti i zdravlja prema smjernicama EU.
Ako dođe do promjena na uređaju bez naše suglasnosti, ova Izjava postaje nevažećom.
Oznaka uređaja: GD 30 TRI
Kat br.: #85109
- Einleitung
- Appliance description
- Unpacking
- Appliance description (pic. A)
- Technical specifications
- GD 30 TRI
- safety instructions
- Safe working
- Appliance-specific safety instructions
- WARNINGS
- Fuel:
- General information:
- CAUTION:
- Use as designated
- Assembly, pic. B
- Description, pic. B
- Necessary tools:
- Safety equipment
- Behaviour in case of emergency
- Operating staff requirements
- Qualification
- Minimum age
- Training
- Putting the appliance into operation
- WARNING:
- To put the appliance into operation, the following is needed:
- Thermostat:
- Example of use:
- To switch the appliance off, the following is needed:
- Marking
- EU DECLARATION OF CONFORMITY
- Disposal
- Servicing
- Guarantee
- Transport
- CAUTION
- Maintenance and storing
- Introduction
- DÉCLARATION DE CONFORMITÉ CE
- Güde GmbH & Co. KG
- Birkichstrasse 6
- D-74549 Wolpertshausen
- Deutschland
- Tehnični podatki
- Izjava o sukladnosti EU
Brand : Güde
Model : GD 30 TRI
Category : Heating