
DAB 010 - Radio AudioAffairs - Free user manual and instructions
Find the device manual for free DAB 010 AudioAffairs in PDF.

| Product type | DAB+/FM radio with alarm, Bluetooth and SD player |
| Brand | AudioAffairs |
| Model | DAB 010 |
| Dimensions (L x W x H) | 164 x 48 x 96 mm |
| Weight | 355 g |
| Power supply | 5 V / 1 A mains adapter (included) and built-in 3.7 V / 1800 mAh lithium-ion battery |
| Main functions | DAB+/FM radio, Bluetooth 2.1+EDR, microSD player, AUX input/output, dual alarm, sleep function, brightness adjustment |
| Reception | DAB: 174.928 – 239.200 MHz; FM: 87.5 – 108 MHz |
| Audio power | 1 x 1.5 W RMS |
| Connectivity | AUX IN jack (3.5 mm), AUX OUT jack (3.5 mm), microSD reader, micro USB port for power |
| Battery life (estimated) | Approximately 4 to 6 hours depending on use |
| Cleaning | Soft dry cloth; do not use corrosive detergents |
| Safety | Do not open the casing; avoid moisture; use only the supplied adapter; keep away from children under 8 years |
| Warranty | 24 months (subject to legal conditions) |
| Customer service | Free hotline: 00800 – 456 22 000; e-mail: gt-support@teknihall.fr |
| Package contents | DAB 010 radio, mains adapter, reset pin, user manual |
Frequently Asked Questions - DAB 010 AudioAffairs
User questions about DAB 010 AudioAffairs
0 question about this device. Answer the ones you know or ask your own.
Ask a new question about this device
Download the instructions for your Radio in PDF format for free! Find your manual DAB 010 - AudioAffairs and take your electronic device back in hand. On this page are published all the documents necessary for the use of your device. DAB 010 by AudioAffairs.
USER MANUAL DAB 010 AudioAffairs
CE
(1) 无标
natural_image
Simple crosshair target symbol with concentric circles and intersecting lines (no text or labels)
natural_image
Simple crosshair target symbol with concentric circles and intersecting lines (no text or labels)

Stromversorgung


16 KUNDENDIENST

www.gt-support.de 00800-45622000


natural_image
Simple crosshair target symbol with concentric circles and intersecting lines (no text or labels)


DE
Geräteübersicht
DAB 010
Bluetooth/SD: Play/Pause
natural_image
Simple line drawing of a vertical stick with an oval top, no text or symbols presentnatural_image
Simple crosshair target symbol with concentric circles and intersecting lines (no text or labels)

8. ANSCHLÜSSE
natural_image
Simple geometric diagram with intersecting lines and a central circle (no text or symbols)

9. GRUNDBEDIENUNG
natural_image
Simple geometric diagram with intersecting lines and a central circle (no text or symbols)


DE
UKW-Radio
DAB 010
14.3 ALARM AUSSCHALTEN

- Thank you for your trust! 62
- General 63
- Scope of supply ......66
- Safety instructions ....67
- Device overview ....71
- Setting up ....74
- Power supply ....75
- Connections ......76
- Setting the language .....77
- Basic operation ....78
- DAB 80
11.1 Setting stations ....80
11.2 Browsing station information ....82
11.3 Additional DAB function 84 - FM radio 85
- Bluetooth connection ....88
13.1 Establishing a connection ....88
13.2 Operation via Bluetooth 89
13.3 Accepting incoming calls ....90
13.4 Disconnecting 90 - Card reader (SD) 91
- Alarm clock .....93
15.1 Setting the alarm time .....93
15.2 Switching off the alarm clock 95
60 CUSTOMER SERVICE
www.gt-support.de 00800-45622000


DAB 010
15.3 Switching off the alarm .....95
15.4 Snooze function .....95
-
Other functions .....96
-
Cleaning 100
- Troubleshooting ....101
- Disposal 103
- Technical data ......104
- Hotline 106
- Warranty ....107


Thank you for your trust! DAB 010
1. THANK YOU FOR YOUR TRUST!
We congratulate you on the purchase of your new DAB radio and are convinced that you will be satisfied with this modern device. In order to guarantee optimal functioning and performance from your DAB radio at all times, and to ensure your personal safety:
Before using the device for the first time, read the operating instructions carefully and ensure you comply with the safety instructions!
We hope you enjoy using your new DAB radio.
| Article DAB radio | |
| Model DAB 010 | |
| Manual ID 05/18_DAB 010_V.2 | |
| Manufacturer | Globaltronics GmbH & Co. KG Domstrasse 19 - 20095 Hamburg Germany |
| Web | www.gt-support.de |


62 CUSTOMER SERVICE

www.gt-support.de 00800-45622000


natural_image
Pure geometric diagram with crosshair and circular pattern (no text or symbols)2. GENERAL
Retaining the manual
- All activities in relation to using or servicing this device must only be performed in the manner described in these operating instructions.
- Keep these instructions for reference.
- If you pass the device on to someone else, please include these operating instructions.
Intended purpose
This device is...
... an entertainment electronics device.
... intended for the wireless reception of analogue and digital radio stations, as well as an alarm clock with an alarm or radio playback.
... suitable for the reception and playback of audio signals from external devices via Bluetooth, the AUX connection and SD cards.
The device is designed for private use, and is not suitable for commercial use. It is not permitted to make modifications to the device. Any other use or modification is excluded from the intended purpose.


If necessary, you will find the following warnings in these operating instructions:

DANGER! High risk: failure to observe this warning may result in injury to life and limb.
WARNING! Moderate risk: failure to observe this warning may result in injury or serious material damage.
CAUTION: low risk: failure to observe this warning may result in minor injury or material damage.
NOTE: circumstances and specifics that must be observed when handling the device.
• Information on the display is written in italics (slanted text). Example:
- Buttons to be pressed are always written in bold.
Example: Press the MENU/ENTER button.
- Instructions with a specific sequence are always numbered (1., 2., 3. etc.).


natural_image
Simple crosshair target symbol with concentric circles and intersecting lines (no text or labels)


GB
General
DAB 010
Notes on the declaration of conformity

The firm Globaltronics GmbH hereby declares that this product complies with the fundamental requirements and other relevant regulations of RED Directive 2014/53/EU, EMC Directive 2014/30/EU, ErP Directive 2009/125/EC, Low Voltage Directive 2014/35/EU and RoHS Directive 2011/65/EU.
The complete declaration of conformity and these operating instructions in PDF format can be found on the Internet at www.audioaffairs.de.

This symbol identifies the power adapter as a device of protection class II. Devices with this protection class have reinforced or double insulation.

Devices bearing this symbol may only be operated indoors (in a dry environment).
Rating plate
The rating plate with the technical details can be found on the underside of the device.
CUSTOMER SERVICE 65

00800 - 456 22 000

www.gt-support.de


Scope of supply DAB 010
3. SCOPE OF SUPPLY
When unpacking it, ensure that the following parts have also been supplied:
• D A B r a d i o
• Power unit
- Reset pin
- Operating instructions (including warranty card)


66 CUSTOMER SERVICE
www.gt-support.de 00800-45622000


natural_image
Simple geometric diagram with intersecting lines and a central circle (no text or symbols)

4. SAFETY INSTRUCTIONS
General notes
- The rating plate with the technical details can be found on the underside of the device.
- Before you connect the device, please carefully read the safety instructions and the operating instructions. Only then will you be able to use all functions safely and reliably.
- Packaging material and protective films are not a toy for children. Do not allow children to play with plastic bags. Danger! Risk of suffocation.
- This device may be used by children from the age of 8 and by persons with reduced physical, sensory or mental abilities or a lack of experience and knowledge if they are supervised or have been instructed in the safe use of the device and have understood the associated hazards.
• Children must not play with the device. Cleaning and maintenance by the user must not be performed by children without supervision.
• To avoid any hazard, do not make modifications to the device. Repairs must be carried out by a specialist workshop or the Service Centre.
Ambient conditions
- The device and the mains plug must not be exposed to dripping or splashing water, as otherwise there is a risk of electric shock. Do not place any objects filled with liquid, such as vases, on or in the immediate vicinity of the device.

GB
Safety instructions DAB 010
- If you place the device on a shelf, keep at least 10 cm free on all sides of it.
- If the device has fallen into water, pull out the mains plug immediately, and only then remove the device from the water. Do not use the device again, but have this checked by a specialist.
- Only use the device in a moderate climate.
• Candles and other open flames must be kept away from the product at all times in order to prevent the spread of fire.
- Set up the device in a location where it is not exposed to direct sunlight.
- Do not use the device near a radiator.
- Do not use the device outdoors or near areas of water, e.g. bathtubs.
- If the device is moved from a cold room to a warm room, wait before connecting the mains plug. The resulting condensation can destroy the device under certain circumstances. When the device has reached room temperature, it can be safely turned on.

Power supply
- Only connect the mains plug to a properly installed and easily accessible power socket whose voltage corresponds to the specifications on the rating plate. The power socket must still be easily accessible after connection.
- Do not turn the device on if there is visible damage to the device, the mains plug or the cable, or if the device has been dropped.

68 CUSTOMER SERVICE
www.gt-support.de 00800-45622000


DAB 010
Safety instructions
- Ensure that the cable cannot be damaged by sharp edges or hot surfaces.
- Ensure that the cable is not trapped or crushed.
- When removing the mains plug from the power socket, always pull the plug and never the cable.
- Lay the cable in such a way that it does not become a tripping hazard.
- Disconnect the mains plug from the power socket, ... ... if there is a fault, ... when you are not using the device, ... if you want to clean the device, and ... during thunderstorms.
- To completely disconnect the device from the mains, pull the mains plug out of the power socket.
.

DANGER! Never open the housing of the device - it does not contain any parts that require maintenance! There is a danger of a fatal electric shock when the housing is open.
In the case of faults
- Unplug the device immediately if it is damaged.
• DANGER! Should liquids or foreign objects get into

the device, remove the mains plug from the power socket immediately. Have the device checked before using it again.
- Do not use the device if there is visible damage to the housing or the mains lead/plug. Repairs to the device may only be carried out by the Service Centre.

GB
Safety instructions DAB 010
Battery
- Do not expose the device to direct sunlight or heat. The ambient temperature should not be lower than +5 °C or higher than +35 °C.
- Only charge the battery with the original accessory (power adapter).
- When the battery has reached the end of its service life, the device must be disposed of properly with the integrated battery. Do not attempt to remove or replace the battery.
• The battery must not be used again or taken apart. - Should the electrolyte solution leak out of the battery, avoid contact with eyes, mucous membranes and skin. Rinse immediately with plenty of clean water and consult a doctor. The electrolyte solution can cause irritation.
- The battery must not be short-circuited. The battery can overheat and explode.
- The device must not be thrown into a fire. The battery can explode.
Cleaning and care
- Use a soft, dry cloth for cleaning. Do not use any corrosive or abrasive cleaning agents. These could damage the surface of the device.

70 CUSTOMER SERVICE
www.gt-support.de 00800-45622000


1 Loudspeaker
2 Rotating telescope antenna
3 Display: display of plain text, symbols and digits
4 ▶▶| DAB: search the station list
TUNING + FM: press briefly to display the previous/next memory location / press and hold to start station scan
Bluetooth/SD: next track
5 MENU/ENTER Press briefly to enter the menu and confirm entries Press and hold to switch back in the menu
6 ▶II SCAN FM/DAB: automatic station search with station storage
Bluetooth/SD: Play/Pause
in standby: set the alarm
7 DAB: search the station list
TUNING – FM: press briefly to display the previous/next memory location / press and hold to start station scan Bluetooth/SD: previous track
8 SOURCE Press to switch operating modes
9 O N / O F F Press briefly: switches the device to standby mode / switches it on from standby mode Press for approx. 2 seconds: switch off device functions
72 CUSTOMER SERVICE
www.gt-support.de 00800-45622000


natural_image
Pure geometric diagram with intersecting lines and a circular pattern (no text or symbols)Side view
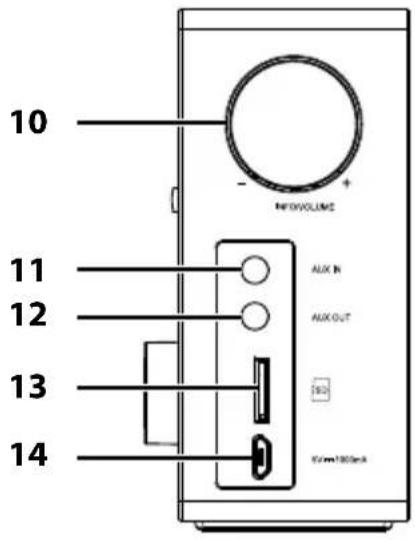
10 INFO/
Press in order to ...
VOLUME -/+
... read out station information in DAB mode and
... show the signal strength in FM mode
Rotate to adjust the volume
11 AUX IN Input: jack socket ∅ 3.5 mm
Reset button, operated with the reset pin
12 AUX OUT Output: jack socket ∅ 3.5 mm
13 SD SD card slot for microSD card
14 5V
Power adapter socket
1000mA


CUSTOMER SERVICE 73

00800 - 456 22 000

www.gt-support.de


natural_image
Simple line drawing of a vertical stick with an oval top, no text or symbols present15 Power adapter
16 Reset pin
6. SETTING UP
- Completely remove all packaging components.
- Place the device on a stable, flat surface.
- Do not expose the device to extreme heat or moisture.
- Remove the protective film from the display.


74 CUSTOMER SERVICE

www.gt-support.de 00800-45622000


natural_image
Simple geometric diagram with intersecting lines and a central circle (no text or symbols)

7. POWER SUPPLY
WARNING!
- The DAB radio may only be charged and operated with the power adapter supplied.
NOTES:
- The rechargeable battery which is permanently installed in the DAB radio has to be charged up at least 6 hours during the first charging process. The charging time is then reduced to approx. 3 to 4 hours.
- Shortly before the battery is discharged (battery indicator ☐), the battery indicator and Low Bat flash on the display.
- Connect the USB Micro-B plug of the power adapter to the 5V 1000mA socket on the DAB radio.
- Plug the power adapter into a properly installed, easily accessible power socket. The power socket must still be easily accessible after connection. The battery is now being charged. The charging process is indicated by animation of the battery symbol on the display.
- After charging, disconnect the power adapter from the DAB radio (battery indicator)
GB
Connections DAB 010
8. CONNECTIONS
CAUTION: make sure that the DAB radio and the devices to be connected are switched off before you connect them. Also read the operating instructions for the devices you wish to connect.
AUX IN
The jack socket of the AUX IN stereo input allows you to connect external media playback devices, e.g. an mp3 player, and to use the loudspeaker of the DAB radio for playback.
- Connect an external media playback device to the AUX IN socket of the DAB radio.
- Press the SOURCE button repeatedly until AUX appears on the display.
- Start playback on the media playback device.
- Playback is controlled via the external device. You can also set the volume on the DAB radio by turning the INFO/VOLUME -/+ knob.
AUX OUT
The jack socket of the AUX OUT stereo output allows you to connect an external loudspeaker, for example.
- Connect a loudspeaker to the AUX OUT socket of the DAB radio.
- Start playback on the DAB radio.
- The volume can be set ...
... on the DAB radio by turning the INFO/ VOLUME -/+ knob and
... on the loudspeaker if necessary.
76 CUSTOMER SERVICE
www.gt-support.de 00800-45622000


9. SETTING THE LANGUAGE
- Press the ON/OFF button if necessary to switch on the device from standby mode.
- Press the MENU/ENTER button.
appears on the display. - Press the MENU/ENTER button and select
by turning the MENU/ENTER button. - Press the MENU/ENTER button and select the desired language
by turning theMENU/ENTER button. - Press the MENU/ENTER button to save the setting.


Basic operation DAB 010
10. BASIC OPERATION
Switching the device on/to standby/off
- Press the ON/OFF button for approximately 2 seconds to turn the device on when it is switched off. It is in the last selected operating mode.
- Press the ON/OFF button to switch the device to standby mode. The display shows the time, date, battery indicator and, if applicable, any alarm that has been set.
- In standby mode, press ...
... the ON/OFF button briefly to switch on the device from standby mode.
... the ON/OFF button for approx. 2 seconds to switch off the display and the device functions. Power Off appears briefly on the display before it disappears.
• To disconnect the device from the mains, pull the power adapter out of the power socket.
Selecting operating mode
- With the device switched on, press the SOURCE button repeatedly to switch between the different operating modes DAB (digital radio), FM (radio), BT (Bluetooth), SD (SD card slot) and AUX (AUX).
Setting the volume
- Adjust the volume by turning the INFO/ VOLUME -/+ knob.
78 CUSTOMER SERVICE
www.gt-support.de 00800-45622000


natural_image
Simple crosshair target symbol with concentric circles and intersecting lines (no text or labels)

Setting the time and date
NOTES:
- Please note that the time and date are set automatically when a station that broadcasts this information is selected in radio mode.
-
If no adjustment is made in the setting mode for approx. 30 seconds, the setting menu is exited. The display shows the time. Adjustments made up to this time are not stored.
-
The device must be switched on. Press the ON/OFF button if necessary to switch on the device from standby mode.
-
Press the MENU/ENTER button.
appears on the display. -
Press the MENU/ENTER button.
-
Rotate the MENU/ENTER button until
-
Press the MENU/ENTER button. The hour indicator flashes.
-
By rotating the MENU/ENTER button you can set the hours.
-
Press the MENU/ENTER button. The minute indicator flashes.
-
By rotating the MENU/ENTER button you can set the minutes.
-
Press the MENU/ENTER button. The date display flashes.
-
By rotating the MENU/ENTER button you can set the days.
-
Press the MENU/ENTER button. The month indicator flashes.
-
By rotating the MENU/ENTER button you can set the months.
-
Press the MENU/ENTER button. The year flashes.
-
By rotating the MENU/ENTER button you can set the years.
-
Press the MENU/ENTER button and Time/Date Saved appears briefly on the display. The date and time are now saved.

GB
DAB DAB 010
11. DAB
Digital Audio Broadcasting (DAB) is a digital transmission standard for the terrestrial reception of digital radio. The "+" stands for modern transmission in the best sound quality, which also leaves room for additional information accompanying the programme, such as the title and artist, programme name or station information.
11.1 SETTING STATIONS
- Press the ON/OFF button if necessary to switch on the device from standby mode.
- Press the SOURCE button repeatedly if necessary to switch to DAB. When switched on for the first time, a station search starts. A station is played at the end of the search. If a station scan was already completed previously, the most recently selected station will be played.
Automatic station search
The automatic station search scans the frequency blocks that can be received.
- Press and hold down the ▶II SCAN button until Scanning... appears on the display. When the search is complete, play-back starts at the first station in alphabetical order.
Improving reception
- Pull the telescope antenna all the way out.
- Try out different positions in order to improve the reception quality and change the location of the device if necessary.
80 CUSTOMER SERVICE
www.gt-support.de 00800-45622000


Playing DAB radio stations
- To select another station, press the I ◀◀ TUNING – button or ▶▶I TUNING +. In the upper display line the message Station List appears and the new station below it. Press and hold the I◀◀ TUNING – or ▶▶I TUNING + button to quickly search through the contents of the station list.
- Press the MENU/ENTER button. The selected station is played.
To switch directly to the next station without having to press MENU/ENTER, set the AutoScan function in the menu to
. - Press the MENU/ENTER button.
appears on the display. - Press the MENU/ENTER button.
appears on the display. - Press the MENU/ENTER button and select
by turning the MENU/ENTER button. Confirm by pressing the MENU/ENTER button.
Saving DAB stations to the Favourites list
DAB stations can be stored in the Favourites list (1-30).
- Select the desired programme with the I ◀◀ TUNING – or ▶▶I TUNING + button and activate it by briefly pressing the MENU/ENTER button.
- Press the MENU/ENTER button.
appears on the display. - Select
by turning the MENU/ENTER button. Confirm by pressing the MENU/ENTER button.
GB
DAB DAB 010
- Turn the MENU/ENTER button to select
. Confirm by pressing the MENU/ENTER button. - Turn the MENU/ENTER button to select the desired memory location (1-30).
- Confirm by briefly pressing the MENU/ENTER button. The station is saved to the desired memory location and the message "Stored" appears.
Selecting a DAB station from the Favourites list
- Press the MENU/ENTER button.
appears on the display. - Select
by turning the MENU/ENTER button. Confirm by pressing the MENU/ENTER button. - Turn the MENU/ENTER button to select
. Confirm by pressing the MENU/ENTER button. - Turn the MENU/ENTER button to select the desired memory location (1-30).
- Confirm by briefly pressing the MENU/ENTER button. The station in the selected memory location is played back.
11.2 BROWSING STATION INFORMATION
Additional station information is shown in the display. This information is transmitted by the radio stations. The information may be different from station to station.
- Press INFO/ VOLUME -/+ to change the information. The following information will be displayed:

82 CUSTOMER SERVICE
www.gt-support.de 00800-45622000


DAB 010
GB
DAB
| DLS (Dynamic Label Segment) | The display will show: e.g. the name of the radio show, title, artist and station information |
| Signal strength | The more squares that are filled in, the stronger the signal. This is a useful aid to adjust the direction of the antenna or the location of the device. |
| Radio station type / PTY | Shows the station type, e.g. sports, news, etc. |
| Multiplex name | Digital radio bundles stations into units. These units are called Multiplex (e.g. DRN Hamburg). |
| Frequency | The block and the frequency in mega-hertz are displayed. |
| Signal Error: | The fault rate is displayed. The lower the number, the better the reception. |
| xxkbps / DAB+ | Displays the bit rate.News and talk radio programmes usually have a lower bit rate than music programmes. |
| Hours:minutes Time | |
| Days-Months-Year Date |


GB
DAB DAB 010
11.3 ADDITIONAL DAB FUNCTION
- DRC: the DRC function ensures that quiet passages are reproduced a little louder.
- Press the MENU/ENTER button.
appears on the display. - Press the MENU/ENTER button and select
by turning the MENU/ENTER button. - Press the MENU/ENTER button and select
, and by turning the MENU/ENTER button. - Press the MENU/ENTER button to confirm the selected setting.
- To exit the menu, press and hold down the MENU/ENTER button repeatedly if necessary.


12. FM RADIO
- Press the ON/OFF button if necessary to switch on the device from standby mode.
- Press the SOURCE button repeatedly if necessary to switch to FM (radio).
Improving reception
- Pull the telescope antenna all the way out.
- Try out different positions in order to improve the reception quality and change the location of the device if necessary.
Automatic station search
- Press the I ◀◀ TUNING – or ▶▶| TUNING + button for approx. 2 seconds to start an automatic station scan that ends at the next station with a sufficiently strong signal.
Automatic station search with station storage
The automatic station search with station storage searches the frequency band once and automatically stores the first 30 stations with sufficient reception.
- Select the FM (radio) operating mode by repeatedly pressing the SOURCE button.
- Press the ▶II SCAN button for approx. 2 seconds until the frequency display changes. The station search starts at the selected frequency and the first 30 stations found are automatically stored in order of ascending frequency in program slots 1 to 30. The station in the first program slot plays automatically after the search is completed.

GB
FM radio DAB 010
NOTE: the order of the saved stations after an automatic station search cannot be changed. However, you can create a completely new station list manually or save additional radio stations to the automatically generated station list in the next free memory location. (see "Saving radio stations to the station list" on page 86).
Tuning stations manually
- Rotate the MENU/ENTER button to change the frequency 0.05 MHz steps. The frequency is shown on the display.
Saving radio stations to the station list
Radio stations can be saved manually in the station list (1-30).
- Select the desired radio station with the I ◀◀ TUNING – or ▶▶ I TUNING + buttons.
- Press the MENU/ENTER button.
appears on the display. - Select
by turning the MENU/ENTER button. Confirm by pressing the MENU/ENTER button. - Select
by turning the MENU/ENTER button. Confirm by pressing the MENU/ENTER button. - Turn the MENU/ENTER button to select the desired memory location (1-30).
- Confirm by briefly pressing the MENU/ENTER button. The station is saved to the desired memory location and the message "Stored" appears.

86 CUSTOMER SERVICE
www.gt-support.de 00800-45622000


Accessing saved stations
• To select a saved station, press the I ◀◀ TUNING – or
▶▶TUNING + button briefly. The current programme position is briefly displayed, e.g. P01.
Stereo/mono switching
For stations with a low or fluctuating transmission power, the reception quality can be improved by switching from stereo to mono reception.
- Press the MENU/ENTER button.
appears on the display. - Press the MENU/ENTER button.
- Press the MENU/ENTER button and select
by turning the MENU/ENTER button. Confirm by pressing the MENU/ENTER button.
Select


GB
Bluetooth connection DAB 010
13. BLUETOOTH CONNECTION
Bluetooth radio technology makes it possible to wirelessly transmit data to devices equipped with this interface. For example, you can play music files stored on a Bluetooth enabled mobile phone and play them back through the loudspeaker.
13.1 ESTABLISHING A CONNECTION
- Press the ON/OFF button if necessary to switch on the device from standby mode.
- Press the SOURCE button repeatedly if necessary to switch to BT (Bluetooth). An acoustic signal sounds, "Searching" appears on the display and the search for a media playback device starts.
- Start Bluetooth on the media playback device (e.g. smartphone, MP3 player). The media playback device will now receive the device name "DAB 010".
- Establish a connection to the DAB radio on the media play-back device. The two devices are now connected with one another. Two sounds are heard and "Connected" appears on the display.
- If playback does not start automatically, start the playback of a music track on the media playback device. Audio will be played back via the DAB radio.
NOTES:
• If a code is requested during connection set-up, enter 0000.
- If the Bluetooth connection is interrupted, the DAB radio automatically tries to re-establish the connection.
88 CUSTOMER SERVICE

www.gt-support.de 00800-45622000


DAB 010
Bluetooth connection
• Media playback devices may save the ID code of the device. When a new connection is created, it may not be necessary to create the connection manually if the Bluetooth function is active.
- When the Bluetooth connection is established, you can move freely around your home with the DAB radio. As long as there are no interfering objects (e.g. reinforced concrete walls or other radio devices) between the media playback device and the DAB radio, you can also take it into another room. The maximum range in closed rooms is approx. 10 metres.
You can control the playback via the media playback device or via the DAB radio.
NOTE: it is possible that some devices will not support being remotely controlled by the DAB radio.
| Function Operation on the DAB radio itself | |
| Start / Pause | Press ▶II SCAN briefly |
| Next track | Press ▶▶I TUNING + briefly |
| To the beginning of the track | Press I◀◀ TUNING – briefly |
| Previous track | Press I◀◀ TUNING – again briefly when playback is at the beginning of the track. |
| Setting the volume Turn INFO/ VOLUME -/+ | |

GB
Bluetooth connection DAB 010
13.3 ACCEPTING INCOMING CALLS
- An incoming call during playback will automatically reduce the volume and sound the telephone call signal.
- Answer the call as you would usually do. The call will use the telephone for audio.
- When you are finished, hang up as you would usually do. The DAB radio will resume playback after a few seconds.
13.4 DISCONNECTING
You can end the connection by ...
- switching off the Bluetooth function on the media play-back device,
- selecting a different playback mode,
- pressing the ▶II SCAN button until you hear a beep,
- switching the DAB radio to standby mode,
- moving out of reception range.
Connecting (pairing) with another device
• To connect to another device via Bluetooth, press the
▶II SCAN button until you hear a beep. "Searching" appears on the display and the search for a media playback device starts.

90 CUSTOMER SERVICE
www.gt-support.de 00800-45622000


14. CARD READER (SD)
Inserting cards
CAUTION: incorrect insertion can cause damage to the cards or the device.
- Push the microSD card carefully to the end of the shaft. The gold contacts point backwards and are first pushed into the device.
- Press the SOURCE button repeatedly if necessary to switch to SD (card reader). The table of contents is loaded. This process may take some time. When the "Music" signal sounds, MP3 files have been detected on the card.
- Start the playback by pressing the ▶II SCAN button if play-back does not start automatically.
NOTE: tracks that are not stored in folders are detected in the ROOT directory and played first during playback.
Removing the card
To remove a card, the card reader must not be active.
- Press the SOURCE button repeatedly if necessary in order to switch to a different operating mode to SD (card reader) or switch the device to standby mode with ON/OFF.
- Press the memory card down once briefly and carefully pull the memory card out of the slot.


| Function for MP3 on the SD card | |
| Start | Press ▶II SCAN |
| From pause, press: ▶II SCAN | |
| Pause | Press ▶II SCAN |
| Stop | ·Keep ▶II SCAN pressed down·To start playback again, press and hold down ▶II SCAN |
| Next track | Press ▶▶I TUNING + |
| Previous track | Press ◀◀TUNING - |


15. ALARM CLOCK
You can set two different alarm times for your DAB radio; you can be woken up either by an alarm tone or by DAB/FM radio by each of these.
NOTE: the time must be correctly adjusted before the alarm time is set.
15.1 SETTING THE ALARM TIME
- Turn on the DAB radio to standby mode if necessary with ON/OFF.
- Press the ▶II SCAN button briefly. Alarm 1 Setup appears on the display.
- Press the MENU/ENTER button.
- Select Alarm On or off by turning the MENU/ENTER button. Alarm 1 Wizard On time appears on the display and the hours display flashes.
- Select the hours by turning the MENU/ENTER button and confirm by pressing the MENU/ENTER button. The minute indicator flashes.
- Select the minutes by turning the MENU/ENTER button and confirm by pressing the MENU/ENTER button. Duration appears on the display and the display for alarm duration flashes.
- Select the alarm duration (15, 30, 45, 60, 90 minutes) by turning the MENU/ENTER button and confirm by pressing the MENU/ENTER button. Source appears on the display and the display for the alarm source flashes.

GB
Alarm clock DAB 010
- Select the alarm source (DAB, FM, Buzzer) by turning the MENU/ENTER button and confirm by pressing the MENU/ENTER button.
DAB and FM: Last listened flashes on the display. Confirm by pressing the MENU/ENTER button or select a saved station by turning MENU/ENTER and confirm this by pressing the MENU/ENTER button. The repeat alarm message appears on the display. - Select the alarm repeat (Daily, Weekdays, Weekends, Once) by turning the MENU/ENTER button and confirm by pressing the MENU/ENTER button.
Once: Enter the date by turning the MENU/ENTER button and confirm by pressing the MENU/ENTER button. The volume indicator appears on the display. - Select the volume by turning the MENU/ENTER button and confirm by pressing the MENU/ENTER button.
If the alarm clock is ...
... activated, Alarm Saved appears and then the alarm symbol ⚠️ and alarm 1 and/or 2 on the display.
... not activated, Alarm Not Saved appears on the display.
NOTES:
- Press the ▶II SCAN button twice in quick succession to set the second alarm clock.
- If you do not press any button for about 30 seconds while the alarm is being programmed, the settings made up to that time will be deleted.

94 CUSTOMER SERVICE
www.gt-support.de 00800-45622000


GB
Alarm clock
DAB 010
15.2 SWITCHING OFF THE ALARM CLOCK
- Press the ON/OFF button if necessary to switch the device to standby mode.
- Press the ▶II SCAN button for approx. 5 seconds. The alarm clock is now switched off.
15.3 SWITCHING OFF THE ALARM
- When the alarm sounds at the set time, press one of the buttons (except MENU/ENTER) on the front of the device. The alarm goes off and the settings remain activated.
15.4 SNOOZE FUNCTION
- When the alarm sounds at the set time, press the MENU/ENTER button to interrupt the alarm (by the sound of the alarm or the radio). Snooze and an elapsing time appear on the display.
- By repeatedly pressing the MENU/ENTER button you can set the snooze time (5, 10, 20, 25, 30 minutes, off). The remaining snooze time is shown on the display.
- You can stop the snooze function by pressing the ON/OFF button.

CUSTOMER SERVICE 95

00800 - 456 22 000

www.gt-support.de


GB
Other functions DAB 010
16. OTHER FUNCTIONS
NOTE: to exit the menu, press and hold down the MENU/ENTER button repeatedly if necessary.
Setting the language
You can change the menu language.
- Press the ON/OFF button if necessary to switch on the device from standby mode.
- Press the MENU/ENTER button.
appears on the display. - Press the MENU/ENTER button and select
by turning the MENU/ENTER button. - Press the MENU/ENTER button and select the desired language
, , or by turning the MENU/ENTER button. - Press the MENU/ENTER button to save the setting.
Factory settings
You can reset the DAB radio to the factory settings in the case of malfunctions, for example.
- Press the ON/OFF button if necessary to switch on the device from standby mode.
- Press the MENU/ENTER button.
appears on the display. - Press the MENU/ENTER button and select
by turning the MENU/ENTER button.

96 CUSTOMER SERVICE

www.gt-support.de 00800-45622000


DAB 010
Other functions
- Press the MENU/ENTER button and select
or by turning the MENU/ENTER button. - Press the MENU/ENTER button to save the setting. If the reset is successful, Restarting appears on the display and the device starts with a search in DAB mode.
Software (SW) version
How to read out the software version of the DAB radio:
- Press the ON/OFF button if necessary to switch on the device from standby mode.
- Press the MENU/ENTER button.
appears on the display. - Press the MENU/ENTER button and select
by turning the MENU/ENTER button. - Press the button and read off the version number.
Display brightness
The brightness of the display can be adjusted in 4 steps.
- Press the ON/OFF button if necessary to switch on the device from standby mode.
- Press the MENU/ENTER button.
appears on the display. - Press the MENU/ENTER button and select
by turning the MENU/ENTER button. - Press the MENU/ENTER button and select
, , or by turning the MENU/ENTER button. - Press the MENU/ENTER button to save the setting.

GB
Other functions DAB 010
Turning down the display brightness automatically
The display brightness turns down automatically some time after the last press of a button: After 10 seconds the brightness is dimmed by half.
- Press the ON/OFF button if necessary to switch on the device from standby mode.
- Press the MENU/ENTER button.
appears on the display. - Press the MENU/ENTER button and select
by turning the MENU/ENTER button. - Press the MENU/ENTER button. Backlight Auto appears on the display. Select
or by turning the MENU/ENTER button. - Press the MENU/ENTER button to save the setting.
Sleep timer
The device switches to standby mode with the sleep timer after a preset time.
- Press the ON/OFF button if necessary to switch on the device from standby mode.
- Press the MENU/ENTER button.
appears on the display. - Press the MENU/ENTER button and select
by turning the MENU/ENTER button.

98 CUSTOMER SERVICE
www.gt-support.de 00800-45622000


- Press the MENU/ENTER button and select
, <15 minutes>, <30 minutes>, <45 minutes>, <60 minutes>, <75 minutes> or <90 minutes> by turning the MENU/ENTER button. - Press the MENU/ENTER button to save the setting. When you exit the menu, the remaining time is shown on the display before switching off to standby mode.
Setting the time update
You can set whether the date and time should synchronise automatically via DAB and/or radio, or whether you want to deactivate this function. This can be useful, for example, if you are in a different time zone and set the time manually.
- Press the ON/OFF button if necessary to switch on the device from standby mode.
- Press the MENU/ENTER button.
appears on the display. - Press the MENU/ENTER button and select
- Press the MENU/ENTER button and select
, , or by turning the MENU/ENTER button. - Press the MENU/ENTER button to save the setting.


GB
Cleaning DAB 010
Setting the night-time switch off
You can set whether the display is to switch off automatically between 10 p.m. and 5 a.m. at night.
- Press the ON/OFF button if necessary to switch on the device from standby mode.
- Press the MENU/ENTER button.
appears on the display. - Press the MENU/ENTER button and select
by turning the MENU/ENTER button. - Press the MENU/ENTER button and select
or by turning the MENU/ENTER button. - Press the MENU/ENTER button to save the setting.

17. CLEANING
Use a soft, dry cloth for cleaning. Do not use any corrosive or abrasive cleaning agents. These could damage the surface of the device.

100 CUSTOMER SERVICE
www.gt-support.de 00800-45622000


18. TROUBLESHOOTING
If your device fails to function as required, please try this checklist first. Perhaps it is just a small problem that you can resolve yourself.

DANGER! Do not attempt to repair the device yourself under any circumstances.
If you cannot resolve the fault, please contact our service centre.
| Fault Possible causes / action | |
| The device cannot be switched on. | Are the power adapter and USB Micro-B plug connected correctly?Check the connection. |
| Battery operation: Is the battery empty? | |
| No sound | Is the correct operating mode selected? |
| Are connected devices switched on (e.g. mp3 player)? | |
| Is the volume on the media playback device set too low? | |
| Has the playback been interrupted? | |
| Poor radio reception | Is the telescope antenna fully extended and correctly aligned? |


GB
Troubleshooting DAB 010
| Fault Possible causes / action | |
| A DAB station is dis-played but not played. | Perform a station scan. |
| Unexplained malfunction | Reset the device to the factory settings in the menu. |
| Device does not respond to the press of a button. | Insert and press the reset pin into the AUX IN socket. The device switches itself off. Press the ON/OFF button for approximately 2 seconds to turn the device on. |
19. DISPOSAL
The battery integrated in this device must not be disposed of in the household waste. The device with the installed battery must be disposed of properly.
Keep the packaging if possible until the expiration of the warranty period. After that, please dispose of it in an environmentally friendly manner.
The device must be disposed of at a proper waste disposal facility, in accordance with the Waste Electrical & Electronic Equipment Directive 2012/19/EU. Plastics and electronic parts must be recycled.
Check with your local waste disposal company or authority.


Technical data DAB 010
20. TECHNICAL DATA
| Electrical data | |
| Power adapter:Shenzhen Keyu Power Supply Technology Co., Ltd. | Model no.: KA0601A-0501000EUSInput: 100-240 V ~ 50/60 Hz 0.2 A max.Output: 5 V [IMAGE]Protection class: II [6870] |
| Battery: Lithium-ion, 3.7 | V, 1800 mAh (not re-placeable) |
| Sound | |
| Audio output port: 1x 1.5 W (RMS) | |
| System | |
| VHF (FM): 87.5 - 108 MHz | |
| DAB: 174.928 - 239.200 MHz | |
| Bluetooth: Bluetooth 2.1+EDR (A2DP) | |
| Frequency range: | 2400-2410 MHz |
| Transmitting power: | 2.5 mW (max.) |
| Connections | |
| AUX IN:AUX OUT:SD: | Input: 1x dia. 3.5 mm jack socketOutput: 1x dia. 3.5 mmInput: microSD card reader |

DAB 010
Technical data
| General | |
| Dimensions(W x D xH): approx. 164 | x 48 x 96 mm |
| Weight: approx. 355 g | |
| Ambient conditions: Operating temperature: 5 °C – 35 °CHumidity: 40% to 80% relative | |
Specifications subject to change without notice.

GB
Hotline DAB 010
21. HOTLINE
If a technical problem occurs, please contact our hotline, as most errors can be corrected by this method without having to send in the device for repair.
If it is determined during the call that the device is actually defective, you will be asked to send us the device for repair, together with an exact description of the fault.
In this event, please include the fully completed Service Card (from the end of these instructions) and a copy of the proof of purchase.
Please note that you will be invoiced for unjustified complaints!

Thank you very much
Hotline:
00800 - 456 22 000 (Freecall)
free of charge - 365 days per year - from Monday to Sunday
Email:
GB: gt-support-gb@telemarcom.de
IE: gt-support-ie@telemarcom.de

106 CUSTOMER SERVICE
www.gt-support.de 00800-45622000


22. WARRANTY
Dear Customer,
Thank you for selecting a product from our company. Our product corresponds to the legal requirements, and was manufactured with continuous quality control. The technical data correspond to the current state of the art at the time of printing. Specifications are subject to change without notice.
The warranty period for electronic devices corresponds to the statutory provisions at the time of purchase.
If a technical problem should unexpectedly occur with the device, please note the following points:
The guarantee and warranty period for your device are valid for 24 months after the purchase date. Please retain the proof of purchase for this purpose.
The guarantee and warranty relate only to defects that are attributable to manufacturing or material faults.
No guarantee or warranty can be accepted for damage caused by improper handling or improper interventions or for damage resulting from a lightning strike, overvoltage, power failures, fire or any other natural catastrophes. If the device should nevertheless be repaired, you will be given a cost estimate.
The guarantee and warranty also expire if the product has been modified or repaired by an unauthorised person, the serial number of the product has been changed or removed, the product has been / is used outside the scope of its intended use or if the warranty period has expired.

Please always retain the proof of purchase and the original packaging. If your product needs to be returned to the service centre and you do not have sufficient transport packaging, this can be sent to you for a charge.
If a technical problem occurs, please contact our hotline.
Within the framework of the warranty, we retain the right to repair the device or to replace it with a comparable device.
This guarantee does not restrict your statutory rights.


108 CUSTOMER SERVICE
www.gt-support.de 00800-45622000


natural_image
Simple geometric diagram with intersecting lines and a central circle (no text or symbols)


Purchase date (as shown on enclosed receipt)
Owner data:
Name
Telephone number
Address
CUSTOMER SERVICE 109

00800 - 456 22 000

www.gt-support.de


Description of fault:


110 CUSTOMER SERVICE
www.gt-support.de 00800-45622000


natural_image
Simple crosshair target symbol with concentric circles and intersecting lines (no text or labels)

4. CONSIGNES DE SÉCURITÉ
Consignes générales
natural_image
Simple crosshair target symbol with concentric circles and intersecting lines (no text or labels)

FR
DAB 010
natural_image
Simple line drawing of a vertical stick with an oval top, no text or symbols presentnatural_image
Simple crosshair target symbol with concentric circles and intersecting lines (no text or labels)


natural_image
Simple crosshair target symbol with concentric circles and intersecting lines (no text or labels)

DAB 010
natural_image
Pure geometric diagram with crosshair and circular pattern (no text or symbols)natural_image
Simple crosshair target symbol with concentric circles and intersecting lines (no text or labels)

natural_image
Simple line drawing of a vertical stick with an oval top, no text or symbols presentnatural_image
Pure geometric diagram with intersecting lines and a circular pattern (no text or symbols)
natural_image
Simple crosshair symbol with concentric circles and intersecting lines (no text or labels)


IT
Radio VHF
DAB 010
natural_image
Simple crosshair target symbol with concentric circles and intersecting lines (no text or labels)

- Premere il tasto MENU/ENTER. Sul display compare
. - Premere la manopola MENU/ENTER e, girando la manopola MENU/ENTER, selezionare
. - Premere la manopola MENU/ENTER e, girando la manopola MENU/ENTER, selezionare
, <15 minuti>, <30 minuti>, <45 minuti>, <60 minuti>, <75 minuti> o <90 minuti>. - Premere la manopola MENU/ENTER per salvare l'imposta- zione.


20. DATI TECNICI
natural_image
Simple crosshair target symbol with concentric circles and intersecting lines (no text or labels)


Garanzia
DAB 010
SCHEDA DI ASSISTENZA
Dati del prodotto:
Modello
Numero di serie
Data d'acquisto
(come da scontrino
allegato)


- Stromversorgung
- ANSCHLÜSSE
- GRUNDBEDIENUNG
- ALARM AUSSCHALTEN
- DAB 010
- THANK YOU FOR YOUR TRUST!
- GENERAL
- Retaining the manual
- Intended purpose
- This device is...
- Notes on the declaration of conformity
- Rating plate
- SCOPE OF SUPPLY
- SAFETY INSTRUCTIONS
- General notes
- Ambient conditions
- GB
- Safety instructions DAB 010
- Power supply
- CUSTOMER SERVICE
- www.gt-support.de 00800-45622000
- Safety instructions
- In the case of faults
- Battery
- Cleaning and care
- CUSTOMER SERVICE
- SETTING UP
- CUSTOMER SERVICE
- POWER SUPPLY
- WARNING!
- NOTES:
- CONNECTIONS
- AUX IN
- AUX OUT
- CUSTOMER SERVICE
- SETTING THE LANGUAGE
- BASIC OPERATION
- Switching the device on/to standby/off
- Selecting operating mode
- Setting the volume
- Setting the time and date
- DAB
- SETTING STATIONS
- Automatic station search
- Improving reception
- Playing DAB radio stations
- Saving DAB stations to the Favourites list
- DAB DAB 010
- Selecting a DAB station from the Favourites list
- BROWSING STATION INFORMATION
- CUSTOMER SERVICE
- ADDITIONAL DAB FUNCTION
- FM RADIO
- Automatic station search with station storage
- Tuning stations manually
- Saving radio stations to the station list
- CUSTOMER SERVICE
- Accessing saved stations
- Stereo/mono switching
- BLUETOOTH CONNECTION
- ESTABLISHING A CONNECTION
- Bluetooth connection
- ACCEPTING INCOMING CALLS
- DISCONNECTING
- Connecting (pairing) with another device
- CARD READER (SD)
- Inserting cards
- Removing the card
- ALARM CLOCK
- SETTING THE ALARM TIME
- Alarm clock DAB 010
- CUSTOMER SERVICE
- SWITCHING OFF THE ALARM CLOCK
- SWITCHING OFF THE ALARM
- SNOOZE FUNCTION
- OTHER FUNCTIONS
- Setting the language
- Factory settings
- Other functions
- Software (SW) version
- Display brightness
- Turning down the display brightness automatically
- Sleep timer
- CUSTOMER SERVICE
- Setting the time update
- Setting the night-time switch off
- CLEANING
- TROUBLESHOOTING
- DISPOSAL
- TECHNICAL DATA
- HOTLINE
- Hotline:
- Email:
- WARRANTY
- If a technical problem occurs, please contact our hotline.
- Owner data:
- CONSIGNES DE SÉCURITÉ
- Consignes générales
- DATI TECNICI
- SCHEDA DI ASSISTENZA
- Dati del prodotto:
Brand : AudioAffairs
Model : DAB 010
Category : Radio