
NRD 010 - Radio AudioAffairs - Free user manual and instructions
Find the device manual for free NRD 010 AudioAffairs in PDF.
| Product type | Retro radio |
| Brand | AudioAffairs |
| Model | NRD 010 |
| Dimensions (W x D x H) | 228 x 153 x 136 mm |
| Weight | 1360 g |
| Power supply | 230 V ~ 50 Hz |
| Power consumption | Max. 17 W / Standby < 0.5 W |
| Audio power | 5 W RMS |
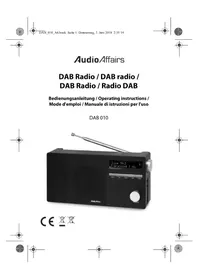
| Radio bands | DAB (174.928 – 239.200 MHz) / FM (87.50 – 108.00 MHz) |
| Bluetooth | Bluetooth 2.1+EDR (A2DP), 2400-2483.5 MHz, power 2.5 mW |
| Connectivity | AUX input (3.5 mm jack), headphone output (3.5 mm jack) |
| Antenna | Telescopic rotating antenna |
| Display | Screen with station, date, time information |
| Speakers | Built-in speaker |
| Main functions | DAB+/FM radio, Bluetooth, AUX, dual alarm, 20 presets, treble/bass adjustment, auto off |
| Safety | Protection class II, automatic shutdown after 15 min without signal |
| Cleaning | Soft dry cloth, no solvents |
| Supplied accessories | Instruction manual and warranty certificate |
| Manufacturer | Globaltronics GmbH & Co. KG |
Frequently Asked Questions - NRD 010 AudioAffairs
User questions about NRD 010 AudioAffairs
0 question about this device. Answer the ones you know or ask your own.
Ask a new question about this device
Download the instructions for your Radio in PDF format for free! Find your manual NRD 010 - AudioAffairs and take your electronic device back in hand. On this page are published all the documents necessary for the use of your device. NRD 010 by AudioAffairs.
USER MANUAL NRD 010 AudioAffairs
- Thank you for your trust! 33
- General 34
- Scope of supply 35
- Safety instructions 36
- Setting up the device 38
- Device overview 38
- Connecting external devices 40
- Connecting a set of headphones 40
- Power supply connection 40
- Operation 41
10.1. Switching the device on/off 41
10.2. Switching to standby mode 41
10.3. Language 41
10.4. Selecting an operating mode 42
10.5. Controlling the volume ....42
10.6. Adjusting bass and treble 42
10.7. Setting the date and time 42
-
Playback audio from external devices (AUX) 43
-
FM-radio 44
12.1. Setting stations 44
12.2. Browsing station information 44
12.3. Saving the currently tuned station 44
- DAB-radio 46
13.1. Initial setting of stations 46
13.2. Station scan 46
13.3. Browsing station information 47
13.4. Additional DAB functions ..... 48
- Setting the alarm 49
14.1. Activating/deactivating the alarm 49
- Bluetooth 50
15.1. Establishing a Bluetooth connection ....50
15.2. Operation via Bluetooth 51
- Special functions 52
16.1. Factory settings ....52
16.2. Checking the software version ....52
- Cleaning 53
- Disposal 53
- Troubleshooting 54
- Technical data .... 55
- Hotline 56
- Warranty 57
1. THANK YOU FOR YOUR TRUST!
We congratulate you on the purchase of your new Nostalgia Radio and are convinced that you will be satisfied with this modern device.
In order to guarantee optimal functioning and performance of your Nostalgia Radio at all times, and to ensure your personal safety:
Before commissioning the device, read the operating instructions carefully and ensure you comply with the safety instructions!
We hope you enjoy your new Nostalgia Radio!
| Article Nostalgia Radio | |
| Model NRD 010 | |
| Manual ID 05/18_NRD 010_V.2 | |
| Manufacturer Globaltronics GmbH & Co. KG Domstrasse 19 - 20095 Hamburg Germany | |
| Web www.gt-support.de | |
2. GENERAL
Retaining the manual
- All activities in relation to using or servicing this device must only be performed in the manner described in these operating instructions.
- Keep these instructions for reference.
- If you pass the device on to someone else, please include these operating instructions.
Intended purpose
This device is...
... an entertainment electronics device.
… for the reception and playback of audio signals from external devices via AUX and Bluetooth connections.
... for radio reception from FM and digital stations.
The device is intended for private use, and is not suitable for commercial use. Any other use or modification is excluded from the intended purpose.
Markings/symbols
If necessary, you will find the following warnings in these operating instructions:

DANGER! High risk: failure to observe this warning may result in injury to life and limb.
WARNING! Moderate risk: failure to observe this warning may result in injury or serious material damage.
CAUTION: low risk: failure to observe this warning may result in minor injury or material damage.
NOTE: circumstances and specifics that must be observed when handling the device.
• Information in the display is written in italics (slanted text).
Example: 12 or 24 H appears on the display.
- Buttons to be pressed are always written in bold.
Example: press the button NAP/SLEEP.
- Instructions with a specific sequence are always numbered (1., 2., 3. etc.).
Note on the declaration of conformity

Globaltronics GmbH hereby declares that this product is in compliance with the fundamental requirements and other relevant regulations of RED Directive 2014/53/EU, ErP Directive 2009/125/EC, Low Voltage Directive 2014/35/EU and ROHS Directive 2011/65/EC.
The full declaration of conformity and a PDF version of these operating instructions can be found on the internet under www.gt-support.de.
Saving energy: fully automatic!
NOTE: new automatic shutdown system!
For reasons of statutory regulations regarding energy saving, this device has an automatic shutdown system. The device automatically switches over to standby mode if it has not received an audio signal for 15 minutes and has not been operated.

This symbol identifies the product as a device of protection class II. Devices with this protection class possess a reinforced or double insulation.
Rating plate
- The rating plate with the technical details can be found on the underside of the device.
3. SCOPE OF SUPPLY
When unpacking it, ensure that the following parts have also been supplied:
• N o s t a l g i a R a d i o
- Operating instructions (including warranty card)
4. SAFETY INSTRUCTIONS

DANGER for children and persons with disabilities
- Children must not play with packing material. Do not allow children to play with plastic bags. Danger! Risk of suffocation.
- This device can be used by children aged 8 and over and by people with reduced physical, sensory or intellectual abilities or lack of experience and knowledge, provided that they are supervised or have been instructed in the device's use and have understood the resulting hazards.
- Children must not play with the device. Cleaning and maintenance by the user must not be performed by children without supervision.

DANGER! Risk of electric shock due to moisture
- Protect the device from moisture, water drops and water splashes: there is a risk of receiving an electric shock. For example, never place vases or similar items full of liquid on or in the vicinity of the device.
- The device is not intended for operation in rooms with high humidity (e.g. bathrooms). Observe the ambient conditions specified in the technical data.
- Avoid foreign bodies and liquids entering the device.
- Should liquids or foreign objects get into the device, remove the mains plug from the power socket immediately. Have the device checked before using it again.

DANGER! Risk of electric shock
- If the mains lead or the device is damaged, immediately pull the mains plug out of the power socket.
- Do not use the device if there is visible damage to the housing or the mains lead.
- It is not permitted to make modifications to the device. Repairs to the housing and mains lead may only be carried out by the service centre. If the mains lead of this device is damaged, it must be replaced by a special power cable that is available from our service centre.
- Only connect the mains lead to a properly installed, easily accessible power socket. The power socket must still be easily accessible after connection.
- Lay all cables in such a way that they do not represent a tripping hazard.
- When setting up the device, make sure that the mains lead is not pinched or squeezed. Keep the mains lead away from hot surfaces and sharp edges.
-
To disconnect the device completely from the mains, remove the mains plug from the power socket.
-
Disconnect the mains plug from the power socket, ... ... when you are not using the device, ... if you want to clean the device and ... during thunderstorms.
- Never open the casing of the device; it contains no parts requiring maintenance! When the casing is open, there is danger of death from electric shock.
- The device is not disconnected from the power supply when it is switched off.

FIRE HAZARD
- Candles and other open flames must be kept away from the product at all times in order to prevent the spread of fire.
WARNING! Risk of hearing loss
- To prevent a potential hearing loss, please avoid listening at high volumes for extended periods.

WARNING! Risk of material damage
- If the device is moved from a cold location to a warm location, condensate may form inside the device. Leave the device switched off for a few hours.
- Place the device on a stable, flat surface.
- Please ensure adequate ventilation around the device. Keep a distance of at least 10 cm on all sides. Do not cover the device (e.g. with magazines, tablecloths, curtains, etc.).
- Set up the device in a location where it is not exposed to direct sunlight.
- The device is fitted with non-slip plastic feet. As furniture is coated with a variety of different varnishes and acrylics, and treated with different cleaning agents, it cannot be completely ruled out that components are contained in some of these substances that could damage and soften the plastic feet. If necessary, place a non-slip mat under the device.
- Use a soft, dry cloth for cleaning. Do not use any corrosive or abrasive cleaning agents. These could damage the surface of the device.
5. SETTING UP THE DEVICE
• Completely remove all packaging components.
- Place the device on a stable, flat surface.
- Do not expose the device to extreme heat or moisture.
- Ensure that the device is always well ventilated. Keep a distance of at least 10 cm on all sides.
6. DEVICE OVERVIEW
Front view
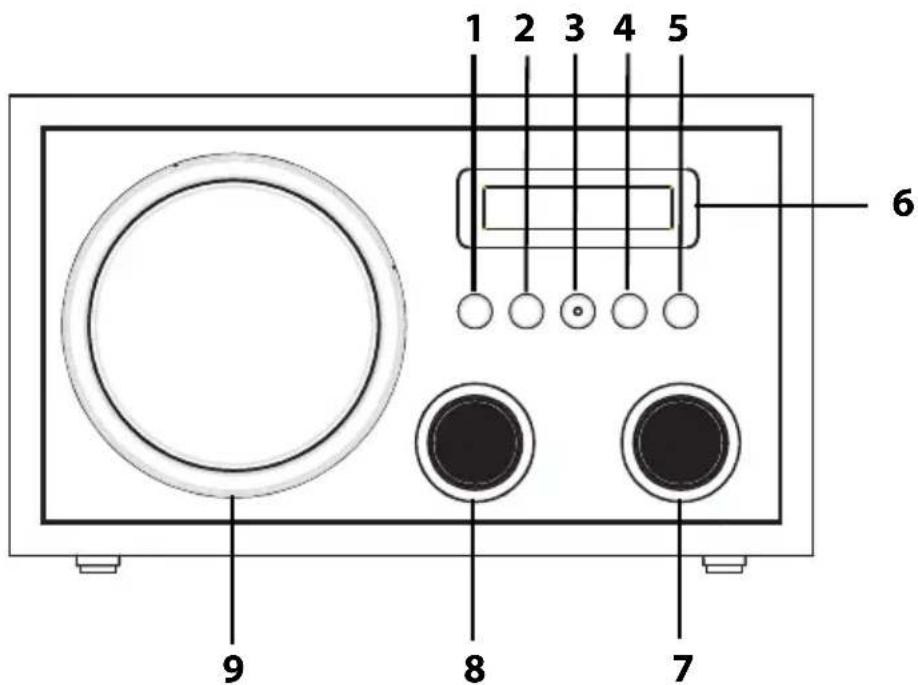
1 SOURCE Setting the operating mode.
2 M E N U Press and hold: access menu
Press briefly: browse station information
3 ▶II Bluetooth: start/pause playback
Radio: station scan
Menu: confirm settings
4 T U N E Show frequency
5 POWER Switch device to standby or switch on from standby
6 Display
7 - P R E S E T + Select station, saved stations and menu items
8 - V O L U M E + Setting the volume
9 Loudspeakers
Rear view
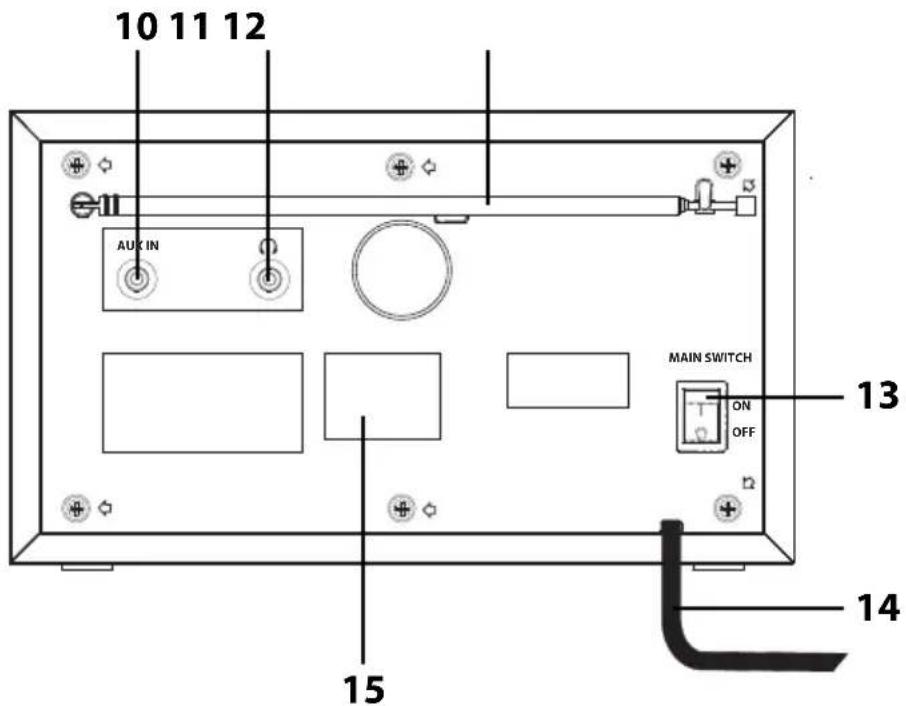
10 AUX IN Stereo audio in: 3.5 mm jack socket
11 Headset out: 3.5 mm jack socket
12 Rotating telescope antenna
13 MAIN SWITCH
ON (I) Use the power switch to switch the device on
OFF (0) Use the power switch to switch the device off
14 Power cable with mains plug
15 Rating plate
7. CONNECTING EXTERNAL DEVICES
To connect external devices, you require an audio cable (not included in the scope of supply). The cable must have a 3.5 mm jack plug for the socket AUX IN. The type of plug on the other end depends on the audio output port of the external device.
- Press the SOURCE button repeatedly until AUX-Eingang (AUX-In) appears on the display.
WARNING!
- Turn down the volume on the devices before you connect them to one another.
- Switch off all devices before you connect them to one another, and comply with the instructions for the devices that you wish to connect.
8. CONNECTING A SET OF HEADPHONES

WARNING! To prevent a potential hearing loss, please avoid listening at high volumes for extended periods.
- Use - VOLUME + to set the lowest volume.
- Insert the jack plug of the headphones or earphones in the headphones socket on the rear of the device. The sound is now played back only through the headphones.
- Adjust the volume with - VOLUME+.
9. POWER SUPPLY CONNECTION
- Insert the mains plug into a readily accessible power socket whose voltage matches the voltage stated on the rating plate. The power socket must still be easily accessible after connection.
NOTE: to disconnect the device from the mains pull out the mains plug out of the power socket.
10. OPERATION
10.1 SWITCHING THE DEVICE ON/OFF
- To switch the device on using the power switch, set the MAIN SWITCH on the back side of the device to ON (I). Once switched on, the display will flash 00:00 as the time. It usually only takes a few seconds for the time to set automatically and show correctly in the display.
- To switch the device off using the power switch, set the MAIN SWITCH on the back side of the device to OFF (O).
- In AUX or Bluetooth mode, the device will automatically switch to standby mode after approx. 15 minutes if no signal is received.
10.2 SWITCHING TO STANDBY MODE
- You can switch the device in and out of standby mode by pressing the POWER button. Power On will briefly appear on the display after switching the device on. The operating mode selected before switching to standby will be selected automatically.
10.3 LANGUAGE
You can select the display information to be shown in German or English.
-
Press and hold the MENU button until
-
the display shows Alarmzeiten (alarm times) in FM and DAB Radio (DAB radio) mode. Turn the PRESET dial until the Hauptmenü (main menu) is displayed and then press button ▶II, or until
-
the Hauptmenü (main menu) is displayed in AUX and Bluetooth mode.
-
Turn the PRESET dial until the menu Sprache (language) is displayed.
-
Press the button ▶II to select the menu.
-
Turn the PRESET dial to select a language.
-
Press the button ▶II to save the new language.
10.4 SELECTING AN OPERATING MODE
You can select the operating mode by pressing the SOURCE button:
- DAB: select digital radio mode
- FM: select FM radio mode
- Bluetooth: start Bluetooth connection
- AUX-Eingang (AUX-In): select device connected via AUX IN
10.5 CONTROLLING THE VOLUME
Use the button - VOLUME + to adjust the volume higher/lower.
10.6 ADJUSTING BASS AND TREBLE
You can create your own sound experience by adjusting treble and bass levels.
-
Press and hold the MENU button until
-
the display shows Alarmzeiten (alarm times) in FM and DAB Radio (DAB radio) mode. Turn the PRESET dial until the Hauptmenü (main menu) is displayed and then press button ▶II, or until
-
the Hauptmenü (main menu) is displayed in AUX and Bluetooth mode.
-
Turn the PRESET dial until the menu Bass (bass) or Höhen (treble) is displayed.
-
Press the button ▶II to select one of the menus.
-
Turn the PRESET dial to adjust bass and treble from -14 dB to +14 dB.
-
Press the button ▶II to save the new settings.
10.7 SETTING THE DATE AND TIME
NOTE: the time usually sets itself automatically. Should this not happen within a few minutes, you can also set the time manually.
-
Press and hold the MENU button until
-
the display shows Alarmzeiten (alarm times) in FM and DAB Radio (DAB radio) mode. Turn the PRESET dial until the Hauptmenü (main menu) is displayed and then press button ▶II, or until
-
the Hauptmenü (main menu) is displayed in AUX and Bluetooth mode.
-
Turn the PRESET dial until the menu Datum/Uhrzeit (date/time) is displayed.
-
Press the button ▶II to select the menu. The first of 4 sub-menus will be displayed, e.g. Uhrzeit einstellen (set time).
-
Turn the PRESET dial to select the relevant sub-menu and press button ▶II to access the menu.
-
Uhrzeit einstellen (Set time): setting the time
- Datum einstel (Set date): setting the date
- Autom. einstel (auto set): select between automatic tuning (von Sender (of station)) and manual tuning (Manuell (manual)).
-
12/24 Anzeige (12/24 display): select the time format. The display will show AM if you select the 12h time format before midday and PM if it is after midday.
-
Turn the PRESET dial to select the settings and press button ▶II to save your selection.
-
The menu will automatically disappear a few seconds after the settings are saved.
11. PLAYBACK AUDIO FROM EXTERNAL DEVICES (AUX)
The AUX IN socket can be used to connect external devices, e.g. an MP3 player.
- Use an audio cable to connect the audio output port of the external device, e.g. MP3 player, with the AUX IN socket.
- Switch the device on by setting the MAIN SWITCH to the ON (I) position.
- Press the SOURCE button repeatedly until AUX-Eingang (AUX-In) appears on the display.
- Start the playback on the connected device.
- The playback is controlled using the external device, but the volume can also be adjusted using the Nostalgia Radio.
- Switch off both devices before disconnecting.
NOTES:
- Please note that while in AUX mode, the volume can also be adjusted at the external device.
- If the playback is distorted, reduce the volume level on the external device.
12. FM-RADIO
- Extend the telescope antenna and adjust for good reception.
- Press SOURCE repeatedly until the FM-radio mode is selected.
12.1 SETTING STATIONS
Automatic station scan, saving stations and selecting stations
- Press the button ▶II. The device will scan for stations and store the 20 stations with the best reception it can find. The number of saved stations is displayed in the upper right hand corner of the display. When the scan is completed, the device will play the station saved to the first saved station position.
- Turn the PRESET dial until the display shows the saved station you would like to play. The station will start to play after a few seconds, provided there is reception.
NOTE: the automatic station scan will replace previously saved stations.
Tuning stations manually
- Press the button TUNE in FM mode. The current frequency will be displayed.
- Turn the PRESET dial until the display shows the desired frequency. The station will start to play after a few seconds, provided there is reception.
12.2 BROWSING STATION INFORMATION
Additional station information is shown on the bottom edge of the display. This information is transmitted by the radio stations. The information may be different from station to station.
- Press MENU briefly to browse the station information sections. You can select to see information about the artist and title or the date and time.
12.3 SAVING THE CURRENTLY TUNED STATION
You can save up to 20 radio stations.
- Tune in to the desired station.
- Turn the PRESET dial until the display shows the desired saved station number. This will appear in the bottom right area of the display. Previously saved stations can be overwritten.
- Press button ▶II until gespeichert (saved) is displayed.
Switching to mono
If you are in an area with poor reception, you may want to switch to mono playback. This option is only available in FM radio mode.
- Press the button MENU in FM mode until Alarmzeiten (alarm times) is displayed.
- Turn the PRESET dial until the Audio-Einst. (audio settings) is displayed and then press button ▶II.
- Turn the PRESET dial to switch between Auto stereo (auto stereo) and Mono (mono).
- Press the button ▶II to save the new settings.
13. DAB-RADIO
13.1 INITIAL SETTING OF STATIONS
- Press SOURCE repeatedly until the DAB-radio mode is selected.
- Once the display shows DAB Radio (DAB-radio), the device will do one of the following two things automatically:
- When switching the DAB-radio function on for the first time, or after the device was reset to factory settings, the device will perform an automatic scan for DAB radio stations. It will switch to standby mode once the station scan is complete.
- If a station scan was already completed previously, the most recently selected station will be played.
13.2 STATION SCAN
The device will scan for DAB radio stations automatically after being switched on for the first time. You should run a new station scan if the station frequencies have changed or the digital radio is used in a different place (relocation).
- Press and hold the MENU button until Alarmzeiten (alarm times) is displayed.
- Turn the PRESET dial until the Suchlauf (station scan) is displayed and then press button ▶II.
-
Turn the PRESET dial until the desired menu is displayed.
-
Lokaler Suchlauf (local station scan): the scan will only search for stations nearby.
- Vollsuche (full scan): all stations will be saved.
-
Man. Suche (manual scan): turn the dial to select the Multiblex block you would like to browse and then press button ▶II.
-
Press button ▶II to access or open a sub-menu.
Playing DAB radio stations
- Turn the PRESET dial until the display shows the saved station you would like to play. The station will start to play after a few seconds, provided there is reception.
Saving DAB stations in a program list
You can save up to 20 radio stations.
- Tune in to the desired station.
- Press TUNE. PXX will be displayed in the upper right hand corner of the display
- Within 3 seconds, turn the PRESET dial until the display shows the saved station number. Previously saved stations can be overwritten.
- Press button ▶II until gespeichert (saved) is displayed.
Playing DAB stations from a station list
- Press TUNE and turn the PRESET dial until the display shows the saved station number. The station will start to play after a few seconds, provided there is reception.
13.3 BROWSING STATION INFORMATION
Additional station information is shown on the bottom edge of the display. This information is transmitted by the radio stations. The information may be different from station to station.
- Press MENU briefly to browse the station information sections. The following information will be displayed:
| DLS (Dynamic Label Segment) | the display will show: e.g. the name of the radio show, title, artist and station information |
| Radio station type / PTY | Shows the station type, e.g. sports, news, etc. |
| Multiplex name and frequency | Digital radio bundles stations into units. These units are called Multiplex (e.g. DRN Hamburg).The frequency in Mhz is displayed below the station name. |
| Signalfehler (signal fault): | The fault rate is displayed. The lower the number, the better the reception.Signal strength: the signal strength is shown by the position of the signal box. The further to the right, the stronger the signal. This is a useful aid to adjust the direction of the antenna or the location of the device. |
| xxbps (xxbps)Codec (codec)Channels | Displays the bit rate. News and talk radio programmes usually have a lower bit rate than music programmes.Compression (e.g. AAC)displays whether stereo or mono channels are used. |
| Datum (date) Date and time | |
| Titel (track)Künstler (artist) | Name of current trackName of currently played artist |
13.4 ADDITIONAL DAB FUNCTIONS
- Liste bereinigen (purge list): the Liste bereinigen (purge list) function will delete stations that can no longer be received from the saved stations. This can be useful when you move or a station has gone off air.
- Press and hold the MENU button until Alarmzeiten (alarm times) is displayed.
- Turn the PRESET dial until the Hauptmenü (main menu) is displayed and then press button ▶II.
- Turn the PRESET dial until the menu Liste bereinigen (purge list) is displayed.
- Press the button ▶II to select the menu.
- Press the button ▶II to remove inactive stations from the saved stations.
14. SETTING THE ALARM
You must set the time before you can set the alarm.
Two individual alarm times can be set.
NOTES:
- If an alarm is active, the display will show or ① ②
-
Make sure you save your changes to the alarm times.
-
Press and hold the MENU button until Alarmzeiten (alarm times) is displayed.
- Press the button ▶II. The display will show Alarm1 (alarm1). You can switch to Alarm 2 (alarm 2) by turning the PRESET dial.
- Press the button ▶II to select one of the two alarms.
- Press the button ▶II again to activate or deactivate the alarm.
- Turn the PRESET dial until the menu Zeit (time) is displayed and open it by pressing button ▶II.
All settings are accessible by turning the PRESET dial and pressing button ▶II.
- Zeit (time): set the hour and time.
- Tage (days): adjust the wake-up mode settings. You can select between täglich (daily), einmal (once), Werktag (weekdays) and Wochenenden (weekends).
NOTE: if you select the function einmal (once), the wake-up function will be activated at the next set wake-up time.
- Modus (mode): you can choose between DAB, FM or a Buzzerton (buzzer signal) for your wake-up call
- Lautstärke (volume): Setting the volume
-
Speichern (save): new settings become active once they have been saved.
-
When you are finished, press the button ▶II to save the new settings. The display will briefly show Alarm gespeichert (Alarm saved). The display will then show Alarm 1/2 (Alarm 1/2) and the alarm time.
-
You can turn off the alarm signal by pressing POWER.
• To repeat the alarm after 9 minutes, press the button ▶II.
14.1 ACTIVATING/DEACTIVATING THE ALARM
- Press and hold the MENU button until Alarmzeiten (alarm times) is displayed.
- Press the button ▶II. The display will show Alarm1 (alarm1). You can switch to Alarm 2 (alarm 2) by turning the PRESET dial.
- Press the button ▶II to select one of the two alarms.
- Press the button ▶II again to activate or deactivate the alarm. Ein (on) or Aus (off) will appear on the display.
15. BLUETOOTH
15.1 ESTABLISHING A BLUETOOTH CONNECTION
NOTES:
-
After activating the Bluetooth mode, the device will automatically try to reconnect to the most recently paired device or to establish a new connection. This requires both devices to be turned on with Bluetooth mode activated and both devices must be within range.
• The name of your device is NRD 010. -
Activate the Bluetooth connection of the media playback device. The media play-back device will now search for devices to which it can connect.
- Switch the Nostalgia Radio on.
- Press the SOURCE button repeatedly until Bluetooth appears on the display. The word Suchen (searching) will flash on the display until the connection is established.
- The media playback device will now receive the device name "NRD 010". Select the media playback device name to connect it with the Nostalgia Radio. You will hear a beep and the Nostalgia Radio display will light up with the message Verbunden (connected). The two devices are now connected
- Now use the media playback device to start playback of a music track. Audio will be played back via the Nostalgia Radio. The playback is controlled using the media playback device, but the volume can also be adjusted at the Nostalgia Radio.
NOTE: some media playback devices can also be controlled via the buttons of the Nostalgia Radio. Functions like play/pause and next or previous track can then be controlled on the Nostalgia Radio.
NOTES:
- If you are asked to enter a code when pairing, use "0000". Enter this code using the media playback device.
- If the playback is distorted, this may be because the volume level on the media playback device is set too high. Turn down the volume on the media playback device and at the same time increase the volume on the Nostalgia Radio.
- It may be the case that not all Bluetooth devices can be connected.
Disconnecting
You can end the connection by ...
- switching off the Bluetooth function on the media playback device,
- selecting a different playback mode,
- pressing button ▶II until you hear a beep,
- switching the Nostalgia Radio to standby mode,
- moving out of reception range.
NOTE: it is possible that some devices will not support being remotely controlled by the Nostalgia Radio.
Settings of the Nostalgia Radio
| Function on the external device | |
| Playback Automatic playback or press button ▶II | |
| Pause During playback: Press button ▶II | |
| Next track | Turn the PRESET dial to the right (+) |
| Previous track | Turn the PRESET dial 2x to the left (-) |
| Beginning of current track | Turn the PRESET dial 1x to the left (-) |
Accepting incoming calls
- An incoming call during playback will automatically reduce the volume and sound the telephone call signal.
- Answer the call as you would usually do. The call will use the telephone for audio.
- When you are finished, hang up as you would usually do. The Nostalgia Radio will resume playback after a few seconds.
Connecting an additional Bluetooth device
-
If you would like to connect another external Bluetooth device, press the button ▶II until you hear a beep and Suchen (searching) flashes on the Nostalgia Radio display.
-
Connect the new device as described above.
16. SPECIAL FUNCTIONS
16.1 FACTORY SETTINGS
NOTE: all individual settings will be deleted when resetting the device to factory settings.
- Press and hold the MENU button until
- the display shows Alarmzeiten (alarm times) in FM and DAB Radio (DAB radio) mode. Turn the PRESET dial until the Hauptmenü (main menu) is displayed and then press button ▶II, or until - the Hauptmenü (main menu) is displayed in AUX and Bluetooth mode.
- Turn the PRESET dial until the menu Werksreset (factory reset) is displayed.
- Press the button ▶II to select the menu.
- Press button ▶Ⅱ again to perform a factory reset. The display will show Neu starten bitte warten (restarting, please wait). The radio will switch to standby mode once the factory reset is complete.
16.2 CHECKING THE SOFTWARE VERSION
- Press and hold the MENU button until
- the display shows Alarmzeiten (alarm times) in FM and DAB Radio (DAB radio) mode. Turn the PRESET dial until the Hauptmenü (main menu) is displayed and then press button ▶II, or until - the Hauptmenü (main menu) is displayed in AUX and Bluetooth mode.
- Turn the PRESET dial until the menu SW Version (SW version) is displayed.
- Press the button ▶II to select the menu. The display will show the software version.
17. CLEANING

DANGER! Disconnect the device from the power supply before cleaning.
Ensure that no liquid gets into the device.
CAUTION: solvents, alcohol, thinning agents etc. must never be used, as these can damage the surface of the device.
Do not use any corrosive or abrasive cleaning agents. These could damage the surface of the device.
- If necessary, clean the device using a soft, dry cloth.
18. DISPOSAL
Old devices and batteries must not be disposed of in the normal domestic waste.
Keep the packaging if possible until the expiration of the warranty period. After that, please dispose of it in an environmentally friendly manner.
The device must be disposed of at a proper waste disposal facility, in accordance with the Waste Electrical & Electronic Equipment Directive 2012/19/EU. Plastics and electronic parts must be recycled.
Check with your local waste disposal company or authority.

19. TROUBLESHOOTING
If your device fails to function as required, please try this checklist first. Perhaps it is just a small problem that you can resolve yourself.

DANGER! Do not attempt to repair the device yourself under any circumstances. If you cannot resolve the fault, please contact our service centre.
| Fault Possible causes / action to be taken | |
| No audio. | - Is the mains plug plugged in? Check the connection.- Is the device switched on?- Is the volume set to zero (mute)? |
| - If the device is set to AUX mode, is the media playback device switched on and set to the right function? Increase the volume at the media playback device. | |
| - If the device is set to BT mode, is Bluetooth switched on at the media playback device?- Are the media playback device and the Nostalgia Radio connected via a Bluetooth connection? Try disconnecting the Nostalgie Radio from any other media playback device. | |
| In Bluetooth mode: Poor audio quality. | - Are there physical obstacles between the media playback device and the Nostalgia Radio? This could be concrete walls or other radio-transmitting devices.- Have you moved out of range from the media playback device?- Is there any interference from devices close to the media play-back device? Try moving the media playback device to a different place.- Increase the volume at the media playback device. |
20. TECHNICAL DATA
| Electrical data | |
| Mains voltage: 230 V ~ 50 Hz | |
| Protection class: II | ☐ |
| Power consumption: In standby mode: | max. approx. 17 W< 0.5 W |
| Sound | |
| Audio output port: 5 W RMS | |
| System | |
| DAB: 174.928 -239.200 MHz | |
| VHF (FM): 87.50 - 108.00 MHz | |
| Bluetooth: Bluetooth 2.1+EDR (A2DP) | |
| Frequency range: 2400-2483.5 MHz | |
| Transmission power: 2.5 mW (max.) | |
| Ports | |
| AUX IN | Headset out: 3.5 mm jack socket3.5 mm jack socket |
| General | |
| LED class: | RG0 |
| Dimensions (W x D xH): | approx. 228 x 153 x 136 mm |
| Ambient conditions: | Operating temperature: 5 °C – 35 °CHumidity: 40 to 80% relative |
| Weight: | approx. 1360 g |
Specifications subject to change without notice.
21. HOTLINE
If a technical problem occurs, please contact our hotline, as most errors can be corrected by this method without having to send in the device for repair.
If it is determined during the call that the device is actually defective, you will be asked to send us the device for repair, together with an exact description of the fault.
In this event, please include the fully completed Service Card (from the end of these instructions) and a copy of the proof of purchase.
Please note that you will be invoiced for unjustified complaints!
Thank you very much
Hotline:
00800 - 45622000 (Freecall)
free of charge - 365 days per year -
from Monday to Sunday
Email:
gt-support-gb@telemarcom.de
gt-support-ie@telemarcom.de
22. WARRANTY
Dear Customer,
Thank you for selecting a product from our company. Our product corresponds to the legal requirements, and was manufactured with continuous quality control. The technical data correspond to the current state of the art at the time of printing. Specifications are subject to change without notice.
The warranty period for electronic devices corresponds to the statutory provisions at the time of purchase.
If a technical problem should unexpectedly occur with the device, please note the following points:
The guarantee and warranty period for your device are valid for 24 months after the purchase date. Please retain the proof of purchase for this purpose.
The guarantee and warranty relate only to defects that are attributable to manufacturing or material faults.
No guarantee or warranty can be accepted for damage caused by improper handling or improper interventions or for damage resulting from a lightning strike, overvoltage, power failures, fire or any other natural catastrophes. If the device should nevertheless be repaired, you will be given a cost estimate.
The guarantee and warranty also expire if the product has been modified or repaired by an unauthorised person, the serial number of the product has been changed or removed, the product has been / is used outside the scope of its intended use or if the warranty period has expired.
Please always retain the proof of purchase and the original packaging. If your product needs to be returned to the service centre and you do not have sufficient transport packaging, this can be sent to you for a charge.
If a technical problem occurs, please contact our hotline.
Within the framework of the warranty, we retain the right to repair the device or to replace it with a comparable device.
This guarantee does not restrict your statutory rights.
SERVICE CARD
Product data:
Model
Serial number
Purchase date
(as shown on enclosed receipt)
Owner data:
Name
Telephone number
Address
Description of fault:
SOMMAIRE

- THANK YOU FOR YOUR TRUST!
- GENERAL
- Retaining the manual
- Intended purpose
- This device is...
- Markings/symbols
- Note on the declaration of conformity
- Saving energy: fully automatic!
- NOTE: new automatic shutdown system!
- Rating plate
- SCOPE OF SUPPLY
- SAFETY INSTRUCTIONS
- DANGER for children and persons with disabilities
- DANGER! Risk of electric shock due to moisture
- DANGER! Risk of electric shock
- FIRE HAZARD
- WARNING! Risk of hearing loss
- WARNING! Risk of material damage
- SETTING UP THE DEVICE
- DEVICE OVERVIEW
- Front view
- Rear view
- CONNECTING EXTERNAL DEVICES
- WARNING!
- CONNECTING A SET OF HEADPHONES
- POWER SUPPLY CONNECTION
- OPERATION
- SWITCHING THE DEVICE ON/OFF
- SWITCHING TO STANDBY MODE
- LANGUAGE
- SELECTING AN OPERATING MODE
- CONTROLLING THE VOLUME
- ADJUSTING BASS AND TREBLE
- SETTING THE DATE AND TIME
- PLAYBACK AUDIO FROM EXTERNAL DEVICES (AUX)
- NOTES:
- FM-RADIO
- SETTING STATIONS
- Automatic station scan, saving stations and selecting stations
- Tuning stations manually
- BROWSING STATION INFORMATION
- SAVING THE CURRENTLY TUNED STATION
- Switching to mono
- DAB-RADIO
- INITIAL SETTING OF STATIONS
- STATION SCAN
- Playing DAB radio stations
- Saving DAB stations in a program list
- Playing DAB stations from a station list
- BROWSING STATION INFORMATION
- ADDITIONAL DAB FUNCTIONS
- SETTING THE ALARM
- ACTIVATING/DEACTIVATING THE ALARM
- BLUETOOTH
- ESTABLISHING A BLUETOOTH CONNECTION
- Disconnecting
- Accepting incoming calls
- Connecting an additional Bluetooth device
- SPECIAL FUNCTIONS
- FACTORY SETTINGS
- CHECKING THE SOFTWARE VERSION
- CLEANING
- DISPOSAL
- TROUBLESHOOTING
- TECHNICAL DATA
- HOTLINE
- Hotline:
- Email:
- WARRANTY
- SERVICE CARD
- Product data:
- Owner data:
- Description of fault:
- SOMMAIRE
Brand : AudioAffairs
Model : NRD 010
Category : Radio