
MCD 010 - Hi-Fi System AudioAffairs - Free user manual and instructions
Find the device manual for free MCD 010 AudioAffairs in PDF.


| Product Type | Hi-Fi System - Micro CD System |
| Brand | AudioAffairs |
| Model | MCD 010 |
| Dimensions (W x D x H) | Approx. 376 x 240 x 120 mm |
| Weight | Approx. 3170 g |
| Power Supply | 230 V ~ 50 Hz |
| Power Consumption | Max. ~50 W; Standby < 0.9 W |
| Supported Audio Formats | Audio CD, MP3 |
| Connections | USB 2.0 (max. 32 GB, FAT/FAT32), AUX (R/L) via RCA, Bluetooth 3.0 + A2DP, 3.5 mm headphone jack |
| Radio | FM (87.5 - 108 MHz) and DAB (174 - 240 MHz) |
| Bluetooth | Built-in, range approx. 6 m |
| Main Functions | CD player, USB, FM/DAB radio, Bluetooth, AUX input, headphone, alarm, sleep function, equalizer (EQ), bass adjustment |
| Cleaning and Maintenance | Soft, dry cloth; do not use solvents |
| Safety Instructions | Class 1 laser, moisture protection, auto-off after 15 min without signal |
| Warranty | 24 months from date of purchase |
| Customer Service | Toll-free hotline 00800 45622000, email gt-support@teknihall.fr |
Frequently Asked Questions - MCD 010 AudioAffairs
User questions about MCD 010 AudioAffairs
0 question about this device. Answer the ones you know or ask your own.
Ask a new question about this device
Download the instructions for your Hi-Fi System in PDF format for free! Find your manual MCD 010 - AudioAffairs and take your electronic device back in hand. On this page are published all the documents necessary for the use of your device. MCD 010 by AudioAffairs.
USER MANUAL MCD 010 AudioAffairs
natural_image
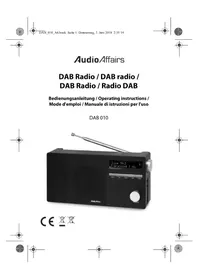
Black audio/film device with two speakers and a digital display showing 99.20 time (no visible text or symbols on main body)

- Thank you for your trust! 44
- General 44
- Scope of supply 46
- Safety instructions 46
- Device overview 50
- Setting up the device 53
- Connecting a set of headphones 53
- Power supply 54
- Starting automatic installation mode 55
- Basic functions .... 55
10.1. Switching the device on/off 55
10.2. Selecting operating mode 56
10.3. Using the remote control 56
10.4. Controlling the volume 56
10.5. Muting 57
10.6. Adjusting the tone quality 57
10.7. Adjusting the display brightness 57
- Time, alarm function and snooze function 58
11.1. Setting the time 58
11.2. Setting the alarm time ....58
11.3. Enabling and disabling the alarm function 59
11.4. Setting the snooze function 60
- Playback of CD and USB 60
12.1. Using CD mode 60
12.2. Using USB mode 61
12.3. Playback functions in CD and USB mode 61
-
Establishing a Bluetooth connection 62
-
Radio 65
14.1. FM radio 65
- DAB radio 67
15.1. Setting the stations 67
15.2. Browsing station information 68
15.3. Additional DAB functions .....68
-
AUX-connection 69
-
Special functions .... 70
17.1. Factory settings ....70
17.2. Software version 70
42 CUSTOMER SERVICE
www.gt-support.de 00800-45622000
GB


CD Microsystem
- Troubleshooting 71
- Disposal 72
- Cleaning and Storage 72
- Technical data 73
- Hotline 74
- Warranty 76
GB
Thank you for your trust! CD Microsystem
1. THANK YOU FOR YOUR TRUST!
We congratulate you on the purchase of your new CD Microsystem and are convinced that you will be satisfied with this modern device.
In order to guarantee optimal functioning and performance from your CD Microsystem at all times and to ensure your personal safety:
Before using the device for the first time, read through the operating instructions carefully and ensure you comply with the safety instructions!
| Article CD Microsystem | |
| Model MCD 010 | |
| Manual ID 08/18_MCD 010_V.1 | |
| Manufacturer Globaltronics GmbH & Co. KG Domstrasse 1920095 Hamburg | Germany | |
| Web | www.gt-support.de |
2. GENERAL
Retaining the manual
- All activities in relation to using or servicing this device must only be performed in the manner described in these operating instructions.
- Keep these instructions for reference, they form an integral part of the product.
- If you pass the device on to someone else, please include these operating instructions.
Intended purpose
This device is...
... an entertainment electronics device.
... suitable for the playback of audio signals from the integrated CD-Player.
... suitable for radio reception from FM and DAB stations.
... suitable for the reception and playback of audio signals from external devices via USB, AUX and Bluetooth connections.
The device is intended for private use, and is not suitable for commercial use. Any other use or modification is excluded from the intended purpose.
CD Microsystem
GB
General
Markings/symbols
If necessary, you will find the following warnings in these operating instructions:

DANGER! High risk: failure to observe this warning may result in injury to life and limb.
WARNING! Moderate risk: failure to observe this warning may result in injury or serious material damage.
CAUTION: low risk: failure to observe this warning may result in minor injury or material damage.
NOTE: circumstances and specifics that must be observed when handling the device.
Notes on the declaration of conformity
CE
Globaltronics GmbH & Co. KG hereby declares that this product is in compliance with the fundamental requirements and other relevant regulations of RED Directive 2014/53/EU, ErP Directive 2009/125/EC, Low Voltage Directive 2014/35/EU and ROHS Directive 2011/65/EC.
The complete declaration of conformity and these operating instructions in PDF format can be found on the Internet at www.gt-support.de.
Saving energy: fully automatic!
NOTE: new automatic shutdown system!
For reasons of statutory regulations regarding energy saving, this device has an automatic shutdown system. The device automatically switches over to Standby mode if it has not received an audio signal for 15 minutes and has not been operated.

This symbol identifies the product as a device of protection class II. Devices with this protection class possess a reinforced or double insulation.

The microsystem includes a Class 1 laser.
Rating plate
The rating plate with the technical details can be found on the rear of the device.
GB
Scope of supply CD Microsystem
3. SCOPE OF SUPPLY
• C D M i c r o s y s t e m
- Remote control
- Battery type CR 2032, 3 V (already inserted)
• E U m a i n s l e a d
• U K m a i n s l e a d
- Operating instructions and warranty card
4. SAFETY INSTRUCTIONS

DANGER for children and people with disabilities
- Children must not play with packing material. Do not allow children to play with plastic bags. Danger! Risk of suffocation.
- This device can be used by children aged 8 and over and by people with reduced physical, sensory or intellectual abilities or lack of experience and knowledge, provided that they are supervised or have been instructed in the device's use and have understood the resulting hazards.
• Children must not play with the device. Cleaning and maintenance by the user must not be performed by children without supervision. - Please ensure that children do not insert any objects into the microsystem.
- Keep children who are younger than eight years of age away from the microsystem and the power cable.
- Do not leave the microsystem unsupervised when in use.

DANGER! Risk of electric shock due to moisture
- Protect the device from moisture, water drops and water splashes: failure to observe this instruction may result in an electrical shock hazard. For example, never place vases or similar items full of liquid on or in the vicinity of the device.
- The device is not intended for operation in rooms with high humidity (e.g. bathrooms). Observe the ambient conditions specified in the technical data.
- Avoid foreign bodies and liquids entering the device.
- Should liquids or foreign objects get into the device, remove the mains plug from the power socket immediately. Have the device checked before using it again.
- Do not immerse the microsystem, mains lead or mains plug in water or other liquids.
CD Microsystem
GB
Safety instructions
- Never touch the mains plug with moist hands.
- Never remove the mains plug from the power socket by pulling on the mains lead, but always hold the mains plug itself.
- Never use the mains lead as a carrying handle.
- Only use the microsystem indoors. Never operate it in damp rooms or in the rain.
- Never set up the microsystem in such a way that it can fall into a bath or wash basin.
- Never reach for the microsystem if it has fallen into water. In such cases, always remove the mains plug immediately.

DANGER! Risk of electric shock
- If the mains lead or the device is damaged, immediately pull the mains plug out of the power socket.
- Do not use the device if there is visible damage to the casing or the mains lead.
- It is not permitted to make modifications to the device. Repairs to the casing and mains lead may only be carried out by the service centre. If the mains lead of this device is damaged, it must be replaced by a special power cable that is available from our service centre.
- Only connect the mains lead to a properly installed, easily accessible power socket. The power socket must still be easily accessible after connection.
- Lay all cables in such a way that they do not represent a tripping hazard.
- When setting up the device, make sure that the mains lead is not pinched or squeezed. Keep the mains lead away from hot surfaces and sharp edges.
- To disconnect the device completely from the mains, remove the mains plug from the power socket.
- Disconnect the mains plug from the power socket, ... ... when you are not using the device, ... if you want to clean the device and ... during thunderstorms.
- Never open the casing of the device - it does not contain any parts that require maintenance! When the casing is open, there is danger of death from electric shock.
- The device is not disconnected from the power supply when it is switched off.
-
Disconnect the microsystem immediately from the mains supply,
-
if smoke is given off during operation,
- if there is a smell of burning,
- if the microsystem is giving off unusual noises.
- During repairs, only parts which correspond to the original device data may be used. In this microsystem there are electrical and mechanical parts which are indispensable for protecting against sources of danger.
GB
Safety instructions CD Microsystem
- For the operation of the microsystem you should use only the accessories included in the scope of supply or specified by the manufacturer.

FIRE HAZARD
- Candles and other open flames must be kept away from the product at all times in order to prevent the spread of fire.

INJURY RISK
- Do not use the microsystem in surroundings subject to explosion hazards.
- Use the Bluetooth® function only in locations in which wireless radio transmission is permitted.

DANGER from laser radiation
- The device works with a weak, but sharply focused laser beam. In the case of improper use this beam can be dangerous to the eyes. Under no circumstances should you open the device. Avoid direct irradiation of the eyes during servicing, repair and maintenance if the casing has been opened and safety locking devices have been bridged!

WARNING! Risk of hearing loss
- Listening to music which is too loud via ear or headphones produces excessive sound pressure and can result in loss of hearing. Prevent damage to your health by avoiding listening to high-volume sounds over a prolonged period via headphones and earphones.

DANGER from batteries
- Keep new and old batteries out of the reach of children.
- Batteries can be life-threatening. Therefore you should store batteries and the remote control out of the reach of young children. If a battery has been swallowed, medical assistance must be sought immediately. Otherwise the person who swallowed it may experience serious internal burns within 2 hours, which may prove fatal.
- The battery must not be charged or reactivated by other means, nor may it be dismantled, thrown into a fire or short-circuited.
- Clean the battery and device contacts before you insert the battery.
CD Microsystem
GB
Safety instructions
- There is a danger of explosion if the battery is not correctly replaced. Replace only with the same or an equivalent type.
- When inserting the battery, make sure the polarity is correct (+/-).
- Remove the battery from the remote control if you do not intend to use the remote control for a prolonged period. The battery might leak and damage the remote control.
- If the battery compartment will not close properly, stop using the remote control and keep it away from children.
- Do not subject the battery to extreme conditions, e.g. do not place the remote control on radiators or expose it to direct sunlight. Otherwise there is an increased danger of battery leaking.
- Remove a flat battery immediately from the remote control! There is an increased danger of batteries leaking.
- If battery fluid has leaked out, avoid contact with the skin, eyes and mucous membranes. In the event of contact with the liquid, rinse the affected areas with copious amounts of clean water and consult a doctor immediately.

WARNING! Risk of material damage
- If the device is moved from a cold location to a warm location, condensate may form inside the device. Leave the device switched off for a few hours.
- Place the device on a stable, flat surface.
- Do not move the device during playback. The device or CDs might be damaged.
- Please ensure adequate ventilation around the device. Keep a distance of at least 10 cm on all sides. Do not cover the device (e.g. with magazines, tablecloths, curtains, etc.).
- Set up the device in such a way that it is not exposed to direct sunlight.
- The device is fitted with non-slip plastic feet. As furniture is coated with a variety of different varnishes and acrylics, and treated with different cleaning agents, it cannot be completely ruled out that components are contained in some of these substances that could damage and soften the plastic feet. If necessary, place a non-slip mat under the device.
- Use a soft, dry cloth for cleaning. Do not use any corrosive or abrasive cleaning agents. These could damage the surface of the device.
- Make sure that there is no CD in the CD tray of the microsystem if you move the CD system.
GB
Device overview CD Microsystem
5. DEVICE OVERVIEW
Device - Front
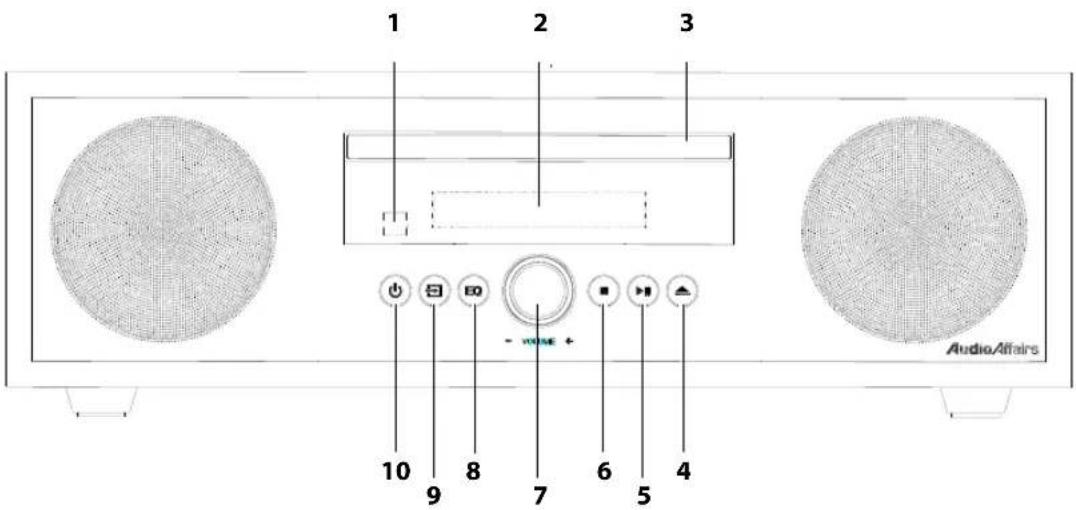
1 Infrared receiver
2 Display
3 CD tray
4 ▲ Open/close the CD tray
5 ▶ Start/Pause
6 Stop during playback from CD or USB in case of Bluetooth: disconnect
7 V O L U M E Volume control
8 E Q Sound characteristics
9 → Operating mode
10 On/Standby
CD Microsystem
GB
Device overview
Device - Rear
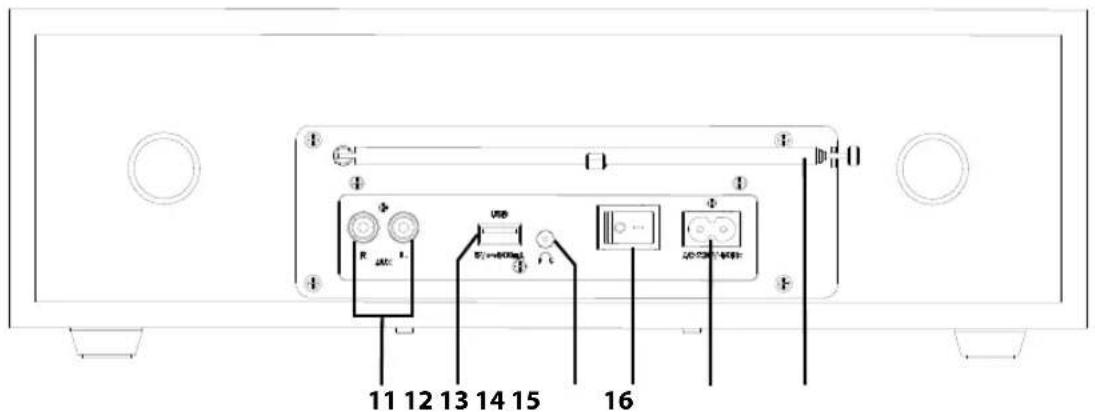
11 AUX (R/L) AUX connection: 2x cinch
12 USB
USB connection
5V 500mA
13
Headphone connection
14 0/I On/off switch (power switch)
15 AC\~ 230V\~50Hz Connection for mains lead
16 Telescope antenna
GB
Device overview CD Microsystem
Remote control
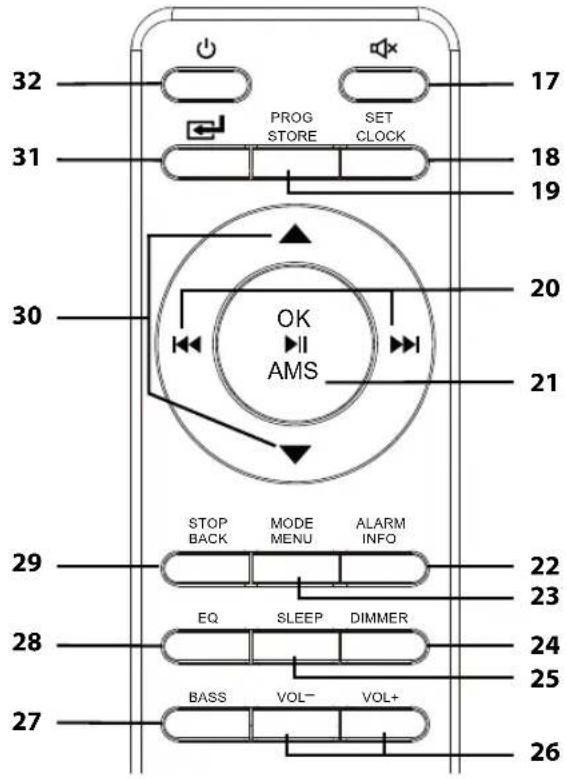
17 Mute on/off
18 SET CLOCK Set and show time
19 PROG STORE Store radio stations
20 backward/forward, e.g. track or station
21 OK▶ii AMS Confirmation // radio: start station scan
22 ALARM Set and switch alarm on/off INFO Show information for various media
23 MODE MENU Call up the menu in the radio mode
24 DIMMER Display brightness
25 SLEEP Set switch-off time
26 VOL-/VOL+ Increase/decrease volume
27 BASS Bass adjustment
28 EQ Sound characteristics
29 STOP BACK Stop playback // back in menu
30 ▲▼ next/previous, e.g. album or saved station or browsing through the menu
31 Operating mode
32 On/Standby
CD Microsystem
GB
Setting up the device
6. SETTING UP THE DEVICE
NOTE:
If you are not careful while opening the packaging with a sharp knife or other pointed objects, the microsystem may be damaged.
- Please be very careful when opening the package.
- Completely remove all packaging components.
- Check whether the delivery is complete and that all parts are undamaged.
- Place the device on a stable, flat surface.
- Do not expose the device to extreme heat or moisture. Ensure that the device is well ventilated on all sides.
7. CONNECTING A SET OF HEADPHONES

WARNING! Listening to music which is too loud via ear or headphones can result in loss of hearing. Prevent damage to your health by avoiding listening to high-volume sounds over a prolonged period via headphones and earphones.
- Use VOLUME or VOL+/VOL- to set the lowest volume.
- Insert the jack plug of the headphones or earphones in the headphones socket on the rear of the device. The sound is now played back only through the headphones.
- Adjust the desired volume with VOLUME or VOL+/VOL-.
GB
Power supply CD Microsystem
8. POWER SUPPLY
Inserting/changing the battery of the remote control

DANGER! There is a danger of explosion if the battery is not correctly replaced. Replace only with the same or an equivalent type.
NOTE: the remote control is supplied with an inserted battery. Pull the plastic strip out of the remote control before using it for the first time. For this, the battery compartment does not have to be removed.
- Insert a coin into the slot of the battery compartment cover and turn it slightly anticlockwise.
- Insert the battery (CR2032 3 V) or replace the old battery with a new one. The positive pole (+) of the battery must point upwards.
- Replace the battery compartment cover in the remote control and turn it slightly clockwise.
Power supply connection
- Connect all devices before you connect the power supply.
- Insert the flat end of the mains plug into the connection AC 230 V \~ 50 Hz on the device.
- Insert the mains plug into a readily accessible power socket whose voltage matches the voltage stated on the rating plate. The power socket must still be easily accessible after connection.
NOTE: to disconnect the device from the mains pull out the mains plug out of the power socket.
CD Microsystem
Starting automatic installation mode
GB
9. STARTING AUTOMATIC INSTALLATION MODE
When you turn on the microsystem for the first time or after it has been disconnected from the mains supply, the automatic installation mode starts. The microsystem automatically stores all radio stations which can be received in FM and DAB and sets the current time by means of the DAB information.
- Position the telescope antenna.
- Turn the on/off switch on the rear of the microsystem to I.
The microsystem is in Standby mode and begins with the automatic installation mode. The word INSTALL appears in the display.
The installation process can last up to 3 minutes.
When the installation has been completed, the microsystem changes to Standby mode.
10. BASIC FUNCTIONS
You can enable or disable the Standby mode of the microsystem using the ⏻ button on the device or remote control.
10.1 SWITCHING THE DEVICE ON/OFF
- Switch the device on using the 0/I power switch (I). The device is in Standby mode.
- Press the ⏻ button to switch on the device from Standby mode. It is in the mode selected last.
- Press the button to switch the device off (Standby mode). The display goes off.
NOTES:
• If you switch off the device using the 0/I power switch (0), all settings will be lost.
- To disconnect the device from the mains pull out the mains plug out of the power socket.
GB
Basic functions CD Microsystem
10.2 SELECTING OPERATING MODE
- By pressing the button, you switch between the individual operating modes. The following operating modes are available:
- FM: FM radio centre
- D A B : Digital radio
- D I S C : CD-Player
- U S B : connected USB stick
- AUX: external device connected via the AUX socket
- B T : Bluetooth
10.3 USING THE REMOTE CONTROL
You can conveniently operate the microsystem with the remote control supplied.
In order to do this, please note the following information:
• To operate the microsystem, point the remote control in its direction.
- Please note that the remote control should be not more than 6 m away from the microsystem if you operate the microsystem with it.
- If there are obstacles between the microsystem and the remote control, this may impair the function of the remote control, i.e. you may not be able to operate any functions. You should therefore make sure that there are no obstacles between the remote control and the microsystem when you use the remote control.
- Other electrical devices or other remote controls which transmit signals by means of infrared radiation may impair the function of the remote control. Similarly, the remote control of the microsystem can impair the function of these other electrical devices or remote controls.
10.4 CONTROLLING THE VOLUME
- Press the VOL+ or VOL− button on the remote control or turn the VOLUME volume control on the microsystem to regulate the volume. The current volume level is shown on the display.
- VOL MIN: sound off
- VOL MAX: maximum volume
10.5 MUTING
- Press the button on the remote control in order to mute the playback. On the display MUTE appears, when the playback is muted.
- Press the button again in order to continue the playback at the previously selected volume. You can also disable the mute function by pressing the VOL+ or VOL- buttons on the remote control or turning the VOLUME volume control.
10.6 ADJUSTING THE TONE QUALITY
Sound characteristics (EQUALIZER)
With the EQ button on the remote control or on the microsystem, you can specify the desired sound characteristics during playback with which music or voice sounds should be reproduced.
- Press the EQ button repeatedly to change between the following sound characteristics:
- POP
- CLASSIC
- J A Z Z
- R O C K
- FLAT (without display)
The selected sound characteristics are shown on the display. If you do not select any of the pre-set sound characteristics, the sounds are played back with an unchanged tone.
Setting the Bass
- During playback, press the BASS button on the remote control repeatedly in order to carry out adjustments to the Bass.
The following briefly appears on the display:
- BASS ON: the bass sounds are raised. Bass is lit continuously at the top of the display.
- BASS OFF: the Bass sounds are played back normally.
10.7 ADJUSTING THE DISPLAY BRIGHTNESS
By repeatedly pressing the DIMMER button on the remote control you can set the brightness of the display in three stages or switch it off completely.
GB
Time, alarm function and snooze function CD Microsystem
11. TIME, ALARM FUNCTION AND SNOOZE FUNCTION
11.1 SETTING THE TIME
NOTE: usually, the time is set via the time signal of a radio station. This will happen several seconds after the setting of the radio station. Only if this is not the case, you will have to set the time as described below.
If the microsystem is in Standby mode, the current time is shown on the display. In order to display the time during playback, press the SET CLOCK button on the remote control: the time is displayed for a few seconds.
Proceed as follows to set the time:
- Turn the microsystem to Standby mode.
- Hold down the SET CLOCK button on the remote control until the hours display flashes.
- Press the ▼/▲ button on the remote control, in order to set the hour.
- Then press the SET CLOCK button on the remote control. The minute indicator flashes.
- Press the ▼/▲ button on the remote control, in order to set the minutes.
- Press the SET CLOCK button, and TS ON or TS OFF will appear on the display.
- Press the ▼/▲ button to switch between the two displays.
- TS ON: the time will continue to be set via a radio signal.
- TS OFF: the time must be set manually.
- Press the SET CLOCK button on the remote control to complete the process. The time is adjusted.
11.2 SETTING THE ALARM TIME
In order to be able to use the alarm function, the time has to be set correctly.
- Turn the microsystem to Standby mode in order to set the time of the alarm. The current time is shown.
- Hold down the ALARM INFO button on the remote control until the hours display flashes. Now on the display either 00:00 or the current alarm time should appear with the 🔔 symbol. The hour indicator flashes.
- Press the ▼/▲ button on the remote control, in order to set the hour.
CD Microsystem
Time, alarm function and snooze function
GB
- Then press the ALARM INFO button on the remote control.
The minute indicator flashes.
-
Press the ▼/▲ button on the remote control, in order to set the minutes.
-
Press the ALARM INFO button on the remote control.
-
Press the ▼/▲ button to select the alarm signal.
You have following selection options:
- FM // DAB // DISC // USB // BUZZER
- Press the ALARM INFO button.
On the display, the volume is shown at which the alarm signal is emitted.
-
Press the ▼/▲ button to adjust the volume.
-
Press the ALARM INFO button to exit the process.
The symbol is shown on the display. This indicates that the alarm function is enabled.
NOTE: if you want to be woken up by CD or USB playback, but these are not available, you will automatically be woken up by the BUZZER.
Show Alarm settings
-
Turn the microsystem to Standby mode in order to set the time of the alarm. The current time is shown.
-
Briefly press the ALARM INFO button. The settings are shown successively.
Switching off the alarm sound
- Press the button to turn off the alarm sound.
11.3 ENABLING AND DISABLING THE ALARM FUNCTION
- If an alarm has already been set, press the ALARM/ INFO button once on the remote control while the microsystem is in Standby mode:
On the display, the alarm details which have been set are displayed one after the other and the alarm function is activated. The 🔔 symbol is displayed.
- Disable the alarm function by pressing the ALARM/ INFO button twice on the remote control while the microsystem is in Standby mode:
The symbol is no longer displayed.
GB
Playback of CD and USB CD Microsystem
11.4 SETTING THE SNOOZE FUNCTION
If you use the snooze function, the microsystem automatically switches to Standby mode after a previously specified period of time.
The microsystem must be switched on for the snooze function to be activated.
Activation in Standby mode is not possible.
- Press the SLEEP button on the remote control repeatedly.
The periods that can be selected appear one after the other on the display. The displayed number shows the number of minutes until the automatic changeover to Standby mode:
- SLEEP 90 / SLEEP 60 / SLEEP 30 / SLEEP 15
As soon as the SLEEP XX display disappears, the selection has been accepted and the snooze function is activated.
- Press the SLEEP button again on the remote control in order to display the remaining time until the automatic change to Standby mode.
- In order to display the remaining time, press SLEEP once briefly. The remaining time is displayed.
- In order to disable the snooze function, press the SLEEP button on the remote control repeatedly until the SLEEP 00 display appears.
The snooze function is deactivated.
12. PLAYBACK OF CD AND USB
The mode has to be adjusted on the microsystem in order to play back music or voice sounds from the desired source device.
When you switch on the microsystem, the last selected source is automatically played back.
12.1 USING CD MODE
If you select CD mode and there is no CD in the CD tray, NO DISC appears on the display.
- Press the Ⓗ button repeatedly on the microsystem or press the CD button on the remote control in order to select CD mode.
DISC is shown on the display.
-
Press the ▲ button on the microsystem, in order to open the CD tray.
-
Insert the CD in the CD tray.
-
Press the ▲ button on the microsystem, in order to close the CD tray.
The number of tracks available on the CD appears on the display.
CD Microsystem
Playback of CD and USB
GB
The playback of the first track begins automatically. Shown is the track number and the remaining time of the currently playing track.
12.2 USING USB MODE
If you select USB mode and no USB stick is connected, NO USB appears on the display.
- Insert a USB stick in the USB connection on the rear of the microsystem.
- Press the ⏻ button repeatedly until USB appears on the display.
12.3 PLAYBACK FUNCTIONS IN CD AND USB MODE
NOTE: for CDs that you have burned yourself the functions may differ.
Starting and stopping playback
| Function Button | |
| Playback | Automatic playback or press OK ▶II AMS |
| Pause | During playback: press OK ▶II AMS |
| Stop playback | During playback: press OK ▶II STOP / BACK |
| Fast forward Hold down ▶I | |
| Fast backward Hold down |◀◀ | |
| Next track (possibly also folder/album) | Press ▶▶I |
| Previous track (possibly also folder/album) | Press I◀◀ twice |
| Beginning of current track | Press I◀◀ |
| Brief display of the total running time | Press INFO |
| Only MP3 playback | |
| Next album Press ▲ | |
| Previous album Press ▼ | |
GB
Establishing a Bluetooth connection CD Microsystem
Playback options
During playback the MODE / MENU button calls up the following functions successively:
| Press MODE / MENU | Function Display | |
| Press once | Play Intro | INTRO appears briefly on the display. The first 10 seconds of each track are played back. |
| Press twice | Repeat track | displayed. Current track is repeated. |
| Press three times | Repeat tracks of entire CD | is displayed. Entire CD is repeated. |
| Press four times | Random play-back | is displayed. |
| Press five times | Return to normal playback | |
13. ESTABLISHING A BLUETOOTH CONNECTION
NOTES:
• After activating the Bluetooth mode, the device will automatically try to reconnect to the most recently paired device or to establish a new connection. This requires both devices to be turned on with Bluetooth mode activated and both devices must be within range.
• The name of the device is MCD 010.
- Activate the Bluetooth connection of the media playback device. The media play-back device will now search for devices to which it can connect.
- Turn on the microsystem.
- Press the ☐ button repeatedly until BT appears in the centre of the display. On the left side of the display BT flashes.
- The media playback device should now be receiving the device code MCD 010. Select the device code on the media playback device to connect it with the microsystem. You will hear a brief sound sequence. On the left side of the microsystem display BT is lit. The two devices are now connected with one another.
CD Microsystem
Establishing a Bluetooth connection
GB
-
Now use the media playback device to start playback of a music track. The sound will be played back via the microsystem. The playback is controlled using the media playback device, but the volume can also be adjusted at the microsystem. NOTE: some media playback devices can also be controlled via the remote control of the microsystem. Functions like Play/Pause and next or previous track can be controlled.
-
You can end the connection by ...
-
switching off the Bluetooth function on the media playback device,
- selecting a different playback mode,
- switching the microsystem to Standby mode,
- moving out of reception range.
NOTES:
- If you are asked to enter a code when pairing, use "0000". Enter this code using the media playback device.
- If the playback is distorted, this may be because the volume level on the media playback device is set too high. Turn down the volume on the media playback device and instead increase the volume on the microsystem.
- It may be the case that not all Bluetooth devices can be connected.
Operation via Bluetooth
NOTE: it is possible that some devices will not support being remotely controlled by the microsystem.
GB
Establishing a Bluetooth connection CD Microsystem
Settings via the remote control of the microsystem
| Function Button | |
| Playback | Automatic playback or press OK ▶II AMS |
| Pause | During playback: press OK ▶II AMS |
| Next track Press ▶I | |
| Previous track Press I◀◀ twice | |
| Beginning of current track | Press I◀◀ |
| Disconnecting when in Bluetooth mode | Hold down the STOP BACK button until a brief acoustic signal can be heard and BT flashes on the left side of the display |
Accepting incoming calls
- An incoming call during playback will automatically reduce the volume and the telephone call signal will sound.
- Answer the call as you would usually do. The call will use the telephone for the sound.
- When you are finished, hang up as you would usually do. The microsystem will resume playback after a few seconds.
Connecting an additional Bluetooth device
If you want to connect a different playback device via Bluetooth the existing connection must first be disconnected.
- Hold down the ■ button at the microsystem until you hear a brief acoustic signal and BT flashes on the left side of the display. Now the device can establish a new connection.
- Connect the new device as described above.
14. RADIO
14.1 FM RADIO
Switching between stereo and mono
- Turn the radio on.
- Press the MODE / MENU button. SCAN or FULL SCAN appears on the display.
- Press the ▲ or ▼ button until AUDIO appears on the display.
- Press the OK ▶II AMS button on the remote control.
- Use the ▲ / ▼ button to switch between STEREO and MONO.
To save the setting, press the OK ▶II AMS button on the remote control.
Telescope antenna
The telescope antenna is required to properly receive FM radio stations.
- Fold out the telescope antenna a little.
- Extend the antenna completely.
- Align it only when receiving a radio station. Try out different positions in order to find the optimum reception quality.
Accessing saved stations
- Press the ▲ or ▼ button on the remote control to switch between the stored stations.
Setting the stations
- Hold down the ▶▶1 or ◀◀ button on the remote control until the frequency display changes.
The automatic station scan runs until the first radio station with a sufficiently strong signal is found. This station will then be played. - In order to change the frequency manually in 0.05 MHz steps, press the ▶▶▶ or ◀◀◀ button briefly on the remote control or on the microsystem.
If reception is poor
If the reception of the desired radio station is poor, try out the following options in order to improve it:
• Realign the telescope antenna.
- Choose a different location for the microsystem if necessary.
GB
Radio CD Microsystem
Storing the stations automatically
- Hold down the OK▶II AMS button on the remote control until the frequency display changes. The automatic station scan is started. The first 30 available radio stations are stored sequentially. After the completion of the automatic station scan, the first radio station found is automatically played back.
Existing programme channels are overwritten.
Storing the stations manually
- Tune in to the desired radio station.
- Press the PROG / STORE button on the remote control.
- Use the ▲ or ▼ button on the remote control to select the storage location for the radio station.
- Press the OK ▶II AMS button on the remote control to confirm the selection.
- Repeat steps 1. to 4. to store further stations.
Displaying RDS information
RDS (Radio Data System) is a service which enables radio stations to transmit additional information. If you tune into a radio station which uses the RDS signal the name of the station appears on the display, for example.
During the automatic station scan, radio stations which transmit an RDS signal are listed first.
- Select a radio station.
Please note that not every radio station transmits an RDS signal. - Press the INFO button on the remote control in order to select the RDS function which is to be shown on the display:
If you have selected a radio station which does not transmit an RDS signal NO RDS appears on the display.
Not every radio station which transmits an RDS signal displays all of the (PTY, CLOCK INFO, FREQUENZ, RADIO TEXT) information.
15. DAB RADIO
15.1 SETTING THE STATIONS
Initial activation
- Once the display shows DAB, the device will do one of the following two things automatically:
- When switching the device on for the first time, or after the device was reset to factory settings, the device will perform an automatic scan for DAB radio stations.
- The most recently selected station will be played.
Accessing DAB radio stations
- Use ▶▶▶ I or ◀◀◀ to select a station and press OK ▶▶II AMS on the remote control to play the station.
Selecting and playing DAB stations
You can store up to 30 radio stations.
- Activate the station you want to store.
- Press the PROG / STORE button on the remote control.
- Now, use ▲▼ to select the storage location for this station and press OK▶II AMS. STORED appears on the display. The station is now stored to this storage location.
Accessing a stored DAB station
- Use ▲▼ to select the storage location of the requested station and press OK. Now the station is played.
Automatic station scan
The device will scan for DAB radio stations automatically after being switched on for the first time. You should run a new station scan if the station frequencies have changed or the device is used in a different place (relocation).
- Press the OK▶II AMS button on the remote control until SCAN appears on the display. The number of stations found appears on the right side of the display. When the station scan is completed, the device will play one of the stations saved.
GB
DAB radio CD Microsystem
Manual station scan
Usually, there is no need to manually search for stations, since all available stations are already found during the automatic search.
- Turn on the DAB radio.
- Press the MODE / MENU button.
- Press the ▲ or ▼ button until MANUAL appears on the display.
- Press the OK ▶II AMS button on the remote control.
- Using ▲▼ browse until the requested multiplex block appears.
- Press the OK ▶ II AMS button to activate the selected multiplex block.
15.2 BROWSING STATION INFORMATION
Additional station information is shown in the display. This information is transmitted by the radio stations. The information may be different from station to station.
- Press INFO to change the information. The following information is shown, such as type of programme, the multiplex name, artist and track.
15.3 ADDITIONAL DAB FUNCTIONS
-
PRUNE: the function deletes stations from the station list, which can no longer be received. This can be useful when you move or a station has gone off air.
• DRC: the DRC function ensures that quiet passages are reproduced a little louder. -
Turn on the DAB radio.
-
Press the MODE / MENU button.
-
Press the ▲ or ▼ button until DRC or PRUNE appears on the display.
-
Press the OK▶II AMS button on the remote control.
-
Proceed as follows:
-
For PRUNE you use ▲▼ to switch between Y and N.
-
For DRC you use ▲▼ to switch between DRC HIGH, DRC LOW and DRC OFF.
-
Press the OK ▶ II AMS button to store the selection.
16. AUX-CONNECTION
WARNING!
- Turn down the volume on the devices before you connect them to one another.
- Switch off all devices before you connect them to one another, and comply with the instructions for the devices that you wish to connect.
Via both R AUX L sockets you can use a suitable cinch cable and possibly an adapter to connect external source devices to the microsystem. In this way you can listen to music or voice sounds from an external source device through the integrated loudspeakers of the microsystem.
- Use an audio cable with two cinch plugs (not included in the scope of supply) to connect a television set, MP3 player or smartphone to the microsystem, for example. For smartphones and similar devices you need an adapter from cinch to jack.
- When selecting the connection cable, please note the connection options on the external source device.
• The volume can be controlled both on the external source device and through the microsystem. -
Switch off both devices before disconnecting.
-
Make sure that the microsystem is connected by means of a cinch cable, possibly with an adapter (not included in the scope of supply), to a television set/smartphone or another external source device.
- Press the button repeatedly to select the AUX mode. The word AUX is shown on the display.
- Carry out the settings such as start or stop directly on the external source device.
NOTE: if the playback is distorted, this may be because the volume level on the external device is set too high. Turn down the volume on the external device and instead increase the volume on the microsystem.
GB
Special functions CD Microsystem
17. SPECIAL FUNCTIONS
17.1 FACTORY SETTINGS
- Turn the radio on.
Press the MODE / MENU button. SCAN or FULL SCAN appears on the display. - Press the ▲ or ▼ button until SYSTEM appears on the display.
- Press the OK ▶ II AMS button on the remote control.
- Press the ▲ or ▼ button until RESET appears on the display.
- Press the button OK ▶II AMS. N flashes on the display.
- Use the ▲ / ▼ button to switch between Y and N:
- Y = perform reset
- N = no reset
- Press the button OK ▶ II AMS.
17.2 SOFTWARE VERSION
- Turn the radio on.
- Press the MODE / MENU button. SCAN or FULL SCAN appears on the display.
- Press the ▲ or ▼ button until SYSTEM appears on the display.
- Press the OK ▶II AMS button on the remote control.
- Press the ▲ or ▼ button until SW VER appears on the display.
- Press the button OK ▶II AMS. The display will show the software version.
- Use the ▲ / ▼ button to switch between Y and N:
- Press the BACK / STOP button to return to the menu.
18. TROUBLESHOOTING
If your device fails to function as required, please try this checklist first. Perhaps it is just a small problem that you can resolve yourself.

DANGER! Do not attempt to repair the device yourself under any circumstances. If you cannot resolve the fault, please contact our service centre.
| Fault Possible causes / action to be taken | |
| The microsystem cannot be switched on. | - Make sure that the mains plug is in the power socket.- Check that the plug of the device is correctly inserted in its connection socket on the rear of the microsystem.- Make sure that the on/off switch on the rear of the microsystem is turned to I. |
| The microsystem does not respond to the remote control. | - Make sure that the battery is correctly inserted in the remote control and fully charged.- Make sure that the remote control is not further than 6 m from the microsystem during operation. Reduce the distance if necessary.- Remove any obstacles between the remote control and microsystem. |
| The external Bluetooth® device does not show the microsystem. | - Make sure that the Bluetooth® function on both devices is activated.- Is the microsystem still connected to another Bluetooth device?- Are the devices not within range? |
| A CD is not being played back. | - Make sure that you have inserted the CD correctly and the right way round in the CD tray (see section „Using CD mode“).- Make sure that the CD is undamaged.- CDs that you have burned yourself: make sure that the audio files on the CD have the correct format (see section „Technical data“). |
| The USB stick is not being read. | - Make sure that the maximum storage capacity of the USB stick is not exceeded.- Make sure that the audio files on the USB stick have the correct format (see section „Technical data“). |
GB
Disposal CD Microsystem
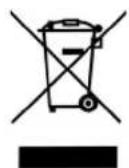
19. DISPOSAL
Old devices and batteries must not be disposed of in the normal domestic waste.
Keep the packaging if possible until the expiration of the warranty period. After that, please dispose of it in an environmentally friendly manner.
The device must be disposed of at a proper waste disposal facility, in accordance with the Waste Electrical & Electronic Equipment Directive 2012/19/EU. Plastics and electronic parts must be recycled.
Check with your local waste disposal company or authority.
Used batteries must be disposed of properly. For this purpose, retailers selling batteries and the municipal waste collection points provide containers for disposing of batteries.
As a consumer, you are legally obliged to return standard and rechargeable batteries to a collection point in your municipality, neighbourhood or to the retail trade.
Only in this way is it possible to dispose of standard and rechargeable batteries in a manner which is environmentally-friendly. Standard and rechargeable batteries which are marked with the letters listed contain the following harmful substances, among others: Cd (cadmium), Hg (mercury), Pb (lead).
20. CLEANING AND STORAGE

DANGER! Disconnect the device from the power supply before cleaning. Ensure that no liquid gets into the device.
CAUTION: solvents, alcohol, thinning agents, corrosive or abrasive cleaning agents must not be used, since they may damage the surface of the device.
Cleaning the casing
Clean the casing with a damp cloth.
Storage
- Store the microsystem in a clean location which is protected against moisture.
21. TECHNICAL DATA
| Electrical data | |
| Mains voltage: 230 V ~ 50 Hz | |
| Protection class: II | ☐ |
| Power consumption: In Standby mode: | Maximum approx. 50 W< 0.9 W |
| Sound | |
| Audio output port: 2x 15 W | |
| System | |
| supported audio formats: Audio CD, MP3 | |
| VHF (FM): 87.5 - 108 MHz | |
| DAB radio: 174 - 240 MHz | |
| CD scanning system: Class 1 laser | |
| Connections | |
| USB:AUX (R/L):Bluetooth:Set of headphones: | USB 2.0 (max. 32 GB - FAT or FAT32) up to 4000 files in 9 subfolders2x cinch3.0 + A2DP3.5 jack |
| Remote control | |
| Battery: 1x CR2032 3V | |
| LED class: RG0 | |
| Range: | approx. 6 m |
| General | |
| Dimensions (W x D xH): | approx. 376 x 240 x 120 mm |
| Ambient conditions: | Operating temperature: 5 °C – 35 °C |
| Weight: | approx. 3170 g |
Specifications subject to change without notice.
GB
Hotline CD Microsystem
22. HOTLINE
If a technical problem occurs, please contact our hotline, as most errors can be corrected by this method without having to send in the device for repair.
If it is determined during the call that the device is actually defective, you will be asked to send us the device for repair, together with an exact description of the fault.
In this event, please include the fully completed Service Card (from the end of these instructions) and a copy of the proof of purchase.
Please note that you will be invoiced for unjustified complaints!
Thank you very much
Hotline:
00800 - 45622000 (free call)
free of charge - 365 days per year -
from Monday to Sunday
Email:
gt-support-gb@telemarcom.de
gt-support-ie@telemarcom.de
CD Microsystem
GB
Hotline
GB
Warranty CD Microsystem
23. WARRANTY
Dear Customer,
Thank you for selecting a product from our company. Our product corresponds to the legal requirements, and was manufactured with continuous quality control. The technical data correspond to the current state of the art at the time of printing. Specifications are subject to change without notice.
The warranty period for electronic devices corresponds to the statutory provisions at the time of purchase.
If a technical problem should unexpectedly occur with the device, please note the following points:
The guarantee and warranty period for your device are valid for 24 months after the purchase date. Please retain the proof of purchase for this purpose.
The guarantee and warranty relate only to defects that are attributable to manufacturing or material faults.
No guarantee or warranty can be accepted for damage caused by improper handling or improper interventions or for damage resulting from a lightning strike, overvoltage, power failures, fire or any other natural catastrophes. If the device should nevertheless be repaired, you will be given a cost estimate.
The guarantee and warranty also expire if the product has been modified or repaired by an unauthorised person, the serial number of the product has been changed or removed, the product has been / is used outside the scope of its intended use or if the warranty period has expired.
Please always retain the proof of purchase and the original packaging. If your product needs to be returned to the service centre and you do not have sufficient transport packaging, this can be sent to you for a charge.
If a technical problem occurs, please contact our hotline. If a technical problem occurs, please contact our hotline.
Within the framework of the warranty, we retain the right to repair the device or to replace it with a comparable device.
This guarantee does not restrict your statutory rights.


Warranty CD Microsystem
SERVICE CARD
Product data:
Model
Serial number
Date of purchase (as shown on enclosed receipt)
Owner data:
Name ____
Telephone number
Address
Email ____
Description of fault:


20095 Hamburg | Germany
www.gt-support.de


- CD Microsystem
- THANK YOU FOR YOUR TRUST!
- GENERAL
- Retaining the manual
- Intended purpose
- This device is...
- Markings/symbols
- Notes on the declaration of conformity
- Saving energy: fully automatic!
- NOTE: new automatic shutdown system!
- Rating plate
- SCOPE OF SUPPLY
- SAFETY INSTRUCTIONS
- DANGER for children and people with disabilities
- DANGER! Risk of electric shock due to moisture
- DANGER! Risk of electric shock
- FIRE HAZARD
- INJURY RISK
- DANGER from laser radiation
- WARNING! Risk of hearing loss
- DANGER from batteries
- WARNING! Risk of material damage
- DEVICE OVERVIEW
- SETTING UP THE DEVICE
- NOTE:
- CONNECTING A SET OF HEADPHONES
- POWER SUPPLY
- Inserting/changing the battery of the remote control
- Power supply connection
- STARTING AUTOMATIC INSTALLATION MODE
- BASIC FUNCTIONS
- SWITCHING THE DEVICE ON/OFF
- NOTES:
- SELECTING OPERATING MODE
- USING THE REMOTE CONTROL
- CONTROLLING THE VOLUME
- MUTING
- ADJUSTING THE TONE QUALITY
- Sound characteristics (EQUALIZER)
- Setting the Bass
- ADJUSTING THE DISPLAY BRIGHTNESS
- TIME, ALARM FUNCTION AND SNOOZE FUNCTION
- SETTING THE TIME
- SETTING THE ALARM TIME
- Show Alarm settings
- Switching off the alarm sound
- ENABLING AND DISABLING THE ALARM FUNCTION
- SETTING THE SNOOZE FUNCTION
- PLAYBACK OF CD AND USB
- USING CD MODE
- USING USB MODE
- PLAYBACK FUNCTIONS IN CD AND USB MODE
- Playback options
- ESTABLISHING A BLUETOOTH CONNECTION
- Establishing a Bluetooth connection
- Operation via Bluetooth
- Settings via the remote control of the microsystem
- Accepting incoming calls
- Connecting an additional Bluetooth device
- RADIO
- FM RADIO
- Switching between stereo and mono
- Telescope antenna
- Accessing saved stations
- Setting the stations
- If reception is poor
- Storing the stations automatically
- Storing the stations manually
- Displaying RDS information
- DAB RADIO
- SETTING THE STATIONS
- Initial activation
- Accessing DAB radio stations
- Selecting and playing DAB stations
- Accessing a stored DAB station
- Automatic station scan
- Manual station scan
- BROWSING STATION INFORMATION
- ADDITIONAL DAB FUNCTIONS
- AUX-CONNECTION
- WARNING!
- SPECIAL FUNCTIONS
- FACTORY SETTINGS
- SOFTWARE VERSION
- TROUBLESHOOTING
- DISPOSAL
- CLEANING AND STORAGE
- Cleaning the casing
- Storage
- TECHNICAL DATA
- HOTLINE
- Hotline:
- Email:
- WARRANTY
- SERVICE CARD
- Product data:
- Owner data:
- Description of fault:
Brand : AudioAffairs
Model : MCD 010
Category : Hi-Fi System