
Artisan Series 12” x 16” Smokeless Grill & Griddle - Grill plate CRUX - Free user manual and instructions
Find the device manual for free Artisan Series 12” x 16” Smokeless Grill & Griddle CRUX in PDF.


User questions about Artisan Series 12” x 16” Smokeless Grill & Griddle CRUX
0 question about this device. Answer the ones you know or ask your own.
Ask a new question about this device
Download the instructions for your Grill plate in PDF format for free! Find your manual Artisan Series 12” x 16” Smokeless Grill & Griddle - CRUX and take your electronic device back in hand. On this page are published all the documents necessary for the use of your device. Artisan Series 12” x 16” Smokeless Grill & Griddle by CRUX.
USER MANUAL Artisan Series 12” x 16” Smokeless Grill & Griddle CRUX
Register your product and get support

Contents
Índice
Table des matieres
Table of Contents
Important Safeguards. 2
Additional Important Safeguards 3
Notes On The Plug 3
Notes On The Cord 3
Plasticizer Warning 3
Electric Power 4
Getting To Know Your 12" X 16" Smokeless Grill & Griddle. 4
Temperature Control Probe 4
Before Using For The First Time 5
Operating Instructions 5
Time/Temperature Chart. 6
Usda Cooking Guidelines 6
User Maintenance Instructions.. 6
Care & Cleaning Instructions 6
Hints For Care And Use Of Non-Stick Surface 7
Steps For Stain Removal And Proper Care Of Your Non-Stick Coating 7
Recipe Guide. 8-9
Warranty 10
Indice
When using electrical appliances, basic safety precautions should always be followed, including the following:
- READ ALL INSTRUCTIONS.
- Do not touch hot surfaces. Use handles or knobs. Use oven mitts or potholders.
- To protect against electrical shock, do not immerse cord or plugs or temperature control probe in water or other liquid.
- This appliance is not intended for use by persons (including children) with reduced physical, sensory or mental capabilities, or lack of experience and knowledge, unless they have been given supervision or instruction concerning use of the appliance by a person responsible for their safety.
- Close supervision is necessary when any appliance is used by or near children.
- Turn unit Off and unplug from outlet when not in use and before cleaning. Allow to cool before putting on or taking off parts, and before cleaning the appliance.
- Do not operate any appliance with a damaged cord or plug or after the appliance malfunctions, or has been damaged in any manner. Return appliance to the nearest authorized service facility for examination, repair or adjustment.
- The use of accessory attachments not recommended by the appliance manufacturer may cause injuries.
- Do not use outdoors.
- Do not let cord hang over the edge of table or counter, or touch hot surfaces.
- Do not place on or near a hot gas or electric burner, or in a heated oven.
- Extreme caution must be used when moving an appliance containing hot oil or other hot liquids.
- Always attach temperature control probe to appliance first, then plug cord in the wall outlet. To disconnect, turn temperature control probe to OFF, then remove plug from wall outlet.
- Do not use appliance for other than intended use.
FOR HOUSEHOLD USE ONLY SAVE THESE INSTRUCTIONS
ADDITIONAL IMPORTANT SAFEGUARDS
CAUTION HOT SURFACES: This appliance generates heat and escaping steam during use. Proper precautions must be taken to prevent the risk of burns, fires or other injury to persons or damage to property.
CAUTION: This appliance is hot during operation and retains heat for some time after turning OFF. Always use oven mitts when handling hot materials and allow metal parts to cool before cleaning. Do not place anything on top of the appliance while it is operating or while it is hot.
- All users of this appliance must read and understand this Instruction Manual before operating or cleaning this appliance.
- The cord to this appliance should be plugged into a 120 V AC electrical outlet only.
- If this appliance begins to malfunction during use, turn unit Off and immediately unplug the cord. Then remove the temperature control probe. Do not use or attempt to repair the malfunctioning appliance.
- Do not leave this appliance unattended during use.
- To prevent fire hazards; the Grill or Griddle plate must be placed in the proper position when plugged in.
- WARNING: To prevent personal injury or property damage, the drip pan must be in place during cooking.
NOTES ON THE PLUG
This appliance is equipped with a grounded-type 3-wire cord (3-prong plug). This plug will only fit into an electrical outlet made for a 3-prong plug. This is a safety feature. If the plug should fail to fit the outlet, contact an electrician to replace the obsolete outlet. Do not attempt to defeat this safety feature.
NOTES ON THE CORD
a) A short power-supply cord (or detachable power-supply cord) is to be provided to reduce risks resulting from becoming entangled in or tripping over a longer cord.
b) Longer detachable power-supply cords or extension cords are available and may be used if care is exercised in their use.
c) If a long detachable power-supply cord or extension cord is used:
1) The marked electrical rating of the detachable power-supply cord or extension cord should be at least as great as the electrical rating of the appliance:
2) If the appliance is of the grounded type, the extension cord should be a grounding-type 3-wire cord:
3) The longer cord should be arranged so that it will not drape over the counter top or table top where it can be pulled on by children or tripped over unintentionally.
Plasticizer Warning
CAUTION: To prevent Plasticizers from migrating to the finish of the counter top or table top or other furniture, place NON-PLASTIC coasters or plac mats between the appliance and the finish of the counter top or table top. Failure to do so may cause the finish to darken; permanent blemishes may occur or stains can appear.
Electric Power
If the electrical circuit is overloaded with other appliances, your appliance may not operate properly. It should be operated on a separate electrical circuit from other appliances.
GETTING TO KNOW YOUR 12" X 16" SMOKELESS GRILL & GRIDDLE
Product may vary slightly from illustrations
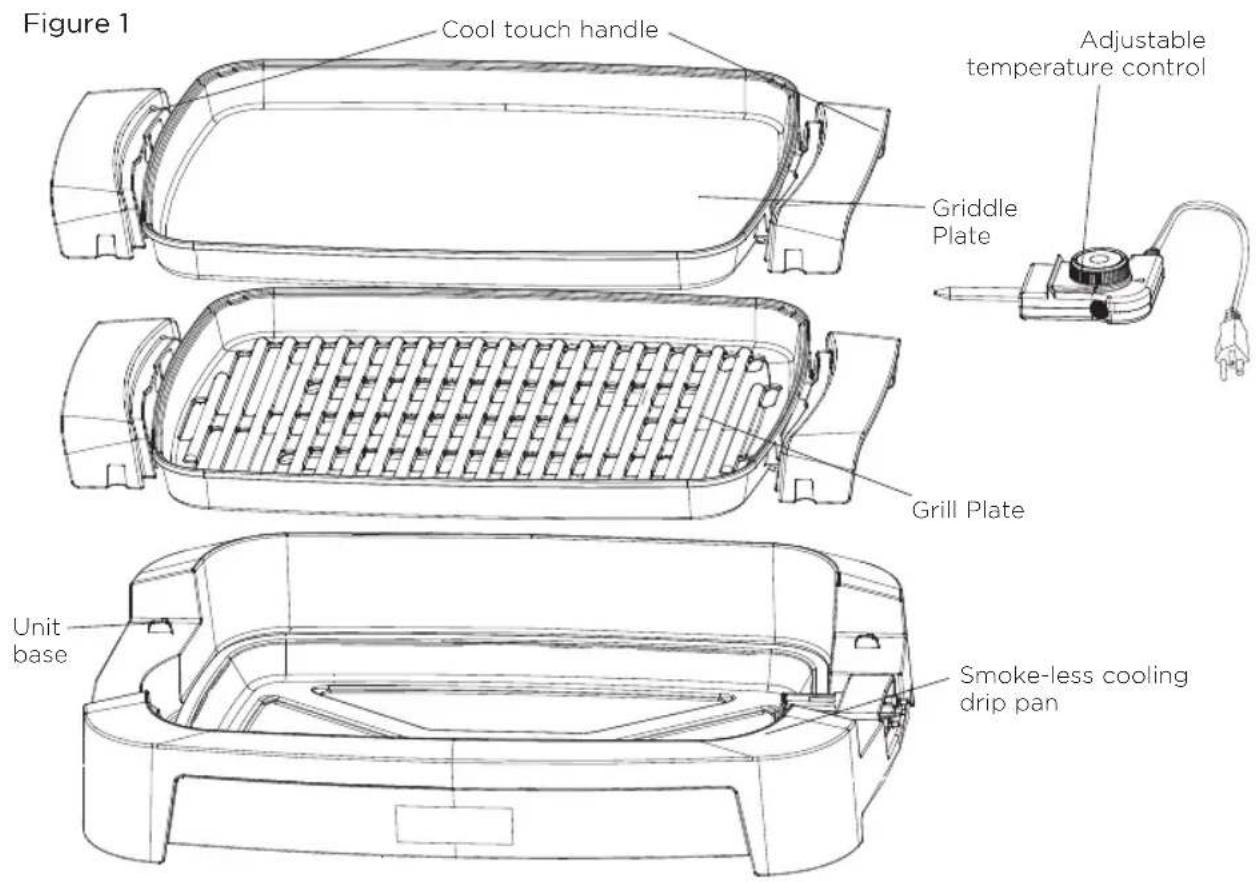
TEMPERATURE CONTROL PROBE
- The temperature control probe is the nerve center and brain of the appliance. Treat it carefully. Dropping or banging it could change its calibration and make the temperature settings inaccurate.
- Rotate the dial to select the temperature as called for in the recipe.
- The indicator light on the temperature control probe will illuminate as soon as the dial is rotated. The light will go out once the selected temperature has been reached.
- Allow the smokeless Grill or Griddle to cool before removing the temperature control probe.
- To clean the temperature control probe, simply wipe down with a soft, damp cloth. Make sure you dry it thoroughly before using again.
NOTE: The temperature control probe is not submersible.
CAUTION: Use the temperature control probe supplied with this appliance only. The use of any other temperature control probe may cause fire, electric shock, or injury.
BEFORE USING FOR THE FIRST TIME
- Carefully unpack the 12'' × 16'' Smokeless Grill & Griddle and remove all packaging materials.
- Place the unit on a clean, flat working surface.
NOTE: Some countertop and table surfaces, such as Corian® and other surfaces, are not designed to withstand the prolonged heat generated by this Grill or Griddle. We recommend placing a hot pad or trivet under the unit beforehand to avoid possible damage to the surface. Be sure the sides and back of the unit are at least 4 inches away from any walls, cabinets, or objects on the counter or table.
- Before first use, see Hints For Care and Use of Non-Stick Surface and Care & Cleaning Instructions sections of this Instruction Manual.
- Before cooking in the 12^ × 16^ Smokeless Grill & Griddle for the first time, wash the non-stick cooking plates in mild dishwashing soap, wipe and allow to dry.
- Place the drip pan inside the unit base and place the Grill or Griddle plate over in a way that it locks in place between the gaps. Add water to the drip tray up to the max line.
- Turn the temperature control knob on probe to OFF position and attach securely in place.
- Coat the non-stick surface with vegetable shortening before heating. If necessary, remove excess oil with paper towel.
OPERATING INSTRUCTIONS
- Place the drip pan inside the base and place the grill or griddle plate over in a way that it locks in place between the gaps. Add water to the drip tray up to the max line.
- Turn temperature control probe to the OFF position.
- Plug the temperature control probe securely into unit's control probe socket.
- Plug cord into any standard 120 V AC wall outlet.
IMPORTANT: ALWAYS PLUG CORD INTO SMOKELESS GRILL & GRIDDLE FIRST, THEN INTO WALL OUTLET.
- Preheat the unit for approximately 10 minutes before cooking. To preheat, turn the temperature control to desired temperature. The indicator light on the temperature control probe will illuminate as soon as the dial is rotated. The light will go out once the selected temperature has been reached.
- Add food and cook according to the recipe. Adjust temperature control dial from 200^ to 400^ as necessary.
NOTE: During cooking, the light will go on and off indicating that the unit is maintaining proper temperature.
CAUTION: Cooking surfaces are hot during use.
CAUTION: DO NOT USE COOKING SPRAYS. THEY CAN CAUSE A BUILD-UP ON THE COOKING PLATES AND MAY AFFECT THE NON-STICK PERFORMANCE OF THE PRODUCT.
- When cooking has been completed, turn the temperature control to the OFF position. The indicator light on the temperature control probe will turn off.
- Unplug cord from wall outlet. Let the unit cool completely.
- Remove temperature control probe from the unit. Follow the Care & Cleaning Instructions described in this Instruction Manual.
TIME/TEMPERATURE CHART
| FOOD | TEMPERATURE | TIME DIRECTIONS | |
| Chicken | 350° F | 20-25 minutes | Rotate halfway into cooking time |
| Bacon 325° - 350° F 8-14 minutes | Set to appropriate temperature - turn as required | ||
| Sausage 325° - 350° F 20-30 minutes | Set to appropriate temperature - turn as required | ||
| French Toast | 350° F | 6-10 minutes | Rotate halfway into cooking time |
| Hamburger | 350° F | 3-14 minutes | Rotate halfway into cooking time |
| Ham Slices 350° F 14-18 minutes | Rotate halfway into cooking time | ||
| Sandwiches | 350° F | 6-10 minutes | Butter outside and brown both sides |
| Pork Chops | 350° F 20-30 minutes | Brown both sides then reduce temperature to 325° F. Rotate halfway into cooking time | |
| Steaks | 400° F - Rare 400° F - Medium 400° F - Well | 4-6 minutes7-12 minutes13-18 minutes | Rotate halfway into cooking time |
USDA COOKING GUIDELINES
NOTE: The United States Department of Agriculture recommends that meat and poultry be cooked to the following internal temperatures to be sure any harmful bacteria has been killed. Ground turkey and chicken should be cooked to an internal temperature of 165^ / 74^ and ground beef, veal, lamb and pork be cooked to an internal temperature 160^ / 71^ . Whole chicken and turkey should be cooked to an internal temperature of 180^ / 82^ ; 170^ / 77^ for the breast. Goose and duck should be cooked to an internal temperature of 180^ / 82^ . Fresh beef, veal and lamb, etc., should be cooked to an internal temperature of at least 145^ / 63^ . Fresh pork should be cooked to an internal temperature of at least 160^ / 71^ . When re-heating meat and poultry products, they should also be cooked to an internal temperature of 165^ / 74^ .
USER MAINTENANCE INSTRUCTIONS
This appliance requires little maintenance. It contains no user serviceable parts. Do not try to repair it yourself. Any servicing requiring disassembly other than cleaning must be performed by a qualified appliance repair technician.
CARE & CLEANING INSTRUCTIONS
CAUTION: Do not immerse the cord, plug or temperature control probe in water or any other liquid.
CAUTION: To avoid accidental burns, allow cooking plates to cool thoroughly before cleaning.
- When cooking is completed, turn unit Off and unplug cord from wall outlet. Allow unit to cool.
- Remove temperature control probe from the unit.
CAUTION: The probe may become hot after use. Allow to cool before handling.
- If necessary, wipe temperature control case and probe with a damp, soft cloth. Dry temperature control probe completely. Set aside.
CAUTION: The temperature control probe is not submersible.
- Remove drip tray; empty contents. Wash Grill or Griddle plate and drip tray in soapy water; rinse and dry thoroughly.
CAUTION: the content in the drip tray may become hot. Allow the drip tray and the content to cool before removing it from the unit for cleaning.
- To wash by hand, wash grill or Griddle plate with hot soapy water. Dry with towel.
CAUTION: Probe and probe receptacle must be completely dry before use. - For stubborn food particles, loosen with a plastic cleaning pad. Avoid hard scouring on the non-stick finish as this may cause surface scratches. Do not use steel wool, scouring pads, or abrasive cleaners on any part of the unit. Clean this unit after each use.
HINTS FOR CARE AND USE OF NON-STICK SURFACE
- To avoid scratching the non-stick surface, do not stack objects on the Grill or Griddle cooking plates.
CAUTION: DO NOT USE COOKING SPRAYS. THEY CAN CAUSE A BUILD-UP ON THE COOKING
PLATES AND MAY AFFECT THE NON-STICK PERFORMANCE OF THE PRODUCT.
- Use medium to low heat for best cooking results. Very high temperatures can cause discoloration and shorten the life span of any non-stick surface. If higher temperatures are necessary, preheat on medium heat for a few minutes.
- For best results and preserve the non-stick coating longer, use nylon, plastic, wooden or rubber utensils. Never cut food on the cooking surfaces.
- Remove stubborn stains with a plastic scouring pad and mild dish washing liquid; DO NOT USE STEEL WOOL as it will damage the non-stick surface of the cooking plates.
- The Grill or Griddle plates are dishwasher safe. For best results, place in the top rack of your dishwasher to clean.
STEPS FOR STAIN REMOVAL AND PROPER CARE OF YOUR NON-STICK COATING
- Identify stained areas on the cooking surface and sprinkle some baking soda on the stains.
- Moisten the baking soda to get a paste like texture by adding some water.
- Let the paste stand for a few minutes on the stains (not more than an hour).
- Rub with a soft damp cloth or lightly scrub with a plastic scouring pad, wipe clean and dry thoroughly.
NOTE: Do not rub vigorously when using a plastic scouring pad and NEVER use a metal scouring pad as this may damage the non-stick coating.
- Repeat the cycle once again if necessary. The performance and non-stick property of the non-stick coating will not be affected due to stains.
Recipes
Grilled Corn with Chipotle and Lime Aioli
Servings: 5
Prep time: 5 minutes / Cook time: 15 minutes
5 ears of corn
1 chipotle pepper in adobo sauce, minced
2 cups mayonnaise
1/4 teaspoon ground cumin
Juice of 1 lime
2 tablespoons butter, melted
1/2 jalapeño, seeded and minced
Salt and pepper to taste
2 garlic cloves, minced
- Preheat the Smokeless Grill. Turn the dial to 400F to preheat.
- Brush the ears of corn with butter and place on the grill. Grill for 15 minutes, turning every 5 minutes.
- Add 1 cup of mayonnaise, the juice of one lime, and the minced jalapeño to a small bowl. Add salt and pepper to taste and mix well.
- Add the remaining cup of mayonnaise to another small bowl with the minced chipotle and the ground cumin. Add salt and pepper and mix well.
- Serve the grilled corn with both aioli and wedges of lime on the side.
Grilled Chicken, Avocado and Asparagus Power Bowl
Servings 2
Prep time: 5 minutes / Cook time: 30 min
2 avocados, halved
3 tablespoons extra virgin olive oil
2 chicken breasts
1 honey
10-12 asparagus spears
1/2 teaspoon Dijon mustard
5 cups baby spinach
1/2 teaspoon garlic powder
2 tablespoons flax seeds
Salt and pepper to taste
3 tablespoons balsamic vinegar
- Preheat the Smokeless Grill. Turn the dial to 350F to preheat.
- Add the balsamic vinegar, olive oil, honey, Dijon mustard, garlic powder, salt and pepper to a mason jar. Shake well and set aside.
- Brush the chicken breasts with olive oil and season with salt and pepper.
- Place the chicken on the grill and cook for 20 minutes, flipping halfway.
- At the 15 minute mark, brush the avocado with olive oil and grill for 5 minutes.
- Remove the chicken and avocado. Brush asparagus with olive oil and grill for 10-12 minutes or until tender.
- Place half of the baby spinach in a bowl. Add one chicken breast, two avocado halves, and half of the asparagus. Sprinkle one tablespoon of the flax seeds. Repeat for the second bowl.
- Shake the dressing once more and drizzle onto both bowls.
Recipes
Lamb Skewers With Grilled Zucchini, Kalamata Olives, and Crumbled Feta
Serves 3-4
Prep time: 1 hour minutes / Cook time:
1 pound of lamb, 1" cubes
1 tablespoon fresh thyme, minced
1 tablespoon dried oregano
Juice of one lemon
2 tablespoons extra virgin olive oil
2 large zucchini, cut into 1/2" slices
length wise
3/4 cup Kalamata olives, sliced
3/4 cup crumbled feta
Salt and pepper
- Add the cubed lamb, thyme, oregano, lemon, olive oil, salt and pepper to a resealable plastic bag. Shake the bag to mix the marinade and set aside for at least an hour.
- Meanwhile, soak wooden skewers in water.
- Preheat the Smokeless Grill. Turn the dial to 375F to preheat.
- Add 3-4 cubes of lamb to each skewer and grill for 10-12 minutes, turning halfway through.
- Remove the lamb skewers. Brush olive oil on the zucchini, season with salt and pepper, and grill for 2 minutes on each side.
- Serve the skewers and grilled zucchini on a plate and top off with the crumbled feta and sliced Kalamata olives.
Limited TWO-YEAR Warranty
SENSIO Inc. hereby warrants that for a period of TWO YEARS from the date of purchase, this product will be free from mechanical defects in material and workmanship, and for 90 days in respect to non-mechanical parts. At its sole discretion, SENSIO Inc. will either repair or replace the product found to be defective, or issue a refund on the product during the warranty period.
The warranty is only valid for the original retail purchaser from the date of initial retail purchase and is not transferable. Keep the original sales receipt, as proof of purchase is required to obtain warranty validation. Retail stores selling this product do not have the right to alter, modify, or in any way revise the terms and conditions of the warranty.
EXCLUSIONS:
The warranty does not cover normal wear of parts or damage resulting from any of the following: negligent use of the product, use of improper voltage or current, improper routine maintenance, use contrary to the operating instructions, disassembly, repair, or alteration by anyone other than qualified SENSIO Inc. personnel. Also, the warranty does not cover Acts of God such as fire, floods, hurricanes, or tornadoes.
SENSIO Inc. shall not be liable for any incidental or consequential damages caused by the breach of any express or implied warranty. Apart from the extent prohibited by applicable law, any implied warranty of merchantability or fitness for a particular purpose is limited in time to the duration of the warranty. Some states, provinces or jurisdictions do not allow the exclusion or limitation of incidental or consequential damages, or limitations on how long an implied warranty lasts, and therefore, the above exclusions or limitations may not apply to you. The warranty covers specific legal rights which may vary by state, province and/or jurisdiction.
HOW TO OBTAIN WARRANTY SERVICE:
You must contact Customer Service at our toll-free number: 1-866-832-4843. A Customer Service Representative will attempt to resolve warranty issues over the phone. If the Customer Service Representative is unable to resolve the problem, you will be provided with a case number and asked to return the product to SENSIO Inc. Attach a tag to the product that includes: your name, address, daytime contact telephone number, case number, and description of the problem. Also, include a copy of the original sales receipt. Carefully package the tagged product with the sales receipt, and send it (with shipping and insurance prepaid) to SENSIO Inc.'s address. SENSIO Inc. shall bear no responsibility or liability for the returned product while in transit to SENSIO Inc.'s Customer Service Center.
For customer service questions or comments: 1-866-832-4843
For Recipes and Cooking tips cruxkitchen.com
Sensio Inc.
New York, NY 10016/USA
All rights reserved.
17195 Rev. 4