6062 - Measuring equipment Testo - Free user manual and instructions
Find the device manual for free 6062 Testo in PDF.
| Product type | Combined material moisture, air humidity, and temperature measuring device |
| Brand | Testo |
| Model | 606-2 |
| Category | Measuring equipment |
| Dimensions (L x W x H) | 119 x 46 x 25 mm (with protective cap) |
| Weight | 90 g (with batteries and protective cap) |
| Power supply | 2 AAA 1.5 V batteries |
| Battery life | 130 h (without display backlight) |
| Operating temperature range | -10 to 50 °C |
| Relative humidity range | 0 to 100 % RH |
| Material moisture measurement range (wood) | 7.0 to 54.8 % by mass (depending on wood species) |
| Material moisture measurement range (construction) | 0.0 to 22.1 % by mass (depending on material) |
| Resolution | 0.1 % (humidity), 0.1 °C / 0.1 °F |
| Accuracy (temperature) | ±0.5 °C |
| Accuracy (relative humidity) | ±2.5 % RH (5 to 95 % RH) |
| Accuracy (conductivity) | ±1 % |
| Measurement frequency | 0.5 s (material moisture), 1 s (air humidity) |
| Protection class | IP20 |
| Display | Backlit display (10 s) |
| Display functions | Current value, Hold, Max, Min |
| Auto-off function | Yes (10 min after last operation) or can be deactivated |
| Warranty | 2 years |
| Maintenance | Clean the housing with a damp cloth; replace batteries if necessary |
| Safety | Caution: sharp measuring electrodes; use as intended |
| Spare parts / Repairability | Send the device to Testo customer service in case of defect |
Frequently Asked Questions - 6062 Testo
User questions about 6062 Testo
0 question about this device. Answer the ones you know or ask your own.
Ask a new question about this device
Download the instructions for your Measuring equipment in PDF format for free! Find your manual 6062 - Testo and take your electronic device back in hand. On this page are published all the documents necessary for the use of your device. 6062 by Testo.
USER MANUAL 6062 Testo
text_image
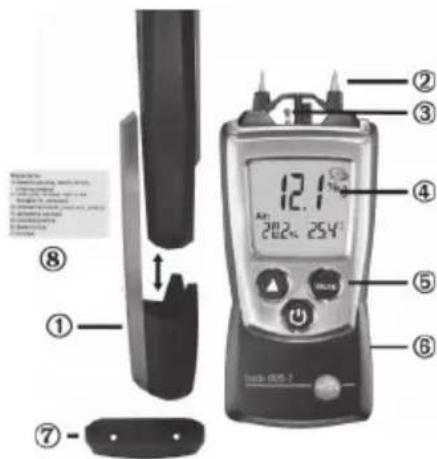
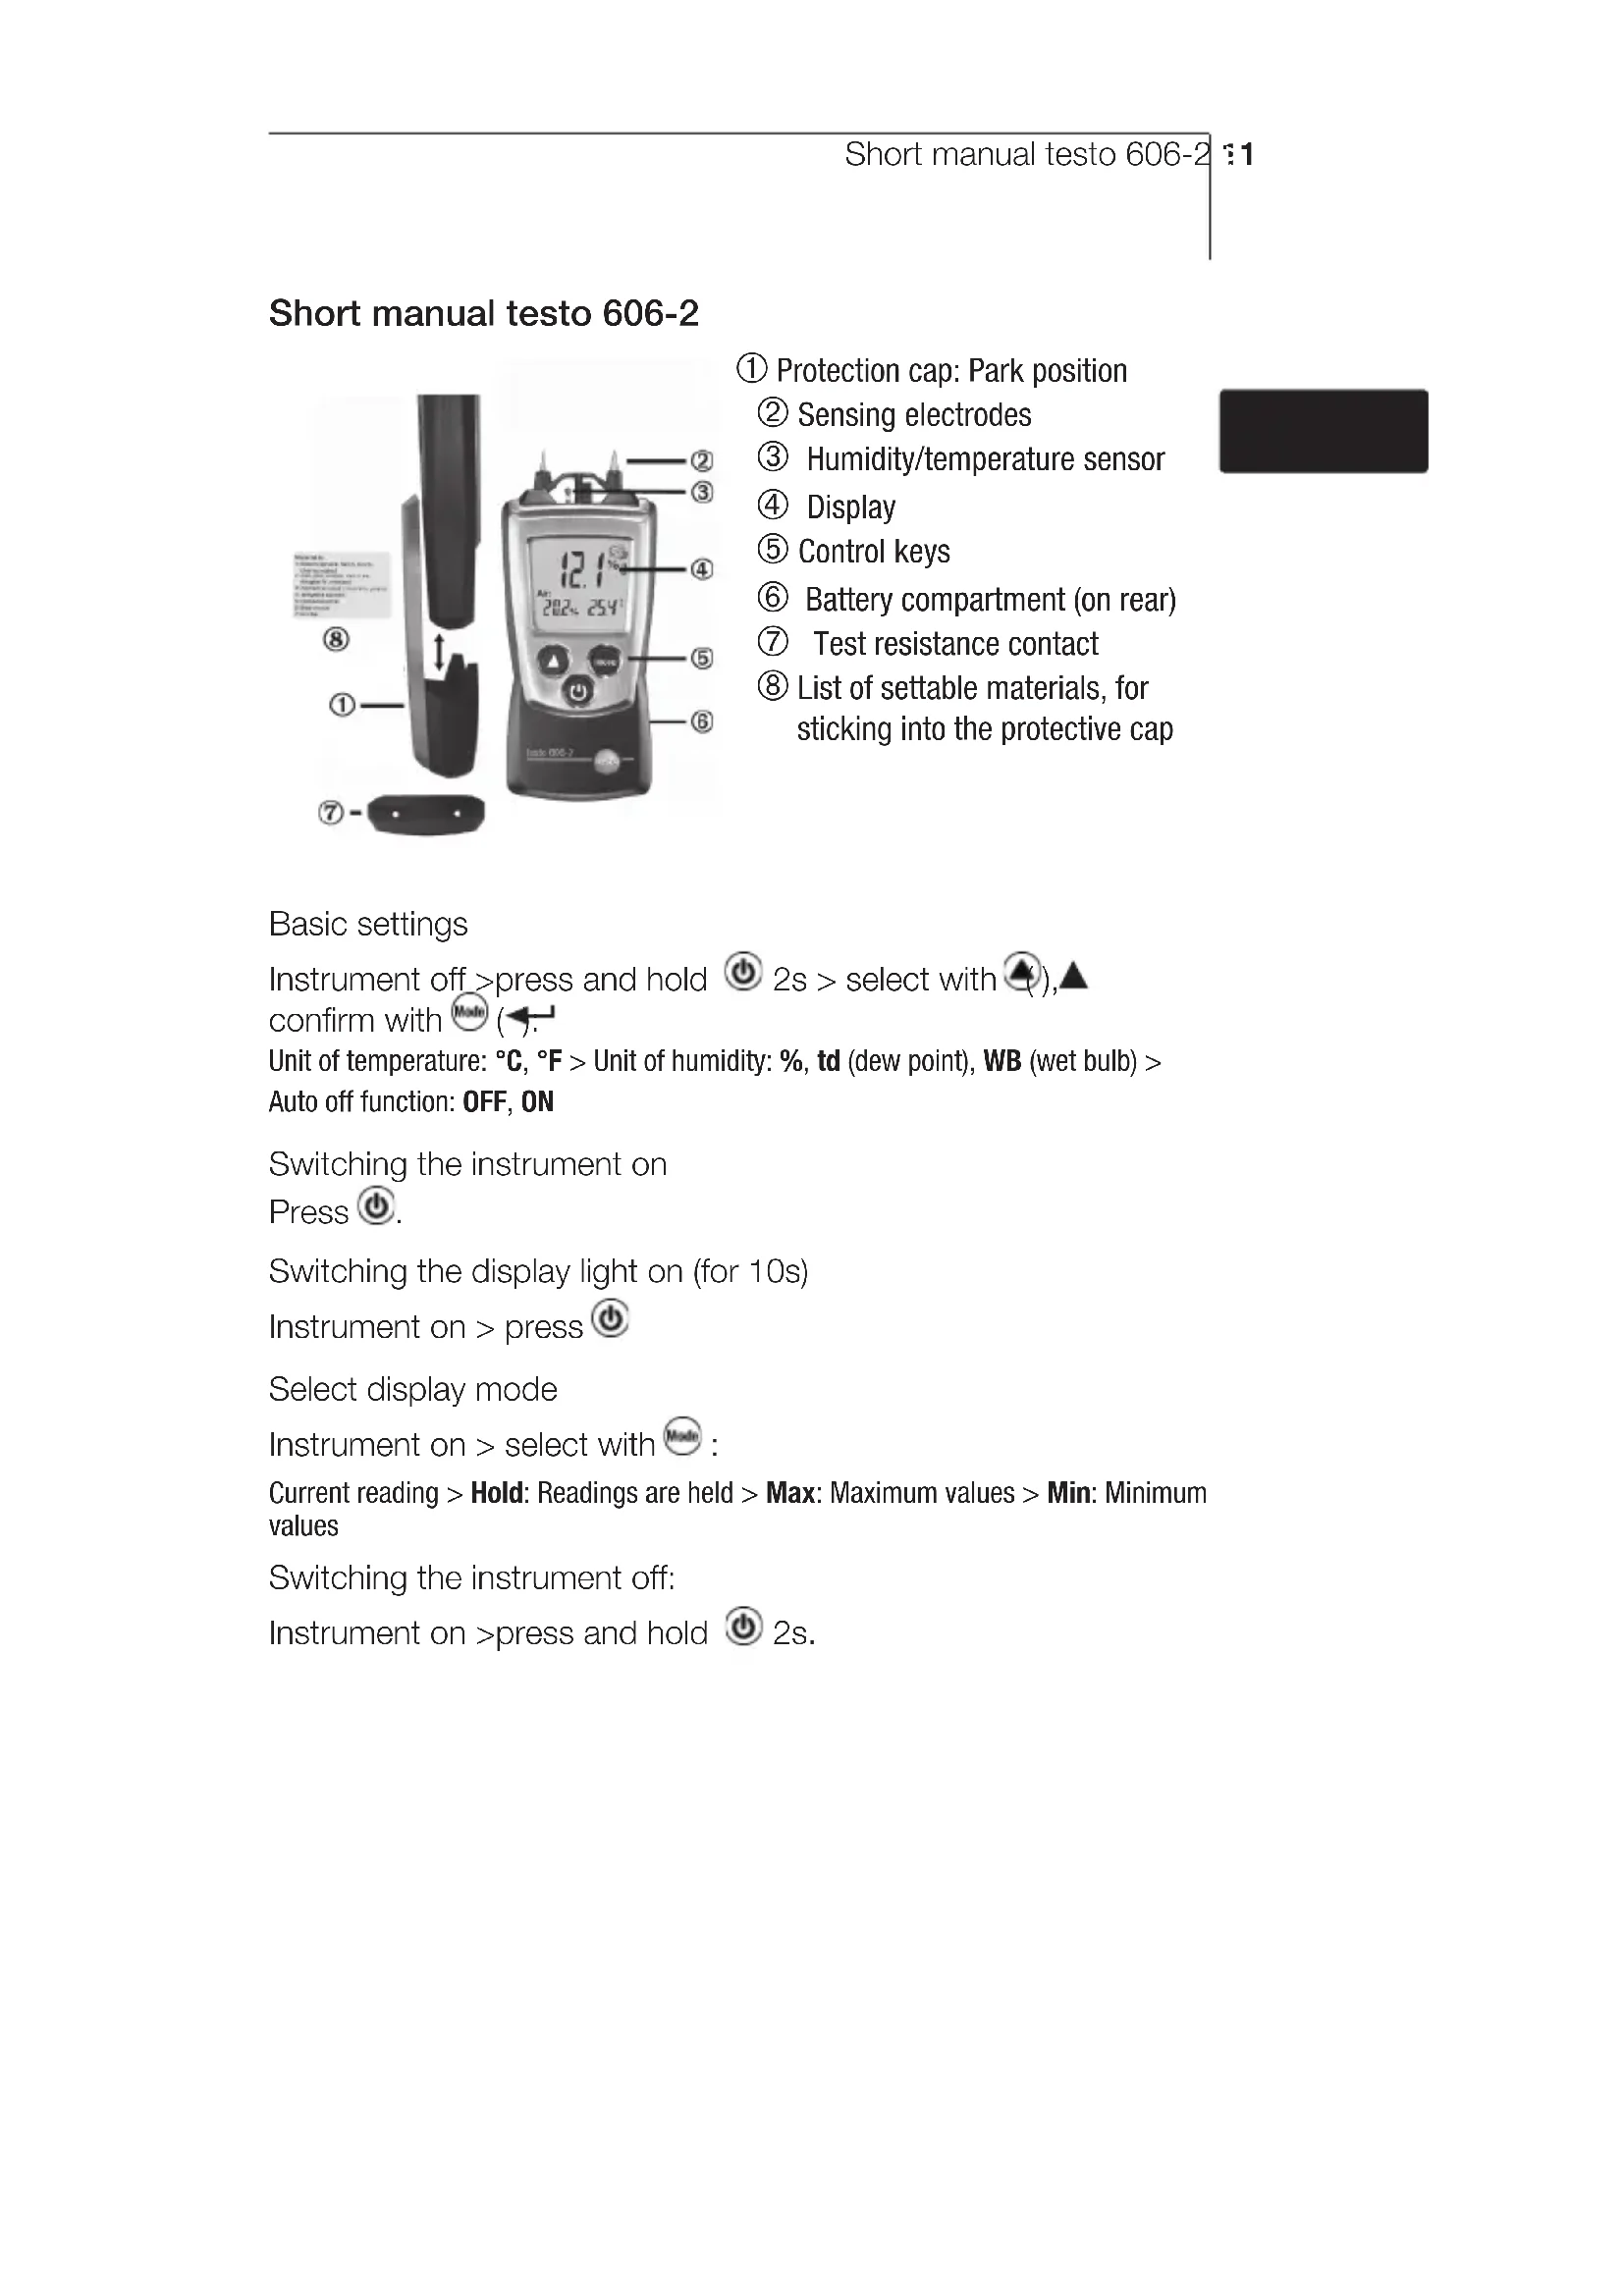
Labeled diagram of a medical or scientific instrument showing components like a digital display, battery, and control panel with numbered parts.① Protection cap: Park position
② Sensing electrodes
③ Humidity/temperature sensor
④ Display
⑤ Control keys
⑥ Battery compartment (on rear)
⑦ Test resistance contact
⑧ List of settable materials, for sticking into the protective cap
Basic settings
Instrument off >press and hold ⏻ 2s > select with ⬇,▲ confirm with Mode (◀).
Unit of temperature: °C, °F > Unit of humidity: %, td (dew point), WB (wet bulb) > Auto off function: OFF, ON
Switching the instrument on Press ⏻.
Switching the display light on (for 10s)
Instrument on > press ⏻
Select display mode
Instrument on > select with 📂 :
Current reading > Hold: Readings are held > Max: Maximum values > Min: Minimum values
Switching the instrument off:
Instrument on >press and hold ⏻ 2s.
Safety and the environment
About this document
Please read this documentation through carefully and familiarise yourself with the product before putting it to use. Keep this document to hand so that you can refer to it when necessary. Hand this documentation on to any subsequent users of the product.
Pay particular attention to information emphasised by the following symbols:

With the signal word Caution!:
Warns against hazards which could result in minor physical injury or damage to equipment if the precautionary measures indicated are not taken.

Important.
Avoid personal injury/damage to equipment
Only operate the measuring instrument properly, for its intended purpose and within the parameters specified in the technical data. Do not use force.
Never store the product together with solvents, acids or other aggressive substances.
Only carry out the maintenance and repair work that is described in the documentation. Follow the prescribed steps when doing so. Use only OEM spare parts from Testo.
Protecting the environment
Take faulty rechargeable batteries as well as spent batteries to the collection points provided for them.
Send the product back to Testo at the end of its useful life. We will ensure that it is disposed of in an environmentally friendly manner.
Specifications
Functions and use
The testo 606-2 is a material moisture, air humidity and temperature measuring instrument. It is normally used to determine the material moisture contents in wood or building materials and air humidity. The measurement procedure used is suitable for overview measurement to determine whether the material is continuing to dry out. The material moisture is given in % by weight.
Technical data
Measurement data
- Sensors:
Electrical resistance (conductivity measurement), Testo humidity sensor, NTC temperature sensor - Parameters:
% by weight material moisture (wood, building materials), %rH, td, wb, °C, °F - Measuring ranges: -10...50 °C, 14...122 °F, 0...100 %rH Material moisture: See chapter Using the Product
- Resolutions: 0.1 %, 0.1 °C, 0.1 °F, 0.1 %rH
- Accuracies (Nominal temperature 25 °C, ±1 Digit): Conductivity measurement ±1 %, ±0.5 °C, ±0.9 °F, ±2.5%rH (5...95%rH)
- Measuring rate: 0.5 s, humidity: 1s
Further instrument data
• Protection class: IP20
- Ambient conditions: -10...50 °C, 14...122 °F
- Storage/transport conditions: -40...70 °C, -40...158 °F
• Voltage supply: 2x 1.5 V type AAA
- Battery life:
130 h (without display light)
- Dimensions: 119x46x25mm / 4.69x1.81x0.98" (inc. protection cap)
- Weight: 90 g / 3.2 oz (inc. batteries and protection cap)
Examinations and licenses
- As declared in the Certificate of Conformity, this product complies with Directive 2004/108/EC.
Warranty
• Duration: 2 years, warranty conditions: see www.testo.com/warranty
Product description
At a glance
text_image
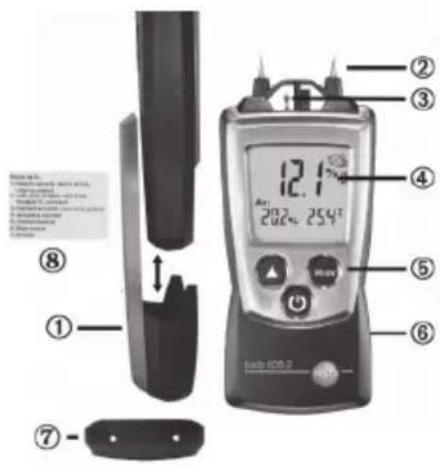
① ② ③ ④ ⑤ ⑥ ⑦ ⑧ 12.1 2024 254T Bath 605.2① Protection cap: Park position
② Sensing electrodes

Caution! Risk of injury from sensing electrodes!
Attach protection cap when not in use.
③ Humidity/temperature sensor
④ Display
⑤ Control keys
⑥ Battery compartment (on rear)
⑦ Test resistance contact
⑧ List of settable materials, for sticking into the protective cap
First steps
▶ Inserting batteries:
1 To open the battery compartment, push the battery cover down.
2 Insert batteries (2x 1.5 V type AAA). Observe the polarity!
3 To close the battery compartment, push the battery cover back on.
▶ Basic settings (configuration mode):
Adjustable functions
- Unit of temperature: °C, °F
- Unit of humidity: %, td (dew point), WB (wet bulb)
- Auto off function: OFF, ON (instrument switches off automatically if no key is pressed for 10 minutes)
1 When switching the instrument on, press and hold (until ▲ and ← appear on the display (configuration mode).
- The adjustable function is displayed. The current setting flashes.
2 Press ⬆ (▲several times until the desired setting flashes.
3 Press Ⓜ (←) to confirm the input.
4 Repeat steps 2 and 3 for all functions.
- The instrument changes to measuring mode.
Using the product
To guarantee correct readings:
- Repeat the measurement at several points. The differing resistance of the wood, with or across the grain, may have an impact on the measurement result. If the injection needles are inserted with the grain, this may result in slightly higher readings because the resistance in the material is lower.
- A measurement is only implemented as far as the depth that the injection needles are inserted within the material. Insert the measuring needles as far as possible (4 to 5 mm).
- When measuring fuel moisture content, it is advisable to split the log prior to measurement and to measure at three points. Measuring points: each 5 cm away from the left and right cut edge and once in the centre of the log.
- Keep temperature and humidity sources which may falsify the measurement (e.g. hands) away from the sensor.
The values displayed are highly dependent on the building material/manufacturer used, and on the ambient conditions. As the materials are natural, the same materials can vary from batch to batch.
▶ Switching the instrument on:
Press ⏻.
- Measuring mode is opened.
▶ Switching the display light on:
√ The instrument is switched on.
Press ⏻.
- The display light goes out automatically if no key is pressed for 10 seconds.
Setting the material characteristic curve:
The material moisture is indicated in the top line of the display. The material symbol (wood) or (building
material) is displayed with the relevant material number (see enclosed sticker for the inside of the protective cap).
Settable
materials
Measuring
- beech, spruce, larch, birch, cherry, walnut 8.8...54.8 % by weight
- oak, pine, maple, ash-tree, douglas fir, meranti 7.0...47.9 % by weight
- cement screed, concrete 0.9...22.1 % by weight
- anhydrite screed 0.0...11.0 % by weight
- cement mortar 0.7...8.6 % by weight
- lime mortar, plaster 0.6...9.9 % by weight
- bricks 0.1...16.5
Press ⬆ several times until the desired material characteristic curve appears.
▶ Testing the instrument function:
1 Press ⬆ several times until Test: lights up.
2 Connect sensing electrodes with the contacts of the test resistor on the top of the protection cap.
- Test flashes.
- Test: ok lights up: instrument is functioning.
Test: ok does not light up: test not possible, see chapter, Tips and assistance'.
3 Press ▲ back to measurement menu.
Changing the display view:
Adjustable views
- Current reading
- Hold: Readings are held.
i Max/Min-display for air humidity and temperature only.
- Max: Maximum values since the instrument was last switched on or last reset.
- Min: Minimum values since the instrument was last switched on or last reset.
Press Mode several times until the desired view appears.
▶ Resetting Max/Min values:
1 Press Mode several times until the desired view appears.
2 Press Mode and hold until - - - - appears.
3 Repeat steps 1 and 2 for all values that are to be reset.
▶ Switching the instrument off:
Press ⏻ and hold until the display goes out.
Maintaining the product
Changing batteries:
1 To open the battery compartment, push the battery cover down.
2 Remove used batteries and insert new batteries (2x 1.5 V type AAA). Observe the polarity!
3 To close the battery compartment, push the battery cover back on.
▶ Cleaning the housing:
Clean the housing with a moist cloth (soap suds) if it is dirty. Do not use aggressive cleaning agents or solvents!
Questions and answers
| Question | Possible | causes/solutions |
| Hi or Lo | · Readings outside the measuring range (too high, too low): Readings outside the measuring range (too high, too low): for materials that have not been specially dried or moistened, the measurement results should always be within the measuring range. | |
| · Residual capacity <10 min: Change batteries. | ||
| Testing the instrument function: Test: ok does not light up · Clean sensing electrodes and contacts on the top of the protection cap. · If the error message appears again, send the instrument to Testo Customer Service. | ||
| Meas. electrodes defective/ worn · Send instrument to Testo customer service. | ||
The material's measured moisture content is relative to the dry weight (0% moisture) of the relevant material. The stored material characteristic curves were determined using the Darr (wet and dry weighing) method. The specified measuring ranges are derived from this.
Conversion to percent by weight
Percent by weight = (wet weight-dry weight) × 100 / dry weight
Example
Wet weight: 180 g
Dry weight: 150 g
Percent by weight: (180 - 150) × 100 / 150 = 20%
Conversion to water content
Water content \% = (wet weight-dry weight) / dry weight × 100
Example
Wet weight: 180 g
Dry weight: 150 g
Percent by weight: (180 - 150) / 150 × 100 = 16.6%
What constitutes dry, or at risk, or damp?
The values indicated serve as guideline figures for assessing the materials. The values are typical inner area values
| Characteristic curve | Material Dry At risk Damp / | very damp | |
| Characteristic curve 1 or 2 inside heated | Beech, fir, larch... < 12 12...15 > 15 | ||
| Characteristic curve 1 or 2 inside unheated | Oak, pine, maple wood... < 15 15...20 > 20 | ||
| Characteristic curve 3 | Cement screed < 3 3.. 5 > 5 | ||
| Characteristic curve 3 | Concrete < 2.2 2.2...4.4 > 4.4 | ||
| Characteristic curve 4 | Anhydrite screed < 0.5 0.5...1 > 1 | ||
| Characteristic curve 5 | Cement mortar < 3 3...5 > 5 | ||
| Characteristic curve 6 | Lime mortar < 2 2...4 > 4 | ||
| Characteristic curve 6 | Gypsum < 2 2...4 > 4 | ||
| Characteristic curve 7 | Brick < 1 1...3 > 3 |
Guideline values for the installation moisture of wood, which sets in as an average after a certain period in use-status (DIN 1052-1 (4/88) Para. 4.2.1.):
| Char. curve | Application area | Wood humidity in % by weight |
| 1 or 2 | buildings closed on all sides with heating | 9 ± 3 |
| 1 or 2 | buildings closed on all sides without heating | 12 ± 3 |
| 1 or 2 | roofed open buildings | 15 ± 3 |
| 1 or 2 | constructions which are open to the weather on all sides | 18 ± 6 |
If we could not answer your question, please contact your dealer or Testo Customer Service. For contact details, please visit wwwtesto.com/service-contact.
Instructions succinctes testo 606-2