Force 1801 - Pressure washer Eurom - Free user manual and instructions
Find the device manual for free Force 1801 Eurom in PDF.
| Product type | High pressure cleaner |
| Brand | Eurom |
| Model | Force 1801 |
| Voltage | AC 220-240 V ~ 50 Hz |
| Power consumption | 1800 W |
| Maximum pressure | 145 bars |
| Operating pressure | 100 bars |
| Max water flow | 450 l/h |
| Min water consumption | 330 l/h |
| Max inlet pressure | 7 bars (0.7 MPa) |
| High pressure hose length | 5 m |
| Water temperature | 0 – 40 °C |
| Automatic stop/start | Yes |
| Protection class | II |
| Protection rating | IPX5 |
| Sound level | 92 dB(A) |
| Vibration | 2.5 m/s² |
| Dimensions (L x W x H) | 28.7 x 32.8 x 82 cm |
| Weight | 9 kg |
| Main functions | High pressure cleaning for domestic use: cars, terraces, walls, garden equipment |
| Included accessories | Lance extension, floor cleaner, cleaning rod, adjustable nozzle, turbo nozzle, spray gun, HP hose 5 m |
| Safety | Safety lock on gun, motor thermal protection, anti-unintended start pressure switch |
| Maintenance | Cleaning nozzles, water inlet filter, lubricating O-rings |
Frequently Asked Questions - Force 1801 Eurom
User questions about Force 1801 Eurom
0 question about this device. Answer the ones you know or ask your own.
Ask a new question about this device
Download the instructions for your Pressure washer in PDF format for free! Find your manual Force 1801 - Eurom and take your electronic device back in hand. On this page are published all the documents necessary for the use of your device. Force 1801 by Eurom.
USER MANUAL Force 1801 Eurom
natural_image
Exterior view of a modern Euron air purifier with blue and white body, no visible text or symbols on the device itself.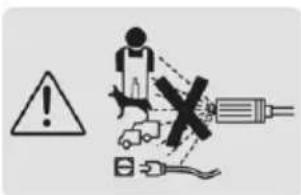
Do not point the high-pressure jet at people, animals, active electrical equipment or the appliance itself.
Model: Force 1801
Product code: 135688
Date: 16-1-2024
Version: v3.0
EUROM®
POWERFUL PRODUCTS SINCE 1974
WAARSCHUWING
Afbeelding 2
Afbeelding 4
Afbeelding 5
Afbeelding 6
-
Trekker veiligheidsvergrendeling
-
Trekker
-
Hogedrukwaterkoppeling
-
Ontgrendeling hogedrukwaterkoppeling
-
Koppeling accessoires
Montage
Afbeelding 7
Beugels
Afbeelding 8
Hogedrukslanghaspel
Afbeelding 9
Installatie

LET OP
Afbeelding 10
Spuitpistool
Afbeelding 11
Vloerreiniger

natural_image
Technical diagram of a mechanical component with gear and shaft assembly (no text or symbols)Afbeelding 12
Spuitmond of vloerreiniger
Afbeelding 13
Werking

WAARSCHUWING
Afbeelding 14
Na gebruik
WAARSCHUWING
Afbeelding 15
Vervoer en opslag

WAARSCHUWING
natural_image
3D rendering of a mechanical device with threaded body and top component (no text or symbols visible)Afbeelding 16
Afbeelding 17
natural_image
Technical illustration of a mechanical device with an inset close-up showing a detailed view of the shaft and housing (no text or symbols present)Afbeelding 18
natural_image
3D mechanical component diagram showing a gear and shaft assembly (no text or symbols)Afbeelding 19
Afbeelding 20
Reinig de spuitmond(en)
Afbeelding 21
Afbeelding 22
Probleemoplossing

LET OP
- The machine is not to be used by persons (including children) with reduced physical, sensory or mental capabilities, or lack of experience and knowledge.
• Children should be supervised so that they not to play with the appliance. - Keep all packaging materials, especially foil (danger of suffocation), out of reach of children.
- Instructions for appliances connected to the water mains: Max. inlet water pressure 7 bar or 0,7 MPa.
- Never touch the plug or the socket with wet hands.
- This machine has been designed for use with the cleaning agent supplied or recommended by the manufacturer. The use of other cleaning agents or chemicals may adversely affect the safety of the machine. Keep the cleaning agents out of reach of children.
- High pressures jets can be dangerous if subject to misuse. The jet must not be directed at persons, live electrical equipment or the machine itself.
- During use of high-pressure cleaners, aerosols may be formed. Inhalation of aerosols can be hazardous to health.
- Do not use the machine within range of persons unless the wear protective clothing.
- Do not direct the jet against yourself or others in order to clean clothes or footwear.
- All current-conductive objects in the work area must be protected against water jets.
- Risk of explosion - Do not jet flammable liquids and in circumstances that have risk of explosion.
- Never suck up fluids that contain solvents or undiluted acids or solvents. This includes (for example) petrol, paint thinner or fuel oil. The jet mist is very lightly flammable, explosive and toxic. Do not use acetone, undiluted acids and solvents; these harm the materials used in the machine.
- High pressure cleaners shall not be used by children or untrained personnel.
- High pressure hoses, fittings and couplings are important for the safety of the machine. Use only hoses, fittings and couplings recommended by the manufacturer.
- To ensure machine safety, use only original spare parts from the manufacturer or approved by the manufacturer.
- Water that has flowed through backflow preventers is considered to be non-potable.
- The machine has to be disconnected from its power source during cleaning or maintenance and when replacing parts or converting the machine to another function always remove the plug from the socket-outlet.
- Do not use the machine if a supply cord or important parts of the machine are damaged, e.g. safety devices, high pressure hoses, trigger gun.
- Inadequate extension cords can be dangerous. If an extensions cord is used, it shall be suitable for outdoor use, and the connection has to be kept dry and off the ground. It is recommended that this is accomplished by means of a cord reel which keeps the socket at least 60 mm above the ground.
- Make sure that the line cord and the extension cord are not damaged by stepping on them, squeezing, dragging or something similar. Protect the line cord against heat, oil or sharp edges.
- Always switch off the mains disconnection switch when leaving the machine unattended.
- Depending on the application, shielded nozzles can be used for high pressure cleaning, which will reduce the emission of hydrous aerosols dramatically. However, not all applications allow the use of such a device. If shielded nozzles are not applicable for the protection against aerosols, a respiratory mask of class FFP 2 of equivalent may be needed, depending on the cleaning environment.
General safety instructions
- The minimum diameter of the water connection (hose) is 12.7mm (1/2").
- The water supply must supply at least the water consumption of the device (330 l/h)! The pump must always be supplied with sufficient water. 'Dry operation' causes damage.
- The water temperature may not exceed 40 °C.
- Only use clean water with this device. Impurities or aggressive chemicals damage the device!
-
The voltage and frequency stated on the device must correspond to those of the socket. The electrical system must be approved (IEC 60364-1) and secured with an earth leak switch (max. 30 mA). Never make any changes to the plug or socket in order to adjust them! Defectiveness in the electric connection could result in a shock!
-
Damaged components (including plug, electric cable, hose and jet gun) must be replaced immediately by a technician trained for that purpose or a qualified electrician. Be sure to use only original parts; hoses and connections are also important for safety. Never carry out repairs by yourself.
- Never make any changes to the device, nozzle(s) or any other parts.
• Never cover the device, nozzle(s) or any other parts when using the device.
Safety before and during operation
- Use the device only for home use, such as cleaning cars, boats, terraces, walls, garden equipment, etc.
- Check the device before each time you use it (including cable, plug, hose and jet gun) for any visible damage. Check especially the electric cable for faults or cracks. Do not use a damaged device or one that has not functioned properly when you used last. Give it to your supplier for repair or replacement.
- When using the device, unroll the cable entirely to prevent overheating. If an extension cable is unavoidable, use a cable of adequate thickness: 3x2.5mm ^2 . Inadequate extension cables can be dangerous! The female plug must be waterproof and the connection must be kept dry. Faulty extension cables are dangerous!
- Vehicle tyres and/or tyre valves can get damaged by high-pressure jets and can spring out. The initial sign of this is discolouring of the tyre. Damaged vehicle tyres/tyre valves involve risk of life. When cleaning, observe a minimum jet distance of 30cm.
- In case of long breaks, switch off the device using the main switch or pull out the plug from the socket.
- Do not use the device in temperatures under 0^ .
- It is forbidden to use the device in areas or under circumstances that have risk of explosion.
• In case of accidents or electricity failure, switch off the device immediately. - Use only clean water. If you use water that contains for example sand (from a well or something similar), you have to install an extra filter.
- In compliance with valid regulations, the device may not be connected to the drinking water network without a non-return valve. Make sure that your household water system to which the high-pressure cleaner is connected is equipped with a non-return valve.
Take the device's weight into account when selecting its storage location and during transport in order to prevent accidents and injuries. - Release the residual pressure by squeezing the trigger a bit before you disconnect the hose from the product.
- Before each time you use the device and at regular intervals, check whether all the metal fasteners are sitting well and whether the components of the product are in good condition; inspect for broken or worn-out parts.
Personal safety
- Wear suitable gear for your personal protection (PPE) when using the device: hearing protection, safety goggles and protective clothing.
- Wear gloves, keep your hands warm and take regular breaks.
- In rare cases, uninterrupted use of the device for several hours might cause insensitivity of the hands.
- Before you operate the device, move it or store it, make sure it is standing on a solid, even and horizontal surface to prevent accidents.
- The user must use the device in a reasonable manner. Take local conditions into account and when carrying out these activities, watch out for people in the surroundings.
- The water jet through the high-pressure mouthpiece results in a kickback, which has an effect on the handgun. Make sure that you are standing firmly and are also holding the handgun firmly.
- Do not jet objects that contain unhealthy substances (e.g., asbestos).
- It is forbidden to clean surfaces that contain asbestos.
- Do not use the device in an inadequately ventilated area.
- Always switch off the device and take out the plug from the socket before assembling, maintaining, storing and transporting it or when changing the function of the device. This also applies when you change the jet head or nozzle and when you are not using the device. For that purpose, take the plug out with your hand. Never use the plug and/or operate the device with wet hands!
• Water from the device, hose or the jet gun is not suitable for consumption.
- Be aware of a kickback; hold the jet gun with both hands.
Additional risks
Even if you use this product in compliance with all the safety requirements, there are still potential risks related to injuries and damage. The following dangers could occur with regard to the structure and design of this product:
- Health deficiencies that result from vibrations if the product is used for long periods, inadequately operated and not maintained properly.
- Danger of injury and material damage from flying objects.
- Wounds and damage to property, as a result of broken accessories or sudden impact from concealed objects during use.
Safety provisions
Safety systems are for the purpose of protecting the user and may not be altered.
- The ON/OFF switch prevents unintended operation of the device.
- The jet gun is equipped with a lock. This lock locks the gun and prevents unintended engagement of the device.
- As soon as the trigger of the jet gun is loosened, the pressure switch switches off the pump and the high-pressure jet stops. The pump is re-engaged when the trigger is squeezed.
- The motor is equipped with a thermal protection, which switches off the motor in case of overheating. In principle, the motor restarts by itself after it has cooled down sufficiently. However, it is better to switch off the device and then wait 5 minutes before re-starting. Find out why the device had overheated and then fix the problem. If it recurs, then do not continue using the device and contact your supplier/service provider.
• The motor protection switches off the device if the power consumption is high.
Safety stickers
On the device (Figure 1) you will find stickers (Figure 2 and 3). These provide important information about the device.
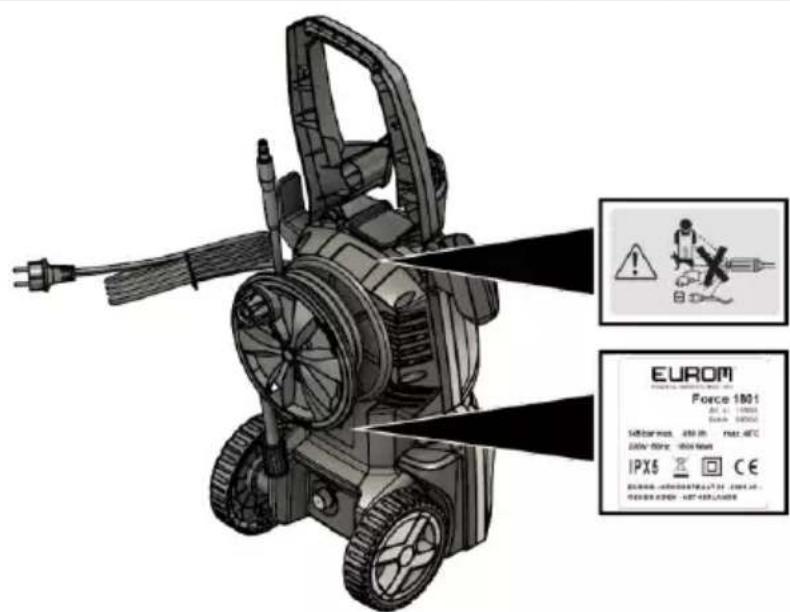
Figure 1
The high-pressure jet (Figure 2) must not be directed at:
- persons;
- animals;
• live electrical equipment;
• the appliance itself.
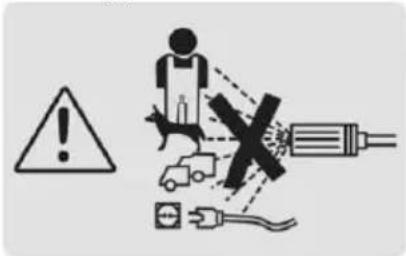
Figure 2
Thank you for choosing this EUROM device. You have purchased a quality device that you will enjoy for many years. Using this device with respect and care will reduce the risk of personal injury or material damage.

CAUTION
It is important to read and understand this manual before assembling, installing and using the device.
Introduction
This manual describes the correct and safe use of this device. Keep this manual for future reference. The manual is an essential part of the device and must be given to the new owner upon resale or exchange. This manual has been compiled with the utmost care. Nevertheless, we reserve the right to improve and adjust this manual at any time. The images used may differ. Do not use if the device (including cable and plug) if it is damaged, but always contact your supplier. Keep the packaging for safe storage and transport.
The following symbols and terms are used in this manual to alert the reader to safety issues and important information:
WARNING
Indicates a hazardous situation which, if the safety instructions are not followed, can lead to injuries to the user or bystanders, light and/or moderate damage to the product or to the environment.

CAUTION
Indicates a hazardous situation which, if the safety instructions are not followed, can lead to light and/or moderate damage to the product or to the environment.
Warranty
EUROM offers a 24-month warranty on this device from the date of purchase. The warranty does not cover wear and tear from normal use. The warranty expires if a defect is the result of unintentional or careless use of the device. The manufacturer, importer and supplier are not liable for incorrect connections.
Identification

POWERFUL PRODUCTS SINCE 1974
Force 1801
Art. nr. 135688
Batch. BB0450
145 bar max. 450 l/h max. 40^
230V\~50Hz 1800 Watt
IPX5


EUROM - KOKOSSTRAAT 20 - 8281 JC -
GENEMUIDEN - NETHERLANDS
Figure 3
Specifications
| Type: | Force 1801 |
| Voltage: | AC 220-240V~50Hz |
| Power consumption: | 1800 W |
| Max. pressure: | 145 bar |
| Operating pressure: | 100 bar |
| Min. water inlet consumption: | 330 l/h |
| Max. pressure water intake: | 7 bar |
| Water inlet connection: | Garden hose connection |
| Length high-pressure hose: | 5 m |
| Water temperature: | 0 – 40 °C |
| Automatic start-stop: | Yes |
| Protection class: | II  |
| Protection level: | IPX5 |
| Sound power level: | 92 dB(A) |
| Vibration values: | 2.5 m/s ^2 |
| Dimensions: | 28.7 x 32.8 x 82 cm |
| Weight: | 9 kg |
Description
This EUROM device is an easy-to-use high-pressure cleaner (Figure 4). The device is designed for household use, such as cleaning vehicles, buildings, terraces, facades and garden equipment.
Main body
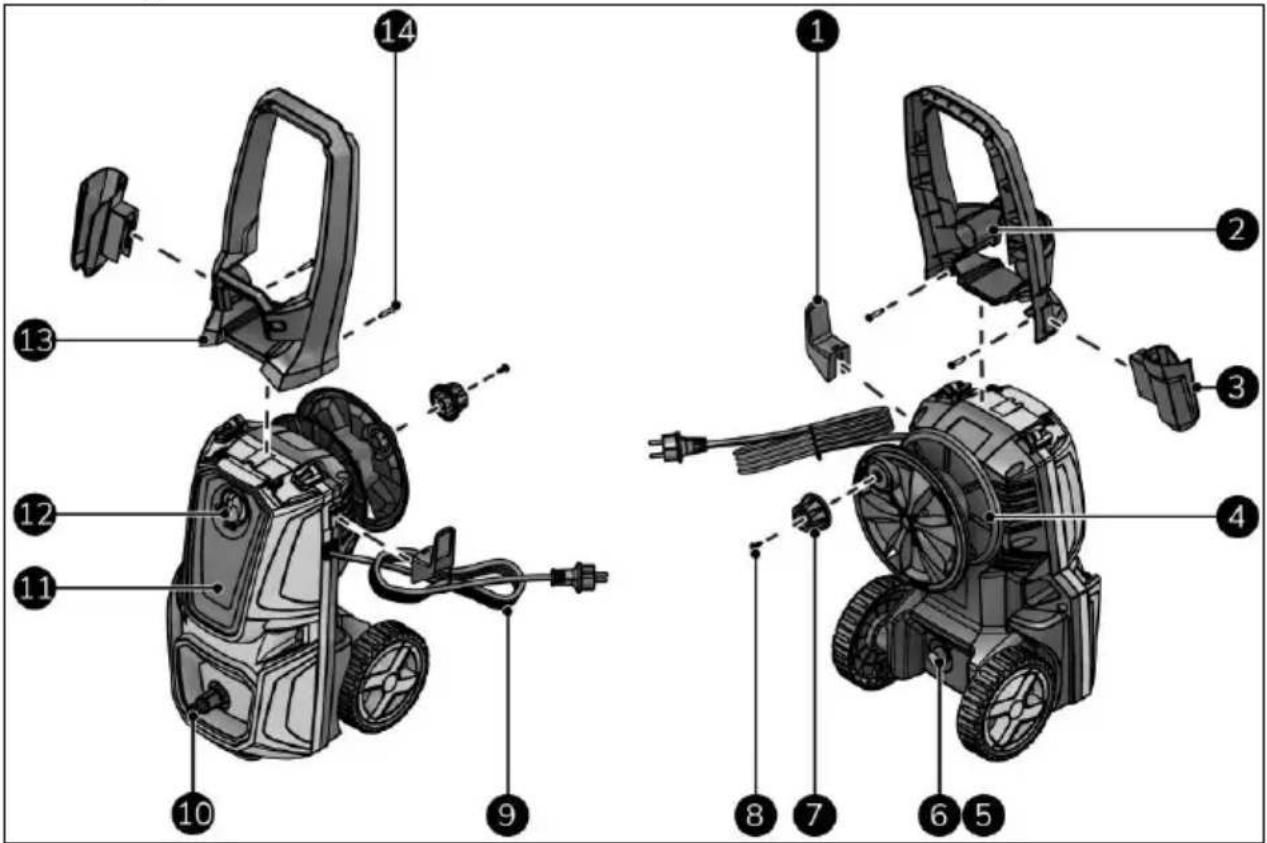
Figure 4
- Power cable bracket
- Nozzle storage (2x)
- Jet gun bracket
- High-pressure hose reel
- High-pressure water outlet
- High-pressure water outlet cap
-
High-pressure hose reel handle
-
Self-tapping screw with Philips head ST4.8x16
- Power cable
- Water inlet (garden hose coupling)
- Main body
- ON(I) / OFF(0) switch
- Handle
- Self-tapping screw with Philips head ST4.8x24 (2x)
Accessories

CAUTION
The accessories are not interchangeable with another Force devices.
CAUTION
Use only original accessories.
This device contains the following accessories (Figure 5):
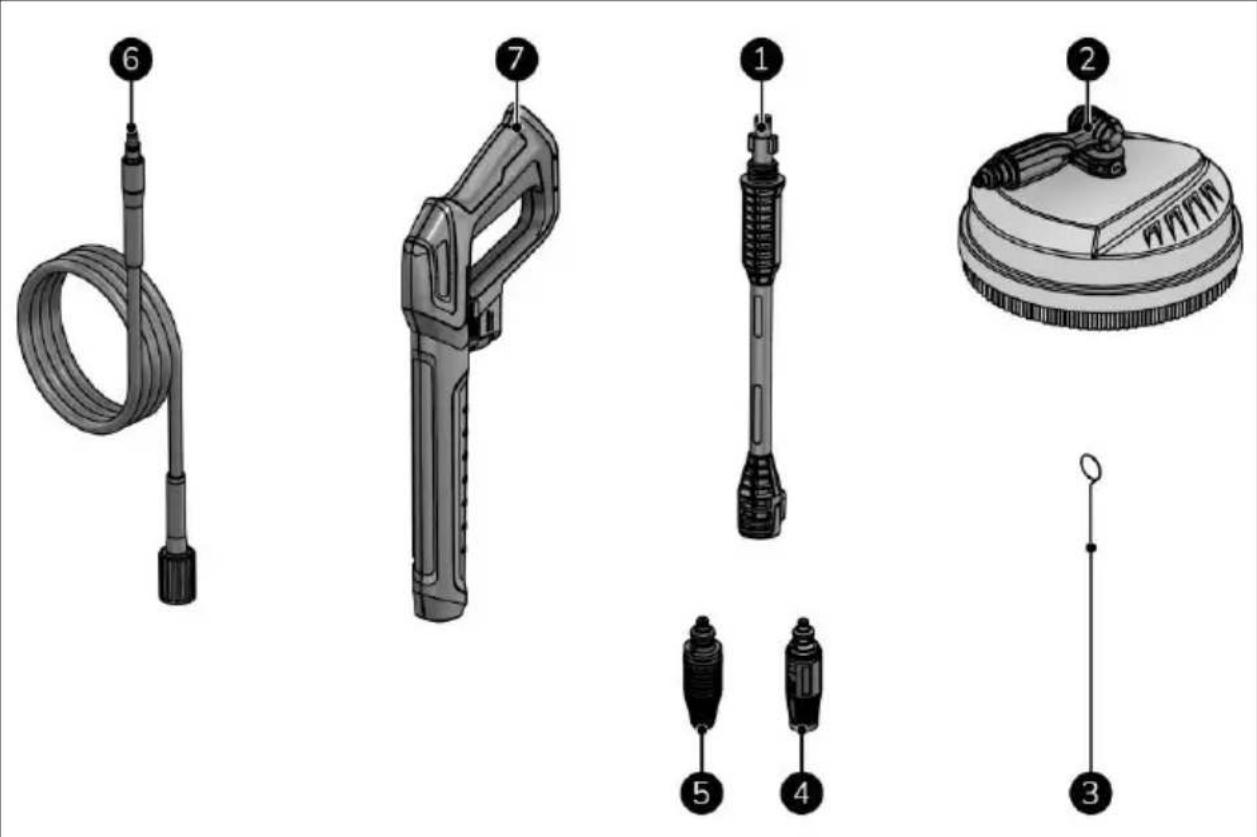
Figure 5
- Extension lance
- Floor cleaner
- Cleaning pin
-
Adjustable jet nozzle
-
Turbo nozzle
- 5m high-pressure hose
- Jet gun
Jet gun
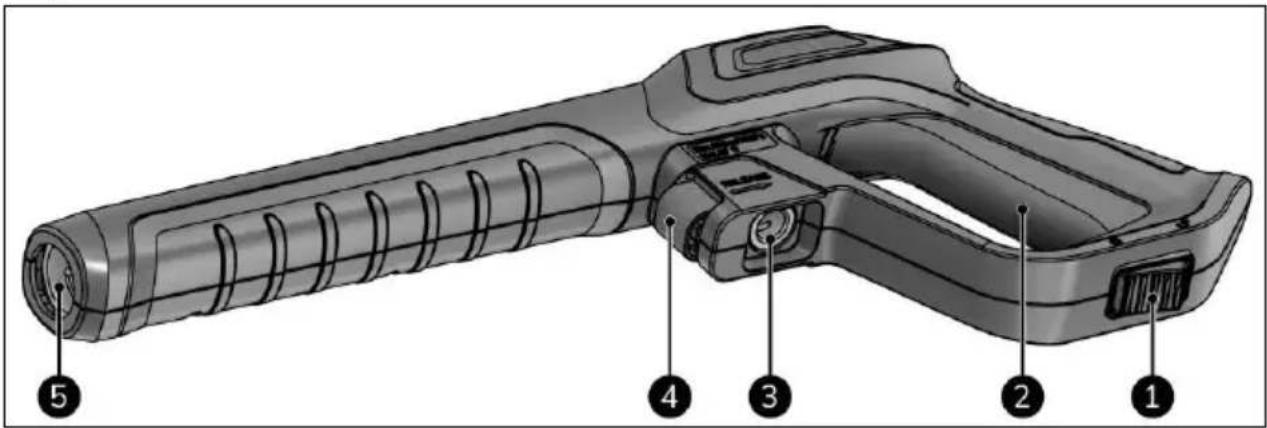
Figure 6
-
Safety lock trigger
-
Trigger
-
High-pressure water coupling
-
Release high-pressure water coupling
-
Accessory coupling
Assembly
The device is packed in one box. Remove all packaging materials and check that the device is not damaged. Do not use the device if it is damaged, but always contact your supplier. Keep the packaging for safe storage and transport. Minor assembly is required.
Handle
- Attach the handle (Figure 7, pos. 1) to the main body (Figure 7, pos. 2) with both ST4.8x24 screws (Figure 7, pos. 3).
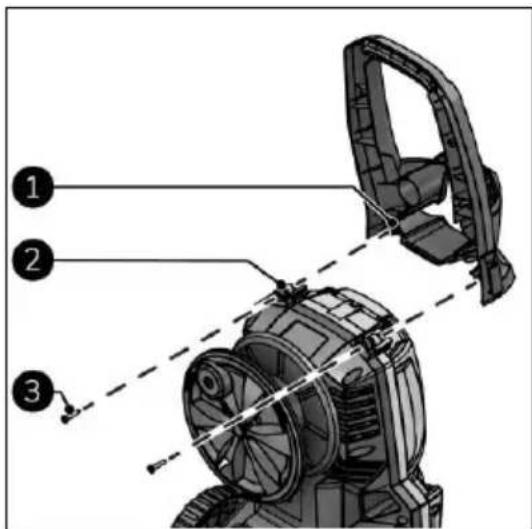
Figure 7
Brackets
- Slide the power cable bracket (Figure 8, pos. 1) onto the main body (Figure 8, pos. 2).
- Press firmly until you hear a 'click'.
- Slide the jet gun bracket (Figure 8, pos. 4) onto the handle (Figure 8, pos. 3).
- Press firmly until you hear a 'click'.
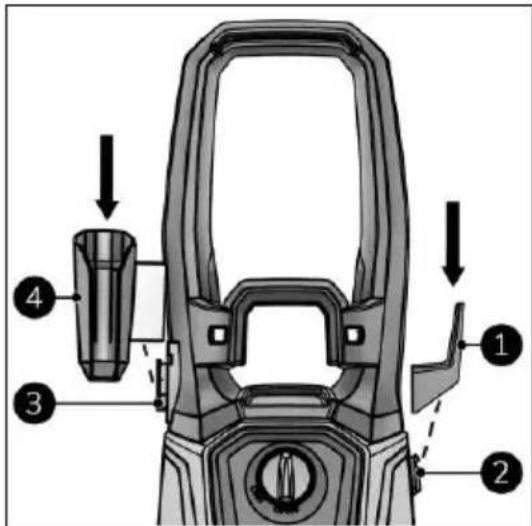
Figure 8
High pressure hose reel
- Attach the handle (Figure 9, pos. 2) to the high-pressure hose reel (Figure 9, pos. 1) with the ST4.8x16 screw (Figure 9, pos. 3).
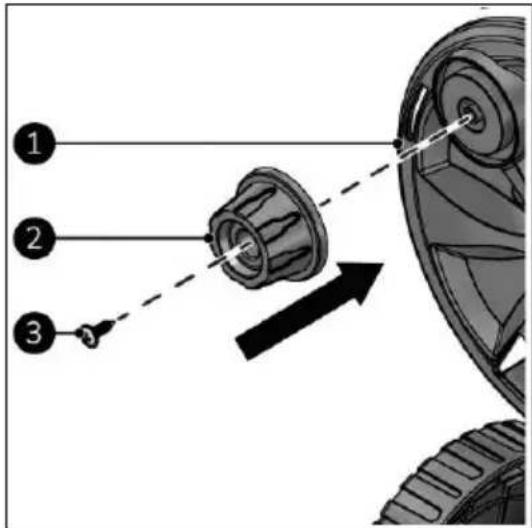
Figure 9
Installation

CAUTION
Place the cleaner as close as possible to the water supply.
CAUTION
The cleaner must be placed upright on a solid, flat and horizontal surface (handle on top).
Main body

CAUTION
The water hose and female water coupling are not included.
- Make sure the device is correctly assembled.
- Make sure the ON(I)/OFF(0) switch is in the OFF(0) position (Figure 10, pos. 6).
- Place the power plug (Figure 10, pos. 4) into a socket that is easily accessible.
- For the first use only: remove the protective cap from the high-pressure water outlet (Figure 10, pos. 2).
- Unroll the high-pressure water hose from the hose reel (Figure 10, pos. 1).
- Screw the high-pressure hose (Figure 10, pos. 3) to the high-pressure water outlet.
- Connect the water supply to the device (Figure 10, pos. 5).
- You will hear a 'click' when the water supply is correctly connected.
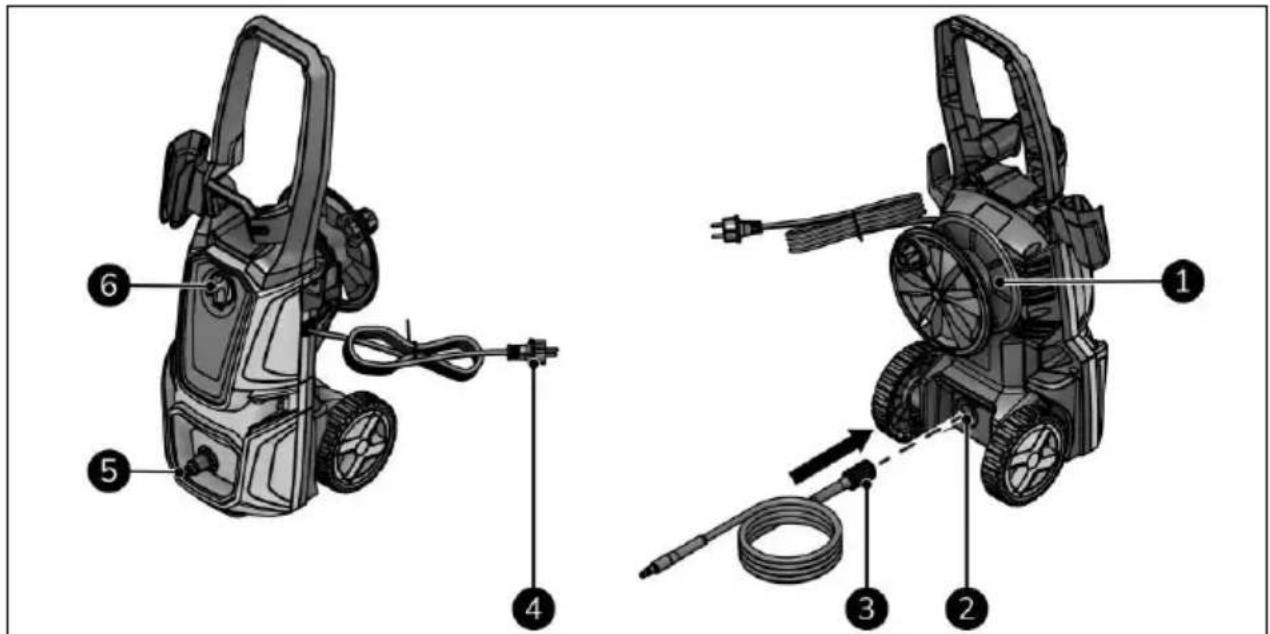
Figure 10
Jet gun
- Make sure that the safety lock under the trigger is locked (Figure 11, pos. 1).
- Connect the high-pressure hose (Figure 11, pos. 3) to the jet gun (Figure 11, pos. 2).
- You will hear a 'click' when the high-pressure hose is correctly connected.
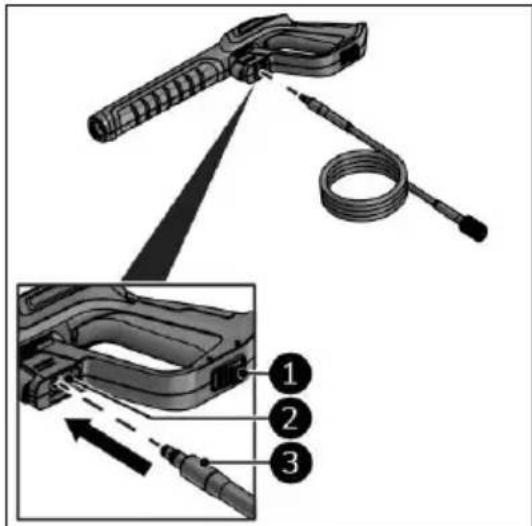
Figure 11
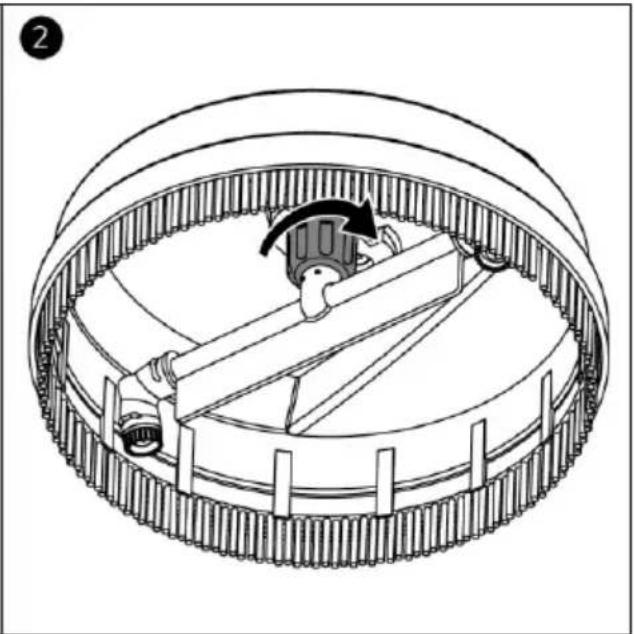
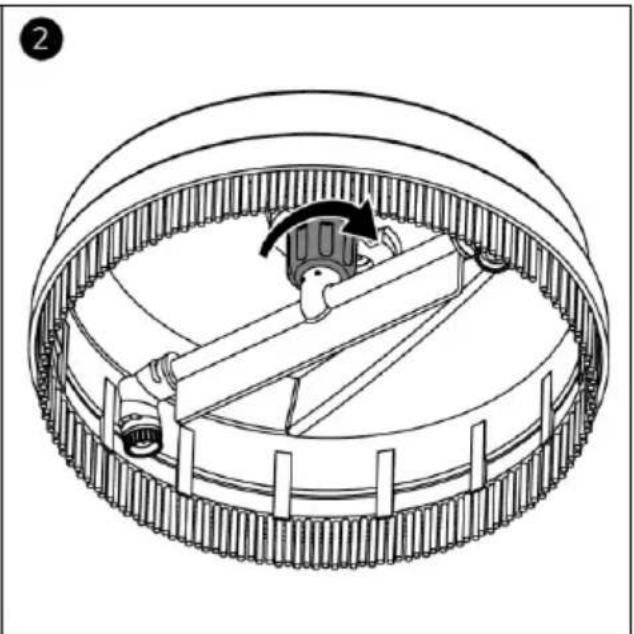
Floor cleaner


natural_image
Technical diagram of a mechanical assembly with gear and shaft components (no text or labels)Figure 12
Nozzle or floor cleaner
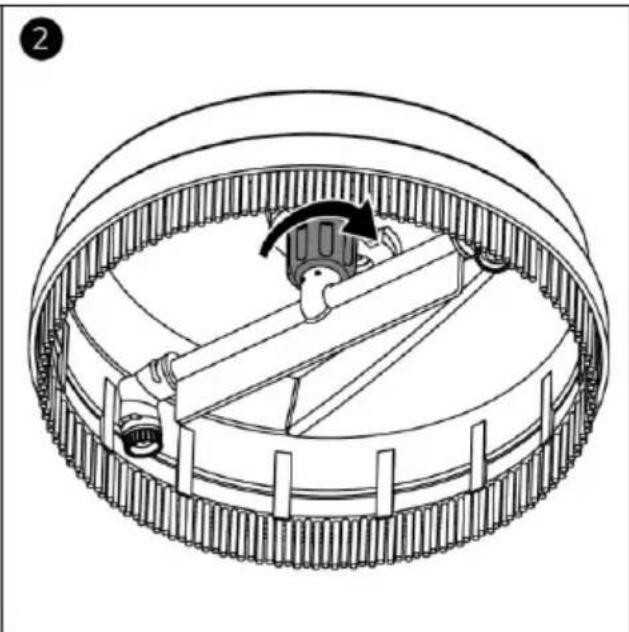
-
Align the ridge of the nozzle or the floor cleaner (Figure 13, pos. 8) with the groove in the extension lance (Figure 13, pos. 9).
-
Insert the nozzle or floor cleaner (Figure 13, pos. 5, 6 or 7) into the extension lance (Figure 13, pos. 4).
-
You will hear a 'click' when the nozzle or floor cleaner is correctly connected.
-
Align the ridge of the extension lance (Figure 13, pos. 1) with the groove in the jet gun (Figure 13, pos. 2).
-
Insert the extension lance (Figure 13, pos. 4) into the jet gun (Figure 13, pos. 3).
-
Turn the extension lance 90° degrees to secure the extension lance.
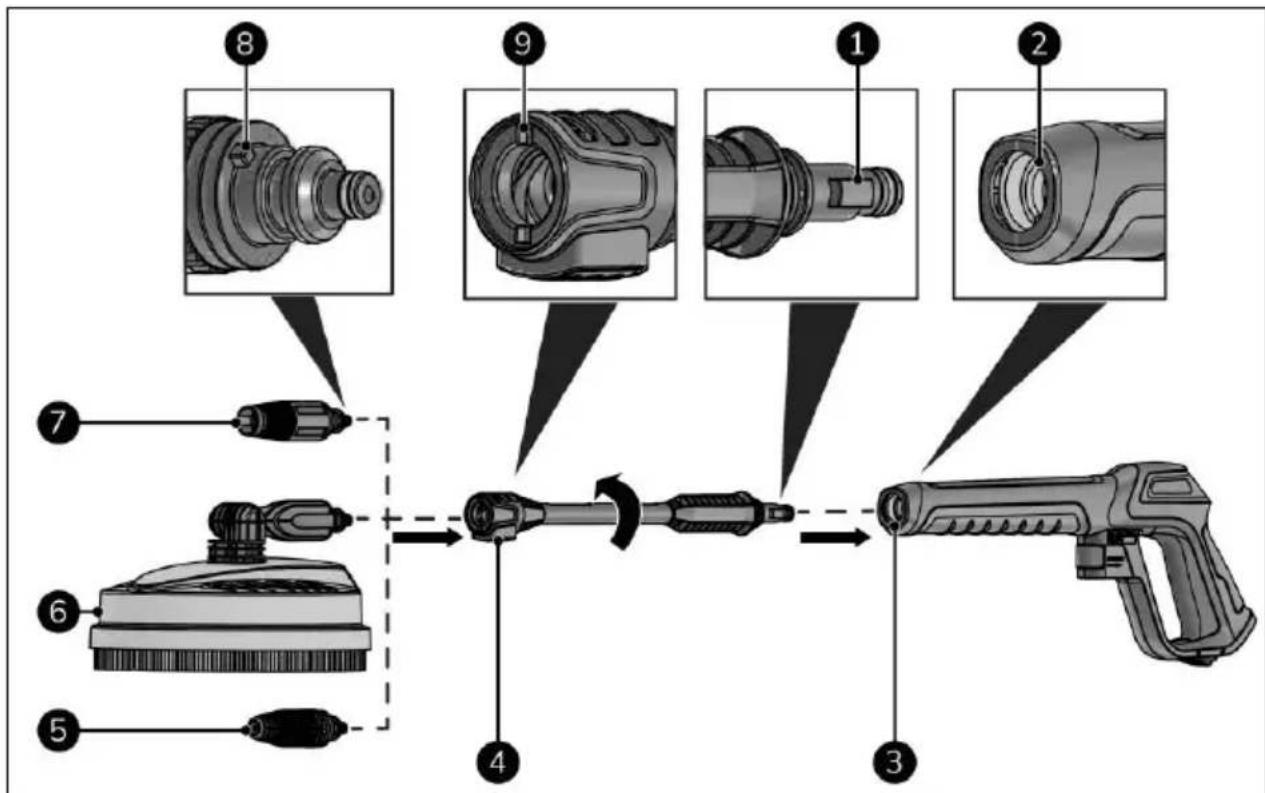
Figure 13
Operation
WARNING
Before operating, see section Safety.

WARNING
Operating the device more than 2 minutes without water leads to damage of the high-pressure pump. If the appliance does not build up pressure within 2 minutes, switch the appliance off and proceed in accordance with the instructions in Chapter “Troubleshooting”.

CAUTION
If the lever of the jet gun is released, the pressure switch turns off the pump and the high-pressure jet stops. The pump switches on again when the lever is pressed.
Start
- Make sure the ON(I)/OFF(0) switch is in the OFF(0) position (Figure 4, pos. 12).
- Open the external water supply completely.
- Unlock the safety lock under the trigger (Figure 6, pos. 1).
- Squeeze the trigger (Figure 6, pos. 2) for several seconds to remove the air from the hose.
- Switch the device on (Figure 4, pos. 12).
Cleaning
WARNING
Be aware of the kickback when squeezing the trigger.

CAUTION
When you stop temporary:
- turn the device off;
- close the external water connection;
-
remove the power plug.
-
Hold the jet gun (Figure 5, pos. 7) with both hands.
- Aim the jet gun at the object that needs to be cleaned.
- Squeeze the trigger (Figure 6, pos. 2) and start cleaning.
Cleaning with floor cleaner
- Hold the jet gun (Figure 5, pos. 7) with both hands.
- Place the floor cleaner (Figure 5, pos. 2) on the surface the be cleaned.
- Squeeze the trigger (Figure 6, pos. 2) and start cleaning.
Change jet angle

CAUTION
The jet angle can only be changed of the adjustable nozzle. The turbo nozzle and floor cleaner have a fixed jet angle.
- If applicable, release the trigger (Figure 6, pos. 2).
- Lock the safety lock under the trigger (Figure 6, pos. 1).
- Rotate the head of the nozzle (Figure 14, pos. 1) to change the jet angle:
- for a smaller (more powerful jet) turn it clockwise (Figure 14, pos. 2).
- for a bigger (less powerful jet) turn it anticlockwise (Figure 14, pos. 1).
- Unlock the safety lock under the trigger.
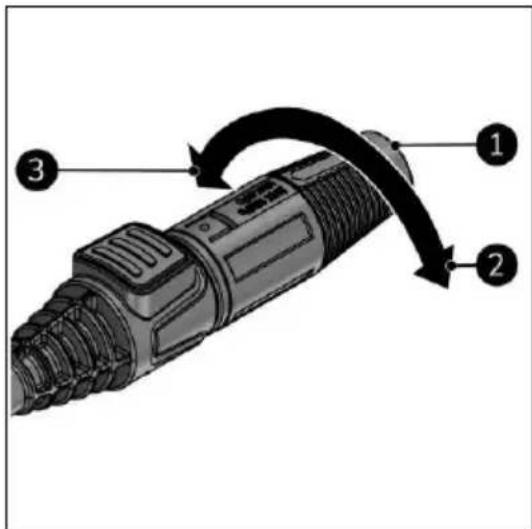
Figure 14
After operation
WARNING
If the device is off, left-over in the device can still be under high pressure.

CAUTION
- Do not use the power cable to unplug or carry the device.
- Do not wind the power cable too tightly or in sharp angles.
-
Do not wrap the power cable around the device.
-
Release the trigger (Figure 6, pos. 2).
- Lock the safety lock under the trigger (Figure 6, pos. 1).
- Switch the device off (Figure 4, pos. 12).
- Pull the power plug out of the socket (Figure 4, pos. 9).
- Wind the power cable.
- Place the power cable on the bracket (Figure 4, pos. 1).
- Close and disconnect the water supply.
- Unlock the safety lock under the trigger.
- Hold the jet gun with both hands.
- Squeeze the trigger to drain the jet gun.
- Unscrew the high-pressure hose (Figure 5, pos. 6) from the high-pressure outlet (Figure 4, pos. 5).
-
Disconnect the high-pressure hose from the jet gun by pressing the button (Figure 6, pos. 4).
-
Drain the high-pressure hose for at least 1 minute.
-
Remove the extension lance (Figure 5, pos. 1) from the jet gun by rotating it 90°.
-
Remove the nozzle or floor cleaner (Figure 15, pos. 1) by pressing the release button (Figure 15, pos. 2) on the jet gun.
-
Place all the accessories on the designated brackets of the device (Figure 4).
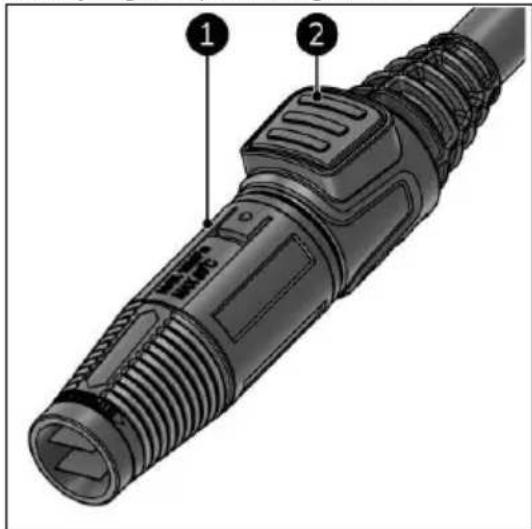
Figure 15
Transport and storage
WARNING
Completely empty the device and accessories. Protect the device from frost. Left over water can freeze and damage the device.
- Move the device by the handle (Figure 4, pos. 13).
- Clean the device before storing it.
• Store the device in its original packaging in, dry and dust-free area.
Prepare for winter / frost-free storage
- Clean the device.
- Make sure there is no left-over water in the device.
- If possible, store the device and accessories in a frost-free of frost-protected room. If not; suck in anti-freeze before you store it. Use the anti-freeze instead of water.
After winter / frost-free storage
WARNING
If the device freezes, have it inspected by an Eurom authorized professional before use.

CAUTION
Frost damage is not covered by warranty.
- If applicable; clean the device.
- Let the device thaw.
- If applicable; remove anti-freeze.
Maintenance
WARNING
Do not repair or modify to this device.
WARNING
Always remove the plug from the socket before you start maintenance!
Repairs and inspections must be carried out by a EUROM authorized professional. If the device, electric cable and/or electric plug are damaged, they should be replaced by the manufacturer or its service employee or persons with similar qualifications to prevent risks.
Perform the following maintenance tasks after every use:
- Carefully remove dust, sand or other dirt from the connections (nozzle, extension lance, jet gun, high-pressure hose and water inlet).
- Remove the nozzle from the extension lance. Regularly clean the nozzle with the supplied pin. Flush it thoroughly (against the direction of the high-pressure jet).
Perform the following maintenance tasks regularly:
• Regularly Vaseline the O-rings of the connectors to prevent them from drying out.
- Clean the water inlet filter.
Grease O-rings
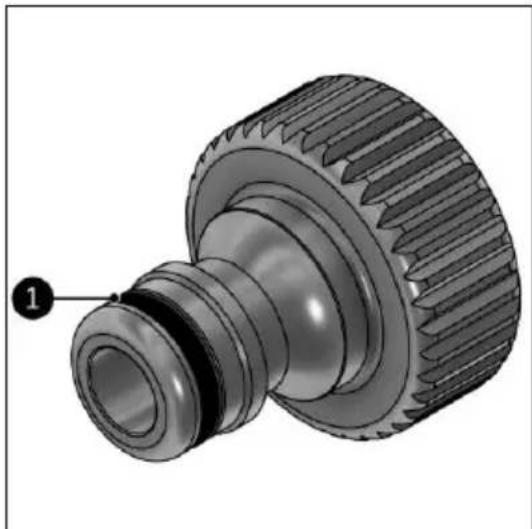
- Pull the nozzle (Figure 5, pos. 4 or 5) from the extension lance (Figure 5, pos. 1).
- Apply Vaseline to the O-ring of the nozzle (Figure 16, pos. 1).
natural_image
3D rendering of a mechanical device with threaded body and cylindrical top (no text or symbols visible)Figure 16
- Pull the floor cleaner (Figure 5, pos. 2) from the extension lance (Figure 5, pos. 1).
- Apply Vaseline to the O-ring of the floor cleaner (Figure 17, pos. 1).

Figure 17
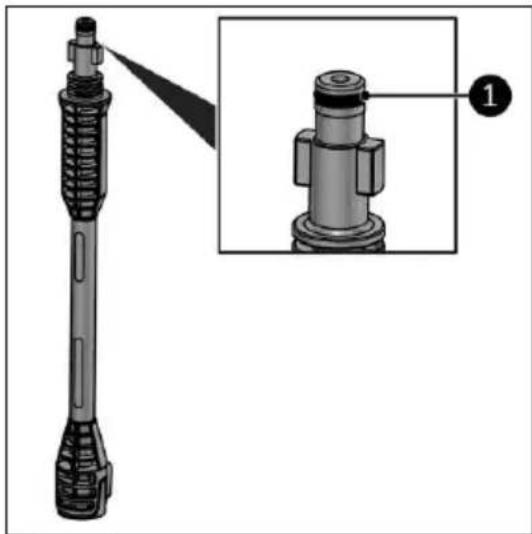
- Remove the extension lance (Figure 5, pos. 1) from the jet gun (Figure 5, pos. 7) by rotating it 90°.
- Apply Vaseline to the O-ring of the lance extension (Figure 18, pos. 1).

natural_image
Technical illustration of a mechanical device with an inset close-up showing a component detail (no text or symbols present)Figure 18
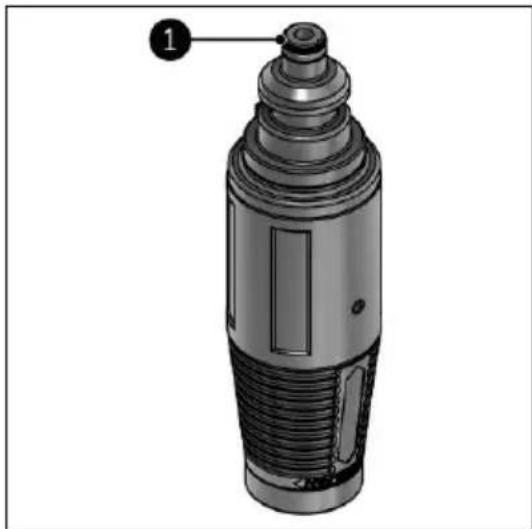
- Apply Vaseline to the O-ring of the garden hose coupling (Figure 19, pos. 1).

natural_image
Mechanical gear component diagram showing teeth and threaded shaft (no text or symbols)Figure 19
Clean the water inlet filter

WARNING
Contact an EUROM authorized professional if the filter needs to be replaced.
CAUTION
Remove the filter with the help of pliers.
- Make sure the device is off.
- Remove the water supply.
- Unscrew the garden hose coupling (Figure 20, pos. 2).
- Pull out the filter (Figure 20, pos. 1).
- Clean the filter under running water.
- Put back the filter.
- Put back the water garden hose coupling.
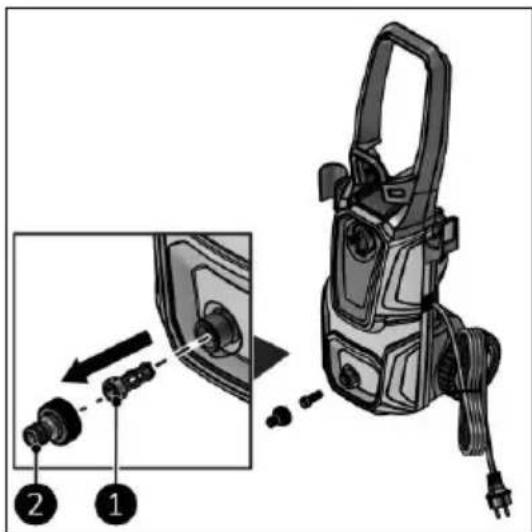
Figure 20
Clean the nozzle(s)
- Make sure the device is off.
- Remove the water supply.
- Pull the nozzle (Figure 21, pos. 2) from the extension lance (Figure 5, pos. 1).
- Clean the nozzle with the cleaning pin (Figure 21, pos. 1).
- Flush it thoroughly (against the direction of the high-pressure jet).
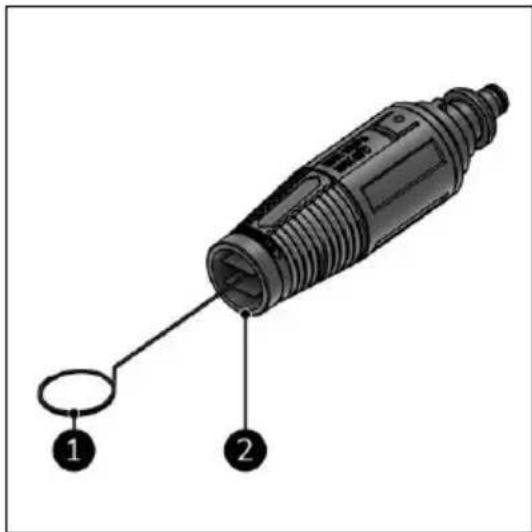
Figure 21
Clean the floor cleaner
-
Make sure the device is off.
-
Remove the water supply.
-
Pull the floor cleaner (Figure 22, pos. 1) from the extension lance (Figure 5, pos. 1).
-
Clean both nozzles (Figure 22, pos. 2) with the cleaning pin (Figure 22, pos. 3).
-
Flush them thoroughly (against the direction of the high-pressure jet).
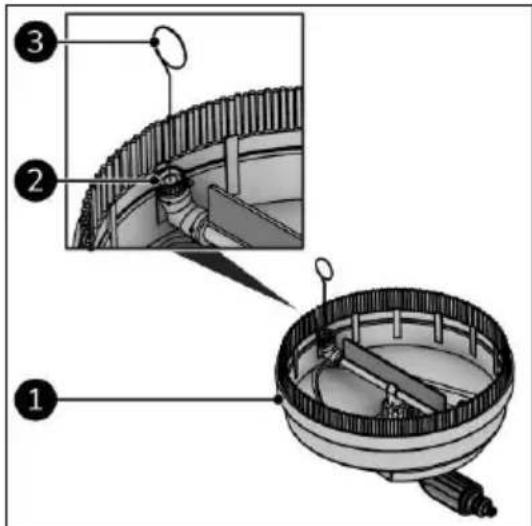
Figure 22
Troubleshoot

CAUTION
Contact a EUROM authorized professional:
• in the event of regularly recurring errors;
- if the errors are not solved.
The following problems can occur:
| Problem | Cause | Solution | Safety instruction |
| The device does not start. | Plug not in the power outlet. | Plug the power plug into the socket. | Make sure the device is off. |
| Power outlet not working. | Use another power outlet. | Make sure the device is off. | |
| Extension cord broken. | Contact a EUROM authorized professional. | Do not use the device. | |
| Fluctuating pressure. | Pump is sucking in air. | Contact a EUROM authorized professional. | Do not use the device. |
| Valves are dirty, worn or broken. | Contact a EUROM authorized professional. | Do not use the device. | |
| Pump seal work. | Contact a EUROM authorized professional. | Do not use the device. | |
| The nozzle is partially blocked. | Clean the nozzle. | Make sure the device is off and drained. | |
| Device stops. | Blown fuse. | Contact a EUROM authorized professional. | Do not use the device. |
| Active thermal safety. | Allow to cool and remove the cause of overheating. | Make sure the device is off. | |
| Do not use the device while cooling off. | |||
| Nozzle is partially blocked. | Clean the nozzle. | Make sure the device is off and drained. | |
| Blown fuse. | Electrical installation is to light. | Connect to an installation with a higher amperage. | Make sure the device is off when switching to another electrical installation. |
| Do not use an extension cable. | Make sure the device is off when removing the extension cable. | ||
| Device vibrates. | Air in the water supply hose. | Allow it to escape by running water through the device while it is switched off. | Make sure the device is off. |
| Problem with the water supply. | Do not use an excessively long or thin hose (min. 1/2".) | Make sure the device is off and drained when changing a hose. | |
| The nozzle is partially blocked. | Clean the nozzle. | Make sure the device is off and drained. | |
| The water inlet filter is dirty. | Clean the water filter. | Make sure the device is off and drained. | |
| There is a kink in the hose. | Straighten the hose. | Make sure the device is off. | |
| The device regularly starts and stops by itself. | Pump or jet lance are leaking. | Have them repaired or replaced. | Contact a EUROM authorized professional. |
| The device starts but does not supply water. | Pump, hose or accessories are frozen. | Allow them to thaw and check them. | Do not use the device. |
| No water supply. | Ensure that there is a water supply. | Make sure the device is off while checking the water supply. | |
| Filter blocked. | Clean the filter. | Make sure the device is off and drained. | |
| Nozzle blocked. | Clean the nozzle. | Make sure the device is off and drained. |
Cleaning

CAUTION
Do not use:
- scouring pads;
- hard brushes;
- flammable, aggressive, or chemical cleaning products.
Prevent water from entering the device. Do not immerse any part of the device in water or other liquids.
It is recommended to clean the device every two weeks and prior to storage. Keep in mind that the water, weather, air pollution, salty environment, smoke, etc. will leave their marks on the device over time.
- Wipe the device with a damp, clean, soft, lint-free cloth, or a soft brush.
- Let the device dry completely prior to use and storage.
Disposal
At its end of life, discard the device according to the local laws and regulations, or deliver the device to your supplier.
Sicherheit
WARNUNG
Abbildung 1
Abbildung 2
Abbildung 4
Abbildung 5
Abbildung 6
Abbildung 7
Halterungen
Abbildung 8
Abbildung 9
Installation
VORSICHT
Abbildung 10
Stahlpistole
Abbildung 11
Bodenreiniger

natural_image
Technical diagram of a mechanical assembly with gear and shaft components (no text or labels)Abbildung 12
Abbildung 13
Betrieb

WARNUNG
Abbildung 14
Nach dem Betrieb
WARNUNG
Abbildung 15
natural_image
3D rendering of a mechanical device with threaded body and top component (no text or symbols visible)Abbildung 16
Abbildung 17
natural_image
Technical illustration of a mechanical component with an inset close-up showing a detailed detail (no text or symbols present)Abbildung 18
natural_image
3D mechanical component diagram showing a gear and shaft assembly (no text or symbols)Abbildung 19
Abbildung 20
Abbildung 21
Abbildung 22
Fehlerbehebung

VORSICHT
Figure 2
Figure 4
Figure 5
Figure 6
Figure 7
Supports
Figure 8
Figure 9
Installation
PRUDENCE
Figure 10
Pistolet à jet
Figure 11
Nettoyeur de sol


natural_image
Technical diagram of a mechanical component with gear and shaft assembly (no text or symbols)Figure 12
Figure 13
Utilisation

AVERTISSEMENT
Figure 14
Après utilisation

AVERTISSEMENT
Figure 15
natural_image
3D rendering of a mechanical device with threaded body and top component (no text or symbols visible)Figure 16
Figure 17
natural_image
Technical illustration of a mechanical device with an inset close-up showing a component detail (no text or symbols present)Figure 18
natural_image
3D mechanical component diagram showing a gear and shaft assembly (no text or symbols)Figure 19
Figure 20
Figure 21
Figure 22

PRUDENCE
Obrázek 2
Obrázek 4
Obrázek 6
Obrázek 7
Držáky
Obrázek 8
Obrázek 9
Instalace

UPOZORNĚNÍ
Obrázek 10
Tlaková pistole
Obrázek 11
Čistič podlah

natural_image
Technical diagram of a mechanical component with gear and shaft assembly (no text or labels)Obrázek 12
Obrázek 13
Provoz
VAROVÁNÍ
Obrázek 14
Ukončení provozu
VAROVÁNÍ
Obrázek 15
natural_image
3D rendering of a mechanical device with threaded body and top component (no text or symbols visible)Obrázek 16
Obrázek 17
natural_image
Technical illustration of a mechanical device with an inset close-up showing a component detail (no text or symbols present)Obrázek 18
natural_image
Mechanical gear component diagram showing teeth and threaded shaft (no text or symbols)Obrázek 19
Obrázek 20
Obrázek 21
Obrázek 22
Řešení potíží

UPOZORNĚNÍ
Obrázok 2
Obrázok 4
Obrázok 5
Obrázok 6
Obrázok 7
Konzoly
Obrázok 8
Obrázok 9
Inštalácia
VÝSTRAHA
Obrázok 10
Trysková pištol'
Obrázok 11
Čistič podláh


natural_image
Technical diagram of a mechanical component with gear and shaft assembly (no text or symbols)Obrázok 12
Obrázok 13
Prevádzka

UPOZORNENIE
Obrázok 14
Obrázok 15
Preprava a skladovanie
UPOZORNENIE
natural_image
3D rendering of a mechanical component with threaded body and cylindrical top, labeled with number 1 (no text or symbols on the object itself)Obrázok 16
Obrázok 17
natural_image
Technical illustration of a mechanical device with an inset close-up showing a component detail (no text or symbols present)Obrázok 18
natural_image
Mechanical gear component diagram showing teeth and threaded shaft (no text or symbols)Obrázok 19
Obrázok 20
Vyčistite trysku(y)
Obrázok 21
Obrázok 22
Riešenie problémov

VÝSTRAHA
EU Declaration of Conformity
We,
Company name: Euromac BV
Postal address: Kokosstraat 20
Postcode: 8281 JC
City: Genemuiden
Country: The Netherlands
Declare that the DoC is issued under our sole responsibility and belongs to the following product:
Product: High pressure cleaner
Brand name: Eurom
Model: Force 1801
Item number: 135688
The object of declaration described above is in conformity with the following relevant Union harmonization legislation:
Machinery Directive: 2006/42/EC
Electromagnetic compatibility Directive: EMC 2014/30/EU
Restriction of Hazardous Substances RoHS Directive: 2011/65/EU&(EU)2015/863
and that the product is in conformity with the following standards and/or other normative documents:
EN 60335-1:2012+A11:2014+A13:2017+A1:2019+A14:2019+A2:2019+A15:2021
EN 60335-2-79:2012
EN 62233:2008
EN IEC 55014-1:2021
EN IEC 55014-2:2021
EN IEC 61000-3-2:2019+A1:2021
EN 61000-3-3:2013+A1:2019+A2:2021
Signed for and on behalf of Euromac BV:
Genemuiden, 06-12-2022
W.J. Bakker, alg. Dir.
Kokosstraat 20, 8281 JC Genemuiden, The Netherlands
T: (+31) 038 385 43 21
E: info@eurom.nl
l : www.eurom.nl
Model: Force 1801
Date: 16/01/2024
Version: v4.0