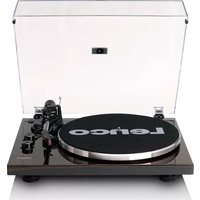
LBT225 - Turntable LENCO - Free user manual and instructions
Find the device manual for free LBT225 LENCO in PDF.
| Product type | Turntable |
| Brand | Lenco |
| Model | LBT225 |
| Dimensions (without cover) | 418 x 123 x 346 mm |
| Dimensions (with cover) | 420 x 410 x 420 mm |
| Weight | 6.65 kg |
| Power supply | DC 12 V / 500 mA adapter (model SW1200500-FM) |
| Power consumption | 6 W |
| Speeds | 33 1/3 and 45 rpm |
| Speed variation | ± 1.0% |
| Wow and flutter | < 0.15% |
| Signal-to-noise ratio | 55 dB |
| Tracking force | 0 - 2.2 g (recommended 1.8 - 2.2 g) |
| Effective tonearm length | 218.5 mm |
| Overhang | 18.54 mm |
| Cartridge | Audio-Technica AT-VM95E (MM) |
| Frequency response | 20 Hz - 20,000 Hz |
| Channel balance | < 2.0 dB |
| Channel separation | > 20 dB |
| Output voltage | 4.0 mV |
| Connectivity | Bluetooth (transmitter), line/phono output (RCA), USB-PC |
| Functions | Vinyl playback, recording via Audacity, Bluetooth transmission |
| Maintenance | Clean with a soft, dry cloth; avoid alcohol, benzene or harsh chemicals |
| Safety | Do not open the device; avoid moisture; use only the supplied adapter |
| Warranty | According to European legislation, contact the retailer |
| Included accessories | Counterweight, anti-skate weight, belt, 45 rpm adapter, USB cable, Audacity software (to download) |
Frequently Asked Questions - LBT225 LENCO
User questions about LBT225 LENCO
0 question about this device. Answer the ones you know or ask your own.
Ask a new question about this device
Download the instructions for your Turntable in PDF format for free! Find your manual LBT225 - LENCO and take your electronic device back in hand. On this page are published all the documents necessary for the use of your device. LBT225 by LENCO.
USER MANUAL LBT225 LENCO
natural_image
Line drawing of a vintage rotary dial with open lid and base mount (no text or symbols)User Manual – Turntable with Glass Platter and Bluetooth Transmission Gebruikershandleiding – Platenspeler met glazen plateau en Bluetooth-zending Bedienungsanleitung – Plattenspieler mit Glasteller und Bluetooth-Übertragung Mode d'emploi – Platine vinyle avec plateau en verre et transmission Bluetooth Manual de usuario – Tocadiscos con plato de cristal y transmisión Bluetooth Manuale Utente – Giradischi con piatto in vetro e trasmissione Bluetooth Brugervejledning – Pladespiller med Bluetooth-forbindelse og pladetallerken i glas Bruksanvisning – Skivspelare med glastallrik och Bluetooth-överföring
Index
English....-3-
Nederlands....- 16 -
Deutsch - 29 -
Français.... - 43 -
Español....- 56 -
Italiano....- 69 -
Русский....- 82 -
Dansk....- 97 -
Svenska....- 110 -
Version: 1.0
English
CAUTION:
Usage of controls or adjustments or performance of procedures other than those specified herein may result in hazardous radiation exposure.
KEEP THESE INSTRUCTIONS IN MIND:
- Do not cover or block any ventilation openings. When placing the device on a shelf, leave 5 cm (2") free space around the whole device.
- Install in accordance with the supplied user manual.
- Keep the device away from heat sources such as radiators, heaters, stoves, candles and other heat-generating products or naked flame. The device can only be used in moderate climates. Extremely cold or warm environments should be avoided. Working temperature between 0^ and 35^ C.
- Avoid using the device near strong magnetic fields.
- Electrostatic discharge can disturb normal usage of this device. If so, simply reset and restart the device following the instruction manual. During file transmission, please handle with care and operate in a static-free environment.
- Warning! Never insert an object into the product through the vents or openings. High voltage flows through the product and inserting an object can cause electric shock and/or short circuit internal parts. For the same reason, do not spill water or liquid on the product.
- Do not use in wet or moist areas such as bathrooms, steamy kitchens or near swimming pools.
- The device shall not be exposed to dripping or splashing and make sure that no objects filled with liquids, such as vases, are placed on or near the apparatus.
- Do not use this device when condensation may occur. When the unit is used in a warm wet room with damp, water droplets or condensation may occur inside the unit and the unit may not function properly; let the unit stand in power OFF for 1 or 2 hours before turning on the power: the unit should be dry before getting any power.
- Although this device is manufactured with the utmost care and checked several times before leaving the factory, it is still possible that problems may occur, as with all electrical appliances. If you notice smoke, an excessive build-up of heat or any other unexpected phenomena, you should disconnect the plug from the main power socket immediately.
- This device must operate on a power source as specified on the specification label. If you are not sure of the type of power supply used in your home, consult your dealer or local power company.
- Keep away from animals. Some animals enjoy biting on power cords.
- To clean the device, use a soft dry cloth. Do not use solvents or petrol based fluids. To remove severe stains, you may use a damp cloth with dilute detergent.
- The supplier is not responsible for damage or lost data caused by malfunction, misuse, modification of the device or battery replacement.
- Do not interrupt the connection when the device is formatting or transferring files. Otherwise, data may be corrupted or lost.
- If the unit has USB playback function, the USB memory stick should be plugged into the unit directly. Don't use an USB extension cable because it can cause interference resulting in failing of data.
- The rating label has been marked on the bottom or back panel of the device.
- This device is not intended for use by people (including children) with physical, sensory or mental disabilities, or a lack of experience and knowledge, unless they're under supervision or have received instructions about the correct use of the device by the person who is responsible for their safety.
- This product is intended for non professional use only and not for commercial or industrial use.
- Make sure the unit is adjusted to a stable position. Damage caused by using this product in an unstable position vibrations or shocks or by failure to follow any other warning or precaution contained within this user manual will not be covered by warranty.
- Never remove the casing of this device.
- Never place this device on other electrical equipment.
- Do not allow children access to plastic bags.
-
Only use attachments/accessories specified by the manufacturer.
-
Refer all servicing to qualified service personnel. Servicing is required when the device has been damaged in any way, such as the power supply cord or the plug, when liquid has been spilled or objects have fallen into the device, when the device has been exposed to rain or moisture, does not operate normally, or has been dropped.
-
Long exposure to loud sounds from personal music players may lead to temporary or permanent hearing loss.
-
If the product is delivered with power cable or AC power adaptor:
-
If any trouble occur, disconnect the AC power cord and refer servicing to qualified personnel.
- Don't step on or pinch the power adaptor. Be very careful, particularly near the plugs and the cable's exit point. Do not place heavy items on the power adaptor, which may damage it. Keep the entire device out of children's reach! When playing with the power cable, they can seriously injure themselves.
● Unplug this device during lightning storms or when unused for a long period.
● The socket outlet must be installed near the equipment and must be easily accessible. - Do not overload ac outlets or extension cords. Overloading can cause fire or electric shock.
● Devices with class 1 construction should be connected to a main socket outlet with a protective earthed connection.
● Devices with class 2 construction do not require a earthed connection.
● Always hold the plug when pulling it out of the main supply socket. Do not pull the power cord. This can cause a short circuit. -
Do not use a damaged power cord or plug or a loose outlet. Doing so may result in fire or electric shock.
-
If the product contains or is delivered with a remote control containing coin/cell batteries:
Warning:
- “Do not ingest battery, Chemical Burn Hazard” or equivalent working.
● [The remote control supplied with] This product contains a coin/button cell battery. If the battery is swallowed, it can cause severe internal burns in just 2 hours and can lead to death. - Keep new and used batteries away from children.
- If the battery compartment does not close securely, stop using the product and keep it away from children.
-
If you think batteries might have been swallowed or placed inside any part of the body, seek immediate medical attention.
-
Caution about the use of Batteries:
● Danger of explosion if battery is incorrectly replaced. Replace only with the same or equivalent type.
● Battery cannot be subjected to high or low extreme temperatures, low air pressure at high altitude during use, storage or transportation.
● Replacement of a battery with an incorrect type that can result in an explosion or the leakage of flammable liquid or gas.
- Disposal of a battery into fire or a hot oven, or mechanically crushing or cutting of a battery, that can result in an explosion.
● Leaving a battery in an extremely high temperature surrounding environment that can result in an explosion or that leakage of flammable liquid or gas.
● A battery subjected to extremely low air pressure that may result in an explosion or the leakage of flammable liquid or gas.
- Attention should be drawn to the environmental aspects of battery disposal.
INSTALLATION
- Unpack all parts and remove protective material.
- Do not connect the unit to the mains before checking the mains voltage and before all other connections have been made.
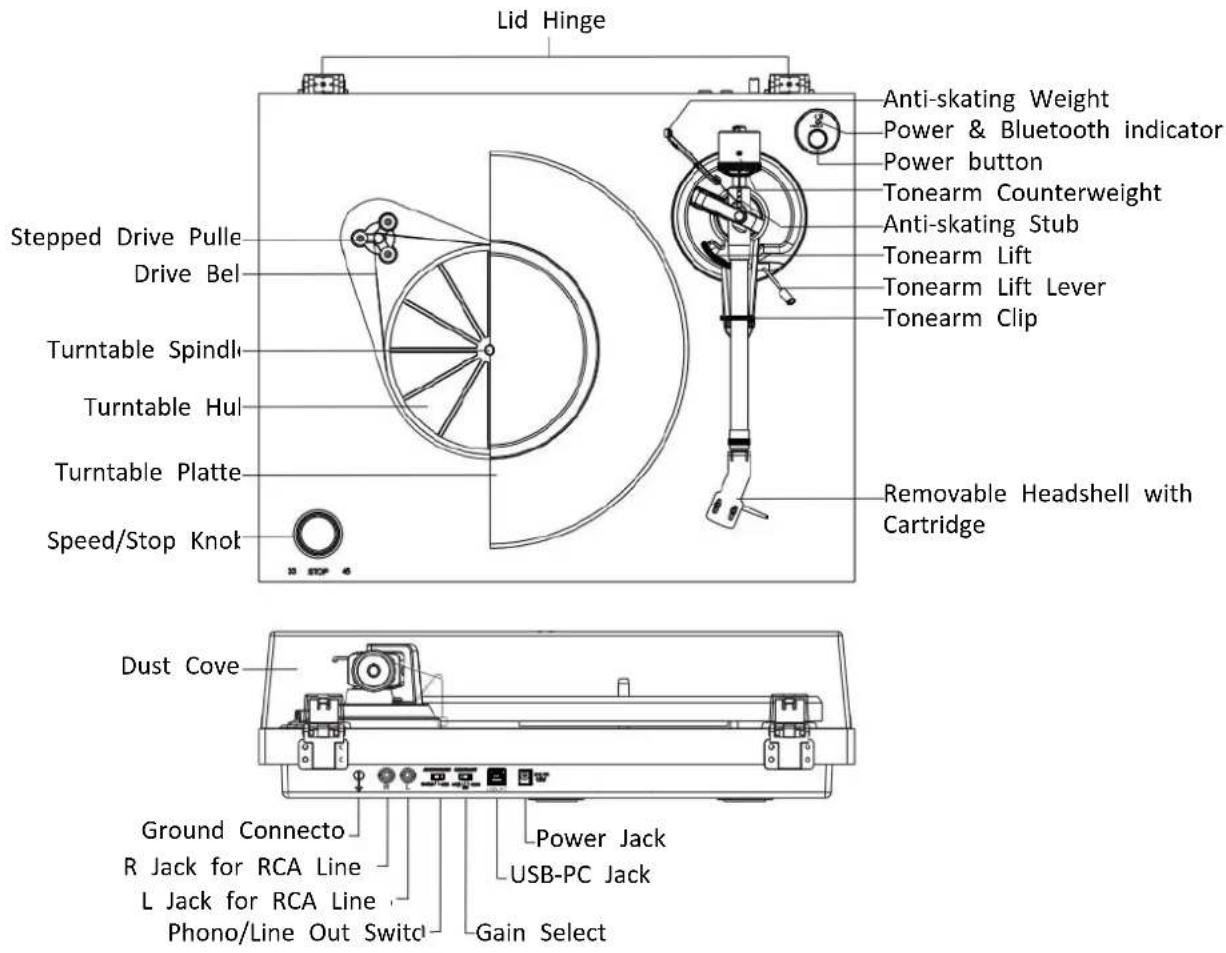
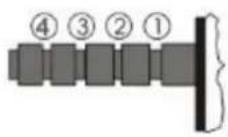
Product Description
text_image
Lid Hinge Stepped Drive Pulle Drive Bel Turntable Spindle Turntable Hul Turntable Platte Speed/Stop Knol Anti-skating Weight Power & Bluetooth indicator Power button Tonearm Counterweight Anti-skating Stub Tonearm Lift Tonearm Lift Lever Tonearm Clip Removable Headshell with Cartridge Dust Cove Ground Connecto R Jack for RCA Line L Jack for RCA Line Phono/Line Out Switch Power Jack USB-PC Jack Gain SelectInitial Setup
- Place the unit on a flat and level surface. The selected location should be stable and free from vibration.
- Install the turntable lid to the hinges.
- Remove the tie-wrap that is holding the tonearm.
- Put the drive belt around the Turntable Hub, and then use the provided belt hoot to help pull the belt to fit around the slot of motor pulley.
- Place the turntable platter through the turntable spindle.
- Place the slip mat on top of the turntable platter.
- Slide Tonearm Counterweight onto tonearm and twist it lightly onto the rear shaft of the tonearm.
- Adjust the counterweight to set proper stylus pressure.
- Locate the anti-skating weight
- Connect AC-DC adaptor to the Power Jack of the unit.
Note: Do not plug the AC power adaptor to power outlet before all the assembly is completed.
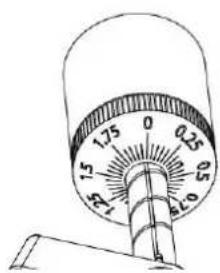
Cartridge Down force Adjustment
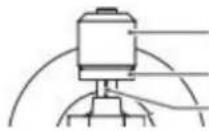
Counterweight
Downforce scale ring
Center line
The Counterweight supplied is suitable for cartridges weighing between 6.0-8.0g.
Gently push and turn the Counterweight onto the rear of the tonearm (with the scale facing toward the front of the turntable).
Remove the cartridge protection cap.
Lower the tonearm lift and position the cartridge in the space between tonearm rest and platter.
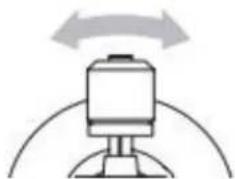
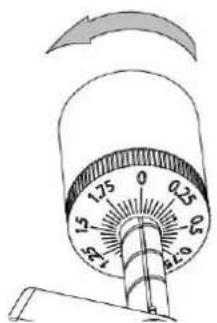
Carefully rotate the Counterweight until the tonearm balances out. The tonearm should return to the balanced position if it is moved up or down. This adjustment must be done carefully.
natural_image
Simple line drawing of a mechanical device with no text or symbolsOnce the tonearm is correctly balanced return it to its' rest. Hold the Counterweight without moving it, and gently rotate the Down force Scale ring until the zero is in line with black line on the rear of the tonearm. Check whether the arm still balances out.
text_image
1.75 0 0.25 1.5 0 5 620Rotate the counterweight counter clockwise (seen from the front) to adjust the down force according to the cartridge manufacturer's recommendations. One mark on the scale represents 0.05g of down force.
text_image
1.75 0 0.25 -0.5 ±15 ±25 ±30NOTE: The recommended down force for the factory fitted cartridge is 2.0 ± 0.2 g.
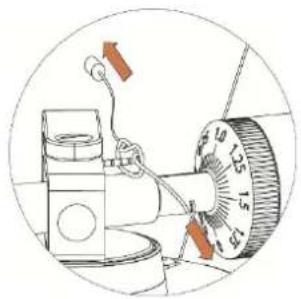
Locate the anti-skating weight
You will find a anti-skating weight with small fishing line from the package, please follow below steps to locate the anti-skating weight:
- Slip the looped end of the fishing line over the anti-skating weight adjustment stub and integrable (the correct anti-skating force for the factory-fitted cartridge).
natural_image
Mechanical diagram showing a piston connected to a drum dial with arrows indicating motion (no text or symbols)-
Pull the anti-skating weight slightly to let the tie of the fishing line move to the stub.
-
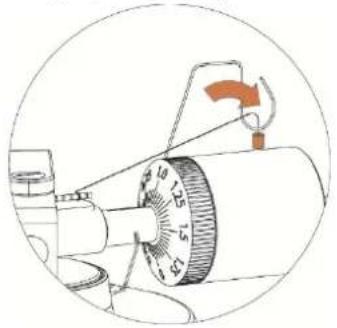
Lift the anti-skating weight over the anti-skating weight wire support. The anti-skating weight should now be dangling in free space to the left of support.
natural_image
Diagram of a mechanical device with a rotating knob and directional arrow (no text or symbols)The anti-skating force must be adjusted corresponding to the down force as follows:
Down force
Groove in the stub
0.51 - 1.02g
1 st from bearing rings
1.02 - 1.53g
2 nd " " "
1.53 - 2.04g
3 rd " " "
2.04g or more
4 th " " "
Stereo System Connection
RCA Jacks
- The RCA Jacks of this unit are shared as both the Phono output jacks and the Line output jacks. They are determined by the Phono/Line Switch.
- When used as a line output, the jacks output analog line-level signals and could be connected directly with a pair of active speakers or the appropriate input of your stereo system. When used as a Phono output, they should be connected to the phono pre-amplifier or the phono input of the stereo system.
- The Red plug connects with the Right channel and the White plug connects with the Left channel.
Note:
- If the Phono/Line switch is set at LINE position but RCA jacks connected to the stereo system's phono input, the sound might be distorted due to input overload and could damage your stereo system.
- If the Phono/Line switch is set at PHONO position but RCA jacks connected to the stereo system's line input, the volume will be very low due to lacking signal pre-amplification.
RCA Jack is not designed to be connected directly to the passive/unpowered speakers and if it does, the volume will be very low.
GAIN SELECT switch
When playing, adjust the difference of the volume of the vinyl records. If the audio track was recorded on the vinyl record at a quite volume, set this to HIGH to play at the appropriate volume. If the audio track was recorded on the vinyl record at a loud volume, the sound may become distorted if you play the vinyl record with this set to HIGH. Change the settings to be appropriate for the vinyl record.
Volume adjustment is effective for audio output when the OUTPUT SELECT switch is set to LINE, the playback volume on BLUETOOTH connections, and the recording volume on the computer. It is ineffective for audio output when the OUTPUT SELECT switch is set to PHONO.
Main Power Connection
The power adaptor is in the foam packing material. Unpack the power adaptor and plug the small end into the DC power jack located at the back side of the turntable. Plug the power adaptor into your power outlet.
Operation
Turntable Operation
- Connect the included power adapter to unit and Press the power button to power ON the turntable.
- Remove the needle cover from the cartridge.
- Place the slipmat on the platter and place a record on the slipmat. If using 45 RPM records, put the 45 RPM adapter on the center spindle before placing the record on the platter.
- Set the 33/45 RPM Selector according to the type of record. The platter starts to spinning.
- Unlock the arm clip and set the Lift Lever to the up position.
- Position the tonearm over the desired location (groove) on the record.
- Move the tonearm lift lever to the down position to move the tonearm toward the record. Alternatively, place the needle over the desired location on the record.
- Carefully lower the tonearm on the record.
- When you are finished playing the record, raise the tonearm, return it to rest on the arm clip, and turn the Speed/Stop Knob to the Stop.
- Press the power button to turn off the power.
Bluetooth Operation
This unit has a Bluetooth transmitter to send the sound to a Bluetooth speaker or headphone wirelessly.
- Power on your Bluetooth speaker and ensure it is in pairing mode.
-
Power ON the turntable with the power button. The LED indicator will first light to RED and then will flash in blue during Bluetooth searching of the external speaker or headphone.
Note: if you want to disable the Bluetooth searching function you can press the Power button for 3 seconds, then the Led light indicator will light to RED. -
When pairing, the Blue LED light will flash twice per second, then change to be long Lighting Blue when paired;
Note: This unit will connect to the closest Bluetooth. If after 2 minutes no Bluetooth speaker can be found to pair with, the Bluetooth transmitter will become inactive and the LED color will turn to red.
- To disconnect pairing, long press power button for 3 seconds or turn off Bluetooth pairing on your External Bluetooth speaker or headphone..
"This product has a bluetooth transmission function, you can not receive any bluetooth sound on it: this means that you can transmit wirelessly a bluetooth sound signal to an external device like a bluetooth speaker, bluetooth headphone, audio system with bluetooth reception,..."
Audacity software overview
Audacity is free software, licensed under the GNU General Public License (GPL). More information as well as open source code can be found on the web at https://www.audacityteam.org/download/
* Please ensure you have installed the software before starting.
Setting up your PC to work with Audacity
- Connect an input source to the unit.
- Connect the USB lead to your computer.
- Install the Audacity recording software.
- Open the Audacity program.
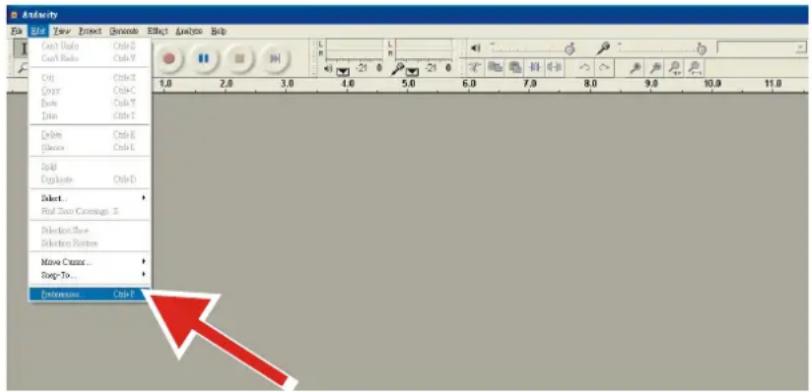
- Select Preference from the Edit tab in the Audacity Menu.
text_image
Unity File Edit View Insert Generate Effect Analysis Help Cut Ctrl+0 Cut Ctrl+1 Cut Ctrl+C Delete Ctrl+2 Delete Ctrl+C Delete Ctrl+E Delete Ctrl+F Delete Ctrl+F Ctrl Ctrl+0 Ctrl+1 Ctrl+2 Ctrl+3 Ctrl+4 Ctrl+5 Ctrl+6 Ctrl+7 Ctrl+8 Ctrl+9 Ctrl+10 Ctrl+11 Ctrl+12 Ctrl+13 Ctrl+14 Ctrl+15 Ctrl+16 Ctrl+17 Ctrl+18 Ctrl+19 Ctrl+20 Ctrl+21 Ctrl+22 Ctrl+23 Ctrl+24 Ctrl+25 Ctrl+26 Ctrl+27 Ctrl+28 Ctrl+29 Ctrl+30 Ctrl+31 Ctrl+32 Ctrl+33 Ctrl+34 Ctrl+35 Ctrl+36 Ctrl+37 Ctrl+38 Ctrl+39 Ctrl+40 Ctrl+41 Ctrl+42 Ctrl+43 Ctrl+44 Ctrl+45 Ctrl+46 Ctrl+47 Ctrl+48 Ctrl+49 Ctrl+50 Ctrl+51 Ctrl+52 Ctrl+53 Ctrl+54 Ctrl+55 Ctrl+56 Ctrl+57 Ctrl+58 Ctrl+59 Ctrl+60 Ctrl+61 Ctrl+62 Ctrl+63 Ctrl+64 Ctrl+65 Ctrl+66 Ctrl+67 Ctrl+68 Ctrl+69 Ctrl+70 Ctrl+71 Ctrl+72 Ctrl+73 Ctrl+74 Ctrl+75 Ctrl+76 Ctrl+77 Ctrl+78 Ctrl+79 Ctrl+80 Ctrl+81 Ctrl+82 Ctrl+83 Ctrl+84 Ctrl+85 Ctrl+86 Ctrl+87 Ctrl+88 Ctrl+89 Ctrl+90 Ctrl+91 Ctrl+92 Ctrl+93 Ctrl+94 Ctrl+95 Ctrl+96 Ctrl+97 Ctrl+98 Ctrl+99 Ctrl+100-
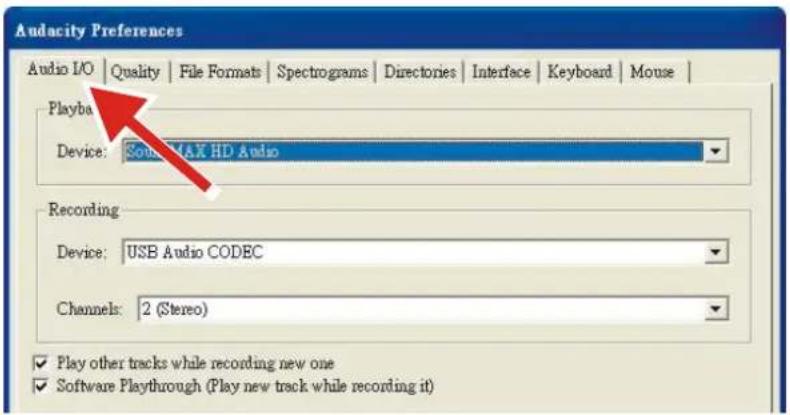
Select Audio I/O tab at the top left.
-
Under Playback, Device, select your internal sound card.
- Under Recording, Device, select USB Audio CODEC.
• Under Recording, Channels, select 2 (Stereo). - Check the box marked Play other tracks while recording new one.
- Check the box marked Software Playthrough.
text_image
Audacity Preferences Audio I/O | Quality | File Formats | Spectrograms | Directories | Interface | Keyboard | Mouse | Playba Device: Sony MAX HD Audio Recording Device: USB Audio CODEC Channels: 2 (Stereo) Play other tracks while recording new one Software Playthrough (Play new track while recording it)Recording Albums with Audacity
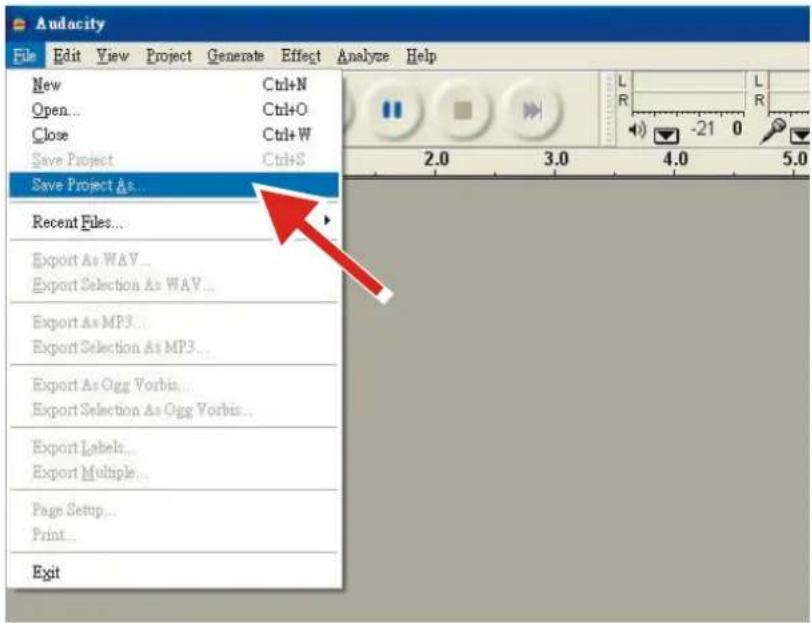
1. Saving a project
- Audacity writes all the changed and recorded audio to a directory called Projectname_data, which is located right where you saved the project file itself.
- Thus, select Save Project as from your Audacity File tab and choose a location and filename for your project.
- Please note that when you startup Audacity fresh, only the "Save As..." menu option is available.
text_image
Audacity File Edit View Project Generate Effect Analyze Help New Ctrl+N Open... Ctrl+O Close Ctrl+W Save Project Ctrl+S Save Project As... Recent Files... Export As WAV... Export Selection As WAV... Export As MP3... Export Selection As MP3... Export As Ogg Vorbis... Export Selection As Ogg Vorbis... Export Labels... Export Multiple... Page Setup... Print... Exit2. How to record
- Set your USB turntable up to play the song or album you want to record.
- Click on the red Record button to begin recording.

- Lower tone arm on USB turntable onto album and track you want to record.

- Click on the blue Pause button to pause the recording. Press it again to continue.
- Click on the yellow Stop button.

That's it. You can now play around with your recording and explore the editing capabilities of Audacity. Remember that you can use the Undo function almost without limits while the project is open.
NOTE: CD's cannot be burned directly from the Audacity application. Other CD burning applications should be used.
Maintenance and Cleaning
-
Do not touch the stylus tip with your fingers. Avoid bumping the stylus on the turntable mat or a record's edge.
-
Clean the stylus frequently with a soft brush with a back-to-front motion only.
-
Clean the records to get rid of dust or grease with a record cleaning brush and record cleaning solution.
-
Clean the turntable lid and turntable cabinet with a slightly damped microfiber cloth.
Note: Do not use cleanser other that contains alcohol, benzene or any other harsh chemicals, with might damage the paint and finish of the turntable.
Your turntable requires little of no regular maintenance. Remove dust with a slightly damp antistatic cloth. Never use a dry cloth, this will create static electricity and attract more dust! Antistatic cleaning agents are available at specialist stores, but must be applied sparingly to avoid damage to rubber parts. It is recommended to install the needle cover before cleaning or maintenance is carried out to avoid damage.
If the turntable is not used over a long period of time, the drive belt should be removed to prevent unequal stretching.
Always disconnect the record player from the power supply as a precaution before maintenance!
Useful Tips
The turntable should be positioned on a low-resonance surface such as wood or multiple layer ply board to avoid structural vibrations disturbing playback.
Cartridge Replacement
-
Before replacement, put the stylus protector back on the stylus to prevent damage to the stylus during the replacement process.
-
Carefully remove the wire leads from the original cartridge.
-
Loosen the two screws on the headshell that are securing the cartridge and then remove the original cartridge.
-
Mount the new cartridge to the headshell and tighten it lightly. Do not completely tighten the screws at this
moment.
- Connect the wire leads to the new cartridge's terminals. The wire lead color are as below:
| White | Left channel positive | (L+) |
| Blue | Left channel negative | (L-) |
| Red | Right channel positive | (R+) |
| Green | Right channel negative | (R-) |
- Adjust the cartridge's position to make sure it is precisely aligned on the headshell so that the stylus will be tracking the grooves in parallel perfectly.
To achieve this, place the included paper cartridge alignment protractor over the turntable spindle, carefully lift the tone arm and place the tip of the stylus on the points marked 130mm and 250mm respectively. Fine tune the cartridge's position on the headshell until the cartridge is perfectly in parallel with the reference lines at both posits.
- Tighten the screws completely once the perfect alignment is achieved.
Specifications
Main Unit
| Power | AC power adaptor, DC output 12V 500mA |
| Power Consumption | 6W |
| Turntable Speed | 33 1/3, 45 RPM |
| Speed Variance | ±1.0% |
| Wow and Flutter | < 0.15% |
| Signal to Noise | 55dB |
| Downforce Range | 0-2.2g |
| Effective Tonearm Length | 8.6" (218.5mm) |
| Overhang | 0.73" |
| Turntable Dimensions (W X H X D) | 418 X 123 X 346 mm, with lid open 420 X 410 X 420 mm |
| Weight | 6.65kgs |
Needle: AT-VM95E
| Frequency Response | 20Hz - 20,000Hz |
| Channel Balance | <2.0dB |
| Channel Separation | >20dB |
| Output Voltage | 4.0mV |
| Recommended Load Resistance | 47kΩ |
| Amplifier connection | MM - input |
| Recommended Tracking Pressure | 1.8-2.2g |
| Weight | 6.1g |
Note:
- Design and specifications are subject to change without notice.
Power supply adaptor:
Manufacturer: BRIGHTPOWER OPTOELECTRONIC TECHNOLOGY CO., LTD
Model number: SW1200500-FM
Input voltage: 100-240V
Input AC frequency: 50/60Hz
Output voltage: DC 12V
Output current: 0.5A
Output Power: 6W
Average active efficiency: 79.62%
Efficiency at low load (10%): 70.40%
No load Power consumption: 0.073W
Use only the power supply listed in the user instructions
Troubleshooting
There is no power
- Power adaptor is not connected correctly.
- No power at the power outlet.
Power is on, but the platter does not turn
- Need to switch the Speed/STOP button to 33 or 45 to start playing.
- Turntable's drive belt is not installed or has slipped off.
- The unit automatically switched in standby mode, power ON again.
Turntable is spinning, but there is no sound, or sound not loud enough
- Stylus protector is still on.
- Tone arm is lift up by the lever.
- The Phono/Line switch is set at PHONO position but RCA jacks connected to the stereo system's line input.
- Forget to connect the speaker to the turntable.
Distorted of inconsistent sound from one or both channels:
- Turntable is connected to wrong input of amplifier.
- Needle or cantilever damaged.
- Drive belt overstretched or dirty.
- Platter bearing without oil, dirty or damaged.
- Dust on stylus.
- MM/MC switch on pre-amplifier set incorrectly.
Record sounds too fast or too slow
- Wrong speed selected for the record.
Strong hum on phono input
- The cable is not grounded correctly.
- Turntable too close to speakers.
Remark:
To protect the stylus, the platter will Stop automatically if no music has been playing for 3 min. For lowering the power consumption, the whole unit will switch to standby mode automatically if no music has been playing for about 20 minutes.
To restart the unit, press the POWER Button.
If your unit switches off regularly, this is no defect.
Guarantee
Lenco offers service and warranty in accordance to European law, which means that in case of repairs (both during and after the warranty period) you should contact your local dealer.
Important note: It is not possible to send products that need repairs to Lenco directly.
Important note: If this unit is opened or accessed by a non-official service center in any way, the warranty expires.
This device is not suitable for professional use. In case of professional use, all warranty obligations of the manufacturer will be voided.
Disclaimer
Updates to Firmware and/or hardware components are made regularly. Therefore some of the instruction, specifications and pictures in this documentation may differ slightly from your particular situation. All items described in this guide for illustration purposes only and may not apply to particular situation. No legal right or entitlements may be obtained from the description made in this manual.

natural_image
Symbol of a trash bin crossed with no text or labels
Disposal of the Old Device
This symbol indicates that the relevant electrical product or battery should not be disposed of as general household waste in Europe. To ensure the correct waste treatment of the product and battery, please dispose them in accordance to any applicable local laws of requirement for disposal of electrical equipment or batteries. In so doing, you will help to conserve natural resources and improve standards of environmental protection in treatment and disposal of electrical waste (Waste Electrical and Electronic Equipment Directive).
DECLARATION OF CONFORMITY
Hereby, Commaxx declares that the radio equipment type [Lenco LBT-225] is in compliance with directive 2014/53/EU. The full text of the EU declaration of conformity is available at the following internet address: https://commaxx-certificates.com/doc/lbt-225_doc.pdf
| Type RF | Frequency range (MHz) | Power (dBm) |
| Bluetooth | 2402-2480 | < 6 |
Service
For more information and helpdesk support, please visit www.lenco.com
Commaxx B.V. Wiebachstraat 37, 6466 NG Kerkrade, The Netherlands.
Nederlands
OPGELET:
natural_image
Simple line drawing of a mechanical device with no text or symbolstext_image
Diagram of a dial indicator with scale markings and an arrow indicating rotation or directiontext_image
Diagram showing mechanical components with numbered parts and directional arrows indicating motion or forcenatural_image
Diagram of a mechanical device with a rotating knob and directional arrow (no text or symbols)text_image
ActionScript File Edit View Project Generate Effect Analysis Help Cut Tools Ctrl+2 Cut Tools Ctrl+1 Copy Ctrl+C Copy Ctrl+C Down Ctrl+7 Down Ctrl+1 Delete Ctrl+E Delete Ctrl+L Split Collapse Ctrl+D Select... Real Save Coverage 3 Selection Save Selection Return Move Caption... Snap-To... Preview... Ctrl?text_image
Audacity Preferences Audio I/O | Quality | File Formats | Spectrograms | Directories | Interface | Keyboard | Mouse | Playba Device: Sound MAX HD Audio Recording Device: USB Audio CODEC Channels: 2 (Stereo) Play other tracks while recording new one Software Playthrough (Play new track while recording it)text_image
Audacity File Edit View Project Generate Effect Analyze Help New Ctrl+N Open... Ctrl+O Close Ctrl+W Save Project Ctrl+S Save Project As... Recent Files... Export As WAV... Export Selection As WAV... Export As MP3... Export Selection As MP3... Export As Ogg Vorbis... Export Selection As Ogg Vorbis... Export Labels... Export Multiple... Page Setup... Print... Exit2. Opnemen
natural_image
Symbol of a trash bin crossed out by two diagonal lines (no text or labels)
natural_image
Simple line drawing of a device with bidirectional arrows indicating motion (no text or symbols)text_image
Diagram of a rotary dial with scale markings and an arrow indicating rotation directionnatural_image
Mechanical diagram showing a piston connected to a drum dial with arrows indicating motion (no text or symbols)natural_image
Diagram of a mechanical device with a rotating knob and directional arrow (no text or symbols)1,02 - 1,53g 2. " " "
1,53 - 2,04g 3. " " "
text_image
Unity File Edit View Insert Documents Effect Locks Help Cut Ctrl X Delete Ctrl Y Delete Ctrl Z Delete Ctrl W Delete Ctrl X Delete Ctrl Y Delete Ctrl Z Delete Ctrl Y Delete Ctrl Z Delete Ctrl Y Delete Ctrl Z Delete Ctrl Y Delete Ctrl Z Delete Ctrl Y Delete Ctrl Y Delete Ctrl Y Delete Ctrl Y Delete Ctrl Y Delete Ctrl Y Delete Ctrl Y Delete Ctrl Y Delete Ctrl Y Delete Ctrl Y Delete Ctrl Y Delete Ctrl Y Delete Ctrl Y Delete Ctrl Y Delete Ctrl Y Delete Ctrl Y Delete Ctrl Y Delete Ctrl Y Delete Ctrl Y Delete Ctrl Y Delete Ctrl Y Delete Ctrl Y Delete Ctrl Y Delete Ctrl Y Delete Ctrl Y Delete CtrlY Delete Ctrl Y Delete Ctrl Y Delete Ctrl Y Delete Ctrl Y Delete Ctrl Y Delete Ctrl Y Delete Ctrl Y Delete Ctrl Y Delete Ctrl Y Delete Ctrl Y Delete Ctrl Y Delete Ctrl Y Delete Ctrl Y Delete Ctrl Y Delete Ctrl Y Delete Ctrl Y Delete Ctrl Y Delete Ctrl Y Delete Ctrl Y Delete Ctrl Y Delete Ctrl Y Delete Ctrl Y Delete Ctrl Y Delete Ctrl Y Delete Ctrl Extrema Ctrl Red Line Cytvage 1 Red Line New Red Line New Move Crotsc... Snap-Tr. Extrema Ctrltext_image
Audacity Preferences Audio I/O | Quality | File Formats | Spectrograms | Directories | Interface | Keyboard | Mouse | Playba Device: Solid MAX HD Audio Recording Device: USB Audio CODEC Channels: 2 (Stereo) Play other tracks while recording new one Software Playthrough (Play new track while recording it)text_image
Audacity File Edit View Project Generate Effect Analyze Help New Ctrl+N Open... Ctrl+O Close Ctrl+W Save Project Ctrl+S Save Project As... Recent Files... Export As WAV... Export Selection As WAV... Export As MP3... Export Selection As MP3... Export As Ogg Vorbis... Export Selection As Ogg Vorbis... Export Labels... Export Multiple... Page Setup... Print... Exit2. Aufzeichnen
natural_image
Symbol of a trash bin crossed out by two crossed lines, with a blank rectangular base below (no text or symbols)https://commaxx-certificates.com/doc/lbt-225_doc.pdf
natural_image
Simple line drawing of a mechanical device with bidirectional arrows indicating motion (no text or symbols)natural_image
Diagram of a mechanical device with a dial and lever, showing no text or symbolsnatural_image
Diagram of a mechanical device with a rotary knob and adjustment knob, no text or symbols presenttext_image
Adobe File Edit View Project Grange Effect Analysis Help Cut Ctrl+0 Cut Tools Ctrl+V Copy Ctrl+C Copy Ctrl+C Delete Ctrl+V Delete Ctrl+V Delete Ctrl+R Delete Ctrl+L Help Delete Ctrl+D Select... Post Save Coverage S Selection Tree Selection Tree Move Caption... Snap-To... Endoform Ctrl+Ptext_image
Audacity Preferences Audio I/O | Quality | File Formats | Spectrograms | Directories | Interface | Keyboard | Mouse | Playba Device: Scot MAX HD Audio Recording Device: USB Audio CODEC Channels: 2 (Stereo) Play other tracks while recording new one Software Playthrough (Play new track while recording it)text_image
Audacity File Edit View Project Generate Effect Analyze Help New Ctrl+N Open... Ctrl+O Close Ctrl+W Save Project Ctrl+S Save Project As... Recent Files... Export As WAV... Export Selection As WAV... Export As MP3... Export Selection As MP3... Export As Ogg Vorbis... Export Selection As Ogg Vorbis... Export Labels... Export Multiple... Page Setup... Print... Exitnatural_image
Symbol of a trash bin crossed with no visible text or labelshttps://commaxx-certificates.com/doc/lbt-225_doc.pdf
| Type RF | Bande de fréquences (MHz) | Puissance (dBm) |
| Bluetooth | 2402-2480 | < 6 |
Réparation
natural_image
Simple line drawing of a mechanical device with bidirectional arrows indicating motion (no text or symbols)natural_image
Mechanical diagram showing a piston connected to a drum dial with arrows indicating motion (no text or symbols)natural_image
Diagram of a mechanical device with a rotating knob and directional arrow (no text or symbols)text_image
Adobe File Edit View Insert Generate Effect Analysis Help Craft Auto Ctrl+2 Craft Tools Ctrl+1 Copy Ctrl+X Copy Ctrl+C Down Ctrl+Y Down Ctrl+Z Delete Ctrl+E Delete Ctrl+L Split Episodes Ctrl+D Select... Real Save Coverage 2 Selection Base Selection Section Move Caption... Snap-To... Preferences Ctrl+1text_image
Audacity Preferences Audio I/O | Quality | File Formats | Spectrograms | Directories | Interface | Keyboard | Mouse | Playba Device: Solid MAX HD Audio Recording Device: USB Audio CODEC Channels: 2 (Stereo) Play other tracks while recording new one Software Playthrough (Play new track while recording it)text_image
Audacity File Edit View Project Generate Effect Analyze Help New Ctrl+N Open... Ctrl+O Close Ctrl+W Save Project Ctrl+S Save Project As... Recent Files... Export As WAV... Export Selection As WAV... Export As MP3... Export Selection As MP3... Export As Ogg Vorbis... Export Selection As Ogg Vorbis... Export Labels... Export Multiple... Page Setup... Print... Exit2. Cómo grabar
natural_image
Symbol of a trash bin crossed out by two crossed lines, with a black rectangular base below (no text or symbols)https://commaxx-certificates.com/doc/lbt-225_doc.pdf
natural_image
Simple line drawing of a mechanical device with bidirectional arrows indicating motion (no text or symbols)natural_image
Mechanical diagram showing a piston connected to a drum dial with arrows indicating motion (no text or symbols)natural_image
Diagram of a mechanical device with a rotating knob and directional arrow (no text or symbols)text_image
Autonomy File Edit View Insert Gradients Effect Analysis Help Craft Date Ctrl+2 Craft Date Ctrl+1 Cut Ctrl+2 Copy Ctrl+C Delete Ctrl+7 Finish Ctrl+7 Define Ctrl+B Balance Ctrl+L Insert Duplicate Ctrl+D Select... Real Save Coverage: 5 Selection Zone Selection Range Move Cursor... Snap-To... Refresh Ctrl+1text_image
Audacity Preferences Audio I/O | Quality | File Formats | Spectrograms | Directories | Interface | Keyboard | Mouse | Playba Device: Soft MAX HD Audio Recording Device: USB Audio CODEC Channels: 2 (Stereo) Play other tracks while recording new one Software Playthrough (Play new track while recording it)text_image
Audacity File Edit View Project Generate Effect Analyze Help New Ctrl+N Open... Ctrl+O Close Ctrl+W Save Project Ctrl+S Save Project As... Recent Files... Export As WAV... Export Selection As WAV... Export As MP3... Export Selection As MP3... Export As Ogg Vorbis... Export Selection As Ogg Vorbis... Export Labels... Export Multiple... Page Setup... Print... Exit2. Come registrare
natural_image
Symbol of a trash bin crossed out by two crossed lines, with a blank rectangular base below (no text or symbols)natural_image
Simple line drawing of a device with bidirectional arrows indicating motion (no text or symbols)natural_image
Diagram of a mechanical device with a dial and directional arrows indicating motion (no text or symbols)natural_image
Diagram of a mechanical device with a rotating knob and directional arrow (no text or symbols)text_image
Unity File Edit View Insert Generate Effect Analysis Help Cut Ctrl+0 Cycl Ctrl+C Copy Ctrl+C Down Ctrl+P Delete Ctrl+T Delete Ctrl+E Paste Ctrl+L Rolls Exploids Ctrl+D Select... Next Save Coverage 2 Selection Save Selection Return Move Center... Snap-To... Preferences Ctrl+7text_image
Audacity Preferences Audio I/O | Quality | File Formats | Spectrograms | Directories | Interface | Keyboard | Mouse | Playba Device: Soft MAX HD Audio Recording Device: USB Audio CODEC Channels: 2 (Stereo) Play other tracks while recording new one Software Playthrough (Play new track while recording it)text_image
Audacity File Edit View Project Generate Effect Analyze Help New Ctrl+N Open... Ctrl+O Close Ctrl+W Save Project Ctrl+S Save Project As... Recent Files... Export As WAV... Export Selection As WAV... Export As MP3... Export Selection As MP3... Export As Ogg Vorbis... Export Selection As Ogg Vorbis... Export Labela... Export Multiple... Page Setup... Print... Exit2. Как записывать
natural_image
Simple line drawing of a trash bin with crossed lines indicating no waste or discharge (no text or symbols)https://commaxx-certificates.com/doc/lbt-225_doc.pdf
natural_image
Simple line drawing of a device with bidirectional arrows indicating motion (no text or symbols)natural_image
Mechanical diagram showing a piston connected to a drum dial with arrows indicating motion (no text or symbols)natural_image
Diagram of a mechanical device with a rotating knob and directional arrow (no text or symbols)text_image
Anfurity File Edit View Project Options Effect Analysis Help Craft Date Ctrl+Z Craft Date Ctrl+Y Copy Ctrl+X Color Ctrl+C Delete Ctrl+Y Delete Ctrl+Y Delete Ctrl+E Delete Ctrl+L Add Delete Ctrl+D Select... Real-Comp-Ctrl+Z Selection Save Selection Runoff Move Cnscs... Snap-To... Options Ctrl+Ptext_image
Audacity Preferences Audio I/O | Quality | File Formats | Spectrograms | Directories | Interface | Keyboard | Mouse | Playba Device: Soft MAX HD Audio Recording Device: USB Audio CODEC Channels: 2 (Stereo) Play other tracks while recording new one Software Playthrough (Play new track while recording it)Optagelse af albums med Audacity
text_image
Audacity File Edit View Project Generate Effect Analyze Help New Ctrl+N Open... Ctrl+O Close Ctrl+W Save Project Ctrl+S Save Project As... Recent Files... Export As WAV... Export Selection As WAV... Export As MP3... Export Selection As MP3... Export As Ogg Vorbis... Export Selection As Ogg Vorbis... Export Labels... Export Multiple... Page Setup... Print... Exit2. Sådan optager du
natural_image
Symbol of a trash bin crossed out by two crossed lines (no text or numbers present)
https://commaxx-certificates.com/doc/lbt-225_doc.pdf
| Type RF | Frekvensområde (MHz) | Effekt (dBm) |
| Bluetooth | 2402-2480 | < 6 |