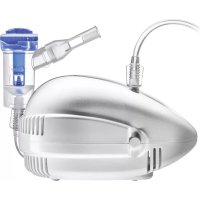
AirMate - Inhaler Flaem - Free user manual and instructions
Find the device manual for free AirMate Flaem in PDF.


User questions about AirMate Flaem
0 question about this device. Answer the ones you know or ask your own.
Ask a new question about this device
Download the instructions for your Inhaler in PDF format for free! Find your manual AirMate - Flaem and take your electronic device back in hand. On this page are published all the documents necessary for the use of your device. AirMate by Flaem.
USER MANUAL AirMate Flaem
text_image
C1 C1.2 C1.1 C1.2.3 C1.2.2 C1.2.1 C4 C5 C1 C2 C3 C2 B A2 A A5 A3 A4 A A6 D Accessory BagSchema di collegamento - Assembly diagram - Schéma de raccordement - Esquema de conexión - Anschlussplan -Aansluitschema - Schemat połączeniowy - مخطّط التوصيل
text_image
TÜVRheinland® CERTIFIED Type Approved Safety Regular Production Surveillance www.tuv.com ID 0217007802AirMate
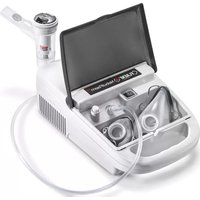
Mod. P0504EM F400 APPARECCHIO PER AEROSOLTERAPIA
text_image
C1.2.1 C1.2.2natural_image
Line drawing of two individuals wearing face masks, one holding a nasal tube near the mouth (no text or symbols)MODI D'USO DEL NEBULIZZATORE "RF8 DUAL SPEED" CON SELETTORE DI VELOCITÀ
natural_image
Technical line drawing of a mechanical component with no visible text or symbolsnatural_image
Technical line drawing of a mechanical component with no visible text or symbolsnatural_image
Diagram of a mechanical component with a circular feature and a tool, no visible text or symbolsWe are pleased you have purchased our product and we thank you for your trust in us. Our goal is to fully satisfy consumers by offering them cutting-edge systems for the treatment of respiratory tract ailments. Carefully read these instructions and keep them in a safe place for future reference. Read these instructions carefully and retain them for future reference. Only use the accessory as described in this manual. This is a medical device to nebulise and administer medication prescribed or recommended by your doctor. Please note that the full range of products is visible on the website www.flaem.it
STANDARD EQUIPMENT INCLUDES:
A - Aerosol apparatus (main unit)
A1 - On/Off switch
A2 - Air intake
A3 - Air filter
A4 - Nebuliser holder
A5 - Handle for transport
A6 - Power cable
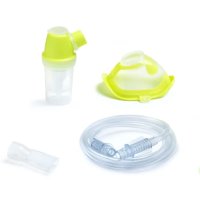
B - Connection tube (main unit / nebuliser)
D - Pochette bag for accessories
C - Accessories
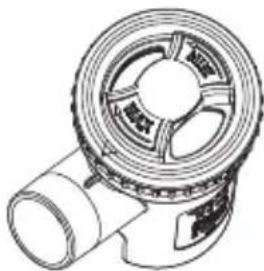
C1 - RF8 Dual Speed Nebuliser
C1.1 - Lower part
C1.2 - Upper part with selector
C1.2.1 - Upper part
C1.2.2 - Selector support
C1.2.3 - Speed selector
C2 - Mouthpiece
C3 - Adult nose piece
C4 - Pediatric SoftTouch face mask
C5 - Adult SoftTouch face mask
IMPORTANT WARNINGS
- This device is also intended for direct use by the patient.
- Before using the product for the first time, and periodically during its lifetime, check the integrity of the device structure and of the power cable to make sure there is no damage. In the event of damage, do not plug in the cable and immediately take the product to an authorised FLAEM service centre or to your trusted dealer.
- Should your device fail to provide the expected performance, contact the authorised service centre for clarifications.
- The expected medical life of the accessories is 1 year. It is, however, advisable to replace the nebuliser cup every 6 months in the event of intense use (or earlier if the cup is obstructed) to always guarantee maximum therapeutic efficacy.
- Children and people who are not self-sufficient must use the device under the close supervision of an adult who has read this manual.
- Some parts of the device are small enough to be swallowed by children; therefore, keep the device out of the reach of children.
- Do not use the supplied tubing and cables for anything other than their intended use. These parts could cause a strangling hazard: pay close attention to children and persons with particular difficulties as they are often unable to accurately evaluate danger.
- The apparatus is unsuitable for use in presence of flammable anaesthetic mixture with air, oxygen or nitrous oxide.
• Always keep the power supply cable away from hot surfaces. - Keep the power cable away from animals (for example, rodents) which could damage the insulation.
- Do not handle the device with wet hands. Do not use the device in damp environments (for example, while taking a bath or shower). Do not immerse the
device in water; in the event of immersion immediately disconnect the plug. Do not remove or touch the immersed device; unplug the power cable first. Immediately bring the device to an authorised FLAEM service centre or to your trusted dealer.
- Use the device only in dust-free conditions, otherwise treatment could be compromised.
- Do not wash the device under running water or by immersion and keep it safe from being sprayed by water or other liquids.
- Do not expose the device to particularly extreme temperatures.
- Do not place the device near sources of heat, in direct sunlight or in excessively hot rooms.
- Do not obstruct or put objects into the filter or its related housing in the device.
- Never obstruct the air vents located on both sides of the device.
• Always use it on a rigid surface that is clear of obstacles. - Make sure there is no material obstructing the air vents before each use.
- Do not put any objects in the air vents.
- Repairs, including the replacement of the supply cord, are to be carried out by FLAEM authorised personnel only, by complying with the information provided by the manufacturer.
- The average expected duration for the compressor series are: F400: 400 hours, F700: 700 hours, F1000: 1000 hours, F2000: 2000 hours.
- WARNING: Do not modify this device without authorisation from the manufacturer.
- The Manufacturer, the Vendor and the Importer shall be held responsible for safety, reliability and performance only if: a) the device is used in compliance with the instructions for use b) the wiring where the device is being used is in compliance with safety regulations and current laws.
- Interactions: the materials used in contact with medication have been tested with a vast range of medications. However, in view of the variety and continuous evolution of pharmaceuticals, interactions cannot be ruled out. We recommend using the medication as soon as possible once it has been opened and preventing prolonged exposure in the nebuliser cup. Interactions: The materials used in the device are biocompatible in accordance with the provisions of Directive 93/42 EC and subsequent amendments. However, the possibility of occurrence of allergic reactions cannot be entirely excluded.
- The manufacturer must be contacted about any problems and/or unexpected events concerning operation and for any clarifications on use, maintenance/cleaning.
- The amount of time required between preservation conditions and use is approximately 2 hours.
OPERATING INSTRUCTIONS
Before each use, clean hands thoroughly and clean the device as described in the section on “CLEANING, SANITIZATION AND DISINFECTION”. During use, it is advisable to protect yourself from any dripping. It is recommended that each person use their own nebulizer cup and accessories to prevent risk of infection due to contamination.
This device is suitable for the administration of medical substances and not, for which the administration via aerosol is foreseen; these substances are to be in any case prescribed by the Doctor. In case of too thick substances, the dilution with a suitable physiological solution could be needed, according to the medical prescription.
-
Plug the power cord (A6) into a power socket corresponding to the voltage of the unit. The position of the socket must be such that the device can be easily unplugged from the mains network.
-
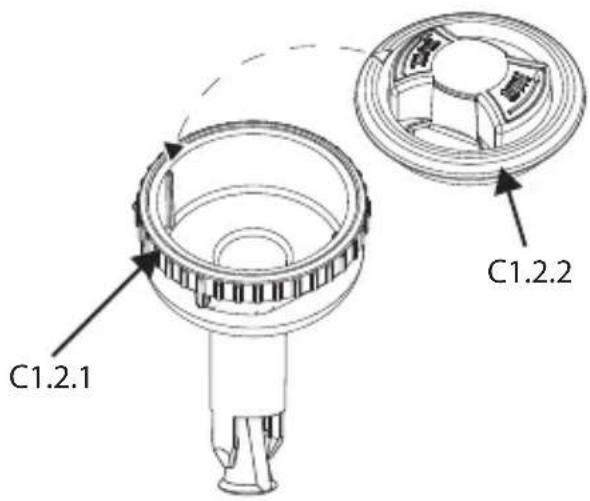
Reassemble the upper part with selector as shown in the assembly diagram section C1.2.
Attention, the selector's support (C1.2.2) must fit in perfectly into the upper part (C1.2.1). To do so, you must align the arrow on the selector's support with the shaft coupling accessories, see the image.
-
Pour the medication prescribed by the doctor into the lower part (C1.1). Insert the upper part (C1.2) into the lower part (C1.1), close the nebuliser by turning the upper part (C1.2) clockwise.
-
Connect accessories as indicated in the "Connection diagram" on the cover.
-
Sit comfortably holding the nebuliser in your hand, place the mouthpiece onto your mouth or alternatively use the nose piece or mask. Should you opt for the mask accessory, place it on your face as shown in the picture (with or without using the elasticated strap).
-
Start the device by means of switch (A1) and breathe deeply in and out. After inhaling, we recommend holding your breath for an instant to allow the inhaled drops of aerosol to deposit. Then exhale slowly.
-
Upon completing application, switch off the device and unplug it.
ATTENTION: If after the therapy session an evident de- posit of moisture forms within the pipe (B), detach the pipe from the nebuliser and dry it with the very ventilation from the compressor; this operation prevents possible blooms of mould inside the pipe.
text_image
C1.2.1 C1.2.2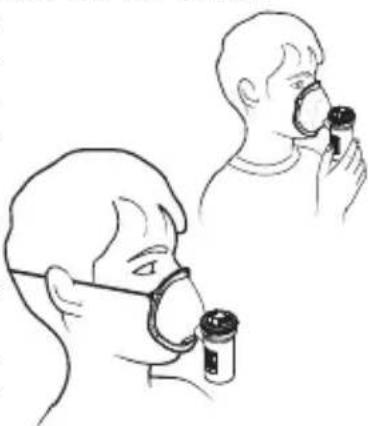
natural_image
Line drawing of two individuals wearing face masks, one holding a device (no text or symbols)USER METHODS OF THE "RF8 DUAL SPEED" NEBULISER WITH SPEED SELECTOR
natural_image
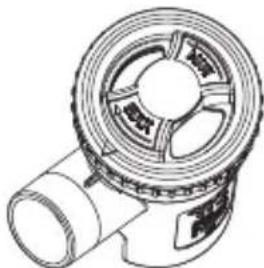
Technical line drawing of a mechanical component with no visible text or symbolsTo make the inhalation therapy faster, turn the speed selector (C1.2.3) clockwise.
natural_image
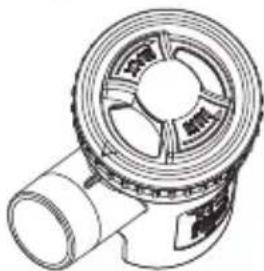
Technical line drawing of a mechanical component with no visible text or symbolsFor more effective inhalation therapy, turn the speed selector (C1.2.3) anticlockwise. In this case, you have optimal assumption of the medication, minimising leaks into the surrounding environment.
text_image
Soft biocompatible material Dispersion Limiting VentSoftTouch masks have an outer edge made of soft biocompatible material that ensures excellent adherence to the face, and is also equipped with an innovative Dispersion Limiting Device. These distinctive elements that distinguish it allow greater sedimentation of medication in the patient and also limit dispersion.
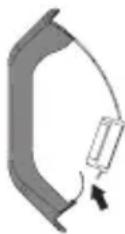
During the inspiratory phase, the tab, acting as a Dispersion Limiting Device, bends inwards towards the mask.
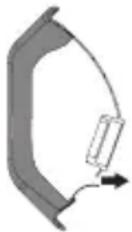
During the expiratory phase, the tab, acting as a Dispersion Limiting Device, bends outwards from the mask.
CLEANING SANITISATION DISINFECTION
Switch off the device before any cleaning procedure and unplug the power cable from the socket.
DEVICE (A) AND TUBING EXTERIOR (B)
Use only a damp cloth with antibacterial soap (non-abrasive and with no solvents of any sort).
ACCESSORIES
Open the nebuliser by turning the upper part (C1.2) anticlockwise, remove the upper part (C1.2) as shown in the "Assembly diagram" in point C1.2.
Then proceed according to the following instructions.
SANITISATION
Before and after each use, sanitise the nebuliser cup and the accessories, choosing one of the methods described below.
method A: Sanitise accessories C1.1-C1.2.1-C1.2.2-C1.2.3-C2-C3-C4-C5 uunder potable hot water (approximately 40°C) with a gentle, non abrasive dish detergent.
method B: Sanitise accessories C1.1-C1.2.1-C1.2.2-C1.2.3-C2-C3-C4-C5 in the dishwasher with a hot cycle.
method C: Sanitise accessories C1.1-C1.2.1-C1.2.2-C1.2.3-C2-C3-C4-C5 by immersing them in a solution of 50% water and 50% white vinegar, then rinse thoroughly under potable hot water (approximately 40°C).
If you want to also perform the cleaning for DISINFECTION, jump to the DISINFECTION paragraph.
After having sanitised the accessories, shake them vigorously and place them on a paper towel. Alternatively, dry them with a jet of hot air (for example, a hair dryer).
DISINFECTION
After sanitising the nebuliser cup and the accessories, disinfect them choosing one of the methods described below.
method A: Accessories C1.1-C1.2.1-C1.2.2-C1.2.3-C2-C3-C4-C5 can be disinfected.
The disinfectant must be an electrolytic chloroxidizer (active principle: sodium hypochlorite) specific for disinfecting, which is available in any pharmacy.
Implementation:
- Fill a container big enough to hold all of the parts to disinfect with a solution of potable water and disinfectant, according to the proportions indicated on the packaging of the disinfectant.
- Completely immerse each part in the solution, taking care to avoid the formation of
air bubbles on the parts. Leave the parts immersed for the amount of time indicated on the packaging of the disinfectant associated with the concentration chosen for the solution.
- Remove the disinfected parts and rinse abundantly with warm potable water.
- Dispose of the solution following the instructions provided by the disinfectant manufacturer.
method B: Disinfect the accessories C1.1-C1.2.1-C1.2.2-C1.2.3-C2-C3-C4-C5 by boiling them in water for 10 minutes; use demineralised or distilled water to prevent calcium deposits.
method C: Disinfect the accessories C1.1-C1.2.1-C1.2.2-C1.2.3-C2-C3-C4-C5 with a hot steam steriliser for baby-bottle (not the microwave type). Perform the process faithfully following the instructions of the steriliser. To ensure that the disinfection is effective, choose a steriliser with an operating cycle of at least 6 minutes.
After having disinfected the accessories, shake them vigorously and place them on a paper towel. Alternatively, dry them with a jet of hot air (for example, from a hair dryer).
At the end of each use store the device complete with accessories in a dry place away from dust.
REPLACING THE FILTER
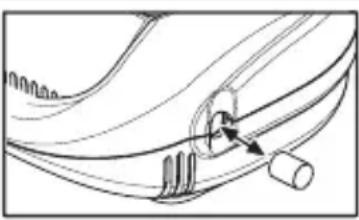
The device has a suction filter (A3) that should be replaced when it is dirty or changes color. Do not wash or reuse the same filter. Regular replacement of the filter is required to help and ensure correct performance of the compressor.
Check the filter on a regular basis.
Do not replace the filter during use.
natural_image
Diagram of a car's side profile showing a handle and seat, with no visible text or symbolsOnly use original accessories and spare parts by Flaem, we disclaim any liability in the event of using non original spare parts or accessories.
TROUBLESHOOTING
Switch off the device before any procedure and unplug the power cable from the socket.
| PROBLEM CAUSE SOLUTION | ||
| The device does not work | The power cable has not been correctly inserted into the socket of the device or the power socket | Correctly insert the power cable in sockets. |
| The device does not nebulize or nebulizes insufficiently. | The medication has not been inserted in the nebulizer | Pour the right amount of medication in the nebulizer |
| The nebulizer has not been properly fitted. | Disassemble the nebulizer and reassemble it correctly as shown in the connection diagram on the cover. | |
| The nebulizer nozzle is clogged | Disassemble the nebulizer, remove the nozzle and perform cleaning operations Failure to remove medication deposits from the nebulizer affects its efficiency and operation. Strictly comply with the instructions contained in the “CLEANING, SANITISATION, DISINFECTION” chapter | |
| The air pipe is not correctly connected to the device | Ensure the device's accessories are properly connected to the air intake (see connection diagram on the cover). | |
| The air pipe is bent, damaged or twisted | Unwind the pipe and ensure it is not crushed or punctured. If necessary replace it. | |
| The air filter is dirty Replace the filter | ||
| The apparatus is noisier than usual | The Filter is not correctly inserted in its housing | Fully and properly insert the Filter in its housing |
If after verifying the above mentioned conditions the device should not operate properly, contact your trusted retailer or the nearest authorized service center.
Certification TÜV


0051
CE Medical Marking ref. Dir. 93/42 EEC and subsequent amendments

Class II device Manufacturer

Important: check the operating instructions

"OFF" for part of equipment

"ON" for part of equipment

Complies with: European standard EN 10993-1 "Biological Evaluation of Medical Devices" and European Directive 93/42/EEC "Medical Devices". Phthalates free. In conformity with Reg. (EC) no. 1907/2006

Minimum and maximum room temperature

Minimum and maximum atmospheric pressure

Serial number of device

Type BF applied part

Alternating current
IP21
Enclosure protection rating: IP21. (Protected against solid bodies over 12 mm. Protected against access with a finger. Protected against vertically falling water drops.)

Minimum and maximum air moisture
ELECTROMAGNETIC COMPATIBILITY
This device was designed to satisfy the currently required requisites for electromagnetic compatibility (EN 60601-1-2). Electro-medical devices require particular care during installation and use relative to EMC requirements. Users are therefore requested to install and/or use these devices following the manufacturer's specifications. Risk of potential electromagnetic interference with other devices. Mobile or portable RF radio and telecommunication devices (mobile phones or wireless connections) may interfere with the operation of medical devices. For more information, visit the website www.flaemnuova.it. The appliance may be susceptible to electromagnetic interference in the presence of other devices used for specific diagnoses or treatments. Flaem reserves the right to make technical and functional changes to the product without prior notice.
Mod. P0504EM F400
| Voltage: | 230V~50Hz130VA | 115V~60Hz 220V~60Hz |
| Safety certifications: |  | |
| Max pressure: | 1.8 ± 0.3 bar | |
| Compressor air output: | 9 l/min approx | |
| Sound level (at 1 m): | 54 dB (A) approx | |
| Operation: | Continuous | |
| Operating conditions: | ||
| Temperature: | min 10^ ; max 40^ | |
| RH Air humidity: | min 10%; max 95% | |
| Atmospheric pressure: | min 69KPa; max 106KPa | |
| Storage conditions: | ||
| Temperature: | min -25^ ; max 70^ | |
| RH Air humidity: | min 10%; max 95% | |
| Atmospheric pressure: | min 69KPa; max 106KPa | |
| Dimensions (W)x(D)x(H): | 16 x 20 x 12 cm | |
| Weight: | 1.500 Kg | |
APPLIED PARTS
Type BF applied parts are: patient accessories (C2, C3, C4, C5)
RF8 Dual Speed nebuliser
| Medication minimum capacity: | 2 ml |
| Medication maximum capacity: | 8 ml |
| Operating pressure (with neb.): | 0.8 bar |
| C1.2.3 speed selector | ||
| in Max pos in pos Min | ||
| (1) Delivery: 0.40 ml/min approx. 0.19 ml/min approx. | ||
| (2) MMAD: 4.48 μm 4.01 μm | ||
| (2) Breathable fraction < 5 μm (FPF): 55.5 % 61.1 % | ||
| (1) Data recorded according to internal Flaem procedure I29-P07.5.(2) In vitro testing performed by TÜV Rheinland Italia S.r.l. in collaboration with the University of Parma and in compliance with the EN 13544-1: 2007 + A1 European Standard for aerosol therapy devices Standard. More details are available on request. | ||
DEVICE DISPOSAL
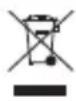
In compliance with the Directive 2012/19/EC, the symbol printed on the device shows that the device to be disposed of is considered waste and must therefore be an item of “differentiated collection”. Consequently, the user must take it (or have it taken) to the designated collection sites provided by the local authorities, or turn it in to the dealer when purchasing an equivalent new device. Differentiated waste collection and the subsequent treatment, recycling and disposal procedures promote the production of devices made with recycled materials and limit the negative effects on the environment and on health caused by potential improper waste management. The unlawful disposal of the product by the user could result in administrative fines as provided by the laws transposing Directive 2012/19/EC of the European member state or of the country in which the product is disposed of.
AirMate
Mod. P0504EM F400 APPAREIL POUR AÉROSOLTHÉRAPIE
text_image
C1.2.1 C1.2.2natural_image
Line drawing of a person wearing a nasal mask and using a vial, with another person holding a nasal mask (no text or symbols present)natural_image
Technical line drawing of a mechanical component with no visible text or symbolsnatural_image
Technical line drawing of a mechanical component with no visible text or symbolsnatural_image
Simple line drawing of a mechanical component with no text or symbolsnatural_image
Diagram of a car's side profile showing a wheel and gear mechanism (no text or labels)Dimensions: 16 (L) x 20 (P) x 12 (H) cm
Poids : 1,5 kg
PARTIES APPLIQUÉES
text_image
C1.2.1 C1.2.2natural_image
Line drawing of two people wearing face masks, one holding a small container (no text or symbols)natural_image
Technical line drawing of a mechanical component with no visible text or symbolsnatural_image
Technical line drawing of a mechanical component with no visible text or symbolsnatural_image
Diagram of a mechanical component with a central circular feature and a curved base, no text or symbols present.Material -biocompatible blando
natural_image
Diagram of a medical procedure showing a catheter insertion into a tube (no text or labels)text_image
C1.2.1 C1.2.2natural_image
Technical line drawing of a mechanical component with no visible text or symbolsnatural_image
Technical line drawing of a mechanical component with no visible text or symbolsnatural_image
Diagram of a mechanical component with a circular feature and arrow indicating direction (no text or symbols)text_image
C1.2.1 C1.2.2natural_image
Illustration of a person using a nasal mask to absorb or filter (no text or symbols present)natural_image
Technical line drawing of a mechanical component with no visible text or symbolsnatural_image
Technical line drawing of a mechanical component with no visible text or symbolsnatural_image
Line drawing of a car's side profile showing a curved track and a circular component with an arrow (no text or symbols)text_image
C1.2.1 C1.2.2natural_image
Line drawing of two people using face masks, one holding a magnifying glass (no text or symbols)natural_image
Technical line drawing of a mechanical component with no visible text or symbolsnatural_image
Technical line drawing of a mechanical component with no visible text or symbolsnatural_image
Diagram of a car's wheel and wheel assembly with a knob (no text or symbols)text_image
C1.2.1 C1.2.2natural_image
Line drawing of two people wearing face masks, one holding a magnifying glass (no text or symbols)natural_image
Diagram of a mechanical component with a circular feature and directional arrow (no text or symbols)natural_image
Technical line drawing of a mechanical component with no visible text or symbolsnatural_image
Technical line drawing of a mechanical component with a cylindrical shaft and flanged circular housing (no text or symbols)natural_image
Simple line drawing of a triangular object with internal components and two lines extending outward (no text or symbols)EN > The warranty terms here specified are valid only in Italy for Italian residents. In all other countries, the warranty will be provided by the local dealer that sold you the unit, in accordance with the applicable laws.
cod. 18389B0 Rev. 05/2020
(TÜV A1)