 — Camcorder — Mode d'emploi PDF")
LIFE S44080 (MD 87280) - Camcorder MEDION - Free user manual and instructions
Find the device manual for free LIFE S44080 (MD 87280) MEDION in PDF.

| Product type | Waterproof digital camcorder |
| Brand | Medion |
| Model | LIFE S44080 (MD 87280) |
| Max. photo resolution | 5152 x 3864 pixels (20 MP) |
| Max. video resolution | 1280 x 720 (720p) at 30 fps |
| Optical zoom | 4x |
| Digital zoom | Up to 8x (can be activated in menu) |
| Waterproof rating | Up to 10 meters depth for 30 minutes |
| Screen | 6.8 cm (2.7 inch) LCD |
| Battery type | Lithium-ion NP-45, 3.7 V / 700 mAh |
| Storage media | microSD / microSDHC card (not included) |
| File formats | Photo: JPEG (EXIF 2.3); Video: AVI (MJPEG) |
| Weight | Approx. 178 g (with battery) |
| Power supply | Rechargeable battery via USB (AC adapter included) |
| Main functions | Photos, videos, scene modes (portrait, sports, night, etc.), image stabilizer, face detection, panorama, artistic effects |
| Care and cleaning | Clean the housing with a soft dry cloth; lens with a brush then soft cloth |
| Safety | Never open the device; keep out of reach of children; do not use flash too close to eyes |
| Spare parts and repairability | Replacement battery (NP-45), USB cable, AC adapter. Repairs only by Medion customer service. |
| General information | Manual available in multiple languages; CyberLink PhotoDirector software provided on CD |
Frequently Asked Questions - LIFE S44080 (MD 87280) MEDION
User questions about LIFE S44080 (MD 87280) MEDION
0 question about this device. Answer the ones you know or ask your own.
Ask a new question about this device
Download the instructions for your Camcorder in PDF format for free! Find your manual LIFE S44080 (MD 87280) - MEDION and take your electronic device back in hand. On this page are published all the documents necessary for the use of your device. LIFE S44080 (MD 87280) by MEDION.
USER MANUAL LIFE S44080 (MD 87280) MEDION
You've got a pretty good camera.
Captor: 20 megapixels CCD
Ouverture: F3.2 - F5.8
Interface: Mini-USB 2.0
Dimensions (I x H x P): Env. 108 x 67 x 51 mm
1. About these instructions 371
1.1. Symbols and key words used in these instructions 372
1.2. Proper use 373
2. Safety instructions
EN
2.1. Dangers for children and people with reduced capability 375
2.2.Warnings 376
2.3. Battery notes 377
2.4. Safety precautions 379
2.5. Never carry out repairs yourself 382
2.6. Water resistance 383
3. Declaration of conformity 384
4. Overview of the appliance 385
4.1. Front 385
4.2. Rear 386
4.3.Top 387
4.4. Bottom 388
5. Package contents 393
6. Using the device for the first time 394
6.1. Inserting the battery 394
6.2. Charging the battery via USB 396
6.3. Attaching the wrist strap.. 397
6.4. Inserting and removing SD cards 398
7. First steps 401
7.1. Switching on the camera 401
7.2. Switching off the camera 402
7.3. Setting the language, date and time 402
7.4.Shooting and playback mode 404
7.5. Displays for shooting 405
7.6. Displays for photo playback 407
7.7. Displays for video playback 408
8. Starting to take photographs 410
8.1. Setting shooting mode 410
8.2. Tips for taking good shots 410
8.3. Taking photographs.. 411
8.4. Recording video clips 417
9. The menus 418
9.1.Navigating in the menus 418
9.2. Recording menu 419
9.3.Shooting mode 430
9.4. The Video menu
9.5. The playback menu 438
10. Using the different shooting modes 447
10.1. Using the art effect mode 447
10.2. Using children mode 450
10.3. Using the sports mode 451
10.4. Using the party mode 451
10.5. Using the soft skin tone mode 452
10.6. Using the panorama mode 452
10.7. Deleting photos 457
10.8.Show slideshow 459
10.9. Lock/unlock functions 460
10.10. Recording voice messages 462
11. Installing software 465
12. Connecting to a printer, PC or TV 467
12.1. Printing shots on a photo printer 467
12.2. Transferring data to a computer 468
12.3. Connecting the USB cable 469
12.4. Displaying captures on a television set 471
12.5. DCF memory standard 472
369 of 480
12.6.Card drive 472
12.7. Folder structure in the memory 472
- Troubleshooting 473
- Maintenance and care 476
- Disposal 477
- Technical data 478
- Legal notice 480
1. About these instructions

Read the safety instructions carefully before use. Note the warnings on the device and in the operating instructions.
Always keep the operating instructions close to hand. If you sell the device or give it away, make sure you also hand over these instructions and the warranty card.
1.1. Symbols and key words used in these instructions

DANGER!
Warning: immediate mortal danger!
WARNING!
Warning of possible risk of fatal injury and/or serious irreversible injuries!
WARNING!
Please follow the instructions to prevent injuries and property damage!

CAUTION!
Please follow the guidelines to avoid property damage!

PLEASE NOTE!
Additional information on using the device.
| PLEASE NOTE! Please follow the guidelines in the operating instructions! | |
| WARNING! Warning of risk of electric shock! | |
| . | Bullet point/information on operating steps and results |
| ►Tasks to be performed | |
1.2. Proper use
This camera is designed for the recording of digital pictures and video clips.
The device is intended for private use only and not for industrial/ commercial use.
Please note that we shall not be liable in case of improper use:
-
Do not modify the device without our consent and do not use any auxiliary equipment which we have not approved or supplied.
-
Use only spare parts and accessories which we have supplied or approved.
- Follow all the instructions in these directions for use, especially the safety information. Any other use is deemed improper and can cause personal injury or damage to the product.
- Do not use the device in areas where there is a risk of explosion. This includes e.g. tank farms, fuel storage depots or areas in which solvents are processed. It is also not permitted to use this device in those areas where the air is polluted with fine particles (e.g. flour dust or sawdust).
- Do not expose the device to any extreme conditions. The following should be avoided:
High humidity or moisture
- Extremely high or low temperatures
- Direct sunlight
- Open fire
2. Safety instructions
2.1. Dangers for children and people with reduced capability
- This product is not intended for use by people (including children) with reduced physical, sensory or mental abilities or for those without experience and/or knowledge, unless they are supervised by a person responsible for their safety or they have been instructed in its use.
- Children should be supervised to ensure that they do not play with the product. Children should not be allowed to use this product without supervision.
- Keep the device and its accessories out of reach of children.

DANGER!
Keep plastic packaging out of the reach of children. There is a risk of suffocation!
2.2.Warnings
In order to avoid injury, please heed the following warnings while using the product:
- Do not trigger the flash too close to the eyes. This can cause damage to the eyes of the person being photographed.
- Keep at least one metre away from children when you are working with the flash.
- Do not open or dismantle the camera.
-
Dismantling the camera constitutes a risk of high-voltage electric shock. Only expert personnel should undertake internal component tests, modifications and repairs. Take the product to an authorised Service Centre for testing.
-
If you are not going to use the camera for a relatively long period of time, remove the batteries to prevent leakage
2.3. Battery notes
Batteries may contain combustible materials. If not properly handled, batteries may leak, heat up, ignite or even explode, which could result in damage to the camera and your health.

WARNING!
There is a risk of explosion if batteries are replaced incorrectly.
Replace batteries only with the same or equivalent type.
Please note the following general instructions for handling batteries:
-
Keep batteries away from children. They can be fatal if swallowed. If a battery is swallowed, please obtain immediate medical assistance.
-
Do not throw batteries into a fire; do not short-circuit them and do not dismantle them.
- If necessary, clean the battery and device contacts before insertion.
- Always change all batteries at the same time.
- Only use batteries of the same type. Do not use different types of batteries; do not use a mix of used and new batteries.
- Please pay attention to the polarity (+/-) when inserting the batteries.
- Remove the batteries if the device is not going be used for long periods.
- Remove spent batteries immediately from the device! There is an increased risk of leakage!
-
Do not expose batteries to extreme conditions or direct sunlight; do not place the device in close proximity to radiators! There is an increased risk of leakage!
-
Remove leaking batteries from the device immediately. Clean the contacts before inserting a new battery. There is a risk of skin irritations from battery acid!
2.4. Safety precautions
Take the following safety precautions, in order to avoid damage to your camera and to always keep it in perfect condition.
- Keep away from damp, salt and dust Wipe off salt and dust with a light, damp cloth if you have been using the camera on the beach or at the seaside. Carefully dry the camera afterwards.
-
Keep away from strong magnetic fields. Never place the camera too close to devices that have strong electromagnetic fields, e.g. electric motors. Strong electromagnetic fields may cause the camera to malfunction or interfere with data recording.
-
Avoid excessive heat
Do not use or store the camera in sunlight or at high temperatures. This can cause the battery to leak or the housing to become misshapen. - Avoid extreme fluctuations in temperature If you take the camera from a cold environment into a warm one or vice versa, drops of water can form outside and inside the device which can cause malfunctions and can damage the device. Wait until the camera has reached ambient temperature before switching it on. Using a carrying case or plastic case offers a certain amount of protection against fluctuations in temperature.
- Do not drop the camera
Jarring or vibrations resulting from a fall can cause malfunctions. Loop the carrying strap around your wrist when you carry the camera.
- Do not remove batteries while data is being processed.
Switching off the power supply while image data is being saved to or deleted from memory cards can result in data loss or damage to the internal circuit or the memory.
- Batteries
If the contacts on the batteries are dirty, clean them with a dry, clean cloth or use an eraser to remove residues.
- Treat the lens and all moving parts carefully
Do not touch the lens or the lens barrel. Take care when handling the memory card and the battery. These parts are not designed for high levels of stress.
Memory cards
Switch the power supply off before you insert or remove the memory card. Otherwise the memory card may become unstable. Memory cards may heat up during use. Always take care when removing the memory cards from the camera.

NOTE!
MicroSD cards are consumable items and need to be replaced after long periods of use.
After a long period of use, the photographs/recordings may be faulty. Therefore, regularly check the performance of the card and replace it where necessary.
Underwater operation
The camera is suitable for underwater operation up to a maximum depth of 3 metres/30 minutes of diving. Please ensure that you do not dive deeper than 3 metres or for longer than 30 minutes.
2.5. Never carry out repairs yourself

WARNING!
Never try to open or repair the product yourself. There is a risk of electric shock!
- If there is a fault, contact the MEDION Service Centre or another specialist repair shop in the interests of safety.
2.6. Water resistance
- The camera is watertight to a depth of 3 metres.
- The camera should only be used for a maximum of 30 minutes under water.
- The accessories supplied with it are not watertight.
2.6.1. Important information to note before diving:
- Check the area around the battery compartment. Remove any dirt, sand or other particles with a dry cloth.
- Ensure that the battery compartment is not scratched or cracked.
- Ensure that there are no cracks in the camera.
-
Check that the battery compartment cover is firmly closed.
-
Do not throw the camera into the water or jump into the water while holding the camera as the force of such movements may cause water to penetrate inside the camera.
3. Declaration of conformity
Medion AG hereby declares that product conforms to the following European requirements:
EMC Directive 2004/108/EC
Low Voltage Directive 2006/95/EC
RoHS Directive 2011/65/EU.
Full declarations of conformity are available at www.medion. com/conformity.
4. Overview of the appliance
4.1. Front
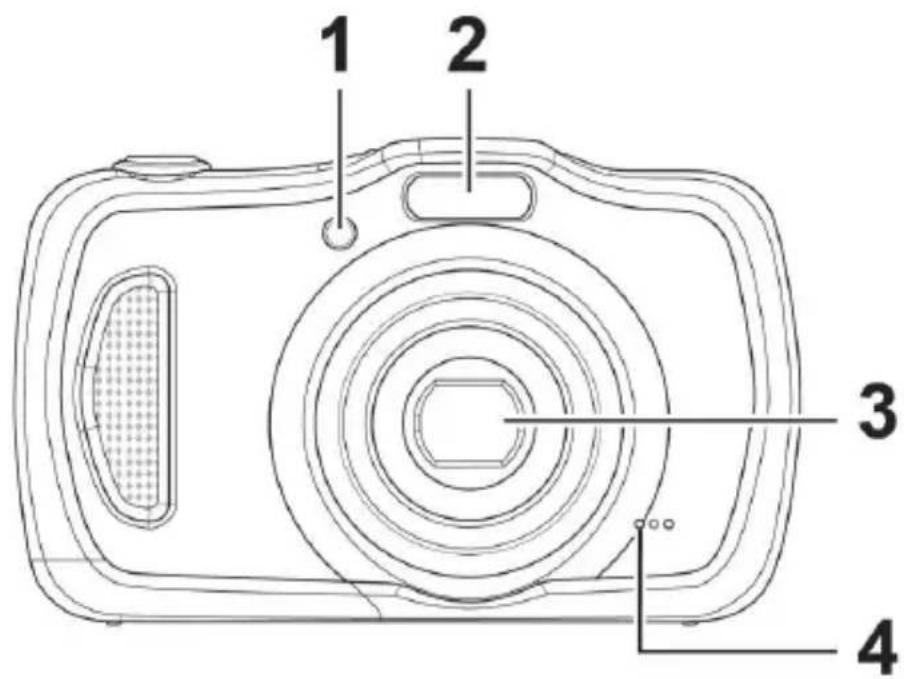
1) Display for self-timer/light flashes: Self-timer switched on, AF assist light
2) Flash
3) Camera lens with lens barrel
4) Microphone
4.2. Rear
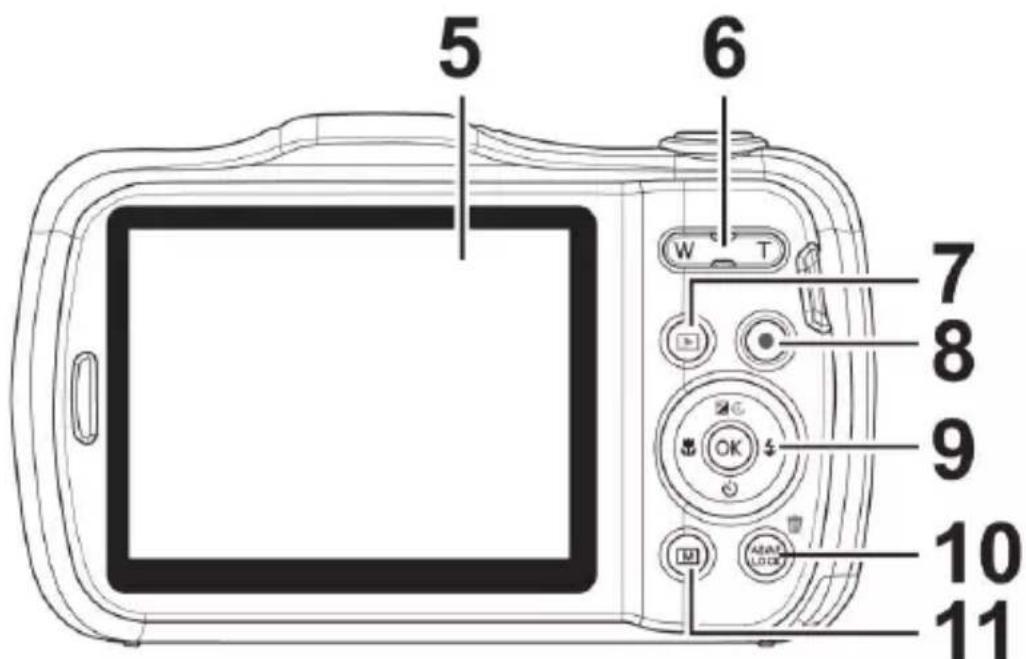
5) LC display
6) Zoom rocker: W/T; enlarge or reduce selection
7) button: Enable playback mode
8) button: Start video recording
9) OK button/observation keys
10) AE/AF LOCKbutton: Autofocus lock/ trash can
11) MENU button: Menu button: Open the menu
4.3. Top
12 13 14
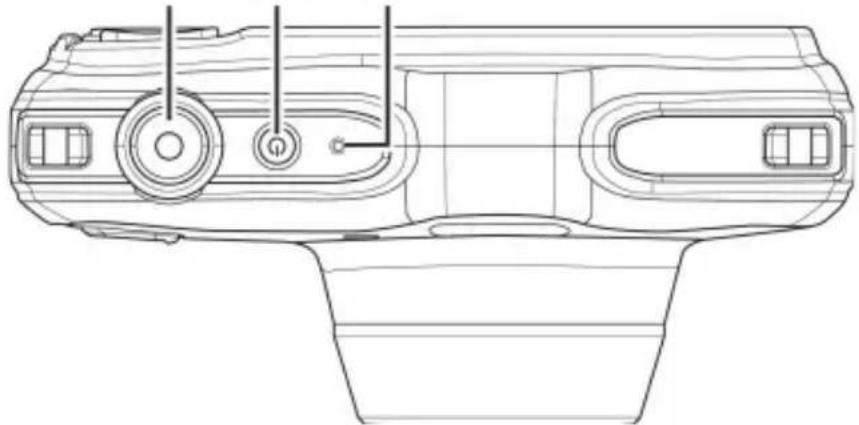
12) Shutter release button
Press half way: Set focus range
Press completely: Take photo
13) ON/OFF: Switch camera on or off
14) Operating LED
4.4. Bottom
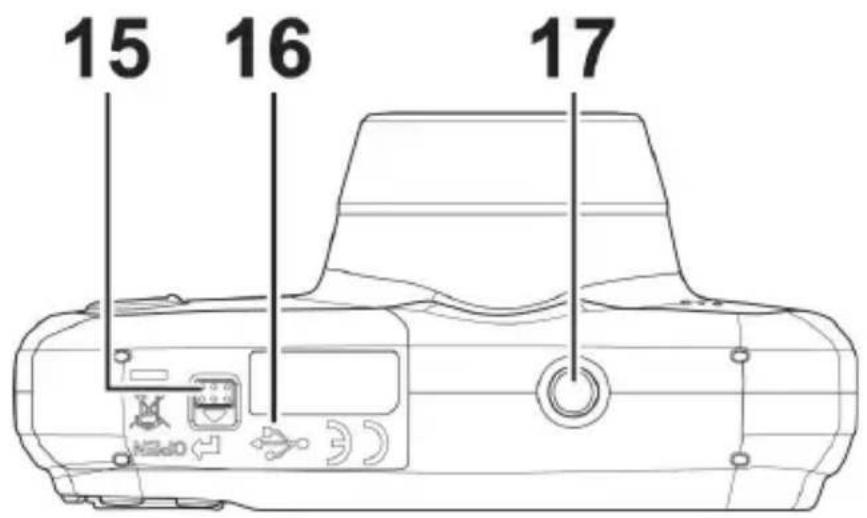
15) Battery / SDHC card compartment cover
16) Mini USB connection
17) Tripod mount
4.4.1. Right and left side
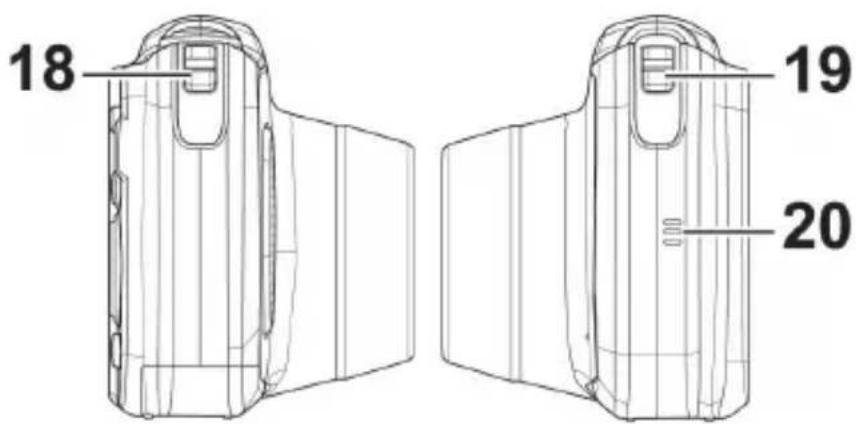
| In shooting mode: Set focus |
| In playback mode: Show previous shot |
| Video playback: Rewind |
| In the menu Quit submenu or select setting |
| #G/ | In shooting mode: Set exposure | |
| In video playback mode: | Pause/resume playback/record-ing | |
| In photo playback mode | Rotate picture by 90° | |
| In the menu Scroll up in menus/submenus | ||
| OK | In playback mode Start playback | |
| In the menu Confirm the selection | ||
| / | In shooting mode Set flash | |
| In playback mode Show next shot | ||
| Video playback Fast forward | ||
| In the menu Open submenu or select setting | ||
| / | In shooting mode Set self-timer | |
| In video playback mode: To stop playback | ||
| In the menu Scroll down in menus/submenus | ||
5. Package contents
Please check your purchase to ensure that all the items are included and contact us within 14 days of purchase if any parts are missing.
The following items are supplied with the product you have purchased:
Camera
- Li-lon battery
USB cable
- USB mains adapter (Ktec KSAS0050500100VKU)
- Wrist strap
Storage bag VG0692174F60290
- Software CD-ROM
Documentation

DANGER! Keep plastic packaging out of the reach of children. There is a risk of suffocation!
6. Using the device for the first time
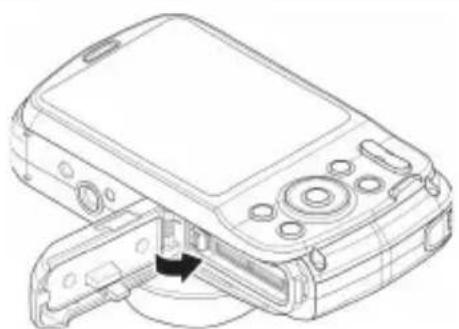
6.1. Inserting the battery

CAUTION!
There may still be water on the battery compartment cover after diving. Dry the camera after diving and follow the recommended steps carefully when opening the compartment cover.
The li-ion battery supplied is required for operating the camera.
- Switch the camera off where necessary.
- Hold the camera so that the battery compartment is facing downwards. This will allow any residual water to drip off.
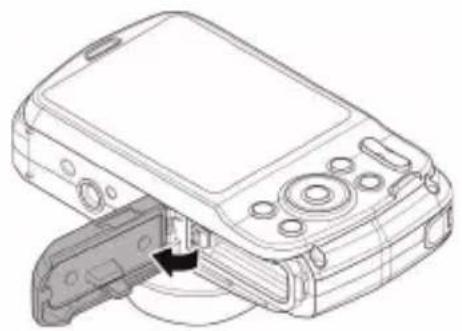
Unlatch the battery compartment cover as shown in the illustration. Push it in the direction of the arrow and flip the cover up.
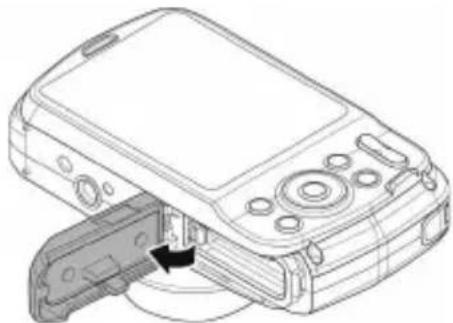
- Use a dry cloth to wipe away any remaining water droplets then you can turn the camera around as required.
Insert the battery, as shown, into the battery compartment.
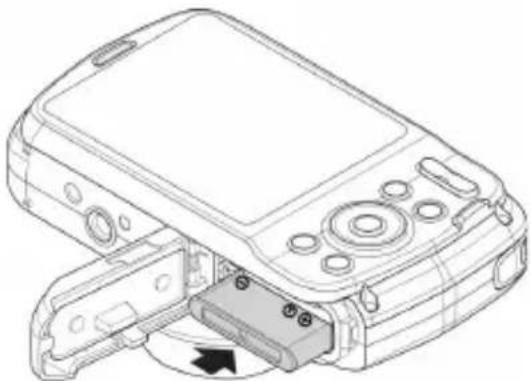
- Flip the battery compartment closed again and latch it as shown in the illustration.
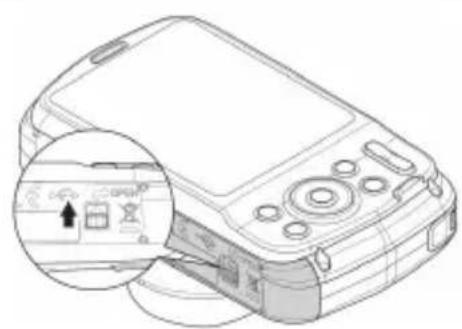
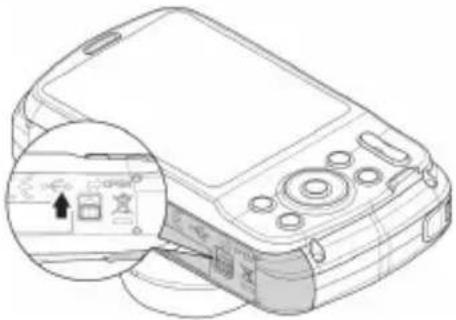
6.2. Charging the battery via USB
You can charge the battery either using the USB mains adapter supplied or via a USB connection on your PC or another device with a USB connection.
Connect the USB cable to the camera.
- Use the USB cable to connect the camera to the USB port on your PC or another device with a USB port.
The operating LED on the camera will flash during the charging process. The operating LED will go out once the battery is fully charged. If the operating LED flashes quickly, check the battery and connections and switch the camera on again.
If the operating LED still flashes quickly, please contact our Service Hotline.

NOTE!
The battery is not charged upon purchase. You need to charge the battery before you can use the camera.
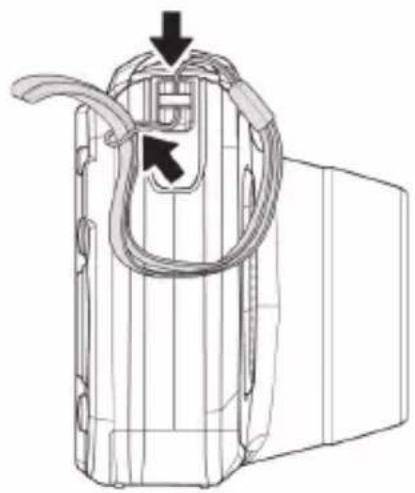
6.3. Attaching the wrist strap
For ease of handling and increased security attach the wrist strap to the camera.
Feed the strap through the eye, as shown in the diagram.
Pull the other end of the carrying strap through the thin loop of the strap and pull tight.

CAUTION!
If you carry the camera by the wrist strap, make sure that it does not bang into anything. While attaching the wrist strap, place the camera on a stable surface so that it cannot fall down and break.
6.4. Inserting and removing SD cards
If no memory card is inserted, photos will be stored in the internal memory. Please note that the capacity of the internal memory is limited.
Use an SD memory card to increase the memory capacity. If a memory card is inserted, your photos will be stored on the card.
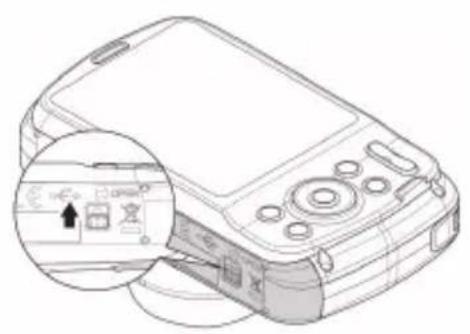
6.4.1. Inserting the card

CAUTION!
There may still be water on the battery compartment cover after diving. Dry the camera after diving and follow the recommended steps carefully when opening the compartment cover.
- Hold the camera so that the battery compartment is facing downwards. This will allow any residual water to drip off.
Unlatch the battery compartment cover as shown in the illustration. Push it in the direction of the arrow and flip the cover up. - Use a dry cloth to wipe away any remaining water droplets then you can turn the camera around as required.
399 of 480
Insert the card, as shown, into the card slot.
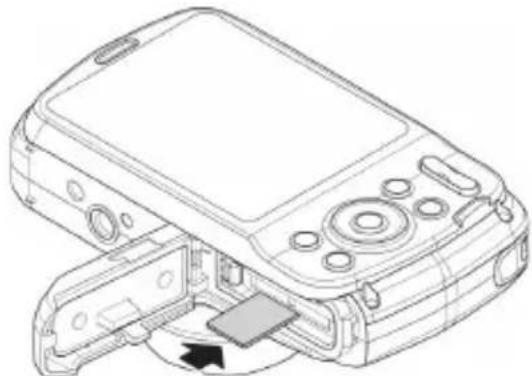
To remove the card, press it down briefly to release it. The card will then protrude slightly and can be removed.
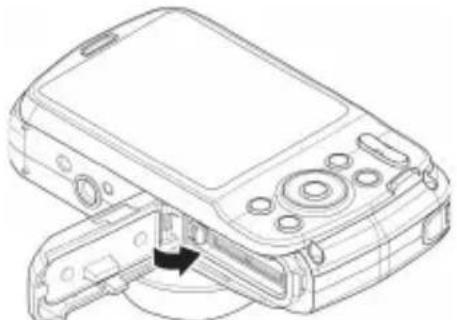
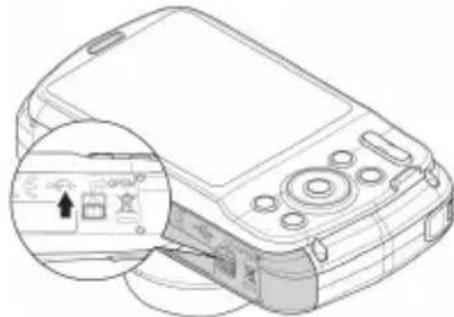
- Close the battery compartment and close the locking latch.

NOTE!
MicroSD cards are consumable items and need to be replaced after long periods of use.
After a long period of use, the photographs/recordings may be faulty. Therefore, regularly check the performance of the card and replace it where necessary.
7. First steps
7.1. Switching on the camera
Press the ON/OFF button to switch on the camera.
The lens comes out, the green light appears briefly on the operating display and the display is switched on. The camera is then in operating mode.

NOTE!
If the camera does not switch on, check whether the battery has been inserted properly and whether it is charged.
7.2. Switching off the camera
Press the ON/OFF button again to switch off the camera.
7.3. Setting the language, date and time
You will be prompted to set the language and time when you switch on the camera for the first time.
7.3.1. Setting the lang uage
Use the navigation keys to select the required language.
Confirm your choice by pressing the OK button.
After the language has been set, the camera switches automatically to the menu so you can set the date and time.
7.3.2. Setting the date and time
- Use the and buttons to choose the appropriate value for the date or time.
Use the and buttons to switch to the next entry - Confirm your settings by pressing the OK button.
As well as the date and time, you can also set the date format.
The following options are available:
YY/MM/DD (Year/Month/Day);
MM/DD/YY (Month/Day/Year);
DD/MM/YY (Day/Month/Year)

NOTE!
Hold the buttons down to run through the numbers quickly.
The camera can only display the date and time in playback mode. This information cannot be printed.
The time setting remains stored thanks to the internal battery. It is lost, however, if the battery is removed from the camera for more than 48 hours.
7.3.3. Power-saving function
If the camera is not used for 60 seconds, it switches off. You can also set the automatic switch-off time to 3 or 5 minutes.
The power-saving function is not enabled:
- while recording audio and video clips;
- while playing back images, video or audio clips;
- while the camera is connected to another device via the USB connection.
7.4. Shooting and playback mode
Shooting mode is enabled as soon as the camera is switched on: you can start taking photos straight away. You can also record audio and video clips.
In playback mode, you can play, edit and delete photos, audio clips and video clips.
To set playback mode, press the button. The playback icon will appear at the top left of the display. The most recently taken picture is displayed.
To go back to shooting mode, press the button again or press the shutter release button.
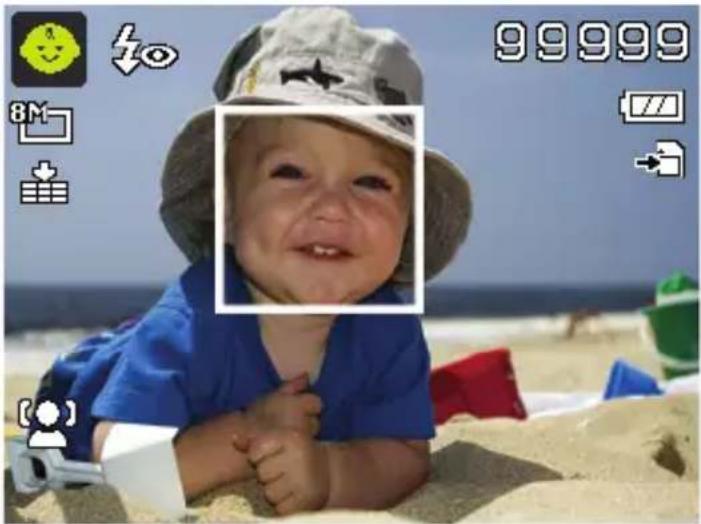
7.5. Displays for shooting
The following displays are possible in shooting mode:
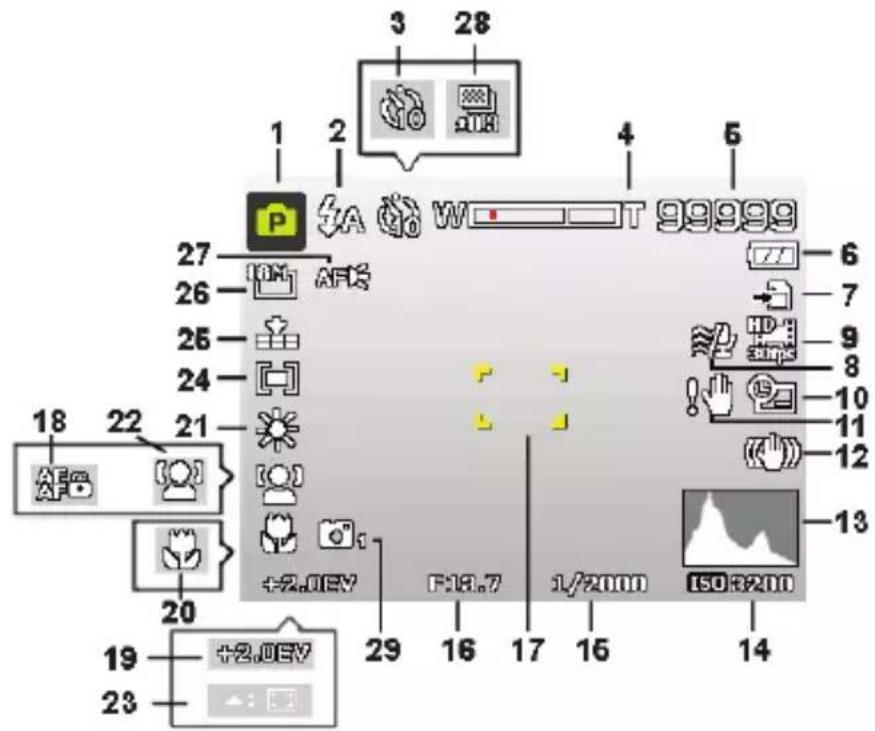
1) You can set different shooting modes. The current shooting mode is displayed here
2) Flash setting
3) Self-timer
4) Zoom setting
5) Remaining shots/recording time (at current resolution)
6) Battery charge status
7) Memory location (internal memory or card)
8) Wind noise reduction enabled
9) Video resolution
10) Date stamp
11) Warning: Risk of camera shake!
12) Image stabiliser switched on
13) Histogram
14) ISO setting
15) Shutter speed
16) Aperture setting
17) Focus
18) AE/AF lock activated
19) Exposure setting
20) Macro setting
21) White balance
22) Face recognition
23) AF tracking activated
24) Exposure measurement
25) Quality
26) Image size
27) AF lamp
7.6. Displays for photo playback
The following displays are possible in playback mode:
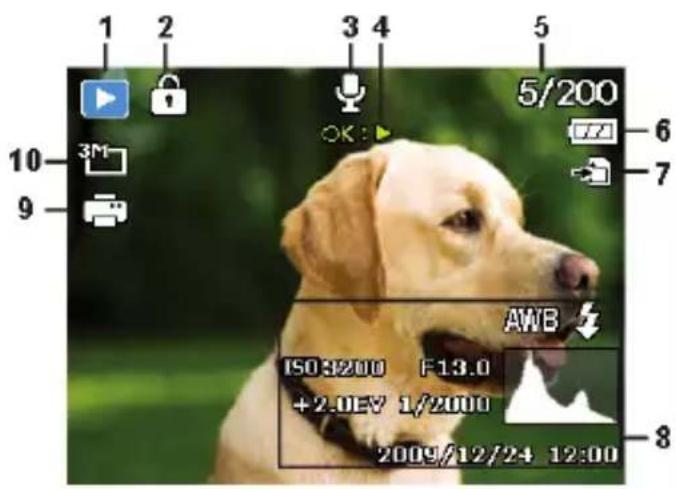
1) Mode display (shooting or playback)
2) Picture is protected
3) Voice message
4) Key assignments
5) Current recording/total number of recordings
6) Battery charge status
7) Memory location (internal memory or card)
8) Recording information
9) DPOF enabled
10) Resolution of image currently displayed
7.7. Displays for video playback
The following displays for video clips are possible in playback mode:
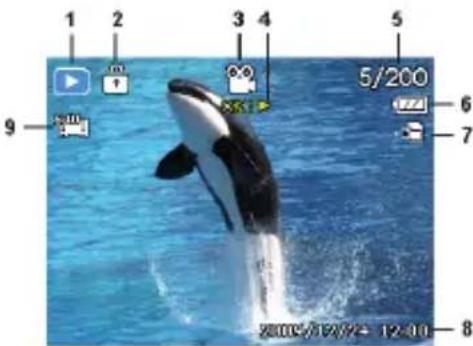
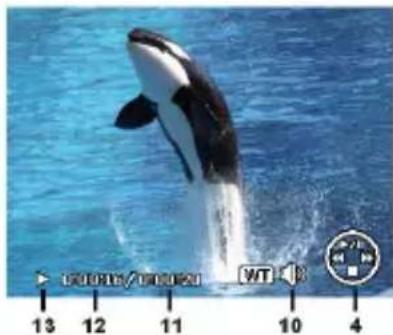
1) Mode display (shooting or playback)
2) Picture is protected
3) Recording videos
4) Recording controls
5) Current recording/total number of recordings
6) Battery charge status
408 of 480
7) Memory location (internal memory or card)
8) Recording information
9) Resolution
10) Volume setting
11) Video length
12) Playback time
13) Indicates the playback status (playback/pause/stop)
8. Starting to take photographs
8.1. Setting shooting mode
When the camera is switched on, the shooting mode "ange-passe Szene" is enabled automatically. It appears in the top left of the display in basic status to indicate the shooting mode "intelligent Scene".
If playback mode is enabled instead of shooting mode, press the button.
8.2. Tips for taking good shots
- Move the camera slowly so that the photos do not become fuzzy. The camera should not move when pressing the shutter release. Do not move the camera directly after pressing the shutter release.
- View the subject on the display before pressing the shutter release.
-
Check the angle if the subject is lit from behind. Change your position to reduce the background lighting.
-
In order to shoot good video clips, move the camera around slowly. If you pan too quickly, the video footage will be fuzzy and blurred.
8.3. Taking photographs
When you can see the image in the viewer, press the shutter release down slightly.
The yellow image section symbols turn red if the autofocus cannot focus.
The display features the shutter speed values, the aperture and the ISO value, providing that an ISO value is set.
Press the shutter release all the way down to take the photograph. A tone indicates that the photo has been taken. The photos are saved as JPEG files.

NOTE!
If there is a risk that the shot will be blurred due to camera shake, this icon also appears: In this case, you should hold the camera still or use a tripod.

NOTE!
To take close-ups, select macro mode using the button.
8.3.1. Using the stabiliser
The stabiliser makes it possible to take better shots in poor lighting conditions. The risk of blurred photographs is thus reduced.
From the camera menu, select "STABILIZER" and activate or deactivate the function here.
8.3.2. Using the flash
If there is insufficient light for the photo, the built-in flash can provide the additional light required.
Press the flash button repeatedly to select the following flash settings:
| ZA | AUTO: The flash is activated automatically when the shooting conditions require additional lighting. |
| ∅ | Flash is triggered before the actual flash; used to prevent “red-eye” effect. The camera detects the brightness of subjects and only flashes if necessary. |
| ↓ | Flash always on |
| ↓SL | "Slow Sync": The flash is synchronised with slow shutter speed. |
| ⓷ | Flash always off |
The flash only works in single shot and self-timer mode. It cannot be used for photo sequences and video recordings.
Using the flash increases battery usage. If the battery is almost flat, the flash requires a longer time for charging.

CAUTION!
Do not use the flash when taking close-ups of people and animals. Maintain a distance of at least one metre from your subject.
8.3.3. Zooming in and out
The camera has an optical and a digital zoom. The optical zoom level is adjusted via the lens settings; use the Settings menu to enable the digital zoom.
Press the zoom rocker in the direction W / T
A bar appears that represents the zoom setting wT.
W: The image is zoomed out ("wide angle"); you can capture a larger section.
T: The image is zoomed in ("telephoto"); you can capture a smaller section.
| If the left side of the bar is filled in, the optical zoom is in use. |
| If you turn T again, the digital zoom will switch on automatically. You can continue to zoom in further in eight stages. The digital zoom function must be enabled in the settings menu! |
The digital zoom is not available for video recordings.

NOTE!
With the digital zoom, the image section is enlarged by interpolation; the image quality may suffer somewhat as a result.
8.3.4. Setting the focus mode
This function allows you to specify the focus type if you wish to take a photo or record a video clip.
Press the macro button repeatedly until the icon for the desired focus mode is displayed.
Confirm your selection by pressing the OK button.
Your camera has four different focus modes, as follows:
AF - Autofocus
In this setting, the camera automatically focuses on subjects.
- Macro
This mode is ideal for close-ups.
Super Macro
This mode is ideal for close-ups. In this mode, you can use the fixed focus to capture details and take sharp photos at much closer distances. When Super Macro is set, you cannot adjust the zoom.
- Infinity
In the Infinity setting, the camera focuses on subjects that are very far away.
MF - Manual Focus
If you enable the manual focus setting, you can then focus in on the image using or .
8.3.5. AE/AF - Autofocus Lock
The autofocus lock fixes the current focus setting.
To lock AE/AF, press the AE/AF LOCK button or press the shutter release button down halfway during video recording and then press the AE/AF LOCK button in photo mode. The AE/AF remains locked even after the shutter is released.
You can unlock AE/AF in one of the following ways:
Press the AE/AF LOCK button
Turn the zoomring
Press on the MENU/Playback/Video/On/Off button to perform a different function
8.4. Recording video clips

Press the button to directly start recording a video. The display will show the recording time.
You can use the zoom rocker W / T to change the image crop.
Press the button if you wish to stop the recording.
Press the button again to continue with the recording.
To stop the recording, press the button again.

NOTE!
The digital zoom is not available for recording video clips.
The microphone is active during video recording and the sound is also recorded.
The video clips are saved with the sound as AVI files.
9. The menus
9.1. Navigating in the menus
Press the MENU button to open the menus.
Use the arrow keys or to select the setting you would like to change.
Press the OK button and the relevant submenu will open.
Use the arrow keys or to choose the desired option and confirm with the OK button.
The MENU button returns you to the previous level at any time.

NOTE!
You cannot access any menus while recording a video.
9.2. Recording menu
The Recording menu allows you to quickly change the key shooting settings.
There is a separate menu for each mode (video, photo shooting mode).
| Setting Meaning | |
| SCENE MODE | Here you can select from the different shoot- ing modes. |
Setting Meaning
| PHOTO SIZE | The image size function is used to set the resolution before taking a picture. Changing the image size will have an effect on the number of images that can be saved to the memory card. The higher the resolution, the more memory space is required. |
| 20 M 515 x 3864 | |
| 8 M 3264 x 2448 | |
| 5 M 2592 x 1944 | |
| 3 M 2048 x 1536 | |
| VGA 640 x 480 | |
| 3:2 5152 x 3435 | |
| 16:9 (14 M) 5152 x 2898 | |
| 16:9 (2 M) 1920 x 1080 | |
| 1:1 2992 x 2992 | |
| Setting Meaning | |
| QUALITY | The quality determines how the data recorded is compressed. The higher the quality, the more memory space the images require. |
| SUPERFINE, Highest quality. | |
| FINE, Medium quality. | |
| NORMAL, Normal quality. | |
Setting Meaning
WHITE BALANCE
AWB - AUTO WHITE BALANCE - The white balance is automatically set by the camera.

DAYLIGHT - Ideal for bright, sunny situations.

CLOUDY - Ideal for cloudy condi

TUNGSTEN - Ideal for indoor shots
with standard light bulbs or halogen lighting without a flash.

FLUORESCENT_1 - Ideal for in-shots with blueish shimmering lighting.
| Setting Meaning | |
| WHITE BALANCE | FLUORESCENT_L - Ideal for in-door shots with reddish shimmering lighting conditions. CUSTOM - Used when the light source cannot be ascertained. Press ➔ so that the camera can automatically select a suitable setting for the white balance based on the relevant conditions. It is advisable here to set up the camera on a white sheet of paper and press the ➔ button. |
| ISO | This setting changes the sensor's sensitivity to light. A higher value increases light sensitivity but generates more noise which can have a negative impact on the image quality. It is therefore important to select the lowest possible ISO value for the conditions. AUTO - Automatic ISO value. ISO 100 - Sets the sensitivity to ISO 100. ISO 200 - Sets the sensitivity to ISO 200. |
| ISO | ISO 400 - Sets the sensitivity to ISO 400. ISO 800 - Sets the sensitivity to ISO 800. ISO 1600 - Sets the sensitivity to ISO 1600. ISO 3200 - Sets the sensitivity to ISO 3200. ISO 6400 - Sets the sensitivity to ISO 6400. |
| MAXIMUM ISO AUTO | With this feature, the camera can set the ISO value automatically between ISO 100 and the maximum sensitivity value according to the exposure conditions. The available options are 200, 400, 800 (standard). |
| METERING | The measurement method for the calculation of the exposure is defined here: MULTI - Selects an exposure based on the measurement results at several points in the shooting range. CENTER - The light in the entire shooting range is measured but the measurement is weighted towards the values near the centre. SPOT - An exposure is selected on the basis of one single measurement in the centre of the picture. |
| EXPOSURE BRACKET-ING | Use this feature to take photos with different exposure compensation levels. When using bracketing, a series of 3 photos are taken in the following order: standard exposure, under-exposed and over-exposed. The available setting are: Off, ±0.3, ±0.7 and ±1.0. |
| AF-AREA | Here you can select the autofocus (AF) range. FACE TRACKING. - The camera auto-matically recognises faces. |
| [ ] | WIDE - A wide area is put in focus CENTER - The centre is put in focus TRACKING AF - The camera focuses on the moving subject and the focus is maintained |
| [ ] | The AF lamp function enables photos to be taken even during poor lighting conditions. If the AF lamp is set to Auto, the AF lamp on the front of the camera will light up red when the shutter release is pressed halfway down so that the camera can easily focus. |
| AF-LAMP | |
| AE-L / AF-L | This function allows you to lock the exposure or focus or both by clicking on the AE/AF lock button. You can set the AE/AF lock but- ton to one of the following functions: AE-L - Lock/unlock exposure. AF-L - Lock/unlock focus. AE-L & AF-L - Lock/unlock exposure and focus. |
| DIGITAL ZOOM | This function is used to control the digital zoom mode on your camera. Your camera firstly increases the size of the image using the optical zoom. When the zoom scale exceeds 4x, the camera uses the digital zoom. |
| DATE STAMP | Here you can choose the date and time stamp for the pictures. DATE DATE/TIME OFF |
| AUTO RE- VIEW | The auto preview function enables you to view images immediately after they are taken. If the auto preview function is switched on, the camera will display the recently taken image for 1 second on the LCD monitor. |
| BLINK DE- TECTION | If the camera detects a blink, the option to "SAVE" or "CANCEL" is shown on the display. Select Speichern to save the image and Abbrechen to discard it. NOTE! The blink detection function is only shown in the recording menu when the face recognition function is enabled. |
| Setting Meaning | |||
| GRID LINE | Set the image grid lines ON or OFF here to make it easier to divide up the image. | ||
| STABILIZER | The stabiliser helps to avoid blurred images caused by camera shake. Here you can switch the stabiliser on and off. | ||
9.3. Shooting mode
For certain shooting situations or subjects, you can use the preset shooting modes. This eliminates the necessity for manual setting.
The following shooting modes are available:
| Symbol Setting Meaning | ||
| INTEL- LIGENT SCENE | The camera analyses the shoot- ing conditions and automatically switches to the right scene mode. | |
| P PROGRAM | The camera automatically selects the appropriate settings, e.g. expo- sure time and f-stop values | |
| For the following special types of shot, certain settings can- not be changed (e.g. flash and macro) as they are preset for the type of shot. | ||
| PORTRAIT | Reduces background focus and fo- cuses on the centre. | |
| Symbol Setting Meaning | ||
| LANDSCAPE | Suitable for wide landscape views. | |
| UNDERWA-TER | Suitable for shooting underwater. | |
| SUNSET | Emphasises the colour red when taking sunsets. | |
| DAWN | Makes the sky clearer and bluer. | |
| BACKLIGHT | Adjusts the "Metering" setting to the backlight. | |
| KIDS | Suitable for capturing people in motion. | |
| Symbol Setting Meaning | ||
| NIGHT SE-CENE | Optimises the settings for shooting night scenes. | |
| FIREWORKS | Reduces the shutter speed for cap-turing fireworks. | |
| SNOW | Suitable for beach and snow shots. | |
| BEACH | Ideal for beach shots. | |
| SPORTS | Suitable for creating images with fast movements. | |
| PARTY | Suitable for indoor shots and par-ties. | |
| CANDLE-LIGHT | Creates shots in warm light. | |
| NIGHT POR-TRAIT | Suitable for portrait shots with a dark background. | |
| SOFT SKIN | Creates a delicate effect with fast movements. | |
| FLOWING WATER | Increases the colour saturation. | |
| FOOD | Erhöht die Farbsättigung. | |
| LOVE POR-TRAIT | This function uses face recognition to automatically produce portrait pictures without any need for assistance from third parties. If more than two faces are detected, the autofocus is activated automatically. The camera begins to count down and takes the photo after two seconds have elapsed. | |
| Symbol Setting Meaning | ||
| SELF POR-TRAIT | This function sets the zoom to wide angle. When a face is detected, the AF is activated automatically and an acoustic signal is issued. The camera starts a two-second count-down and then takes the picture. | |
| D-LIGHTING | This function increases the dynamic scope of a picture by increasing the brightness and contrast values. | |
| TIME LAPSE | This function takes a series of images over a predefined time period. See chapter. | |
| PANorama | Use this function to create a panorama by panning or tilting the camera. | |
| Symbol Setting Meaning | ||
| ART | ART EF-FECT | This feature applies different artis-tic effects to your photos. |
| BURST | With this setting, the camera con- tinues to take shots in sequence for as long as the shutter release is held down. | |
| SPEEDY BURST | With this setting, the camera cap-tures a series of 30 pictures. | |
| GIF CAP-TURE | Use this feature to capture a pre-set number of images in a defined time interval. These images are combined to create an animated GIF file and not saved individually. Make the settings in this mode af-ter you press the OK button. | |
9.4. The Video menu
| Setting Meaning | |
| MOVIE MODE | This function enables you to adjust the resolution and the quality of video clips. The following settings are possible: 720P30 VGAP30 |
| PRERECORD | You can record the first three seconds of an action that you might otherwise have missed. As soon as this function is activated, the camera automatically starts video recording before the shutter button is fully pressed. When the shutter release button is pressed, the preceding three seconds are added to the start of the clip. The symbol will be coloured red while the pre-recording function is enabled. |
| PRERECORD | he pre-recording function is interrupted in the following situations: ·After the recording has been started. ·Switch to playback mode. ·Opening the menu. ·USB mode is enabled. ·Switching off the camera. The pre-recording function is deactivated in the following situations: ·The pre-recording time is less than or precisely 2 seconds. ·If you have not inserted a memory card into the camera, there is not sufficient memory space available to enable this function. |
| WIND CUT | This function reduces wind noise during the video recording. |
9.5. The playback menu
In the playback menu, you can edit images, record voice memos and define the playback settings.
| Setting Meaning | |
| SLIDE SHOW | You can run the shots (photos only) as a slide show. |
| PROTECT | This function can be used to protect shots from accidental deletion. The following options are available: SINGLE: Protect one shot MULTI: Protect multiple shots selected in the thumbnail view. LOCK ALL: Protect all shots UNLOCK ALL: Remove protection for all the shots. |
| VOICE MEMO | You can save a voice memo for each photo taken. The maximum length of voice message is 30 seconds. The time remaining is shown on the display. If there is already a voice message for the selected photo, it is overwritten. |
| FILTER EFFECTS | The filter effect function is only available with other artistic effects on images with an aspect ratio of 4:3. The photos edited with this function are saved as new files. SOFT: The image is given a soft focus effect. COLOR EMPHASIS: Retains the colour tone while reducing the rest of the image to black and white. |
Setting Meaning
FILTER EFFECTS
VIVID: The image is given more contrast and saturation to highlight more vivid colours.
MINIATURE EFFECT: Parts of the photo will be blurred to give the picture a miniature model effect.
ASTRAL: Light areas are filled with stars.
IMPRESSIVE ART: The image is given a dramatic contrast effect.
PAINTING: The image is converted into a line drawing with colour accents.
NEGATIVE: The image colours are inverted.
B&W: Black and white
MOSAIC: The image is displayed in pixelated form
SEPIA: The image is converted to se-pia tones.
| Setting Meaning | |
| TRIMMING | This function can be used to choose an image section and crop the image to this size. The border not visible on the display is deleted. You can either save the corrected file under a new name or you can over-write the original file. |
| RESIZE | You can reduce the resolution of photos and thus reduce the file size. You can either save the corrected file under a new name or you can over-write the original file. The resolution of photos in VGA cannot be changed. |
Setting Meaning
STARTUP IMAGE
You can select a start screen that appears on the screen after the camera has been switched on.
You can choose between the following:
SYSTEM: The default system screen is displayed.
MY PHOTO: Your selected photo is displayed.
OFF: No photo is displayed.
Use or to select the entry Mein BILD.
Use or to select the photo and press OK to confirm.
Setting Meaning
| DPOF | DPOF stands for "Digital Print Order Format".Here you can specify print settings if you wish to have pictures published by a photo studio or printed on a DPOF-compatible printer. With a DPOF-compatible printer you can print the pictures directly without transferring them to the computer beforehand. You can print all the photos or just one, or reset the DPOF settings.Use the ▲ or ▼ buttons to set the number of prints for each picture.NOTE!With DPOF you can specify up to 99 copies. If you set 0 copies for an image, the DPOF setting of this picture deactivates automatically. |
| COPY | Use this function to copy images between the internal memory and the memory card. |
Setting Meaning
MOVIE PASTE
Use this function to combine two videos with the same specifications (video size and fps) into one video.
Firstly select a video here.
Press the MENU button to call up the playback menu.
Select MOVIE PASTE. Those videos with the same specifications as the original video will be displayed on the LCD monitor.
Use the or buttons to search and the or buttons to mark/ unmark the second video.
Press the OK button and select Ja to add the second video to the end of the original video and overwrite it.
Setting Meaning
MOVIE PASTE

NOTE!
The total length of the combined video may not exceed 30 minutes.
Once the videos have been combined, the second video will no longer exist as a separate file.
Setting Meaning
FACE RETOUCH
This function can only be used on photos that have been taken using the face recognition function (e.g. with the "Portrait" shooting mode enabled).
When you have opened the retouch face menu, move the cursor over the image if it contains two or more faces or move the cursor using a function on the right-hand side of the menu if the image only contains one face.
Only one face can be retouched in each case. All functions will be reset to 0 if you exit the retouch face menu, irrespective of whether you save the image or discard the settings.
Images in which faces have been retouched are saved as new images and they can then be edited again using this function.
10. Using the different shooting modes
10.1. Using the art effect mode
Press the MENU button and selection the ART EFFECT option in the shooting menu.
Afterwards, the additional option ART EFFECT appears under the item Shooting mode.
The following settings are possible:
| Symbol Setting Meaning | ||
| STYLISH | This function is used to capture images with over-saturated colours, uneven exposure or blurring. You can select here in shooting mode between 4 different options (styles 1-4) by pressing the button. | |
| SOFT FO-CUS | Adds a blur around the photographed object to create a soft focus effect. | |
| LIGHT TONE | Reduces the contrast to create a calm and relaxed atmosphere | |
| VIVID | The camera adds more contrast and saturation to the image to highlight more vivid colours. | |
| MINIATURE EFFECT | Blurs parts of the photos to make the scene look like a miniature model. We recommend taking the photo from a high angle for best results. | |
| FISHEYE LENSE | The images are shot with a fish-eye effect. | |
| ASTRAL | Star-like light reflections are added to the image. | |
| POSTER | This function gives the picture the effect of an old poster or an old illustration. | |
| IMPRESSIVE ART | This function creates pictures with a dramatic contrast. | |
| BW | B&W | Pictures are taken in black and white. |
| SE | SEPIA | Pictures are taken in sepia tones. |
| COLOUR AC-CENT (RED) | Retains the red colour while re-ducing the rest of the image to black and white. | |
| COLOUR AC-CENT (ORANGE) | Retains the orange colour while reducing the rest of the image to black and white. | |
| COLOUR AC-CENT (YELLOW) | Retains the yellow colour while reducing the rest of the image to black and white. | |
| COLOUR ACCENT (GREEN) | Retains the green colour while re-ducing the rest of the image to black and white. | |
| COLOUR ACCENT (BLUE) | Retains the blue colour while re-ducing the rest of the image to black and white. | |
| Symbol | Setting Meaning | |
| ® | COLOUR AC-CENT (PUR-PLE) | Retains the magenta colour while reducing the rest of the image to black and white. |
10.2. Using children mode
Children are especially difficult to photograph as they are almost always moving and thus present quite a challenge. Use the children mode to take pictures of children.
This modes uses a faster shutter speed and always focuses on the moving subject.
In the shooting mode, select the option.
- Confirm your selection by pressing the OK button.
Focus the camera on the subject and press the shutter release.
10.3. Using the sports mode
Sporting action can often only be captured by using a high shutter speed; the sports mode is particularly well suited for this. In this mode, the camera shoots a photo using an extremely high shutter speed.
In the shooting mode, select the option.
Confirm your selection by pressing the OK button.
Focus the camera on the subject and press the shutter release.
10.4. Using the party mode
If you want to take photos of groups of people, then the party mode is appropriate for this.
In the shooting mode, select the option.
Confirm your selection by pressing the OK button.
Focus the camera on the subject and press the shutter release.
Have fun at your party.
10.5. Using the soft skin tone mode
If you use this mode, the camera detects skin-coloured areas of a subject, e.g. a face, and processes the picture so that the skin appears softer.
In the shooting mode, select the option.
Confirm your selection by pressing the OK button.
Focus the camera on the subject and press the shutter release.
10.6. Using the panorama mode
This function enables you to capture a panoramic image. To assist you, the camera provides guide graphics and an automat-
cally controlled shutter release.
In the shooting mode, select the option. The panorama mode icon appears in the top left corner of the display.
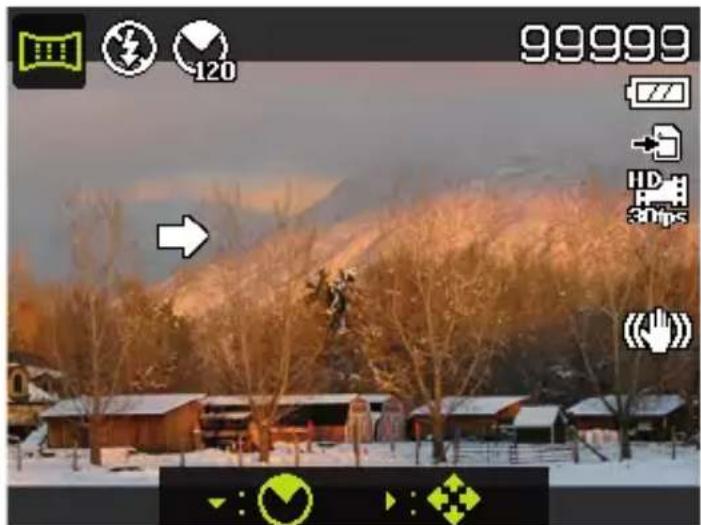
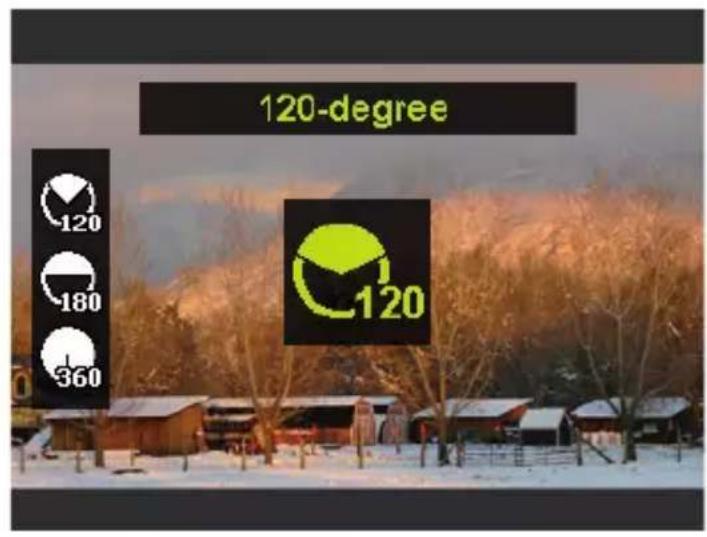
Press the button to open the selection menu for the degrees of the panoramic photo.
Use the or keys to select the desired degree value. You can choose between 120^ , 180^ and 360^ .
- Confirm your selection by pressing the OK button.
Press the button to open the selection menu for the shot direction of the panoramic photo.

453 of 480
Use the or keys to select the desired direction:
FROM LEFT TO RIGHT FROM BOTTOM TO TOP FROM TOP TO BOTTOM FROM RIGHT TO LEFT
Confirm your selection by pressing the OK button.
Press the shutter release all the way down to take the picture.
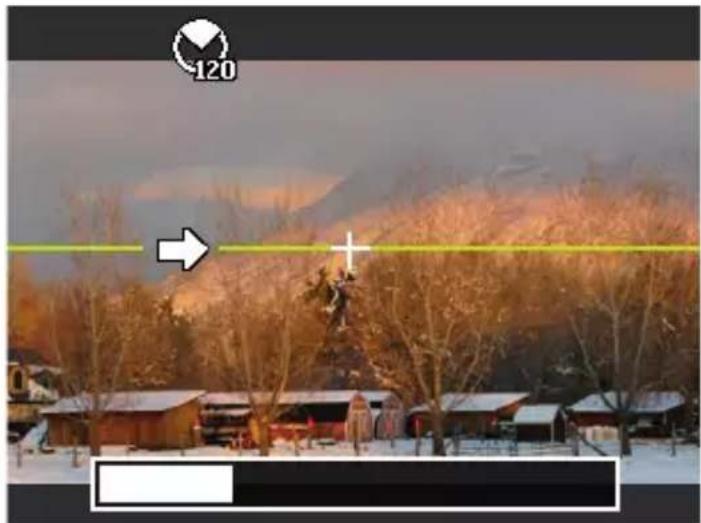
- When you start taking the picture, a white cross appears in the middle of the display. A yellow horizontal or vertical line (depending on the orientation of the camera) also appears in the centre of the display to help with the alignment of the camera.
A recording tool bar appears at the bottom edge of the screen during the capture.
For an ideal panorama
ic shot, the yellow line must always run horizontally or vertically through the positioning cross.
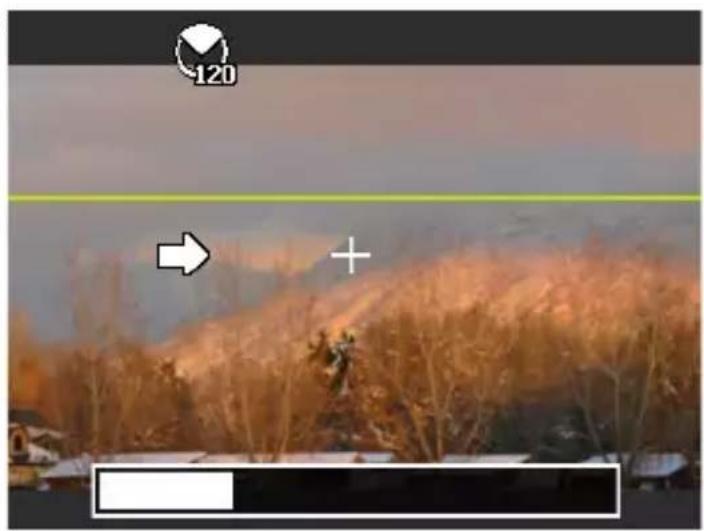
Once the recording tool bar is completely full, the capture is complete and the image is saved.


NOTE!
The following settings are predefined for the panorama function and cannot be changed:
The flash is always off.
- The self-timer is switched off.
The autofocus is active.
- The autofocus range is set to WIDE.
10.6.1. Notes and tips for the panorama function
- The size of the final image may vary depending on the panorama angle and the result of the combination of the constituent images as well as on the degree of camera shake.
-
We recommend using a tripod to stabilise the camera and also to help to move the camera slowly during the capture.
-
If you select VON OBEN NACH UNTEN or VON UNTEN NACH OBEN in 360^ panorama mode, we recommend turning the camera by 90^ to ensure stability during the capture.
- In panorama mode irregular brightness can lead to lighting differences between the capture and the actual subject.
- The longest capture time in panorama mode is approximately 30 seconds.
10.7. Deleting photos

NOTE!
If a memory card is inserted, you can only delete the files on the memory card.
If the memory card is write-protected, then you will not be able to delete the files on the memory card. (The message "card protected" appears.)
You cannot restore a file that has been deleted. You should therefore exercise caution when deleting files.
10.7.1. Individual files
- Choose an image in the playback menu and press the AE/AF LOCK button.
Confirm the "SINGLE" option by pressing the OK button.
Choose the entry "Ja" and confirm with the OK button. - Choose "CANCEL" and confirm with the OK button to return to playback mode.
10.7.2. Multiple files
Press the AE/AF LOCK button in the playback menu.
Confirm the "MULTI" option with the OK button.
- Use the or buttons to select an image and then add a delete mark with the or buttons or remove an existing delete mark.
Press the OK button to confirm the selection.
Choose "YES" to delete all marked files.
Choose "CANCEL" to return to playback mode.
10.7.3. All files
Press the AE/AF LOCK button in the playback menu.
Select "ALL" and press the OK button.
- Choose "YES" and confirm with the OK button to delete all files.
- Choose "CANCEL" and confirm with the OK button to return to playback mode.

NOTE!
Protected files cannot be deleted. In this case, the message "FILE LOCKED" appears on the display.
If a memory card is inserted, you can only delete the files on the memory card.
If the memory card is locked, you will not be able to delete the files on the memory card.
You cannot restore a file that has been deleted. You should therefore exercise caution when deleting files.
10.8. Show slideshow
You can play back the photos as a slideshow.
- Select Slideshow in the Playback menu. The "SLIDESHOW" menu opens.
The following settings are available:
Choose the interval at which the pictures are to be displayed (1, 3, 5 or 10 seconds).
You can select a diverse range of effect for the transitions between the photos.
Choose whether the picture sequence should be continuously repeated ("") or whether it should end after the last picture ("").
When all the settings are made, select START and press the OK button to start the slideshow.
During playback, you can pause and resume the show by pressing OK.
10.9. Lock/unlock functions
10.9.1. Individual files
- Select the entry "PROTECT" in the playback menu and then the option "SINGLE".
Use the or buttons to choose a photo. - Select "LOCK" or "UNLOCK" and press the OK button to protect or unlock the selected file.
- Choose "EXIT" and confirm with the OK button to return to playback mode.
10.9.2. Multiple files
-
Select the entry "PROTECT" in the playback menu and then the option "MULTI".
-
Use the or buttons to select an image and then add a protect mark with the OK button or use the OK button to remove an existing protect mark.
Click on the button to go to the next step.
Choose "YES" to protect or unlock all marked files.
Choose "CANCEL" to return to the playback mode.
10.9.3. All files
- Select the entry "PROTECT" in the playback menu and then the option "LOCK ALL" or "UNLOCK ALL".
- Choose "YES" and confirm with the OK button to protect/ unlock all files.
- Choose "CANCEL" and confirm with the OK button to return to playback mode.

NOTE!
If a memory card is inserted, you can only delete the files on the memory card.
If the memory card is locked, you will not be able to delete the files on the memory card.
You cannot restore a file that has been deleted. You should therefore exercise caution when deleting files.
10.10. Recording voice messages
Select the required photo in Playback mode.

NOTE!
If the photo already contains a voice message, the voice message icon will appear.
- Open the "VOICE MEMO" submenu in the playback menu.
The image preview and a selection menu will appear on the display. - Choose START and press the OK button to start the recording. The microphone is located underneath the lens.
The recording is cancelled automatically after 30 seconds. If you would like to end the recording before then, choose STOP and press the OK button again.

NOTE!
You can only add voice messages to photos, not to video clips. You cannot add voice messages to protected images. You can only delete a voice message along with the photo, not separately.
10.10.1.
Cropping photos
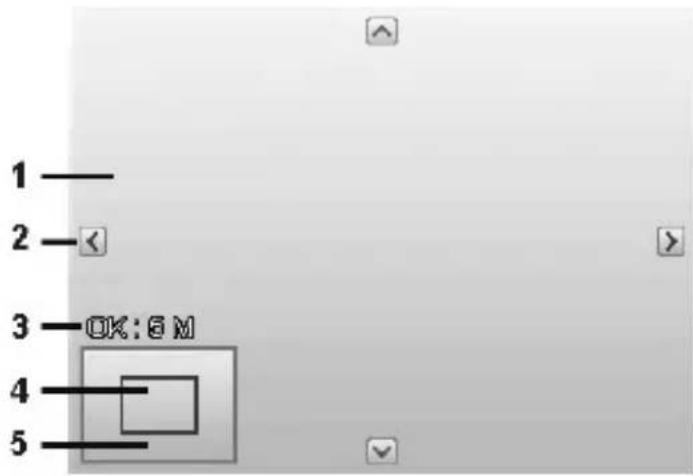
| 1 Enlarged picture |
| 2 4-way display |
| 3 Cropped size |
| 4 The approximate position of the cropping area |
| 5 Image area |
Choose the required photo in Playback mode.
- Open the "TRIMMING" submenu in the playback menu. The editing window appears on the display.
- Turn the zoomring in the direction of QT to enlarge the image. You can detect the position of the image section in the grey rectangle on the left.
During the enlargement, you can use the , , or keys to modify the image section. - Turn the zoomring in the direction of to enlarge the image or in the direction of reduce the size of the image.
A menu selection appears after pressing the OK button. Choose between:
- YES: The customised image is saved as a new file.
- CANCEL: The function is cancelled.
Press the OK button to save/cancel the changes.
10.10.2. Changing size
Choose the required photo in Playback mode.
- Open the "Großeändern" submenu in the playback menu. The Selection menu appears on the display.
Choose one of the following resolutions and press the OK button: 640, 320, 160.

NOTE!
The available resolutions may vary according to the original size of the image. Settings which are not available are greyed out.
A menu selection appears after termination of the function. Choose between:
- YES: The new file is saved as a new file.
- CANCEL: The function is cancelled.
Press the OK button to save/cancel the changes.
11. Installing software
There is a picture editing program called "CyberLink PhotoDirector" on the CD supplied with the product.
How to install the CyberLink PhotoDirector:
Insert the installation CD in the DVD/CD drive.
The CD is automatically executed and a selection screen appears.
- Select the entry "Install CyberLink PhotoDirector" on the selection screen.
Follow the instructions to complete the installation.
Start the program via the symbol on the desktop, where applicable.
When you start the program for the first time, it has to be activated. To activate the program, enter the serial number HEZGA-B5DS5-3P3SS-GS648-HLJS6-UNP3E.

NOTE!
Help with using the program is available in the help system software, which can be accessed by pressing the F1 button.
If the CD is not automatically executed, follow the steps below to install the software:
Double-click on Desktop.
Move the cursor to the DVD/CD drive.
Right-click, then click on Open.
Double-click on Setup.exe.
A wizard will then guide you through the installation process.
Follow the instructions to complete the installation.
Start the program via the symbol on the desktop.
- When you start the program for the first time, it has to be activated. To activate the program, enter the serial number HEZGA-B5DS5-3P3SS-GS648-HLJS6-UNP3E.
12. Connecting to a printer, PC or TV
12.1. Printing shots on a photo printer
Using PictBridge, you can print your shots directly on a PictBridge-compatible photo printer.
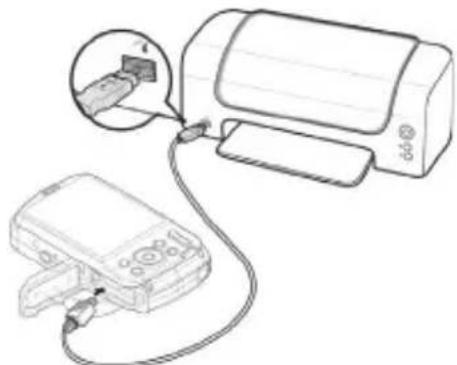
Connect the printer to the camera with the USB cable supplied.
Switch the camera and the photo printer on.
The camera recognises that a USB device has been connected.
- Switch to print mode by selecting the "PTP" option and confirm with OK.
Use the arrow keys or to select the desired photo and the desired number of copies. You have the following options:
- PRINT SELECTED - Select the desired photos and the number of copies
PRINT ALL - Print all photos
PRINT INDEX - Print all images as thumbnails.
12.2. Transferring data to a computer
You can copy your pictures and videos to a computer. Supported operating systems:
- Windows 7
Windows 8 - Windows 8.1
Windows 10
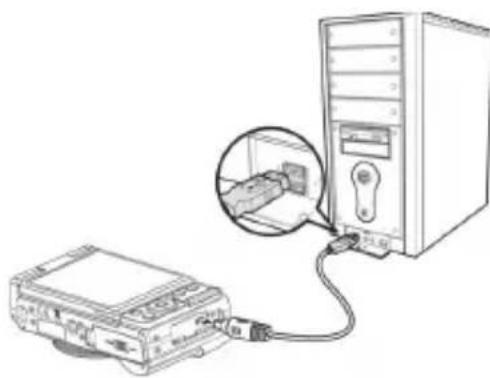
12.3. Connecting the USB cable
Switch the camera off.
- With the computer switched on, connect the USB cable supplied to the USB socket on the camera and a USB socket on the PC.
Switch the camera on.
As soon as the connection between the camera and computer has been established, "MASS STORAGE" or "PTP" appears on the camera screen.
If you select MASS STORAGE, the camera is shown as a mass storage device and can be used as a separate drive in Windows Explorer. Open Windows Explorer or double-click on "My Computer" (in Vista/Windows 7: "Computer").
Double-click on the media icon for the camera.
▶ Navigate to the "DCIM" directory and, where applicable, to the relevant subdirectories in order to display the files (.jpg = photos; .wav = sound recordings; *.avi = video recordings). See also the directory structure in the memory.
Press down the left mouse button and drag the relevant files to the directory provided on the computer, e.g. in the folder "My Documents". You can also highlight the files and use the Windows commands "Copy" and "Paste".
The files are transferred to the computer and stored there. You can display, view and process the files with a suitable software application.
If you select PTP, the camera will be connected as a PTP (picture transfer protocol) device.
In Windows Vista, Windows 7 and Windows 8 you can immediately access the content of the camera memory or the memory card
12.4. Displaying captures on a television set
You can play back the shots from your camera on a television set.
- Switch off the camera and television set.
Connect the TV cable supplied to the USB socket on the camera and the yellow video socket and white audio socket on the television set.
- Switch the camera and television set on.
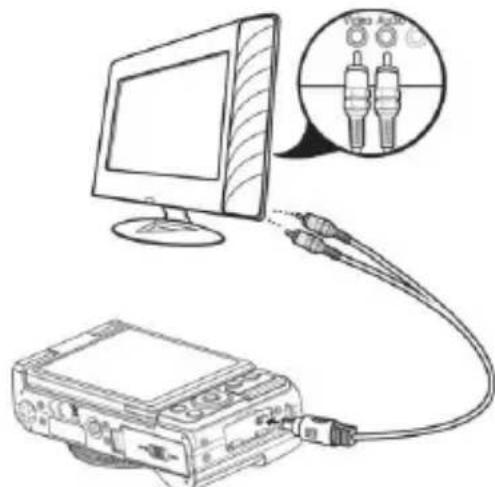
- Switch the camera to Playback mode and begin playback as required.
If the television set does not detect the camera signal automatically, switch to the appropriate video input on the television set (usually by means of the AV button).
In the camera menu " SETTINGS", under the submenu "TV-OUT", you may be required to select between PAL and NTSC.
12.5. DCF memory standard
The recordings on your camera are managed (saved, named, etc.) in accordance with the DCF standard (DCF = Design rule for Camera File system). Recordings on memory cards from other DCF cameras can also be played back on your camera.
12.6.Card drive
If your PC has a card drive or is connected to a card reader and you have saved your pictures and recordings on the memory card, you can also just use the card to copy the files to your PC. The card reader is also detected as a removable storage device on the Windows desktop (or in "Computer" if using Vista).
12.7. Folder structure in the memory
The camera saves the pictures and videos in two different directories on the memory card. The following directories are automatically created during the process:
DCIM: All photo and video files are saved in this folder, Normal shots are located in the "100MEDIA" folder and automatically named with "DSCI" plus a four-digit number. When the highest number "DSCI9999" has been reached, the next folder "101MEDIA" is created for the following shots, and so on.
A maximum of 999 folders can be created. If another capture is made after this point, an error message will appear ("Directory cannot be created").
Insert a new memory card.
Do not try to change the folders and files in the camera's own directory structure (by renaming, etc.) You might destroy the files by doing so.
13. Troubleshooting
Check the following points if the camera does not function correctly. If the problem persists, consult MEDION Service.
The camera will not switch on.
The battery is not inserted correctly.
The battery is flat. Recharge it.
The battery compartment door is not closed properly.
The camera will not take photos.
The flash is still charging.
The memory is full.
The SD card is not correctly formatted or is defective.
The maximum number of files has been exceeded. Reset the file numbering function.
There is not enough light. Change the angle of the camera to
pick up more light or use the flash.
The flash does not go off.
The camera was moved during the shot.
The flash is switched off.
The image is blurred.
The camera was moved during the shot.
The subject was outside the camera's focal range. Use the Macro mode for close-up pictures, where applicable.
The image is not shown on the display.
An SD card has been inserted which took pictures in non-DCF mode on another camera. The camera cannot display this type of image.
The period of time between shots is longer when taking pictures in the dark
The shutter usually works more slowly in poor light conditions.
Change the angle of the camera, or improve the light conditions.
The camera switches itself off.
After a preset period, the camera switches itself off to save the battery charge. Restart the camera.
The shot has not been saved.
The camera was switched off before the shot could be saved.
Shots on other memory cards are not displayed.
The shots on memory cards from other cameras will only be displayed if the other camera also uses the DCF memory system.
The shots cannot be transferred to the PC via the USB cable.
The camera is not switched on.
When the camera is connected to the computer for the first time, no new hardware is found.
The USB connection on the PC is deactivated in the BIOS settings.
Enable the port in the computer's BIOS settings. Refer to the PC manual if necessary.
The zoom function is not available while recording a video.
Ensure the macro function is switched off.
14. Maintenance and care
Clean the housing, lens and display as follows:
Clean the camera housing using a soft, dry cloth.
Do not use thinners or detergents which contain oil. This could damage the camera.
When cleaning the lens and the display, start by removing the dust with a lens brush. Then wipe the lens and display with a soft cloth. Do not apply any pressure to the display and do not use hard objects to clean it.
Do not use strong cleaning agents for the housing and lens (if there is dirt that cannot be removed, contact your dealer).
15. Disposal

Packaging
Your device is packaged to protect it from transportation damage. Packaging is raw material and can be reused or added to the recycling system.

Appliance
According to Directive 2012/19 / EU do not dispose of the product in the household rubbish at the end of its service life. Take it to a local collection point for used appliances in order to comply with environmental regulations. Contact your local authority to find out where your nearest collection point is located.

Batteries
Batteries must be properly disposed of. Retailers who stock batteries and local authority collection points have appropriate disposal containers for this purpose. You can contact your local waste disposal company or municipal authorities for further information.
16. Technical data
Sensor: 20 megapixel CCD
Aperture: F3.2 - F5.8
Focal distance: f = 4,6 - 18,4 mm
Optical zoom: 4 ×
LCD monitor: 6,8cm / 2.7'' LC - Display
File formats: JPEG (EXIF 2.3), AVI (MJPEG)
Max. resolutions:
Camera mode: 5152 x 3864 pixels
Video mode: 640 x 480 Pixel
1280 × 720 pixels (with a class 6
SDHC memory card
Picture memory:
External: microSD/microSDHC-card
Connection: Mini-USB 2.0
Dimensions (W x H x D): approx.108 x 67 x 51 mm
Gewicht: approx. 178 g (incl. battery)
USB MAINS ADAPTER
Model number: KSAS0050500100VKU
Manufacturer: Ktec, China
Input voltage: 100 - 240V 50 / 60Hz0.18A
Output voltage: 5.0V 1.0 A
BATTERY
Manufacturer: HYB BATTERY CO., LTD.
Model number: NP-45
Technical data: 3,7 V / 700 mAh / 2.6 Wh
Subject to technical and optical changes as well as printing errors!

17. Legal notice
Copyright © 2015
All rights reserved.
This operating manual is protected by copyright.
Mechanical, electronic and any other form of reproduction is prohibited without the written permission of the manufacturer
Copyright is owned by the company:
Medion AG
Am Zehnhof 77
45307 Essen
Germany

The operating manual can be reordered via the service hotline and is available for download via the service portal at www.medion.com/gb/service/start/.
You can also scan the QR code above and download the operating manual onto your mobile device via the service portal.
