
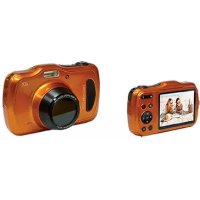
LIFE E46001 (MD 85544) - Camcorder MEDION - Free user manual and instructions
Find the device manual for free LIFE E46001 (MD 85544) MEDION in PDF.


| Product Type | Camcorder |
| Brand | Medion |
| Model | LIFE E46001 (MD 85544) |
| Product Dimensions | Approx. 120 x 60 x 60 mm (4.7 x 2.4 x 2.4 in) |
| Weight | Approx. 200 g (7 oz) |
| Power Source | Rechargeable lithium-ion battery |
| Battery Capacity | 1200 mAh |
| Recording Media | SD/SDHC memory card |
| Video Resolution | Full HD 1080p |
| Optical Zoom | 10x |
| Digital Zoom | 100x |
| Display | 2.7-inch LCD screen |
| Connectivity | USB 2.0, HDMI out, AV out |
| Image Sensor | CMOS sensor |
| Lens | F/2.8 aperture |
| Special Features | Night mode, image stabilization |
| Cleaning | Use a soft dry cloth for exterior; lens cleaning kit for lens |
| Safety | Do not expose to water; avoid dropping; use only specified charger |
| Spare Parts | Battery, charger, USB cable available separately |
| Warranty | 2 years (typical) |
| Manual | Downloadable PDF from Medion website |
Frequently Asked Questions - LIFE E46001 (MD 85544) MEDION
User questions about LIFE E46001 (MD 85544) MEDION
0 question about this device. Answer the ones you know or ask your own.
Ask a new question about this device
Download the instructions for your Camcorder in PDF format for free! Find your manual LIFE E46001 (MD 85544) - MEDION and take your electronic device back in hand. On this page are published all the documents necessary for the use of your device. LIFE E46001 (MD 85544) by MEDION.
USER MANUAL LIFE E46001 (MD 85544) MEDION
Digital Video Camera

natural_image
Line drawing of a digital recording device with control buttons and a blank screen (no text or symbols)User Manual
Content
Section 1 Getting to Know Your Camera....2
Section 2 Getting Up and Running....5
Section 3 Record Mode 7
Section 4 Playback Mode.... 33
Section 5 Listening to MP3 Music 46
Section 6 Viewing MPEG4 Movie on PC.... 48
Section 7 Viewing Pictures and Movies on a TV.... 49
Section 8 Video File Converter 50
Section 9 Burning the Recorded Clip into DVD....54
Section 10 Transferring Data to a Computer.... 57
Section 11 Specifications and System Requirements...... 64
Getting to Know Your Camera
Overview
The camera with 3.2 Mega Pixel sensor can take DVD-Quality MPEG-4 movies. By way of using MPEG-4 technology, more videos can be taken within certain amount of memory. High quality images with up to 10 mega-pixels can also be delivered smoothly. With a color LCD monitor, users can compose images and examine them easily.
Exposure and color balance can either be adjusted automatically or allowed to be changed manually. An 8x digital zoom increases user control over the movies and pictures you take. The camera is also ideally suited for using as a PC camera hooked up to your home computer via high speed USB 2.0 port
Biuld-in 32 MB memory allows you to take pictures and movies without memory card. The memory card slot allows users to increase the storage capacity up to 2GB.

Note
Partial memory of the built-in 32MB memory is used for Firmware code
◆ Standard Accessories
Unpack the package and make sure all standard accessories listed are included:
- Camera
- USB Cable
- TV Cable
- Two AA (Alkaline) Batteries
- Quick Guide
• CD-ROM (Driver, Ulead Software and User Manual) - Earphone (Optional)
- Remote Control (Optional)
- Strap
- Pouch
◆ Front View

◆ KeyPad illustration
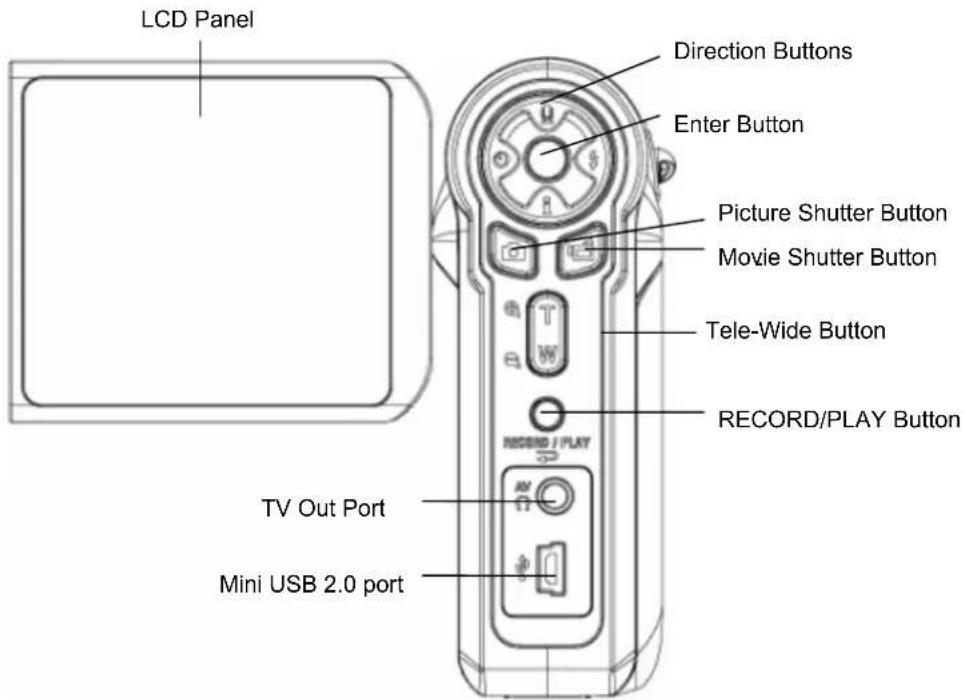
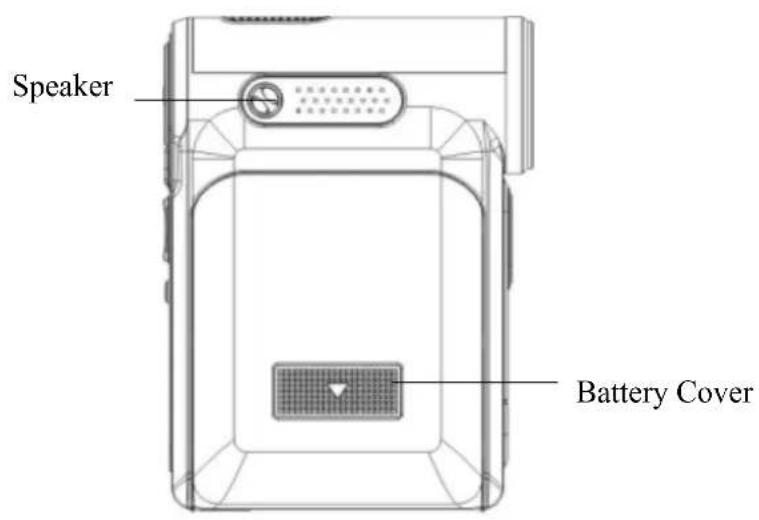

Section 2
Getting Up and Running
◆ Loading the Battery
Before using the camera, user must load two AA (Alkaline) batteries.
- Follow the arrow direction and slide to eject the battery cover.
- Insert the batteries according to the correct polarity marks (+ or -)
- Close the battery cover firmly.

natural_image
Technical line drawing of a device with battery pack and internal components (no text or symbols)◆ Inserting and Removing an SD Card (Optional)
The camera comes with internal memory which allows you to store pictures, movies, recorded voice and music. You can expand the memory capacity by using an optional SD or MMC memory card up to 2GB. To insert a memory card, refer to the figure as below:
- Insert the memory card into the right position.
- To remove an installed SD card, press the card inwards to release it.
- When the card pops out, gently remove it from its slot.
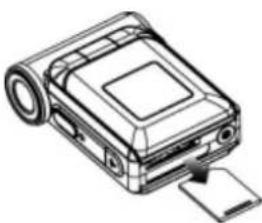
natural_image
Line drawing of a portable electronic device with a scroll and card (no text or symbols)
Note
When a memory card is fitted, movies and pictures are saved on card rather than on the built-in memory.
◆ Protecting Data on an SD Card
SD card is read-only by locking the SD card. No pictures, movies and voice can be recorded when the SD card is locked. Make sure the lock is on writeable position before recording any media.

◆ Turning the Camera On and Getting Started
To turn on the camera:
(1) Flip out the LCD panel; the camera will turn on automatically.
(2) Or press Power Button for one second to turn on it.
To take a movie, press the Movie Shutter Button ( ).
⇒ To take a picture, press the Picture Shutter Button ( ☐ ).
To record the voice, press the Upper Button of Direction Buttons and press the Movie Shutter Button (☐) to start voice recording.
To view stored movies, pictures or listen to stored MP3 and voice recordings, press the RECORD/PLAY Button once to switch to Playback Mode. Press a second time to return to Record Mode.
◆ Turning the Camera Off
To turn off the Camera, you can either press the Power Button for one second, or you can place the LCD panel back to its original position.
◆ Button Function
Enter Button\Left Button Up Button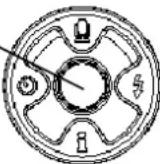 Right ButtonDown Button Right ButtonDown Button | Right Button: Flash AUTO/OFFLeft Button :Self-Timer ON/OFFUp Button : Voice Recording ModeDown Button: LCD Information ON/OFFEnter Button: Menu ON |
 | Power Button: Press down for one second to turn on or turn off the camera. |
 - - | RECORD/PLAY Button functions:1. Switch between Record /Playback Mode.2. Return to the previous page. |
 | Tele-Wide Button: Digital Zoom in and out. |
 | Movie Shutter Button:1. Start to take movie, or record voice.2. To stop recording, press it again. |
 | Picture Shutter Button: Start to take picture |
—  | Macro switch: Switch between Macro Mode, Portrait Mode, and Normal Mode. |
◆ LCD Monitor Information
The indicator shows below may display on LCD when movies and pictures are recorded :
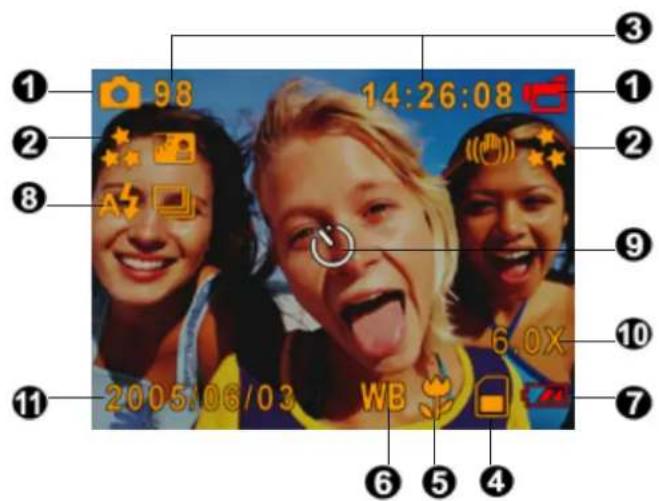
| (1) | Record Mode | |
 | Movie Record Mode | |
 | Picture Record Mode | |
| [T430] | Voice Record Mode | |
 | Motion Stabilization | |
| [1267] | Two in One Mode | |
| [5782] | Photo Frame | |
| [7593] | Multi-Snap Mode | |
 | Backlight Mode | |
| (2) | Resolution | |
| Movie: ★★High / Standard/ Low | ||
| Picture: ★★High / Standard/ Low | ||
| (3) | Number of images or recording time of movie that can still be taken at current resolution. | |
| (4) | SD card inserted | |
| (5) | Macro Position Focusing | |
| (6) | WB | White Balance |
| (7) | Battery indicator: full power / medium power / low power / | |
| [3228]power empty | ||
| (8) | Auto Flash | |
| Flash Off | ||
Resolution
SD card inserted
| (9) | Self-timer enabled | |
| (10) | 8X digital zoom | |
| (11) | Date/Time : YYYY/MM/DD HH: MM | |
◆ MPEG4 Movie Recording
Press the Movie Shutter button ( ) to start recording. When a movie is recording, a time indicator will display on LCD monitor. To stop recording, press Movie Shutter Button ( ) again. Press RECORD/PLAY Button to view the recorded movie.
Three resolution settings are available:
| Resolution | Quality |
| 640*480(1.8Mbps) / 30 fps | High Quality★★ |
| 640*480(1 Mbps) / 30 fps | Standard Quality★★ |
| 320*240 (500 Kbps) / 30 fps | Low Quality ★ |
◆ Picture Recording
Press the Picture Shutter Button ( ) to take a picture.
Press RECORD/PLAY Button to view the picture.
Three resolution settings are available:
| Resolution | Image |
| 3720*2790 (10M pixel) | High Quality ★★ |
| 2048*1536 (3M pixel) | Standard Quality ★★ |
| 1024*768 (800K pixel) | Low Quality ★ |
Quality
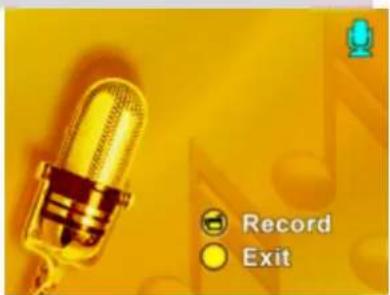
◆ Voice Recording
- Press Upper Button ( ) of direction Buttons to switch to Voice Record Mode.
- Press Movie Shutter Button ( ) to record voice.
- Press Movie Shutter Button ( ) again to stop.
- Press RECORD/PLAY Button to view the recorded voice.
◆ Taking Close up Pictures
The camera has two close-up picture modes to allow you to take pictures at close range. The Macro Mode (💡) should be used for object located at about 20 cm, while the Portrait Mode (💡) should be used for object located from 60 cm to 100 cm.
To take close-up pictures:
- Rotate the lens ring to switch to Macro (✗) or Portrait (✗) positions. In Macro Mode, the macro icon (✗) will appear on the LCD monitor.
- Press the Picture Shutter Button ( ☐ ) to take the picture.

Note
Remember to turn the macro switch back to Normal (▲) when you are not taking close-up pictures.
◆ Using Digital Zoom
The digital zoom magnifies images, when recording movies or taking pictures.
- To zoom in/out, press the Tele/Wide Button.
- The digital zoom can be set from 1x to 8x and the magnification ratio is shown on the LCD monitor.
◆ Options for Record Mode
| Movie Mode | Picture Mode | Voice Pen | Effect | Set |
| ResolutionExposureSharpnessWhite BalanceStabilizationExit | ResolutionExposureTwo in OnePhoto FrameFlashSelf-timerSharpnessWhite BalanceMulti-snapBacklightDate printingExit | EnterExit | NormalB/WClassicNegativeExit | SoundStart-up ScreenTime SettingFormat MemoryTV SystemLanguageDefault SettingExit |
◆ Operations for Record Mode
Operation Screen
- Press the Enter Button when in Movie/Picture Record Mode.

- Use the Right/Left Buttons to move between main menu options, which are Movie Mode, Camera Mode, Voice Mode, Effect, and Set. Submenu will pop out while move to each main option.

- Press Enter Button to validate sub option you select.

- Select Exit option to exit submenu.
◆ Default Setting and Validation
The following table indicates the camera's default setting as well as its validation.
- Always: The setting always keeps valid.
- One Time: The setting is only valid either once or till camera power off.
| Validation Default | Factory Setting | |
| Resolution | Always High for Movie | Standard for Picture |
| Exposure | One Time 0EV | |
| Sharpness | One Time Level 5 | |
| White Balance | One Time Auto | |
| Motion Stabilization | Always | Off |
| Two in One | One Time Off | |
| Photo Frame | One Time Off | |
| Flash | Always | Off |
| Self-Timer | One Time Off | |
| Multi-Snap | One Time Off | |
| Backlight Mode | One Time Off | |
| Date Printing | Always | Off |
| Effect | One Time Normal | |
| Sound | Always | On |
| Format Card | One Time Off | |
| TV System | Always Depends on shipping area | |
| Language | Always Depends on shipping area | |
| Volume | Always | Level 6 |
◆ Movie Mode submenu Setting
Record main menu includes camera setting and other advanced setting. You can use Right/Left Buttons to move between options and press Enter Button to validate the setting.
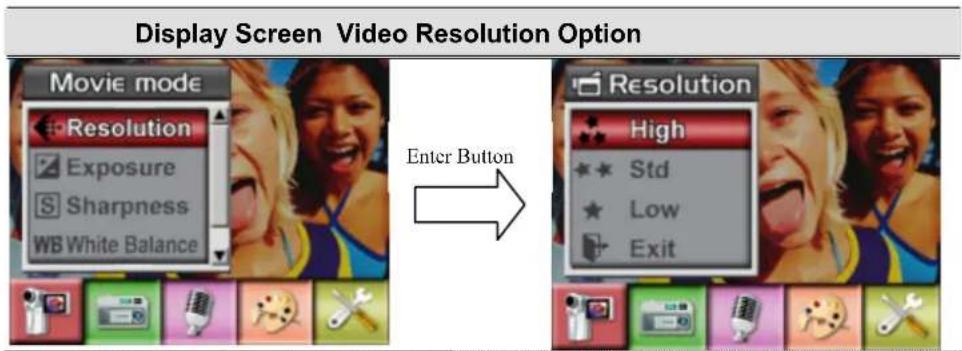
◆ Movie Resolution
To change Movie Resolution:
- In Movie/Picture Record Mode, press Enter Button to switch to record menu screen.
- Use Right/Left Buttons to select Movie Mode. Submenu of Camera Mode will pop out on the screen.
- Use Up/Down Buttons to select Resolution then press Enter Buttons to switch to Resolution submenu.
- Use Up/Down Buttons to move between three settings.
- Press Enter Button to validate the setting and exit.
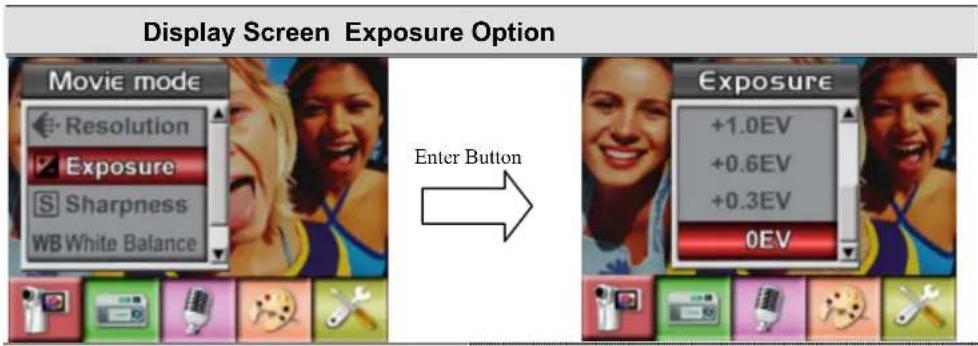
◆ Exposure
The camera adjusts image exposure automatically. In certain circumstances you may wish to adjust the exposure compensation setting.
To change Exposure setting:
- In Movie/Picture Record Mode, press Enter Button to switch to record menu screen.
- Use Right/Left Buttons to select Movie Mode. Submenu of Camera Mode will pop out on the screen.
- Use Up/Down Buttons to move to Exposure Option. Press the Enter Button and then Exposure Submenu will pop out on the screen.
- Use Up/Down Buttons to choose preferred EV value. The change can be previewed immediately.
- Press Enter Button to validate the setting and exit.
◆ Sharpness
You can soften and sharpen images to achieve different effects.
To change Sharpness setting:
- In Movie/Picture Record Mode, press Enter Button to switch record menu screen.
- Use Right/Left Buttons to select Movie Mode. Submenu of Camera Mode will pop out on the screen.
- Use Up/Down Buttons to select Sharpness then press Enter Buttons to switch to Sharpness submenu.
- Use Up/Down Buttons to move between nine levels. The change can be previewed immediately.
- Press Enter Button to validate the setting and exit.
Display Screen Change Sharpness Setting

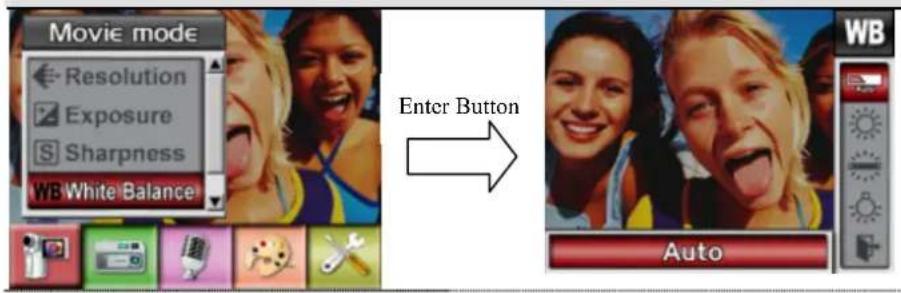
◆ White Balance
The camera adjusts the color balance of images automatically. Three manual white balance settings are available:
- Auto (Default): The camera automatically adjusts white balance.
- Daylight: Under outdoors
- Fluorescent: Under fluorescent light condition.
- Tungsten: Under tungsten light condition.
To change White Balance Setting:
- In Movie/Picture Record Mode, press Enter Button to switch to record menu screen.
- Use Right/Left Buttons to select Movie Mode. Submenu of Camera Mode will pop out on the screen.
- Use Up/Down Buttons to select White Balance, then press Enter Buttons to switch to White Balance submenu.
- Use Up/Down Buttons to move between four settings. The change can be previewed immediately.
- Press Enter Button to validate the setting and exit.
Display Screen W/B Option
♦ Motion Stabilization
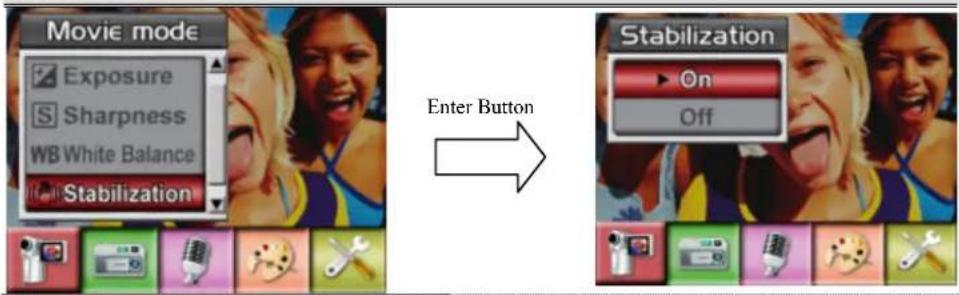
To enable Motion Stabilization:
- In Movie/Picture Record Mode, press Enter Button to switch to record menu screen.
- Use Right/Left Buttons to select Movie Mode. Submenu of Camera Mode will pop out on the screen.
- Use Up/Down Buttons to select Motion Stabilization then press Enter Buttons to switch to Motion Stabilization submenu.
- Use Up/Down Buttons to choose ON or OFF.
- Press Enter Button to validate the setting and exit.
Motion Stabilization Motion Stabilization Option

Note
- The captured screen will be smaller when motion stabilization is enabled.
- Digital Zoom is disabled when motion stabilization is activated.
◆ Camera Mode Setting
◆ Picture Resolution
To change Picture Resolution:
- In Movie/Picture Record Mode, press Enter Button to switch to record menu screen.
- Use Right/Left Buttons to select Camera Mode. Submenu of Camera Mode will pop out on the screen.
- Use Up/Down Buttons to select Resolution then press Enter Buttons to switch to Resolution submenu.
- Use Up/Down Buttons to move between three settings.
- Press Enter Button to validate the setting and exit.
Display Screen Video Resolution Option

◆ Exposure
The camera adjusts image exposure automatically. In certain circumstances you may wish to adjust the exposure compensation setting.
To change Exposure setting:
- In Movie/Picture Record Mode, press Enter Button to switch to record menu screen. Submenu of Picture Mode will pop out on the screen.
- Use Right/Left Buttons to select Camera Mode. Submenu of Camera Mode will pop out on the screen
- Use Up/Down Buttons to move to Exposure Option. Press the Enter Button and then Exposure Submenu will pop out on the screen.
- Use Up/Down Buttons to choose preferred EV value. The change can be previewed immediately.
- Press Enter Button to validate the setting and exit.
Display Screen Exposure Option

◆ Two in One (Picture Record Mode Only)
With camera set to Two in One mode, you can combine two snapshots into one picture. To enable Two in One:
- In Movie/Picture Record Mode, press Enter Button to switch to record menu screen.
- Use Right/Left Buttons to select Camera Mode. Submenu of Camera Mode will pop out on the screen.
- Use Up/Down Buttons to select Two in One then press Enter Buttons to switch to Two in One submenu.
- Use Up/Down Buttons to choose ON or OFF.
- Press Enter Button to validate the setting and exit.
Display Screen Two in One Option

- Take a first picture.

natural_image
Close-up of a smiling man in a white shirt and glasses, outdoors with blurred natural background (no text or symbols visible)- Take a second picture.

natural_image
Two women laughing and interacting in a dimly lit scene (no visible text or symbols)- Press the RECORD/PLAY Button to view the Two in One picture.

natural_image
Three people laughing together, one smiling and gesturing, the other holding a phone to her (no visible text or symbols)◆ Photo Frame (Picture Record Mode Only)
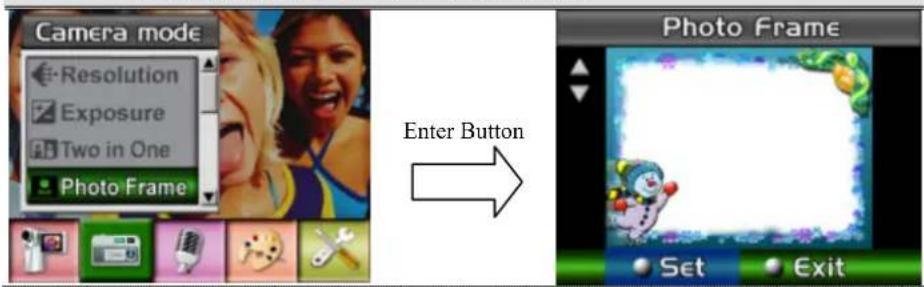
Your camera features popular electronic photo frame. You can take your picture with preferred electronic photo frame. To enable Photo Frame:
- When in Camera Mode, use Up/Down Buttons to select Photo Frame option, then press Enter Buttons to switch to Photo Frame submenu.
- Use Up/Down Buttons to locate preferred photo frame. Then select Set option and press Enter Button to validate the setting and exit.
Display Screen Photo Frame Option
◆ Flash (Picture Record Mode Only)
This camera has two flash settings. To change flash setting by either hot key (Right Button) or Option Setting.
⑦ Auto-flash(A7): the flash fires automatically according to light conditions. Use this mode for general photography.
⑦ Flash Off(3): the flash will not fire under any circumstances. Use this mode when taking images in a place where flash photography is prohibited, or when the subject is distant (beyond the range of the flash).
To change Flash setting:
- When in Camera Mode, use Up/Down Buttons to select Flash Option, then press Enter Buttons to switch to Flash submenu.
- Use Up/Down Buttons to move between 2 settings.
- Press Enter Button to validate the setting and exit.

Note
- The flash will be disabled automatically when battery power is low (☐)
Display Screen Flash Options

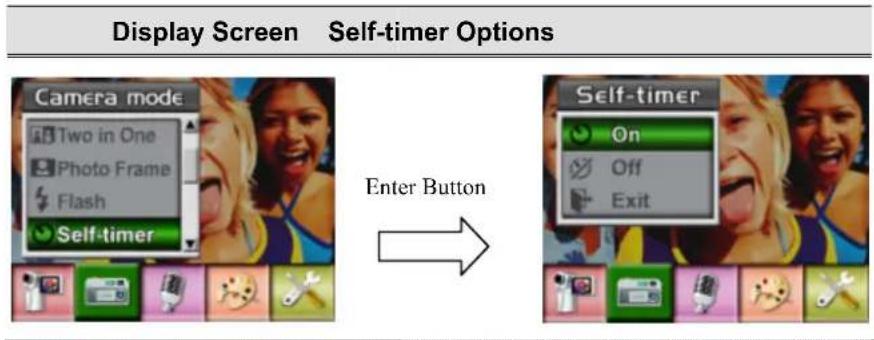
◆ Self-timer (Picture Record Mode Only)
The self-timer allows you to take pictures with a ten-second time delay. To activate Self-timer by either hot key (Left Button) or Option Setting. The self-timer LED on the front of the camera beneath the flash light will also blink. The speed of blinking will increase just before the picture is taken.
◆ Sharpness
You can soften and sharpen images to achieve different effects.
To change Sharpness setting:
- In Movie/Picture Record Mode, press Enter Button to switch record menu screen.
- Use Right/Left Buttons to select Camera Mode. Submenu of Camera Mode will pop out on the screen.
- Use Up/Down Buttons to select Sharpness then press Enter Buttons to switch to Sharpness submenu.
- Use Up/Down Buttons to move between nine levels. The change can be previewed immediately.
- Press Enter Button to validate the setting and exit.
Display Screen Change Sharpness Setting

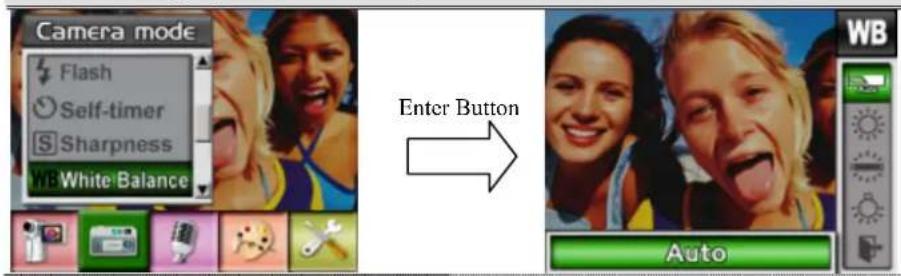
◆ White Balance
The camera adjusts the color balance of images automatically. Three manual white balance settings are available:
- Auto (Default): The camera automatically adjusts white balance.
- Daylight: Under outdoors
- Fluorescent: Under fluorescent light condition.
- Tungsten: Under tungsten light condition.
To change White Balance Setting:
- In Movie/Picture Record Mode, press Enter Button to switch to record menu screen.
- Use Right/Left Buttons to select Camera Mode. Submenu of Camera Mode will pop out on the screen.
- Use Up/Down Buttons to select White Balance, then press Enter Buttons to switch to White Balance submenu.
- Use Up/Down Buttons to move between four settings. The change can be previewed immediately.
- Press Enter Button to validate the setting and exit.
Display Screen W/B Option
◆ Multi-Snap (Picture Record Mode Only)
With the camera set to Multi-Snap Mode, you can take five continuous pictures.

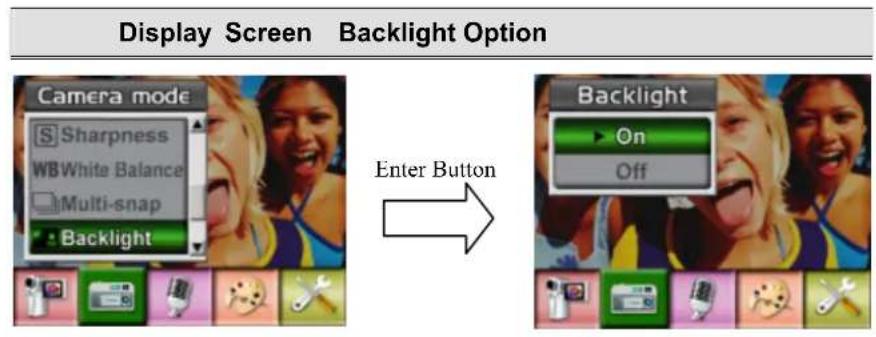
◆ Backlight (Picture Record Mode Only)
With the camera set to backlight Mode, you can take shots when bright light is behind the subject.
◆ Date Printing
To enable Date Printing:
- When in Camera Mode, use Up/Down Buttons to select Date Printing, then press Enter Buttons to switch to Date Printing submenu.
- Use Up/Down Buttons to choose On or Off.
- Press Enter Button to validate the setting and exit.
Display Screen Date Printing Option


Note
Date would be shown on the printed picture once date printing is enabled.
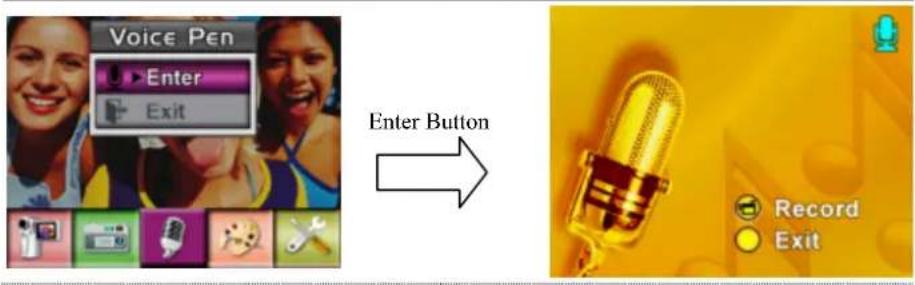
◆ Voice Mode
To enable voice recording:
- In Movie/Picture Record Mode, press Enter Button to switch to record menu screen.
- Use Right/Left Buttons to move to Voice Option. Then Voice Submenu will pop out on the screen.
- Use Up/Down Buttons to move between Enter and Exit Option.
- Choose Enter option to enable voice recording and press Enter Button to validate the setting and exit.
Display Screen Voice Mode Option
◆ Effect Setting
There are four modes which are Normal, Black/White, Classic and Negative.
To change Effect setting:
- In Movie/Picture Record Mode, press Enter Button to switch to record menu screen.
- Use Right/Left Buttons to move to Effect Option. Then Effect Submenu will pop out on the screen.
- Use Up/Down Buttons to move between four settings. The change can be previewed immediately.
- Press Enter Button to validate the setting and exit.
Display Screen

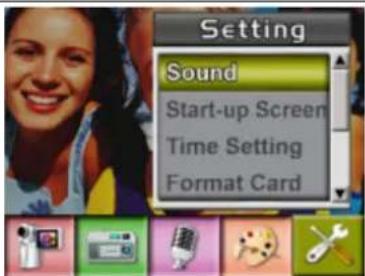
Setting Menu
The Setting submenu contains options for configuring your camera set up.
To change advanced setting:
- In Movie/Picture Record Mode, press Enter Button to switch to record menu screen.
- Use Right/Left Buttons to move to Setting option, then Setting Submenu will pop out on the screen.
- Use Up/Down Buttons to move between settings.
Display Screen Setting Option
• Sound (operation sound)
- Start-Up Screen
- Time Setting
- Format Card
- TV System
- Language
- Default Setting
- Sound Setting
Enable or disable KeyPad tone and operation sound by using Up/Down Buttons, the press Enter Button to validate the setting.
| Submenu Display Screen Sound Setting | ||
| Sound | 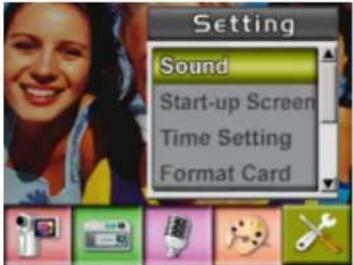 | 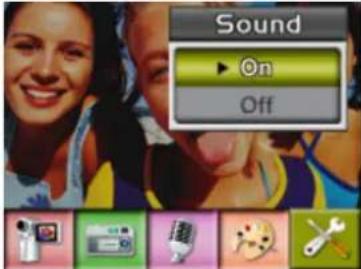 |
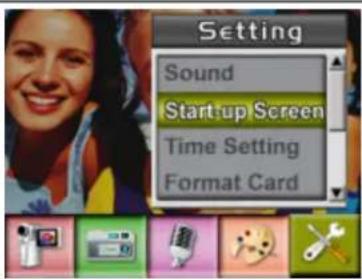
- Start-up Screen
Customize the Start-Up Screen with your favorite pictures. Press Right/Left Buttons to select the picture you want and press Enter Button to validate the setting and exit.
Submenu Display Screen Start-Up Screen
Start-Up Screen

)
If you do not want to customize the start up screen, press Left/Right Buttons and select No Start-Up Screen.
No Start-Up Screen

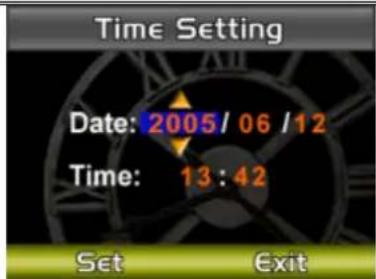
- Time Setting
- Move between Date, Time, Set and Exit by using Left/Right Buttons.
- Adjust date and time by using Up/Down Buttons, then select Set to validate each change.
- Select Exit to leave Time Setting without any change.
Submenu Display Screen Time Setting
Time Setting

- Format Card
Submenu Display Screen Format Card Options
Format Card


Yes : Format the SD Card / built-in memory
No (Default) : Do not format SD Card / built in memory

Note
- All the data will be erased if the SD card is formatted. Make sure all the data are duplicated to PC before formatting SD card.
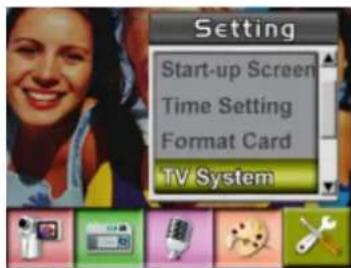
TV System
Ensure that the appropriate TV standard of your area is selected – either NTSC or PAL.
Wrong TV system setting may cause image flicker.
NTSC standard: USA, Canada, Japan, South Korea and Taiwan etc.
PAL standard: UK, Europe, China, Australia, Singapore and Hong Kong etc.
Submenu Display Screen TV System Option
TV System

- Selecting Interface Language
Submenu Display Screen Language Option
Language

English, German, French, Italian,
Spanish and Portuguese
Korean, Japanese, Traditional
Chinese, Simplified Chinese
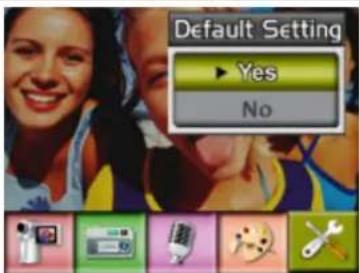
- Default Setting
To restore the default factory setting, select this option.
Submenu Display Screen Default Setting Options
Default Setting

Section 4
Playback Mode
Press RECORD/PLAY Button to switch from Record Mode to Playback Mode.
The Playback Mode is for viewing and managing movies and pictures as well as listening to voice and music on the built-in memory or on an optional memory card.
| Operation | Display |
| Press RECORD/PLAY Button to switch from Record Mode to Playback Mode Main Menu.There are four options in the Playback Mode, movie, picture, voice, and music.Direction Buttons can be used to select the specific option.Press Enter Button to view movies/pictures or listen to voice/music. | 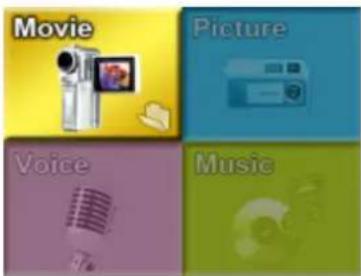 |

Note
When any recorded movie, picture, voice or music is stored in the camera, a folder will be shown on the respective playback mode.
◆ Button Functions
The Direction Buttons have the following functions in Movie and Picture Playback Modes.
Enter | Right ButtonDown Button | Right ButtonDown Button | Right Button: Go to the next movie/ picture.Left Button: Go to the previous movie/ picture.Up Button: InvalidDown Button: Information ON/OFFEnter Button: Enter to movie, picture, voice, or music option menu. | |
 | RECORD/PLAY Button functions:1. Switch between Record and Playback modes.2. Return to the previous page. | |
 | Tele-Wide Button: Digital Zoom in and out. | |
 | Movie Shutter Button:Start playing the recorded movie or voice | |
◆ LCD Monitor Information
Indicators on the LCD screen while in Playback Mode :

| (1) | Mode Indicator | |
 | Movie Playback Mode | |
 | Picture Playback Mode | |
 | Voice Playback Mode | |
 | Music Playback Mode | |
| (2) | Resolution Indicator | |
 | High Resolution | |
 | Standard Resolution | |
| ★ | Low Resolution | |
| (3) |  dicate the selected movie/picture is locked. dicate the selected movie/picture is locked. | |
 dicate the single movie/voice/MP3 is being repeated. dicate the single movie/voice/MP3 is being repeated. | ||
 dicate all of the movies/voices/MP3 are being repeated. dicate all of the movies/voices/MP3 are being repeated. | ||
 dicate the slide show is playing. dicate the slide show is playing. | ||
| (4) | Current Number/ Total number of movie, picture, voice, or MP3. | |
| (5) |  lagnification Indicator. lagnification Indicator. | |
◆ Movie Playback
| Operation Display Screen | |
| 1. Use Direction Buttons to select the Movie option.2. Press Enter Button to go to Movie Playback Mode. |  |
| 3. Use Right/Left Buttons to go to the next or last movie.4. Press Movie Shutter Button to play and press it again to pause.5. While playing movie, press down [Right] or [Left] button to fast forward/backward, then release the button to stop.6. Use the [Up] or [Down] button to adjust volume. |  |
| 7. Press Enter Button to go to the movie option menu.8. Use Direction Buttons to select six options, Delete, Thumbnail, Lock, Repeat One, Repeat All, or Exit. |  |
◆ Delete Movies
| Operation | Display |
| 1. Use Direction Buttons to select the Delete option ( ). |  Delete Delete |
| 2. Press Enter Button to go to the Delete menu.3. Use Right/Left Buttons to select the movie.4. Use Up Button to delete all movies and Down Button to delete single movie.5. Before a movie is deleted, a confirmation screen will appear; choosing “Yes” will execute the operation, “No” will cancel the operation.6. Press Enter Button to exit. | 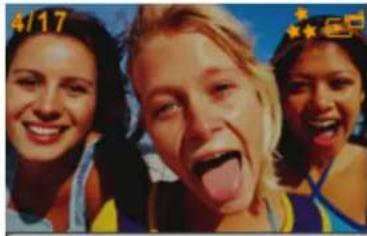 All One Exit All One Exit |

Note
If a memory card is fitted, you can delete only those movies stored on the card.

Note
Movies on a written-protected memory card cannot be deleted.

Note
The delete function will only erase unlocked movies. Locked movies must be unlocked before being deleted.
◆ Thumbnail Function
| Operation | Display |
| 1. Use Direction Buttons to select the Thumbnail option(☐). |  Thumbnail Thumbnail |
| 2. Press Enter Button to view nine thumbnail movies.3. To play a movie, use Direction Buttons to select the movie and press Enter Button to view. | 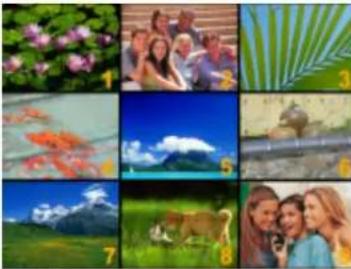 |
◆ Lock Movies
Single or all movies can be locked. This function can prevent the movies from being deleted accidentally.
| Operation | Display |
| 1. Use Direction Buttons to select the Lock option ( ).2. Press Enter Button to go to the Lock menu. |  Lock Lock |
| 3. Use Right/Left Buttons to select the movie.4. Use Up Button to lock/unlock all movies and Down Button to lock/unlock single movie.5. Before a movie is locked/unlocked, a confirmation screen will appear; choosing “Yes” will execute the operation, “No” will cancel the operation.6. Press Enter Button to exit. |  All One Exit All One Exit |
◆ Repeat Movies
This function automatically repeats playing single movie or all movies in order.
| Operation Display Screen | |
| 1. Use Direction Buttons to select the Repeat One option ( ) or Repeat All option ( ).2. Press Enter Button to start repeating. |  Repeat One Repeat One  Repeat All Repeat All |
◆ Picture Playback
| Operation Display Screen | |
| 1. Use Direction Buttons to select the Picture option.2. Press Enter Button to go to Picture Playback Mode. |    |
| 3. Use Right/Left Buttons to go to the next or last picture.4. While the picture is selected, use Tele/Wide Buttons to magnify.5. Use Direction Buttons to navigate the magnified picture. |  |
| 6. Press Enter Button to go to the picture option menu.7. Use Direction Buttons to select five options, Delete, Thumbnail, Lock, Slideshow, or Exit. |  Delete Delete |
◆ Delete Picture
| Operation | Display |
| 1. Use Direction Buttons to select the Delete option ( ). |  |
| 2. Press Enter Button to go to the Delete menu.3. Use Right/Left Buttons to select the picture.4. Use Up Button to delete all pictures and Down Button to delete single picture.5. Before a picture is deleted, a confirmation screen will appear; choosing “Yes” will execute the operation, “No” will cancel the operation.6. Press Enter Button to exit. |  |

Note
If a memory card is fitted, you can delete only those pictures stored on the card.

Note
Pictures on a written-protected memory card cannot be deleted.

Note
The delete function will only erase unlocked pictures. Locked pictures must be unlocked before being deleted.
◆ Thumbnail Function
| Operation | Display |
1. Use Direction Buttons to select the Thumbnail option  | 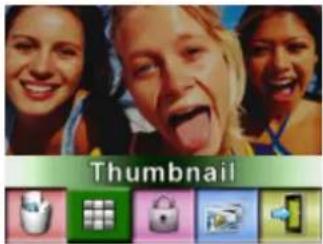 |
| 2. While selecting Thumbnail option, press Enter Button to view nine thumbnail pictures.3. To view a picture, use Direction Buttons to select the picture.4. Press Enter Button to view the selected picture. |  |
◆ Lock Pictures
Single or all pictures can be locked. This function can prevent the pictures from being deleted accidentally.
| Operation Display Screen | |
| 1. Use Direction Buttons to select the Lock option ( [800] |  |
| 2. Press Enter Button to go to the Lock menu.3. Use Right/Left Buttons to select the picture.4. Use Up Button to lock/unlock all pictures and Down Button to lock/unlock single picture.5. Before a picture is locked/unlocked, a confirmation screen will appear; choosing “Yes” will execute the operation, “No” will cancel the operation.6. Press Enter Button to exit. | 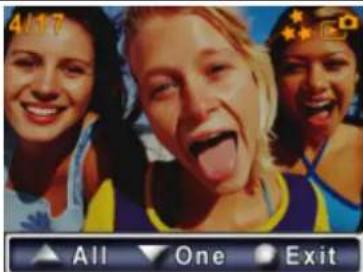 |
◆ Make Slide Show
This function automatically repeats all pictures in order.
| Operation Display Screen | |
1. Use Direction Buttons to select the Slide option  2. Press Enter Button to start the slide show; Press it again to stop. 2. Press Enter Button to start the slide show; Press it again to stop. | 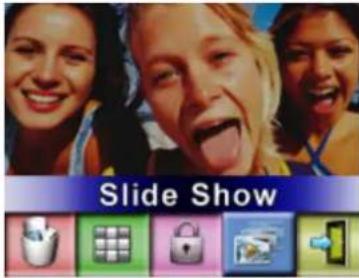 |
◆ Voice Playback
◆ Direction Buttons Function
In Voice Playback Mode, the Direction Buttons have the following functions:
| Enter ButtonLeft ButtonDown ButtonUp ButtonRight Button | Right/ Left Buttons: Select the last or next voice.Up/Down Buttons: Adjust the voice playback volume.Enter Button: Switch to voice option menu. |
| Operation Display Screen | ||
| 1. Use Direction Buttons to select the Voice option.2. Press Enter Button to go to Voice Playback Mode. |  |  |
 |  | |
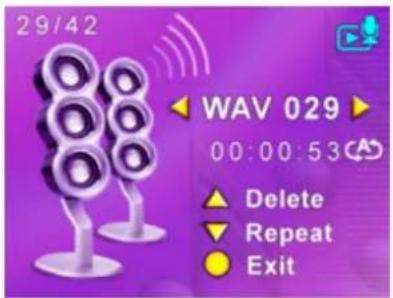
| 3. Use Right/Left Buttons to go to the next or last voice recording.4. Press Movie Shutter Button to start playing back the selected voice. Press it again to stop.5. Use Up/Down Buttons to adjust the volume.6. Press Enter Button to go to the voice playback option menu. |  |  |
| 7. Use Up Button to select Delete option and Down Button to select Repeat option. |  |  |
- Press Up Button once to repeat single voice; Press twice to repeat all voice recording.
- Press it again to disable the repeat function.
- The repeat icons will be different while selecting Repeat One option and Repeat All option.

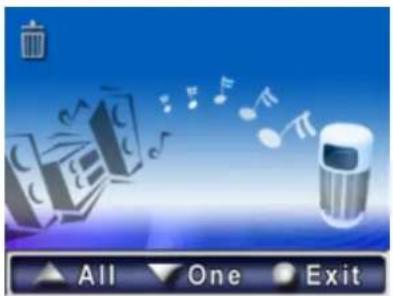
- To delete a voice, use Right/Left Buttons to select the voice.
- Use Up Button to delete all voice recordings and Down Button to delete single voice recording.
- Before a voice is deleted, a confirmation screen will appear; choosing "Yes" will execute the operation, "No" will cancel the operation.
- Press Enter Button to exit.
Section 5
Listening to MP3 Music (Optional)
◆ MP3 Music
MP3 is a compressed audio file format. The MP3 music can be downloaded from some MP3 web sites.
◆ Transfer MP3 Music to the camera
- Install the camera driver on your computer.
- Connect your camera to the computer USB port.
- The Red LED will light when the camera is connected to the computer and in Mass Storage Mode.
- Transfer MP3 music to My Computer\Removable Disk\MP3.
- Once all the music is transferred, disconnect the USB cable from the PC.
◆ Listen to MP3 Music
| Operation Display Screen | |
| 1. In Playback Mode, use Direction Buttons to select the Music option |  |
| 2. Use Right/Left Buttons to select MP3 you want to play. | 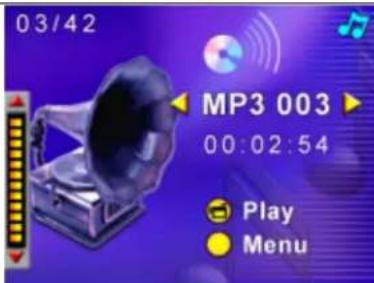 |
| 3. Press Movie Shutter Button to play MP34. Press Movie Shutter Button again to stop playing.5. Press Up/Down Buttons to adjust volume. |  |
| 6. Press Enter Button to go to repeat menu.7. Press Down Button once to repeat current MP3( ) .8. Press Down Button twice to repeat all MP3( ).9. Press Enter Button to exit. | 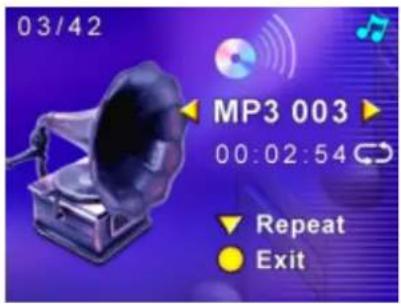  |
◆ Listen to MP3 Music with earphone (optional)
MP3 stored in the camera can be played either by built-in speaker, or Earphone, or TV.
When the earphone cable is plugged in the camera, the option menu of Earphone/TV pops out on the LCD Screen. Choose earphone or TV and press Enter Button to validate the setting.

Viewing MPEG4 Movie on PC
◆ MPEG4 Movie
MPEG4, the multimedia format and compression standards, is a cutting-edge compression technology developed by MPEG (Motion Picture Expert Group). It not only enhances the image quality but also improves the efficiency of recording capacity.
MPEG4 is adopted in this camera to take DVD-quality MPEG4 movies. The MPEG4 movie format of AVI is used in this camera.
◆ View MPEG4 Movie on PC
When playing an MPEG4 movie for the first time, MPEG4 Video Codec Xvid should be installed in PC. To do this:
(1) Insert the CD-ROM into the computer's CD-ROM drive. Click "Install Device Driver" ( Install MPEG4 Video Codec Xivd) and follow the on-screen instructions to complete the installation.
(2) Start video player such as Widows Media Player to view MPEG4 AVI Movies.
Share MPEG4 Movie
You can share the recorded MPEG4 movies to your friends via internet or CD. Make sure MPEG4 Video Codec Xvid is installed in your friends' PC. MPEG4 Video Codec Xvid is available in the provided CD or can be downloaded from Internet.
Section 7
Viewing Pictures and Movies on a TV
You can view stored movies and pictures on a television. To connect to a television:
- Connect one end of the AV cable to your camera's AV Out port.
- Connect the other end of the cable to a television.
- The option menu of Earphone/TV pops out on the LCD Screen.

- Choose TV option and press Enter Button to validate the setting.
- The steps for viewing stored pictures and movie on a TV are exactly the same as for viewing them on the LCD monitor.

Note
The LCD monitor does not work when the camera is connected to a television.
Section 8
Video File Converter
Bundled software CD contains Ulead VideoStudio that features video file converter to convert multiple video formats into MPEG4 Xvid compatible format with your camera. In this way, you can convert any format of video files and playback your favorite movies on your camera.
To convert a video file:
(1) Install Ulead VideoStudio (Refer to section 11)
(2) Click Start→ Select Programs→ Ulead VideoStudio 8.0
(3) VideoStudio 8.0 main Screen will appear on your desktop.
(4) Click "Tools" menu on the right side of the screen then choose "Batch Converter".
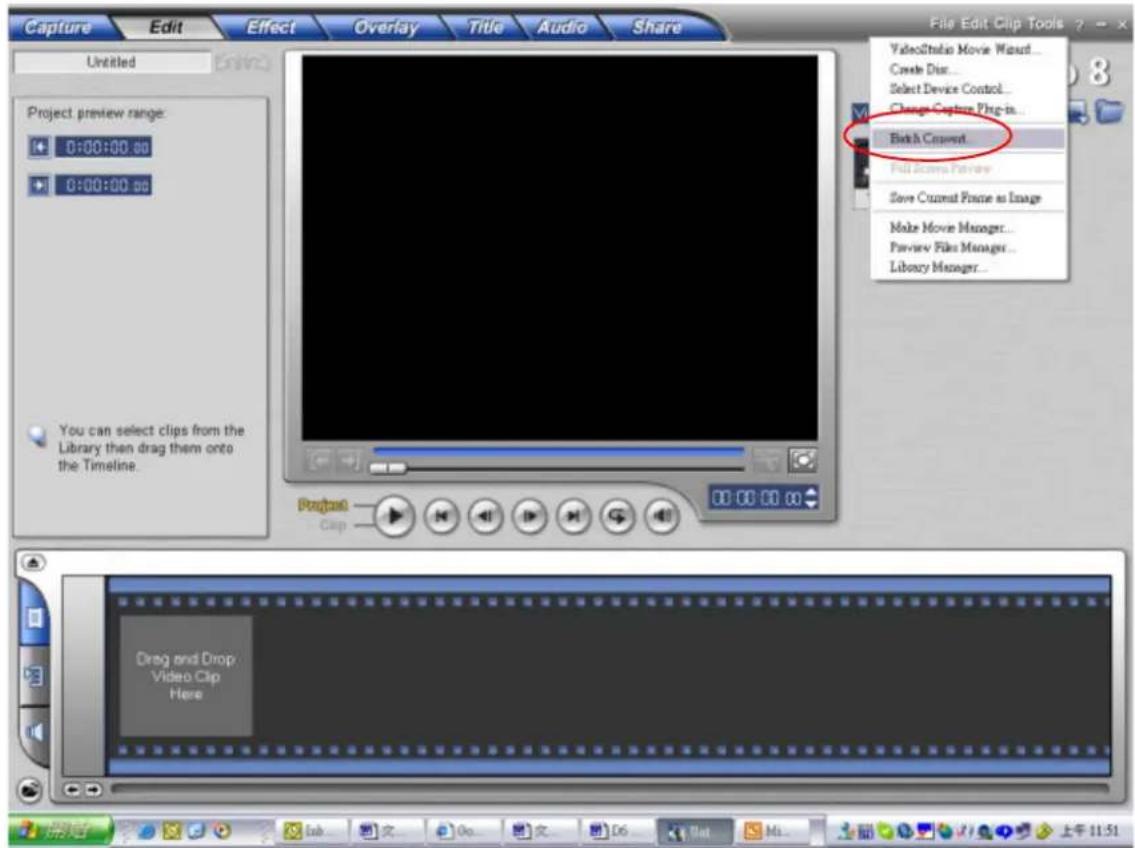
(5) Click "Add" to add the video file you want to convert.
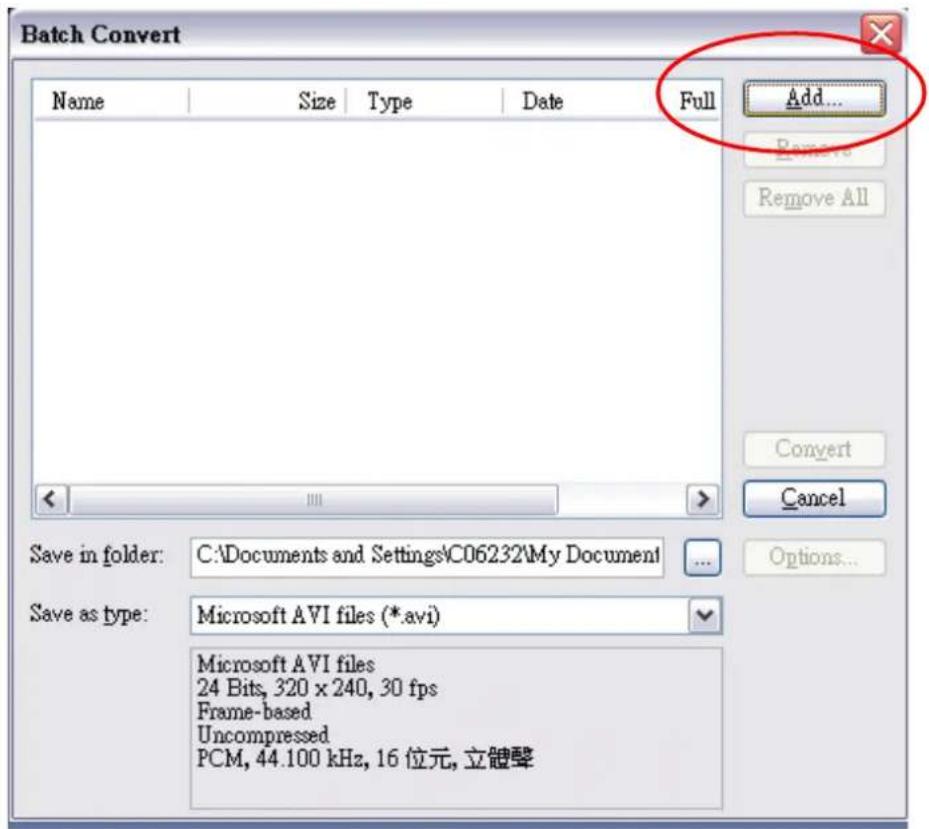
(6) Select "Save as type" to choose output video format and click "Convert" to start file converting.
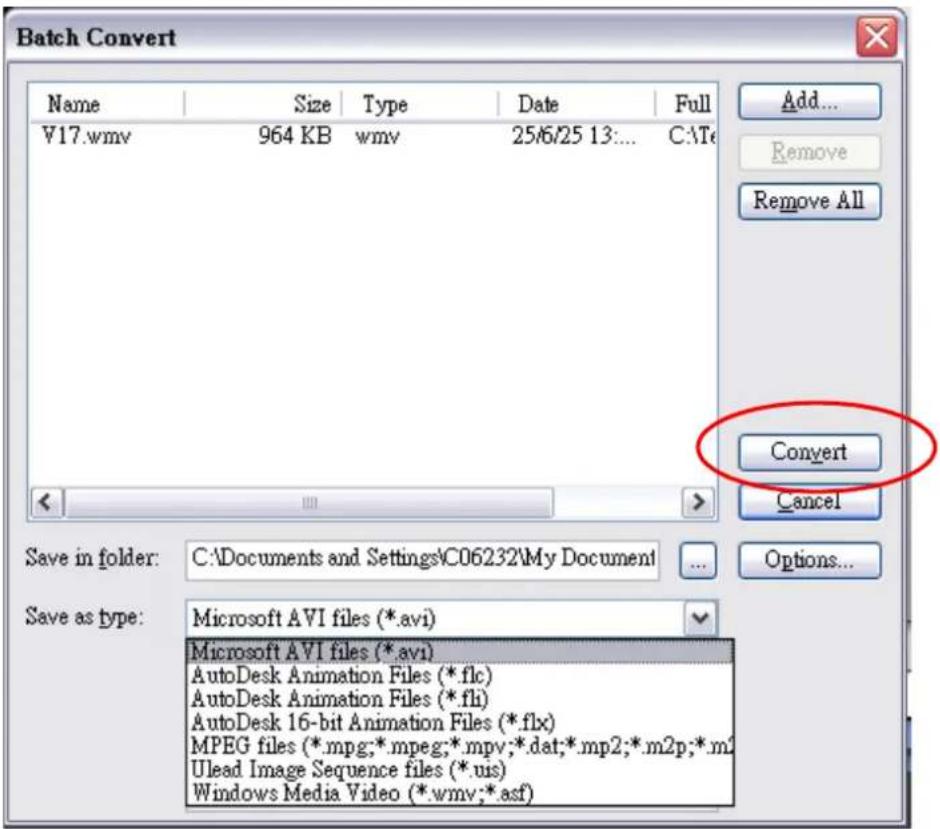

(7) Task Report window will pop out after the task is completed.

(8) Before transferring the converted file to your camera, rename the converted file to "Clip0001.avi". (Please note: if Clip0001.avi exists in the camera, then the converted file has to be renamed to clip0002.avi)
(9) Connect your camera to PC and transfer the converted video to "My Computer\Removable Disk\DCIM\200Movie" in your camera. (Refer to Section 10 Transferring Data to a Computer)
(10) After transferring the converted video to the camera, press RECORD/Play Button to enjoy your favorite movie.
Section 9
Burning the Recorded Clip into DVD
Bundled software CD contains Ulead VideoStudio 8.0 SE DVD also feathers burning the movie clip into DVD. You can preserve your precious movies on DVD to share with family and friends. To create a DVD:
(1) Select "Share" Option and click "Create Disc"

(2) "Create Disc" window pops out and click "Add Video" to add video file you want to burn into DVD. Then click "Next" button and follow on-screen instruction.
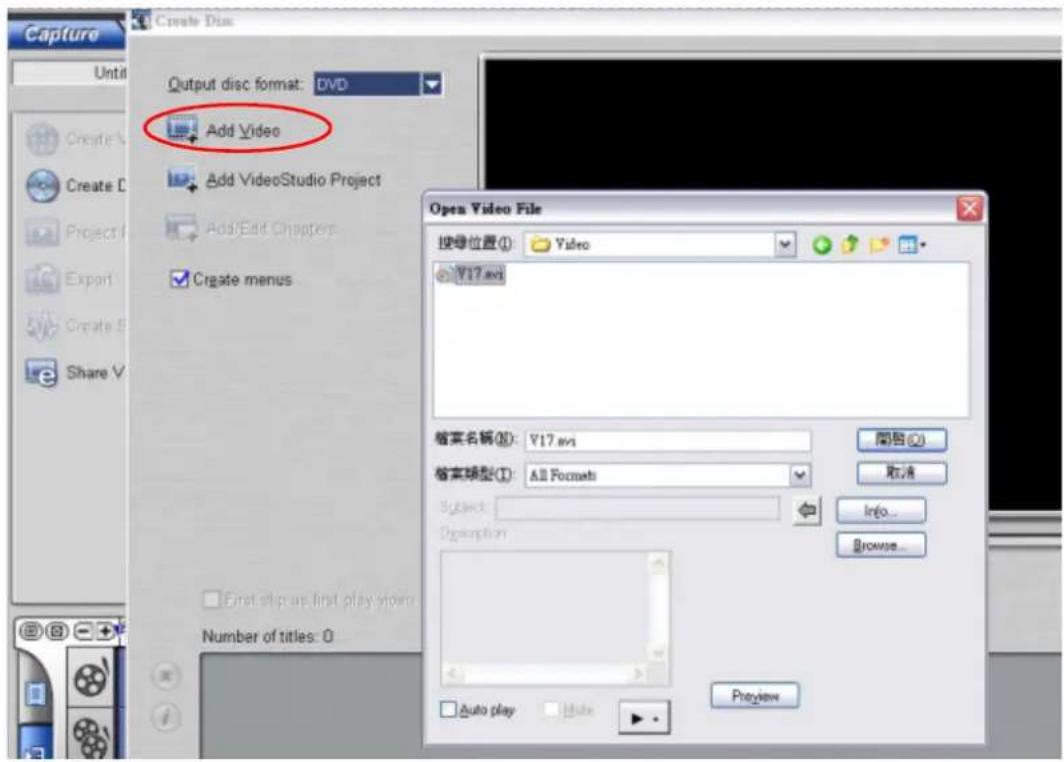
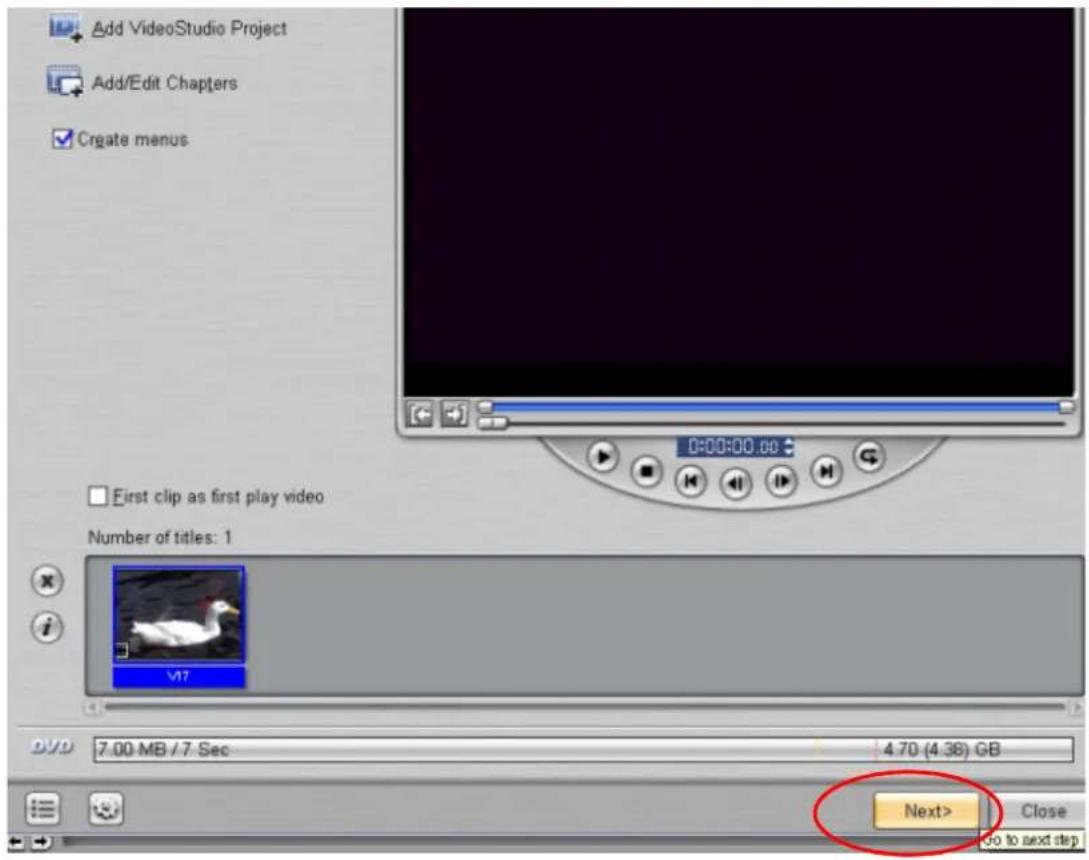
(3) Click "Output" icon ( ) and start to burn DVD.

Output

Transferring Data to a Computer
◆ Installing the Digital Camera Driver
Before connecting this camera to a computer for the first time, you should install a driver on the computer. The driver is on the CD-ROM disc provided in the package. To install the driver:
- Insert the CD-ROM into the computer's CD-ROM drive. The autorun screen will appear.
- Click "Install Device Driver". Follow the on-screen instructions to complete the installation. Depending on your operating system, you may have to restart your computer after installing the driver.
◆ Connecting Your Camera to a Computer
You can transfer pictures, movies or voice recordings stored on your camera to a computer and send them in emails to friends or post them on websites. To do this you should:
- Install the camera driver on your computer.
- Connect the computer and camera with the supplied mini USB 2.0 cable.
- Default mode is Mass Storage Mode when the camera connects to PC
- Transfer pictures or movies or MP3 or voice recordings
◆ Mass Storage Device Mode
The RED LED will light up when the camera is connected to the computer. Movies, pictures and voice recordings can be found on your computer at "My Computer\Removable Disk\DCIM". Under this mode, you can read, delete, move, or copy any movie/picture/voice recording you want. Use the bundled Ulead application software to edit the movies or pictures.
◆ PC Camera Mode
When in Mass Storage Device Mode, press RECORD/PLAY Button to switch to PC Camera Mode and the GREEN LED will light up. Under this mode, you can implement live video conference meetings or use video email over the Internet.
◆ Installing Bundled Software
The CD-ROM supplied with this camera contains five pieces of software.
Ulead VideoStudio 8.0 SE DVD is a user-friendly application that helps you read, edit and organize images.
⇒ Ulead Photo Express 5.0 allows you to edit movies and is equally easy to use.
Acrobat Reader is a popular program that you need to have installed to read the User's Manual. Many computer users will find they already have this software installed on their computer.
MPEG4 Video Codec Xvid, this decode software has to be installed for correctly viewing the movies you record.
The detail information can be found in online help of all the bundled software.
To install the bundled software:
- Insert the CD-ROM into your computer's CD-ROM drive. The autorun screen appears.
- Select the piece(s) of software you want to install from the list, then click Install Application Software. Follow the on-screen instructions to complete the installation.
◆ Getting Started With Photo Express 5.0
- Click Start → Select Programs → Photo Express 5.0
• Photo Express 5.0 main Screen will appear on your desktop.
Viewing Images stored in the Camera through Photo Express 5.0
To view images stored in the camera, you must switch to Mass Storage Device Mode.
- Select the image you want to open in the workspace from the browse bar on the left hand side.
- Double click selected picture.
![Ulead Photo Express SE - [c:\program file\ulead.system\ulead.photo express 5.swimages] File Edit View Help BROWSE Get Photo Batch Adjust Print Share Ulead Links BROWSE PHOTO PROJECT 1 BG002.jpg 2 offline1024_2.jpg 3 offline1024_5.jpg 4 offline1024_6.jpg 5 offline1024_7.jpg 6 offline600_1.jpg 7 offline800_2.jpg 8 offline800_4.jpg 9 offline800_5.jpg 10 offline800_6.jpg 11 space.gf](/content/2026/05/837841/images/1f0948088b06e7c8323093a2ba61e9a6c4a5d2f8a225da21273bfb41e8cab92d.jpg)
Capturing Camera Images through Photo Express 5.0
Before capturing a picture or video from the camera to the Photo Express 5.0 main screen, you must switch to PC Camera Mode. Press RECORD/PLAY Button to Switch to PC Camera Mode. Under this mode, you can capture videos or pictures through Photo Express 5.0:

* Click the [Get Photo] button.
* Click the [Import] button.
![Excel Photo Express - [C:\Documents and Settings\GrenetAuto\Documents] File Edit View Help BROWSE Available picture files Excel PC Server (Ctrl) Get Photo Batch Adjust Print Share Web Links Digital Camera Scanner Video Capture My Music My Pictures File name: Print File type: FP (Logged Image File Format) Change plugin Import Close](/content/2026/05/837841/images/630c56d6baf1f79ed9c54fc1982724c9ca2e0835719e898a8dc3706df296abb7.jpg)
* Click the [Capture] button, and then choose your images.
* Click the [Insert] button, and click [Exit] button to leave the screen.
![Used Photo Capture - [S. Documents and Settings (Editments) (Setments)] File Edit View Help BROWSE Get Photo Batch Adjust Print Share Web Links Available capture driver: DOC WC Device [1986] Used Video Capture Activate capture driver: DOC WC Device [3318] Capture Insert Exit Help Video Device Video Mode Preview Advance... File name: Put File type: TP (Trigger Image File Format) Change plug-in Captured Image: 1 2 3 Import Close](/content/2026/05/837841/images/e2963fcf74843ae1395e7d34831a97fb0859961a4ce8db19f156fbef4e02e07f.jpg)
◆ Getting Started With Video Studio 8.0
- Click Start → Select Programs → Video Studio 8.0
• The Video Studio main Screen will appear on your desktop.

Viewing Images stored in the Camera through Video Studio 8.0
To view images stored in the camera, you must switch to Mass Storage Device Mode.
- Click the folder on the right hand side of the screen.
- Select the image stored in the camera and press Open button to view.
Folder
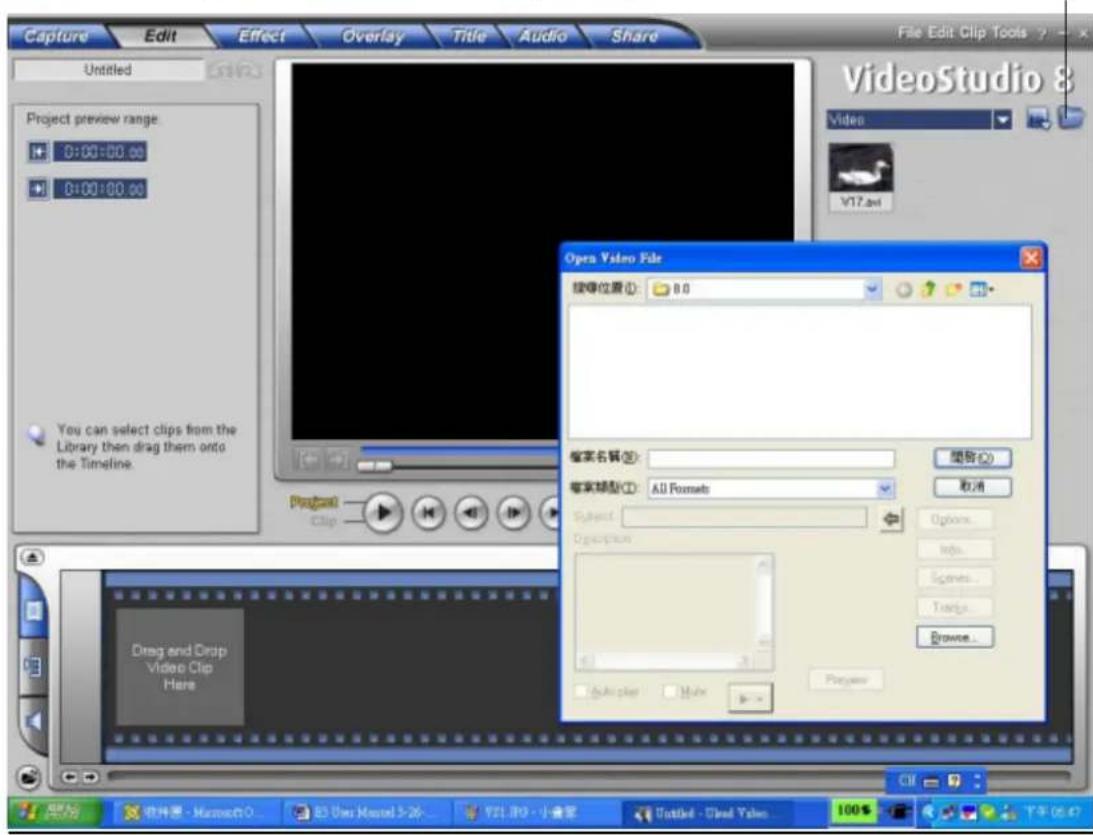
Capturing Video through Video Studio 8.0
Press RECORD/PLAY Button to switch to PC Camera Mode. Under this mode, you can view camera video through Video Studio:
To capture a video/picture from the camera:
* Click the Capture Capture item.
* Click the [Capture Video] button.
* Click the [Capture Image] button.

Specifications and System Requirements
Specification
| Image Sensor 3.2 Mega Pixel Sensor | |
| Operation Modes | Movie Record、Picture Record、Voice Record、MP3 Player、PC Camera、Mass Storage Device |
| Lens F3.0 (f = 8.54 mm) | |
| Focus Range | 100cm~infinite (Normal Mode)60cm ~ 100cm (Portrait Mode)Center: 20 cm (Macro Mode) |
| Digital Zoom 8X | |
| Shutter Electronic | |
| LCD monitor 2.4" TFT LCD | |
| Storage Media | Built-in 32M Memory (partial memory is used for Firmware code);SD/MMC Card Slot support (up to 2GB) |
| Image Resolution | Still image 3720x2790 (10M Pixels)2048x1536 (3M Pixels)1024x768 (800K Pixels) |
| Movie Resolution | VGA 640x480 pixels 30 fpsQVGA 320X240 pixels 30 fps |
| White Balance | Auto/Manual (Daylight, Fluorescent, Tungsten) |
| Exposure | Auto/Manual |
| Self-Timer | 10 second delay |
| Flash | Auto/Off |
| File Format | Picture : JPEGMovie : AVI (Xvid)Voice : WAVMusic : MP3 |
| Image play | Single Image/Thumbnails/Slideshow |
| PC Interface | Mini USB 2.0 Port |
| TV out | NTSC/PAL Selectable |
| Battery | Two AA (Alkaline) Batteries |
| Dimension | 95mm×71mm×34mm |
| Weight | 135g (without battery) |
◆ System Requirement
| Windows 98SE/2000/ME/XP |
| Pentium MMX、Celeron or AMD Athlon®CPU |
| 64MB RAM |
| CD ROM |
| 500MB free HDD space |
| Available USB port |
| 16-bit Color Display |
- Digital Video Camera
- Content
- Getting to Know Your Camera
- Overview
- Note
- ◆ Standard Accessories
- ◆ Front View
- ◆ KeyPad illustration
- Section 2
- Getting Up and Running
- ◆ Loading the Battery
- ◆ Inserting and Removing an SD Card (Optional)
- ◆ Protecting Data on an SD Card
- ◆ Turning the Camera On and Getting Started
- ◆ Turning the Camera Off
- ◆ Button Function
- ◆ LCD Monitor Information
- Resolution
- SD card inserted
- ◆ MPEG4 Movie Recording
- ◆ Picture Recording
- ◆ Voice Recording
- ◆ Taking Close up Pictures
- ◆ Using Digital Zoom
- ◆ Options for Record Mode
- ◆ Operations for Record Mode
- Operation Screen
- ◆ Default Setting and Validation
- ◆ Movie Mode submenu Setting
- ◆ Movie Resolution
- ◆ Exposure
- ◆ Sharpness
- ◆ White Balance
- ♦ Motion Stabilization
- ◆ Camera Mode Setting
- ◆ Picture Resolution
- ◆ Two in One (Picture Record Mode Only)
- ◆ Photo Frame (Picture Record Mode Only)
- ◆ Flash (Picture Record Mode Only)
- ◆ Self-timer (Picture Record Mode Only)
- ◆ Multi-Snap (Picture Record Mode Only)
- ◆ Backlight (Picture Record Mode Only)
- ◆ Date Printing
- ◆ Voice Mode
- ◆ Effect Setting
- Setting Menu
- Display Screen Setting Option
- - Sound Setting
- - Start-up Screen
- Submenu Display Screen Start-Up Screen
- Submenu Display Screen Time Setting
- - Format Card
- Submenu Display Screen Format Card Options
- Format Card
- TV System
- Submenu Display Screen TV System Option
- - Selecting Interface Language
- Submenu Display Screen Language Option
- Language
- - Default Setting
- Submenu Display Screen Default Setting Options
- Default Setting
- Section 4
- Playback Mode
- ◆ Button Functions
- ◆ Movie Playback
- ◆ Delete Movies
- ◆ Thumbnail Function
- ◆ Lock Movies
- ◆ Repeat Movies
- ◆ Picture Playback
- ◆ Delete Picture
- ◆ Lock Pictures
- ◆ Make Slide Show
- ◆ Voice Playback
- ◆ Direction Buttons Function
- Section 5
- Listening to MP3 Music (Optional)
- ◆ MP3 Music
- ◆ Transfer MP3 Music to the camera
- ◆ Listen to MP3 Music
- ◆ Listen to MP3 Music with earphone (optional)
- Viewing MPEG4 Movie on PC
- ◆ MPEG4 Movie
- ◆ View MPEG4 Movie on PC
- Share MPEG4 Movie
- Section 7
- Viewing Pictures and Movies on a TV
- Section 8
- Video File Converter
- To convert a video file:
- Section 9
- Burning the Recorded Clip into DVD
- Output
- Transferring Data to a Computer
- ◆ Installing the Digital Camera Driver
- ◆ Connecting Your Camera to a Computer
- ◆ Mass Storage Device Mode
- ◆ PC Camera Mode
- ◆ Installing Bundled Software
- To install the bundled software:
- ◆ Getting Started With Photo Express 5.0
- Viewing Images stored in the Camera through Photo Express 5.0
- Capturing Camera Images through Photo Express 5.0
- ◆ Getting Started With Video Studio 8.0
- Viewing Images stored in the Camera through Video Studio 8.0
- Capturing Video through Video Studio 8.0
- Specifications and System Requirements
- Specification
- ◆ System Requirement
Brand : MEDION
Model : LIFE E46001 (MD 85544)
Category : Camcorder