
Life P47010 - Camcorder MEDION - Free user manual and instructions
Find the device manual for free Life P47010 MEDION in PDF.


| Product Type | Digital Camcorder |
| Brand | Medion |
| Model | Life P47010 |
| Recording Media | SD/SDHC Card (up to 32GB) |
| Video Resolution | Full HD 1080p (1920 x 1080) |
| Image Sensor | 5 MP CMOS Sensor |
| Optical Zoom | 10x |
| Digital Zoom | Up to 100x |
| Display | 3.0" LCD Touchscreen |
| Connectivity | USB 2.0, HDMI Micro, AV Out |
| Battery | Rechargeable Li-Ion (NP-120 compatible) |
| Dimensions (L x W x H) | 120 x 60 x 60 mm |
| Weight | Approx. 250 g (including battery) |
| Power Source | Battery or DC 5V AC Adapter |
| Photo Resolution | Up to 16 MP (interpolated) |
| Video Format | AVI (MJPEG) |
| Night Vision | Yes (built-in IR LEDs) |
| Image Stabilization | Electronic |
| Face Detection | Yes |
| Care Instructions | Clean lens with soft, dry cloth. Avoid moisture |
| Safety Warnings | Do not disassemble. Keep away from water |
| Spare Parts & Repairability | Battery, charger, remote available. Contact Medion support for repairs |
| Warranty | 2 years (EU) |
Frequently Asked Questions - Life P47010 MEDION
User questions about Life P47010 MEDION
0 question about this device. Answer the ones you know or ask your own.
Ask a new question about this device
Download the instructions for your Camcorder in PDF format for free! Find your manual Life P47010 - MEDION and take your electronic device back in hand. On this page are published all the documents necessary for the use of your device. Life P47010 by MEDION.
USER MANUAL Life P47010 MEDION
natural_image
Black and white photo of a digital camera displaying a photo of a dog on a beach (no visible text or symbols)Instruction Manual
Contents
Safety instructions....2
Danger of injuries 2
Preventing damage to the camcorder 3
The Camcorder ....3
Package contents....3
Product description ....4
Overview of the appliance ....5
Getting started....6
Open the battery and card compartment......6
Inserting and removing the battery....6
Inserting and removing the SC card....6
Close the battery and card compartment......6
Charging the battery....6
Basic operation....7
Switching the camcorder on and off 7
Changing the mode of operation....7
The display in the record mode....7
Making recordings....8
Movies....8
Photos 8
Memory 8
The menu in record mode 9
Using the on-screen menus....9
"Film mode" menu....9
"Camera mode" menu 10
"Effects" menu 10
"Settings" menu....11
Playing back recordings 13
Play back movies on the LCD panel....13
View photos on the LCD panel....13
Playback on a TV set 13
Functions in playback mode 14
Playback functions: movies....14
Playback functions: photos 15
Supplied software.... 16
Transferring films and photos to a computer 16
Arcsoft MedialImpression....16
YouTube Direct....18
Troubleshooting.... 19
Cleaning 20
Technical specifications.... 20
Disposal 21
Safety instructions
- This unit is not intended for use by people (including children) with reduced physical, sensory or mental abilities or for those without experience and/or knowledge, unless they are supervised by a person responsible for their safety or they have been instructed on its use. Children should be supervised to ensure they do not play with this unit.
- Also, keep the plastic packaging out of reach for children to avoid danger of suffocation.
Danger of injuries
Preventing electric shocks
- Never open the camcorder casing or mains adapter plug except to insert the battery.
- Connect the mains adapter plug to a professionally installed 230 V, 50 Hz mains socket.
- To remove the mains adapter quickly and easily from the mains in an emergency, the socket must be easily accessible and close to the appliance.
- Do not bend or crush the mains cable.
• Take measures to prevent moisture or liquid from penetrating the camcorder or mains adapter. - Do not touch the mains cable with wet hands.
- Never use the camcorder if the mains adapter is damaged.
• Always have repairs carried out by qualified professionals. - Switch the camcorder off immediately if it malfunctions.
- Do not allow the camcorder or mains adapter to come into contact with rain or be splashed by water.
- Do not place containers containing liquid, e.g. vases, on the appliance, the mains adapter or near to these and protect all parts of the device from rain and water. The container may tip over and the liquid will impair the electrical safety.
Risk of explosion
- Never expose batteries or rechargeable batteries to excessive heat (such as direct sunlight, fire or similar).
- Do not throw batteries into a fire.
- Never short-circuit any (rechargeable) batteries.
- Do not dismantle (rechargeable) batteries.

CAUTION! There is a risk of explosion if rechargeable batteries are replaced incorrectly. Replace only with the same or equivalent type.
Preventing fire hazards
• Always uncoil the entire length of the mains cable.
- Ensure there is adequate ventilation and never cover the mains adapter.
- Do not place naked flames such as lit candles on or near the unit.
Risk of poisoning
- Keep the battery out of reach of children.
Risk of chemical burns
- If the battery is depleted, remove it from the device immediately. There is an increased risk of leakage. Avoid contact with skin, eyes and mucous membranes. If these areas come into contact with battery acid, rinse them immediately with plenty of clean water and contact a doctor immediately.
Preventing damage to the eyes
- Do not use the flash close to anyone's eyes.
- When using the camera function do not direct the flash towards the eyes of people or animals.
• Always maintain a minimum distance of one metre when using the flash, especially with small children.
Preventing damage to the camcorder
- If the battery is leaking, remove it from the camcorder immediately. Clean the contacts before inserting a new battery.
- Use type NP60 lithium-ion batteries only.
- Before inserting the battery, check that the contacts in the camcorder and on the batteries are clean. Clean the battery connections if necessary with a clean, dry cloth or an eraser.
- Do not touch the lens or lens mounting.
- Only use the supplied mains adapter.
Preventing damage to the battery
- Do not reverse the positive (+) and negative (−) terminals to avoid short-circuit.
- Never allow the battery to come into contact with liquids.
- If the camcorder is not going to be used for long periods, remove the battery.
- Direct, intense heat can damage the battery. Therefore, do not expose the camcorder to any sources of direct heat.
Preventing breakages
- Do not drop the camcorder.
- Place the strap around your wrist when carrying the camcorder.
Preventing data loss
- Never interrupt the power supply when data are being processed.
Preventing damage to the SD/SDHC card
- Never withdraw the SD/SDHC card from the camcorder while data are being processed or saved.
Protecting against condensation
- Avoid rapid changes in temperature.
- Place the camcorder in its protective case or a plastic bag before exposing it to any sudden changes in temperature.
- Do not immediately connect the device to the power supply if the unit has been moved from a cold environment to a warm room. The device can safely be connected for charging as soon as the unit has reached room temperature.
Do not use or store the camcorder in direct sunlight or at high temperatures.

At low temperatures, the capacity of the battery can drop significantly due to the reduced speed of the chemical reactions. When recording in cold weather keep a second battery pack in reserve in a warm place (e.g. trouser pocket).

This symbol on the camcorder certifies that the camcorder complies with EU guidelines (European Union) on radiated emissions. CE stands for Conformité Européenne (European conformity)

The camera is for private use only and not intended for use by companies in the heavy industry sector.
The Camcorder
Package contents
Check that the following parts have been supplied in the package:
- Camcorder
- Mains adapter
- USB cable
- HDMI cable
- AV cable
- Pouch
- 2 x Li-lon rechargeable batteries
• CD with software and instruction manual - Quick Start Guide and guarantee documents
Product description
This camcorder combines the following functions in one easy-to-use device:
• A digital camcorder
- A digital camera.
- A digital camcorder - A digital camera.
Instead of a viewfinder, the camcorder has a high-resolution LC display that enables you to monitor your captures. The LC display also serves to display the on-screen menus where you can make your settings.
The camcorder has a 5x optical zoom and can record video films at a maximum resolution of 1920x1080 (HD) and take photos at 2592 x 1944 (5 Megapixels).
The internal memory has a usable capacity of approx. 74 MB. This means you take photos or shoot short videos even when there is no SD/SDHC card in the camera.
The camcorder can be easily connected to a computer via USB, or to an HD-compatible TV via HDMI.
Overview of the appliance
| Front | Rear |
 1-2- 1-2- | 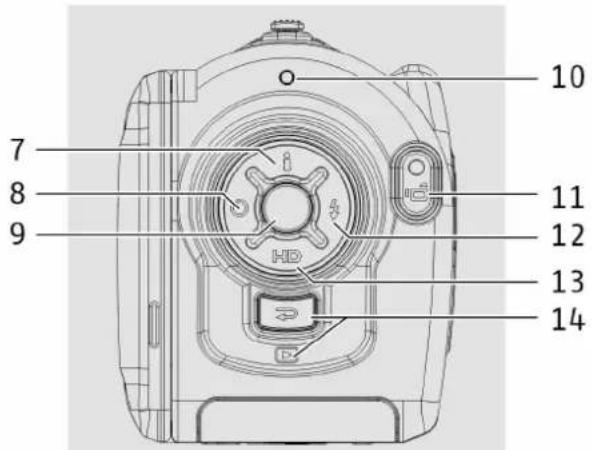 |
| LensSelf-timer LEDMicrophoneLoudspeakerRocker switch T/W:T: Telezoom; W: Wide anglePICTURE shutter | 7. Direction button UP;i: switch display information on and off8. Direction button LEFT;Self timer shutter button9. OK button: confirm selection; open menu10. Operation LED11. MOVIE shutter12. Direction button RIGHT;flash for picture mode13. Direction button DOWN;HD: select resolution for film recordings14. MODE: Switch between recording and play mode; close the menu |
| Side view | |
 | Bottom |
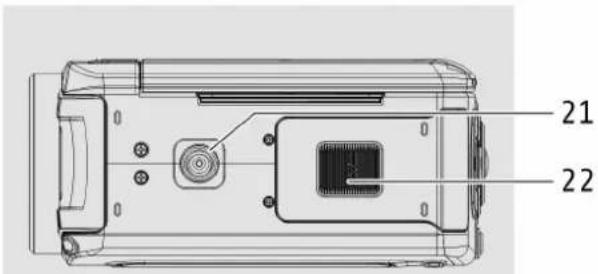 | |
| Power buttonPorts slide coverMini USB port, also for mains adapterHDMI portTV portLCD panel | 21. Tripod socket22. Behind the cover:compartment for battery and memory card |
Getting started
Open the battery and card compartment
The compartment for the battery and memory is on the underside of the camera.
▶ Hold the camcorder so that the cover to the battery compartment is facing upwards.
▶ Slide the cover backwards towards the rear of the device.
Inserting and removing the battery
▶ Pull the grey locking lever away from the battery compartment.
Insert the battery in the designated compartment as shown (with the lettering facing up).

Do not reverse the positive (+) and negative (−) terminals to avoid short-circuit.
To remove the battery, pull the grey locking lever away from the battery compartment and pull the battery out of the device.

natural_image
Line drawing of a HP printer with paper feed and scroll wheel (no text or symbols)Inserting and removing the SC card
Take an SD/SDHC card and insert it into the card slot as shown in the picture.
To remove the memory card, press the memory card inwards until you hear a click in the slot and then let go. The memory card will be automatically pushed out a little way from the slot so that you can remove it.

natural_image
Line drawing of a desktop computer with an open drive and paper feed (no text or symbols)Locking the memory card
If you want to save your recordings on the memory card, make sure that the card is not locked:
| Writable position |  | Write-protected position | 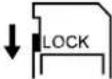 |
Close the battery and card compartment
To close the cover, flip it shut and slide it forwards towards the front end of the camcorder until it clicks into place.
Charging the battery
To charge the battery, connect the camcorder to the supplied mains adapter.
▶ Plug the mains adapter into a 230 V \~ 50 Hz socket.

The first complete charging of the battery will take approx. six hours. During charging, the operation LED will blink red.
Observe the safety instructions for batteries in the chapter Safety instructions, section Preventing damage to the battery.
Basic operation
Switching the camcorder on and off
▶ To turn on the camera, open up the LCD panel.
The display shows information and the operation LED shines green.
▶ To turn the camera off, shut the LCD panel or press the Power button.
Changing the mode of operation
The camera has a record and a playback mode.
When you turn the camcorder on, it is in the record mode. You can take photos and films (see Making recordings, page 8).
▶ To switch from record mode to playback mode, press MODE.
▶ To switch from playback mode to record mode, press MODE again.
The display in the record mode
The indicators shown below may be displayed on the LCD screen while movies and pictures are being recorded:

| 1 | Movie resolution:FH HD (1080p, 30 fps);HD(720p, 30 fps);★★★ WVGA (60 fps);★★A (30 fps);QVGA (30 fps) |
| 1 | Photo resolution: High; High;  dard; Lov dard; Lov  |
| 2 | Number of images that can still be taken at current resolution |
| 2 | Amount of time remaining for recording movie at current resolution |
| 3 |  lash Auto; lash Auto;  Eye Reduction; FI Eye Reduction; FI  Off; Off; Digital light: To extend dynamic range for backlit and high-contrast scenes so that the objects will be brighter and clearer Digital light: To extend dynamic range for backlit and high-contrast scenes so that the objects will be brighter and clearer |
| 4 |  Self-timer Self-timer |
| 5 |  Motion detection Motion detection |
| 6 |  Scene setting: Scene setting:  Skin; Skin;  light; B [6KSH] light; light; B [6KSH] light; tly in the display: Black and white, Classic (Sepia), Negative, Auto tly in the display: Black and white, Classic (Sepia), Negative, Auto |
| 7 |  acro functions enabled acro functions enabled |
| 8 | WB Manual white balance |
| 9 |  SD/SDHC card inserted SD/SDHC card inserted |
| 10 |  Battery: full power; medium power; low power; empty battery Battery: full power; medium power; low power; empty battery |
| 11 |  Zoom meter: (1080p): 1x~10x (5x optical zoom+ 2x digital zoom).Other resolutions: 1x~20x (5x optical zoom + 4x digital zoom)[TSK3] Zoom meter: (1080p): 1x~10x (5x optical zoom+ 2x digital zoom).Other resolutions: 1x~20x (5x optical zoom + 4x digital zoom)[TSK3] |
Making recordings
Movies
Proceed as follows in order to record films:
▶ Lift the LC display flap.
▶ Select the desired picture size with the T/W button.
▶ To start the movie recording, press the MOVIE shutter.

During a movie recording, the microphone is activated. The sound is recorded automatically.
While recording, the recording time is shown in the display (hours:minutes:seconds). At the beginning of the recording, the operation LED briefly lights up red: during recording, it lights up green.
▶ To end the movie recording, press the MOVIE shutter again.
Photos
Proceed as follows to take photos:
▶ Lift the LC display flap.
▶ Select the desired picture size with the T/W button.
▶ If necessary, select a flash ▼ setting:

The flash fires automatically depending on lighting conditions. Use this mode for general photography.
The pre-flash will fire to reduce the red-eye effect.
The flash will not fire under any circumstances. Use this mode when taking images in a place where flash photography is prohibited, or when the subject is distant (beyond the range of the flash).

Digital light: To extend dynamic range for backlit and high-contrast scenes so that the objects will be r and clearer.
▶ Press the PICTURE shutter halfway down (till the focusing frame turns from white to green).
▶ Focus your picture and press the PICTURE shutter fully down to take picture.

To take close-up photos, activate the macro function.
Memory
When a memory card is inserted, the recordings are saved on the memory card. When no memory card is inserted, the recordings are saved in the internal memory.
The menu in record mode
▶ To open the menu, press OK.
In the main menu you will find four menus, indicated by picture symbols:
- Film mode
- Camera mode
- Effects
- Setting
Using the on-screen menus
▶ To select a menu, press the direction buttons LEFT and RIGHT.
▶ To move up and down in the on-screen menu, use the direction buttons UP and DOWN.
▶ Select an option in a menu with the direction buttons LEFT and RIGHT.
▶ Confirm a changed setting by pressing OK (save changes).
▶ You can close the menu at any time with the MODE button
"Film mode" menu
In the "Film mode" menu, you can make settings for movie recordings.
Resolution
The following settings are available for film quality:
| Setting | Resolution |
| HD (1080 p) 1920 x 1080 (30 fps) | |
| D1 (720 p) 1280 x 720 (30 fps) | |
| WVGA 848 x 480 (30 fps) | |
| VGA 640 x 480 (30 fps) | |
| QVGA 320 x 240 (30 fps) | |
The selected resolution will remain active until you select a different one.
Stabilization
Reduce the effect of camera shake by using this setting.

Stabilization does not support HD (1080p) and WVGA (60fps).
The recorded image becomes smaller when the stabilization function is activated. The digital zoom is deactivated if the stabilizer function is enabled.
Motion Detect
When this setting is activated, the camera will start to record a video automatically if it detects a movement for at least 3 seconds.
It will stop recording if no movement is detected for at least 3 seconds.
"Camera mode" menu
Resolution
The following settings are available for photo quality:
| Setting | Explanation |
| High | Choose this setting if you want to have the photos printed or enlarged by a laboratory. |
| Std (standard) | Choose this setting if you want to print the photos or burn them onto a photo CD. |
| Low | Choose this setting if you want to post the photos on the Internet or e-mail them. |
Self-timer
The self-timer allows you to take photographs with a time delay. If, for example, you want to appear on a photograph yourself, you can use the self-timer.
▶ In the menu Self-timer, select the setting On.
- Close the menu. In the display the symbol for self timer is shown.
▶ Press the PICTURE shutter.
After pressing the PICTURE shutter, approx. 10 seconds will pass before the photo is taken. During this time, the self-timer LED blinks slowly. It will blink faster just before the photo is taken.
Place the camera on a level surface or use a tripod in order to prevent the shots from being out of focus.

The self-timer setting is active for only one photograph at a time. The camera then returns to normal shooting mode.
"Effects" menu
In the "Effects" menu you can select special effects for movie and picture recordings.
Macro mode
In macro mode, you can make captures at a distance of 1–80 cm.
In the Macro mode menu, select the Macro setting and confirm with OK.
▶ When the menu is closed, the indicator 🎨 will appear in the display.
▶ To end macro mode, select the Normal setting in the Macro mode menu and confirm with OK.
Scene
You can select the mode according to the scene condition.
| Setting | Explanation |
| Auto | Shoot without any special effects on the image. |
| Skin | Shoot with an effect that makes skin tones more natural. |
| Night | Use Night mode for night scenes or low light conditions. |
| Backlight | For taking shots when a bright light is behind the subject. |
| B/W | The image is converted to black-and-white. |
| Classic | A sepia look is applied to the image. |
| Negative | The image is converted to the negative of the normal. |
WB (White Balance)
The camera adjusts the colour balance of images automatically.
▶ If you notice a colour cast in the preview on the LCD panel, you can also change the basic setting.
The following settings are available:
Setting
Explanation
Auto The camera sets the white balance automatically
Daylight
For shots taken in daylight.
Fluorescent For shots taken in fluorescent light.
Tungsten
For shots taken in electric light.
ISO
With this function you can adjust the light sensitivity according to the light conditions.
Use a higher ISO value in locations with poor lighting and use a lower ISO value in brightly lit settings.
▶ Choose between Auto, 800 and 1600.
"Settings" menu
In the "Settings" menu you can adjust the basic settings for the camera.
Sound
Here you can switch the key pad tone on and off.
▶ To switch the key pad tones off, select Off and press OK.
Information
Here you can switch the LCD information on and off.
▶ To switch the LCD information off, select Off and press OK.

You can also use the button UP (i) to switch the LCD information on and off.
Time setting
Here you set time and date to have your recordings dated correctly.

The time is display in the 12-hour mode (AM/PM).
▶ Select the Time setting menu with OK. The time menu is displayed. The year is highlighted.
▶ Set the value using the UP/DOWN buttons.
▶ Move to the next field using the RIGHT/LEFT buttons.
When you set the hours (1–12), make sure AM or PM is shown correctly.
▶ To confirm the settings, press OK.
Format
Here you can re-format the memory:
- When a memory card is inserted, the card will be formatted;
- When no memory card is inserted, the internal memory is formatted.

CAUTION!
If you format the memory all the data stored there will be deleted. Make sure that no important data are in the memory or on the card.
▶ Select Format and press OK. On the display, a security query is shown.
▶ To abort the formatting, select No. The menu will close and data are saved.
▶ To delete the date, select Yes and press OK. The menu will close and the memory will be formatted.
TV
You can set the camera to various TV systems.
▶ Select between PAL (50 Hz) and NTSC (60 Hz).
▶ To save the settings, press OK.
Language
You can use this setting to specify the on-screen menu language.
▶ Select the desired setting with the LEFT/RIGHT direction button.
▶ To save the settings, press OK.
Default setting
You can use this function to restore the camcorder's factory settings.
▶ Press OK.
On the display, a security query is shown.
▶ To keep the current settings, select the option No.
▶ To activate the factory settings, select the option Yes.
▶ Press OK. The menu will close.
Overview of the factory settings
| Setting | Factory Setting |
| Resolution HD (1080) for movies | Standard for photos |
| Flash | Off |
| Self-timer | Off |
| Scene | Auto |
| Sound | On |
| Information | On |
| TV | PAL |
| Language | English |
| Volume | Level 12 |
| Macro | Standard |
Playing back recordings
Play back movies on the LCD panel
▶ Press the button MODE. The main menu of playback mode is displayed.
▶ Select MOVIE using the RIGHT/LEFT direction button.
▶ Press OK.
You see thumbnail previews of the recorded movies. At the top of the display, the movie number and the number of recordings are shown.
▶ Select a movie clip using the RIGHT/LEFT direction button.
▶ Press OK to enlarge the preview picture.
▶ To start playback, press the MOVIE shutter.
Playback functions
▶ To start a fast playback forward or backward, press RIGHT/LEFT.
▶ You can adjust the volume during playback using the UP/DOWN button.
▶ Press OK to pause playback, and resume playback with the MOVIE shutter.
- When playback is finished, press the MODE button to return to the preview mode.
View photos on the LCD panel
▶ Press the MODE button. The main playback mode menu is displayed.
▶ Select PICTURE using the RIGHT/LEFT direction button.
▶ Press OK.
You see thumbnail previews of the photos. At the top of the display, the photo number and the number of photos are shown.
▶ Select a photo using the RIGHT/LEFT direction button.
▶ Press OK to show the photo in full size.
Zoom photos
▶ To enlarge the photo, push T/W in the direction T.
▶ To shrink the photo, push T/W in the direction W.
▶ Two rectangles will be displayed, one inside the other. The outer rectangle represents the whole photo. The inner rectangle represents the selected area within the photo. Proceed as follows to select a specific area of the photo for enlargement:
▶ With UP/DOWN or RIGHT/LEFT move the inner rectangle to the area which you want to enlarge.
▶ To enlarge this area, push T/W in the direction T.
▶ To shrink the area again, push T/W in the direction W.
Playback on a TV set
Connect the camcorder to a TV
Connect the black plug on the AV cable to the camera's TV output.
Connect the white and yellow plugs on the AV cable to the corresponding sockets on the television set.

If you have made recordings in HD format, connect the camera to the digital HDMI input of your TV set using HDMI cables to enjoy the pictures in a high resolution.
Show movies and photos on the TV
Switch the television set on. The LC monitor is switched off while the camera is connected to a TV set.
▶ Select the movie or photo as described in the previous section.
The recordings are played back on the TV screen.
Functions in playback mode
Playback functions: movies
In movie playback mode, further functions are available.
▶ Open a preview picture of a movie (see Play back movies on the LCD panel, page 13.
▶ Press OK. The playback menu is shown. The following options are available:
- Delete
- YouTube direct (to mark a movie for upload to YouTube)
- Repeat one
- Repeat all
Delete
▶ Select Delete with UP/DOWN.
▶ Press OK to activate the delete function.
▶ To delete the selected movie, press the direction button DOWN.
▶ To delete all movies, press the direction button UP.
▶ To carry out the deletion, select Yes.
▶ To abort the function, press No.
▶ Press OK

If a memory card is inserted, you can delete only the films on the memory card.
If the memory card is locked, you cannot delete the films on the memory card.
YouTube Direct
Here you can mark movies which you want to upload with the software YouTube Direct. The programme is described on page 18.
▶ Select a preview picture and press OK. (If you want to mark a movie which is saved in the internal memory, take out the memory card beforehand.)
▶ Select DOWN if you want to mark this movie only; select UP if you want to mark all movies, and confirm with OK.
Repeat one
▶ With UP/DOWN, select the option Repeat one.
▶ Press OK
▶ The movie is played back.
Repeat all
▶ With UP/DOWN, select the option Repeat all.
▶ Press OK
Starting with the currently selected movie, all movies are played back and will be repeatedly endlessly.
Playback functions: photos
In photo playback mode, further functions are available.
▶ Show a photo on the LCD panel (see Play back movies on the LCD panel, page 13.
▶ Press OK. The playback menu is shown. The following options are available:
- Delete
- Lock
- Slideshow
Delete
▶ Select Delete with UP/DOWN.
▶ Press OK to activate the delete function.
▶ To delete the selected photos, press the direction button DOWN.
▶ To delete all photos, press the direction button UP.
▶ To carry out the deletion, select Yes.
▶ To abort the function, press No.
▶ Press OK

If a memory card is inserted, you can delete only the photos on the memory card. If the memory card is locked, you cannot delete the photos on the memory card. If the photos to be deleted are locked, you must first unlock them.
Lock (and unlock)
This function enables you to protect individual photos or all photos from accidental deletion.
▶ Select Lock with UP/DOWN.
▶ Press OK to activate the lock function.
▶ To lock the selected photos, press the direction button DOWN.
▶ To lock all photos, press the direction button UP.
The photo or the photos are marked with a lock symbol.
▶ To unlock the photos, press UP for all or DOWN for one.
Slideshow
This function enables you to have all the photos in the memory displayed in succession (as a slide show).
▶ Select Slideshow with UP/DOWN.
▶ Press OK. The slide show will start.
▶ To stop the slide show, press OK again.
Supplied software
System requirements
To use the camera on the computer, the following system requirements must be met:
• Intel Pentium III processor or higher
- Windows XP/Vista
- DirectX 9.0c or higher
• 256 MB RAM
• 1 GB free hard disk space
- 4x CD-ROM drive
- 1 free USB port
Transferring films and photos to a computer
- Photos are saved in the JPG format. They are stored in the directory DCIM/100PHOTO in the internal memory or on the SD card.
- Movies are saved in the AVI format. They are stored in the directory DCIM/100MOVIE in the internal memory or on the SD card.

These folders are created automatically on the SD card.
To transfer the recordings onto the computer, proceed as follows:
Using the cable supplied, connect the camera to the computer's USB connection.
The LED in the MOVIE shutter will light up red.
▶ Load the films or photos onto your computer.
▶ Disconnect the camera from the computer.
▶ Remove the USB cable.
Arcsoft MedialImpression
The supplied CD contains the application Arcsoft MedialImpression.
Arcsoft MediaImpression helps you burn your movies on DVD.
To create a DVD, proceed as follows:
▶ Insert the software CD.
▶ Start Arcsoft MedialImpression.
▶ Click on Make Movie.

The operation screen will appear:
▶ Select the folder that contains the video files you want to burn.
▶ Select the files
▶ Click button to add files to the slide show.
▶ Click Burn to Disc.

Before starting the burning, select the drive with the blank DVD.
Now you can create a title in the VCD or DVD menu and add a date. In addition to that, you can allocate a menu design of your choice.
▶ Select the file and click Start to start the burning.


For a detailed description of the MedialImpression functions, simply press the key F1 during operation.
YouTube Direct
The built-in YouTube Direct application offers you an easy way to upload your video clips directly to YouTube. To do so, you must have an account with YouTube.
Connect the camera to a PC with Internet access using the USB cable.
Among the removable media, select the one with the YouTube symbol (in the picture: K:).
The programme YouTube Direct will open.


You will see the preview pictures of your films. The marked movies are highlighted with a globe symbol (see menu YouTube Direct, page 14).
If you want to upload all marked movies, click on the lower push button Upload DV-selected video to YouTube.
Alternatively, you can mark movies in the preview window and click on the upper push button Upload selected video to YouTube.
The window for uploading will open.

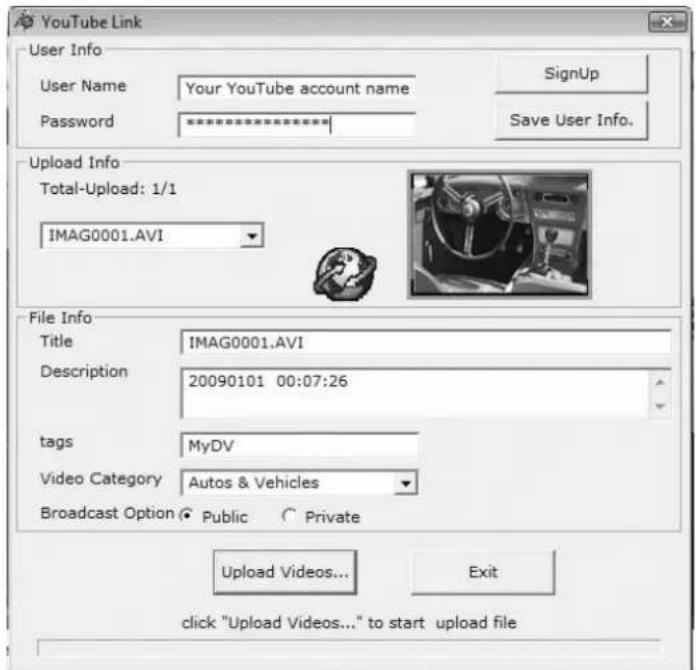
▶ Fill in the information in the blanks.
Troubleshooting
| Fault | Cause | Remedy |
| Macro mode is enabled. Disable macro mode. The photos/films are blurred. | ||
| The lens is dirty. Clean the lens. | ||
| The photos/films have a colour imbalance. | The white balance is not set correctly. | Select a white balance setting matching the current light conditions. |
| The photos/films appear in unusual colours. | A special effect is enabled. Turn the special effect off. | |
| The photos were taken with an inappropriate flash setting. | Select a different flash setting. The pictures are to | |
| The distance from the subject is too great. | Move closer to the subject. | |
| deleted. | The SD/SDHC is locked. Unlock the SD/SDHC card. The photos/films cannot be | |
| The file is locked. Unlock the file. | ||
| The camera will not switch on. The battery is flat. Charge the battery | ||
| You cannot insert the SD/SDHC card. | The SD/SDHC card is the wrong way round. | Insert the card in the correct direction. |
| The computer does not recognise the camera. | The camera driver is not installed on the computer. | Install the camera driver. |
If none of these tips help to solve the problem, please contact our service address. You will find the details on the last page of this brochure.
Never attempt to open up the device: there are no internal parts requiring maintenance from the user. Unauthorized repairs will render the warranty null and void.
Cleaning
Before cleaning the device, always disconnect it from the mains supply.
Only use a dry, soft cloth to clean the device. Do not use chemical solutions and cleaning products, because these may damage the unit's surface and/or inscriptions.
Technical specifications
| Image sensor 5 megapixel CMOS | |
| Modes HD video camera, digital camera | |
| Lens F 3.5–3.7 (f = 6.8–34 mm) | |
| Display | 3” LCD |
| TV standard NTSC/PAL | |
| Data storage media | 128 MB internal (partly reserved for the firmware), card slot for SD/SDHC cards up to 16 GB SDHC. |
| File formats Picture: JPEG; movie: AVI | |
| Range Normal: 10 cm~∞ | Macro: 1 cm–80 cm picture centre |
| Zoom 5-times optical zoom | |
| Image resolution High 4000 x | 3000 (12 M; interpolated)Standard 2592 x 1944 (5 M)Low 2048 x 1536 (3 M) |
| Film resolution HD: (1080 p) | 920 x 1080 (30 fps)D1: (720 p) 1280 x 720 (30 fps)WVGA: 848 x 480 (30 fps)VGA: 640 x 480 (30 fps)QVGA: 320 x 240 (30 fps) |
| PC connection | Mini USB 2.0 port |
| Power supply | NP60 Lithium-Ion rechargeable battery,1050 mAh, 3.7 V |
Disposal
Packaging

To prevent transport damage, your device is packed in packaging.
All packaging materials that are no longer required can and should be recycled.
Appliance
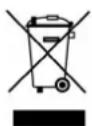
At the end of its life, the appliance should not be disposed of in the normal household rubbish. Please consult your local authority for advice on correct and eco-friendly methods of disposal.
Batteries

Do not dispose of used batteries in household rubbish. Batteries should be taken to a collection point for used batteries.
- Instruction Manual
- Contents
- Safety instructions....2
- The Camcorder ....3
- Getting started....6
- Basic operation....7
- Making recordings....8
- The menu in record mode 9
- Playing back recordings 13
- Functions in playback mode 14
- Supplied software.... 16
- Troubleshooting.... 19
- Cleaning 20
- Technical specifications.... 20
- Disposal 21
- Safety instructions
- Danger of injuries
- Preventing electric shocks
- Risk of explosion
- Preventing fire hazards
- Risk of poisoning
- Risk of chemical burns
- Preventing damage to the eyes
- Preventing damage to the camcorder
- Preventing damage to the battery
- Preventing breakages
- Preventing data loss
- Preventing damage to the SD/SDHC card
- Protecting against condensation
- The Camcorder
- Package contents
- Product description
- Overview of the appliance
- Getting started
- Open the battery and card compartment
- Inserting and removing the battery
- Inserting and removing the SC card
- Locking the memory card
- Close the battery and card compartment
- Charging the battery
- Basic operation
- Switching the camcorder on and off
- Changing the mode of operation
- The display in the record mode
- Making recordings
- Movies
- Photos
- Memory
- The menu in record mode
- Using the on-screen menus
- "Film mode" menu
- Resolution
- Stabilization
- Motion Detect
- "Camera mode" menu
- Self-timer
- "Effects" menu
- Macro mode
- Scene
- WB (White Balance)
- Auto The camera sets the white balance automatically
- Fluorescent For shots taken in fluorescent light.
- ISO
- "Settings" menu
- Sound
- Information
- Time setting
- Format
- CAUTION!
- TV
- Language
- Default setting
- Playing back recordings
- Play back movies on the LCD panel
- Playback functions
- View photos on the LCD panel
- Zoom photos
- Playback on a TV set
- Connect the camcorder to a TV
- Show movies and photos on the TV
- Functions in playback mode
- Playback functions: movies
- Delete
- YouTube Direct
- Repeat one
- Repeat all
- Playback functions: photos
- Lock (and unlock)
- Slideshow
- Supplied software
- System requirements
- Transferring films and photos to a computer
- Arcsoft MedialImpression
- Cleaning
- Disposal
- Packaging
- Appliance
- Batteries
Brand : MEDION
Model : Life P47010
Category : Camcorder