P48AB - Blower Powerworks - Free user manual and instructions
Find the device manual for free P48AB Powerworks in PDF.

| Product Type | Cordless Blower |
| Brand | Powerworks |
| Model | P48AB |
| Power Source | 48 V DC lithium-ion battery (battery not included) |
| Air Volume | 12.2 m³/min |
| Air Speed | 177 km/h |
| Weight (without battery) | 1.9 kg |
| Sound Pressure Level | 90 dB(A) |
| Sound Power Level | 95.6 dB(A) |
| Vibration | < 2.5 m/s² |
| Product Warranty | 3 years (private use) |
| Battery Warranty | 2 years (private use) |
| Main Functions | Blowing, variable speed, turbo, swivel tube |
| Safety | Automatic shut-off, battery lock, overload protection |
| Maintenance and Cleaning | Clean with a damp cloth, vacuum ventilation grilles, do not use solvents |
| Spare Parts and Repairability | Parts available via authorized center, repair by professional |
| General Information | Compliant with CE standards, guaranteed sound power level 98 dB(A) |
Frequently Asked Questions - P48AB Powerworks
User questions about P48AB Powerworks
0 question about this device. Answer the ones you know or ask your own.
Ask a new question about this device
Download the instructions for your Blower in PDF format for free! Find your manual P48AB - Powerworks and take your electronic device back in hand. On this page are published all the documents necessary for the use of your device. P48AB by Powerworks.
USER MANUAL P48AB Powerworks
natural_image
Exterior view of a PowerWorks-branded manual shaver with visible branding and handle (no text-heavy elements)BLM303
CE
Original Instructions / Übersetzung der Originalanweisungen / Traducción de las instrucciones originales / Traduzione delle istruzioni originali / Traduction des instructions d'origine / Vertaling van de originele gebruiksaanwijzing / Alkuperäisten ohjeiden käännös / Översättning av original instruktionerna / Produsentens instruksjoner / Oversættelse af de originale vejledninger / Překlad originálního návodu / Preklad originálneho návodu / Prevod originalnih navodil / Prijevod izvornih uputa / Az eredeti utasítás fordítása / Превод на оригинаналните инструкции / Orijinal Talimatların Tercümesi / Originaalkasutusjuhendi tölge
English
EN
1 Description.... 4
1.1 Purpose......4
1.2 Overview.... 4
2 Safety.... 4
3 Installation.... 4
3.1 Unpack the machine....4
3.2 Install the tube....4
3.3 Install the battery pack.... 4
3.4 Remove the battery pack.... 4
4 Operation....4
4.1 Start the machine.... 4
4.2 Stop the machine.... 4
4.3 Cruise control lever.... 4
4.4 Turbo button....5
4.5 Operation tips....5
5 Maintenance....5
5.1 Clean the machine.... 5
6 Transportation and storage...... 5
6.1 Move the machine....5
6.2 Store the machine.... 5
7 Troubleshooting......5
8 Technical data.... 6
9 Warranty....6
10 EC Declaration of conformity......6
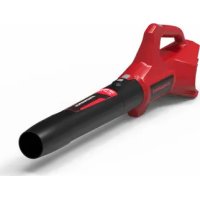
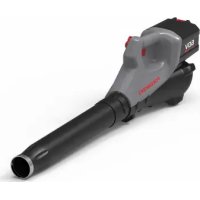
1 DESCRIPTION
1.1 PURPOSE
The machine is used to propel air out of a tube to move unwanted materials such as leaves in the yard. Some machines also suck in leaves and small twigs through a vacuum, and shred them into a bag.
1.2 OVERVIEW
Figure 1 - 4.
| 1 | Trigger | 6 | Lock button |
| 2 | Turbo button | 7 | Slot |
| 3 | Cruise control lever | 8 | Battery release button |
| 4 | Tube release button | ||
| 5 | Tube |
2 SAFETY
WARNING
Make sure that you do/obey all safety instructions.
Refer to Safety Manual.
3 INSTALLATION
3.1 UNPACK THE MACHINE
WARNING
Make sure that you correctly assemble the machine before use.
WARNING
- If the parts have damage, do not use the machine.
- If you do not have all the parts, do not operate the machine.
-
If the parts are damaged or missing, speak to the service center.
-
Open the package.
- Read the documentation in the box.
- Remove all the unassembled parts from the box.
- Remove the machine from the box.
- Discard the box and package in compliance with local regulations.
3.2 INSTALL THE TUBE
Figure 2.
- Move the tube until the lock button engages into the slot.
i TIP
You can use the nozzle to increase airflow in tight areas.
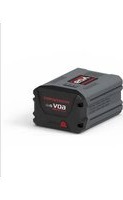
3.3 INSTALL THE BATTERY PACK
Figure 3.
WARNING
- If the battery pack or charger is damaged, replace the battery pack or the charger.
- Stop the machine and wait until the engine stops before you install or remove the battery pack.
-
Read, know, and do the instructions in the battery and charger manual.
-
Align the lift ribs on the battery pack with the grooves in the battery compartment.
- Push the battery pack into the battery compartment until the battery pack locks into place.
- When you hear a click, the battery pack is installed.
3.4 REMOVE THE BATTERY PACK
Figure 3.
- Push and hold the battery release button.
- Remove the battery pack from the machine.
4 OPERATION
WARNING
Make sure the blower tube is in position before operation.
4.1 START THE MACHINE
Figure 4.
- Pull the trigger to start the machine.
- Pull the trigger fully to increase the speed.
- Release the trigger to decrease the speed.
4.2 STOP THE MACHINE
Figure 4.
- Release the trigger to stop the machine.
i NOTE
Wait until the engine stops after you stop the machine.
-
Pull the cruise control lever clockwise to increase the speed. This will lock the speed at the desired setting.
-
Push the cruise control lever counter clockwise to decrease the speed.
NOTE
If you decrease the speed all the way, the unit will stop and it is necessary to do the first step again.
4.4 TURBO BUTTON
Figure 4.
- Push the turbo button, the machine is at the highest speed.
- Release the turbo button, the machine is at the normal speed.
4.5 OPERATION TIPS
- Blow around the outer edge of the unwanted materials to prevent the unwanted materials from scattering.
- Use rakes and brooms to clear the unwanted material before you blow.
- Make the surfaces wet before you clear the unwanted material in dusty conditions.
- Look out for children, pets, open windows, and cleaned cars during operation.
- Clean the machine.
- Discard the unwanted material when you complete work.
5 MAINTENANCE
CAUTION
Do not let brake fluids, gasoline, petroleum-based materials touch the plastic parts. Chemicals can cause damage to the plastic, and make the plastic unserviceable.
CAUTION
Do not use strong solvents or detergents on the plastic housing or components.
WARNING
Remove the battery pack from the machine before maintenance.
5.1 CLEAN THE MACHINE
CAUTION
The machine must be dry. Humidity can cause risks of electrical shocks.
- Clear the unwanted material out of the air vent with a vacuum cleaner.
- Do not spray the air vent or put the air vent in solvents.
- Clean the housing and the plastic components with a moist and soft cloth.
6 TRANSPORTATION AND STORAGE
WARNING
Remove the battery pack from the machine before transportation and storage.
6.1 MOVE THE MACHINE
- Only hold the machine with the handgrip.
- Remove the blower tube when you move the machine on a vehicle.
6.2 STORE THE MACHINE
- Clean the machine before storage.
- Make sure that the motor is not hot when you store the machine.
-
Make sure that the machine does not have loose or damaged parts. If it is necessary, do these steps/instructions:
-
Replace the damaged parts.
- Tighten the bolts.
- Speak to a person of an approved service center.
- Store the machine in a dry area.
- Make sure that children cannot come near the machine.
7 TROUBLESHOOTING
| PROBLEM POSSIBLE CAUSE | SOLUTION | |
| The motor does not start when you pull the trigger. | The battery pack is not installed tightly. | Make sure that you tightly install the battery pack in the machine. |
| The battery pack is out of power. | Charge the battery pack. | |
| The machine does not start. | The power switch is defective. | Replace the defective parts by an approved service center. |
| The motor is defective. | ||
| The PCB board is defective. | ||
| The air does not flow through the tube when you start the machine. | The air inlet or tube outlet has a blockage. | Remove the blockage. |
8 TECHNICAL DATA
| Voltage 48 V DC | |
| Air volume 12.2 m3/min | |
| Air speed 177 km/h | |
| Weight (without battery pack) 1.9 kg | |
| Measured sound pressure level L | _PA = 90 dB(A), K_PA = 3 dB(A) |
| Measured sound power level L | _WA = 95.6 dB(A) |
| Guaranteed sound power level L | _WA.d = 98 dB(A) |
| Vibration < 2.5 m/s | ^2 , K = 1.5 m/s ^2 |
9 WARRANTY
(The full warranty terms and conditions can be found on Powerworks webpage)
The Powerworks warranty is 3 years on the product, and 2 years on batteries (consumer/private usage) from the date of purchase. This warranty covers manufacturing faults. A faulty product under warranty might be either repaired or replaced. A unit that has been misused or used in other ways then described in the owner's manual might be rejected for warranty. Normal wear, and wear parts are not considered as warranty. The original manufacturer warranty is not affected by any additional warranty offered by a dealer or retailer.
A faulty product must be returned to the point of purchase in order to claim for warranty, together with the proof of purchase (receipt).
10 EC DECLARATION OF CONFORMITY
Name and address of the manufacturer:
Name: Changzhou Globe Co., Ltd.
Address: No. 65 (3-4) Xinggang Rd., Zhonglou
Zone, Changzhou 213101 China.
Name and address of the person authorised to compile the technical file:
Name: Peter Söderström
Address: Propellergatan 1, 211 15 Malmö, Sweden
Herewith we declare that the product
Category: Blower
Model: BLM303
Serial number: See product rating label
Year of Construction: See product rating label
- is in conformity with the relevant provisions of the Machinery Directive 2006/42/EC.
- is in conformity with the provisions of the following other EC-Directives:
• 2014/30/EU (EMC-Directive)
• 2000/14/EC (Noise Directive) incl. modifications (2005/88/EC)
Furthermore, we declare that the following (parts/clauses of) European harmonised standards have been used:
• EN 60335-1, EN 50636-2-100, EN 62233, EN ISO 3744, EN 55014-1, EN 55014-2
Measured sound power level: 95.6 dB(A)
Guaranteed sound power level: 98 dB(A)
Conformity assessment method to Annex V Directive 2000/14/EC.
Place, date: 26/10/2018
Signature: Ted Qu, Quality Director
Deutsch
Adresse: No. 65 (3-4) Xinggang Rd., Zhonglou Zone, Changzhou 213101 China.
5.1□□□□3X0] LD□GH□□DSSDUHFFKLR....18
6.1 DÉPLACEMENT DE LA MACHINE
10 DÉCLARATION DE CONFORMITÉ CE
Adresse : No. 65 (3-4) Xinggang Rd., Zhonglou Zone, Changzhou 213101 Chine.
• 2000/14/CE (Directive Bruit) modifications includes (2005/88/CE)
Adres: No. 65 (3-4) Xinggang Rd., Zhonglou Zone, Changzhou 213101 China.
6 TRANSPORT OCH FÖRVARING
▲ WARNING
Adress: No. 65 (3-4) Xinggang Rd., Zhonglou Zone, Changzhou 213101, Kina.
4.2 STOPPING AV MASKINEN
Figur 4.
Adresse: No. 65 (3-4) Xinggang Rd., Zhonglou Zone, Changzhou 213101, Kina.
6.2 A GÉP ELHELYEZÉSE
Cím: No. 65 (3-4) Xinggang Rd., Zhonglou Zone, Changzhou 213101 China.
Adres: No. 65 (3-4) Xinggang Rd., Zhonglou Zone, Changzhou 213101 Çin.
Aadress: No. 65 (3-4) Xinggang Rd., Zhonglou Zone, Changzhou 213101, Hiina.