OD10 - Camcorder Dragon Touch - Free user manual and instructions
Find the device manual for free OD10 Dragon Touch in PDF.

User questions about OD10 Dragon Touch
0 question about this device. Answer the ones you know or ask your own.
Ask a new question about this device
Download the instructions for your Camcorder in PDF format for free! Find your manual OD10 - Dragon Touch and take your electronic device back in hand. On this page are published all the documents necessary for the use of your device. OD10 by Dragon Touch.
USER MANUAL OD10 Dragon Touch
Dragon Touch Outdoor PTZ Security Camera OD10
English
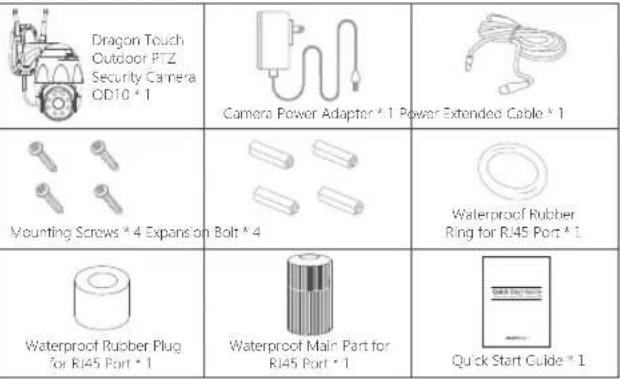
WHAT'S IN THE BOX
 |
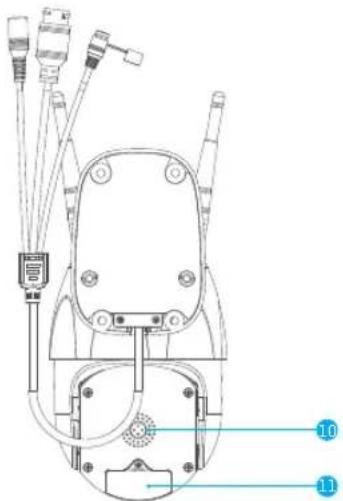
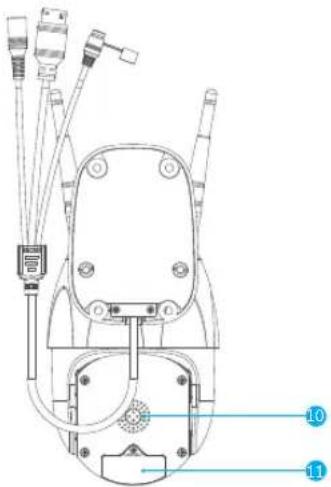
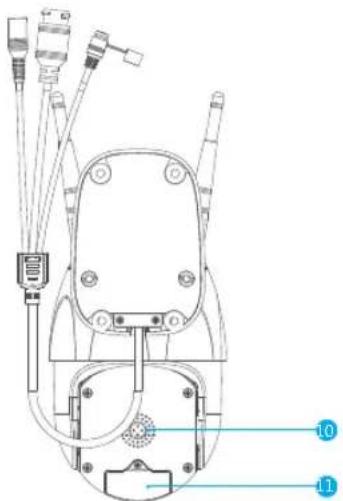
CAMERA INTRODUCTION
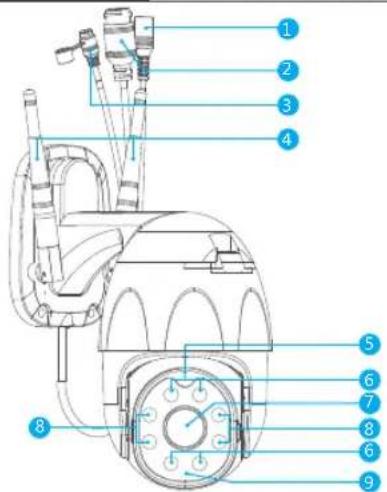
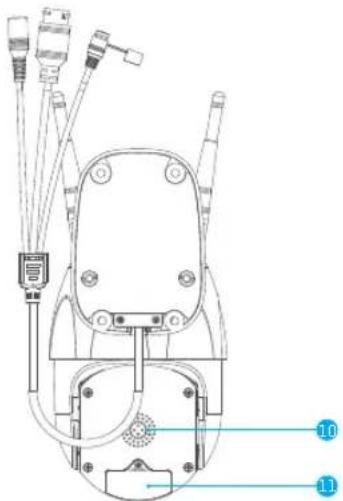
1 DC Power Port
2 RJ45 Port
3 Reset Button
4 Antenna
5 Microphone
6 IR Lights
7 Lens
8 LED Lights
9 Light Sensor
10 Speaker
11 MicroSD Card Slot
SET-UP
1. Install Smart Life App
Search for "Smart Life" app in App Store / Google play, or scan the QR code below to download.


Download the app from App Store Download the App from Google Play
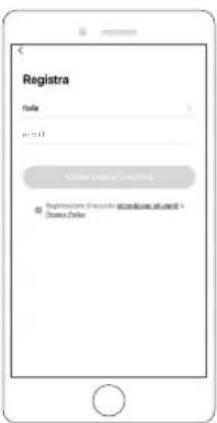
2. Get a New Account
If you already have an account for Smart Life, please log in your account and skip to step 4.
① Open "Smart Life" app to click "Register → Agree". Choose country / region, fill in the email address.

② Fill in email address, a verification code will be sent, please get it and fill it in.
③ Then set password, click "Done".

④ After registering the account, you need to add home information, click “(at the left bottom)”, enter the "Home Management", click "Add Home" and fill in Home name, location, add rooms, then click "Save" to add successfully:
Note:
- Email address should be valid.
- The length of password must be within 6-20 characters, no special characters included.
- Please choose the same country in register and login.
- If you forgot the password, click "Forget Password" to reset it.
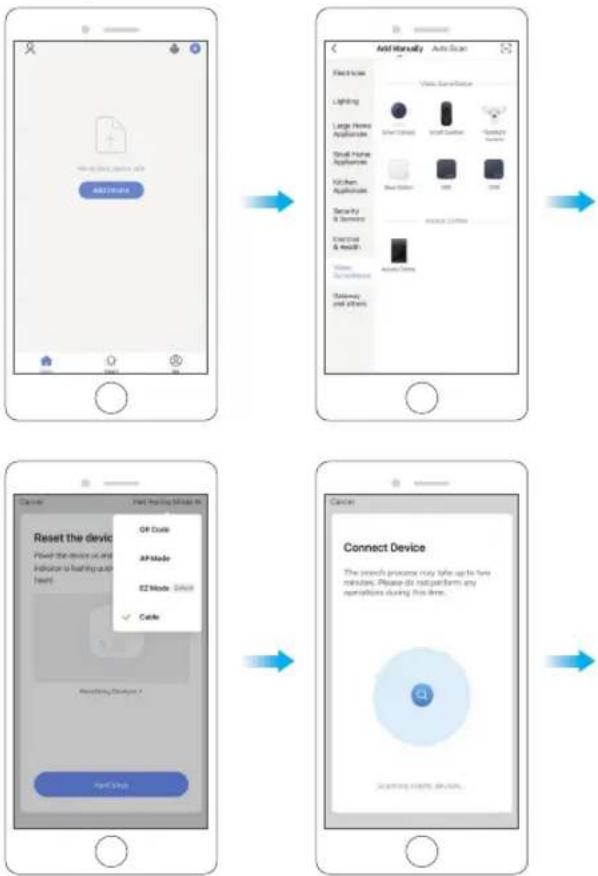
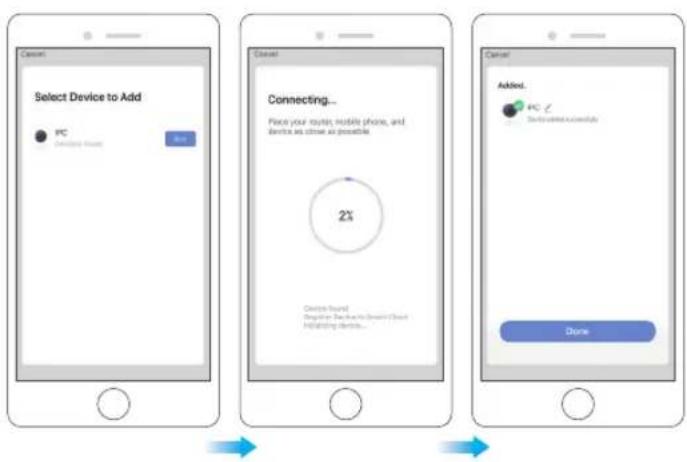
3. Add Your Camera
A. Configure through Wi-Fi (Recommended)
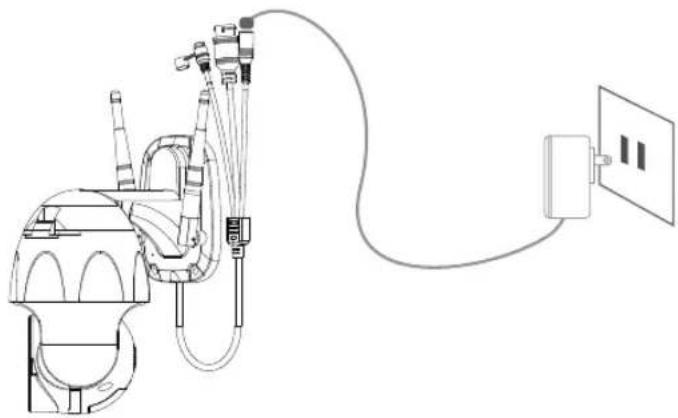
① Power on the Camera
If you want to plug in the microSD Card, please do it before installing camera on the wall. Plug the power adapter into the outlet. The camera will rotate to complete self-test.
After that, you will hear the sound "wait for Wi-Fi config".
natural_image
Technical line drawing of a mechanical device connected to a wall-mounted power outlet (no text or symbols present)Note: If you don't hear any sound, please reset it on again.
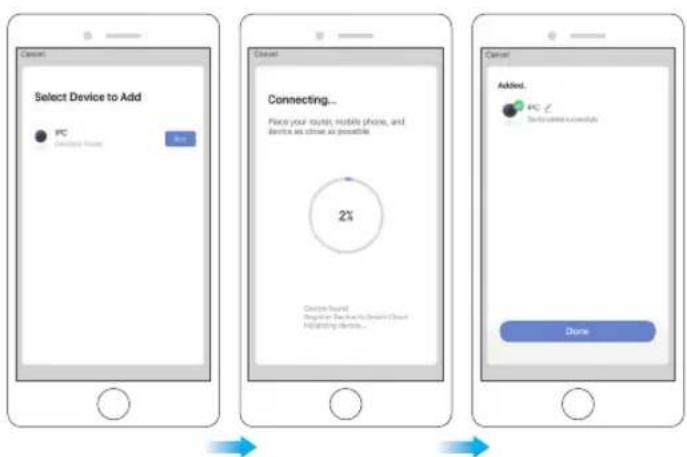
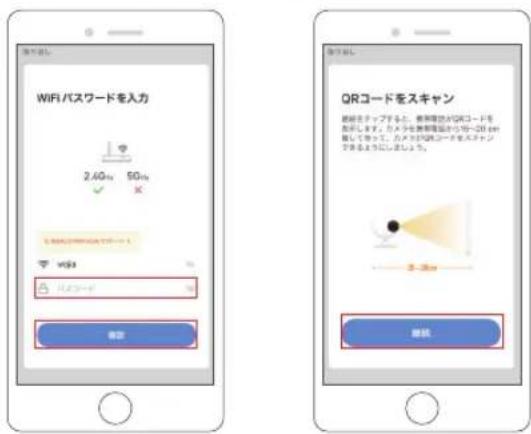
② Choose Room, click "Add Device → Video Surveillance → Smart Camera → next step → Enter Wi-Fi Password → Confirm → Continue".
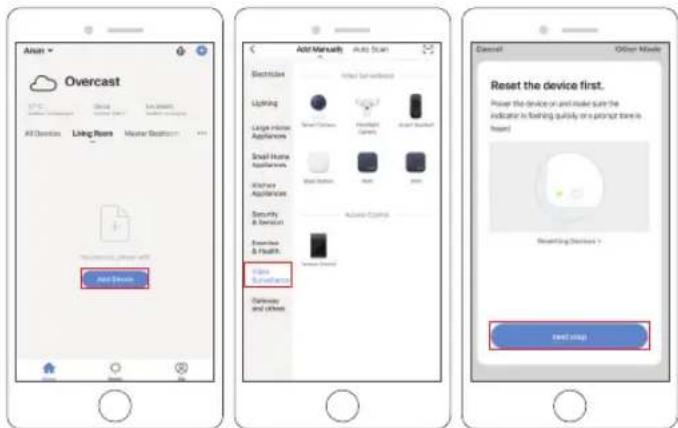

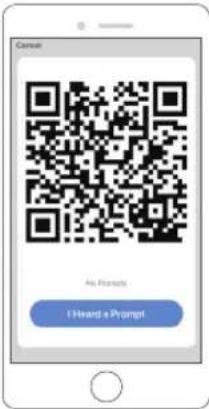
③ A QR code will be shown, just face the phone to the camera, after you hear the sound "connect the router", then click "I heard a Prompt", see below picture.
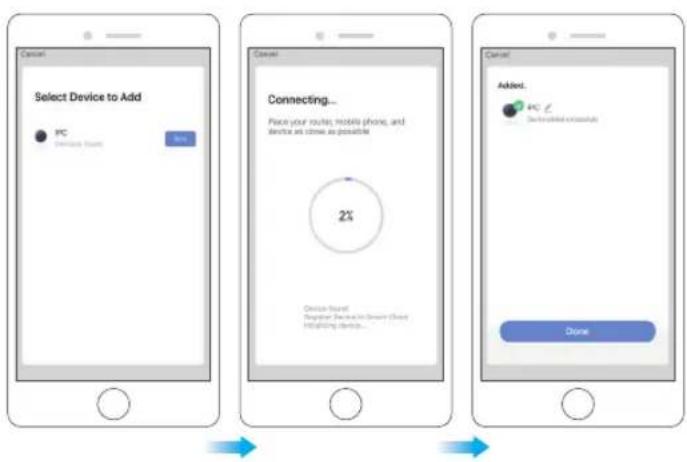
④ Wait for the connection for about 30s, the device will be added successfully. Name your camera and click the room where it is, click "Done".


⑤ Click camera icon to preview camera live video.
⑥ Please install the camera on the wall or ceiling and adjust the antenna to make sure the Wi-Fi signal strength more than 60%.
B. Configure through LAN Cable
Note: If you want to configure through LAN, please make sure there is LAN Cable on the wall or ceiling where you want to install. If yes, please add your camera as following steps.
① Power on the Camera
If you want to insert microSD Card, please do it before installing camera on the wall.
Plug the LAN Cable into the RJ45 port and plug the power adapter into the outlet.
The camera will rotate to complete self-test. After that, you will hear the sound "Wait for Wi-Fi config".
natural_image
Technical line drawing of a mechanical device connected to a wall-mounted electrical outlet (no text or symbols present)② Click "Add Device → Video Surveillance → Smart Camera → Net Paring Mode ⇌ Cable → next step → Bind → Done".
flowchart
graph TD
    A["Add Manual"] --> B["Reset home"]
    B --> C["Lighting"]
    C --> D["Large Home Appliances"]
    D --> E["Small Home Appliances"]
    E --> F["Kitchen Appliances"]
    F --> G["Server by & Services"]
    G --> H["Exercise & Health"]
    H --> I["Video & Entertainment"]
    I --> J["Readaway and others"]

    K["Connect Device"] --> L["Reset the device"]
    L --> M["Open Guide"]
    M --> N["AP Mode"]
    N --> O["E2 Mode: Select"]
    O --> P["Cable"]
    P --> Q["Reseting Devices X"]
    Q --> R["Next Shop"]

    S["Add Manual"] --> T["Reset home"]
    T --> U["Lighting"]
    U --> V["Large Home Appliances"]
    V --> W["Small Home Appliances"]
    W --> X["Kitchen Appliances"]
    X --> Y["Server by & Services"]
    Y --> Z["Exercise & Health"]
    Z --> AA["Video & Entertainment"]
    AA --> AB["Readaway and others"]

    AC["Add Manual"] --> AD["Reset home"]
    AD --> AE["Lighting"]
    AE --> AF["Large Home Appliances"]
    AF --> AG["Small Home Appliances"]
    AG --> AH["Kitchen Appliances"]
    AH --> AI["Server by & Services"]
    AI --> AJ["Exercise & Health"]
    AJ --> AK["Video & Entertainment"]
    AK --> AL["Readaway and others"]

    AM["Add Manual"] --> AN["Reset home"]
    AN --> AO["Lighting"]
    AO --> AP["Large Home Appliances"]
    AP --> AQ["Small Home Appliances"]
    AQ --> AR["Kitchen Appliances"]
    AR --> AS["Server by & Services"]
    AS --> AT["Exercise & Health"]
    AT --> AU["Video & Entertainment"]
    AU --> AV["Readaway and others"]

    AW["Add Manual"] --> AX["Reset home"]
    AX --> AY["Lighting"]
    AY --> AZ["Large Home Appliances"]
    AZ --> BA["Small Home Appliances"]
    BA --> BB["Kitchen Appliances"]
    BB --> BC["Server by & Services"]
    BC --> BD["Exercise & Health"]
    BD --> BE["Video & Entertainment"]
    BE --> BF["Readaway and others"]

    BG["Add Manual"] --> BH["Reset home"]
    BH --> BI["Lighting"]
    BI --> BJ["Lighting"]
    BJ --> BK["Large Home Appliances"]
    BK --> BL["Small Home Appliances"]
    BL --> BM["Kitchen Appliances"]
    BM --> BN["Server by & Services"]
    BN --> BO["Exercise & Health"]
    BO --> BP["Video & Entertainment"]
    BP --> BQ["Readaway and others"]

    CA["Add Manual"] --> CB["Reset home"]
    CB --> CC["Lighting"]
    CC --> CD["Lighting"]
    CD --> DE["Large Home Appliances"]
    DE --> DF["Small Home Appliances"]
    DF --> DG["Kitchen Appliances"]
    DG --> DH["Server by & Services"]
    DH --> DI["Exercise & Health"]
    DI --> DJ["Video & Entertainment"]
    DJ --> DK["Readaway and others"]

    CE["Add Manual"] --> CF["Reset home"]
    CF --> CG["Lighting"]
    CG --> CH["Lighting"]
    CH --> CI["Large Home Appliances"]
    CI --> CJ["Small Home Appliances"]
    CJ --> CK["Kitchen Appliances"]
    CK --> CL["Server by & Services"]
    CL --> CM["Exercise & Health"]
    CM --> CN["Video & Entertainment"]
    CN --> CO["Readaway and others"]

    CP["Add Manual"] --> CQ["Reset home"]
    CP --> CR["Lighting"]
    CR --> CS["Lighting"]
    CS --> CT["Large Home Appliances"]
    CT --> CU["Small Home Appliances"]
    CU --> CV["Kitchen Appliances"]
    CV --> CW["Server by & Services"]
    CW --> CX["Exercise & Health"]
    CX --> CY["Video & Entertainment"]
    CY --> DQ["Readaway and others"]

    DQ --> DQ

③ Click camera icon to preview camera live video.
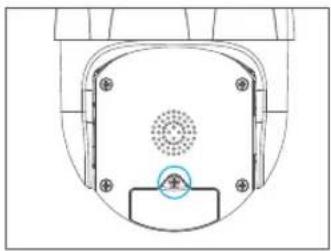
4. Installation
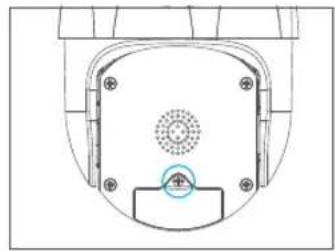
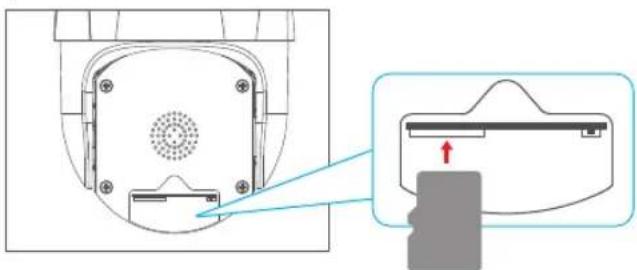
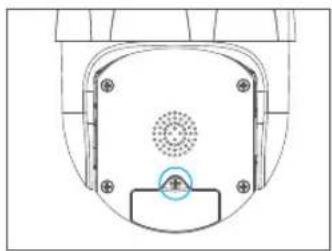
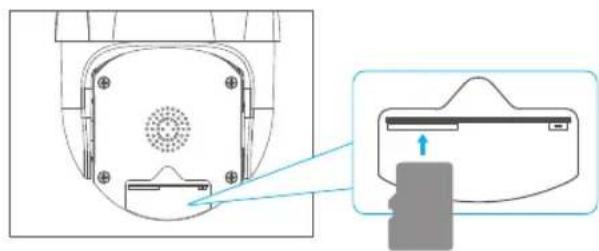
① Insert microSD card
If you want to insert microSD card, please do it firstly. If not, please skip this step. Open the cover and install the microSD card, then close the cover.
Step1: Open the cover.
natural_image
Technical diagram of a mechanical component with mounting holes and a central circular feature (no text or symbols)Step2: Install microSD card.
natural_image
Diagram showing a device rear panel with a circular vent and a close-up view of its internal components (no text or symbols)Step3: Close the cover.
natural_image
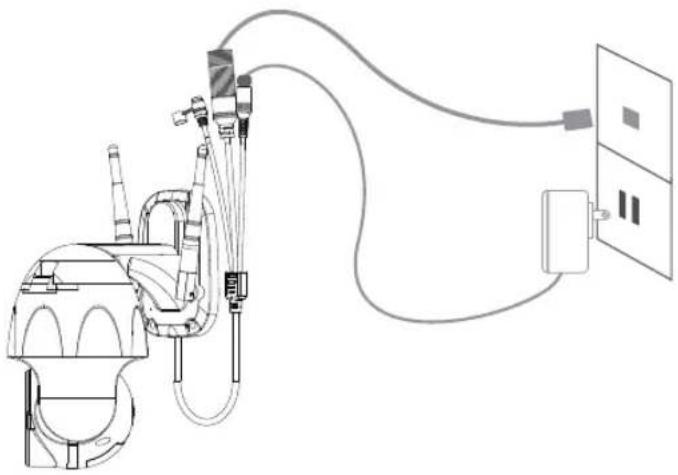
Technical diagram of a mechanical component with mounting holes and a central circular feature (no text or symbols)② Place the camera in a fixed position first and mark the screw hole with a marker. Use a tool to drill holes in the marked screw holes.
③ After screwing four holes, insert the expansion bolt into the screw hole.
④ Align the screw hole on the bottom of the camera bracket with the hole on the wall. Screw to fix the camera with the screws.
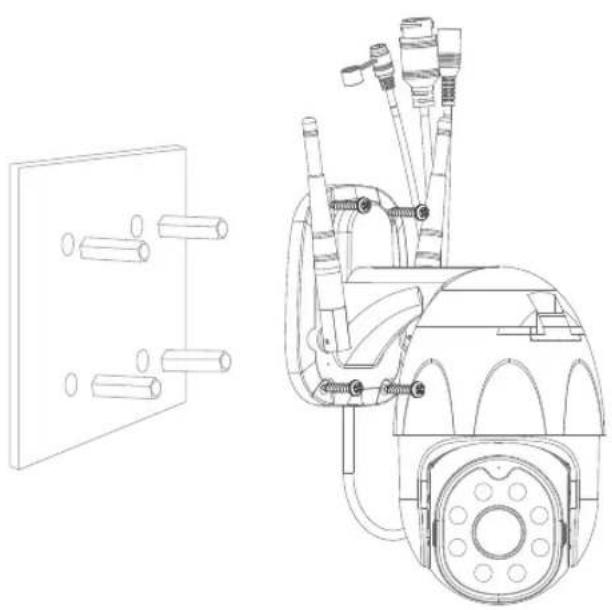
natural_image
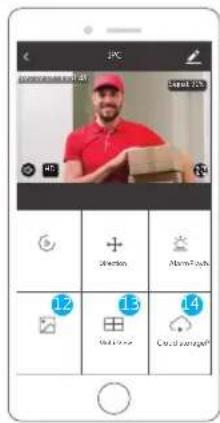
Technical line drawing of a mechanical device with attached components and a separate schematic view (no text or symbols)FUNCTION DESCRIPTION
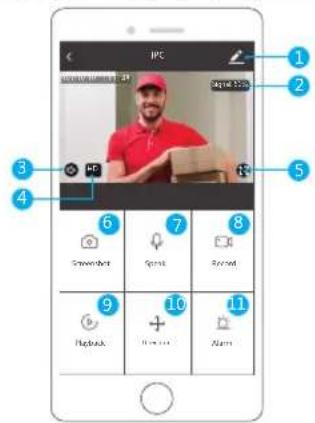
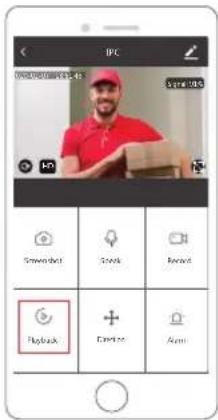
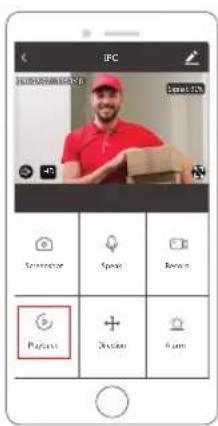
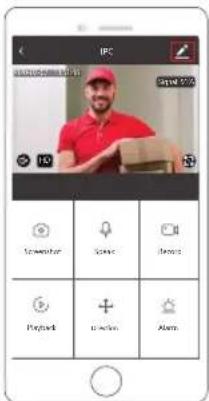
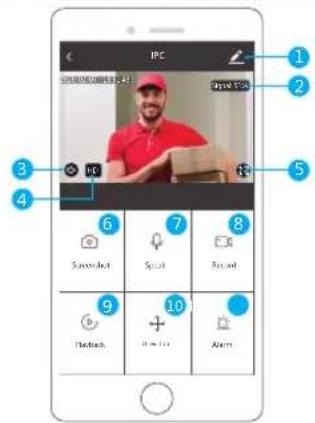
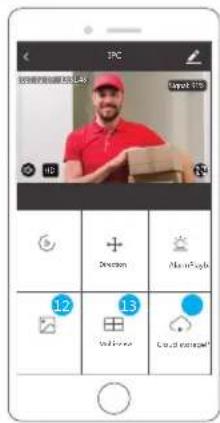
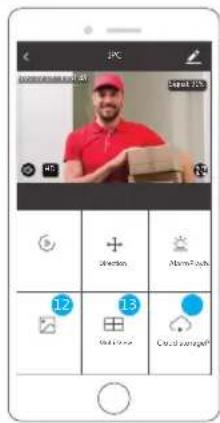
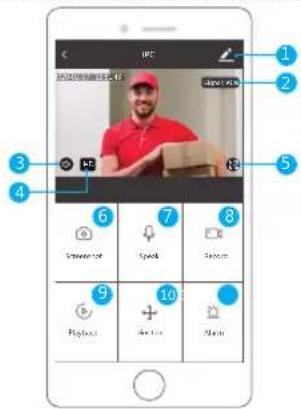
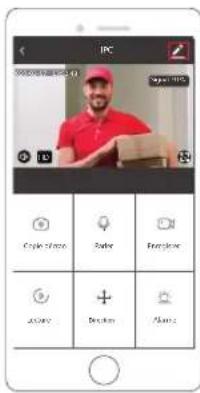
Real-time preview interface
1 Setting & Management
2 Wi-Fi Signal Strength
3 Sound Switch
4 SD/HD
5 Full Screen
10 PTZ Control (The camera can be arbitrarily rotated to give you a different perspective. You can move it up and down, capture any corner you want to view.)
11 Motion detection alarm (Abnormal report notification through intelligent detection of anomaly in home. You can go out to work and play confidently. To set the alarm level according to the camera's filed of view can make the alarm more accurate. Also you set alarm timer as you want.)
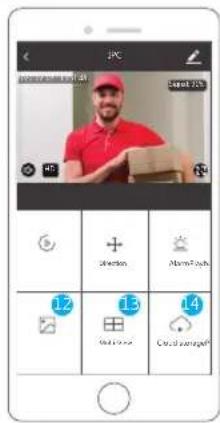
12 Photo Album: You could view the Screenshot and recording videos.
13 Multi-View, if you have installed several Dragon Touch Cameras, you could click multi-view to select the cameras which you want to show on the same screen.
14 Cloud storage, you need to purchase the cloud storage if you want.
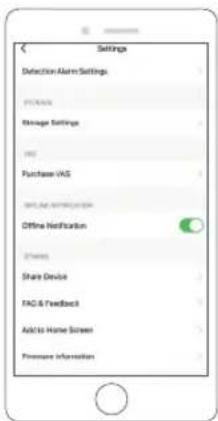
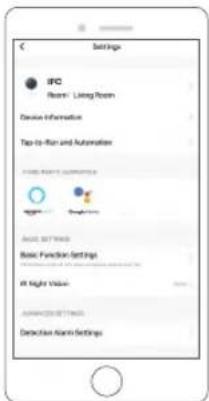
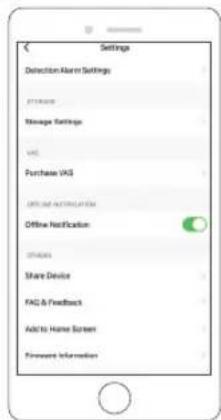
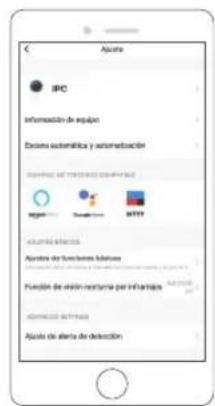
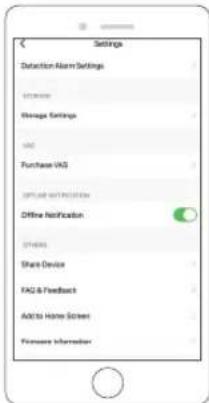
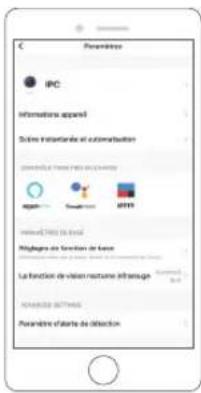
SETTING & MANAGEMENT
Click "Z" in the upper right corner of the control page for the management and setting of the device.
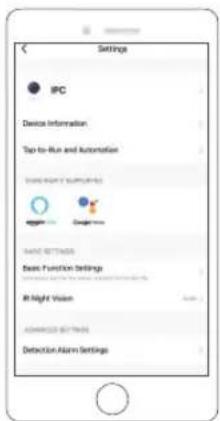

Device Name - Can modify the device name and device location.
Device Information - To view: Owner, Virtual ID, Wi-Fi signal strength, IP address. Device time zone.
Third Party Supported - Click the icon to view its instruction.
Basic Function Settings - Information such as time watermark flip screen.
IR Night Vision - Select IR night vision auto/on/off.
Detection Alarm Settings - a. can set the motion detection alarm on/off and motion detection alarm sensitivity.
b. You could set motion tracking on/off and Alarm schedule
Storage settings - Please make sure you insert the microSD card. You could set the recording mode Non-Stop(7*24h) or Event Recording.
Value-added Service Purchase - Video cloud storage service (optional)
Offline Notification - You could set on/off to notice you once the device offline.
Share Device - Can share this device to other people, enter the people's mobile phone number; (Note: the entered mobile phone number should be registered with a smart life App account).
FAQ & Feedback - Here you could found the questions and answers, if not in, you could contact us through the bottom button. We will reply you in 24 hours.
Firmware Information - Support OTA Remote Upgrade (Do not disconnect during upgrading).
USE THIRD PARTY DEVICES TO CONTROL
Choose the camera you want to control, click "?" on the top right corner to enter into the more settings.

1. Use Amazon Echo To Control
Click "Amazon Echo" to follow the instructions to connect your device.


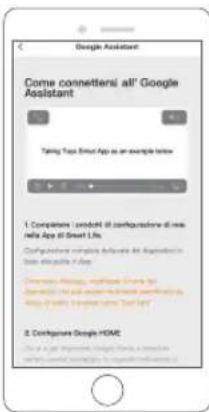
2. Use Google Assistant To Control
Click "Google Home", follow the instructions to connect your device.


SPEC DATA
| Video | High Definition | 1080P |
| Video Compression | Smart H.264 | |
| Rotation Angle | Horizontal: 355° Vertical: 90° | |
| Object Tracking | Support | |
| Low Illumination | 0.1LUX/F1.2 | |
| Picture Capture | Support | |
| Video Flip | Support | |
| Audio | Coding standard | G.711 |
| Two-way Speech | Support | |
| Record Management | Video File Size | 2.5GB-4.5GB/Day |
| Record Mode | Manual Record, Motion Detection Record,Scheduled Record, Alarm Record | |
| Video Storage | microSD Card/Cloud | |
| Playback, Back Up | Support | |
| Alarm Trigger | Video Push, Alarm Recording, Screen ShotCapture, Sending Email | |
| Network | Network Interface | 1*RM5, 10/100M10-100 Base-T,Self-Adaptable Ethernet Port |
| Wi-Fi | 802.11b/g/n | |
| Bitstream | Three Stream | |
| Network Protocol | Support TCP/IP, RTSP, ONVIF, ETC | |
| Transmission Mode | P2P, Smart Cloud Sever | |
| Wi-Fi Connection | Sweep QR Code, Network Cable Connection | |
| Extend | microSD Card | Maximum Support 128GB microSD Card |
| Reset Key | Support | |
| Power Supply | Power | DC 12V 2A |
| Power Consumption | 10W | |
| Work Environment | Suitable Place | Home, Shop, School, Factory |
| Installation Mode | Flat put, Wall mounted, Holsting | |
| Working Temperature | -15°C - +55°C | |
| Working humidity | 10% - 90% |
Q&A
Q: Unable to connect the Wi-Fi?
A: Check your Wi-Fi name and password. Ensure your Wi-Fi is 2.4G, not 5G. Ensure your camera and phone close to router.
Q: Still fail to add device after re-scanning?
A: If fail to add device, it is recommended to restart the device or power off the device, and try again.
Q: The device cannot preview?
A: Check for weak Wi-Fi signal. You can place the camera close to the router. If it still doesn't work, reset the device, and add it again.
Q: Why the device is still on the list after resetting the device?
A: The device resetting only resets the camera's network configuration and cannot change the configuration on the App. You must log in the App to remove the camera from the list.
Q: How to connect the camera to another router?
A: First log in the App to remove and reset the device, and configure the device again through the App.
Q: Why the device cannot identify microSD card?
A: It is recommended to insert and remove the microSD card after power off the device. Check if the microSD card is under normal service conditions and the format is FAT32. The Apo shall suggest "could not find microSD card" under unstable network of the mobile phone or the device.
Using the advanced intelligent alarm push algorithm to ensure that the alarm message will not be frequently, but the camera will record all the alarm messages and videos.
Q: The device is online and has an alarm event, but the mobile phone cannot receive the information?
A: First confirm that App allows notification in the settings of your mobile phone. Under normal circumstances, when an anomaly is detected, a message will appear in
English
the notification bar of your mobile phone. Your should set a notification sound or vibration in your mobile phone. In addition, when viewing the real-time video in the App, you cannot receive alarm of the cameraal being viewed. Because the device defaults the camera being viewed indicating that the user is focusing on the monitoring video, and there is no need for an alarm Using the advanced intelligent alarm push algorithm to ensure that the alarm message will not be frequently, but the camera will record all the alarm messages and videos.
Q: How to reset the camera?
A: Press the reset button for 5 seconds. Hear one "Device resetting" voice. After reset, you could hear "wait for Wi-Fi config".
CONTACT US
For any inquires with Dragon Touch products, please feel free to contact us, we will respond within 24 hours.
E-mail: cs@dragontouch.com
Tel: 1-888-811-1140 (US) Mon-Fri (except holidays) 9am-5pm (EST)
Official website: www.dragontouch.com
Deutsch
WAS IST IN DEM PAKET

natural_image
Technical line drawing of a mechanical device connected to a wall-mounted power outlet (no text or symbols present)natural_image
Technical line drawing of a mechanical assembly with wiring and a wall-mounted panel (no text or symbols)natural_image
Technical line drawing of a mechanical component with mounting holes and a central circular feature (no text or symbols)natural_image
Diagram showing a device rear panel with mounting holes and a close-up view of its internal structure (no text or symbols)natural_image
Top-down view of a mechanical or electronic component with mounting holes and a central circular feature (no text or symbols)natural_image
Simple line drawing of a wall-mounted cable with two cylindrical pins (no text or symbols)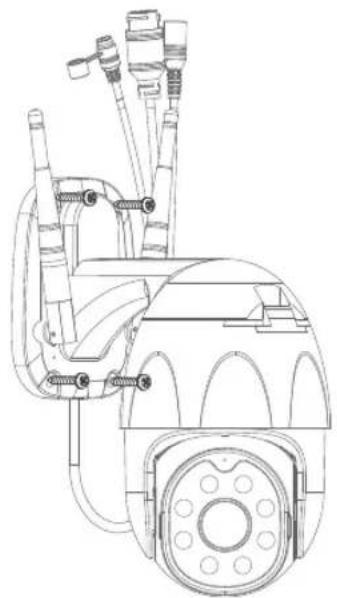
natural_image
Technical line drawing of a mechanical device with hoses and components (no text or symbols)BEDIENUNGSANLEITUNG
1 Setting & Management
2 Wi-Fi Signal Strength
3 Sound Switch
4 SD/HD
5 Full Screen


natural_image
Technical line drawing of a mechanical device connected to a wall-mounted power outlet (no text or symbols present)
natural_image
Technical line drawing of a mechanical device connected to a wall-mounted electrical outlet (no text or symbols present)flowchart
graph TD
    A["Add Existing"] --> B["Add Naturally"]
    B --> C["Connect Device"]
    C --> D["Carner"]
    D --> E["Reset the device"]
    E --> F["OK Gate"]
    E --> G["AP Made"]
    E --> H["E2 Mode"]
    E --> I["Delete"]
    I --> J["Connecting Devices"]
natural_image
Technical diagram of a mechanical component with mounting holes and a central circular feature (no text or symbols)Step2: Instalar tarjeta microSD.
natural_image
Technical diagram showing a device component with a magnified inset view of its internal structure (no text or symbols)natural_image
Technical line drawing of a mechanical component with mounting holes and a central circular feature (no text or symbols)natural_image
Pure electrical circuit lines without any symbols
natural_image
Technical line drawing of a mechanical device with hoses and a central hub (no text or symbols)FUNCIÓN DESCRIPTIVA


QU'Y A-T-IL DANS LA BOITE?
natural_image
Technical line drawing of a mechanical device connected to a wall-mounted power outlet (no text or symbols present)natural_image
Technical line drawing of a mechanical device connected to a wall-mounted electrical outlet (no text or symbols present)natural_image
Technical line drawing of a mechanical component with mounting holes and a central circular feature (no text or symbols)natural_image
Technical diagram showing a device interior with a circular vent and a close-up view of its internal structure (no text or symbols)natural_image
Technical line drawing of a mechanical component with mounting holes and a central circular feature (no text or symbols)natural_image
Technical line drawing of a mechanical device with attached components and a separate schematic view (no text or symbols)DESCRIPTION DE LA FONCTION

natural_image
Technical line drawing of a mechanical device connected to a wall-mounted power outlet (no text or symbols present)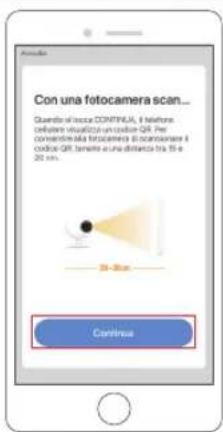
natural_image
Technical line drawing of a mechanical device connected to a wall-mounted electrical outlet (no text or symbols present)flowchart
graph TD
    A["Add Store"] --> B["Add Mostly"]
    B --> C["Reset the device"]
    C --> D["Connect Device"]
natural_image
Technical diagram of a mechanical component with mounting holes and a central circular feature (no text or symbols)natural_image
Diagram showing a device component with a circular vent and a magnified view of its internal structure (no text or symbols)natural_image
Top-down view of a mechanical or electronic component with no visible text or symbolsnatural_image
Technical line drawing of a mechanical device with attached components and a separate schematic view (no text or symbols)

Ocial website: www.dragontouch.com
梱包内容
natural_image
Technical line drawing of a mechanical device connected to a wall-mounted electrical outlet (no text or symbols present)flowchart
graph TD
    A["Add Device"] --> B["Reset the device"]
    B --> C["Text Sensing should be OK Code"]
    B --> D["AP Mode"]
    B --> E["E2 Mode"]
    B --> F["Cable"]
    F --> G["Connecting Devices 1"]
    G --> H["Next step"]

    I["Add Manually"] --> J["Auto Scan"]
    J --> K["Lighting"]
    J --> L["Large Home Appliances"]
    J --> M["Small Home Appliances"]
    J --> N["Kitchen Appliances"]
    J --> O["Security & Services"]
    J --> P["Exercise & Health"]
    J --> Q["Water & Food/Biosks"]
    J --> R["Railway and others"]

    S["Connect Device"] --> T["Scanning wireless devices"]
4. インスト ー ル 説 明
natural_image
Technical line drawing of a mechanical component with no visible text or symbolsステップ1:カバーを開きます。
natural_image
Diagram showing a device rear panel with a close-up view of its internal structure (no text or symbols)ステップ3:カバーを閉じます。
natural_image
Technical diagram of a mechanical or electronic component with no visible text, numbers, or symbols.natural_image
Technical line drawing of a mechanical device with attached panel and motor components (no text or symbols)機能說明