Vision 3 Pro - Camcorder Dragon Touch - Free user manual and instructions
Find the device manual for free Vision 3 Pro Dragon Touch in PDF.

| Product type | Sport camcorder |
| Brand | Dragon Touch |
| Model | Vision 3 Pro |
| Maximum video resolution | 4K (3840x2160) at 30 FPS |
| Available video resolutions | 4K 30FPS, 2.7K 30FPS, 1080P 60FPS/30FPS, 720P 120FPS/60FPS/30FPS |
| Maximum photo resolution | 20 Megapixels (20MP) |
| Capture modes | 8 modes: Normal Video, Loop Video, Time-lapse Video, Slow Motion Video, Normal Photo, Self-timer, Auto Photo, Burst Photo |
| Image stabilization | Yes (on/off) |
| Field of view | 170°/140°/110°/70° |
| Digital zoom | 4x |
| Power source | Rechargeable lithium-ion battery (via micro USB port) |
| Storage | microSD card up to 128 GB (Class 10 or UHS-I, FAT32 format) |
| Wireless connectivity | Built-in WiFi (SSID: Vision 3 Pro, password: 1234567890) |
| Mobile app | XDV (compatible with Android and iOS, except iPad) |
| Ports | Micro USB, Micro HDMI, external microphone jack |
| Display | Built-in LCD |
| Remote control | Included (requires CR2032 battery) |
| Battery life | Varies with use (can be optimized by lowering resolution and turning off WiFi) |
| Maintenance | Clean the lens with a soft, lint-free cloth; avoid shocks and extreme temperatures |
| Safety | Do not disassemble, puncture, or expose the battery to heat sources; avoid contact between terminals and metal objects |
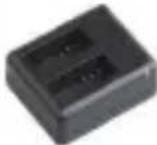
| Included accessories | Remote control, USB cable, waterproof case (not specified in the manual) |
| Warranty | Contact cs@dragontouch.com (response within 24 hours) |
Frequently Asked Questions - Vision 3 Pro Dragon Touch
User questions about Vision 3 Pro Dragon Touch
0 question about this device. Answer the ones you know or ask your own.
Ask a new question about this device
Download the instructions for your Camcorder in PDF format for free! Find your manual Vision 3 Pro - Dragon Touch and take your electronic device back in hand. On this page are published all the documents necessary for the use of your device. Vision 3 Pro by Dragon Touch.
USER MANUAL Vision 3 Pro Dragon Touch
What's in the Box 2
Your Vision 3 Pro 3
Getting Started 5
Overview of Modes 6
Customizing Your Vision 3 Pro 11
Connecting to The XDV App 15
Playing Back Your Content 15
Deleting Videos and Photos on Your Vision 3 Pro 16
Offloading Your Content 17
Adjusting the Zoom Level 19
Reformatting Your Memory Card 19
Maintenance Your Camera 20
Maximizing Battery Life 20
Battery Storage and Handling 20
2.4G Remote 21
Mounting Your Camera 23
Contact US 25
WHAT'S IN THE BOX
 Vision 3 Pro Vision 3 Pro | 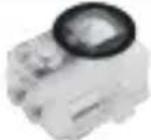 Waterproof Housing Waterproof Housing | 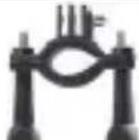 Handele Bar/Pole Mount Handele Bar/Pole Mount | 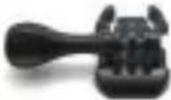 Mount 1 Mount 1 | 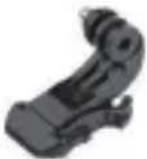 Mount 2 Mount 2 | 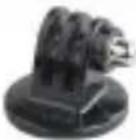 Mount 3 Mount 3 |
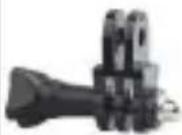 |  Mount 5Mount 4 Mount 6 Mount 5Mount 4 Mount 6 | 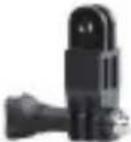 |  |  Remote Remote |  Remote control strap Remote control strap |
 Changer Changer |  Helmet Mounts Helmet Mounts | 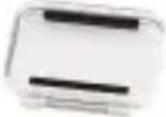 Protective Backdoor Protective Backdoor | 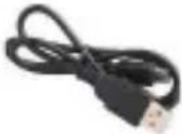 USB Cable USB Cable |  Tethers Tethers |  Lens Cloth Lens Cloth |
 Bandages Bandages | 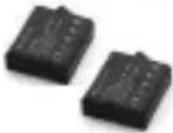 Battery Battery |  Quick Start Guide Quick Start Guide | |||
How to use all sorts of accessories of action camera?
Scan the following QR code or enter the website to watch the video.
www.youtube.com/watch?v=UqKtEIRXqI8&feature=youtu.be


Unboxing: 00:00-00:19
How to remove the camera from the box it's mounted on? : 00:20-00:31
How to remove the camera from the waterproof case? : 00:32-01:05
How to mount the camera to a tripod? : 01:17-01:49
How to mount the camera to your body? : 01:50-02:08
How to mount the camera to a self stick? : 02:09-02:55
How to mount the camera to a bike? : 02:56-04:34
How to mount the protective backdoor? : 04:35-04:59
How to mount the camera to a helmet? : 05:03-11:16
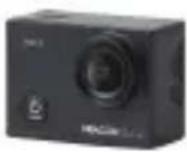
YOUR VISION 3 PRO

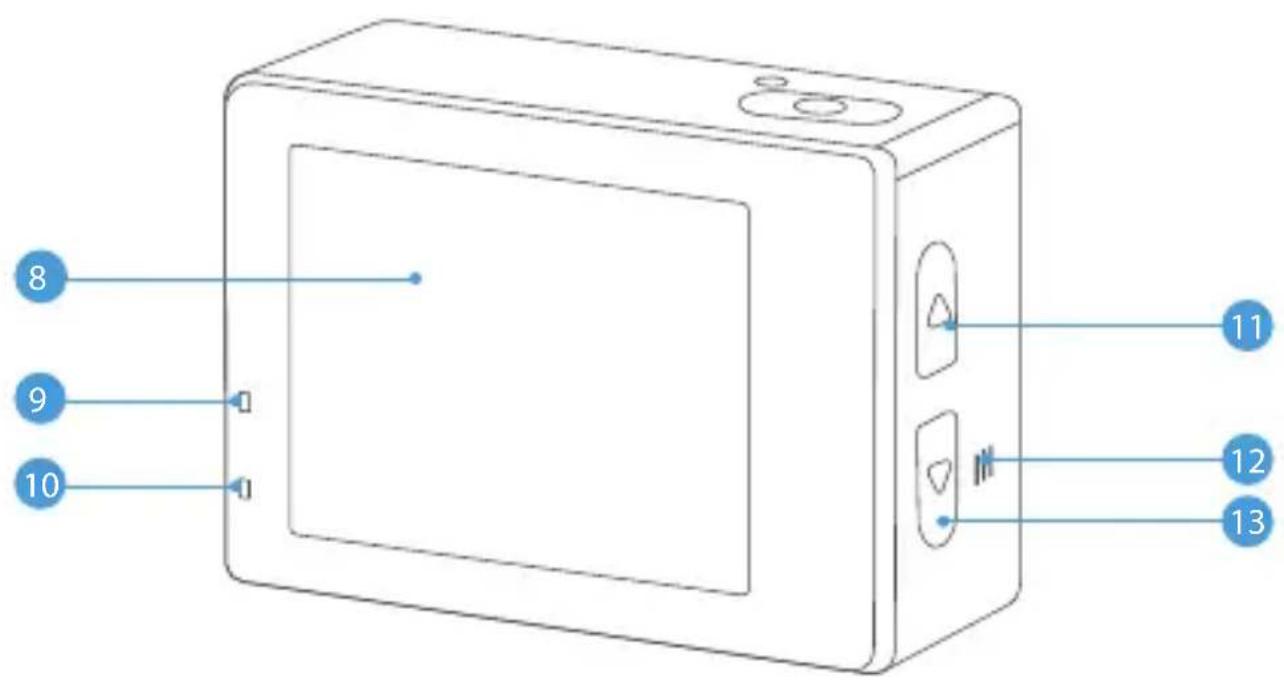
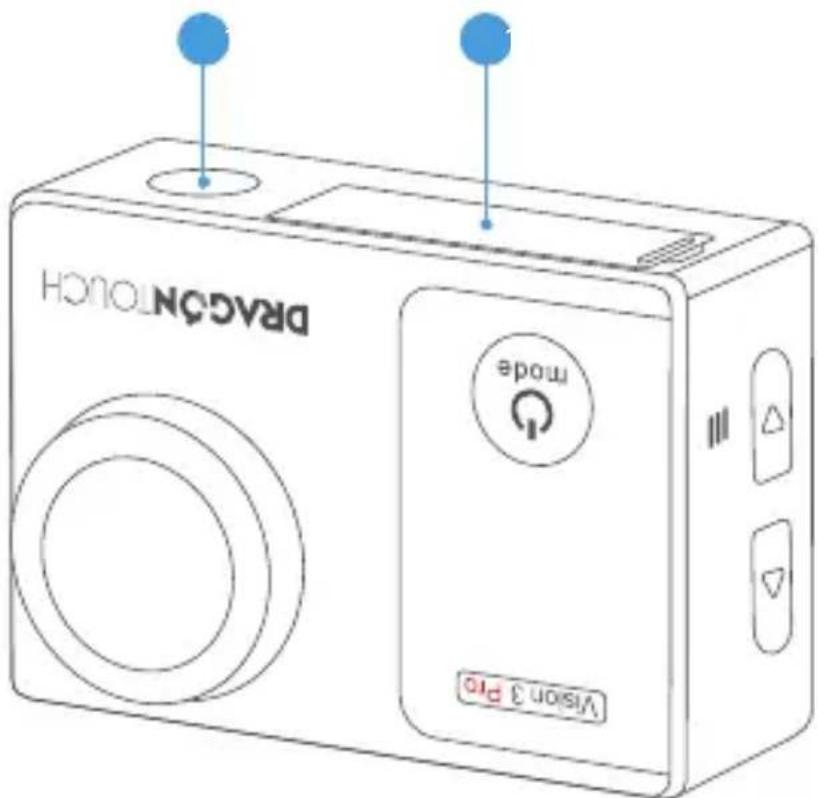
- Shutter / Select Button
- Wifi Indicator
- Power / Mode / Exit Button
- Micro USB Port / External Microphone Port
- Memory Card Slot
- Micro HDMI Port
- Lens
-
Screen
-
Working Indicator
- Charging Indicator
- Wifi / Up Button
- Speaker
- Down Button
- 1/4" Screw Holetripod interface
- Battery Door
Note: Camera does not record sound when it is in the waterproof case. Camera supports external microphone (not included) with Micro USB port.
GETTING STARTED
Welcome to your new Vision 3 Pro. To capture video and photos, you need a memory card (sold separately).
MEMORY CARDS
Use brand name memory cards that meet these requirements:
• Class 10 or UHS-I rating
• Capacity up to 128GB (FAT32)
Note:
- Please format the memory card first in this camera before using. To keep your memory card in good condition, reformat it on a regular basis. Reformatting erases all of your content, so be sure to offload your photos and videos first.
- FAT32 format memory card stops recording when the storage of each file is over 4GB and starts to record again on a new file.
POWERING ON + OFF
To Power On:
Press and hold the Mode button for three seconds. The camera beeps while the camera status light is on. When information appears on the LCD display or the camera status screen, your camera is on.
To Power Off:
Press and hold the Mode button for three seconds. The camera beeps while the camera status light is off.
SWITCHING MODE:
To Switch Mode:
Turn on camera, press Mode button to switch mode.
To Exit Mode:
Press the Mode button to exit mode.
TURNING ON / OFF Wifi
To turn on Wifi:
Turn on camera, press UP Button to turn on Wifi. You can also find Wifi setting from the pull-down menu in the screen.
To turn off Wifi:
Press Up button to turn off Wifi.
Note: Camera does not record sound when it is in the waterproof case.
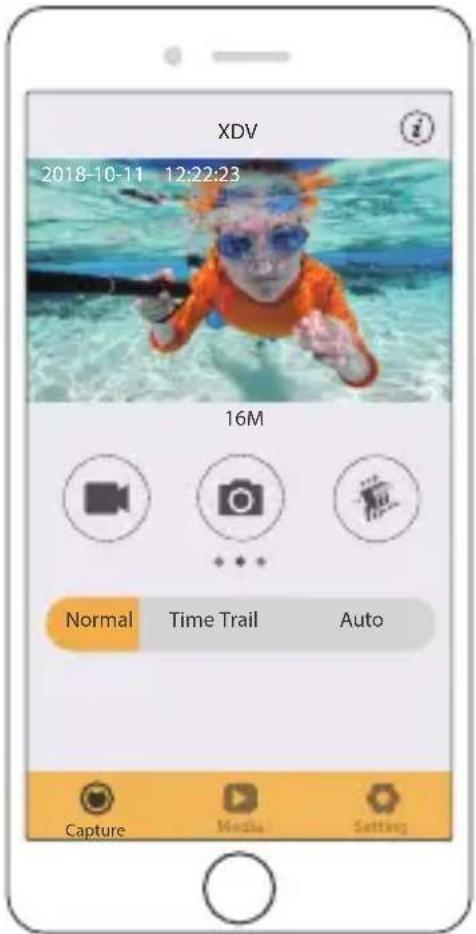
VERVIEW OF MODES
There are 8 modes: Video, Loop Recording, Time Lapse Video, Slow Motion Video, Photo, Self-timer, Continuous Lapse and Burst Photo.
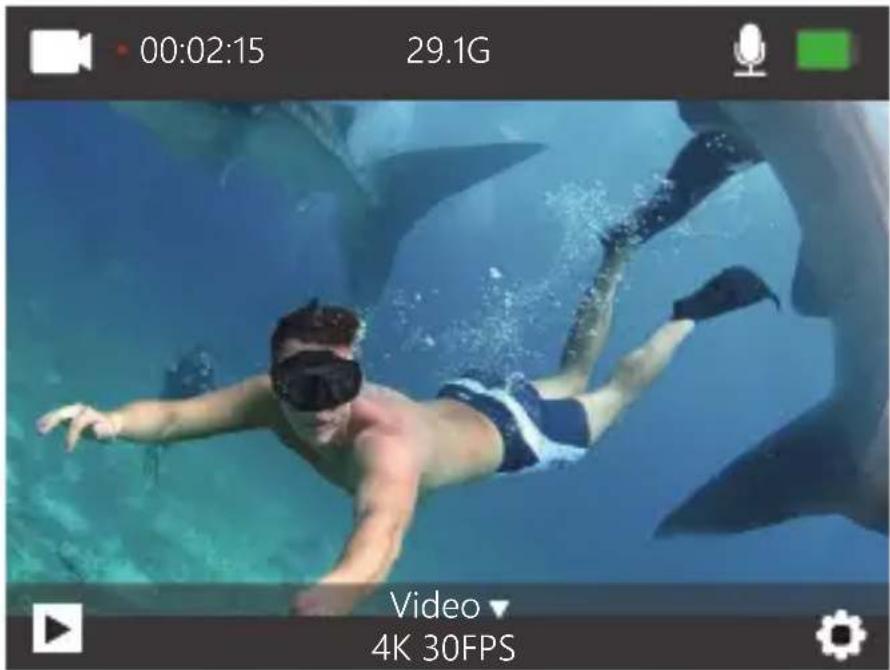
Video Mode
In Video mode, press OK button, the camera starts recording video. Press OK button to stop recording video.
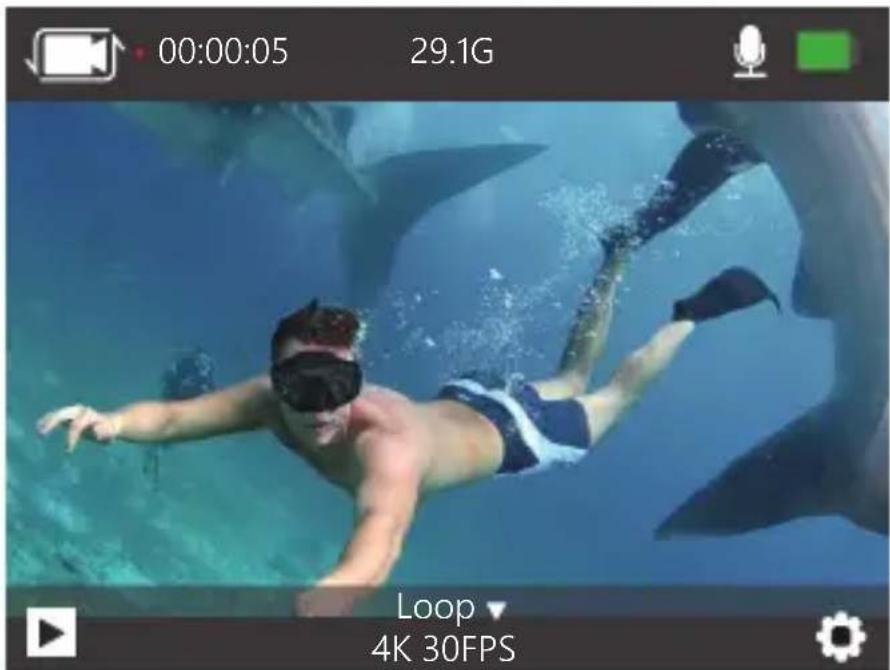
Loop Recording Mode
In Loop Recording mode, press OK button, you can continuously record video, but save only the moments that you want.
Time Lapse Video Mode
In Time Lapse Video mode, press OK button, the camera records video from frames captured at specific intervals.
Time Lapse Video is captured without audio.

Slow Motion Video Mode
In Slow Motion video mode, press OK button, the camera records slow motion video.
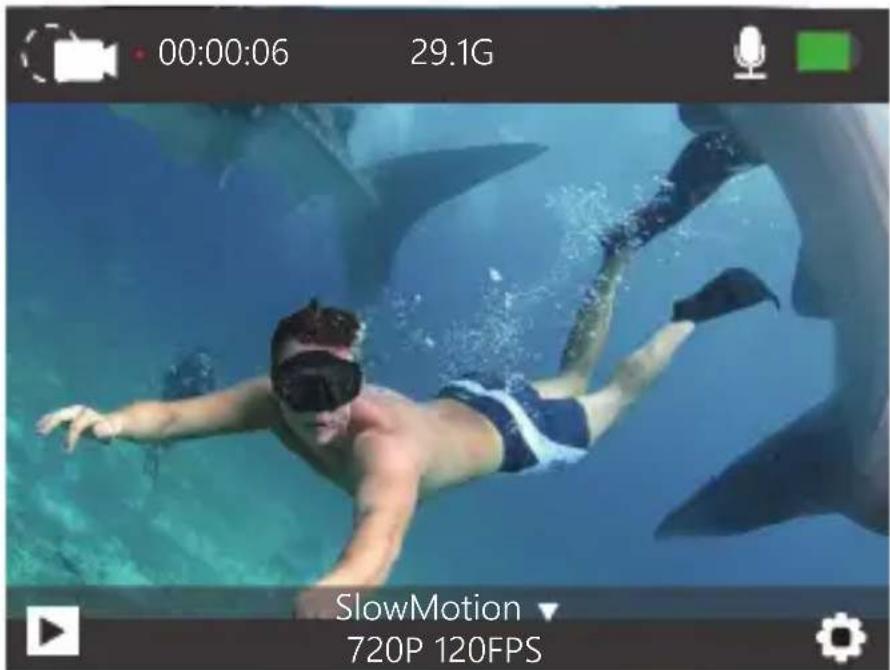
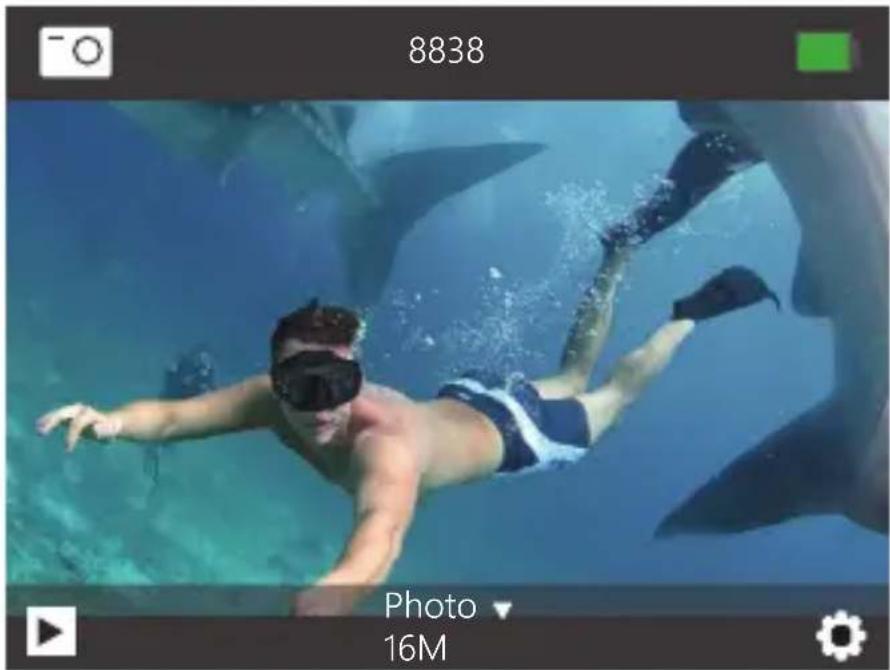
Photo Mode
Press Mode button once to switch to Photo Mode after you turn on camera.
In Photo mode, press OK button, the camera takes a photo.
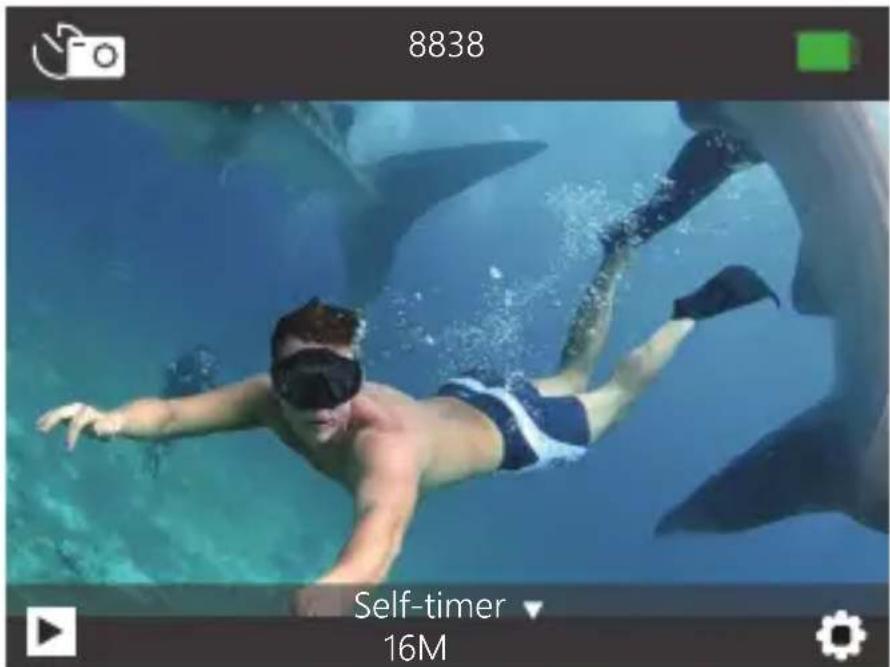
Self-timer Mode
In Self-timer mode, press OK button, it takes a self-timer photo.
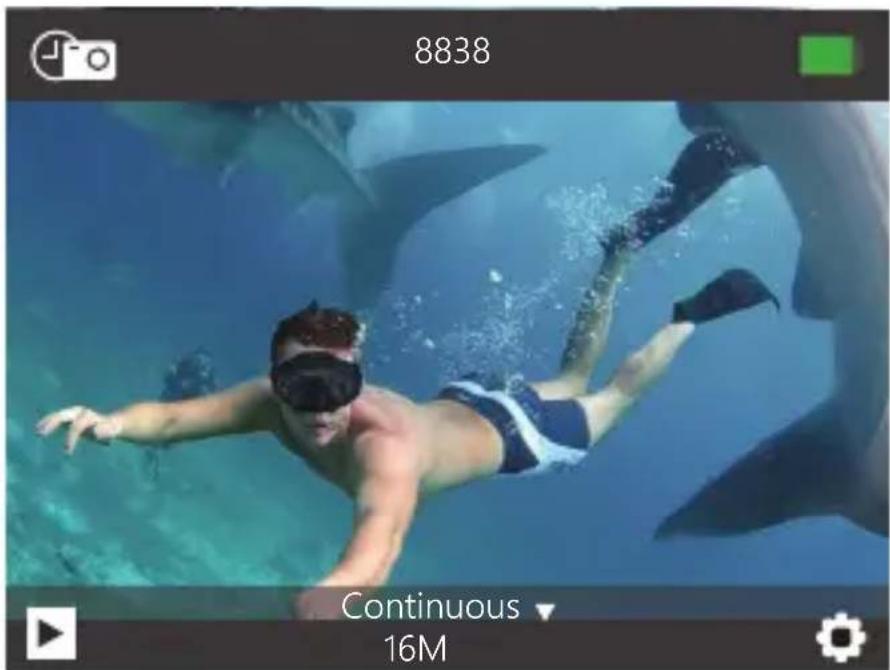
Continuous Lapse Mode
In Continuous Lapse mode, press OK button, this camera takes continuous lapse photo.
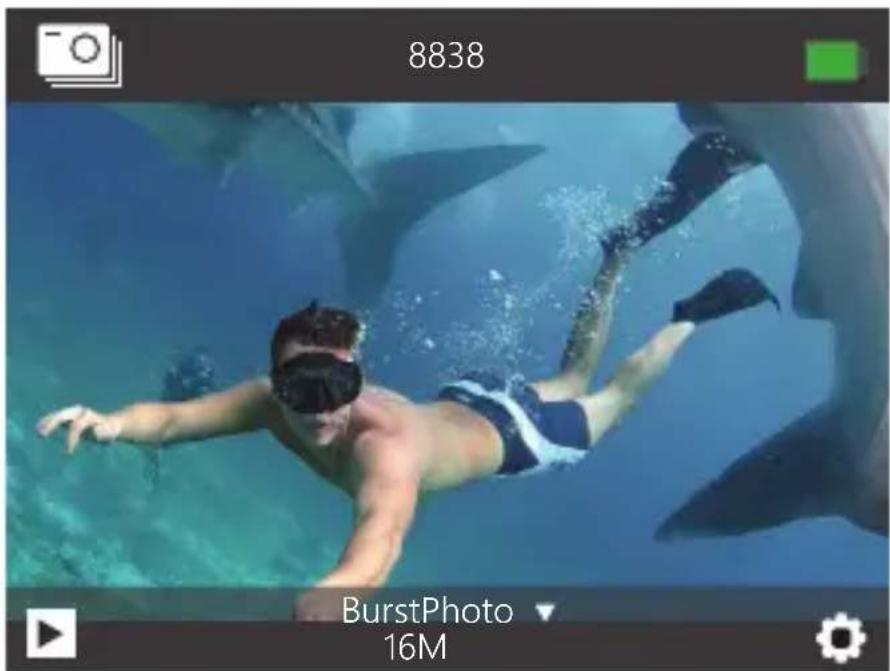
Burst Photo Mode
In Burst Photo mode, press Shutter button, the camera takes 3 photos per second.
CUSTOMIZING YOUR VISION 3 PRO
Press Mode button three times to enter Settings.
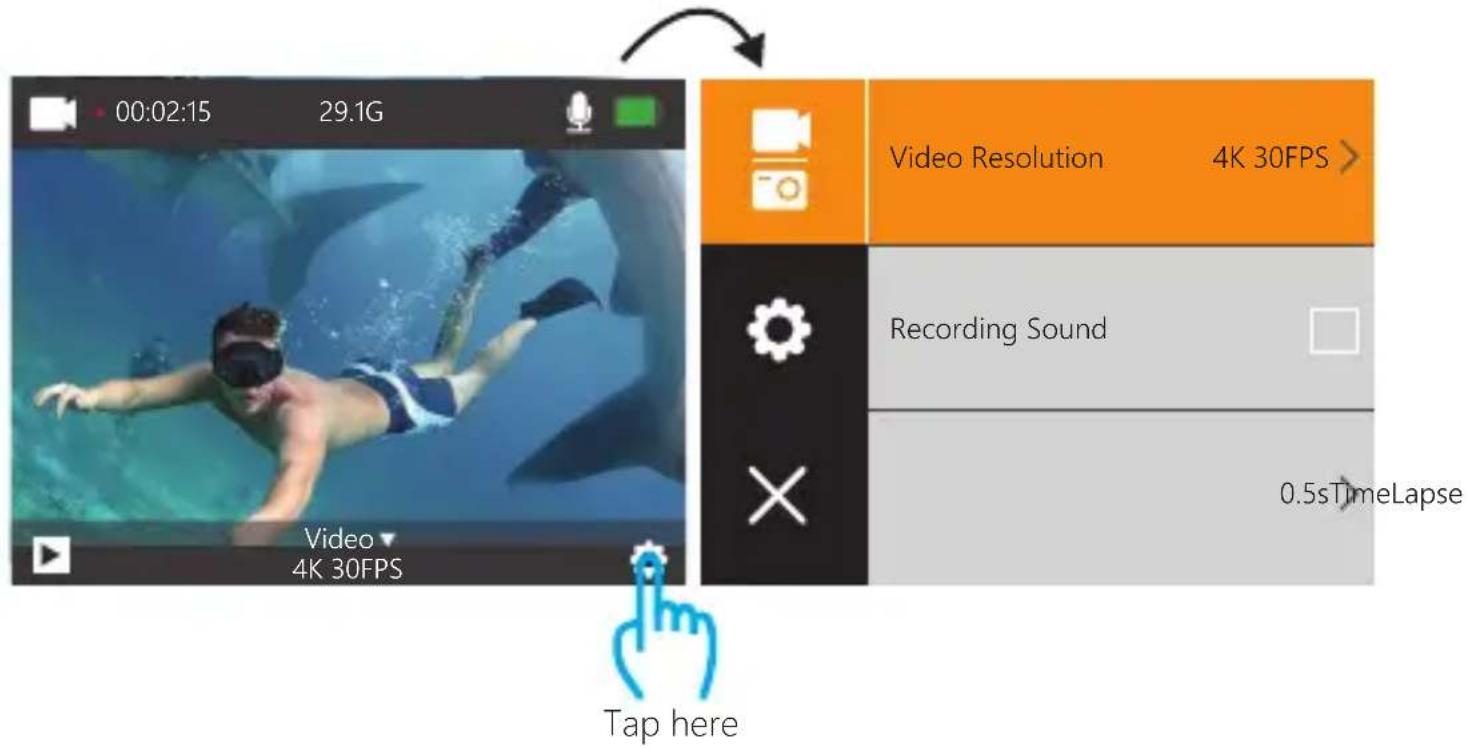
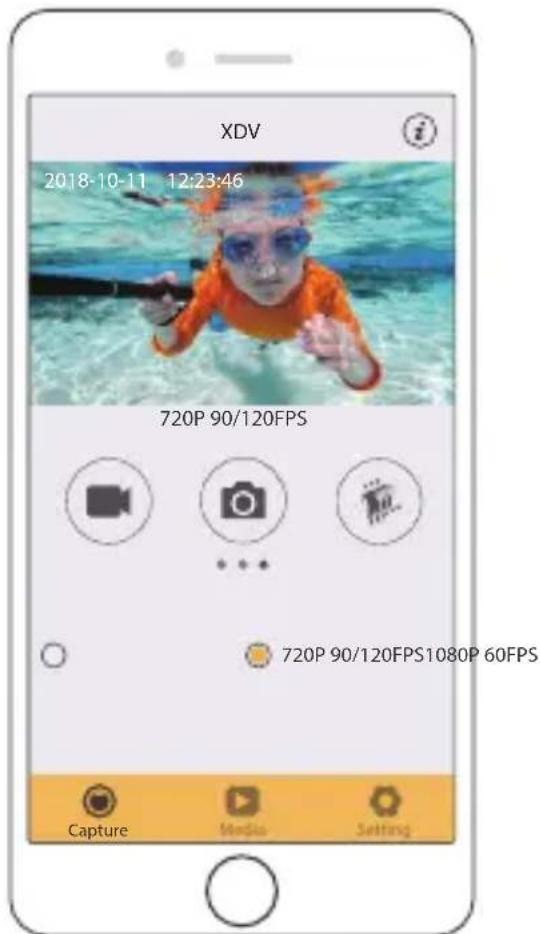
Video & Photo Setting
- Video Resolution: 4K 30FPS, 2.7K 30FPS, 1080P 60FPS, 1080P 30FPS, 720P 120FPS, 720P 60FPS, 720P 30FPS
Default setting is 4K 30FPS.
- Recording Sound: On / Off
Default setting is On.
Turn off Recording Sound, the camera does not record sound when you record video.
- Time Lapse Video: Off, 0.5s, 1s, 2s, 5s, 10s, 30s, 60s
Default setting is Off.
Time Lapse Video creates video from frames captured at specific intervals. This option lets you capture a time lapse event and immediately view or share it as a video. Time Lapse Video is captured without audio.
- Loop Recording: Off, 2 minutes, 3 minutes, 5 minutes Default setting is Off.
The files will be saved every 3 MIN if you choose the 3 MIN option. When the memory card is full, the new files will cover the old one if loop recording is on. If it is off, the camera will not record anymore when the card is full. You will then need to format the memory card or change to a new memory card.
5. Slow Motion Video: 1080P 60FPS, 720P 120FPS
Default setting is 720P 120FPS.
Slow motion is an effect in film-making whereby time appears to be slowed down.
Note: Slow motion video is captured without audio.
6. Image Stabilization: On / Off
This setting adjusts the footage to offset for motion during capture.
7. Photo Resolution: 20MP, 16MP, 14MP, 12MP, 8MP, 5MP
Default setting is 20M.
8. Self-timer: Off, 3S, 5S, 10S, 20S
Default setting is Off.
Timed gives a delay between pressing the OK release and the OK's firing. It is most commonly used to let photographers to take a photo of themselves (often with family).
9. Continuous Lapse: Off, 3S, 10S, 15S, 20S, 30S
Default setting is Off.
Turn on Continuous Lapse, this camera takes continuous lapse photo.
10. Burst Photo: Off, 3P/S, 5P/S, 10P/S
Default setting is Off.
Burst Photo captures up to 10 photos in 1 second, so it is perfect for capturing fast-moving activities.
General Setting
1. Exposure: -3, -2, -1, 0, 1, 2, 3
Default setting is 0.
By default, your camera uses the entire image to determine the appropriate exposure level.
However, Exposure lets you select an area that you want the camera to prioritize when
determining exposure. This setting is particularly useful in shots where an important region might otherwise be over- or underexposed.
When you change this setting, the LCD display immediately shows you the effect on your image. If you change modes, the camera returns to using the entire scene to determine the correct level of exposure.
2. Housing Mode: OFF/ON
Default setting is OFF.
In video mode, press and hold the shutter button for 3s to switch camera node when the camera is in the waterproof case.
3. White Balance: Auto, Sunny, Cloudy, Incandescent Light, Fluorescent Light
Default setting is Auto.
White Balance lets you adjust the color temperature of videos and photos to optimize for cool or warm lighting conditions. When you change this setting, the LCD display immediately shows you the effect on your image.
4. Angle: 170^ , 140^ , 110^ , 70^
Default setting is 170^ .
5. Diving Mode: Off / On
Default setting is off.
Turn on Diving Mode, it can compensate for the lack of red light in underwater scenes.
Diving Mode is designed to be used in tropical and blue water, optimized for use between 10 and 80 feet.
6. Image Rotation: Off / On
Default setting is Off.
This setting determines the orientation of your video or photos to help you prevent upside down footage.
7. Driving Mode: Off/ On
Default setting is Off.
If you turn on driving mode and connect camera with car cigarette lighter, the camera will turn on automatically if you start your car and will turn off if you stop your car.
-
Frequency: Auto, 50Hz, 60Hz Default setting is Auto.
-
LED Indicator Light: Off / On Default setting is On.
-
Screen Saver: Off, 10s, 20s, 30s, Close Default setting is 30s.
Turns off the LCD display after a period of inactivity to save battery life. To turn on the LCD display again, press any button on the camera.
- Power Save: Off, 1 minute, 3 minutes, 5 minutes Default setting is 3 minutes.
Powers off your Vision 3 pro after a period of inactivity to save battery life.
- Date Stamp: Off / On Default setting is On.
If you turn on Date Stamp, this camera adds date stamp to the video and photos you take.
-
Sound: Off / On Turn on of off the key sound.
-
Language: 簡体中文, 繁體中文, English, 日本語, Deutsch, Français, Italiano, Español Default setting is English.
-
Date-Time: MM-DD-YYYY HH-MM-SS
-
Format: Format Card? Confirm / Cancel To keep your memory card in good condition, reformat it on a regular basis. Reformatting erases all of your content, so be sure to offload your photos and videos first.
-
Reset to Factory: Confirm Reset to Factory? Confirm / Cancel This option resets all settings to their default values.
-
Firmware Version
Model: Vision 3 Pro
Manufacturer: DragonTouch
You can check the model, version, updated time and manufacturer of your Vision 3 Pro.
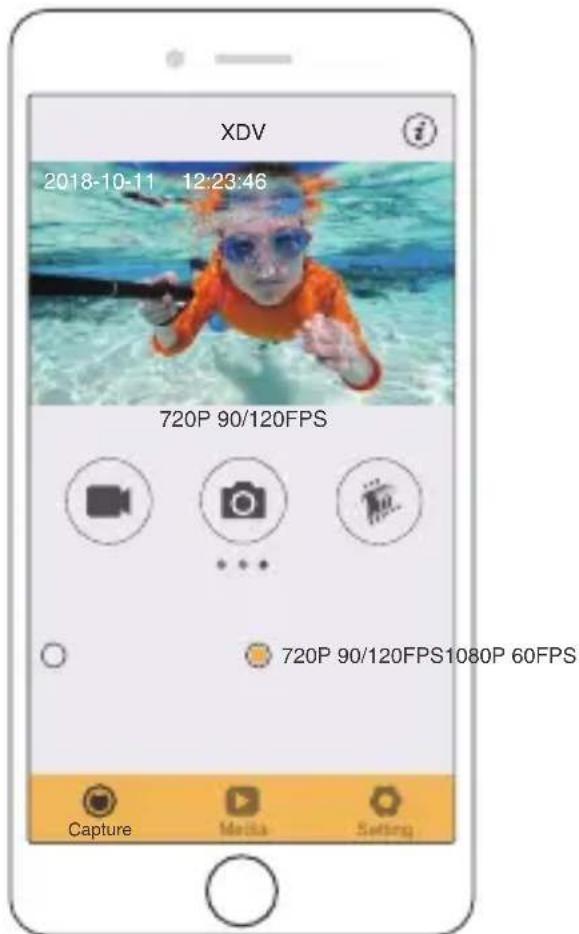
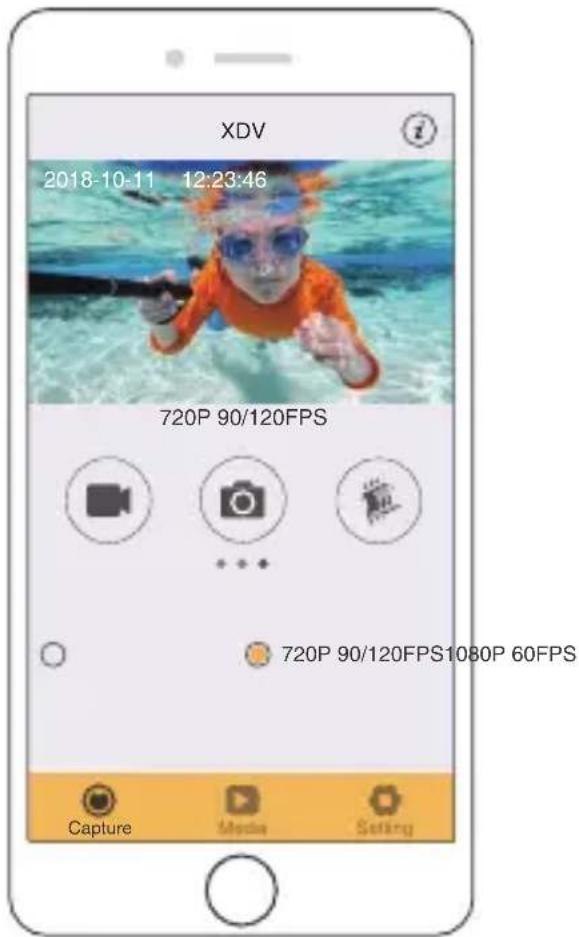
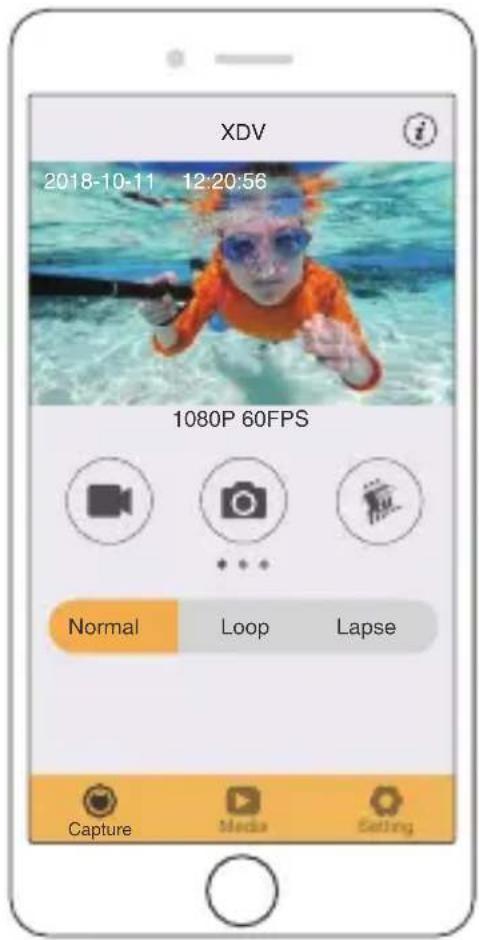
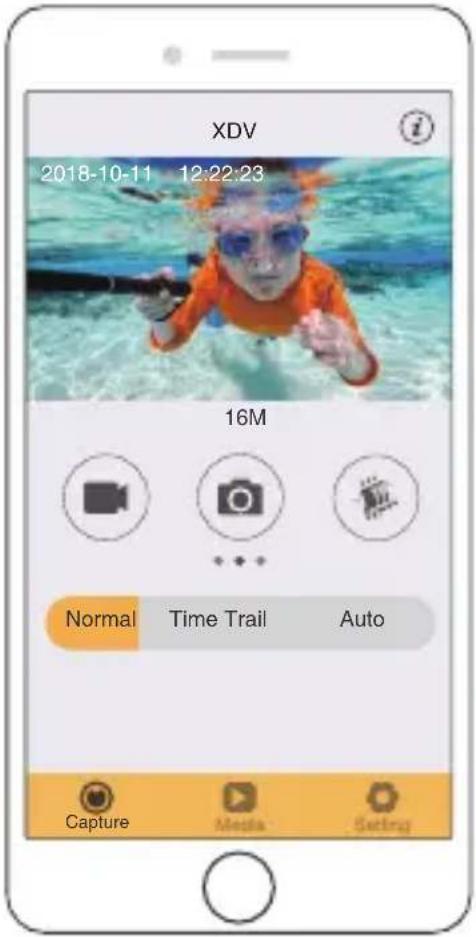
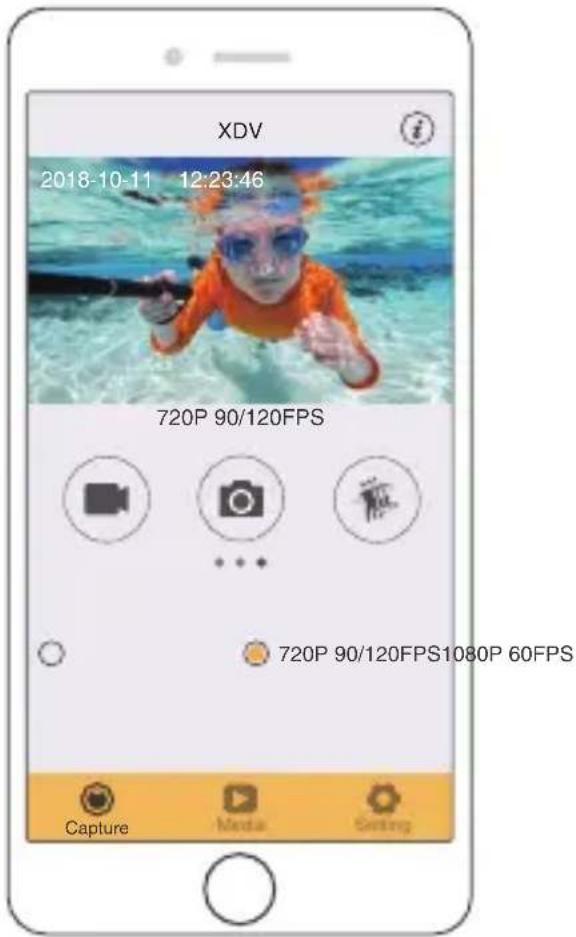
CONNECTING TO THE XDV APP
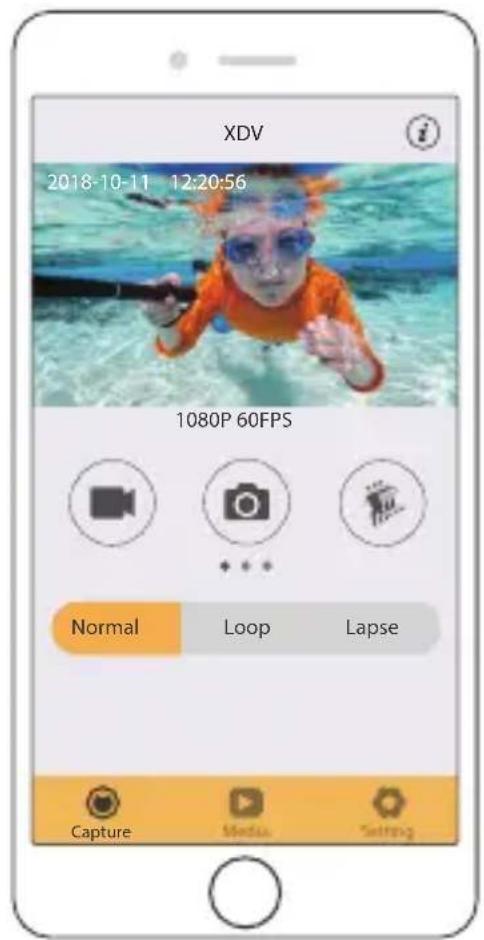
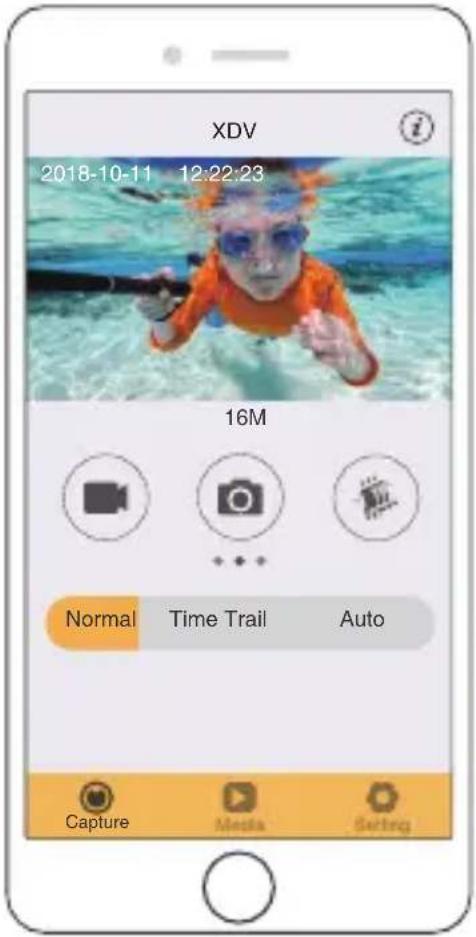
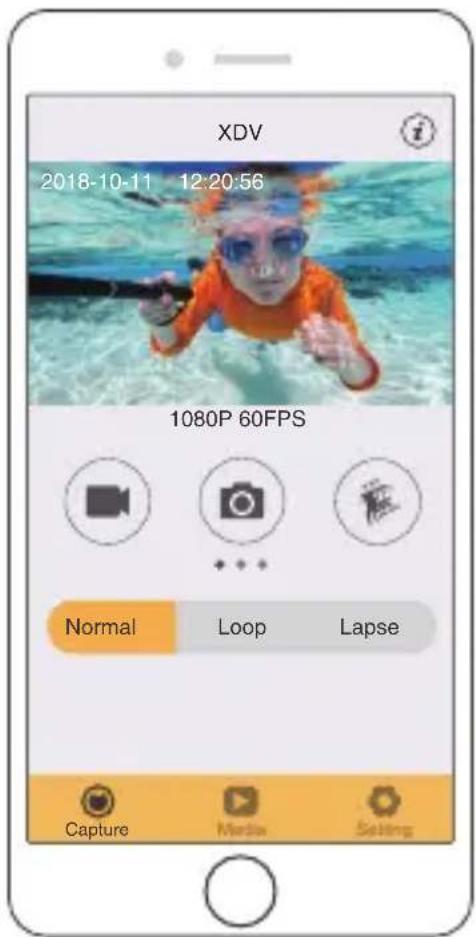
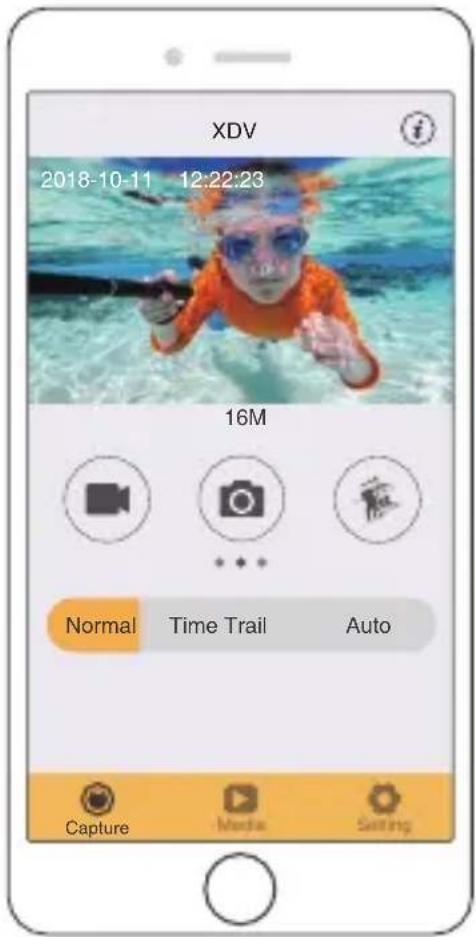
The XDV app lets you control your camera remotely using a smartphone or tablet.
Features include full camera control, live preview, playback, download, sharing of content and setting camera.
- Download XDV app from Google Play or Apple Store.
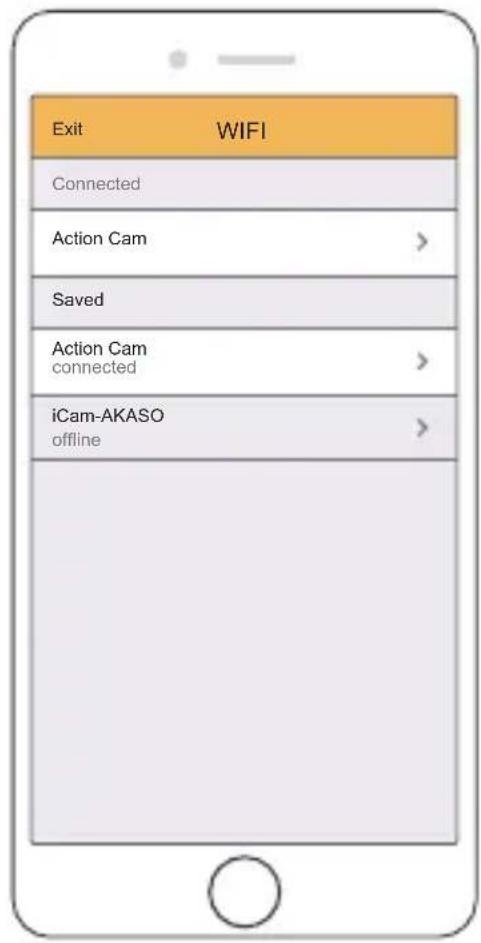
- Turn on camera. Press the UP Button to turn on Wifi in video mode or phone mode.
- Turn on Wifi of your mobile device, connect to the Wifi SSID "Vision 3 Pro".
- Enter the password "1234567890".
- Open the XDV App on your phone or tablet.
Note: This camera does not support iPad tablet.
- Download XDV app from Google Play or Apple Store.
- Turn on camera. Swipe down it from the top of the screen, then Shortcut menu of Wifi will occur.
- Turn on Wifi of your mobile device, connect to the Wifi SSID "Vision 3 Pro".
- Enter the password "1234567890".
- Open the XDV App on your phone or tablet.
Note: This camera does not support iPad tablet.
You can play back your content on the camera's LCD display, your computer, TV, or smartphone / tablet.
You can also play back content by inserting the memory card directly into a device, such as a computer or compatible TV. With this method, playback resolution depends on the resolution of the device and its ability to play back that resolution.
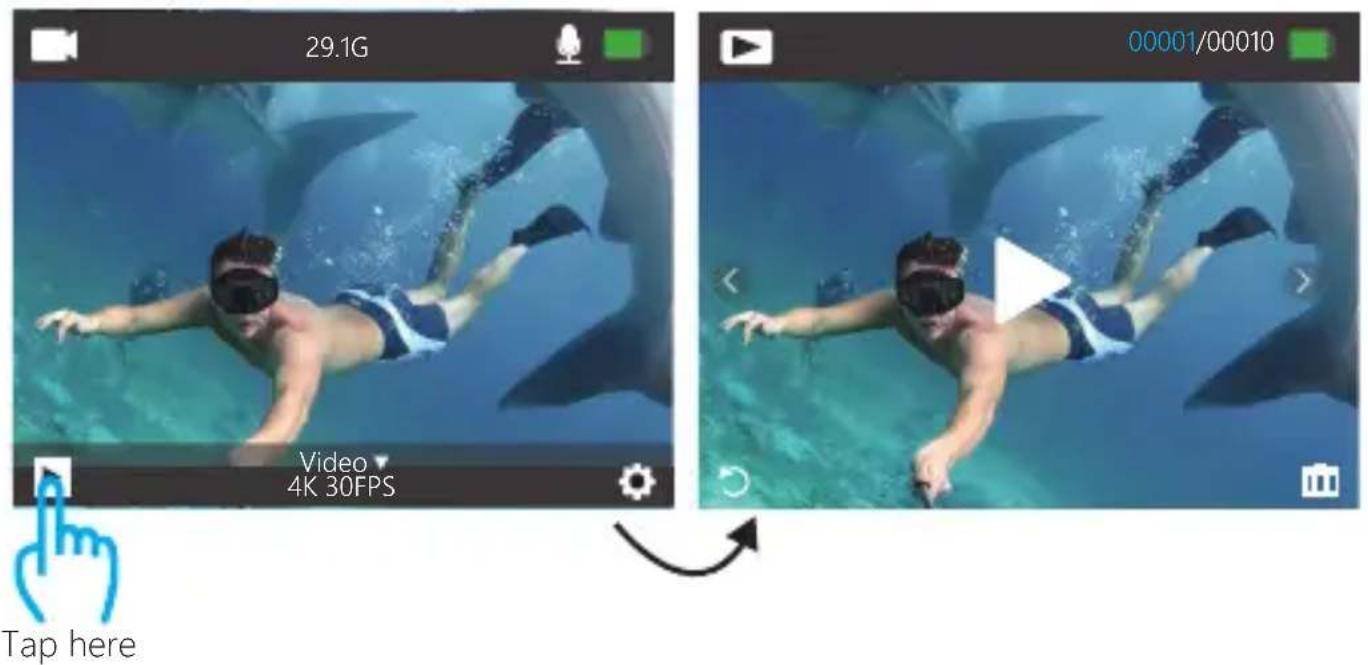
VIEWING VIDEOS AND PHOTOS ON YOUR Vision 3 Pro
- Turn on camera. Press Mode button twice to enter Playback mode. You can also tap the file icon to enter playback mode. If your memory card contains a lot of content, it might take a minute for it to load.
- Press the Up / Down button to scroll through the video or photo files. You can also tap Forward or Backward icon to playback video or photo files.
Note: This camera does not support MAC computer or iPad tablet.
DELETING VIDEOS AND PHOTOS ON YOUR VISION 3 PRO
- Turn on camera. Press Mode button twice to enter Playback mode.
- Press Up / Down button to scroll through the video or photo files.
- Press and hold OK button for three seconds. The screen shows 'Delete this file? Confirm / Cancel'.
- Press Up button then OK button. The selected file will be deleted.
-
To exit Playback mode, press Mode button.
-
Turn on camera. Press Mode button twice to enter Playback mode.
- Tap file icon ▶ at the left corner of the screen to enter playback mode.
- Tap Forward or Backward icon to locate the video or photo file you want to delete.
- Tap 📄 . The screen shows 'Delete this file? Confirm / Cancel'.'
- Tap 'Confirm', the selected file will be deleted.
- To exit playback mode, tap return icon 📋.
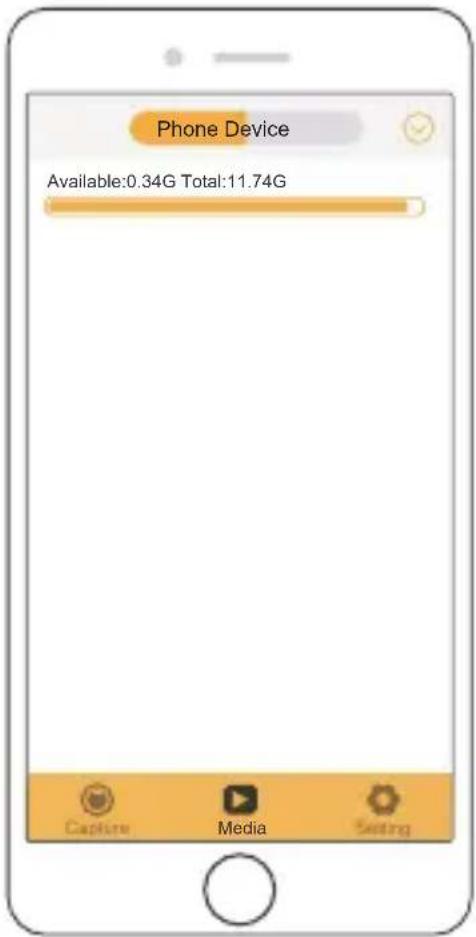
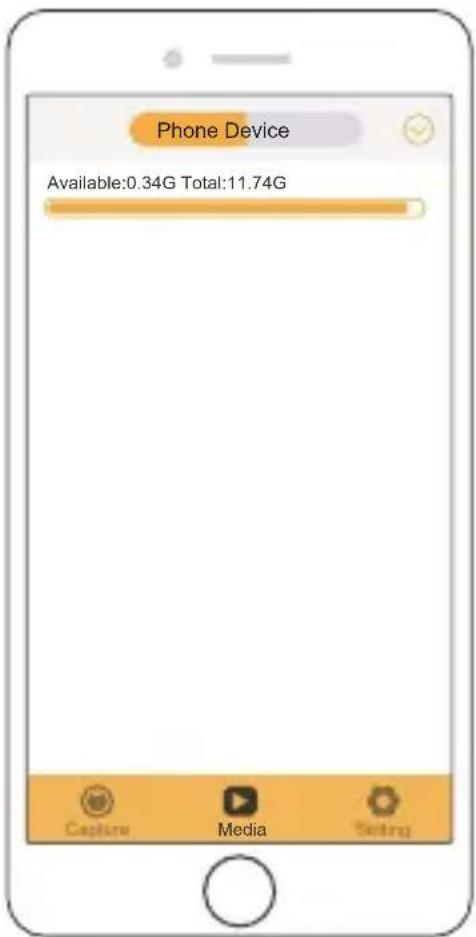
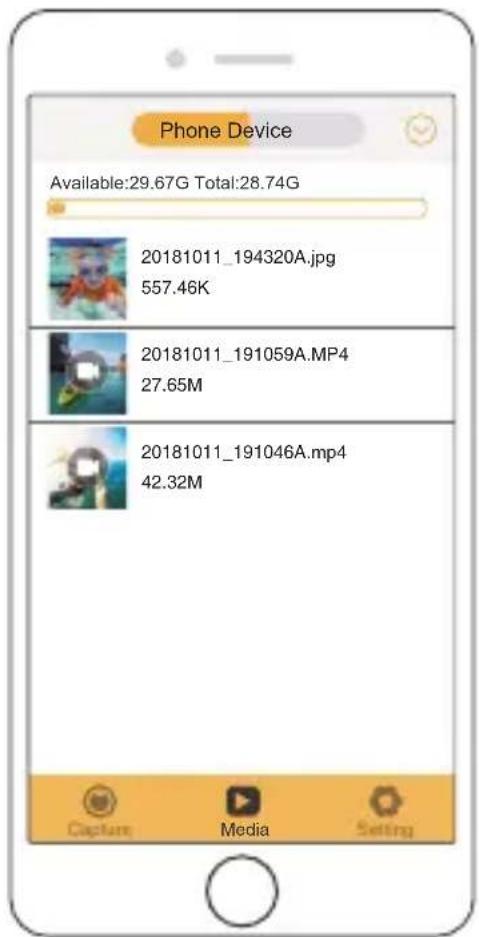
OFFLOADING YOUR CONTENT
OFFLOADING YOUR CONTENT TO A COMPUTER
To play back your video and photos on a computer, you must first transfer these files to a computer. Transferring also frees up space on your memory card for new content.
To offload files to a computer using a card reader (sold separately) and your computer's file explorer, connect the card reader to the computer, then insert the memory card.
You can then transfer files to your computer or delete selected files on your card. You can also offload files to a Windows computer using a USB cable.
Note: This camera does not support Mac computer.
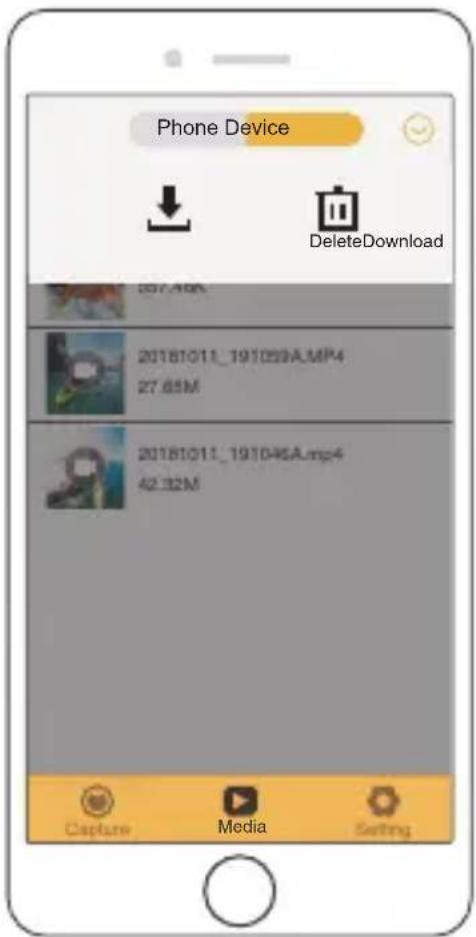
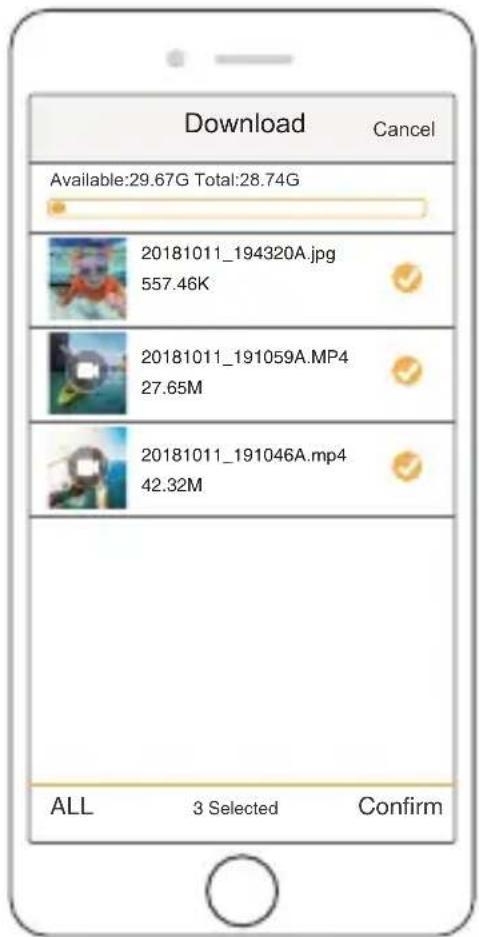
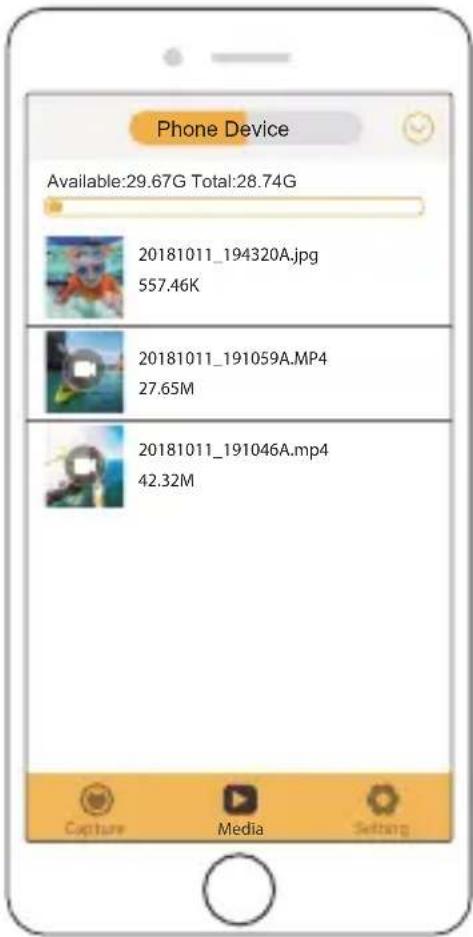
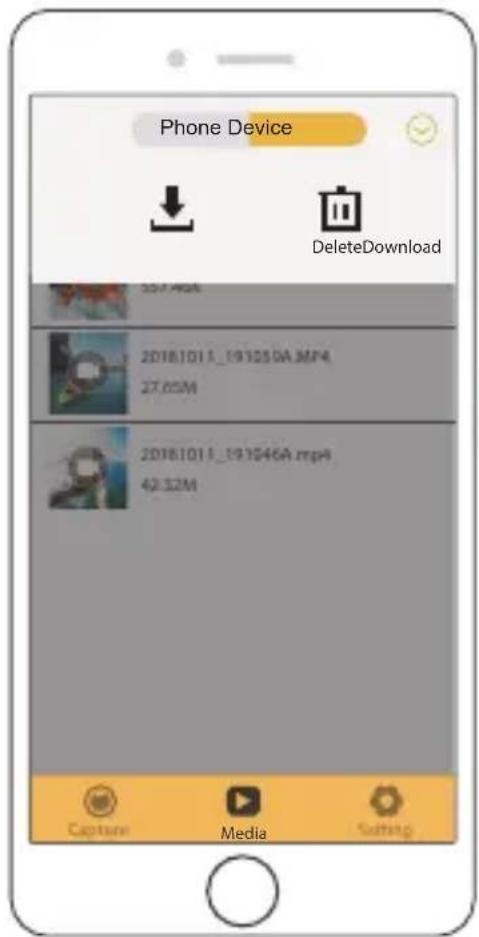
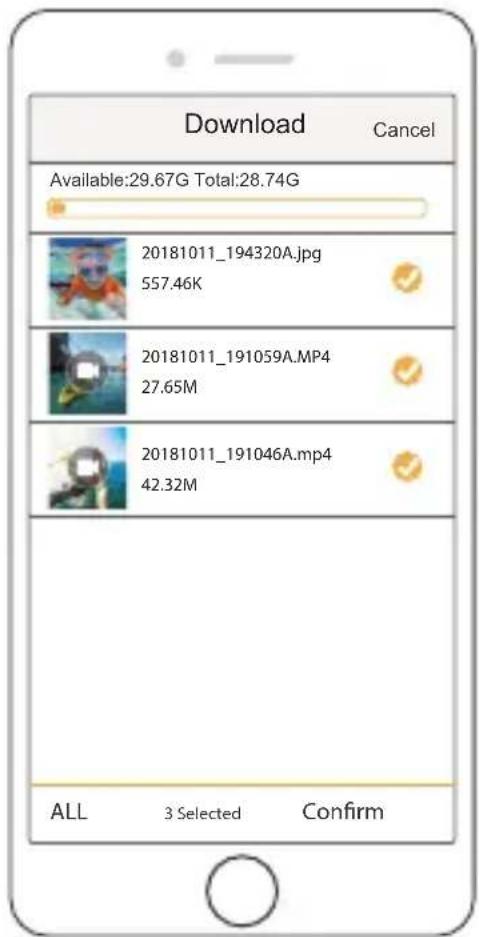
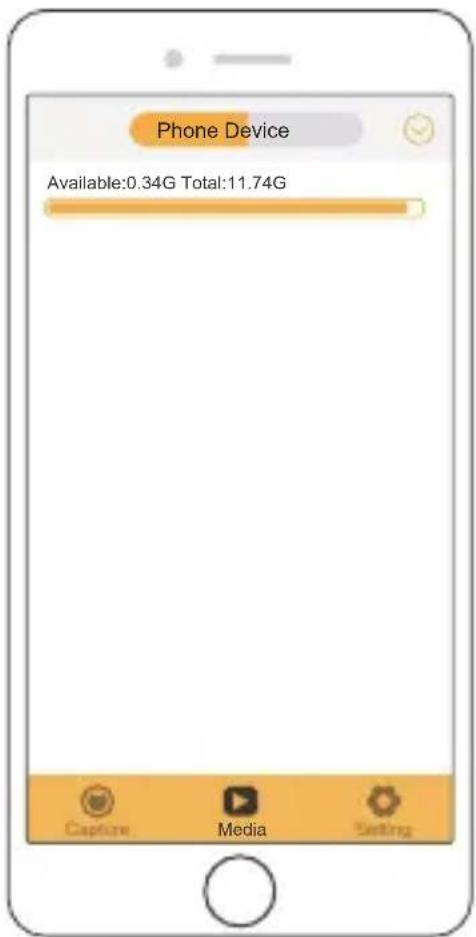
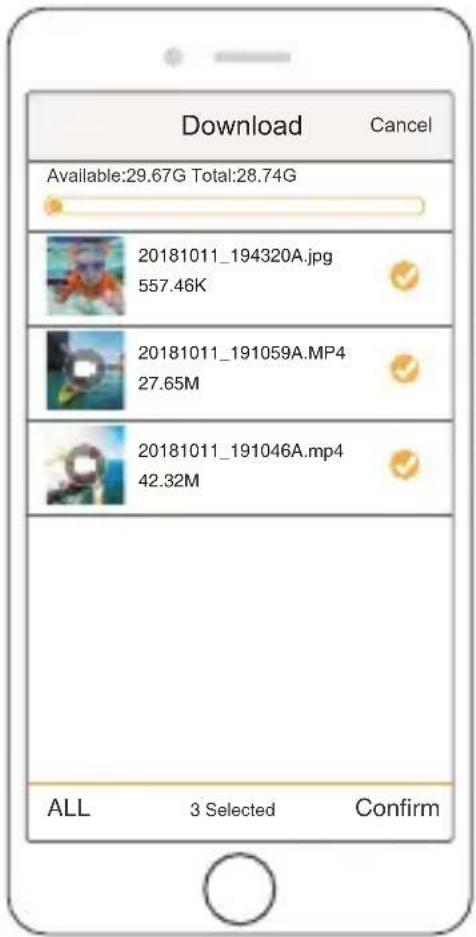
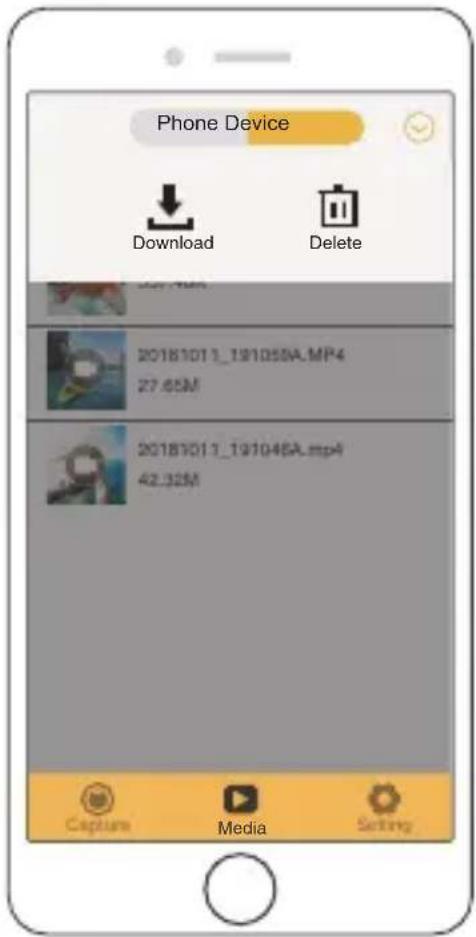
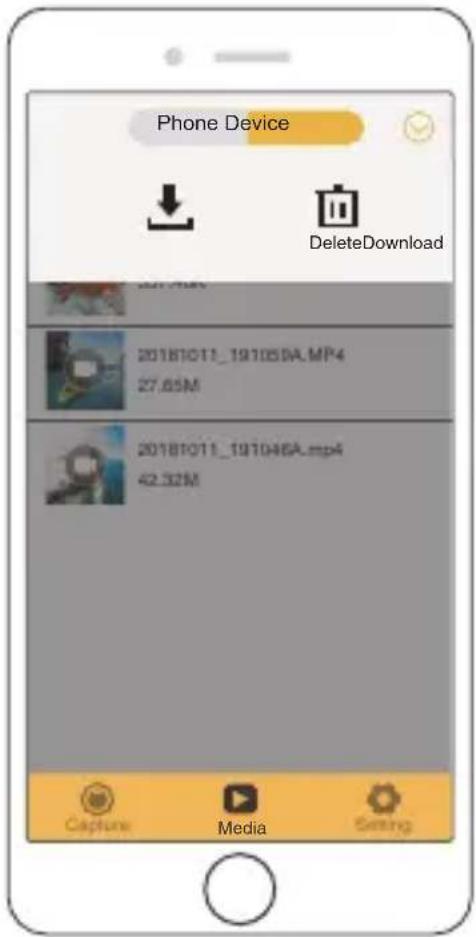
OFFLOADING YOUR CONTENT TO SMARTPHONE OR TABLET
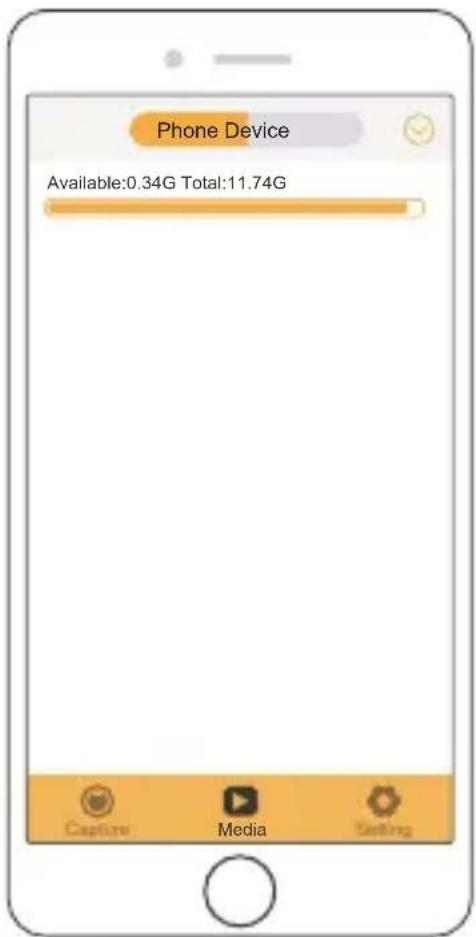
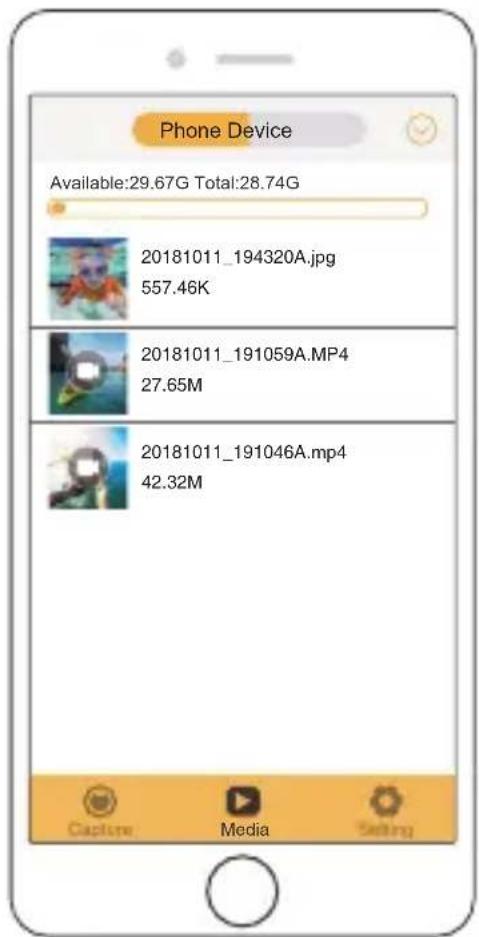
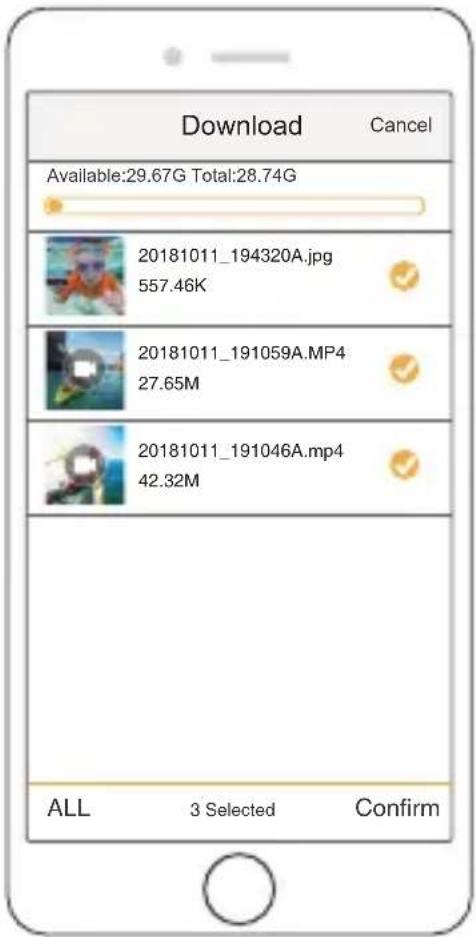
- Open the 'XDV' app and tap 'Vision 3 Pro'.
- Tap Media icon ▶ at the bottom of screen.
- Tap 'Device' at the top of the screen.
- Tap ☺ then tap ↓ to select the files you want to download.
- Tap 'Confirm' at the right corner of the bottom screen.
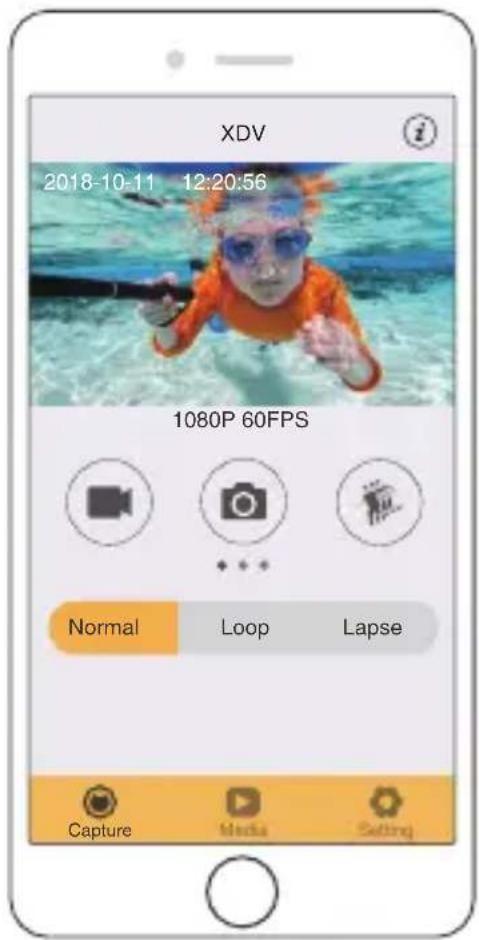


The Zoom function lets you adjust how close or far away the subject appears in your photo. The default is no zoom. Zoom function is available in Video and Photo Mode. Vision 3 Pro has 4X zoom function.
- Turn on Vision 3 Pro.
- Enter Video or Photo Mode.
- Press and hold Up or Down button to adjust the zoom level.
REFORMATTING YOUR MEMORY CARD
To keep your memory card in good condition, reformat it on a regular basis. Reformatting erases all of your content, so be sure to offload your photos and videos first.
- Turn on Vision 3 Pro.
- Enter General Setting.
- Press UP / Down button to find the 'Format' option.
- Press OK button, the screen shows 'Format Card? Confirm / Cancel.'
- Press Up button then OK button, then you format your memory card successfully.
Follow these guidelines to get the best performance from your camera:
-
For best audio performance, shake the camera or blow on the mic to remove debris from the microphone holes.
-
To clean the lens, wipe it with a soft, lint-free cloth. Do not insert foreign objects around the lens.
-
Don't touch the lens with fingers.
-
Keep the camera away from drops and bumps, which may cause damage to the parts inside.
-
Keep the camera away from high temperature and strong sunshine to avoid being damaged.
MAXIMIZING BATTERY LIFE
If the battery reaches 0% while recording, the camera saves the file and powers off.
To maximize battery life, follow these guidelines when possible:
- Turn off Wireless Connections
• Capture video at lower frame rates and resolutions - Use Screen Saver setting.
BATTERY STORAGE AND HANDLING
The camera contains sensitive components, including the battery. Avoid exposing your camera to very cold or very hot temperatures. Low or high temperature conditions may temporarily shorten the battery life or cause the camera to temporarily stop working properly. Avoid dramatic changes in temperature or humidity when using the camera, as condensation may form on or within the camera.
Do not dry the camera or battery with an external heat source such as a microwave oven or hair dryer. Damage to the camera or battery caused by contact with liquid inside the camera is not covered under the warranty.
Do not store your battery with metal objects, such as coins, keys or necklaces. If the battery terminals come in contact with metal objects, this may cause a fire.
Do not make any unauthorized alterations to the camera. Doing so may compromise safety, regulatory compliance, performance, and may void the warranty.
WARNING: Do not drop, disassemble, open, crush, bend, deform, puncture, shred, microwave, incinerate or paint the camera or battery. Do not insert foreign objects into the battery opening on the camera. Do not use the camera or the battery if it has been damaged—for example, if cracked, punctured or harmed by water. Disassembling or puncturing the battery can cause an explosion or fire.
REMOTE
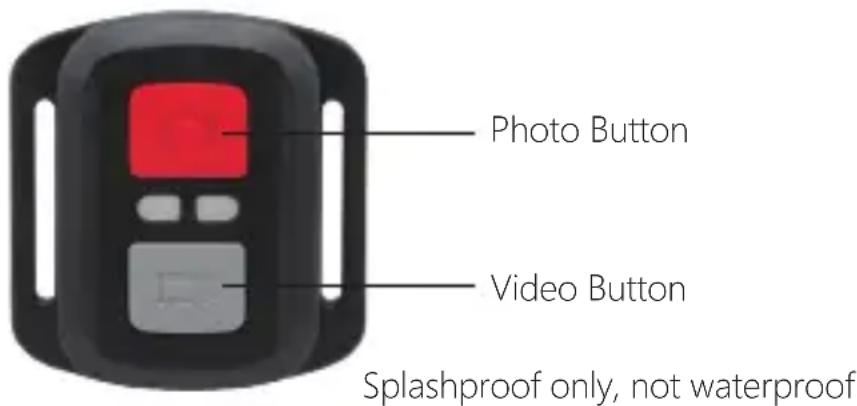
VIDEO
To record Video, verify the camera is in Video mode.
To start recording:
Press the Grey Video Button. The camera will emit one beep and the camera light will flash while recording.
To stop recording:
Press the Grey Video Button again. The camera will emit one beep and the camera light will stop flashing while recording.
PHOTO
To capture a photo, verify the camera is in Photo mode.
To take a photo:
Press the Red Photo Button. The camera will emit a camera shutter sound.
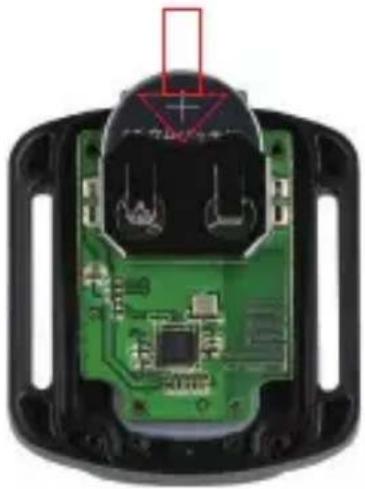
CR2032 BATTERY REPLACEMENT FOR VISION 3 PRO REMOTE
- Use a 1.8mm Phillips tip screwdriver to remove the 4 screws on the back cover of the remote, allowing you to open it.
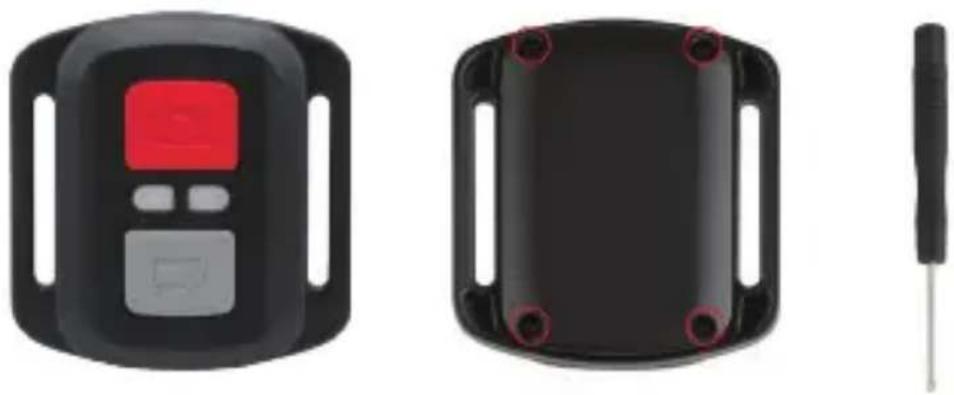
- Remove another 4 screws on PCB board.
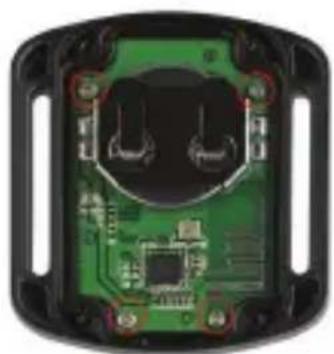
natural_image
Interior view of a green electronic device casing with exposed circuit board and connectors (no text or symbols visible)- Lift the PCB board and slide out the battery, as shown in the picture.
Note: Do NOT rotate the PCB board to avoid reversing the camera and video button functions.
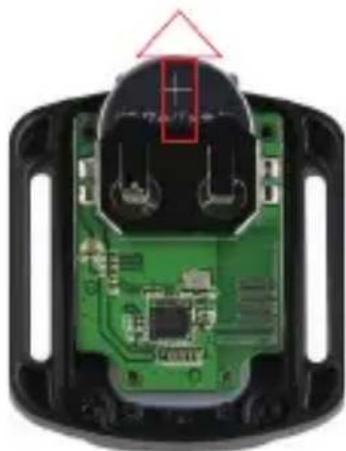
natural_image
Close-up of a green printed circuit board with black plastic components and a red triangular annotation highlighting a component (no readable text or symbols)-
Install the new battery, keeping the "+" pole facing up.
-
Install all 4 screws back onto the PCB board.
natural_image
Interior view of a device showing green circuit board and black plastic casing (no text or symbols visible)- Install all 4 screws back into the cover.
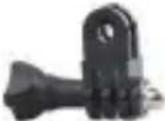
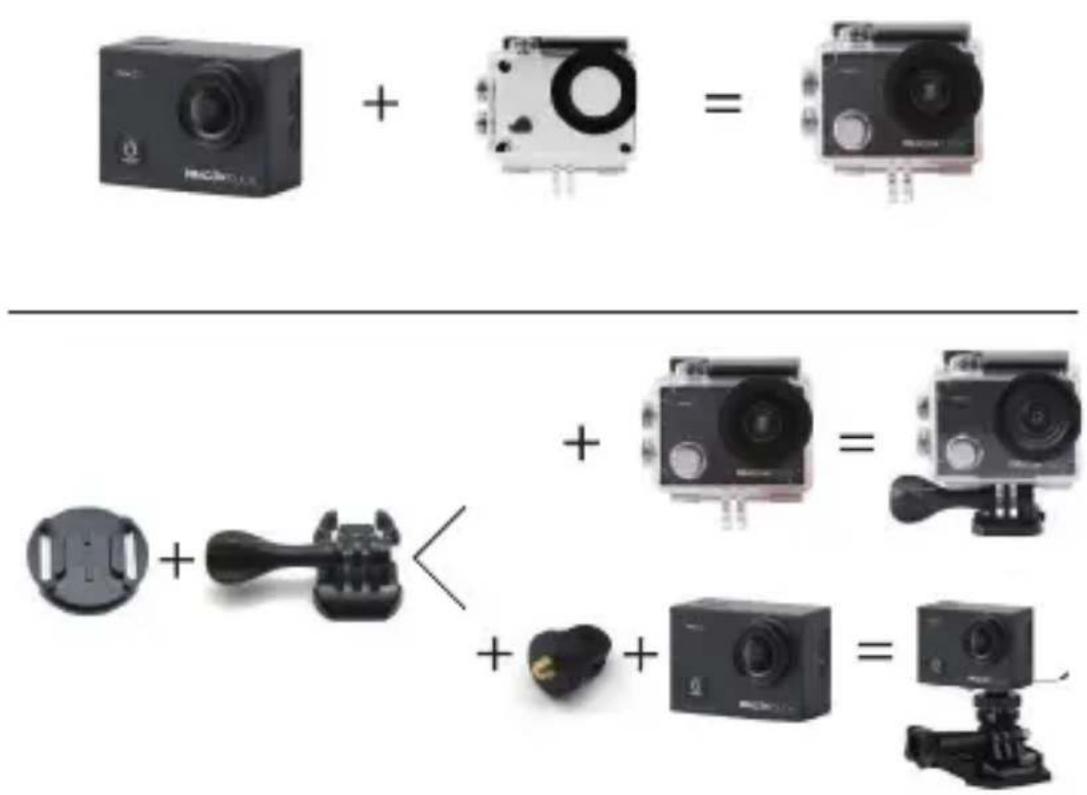
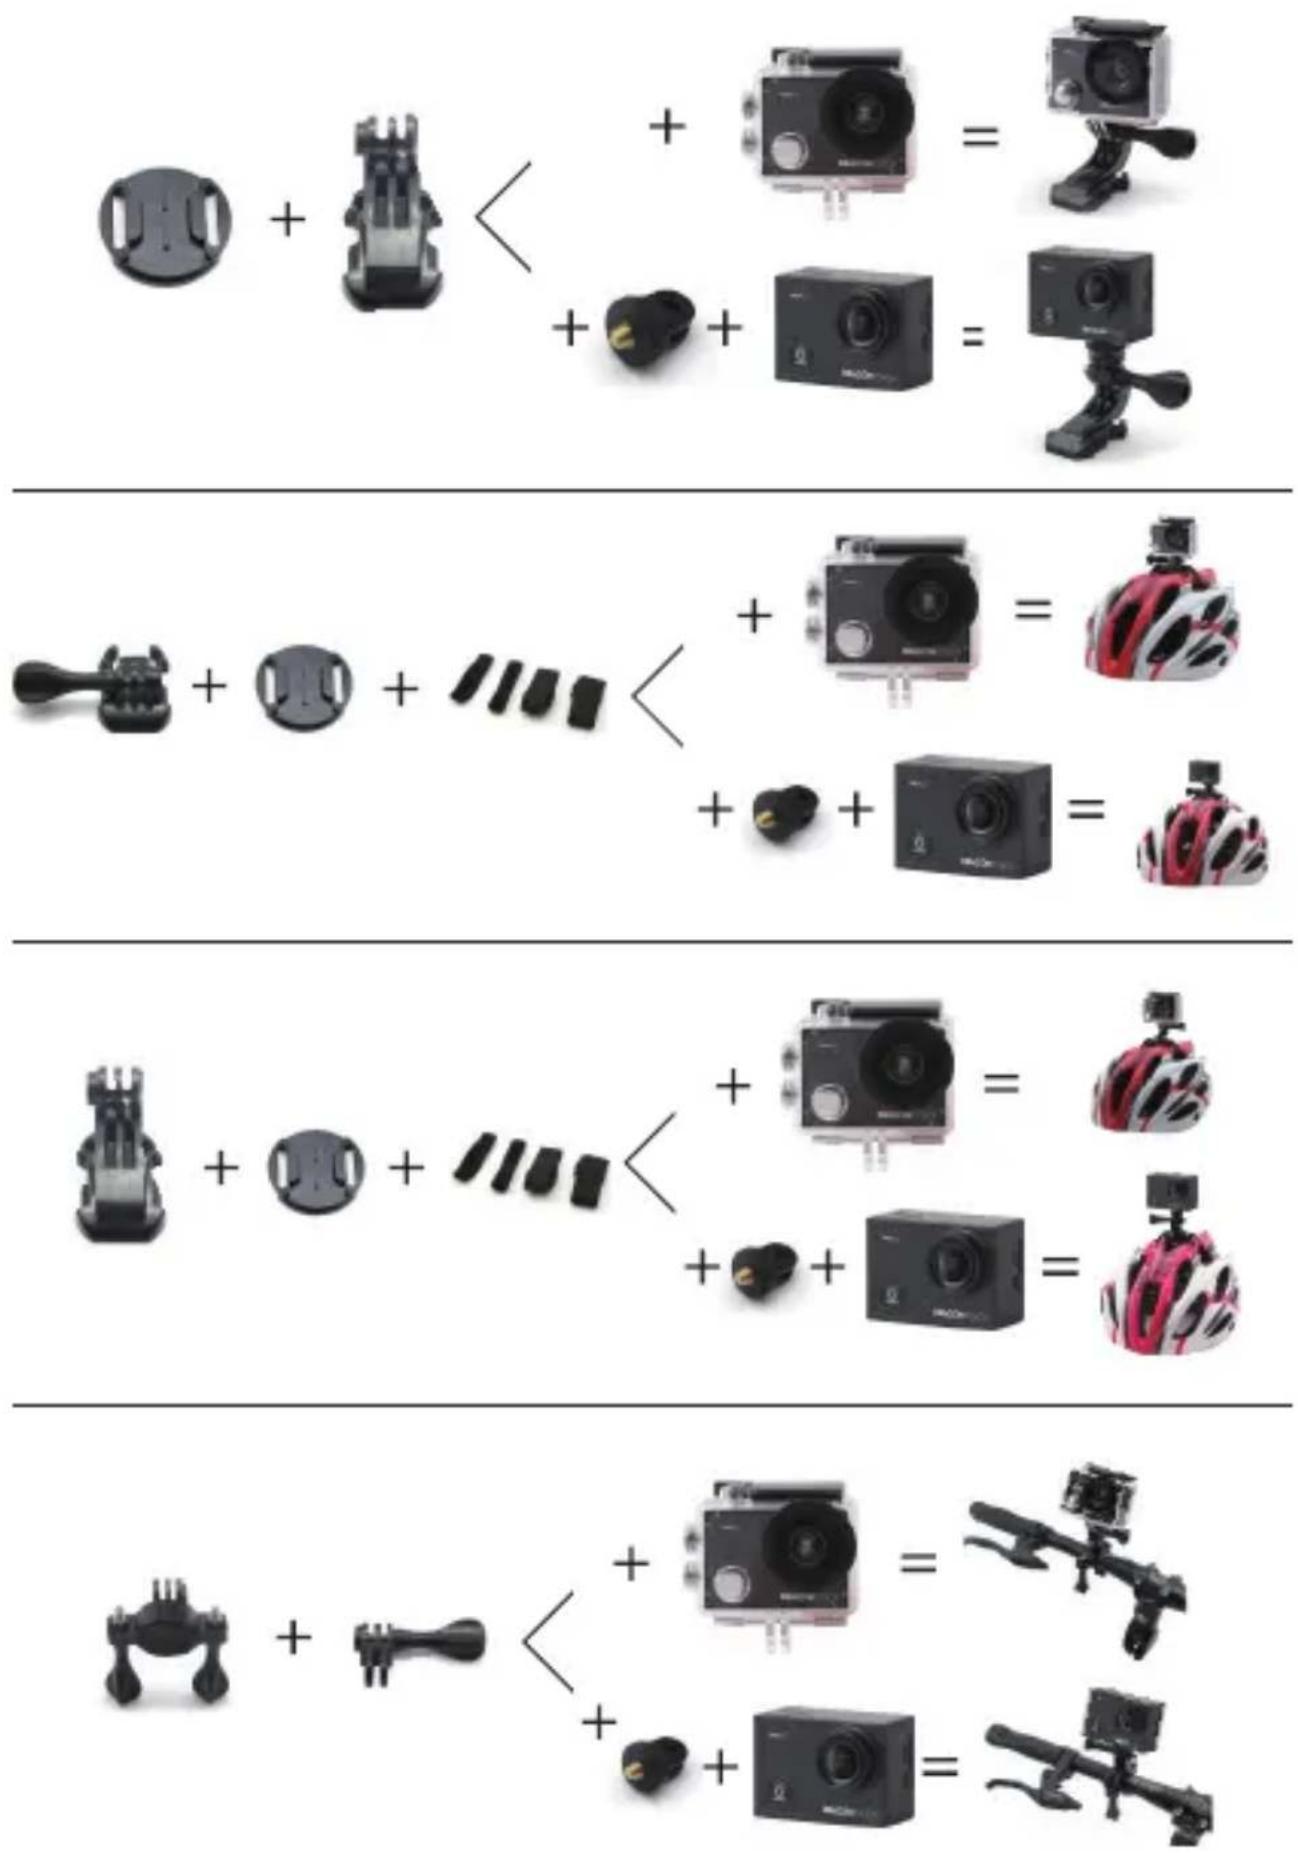
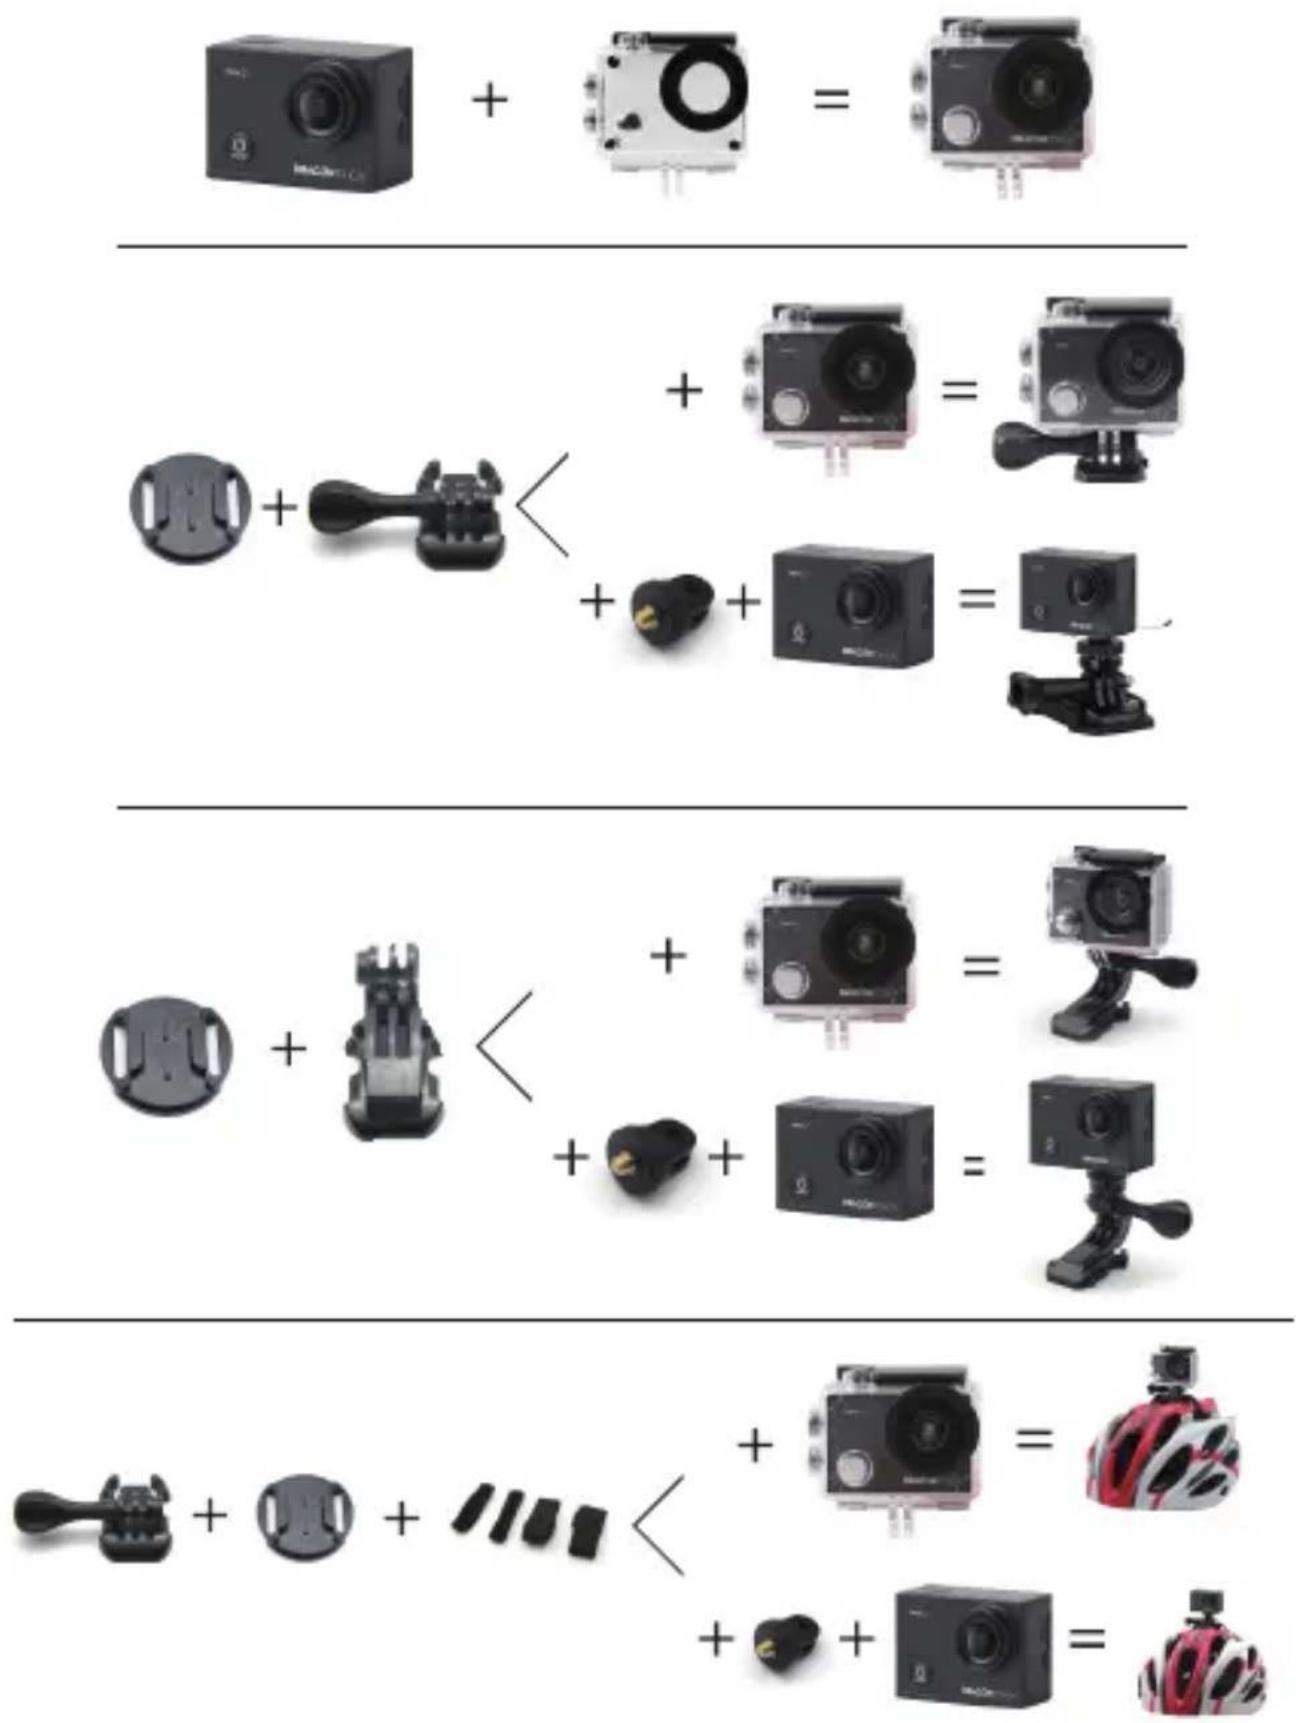
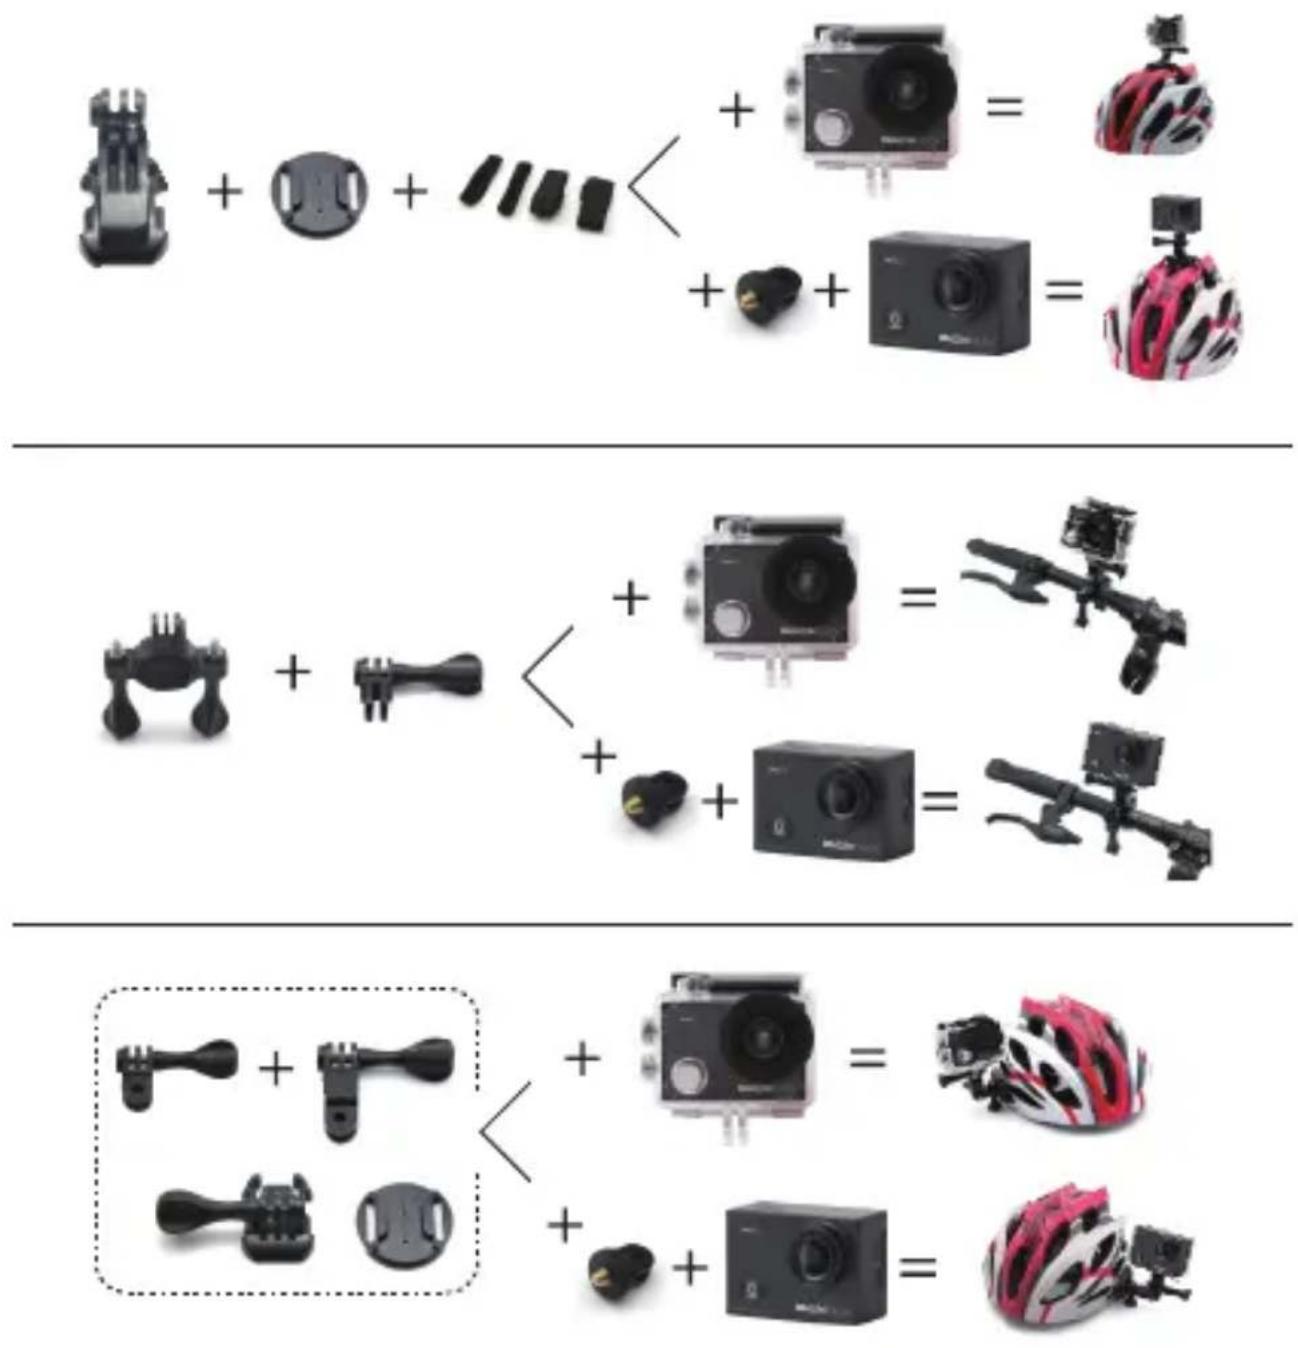
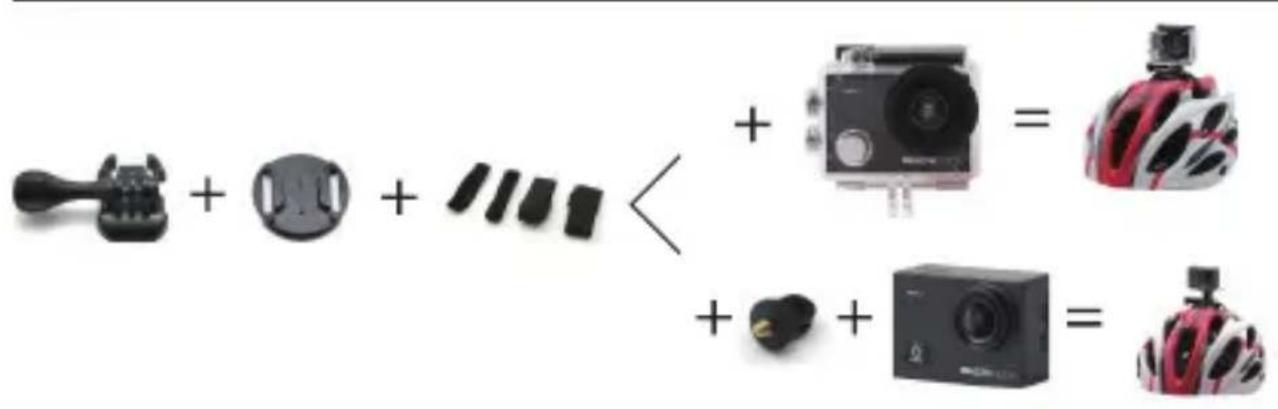
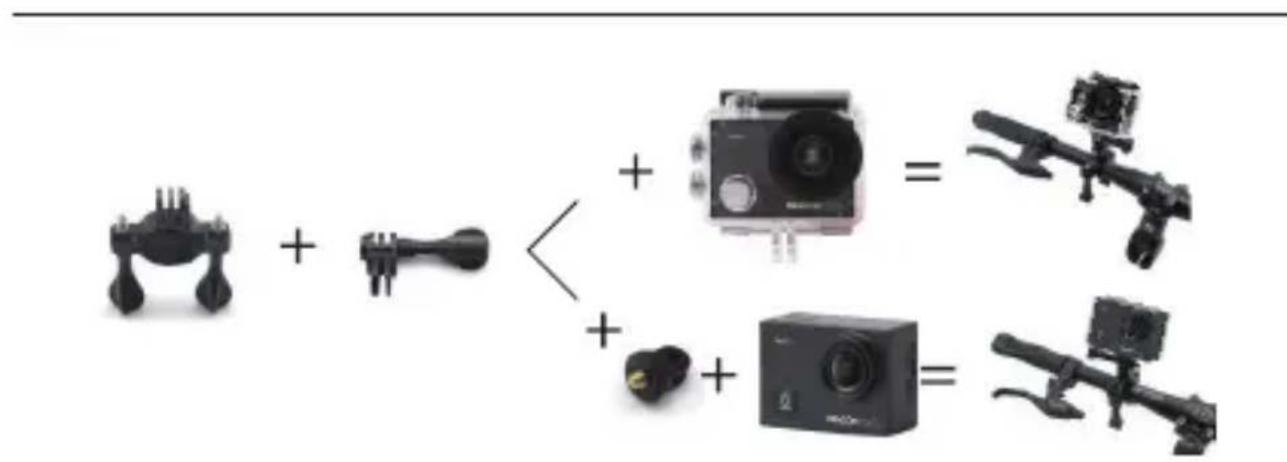
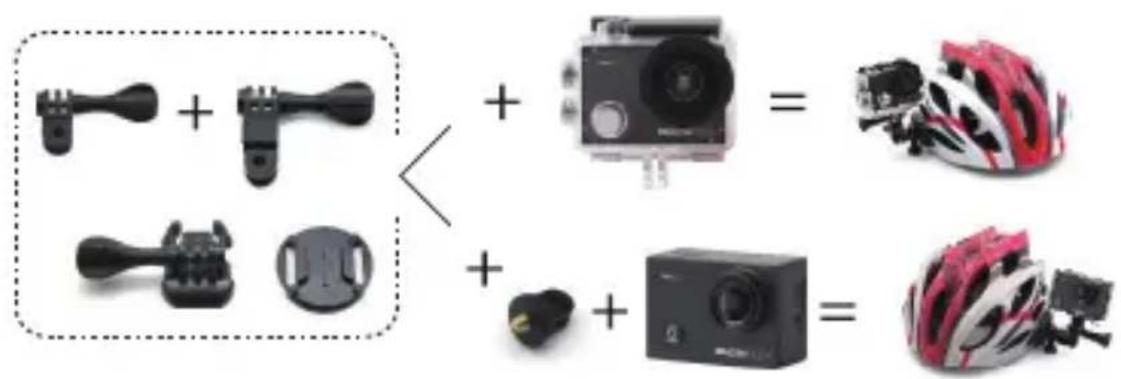
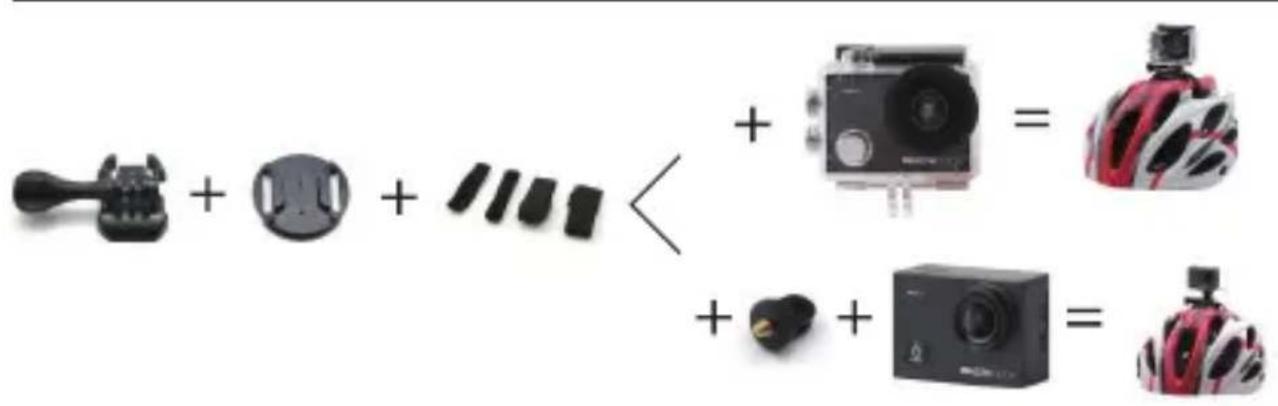
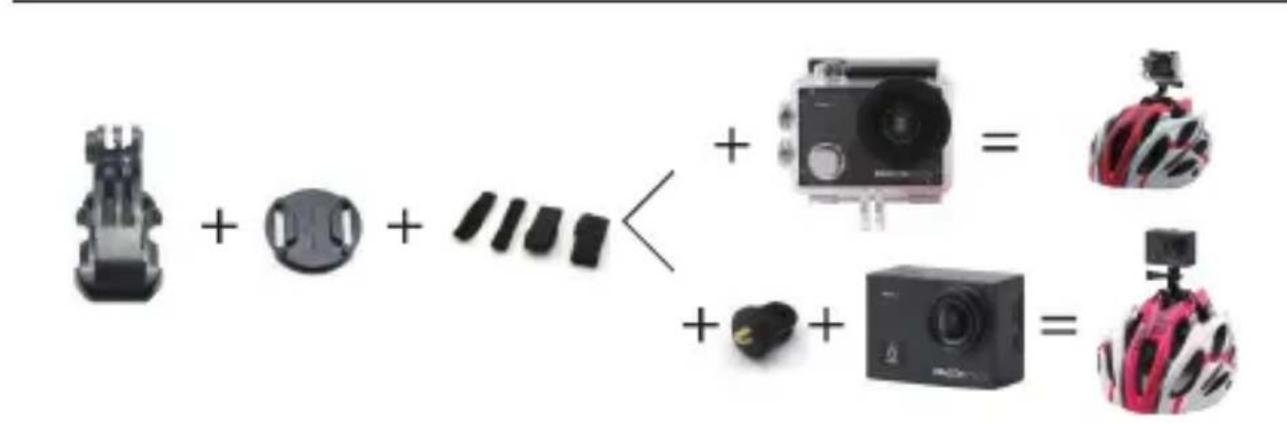
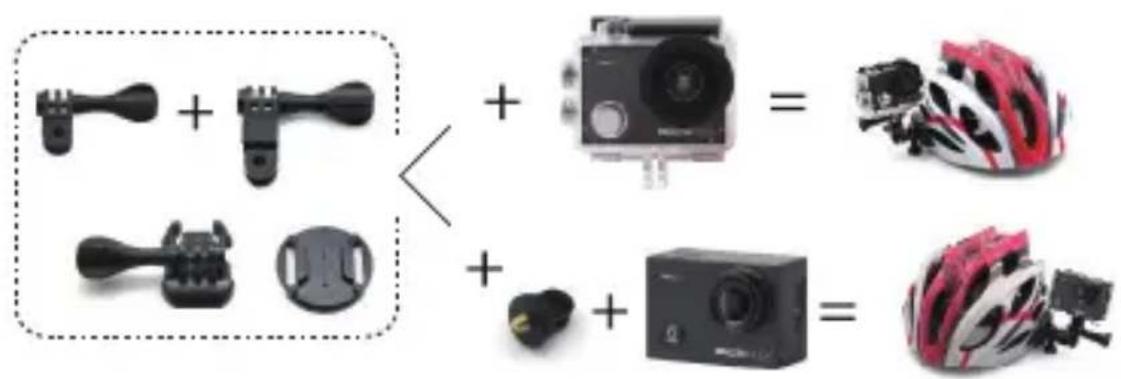
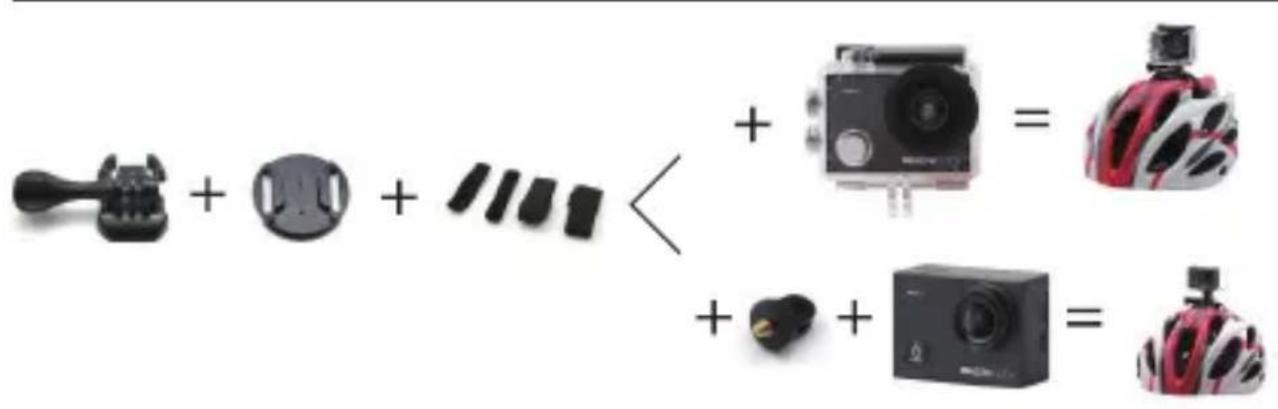
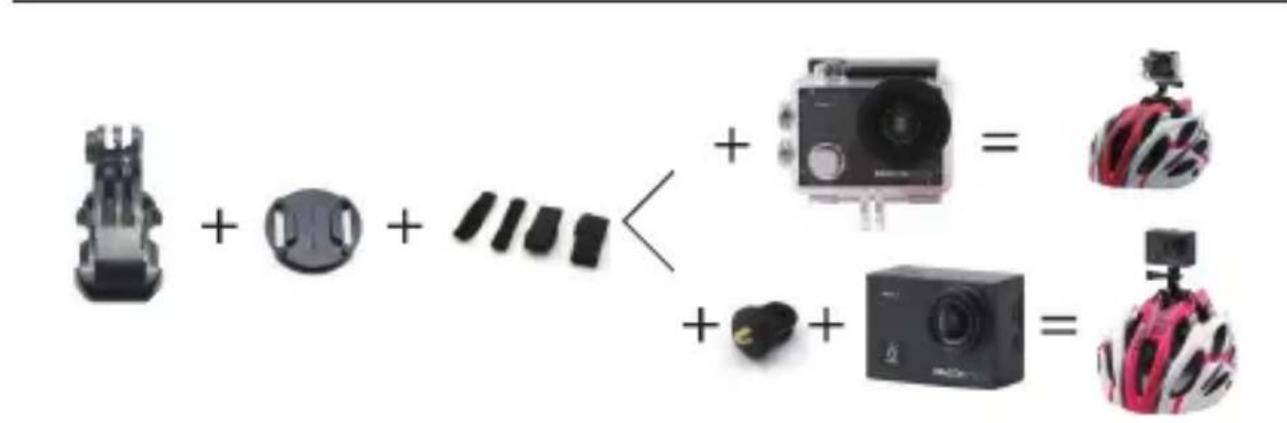
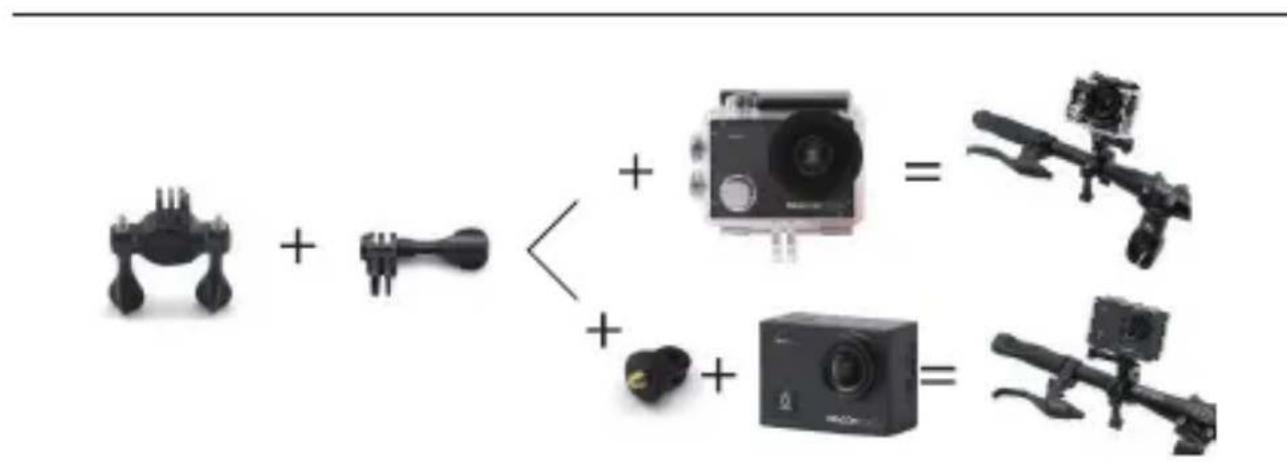
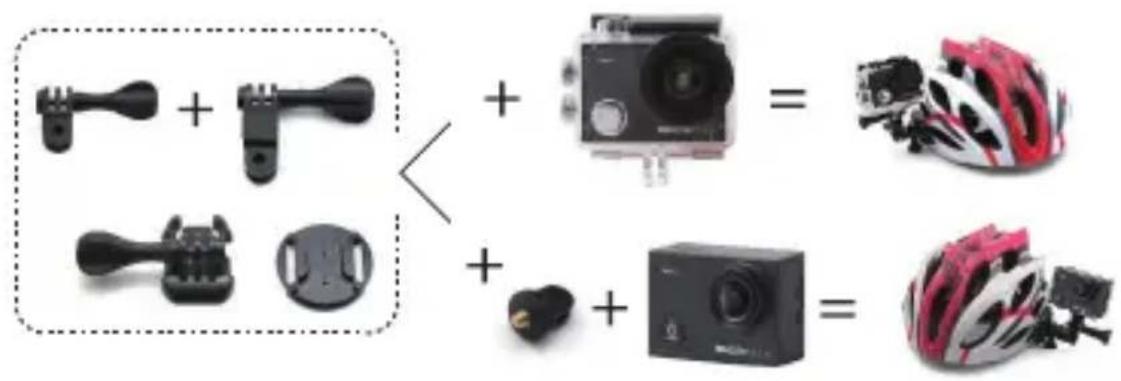
MOUNTING YOUR CAMERA
Attach your camera to helmets, gear and equipment.

CONTACT US
For any inquiries about DragonTouch products, please feel free to contact us.
We will respond within 24 hours.
Tel: 888-811-1140 (US)
Email: cs@dragontouch.com
Web: www.dragontouch.com
INHALTSVERZEICHNIS
Kontinuierlicher
Serienbildmodus
Press Mode button three times to enter Settings.

- Zeitraffer Video: Off, 0.5s, 1s, 2s, 5s, 10s, 30s, 60s
Aus, 0.5s, 1s, 2s, 5s, 10s, 30s, 60s

natural_image
Three black electronic devices: a digital display, a black plastic case with red mounting holes, and a tool tip (no text or symbols visible)natural_image
Close-up of a green circuit board with visible components and mounting brackets (no text or symbols)natural_image
Close-up of a green printed circuit board with exposed components and a red triangle highlighting a component (no text or symbols visible)natural_image
Close-up of a green circuit board with exposed components and a red rectangular annotation (no readable text or symbols)MOUNTING YOUR CAMERA
Attach your camera to helmets, gear and equipment.
KONTAKTIERE UNS
- Video de lapso de tiempo: Apagado, 0.5s, 1s, 2s, 5s, 10s, 30s, 60s
- Salvapantallas: Apagado, 10s, 20s, 30s,
natural_image
Person swimming in a pool with blue water and motion blur, captured in underwater environment (no text or symbols visible)
Tap here
ELIMINAR VIDEOS Y FOTOS EN SU VISION 3 PRO


AJUSTE DEL NIVEL DE ZOOM
natural_image
Three black electronic devices: a digital display, a black rectangular casing with red mounting holes, and a tool tip (no visible text or symbols)natural_image
Interior view of a green electronic device casing with visible circuitry and mounting brackets (no text or symbols)natural_image
Close-up of a green printed circuit board with black plastic components and a red arrow pointing to a component (no text or symbols visible)ES
natural_image
Close-up of a green printed circuit board with black plastic components and a red arrow pointing to a component (no text or symbols visible)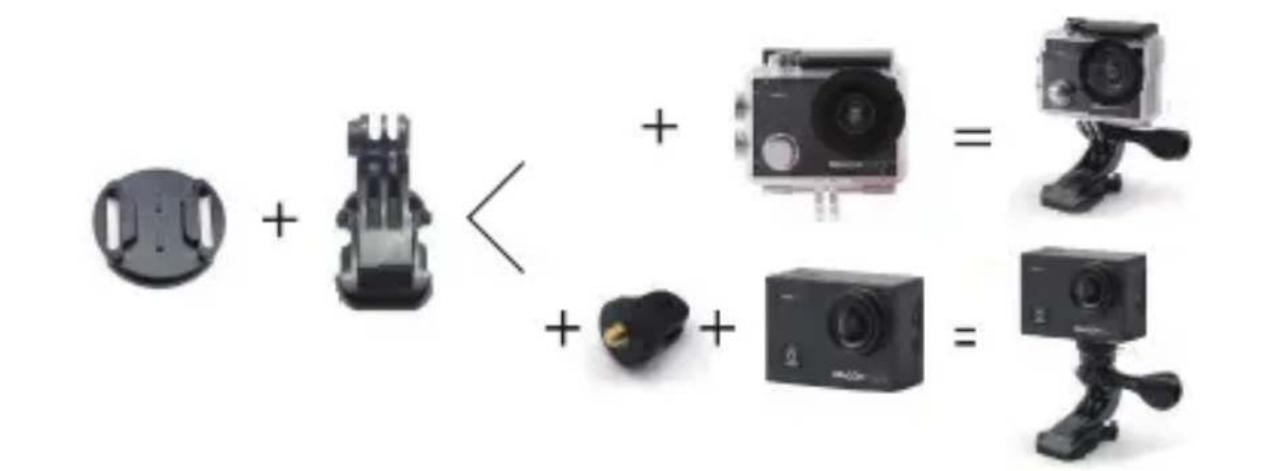

CONTÁCTENOS
- Vidéo Temps-Lapse: Désactivé, 0.5s, 1s, 2s, 5s, 10s, 30s, 60s
natural_image
Person swimming in a pool with a play button overlay (no readable text or symbols)
Appuyez ici
SUPPRESSION DE VIDÉOS ET DE PHOTOS SUR VOTRE VISION 3 PRO
natural_image
Three black electronic devices: a digital display, a black rectangular casing with red mounting holes, and a tool tip (no visible text or symbols)natural_image
Close-up of a green printed circuit board with black plastic casing and red connectors (no visible text or symbols)natural_image
Close-up of a green printed circuit board with exposed components and a red arrow pointing to a component (no text or symbols visible)natural_image
Close-up of a green printed circuit board with exposed components and a red arrow pointing to a component (no text or symbols visible)

CONTACTEZ NOUS
- Time Lapse Video: Off, 0.5s, 1s, 2s, 5s, 10s, 30s, 60s
- Autoscatto: Off, 3S, 5S, 10S, 20S
- Continuo Lapse: Off, 3S, 10S, 15S, 20S, 30S
10. Salvaschermo: Off, 10s, 20s, 30s, Close


REGOLARE IL LIVELLO DELLO ZOOM
natural_image
Close-up of a green printed circuit board with visible traces and components, enclosed in black plastic casing (no text or symbols)natural_image
Close-up of a green printed circuit board with black plastic components and a red arrow pointing to a component (no text or symbols visible)IT
natural_image
Interior view of a black plastic electronic device showing internal circuit board and connector (no text or symbols visible)

CONTATTI
natural_image
Person swimming in a pool with blue water and green play button overlay (no readable text or symbols)
ここをタップ
ビデオと写真を削除する
ズームレベルを調整する
natural_image
Three black electronic devices: a digital display, a black rectangular casing with red mounting holes, and a tool tip (no visible text or symbols)natural_image
Interior view of a black electronic device showing internal circuit board and components (no visible text or symbols)natural_image
Close-up of a green printed circuit board with black plastic components and a red arrow pointing to a component (no visible text or symbols)JP
natural_image
Close-up of a green printed circuit board with black plastic casing and red annotation box (no readable text or symbols)6.4本のネジをカバーに取り付けます。
カメラの取り付け

連絡方法
dragontouch_jp