Vision 3 - Camcorder Dragon Touch - Free user manual and instructions
Find the device manual for free Vision 3 Dragon Touch in PDF.

User questions about Vision 3 Dragon Touch
0 question about this device. Answer the ones you know or ask your own.
Ask a new question about this device
Download the instructions for your Camcorder in PDF format for free! Find your manual Vision 3 - Dragon Touch and take your electronic device back in hand. On this page are published all the documents necessary for the use of your device. Vision 3 by Dragon Touch.
USER MANUAL Vision 3 Dragon Touch
What's in the Box----02
Your Vision 3 03
Getting Started 05
Overviews of Modes 06
Customizing Your Vision 3 09
Connecting to the XDV App---- 13
Playing Back Your Content---- 14
Deleting Your Content on the Vision 3 14
Transferring Your Content 14
Adjusting the Zoom Level 17
Reformatting Your Memory Card 17
Maintaining Your Camera---- 17
Maximizing Battery Life 18
Battery Handling and Storage 18
Remote 19
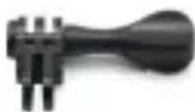
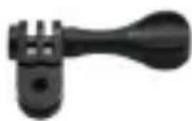
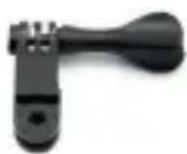
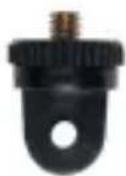
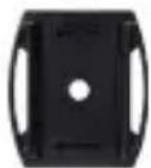
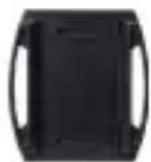
Mounting Your Camera 21
Contact Us 23
What's in the Box

Vision 3
x 1
Waterproof Housing x 1
Battery Charger
x 1

Battery x 2
USB Cable x 1
Remote Control
x 1
Remote Control
Strap x 1

Protective Backdoor x 1
Clip 1 x 1
Clip 2
x 1
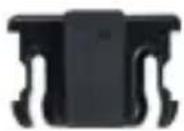
Buckle Mount
x 1
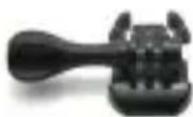
J-Hook Mount
x 1
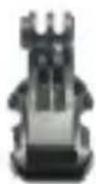
E Mount
x 1
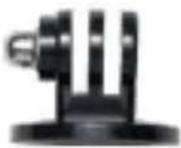
C Mount x 1
D Mount x 1
F Mount x 1
A Mount x 1

H Mount x 1
Helmet Mount 1
x 1
Helmet Mount 2
x 1
Bandage × 4
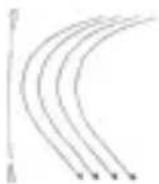
Tether x 5

Lens Cloth
x 1

Double-Sided Adhesive Tape x 2

Quick Start Guide x 1
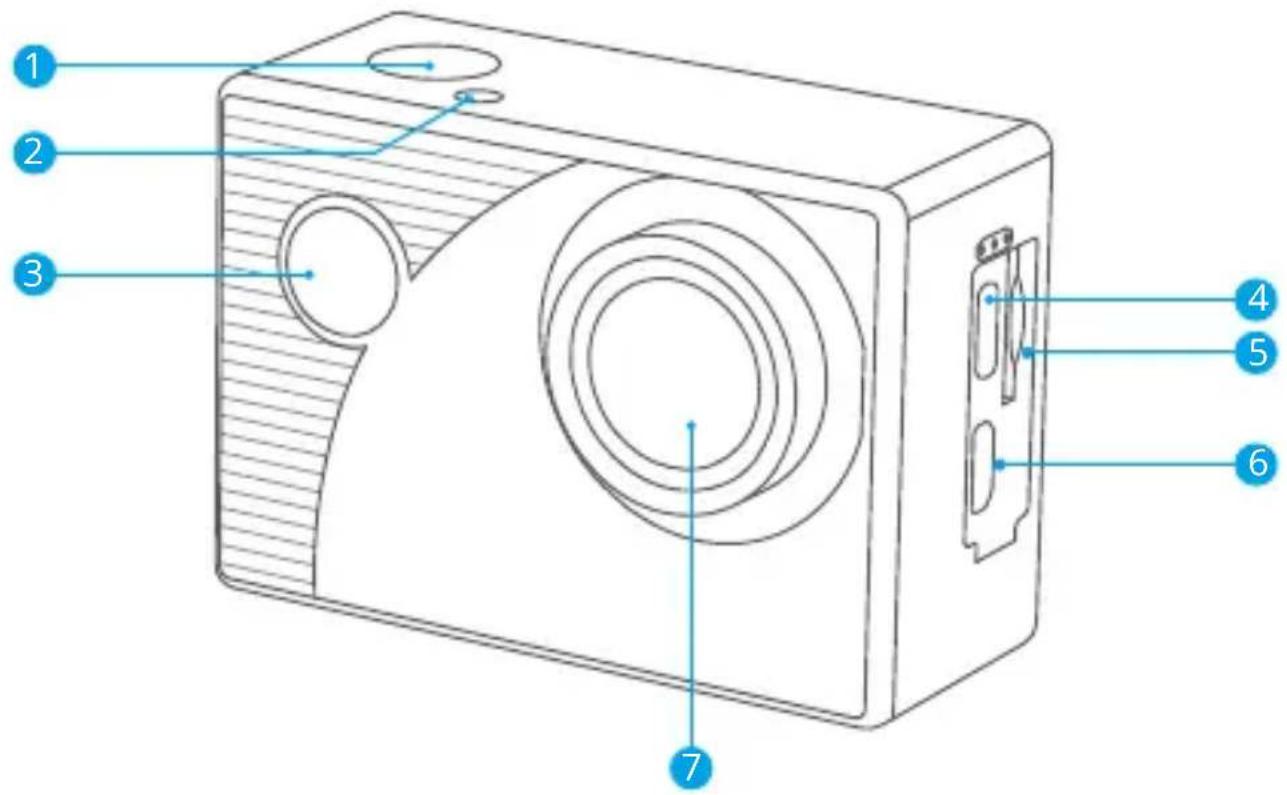
1 Shutter / OK Button
2 Wifi indicator
3 Power / Mode / Exit Button
4 USB / External Mic Port
5 Memory Card Slot
6 Micro HDMI Port
7 Lens
natural_image
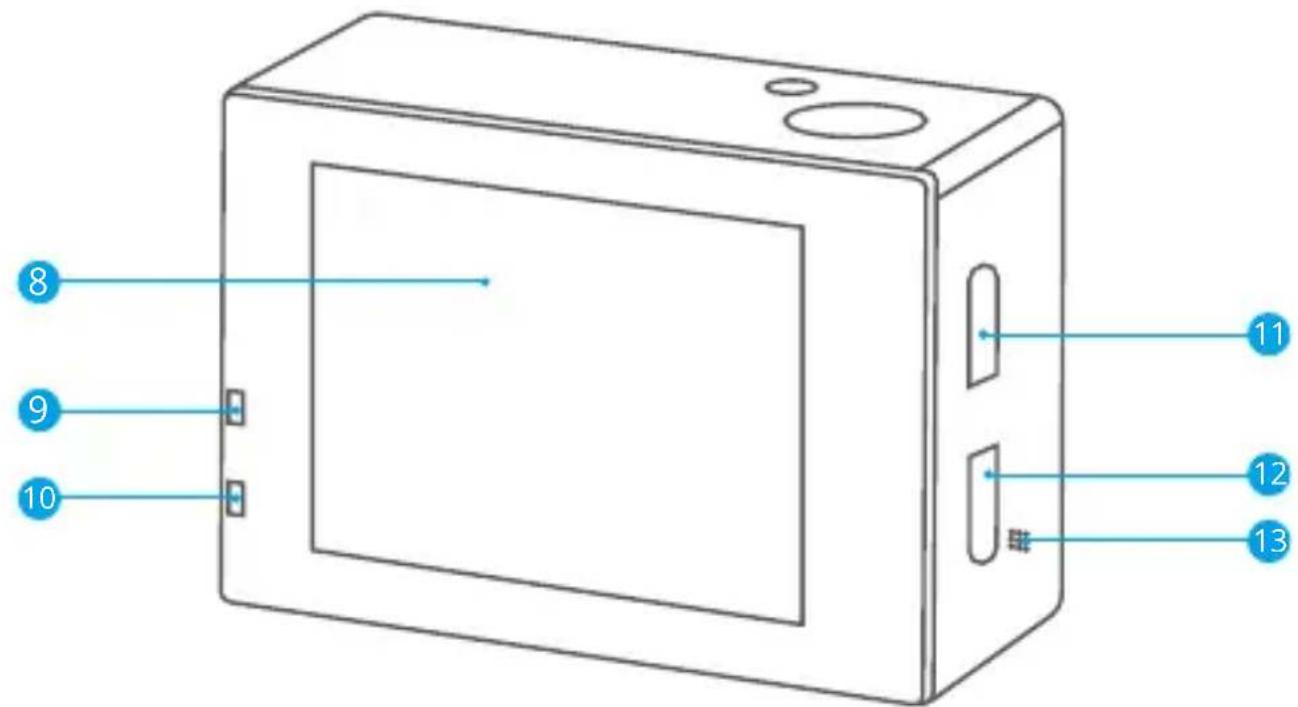
Line drawing of a portable radio with circular design and ventilation slots (no text or symbols)8 Display Screen
12 Down Button
9 Charging Indicator
13 Speaker
10 Working Indicator
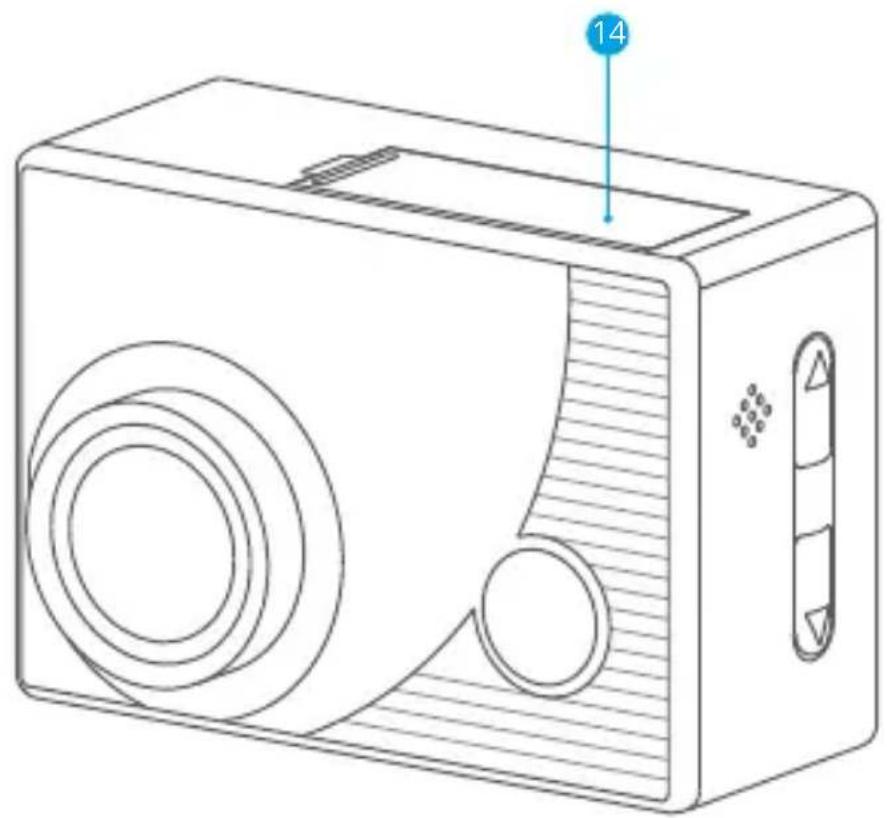
14 Battery Cover
11 Up / Wifi Button
Getting Started
Welcome to your new Vision 3 action camera. To capture videos and photos, you will need a memory card (sold separately).
Memory Card Use
Use brand name memory cards that meet these requirements:
• Class 10 or UHS-I rating
• Capacity up to 128GB (FAT32)
Note:
- Before using this camera, please format the memory card first. To keep your memory card in good condition, reformat it on a regular basis. Reformatting deletes all of your data, so be sure to transfer your photos and videos first.
- The FAT32 format memory card will stop recording when the storage of each file exceeds 4GB and start to record again in a new file.
- Using a memory card with a capacity larger than what is required can lead to complications such as failure to recognize the card. In addition, it may cause camera malfunctions, including unresponsiveness or firmware failure.
Powering on or off
To power on: Press and hold the Power button for 3 seconds. You will hear a beep and see the working indicator turn on. Once information appears on the display screen, you'll know that your camera is turned on.
To power off: Press and hold the Power button for 3 seconds. You will hear a beep and see the working indicator turn off. Once the display screen blacks out, you'll know that your camera is turned off.
Turning Wifi on or off
To turn on: When on the preview screen, press and hold the Wifi button turn on Wifi. Alternatively, enter the camera's system settings to enable Wifi.
To turn off: When on the preview screen, press the Wifi button to turn off Wifi.
Switching Modes
To switch: When on the preview screen, press the Mode button to switch modes.
To exit: Press the Mode button again to exit the current mode.
Using the Shutter Button
When in Photo or Video mode, press the Shutter button to capture photos or start video recording. To stop recording in Video mode, press the Shutter button again.
Charging the Camera
Locate the USB power port, and connect the camera to a USB adapter or computer using the USB cable. The charging indicator will be flashing red while charging, and black out when fully charged. Once fully charged, disconnect the cable.
Tip: The camera can record up to 70 minutes in 4K when fully charged.
Overviews of Modes
There are 8 modes of this camera: Video, Photo, Slow Motion, Playback, Video Settings, Photo Settings, General Settings, and System Settings.
When on the preview screen, press the Mode button to switch modes.
Video Mode
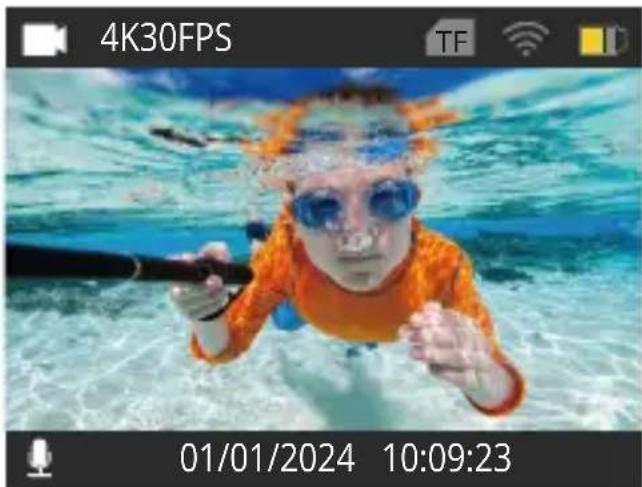
The camera is in Video mode by default when it's turned on.
In this mode, press the Shutter button to start recording. To stop recording, simply press the Shutter button again.

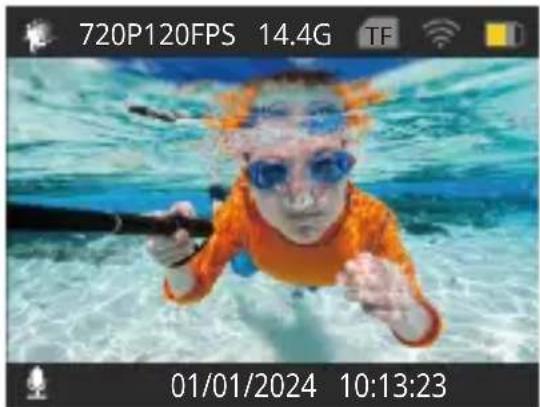
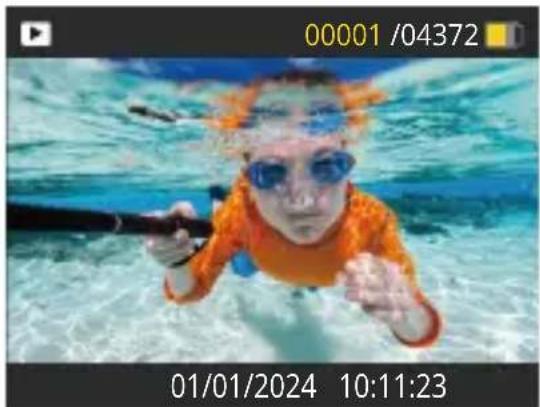
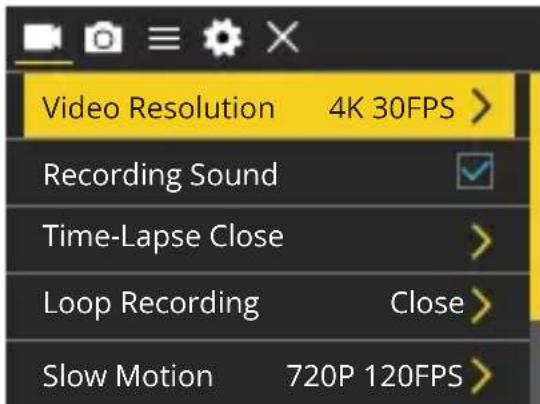
Photo Mode
On the preview screen, press the Mode button once to enter Photo Mode. In this Mode, press the Shutter button to take a photo.
Slow Motion Mode
On the preview screen, press the Mode button twice to enter Slow Motion Mode. In this mode, you can press the Shutter button to record a slow motion video at the set resolution.
Playback Mode
On the preview screen, press the Mode button 3 times to enter Playback Mode. In this mode, you can press the Up/ Down button to select a video or photo file for playback.
Video Settings Mode
On the preview screen, press the Mode button several times till you see a gear icon show on the screen, then press the OK button to enter Video Settings Mode. In this mode, you're free to change the video settings.
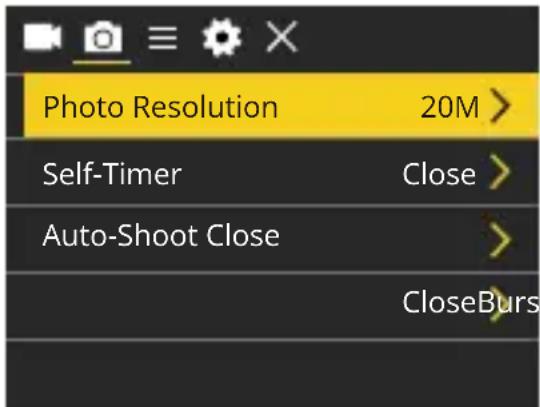
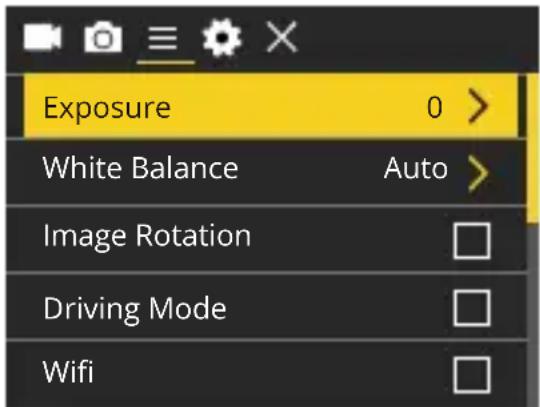
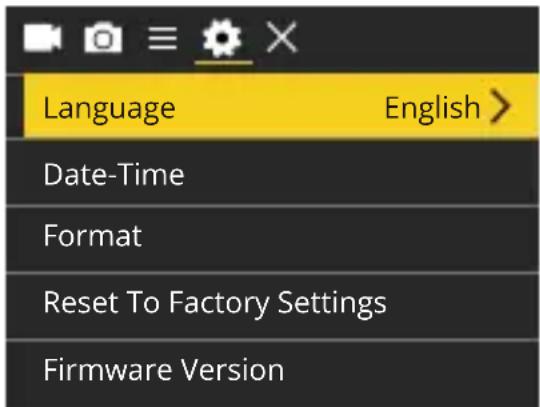
Photo Settings Mode
After accessing the video screen screen, press the Mode button to enter Photo Settings Mode.
In this mode, you're free to change the photo settings.
General Settings Mode
After accessing the photo settings screen, press the Mode button to enter General Settings Mode.
In this mode, you're free to change the general settings.
System Settings Mode
After accessing the general settings screen, press the Mode button to enter System Settings Mode.
In this mode, you're free to change the system settings.
Customizing Your Vision 3
Video Settings
When on the video settings screen, press the Down button to choose a setting from the available options, then press the OK button to confirm your selection and change the setting. To return to the preview screen, press the Mode button several times and then press the OK button.
1. Video Resolution
4K 30FPS/2.7K 30FPS/1080P 60FPS/1080P 30FPS/720P 120FPS/720P 60FPS/720P 30FPS (Default setting: 4K 30FPS)
This camera is capable of recording video up to 4K30fps. The higher resolution, the greater clarity and detail, thus the larger the file.
Note: Capturing high-resolution or high-fps videos in warm environments can cause the camera to heat up and consume more power.
2. Recording Sound
On / Off (Default: On)
Turn "Recording Sound" on or off. With this setting disabled, the camera will record video without audio.
3. Time-lapse
Off/0.5s/1s/2s/5s /10s/30s/60s (Default setting: Off)
Set the interval at which the camera captures frames of video. Once you're done configuring, return to the preview screen. The camera will enter Time-lapse mode. In this mode, the camera will capture frames at the preset interval and seamlessly compile them into a short video.
Note: Time-lapse video is captured without audio.
4. Loop Recording
Off/1 min /3 min /5 min (Default setting: Off)
Set the length of videos captured in Loop Recording mode. For instance, if you set "Loop Recording" to "1 min", the camera will record and save videos every minute. When the memory is full, the camera will automatically delete the earliest videos to continue recording. Once you're done configuring, return to the preview screen. The camera will enter Loop Recording mode.
5. Slow Motion
720P 120FPS/1080P 60FPS (Default setting: 720P 120FPS)
Set the resolution at which the camera records video in Slow Motion mode. The video footage will appear to be in slow motion when played back.
Note: Slow motion video is captured without audio.
6. Image Stabilization
On/Off (Default setting: Off)
Image Stabilization can efficiently smooth out the lens shakes, resulting in smooth and pristine videos. This feature is ideal for capturing scenes involving activities like riding, skating, and handheld use.
7. External Mic
Off/On (Default setting: Off)
Turn the external microphone feature on or off. With this feature enabled, connect a compatible external microphone to the camera's USB port to achieve better sound quality.
Photo Settings
When on the photo settings screen, press the Down button to choose a setting from the available options, then press the OK button to confirm your selection and change the setting.
1. Photo Resolution
20M /16M / 12M / 8M / 5M / 2M (Default setting: 20M)
This camera is capable of capturing 20MP photos. The higher resolution, the greater clarity and detail, thus the larger the file.
2. Self-Timer
Off / 3s / 5s / 10s / 20s (Default setting: Off)
Set the countdown time to take a photo. The camera will initiate the preset countdown, then automatically activate the shutter to take a photo. Once you're done configuring, return to the preview screen. The camera will enter Self-Timer mode.
3. Auto-Shoot
Off / 3s / 10s / 15s / 20s / 30s (Default setting: Off)
Specify the frequency at which the photo is taken. For instance, if you select the "3s" option, a photo will be taken automatically every 3 seconds. Once you're done configuring, return to the preview screen. The camera will enter Auto-Shoot mode.
4. Burst
Off, 3P/S, 5P/S 10P/S (Default setting: Off)
Burst lets you specify the number of consecutive shots per second, making it ideal for capturing fast-moving activities. Once you're done configuring, return to the preview screen. The camera will enter Burst mode.
General Settings
On the general settings screen, press the Down button to choose a setting from the available options, then press the OK button to confirm your selection and change the setting.
1. Exposure
-3 / -2 / -1 / 0 / 1 / 2 / 3 (Default setting: 0)
Adjust the brightness of your photos and videos. A higher exposure value creates a brighter image, while a lower value results in a darker image.
2. White Balance
Auto / Sunny / Cloudy / Incandescent / Fluorescent (Default setting: Auto)
White Balance fine-tunes the color temperature of your videos and photos, ensuring optimal color accuracy in both warm and cool lighting conditions.
3. Wifi
Off / On (Default setting: Off)
Choose to enable Wifi in this setting.
Tip: You can also press and hold the Wifi button to turn on Wifi in Video or Photo Mode. The camera will then enter Wifi mode and display the Wifi information.
4. Image Rotation
Off / On (Default setting: Off)
This setting determines the orientation of your video and photos, helping to prevent upside down footage.
Note: The user interface will be upside down when this feature is enabled.
5. Driving Mode
Off / On (Default setting: Off)
With Driving Mode enabled, if you connect the camera to the car cigarette lighter and start your car, the camera will automatically turn on to start video recording and save the video file at the set interval. It will save the file and automatically turn off when you stop your car. When the SD card is full, the camera will automatically delete the earliest videos to ensure continuous recording.
6. Light Source Frequency
Auto / 50Hz / 60Hz (Default setting: Auto)
You can set the light source frequency to avoid the “water ripples” phenomenon (light waves) while capturing indoors.
7. LED Indicator Light
Off / On (Default setting: Off)
Turn this setting on or off. With this setting enabled, the camera's LED indicator lights will illuminate or flash based on your operations, and vice versa.
8. Auto Screensaver
Off / 10s / 20s / 30s (Default setting: 30s)
Auto Screensaver turns off the LCD display after a period of inactivity to save battery life. To turn the display back on, simply press any button of the camera.
9. Auto Shutdown
Off/1 min/3 min/5 min (Default setting: 3 min)
Auto Shutdown will power off your Vision 3 after a period of inactivity to save battery life.
10. Time Watermark
Off / On (Default setting: On)
With this setting enabled, a watermark will be added to the video or photo.
System Settings
When on the system settings screen, press the Down button to choose a setting from the available options, then press the OK button to confirm your selection and change the setting.
1. Language
简体中文, 繁體中文, English, 日本語, Deutsch, Français, Italiano, Español, Português, Русский, 한국어 (Default setting: English)
You can choose the system language for your Vision 3 action camera.
2. Date-Time
YYYY-MM-DD, HH-MM-SS
Manually set the camera's date and time according to your local time. The date and time will also be automatically updated when you connect your camera to the XDV app.
3. Format
Confirm / Cancel (Default setting: Cancel)
To keep your memory card in good condition, reformat it on a regular basis.
Reformatting erases all of your content, so be sure to offload your photos and videos first.
4. Reset to Factory
Confirm / Cancel (Default setting: Cancel)
This option resets all settings to their default values.
5. Firmware Version
This option allows you to check the brand, model, and firmware version of your camera.
Connecting to the XDV App
You can control your camera to capture photos and videos using the phone app. To do this, please download and install the XDV App on the App Store or Google Play first. When your camera is connected to the app, you can control it to capture, or change the camera's settings using your phone. You can also live preview, playback, download, and edit videos via this app. Please follow the instructions below to connect your camera to the app.
- Turn on the camera, then press and hold the Wifi button to turn on Wifi. The camera will enter Wifi mode and display the Wifi information.
- Turn on your phone's Wifi to enter the Wifi settings page, find the Wifi SSID named "Vision3_****" in the list and tap on it, then enter the password 1234567890 for connection.
Warm tip: Once the camera Wifi is connected, it will give you a "No Internet Connection" or "Weak Security" notice since your phone's 4G signal is blocked. You can ignore it and continue the app connection. - Open the XDV app on your phone or tablet, and tap on the Wifi SSID again.
- Your camera will be connected to the app in seconds.
Note: This camera does not support MacBook or iPad.
Playing Back Your Content
You can play back your contents on the camera, your computer, TV, smartphone, or tablet. To play back your videos and photos on a computer, you need to transfer these files first. Transferring files also frees up space on your memory for new contents. With this method, the playback resolution depends on the resolution of the device and its ability to play back that resolution.
Viewing Videos and Photos on the Vision 3
- Turn on your camera, then press the Mode button 3 times to enter Playback mode.
- Press the Up or Down button to scroll through the video or photo files.
- After selecting the file you want to view, press the OK button. And the file will play.
Deleting Your Content on the Vision 3
- Enter Playback Mode.
- Press the Up or Down button to scroll through the video or photo files.
- Press and hold the OK button for 3 seconds. The screen will display "Delete this file / Confirm / Cancel".
- Press the Up button followed by the OK button, and the selected file will be deleted.
- To exit Playback Mode, press the Mode button.
Transferring Your Content
Transferring Your Content to a Computer
To play back your videos and photos on a computer, you must first transfer these files to the computer. Transferring also frees up space on your memory card for new content. To download files to a computer using a card reader (sold separately), please insert a memory card into your card reader, then connect the card reader to the computer via a USB port. You can then transfer files to your computer or delete selected files by using the file explorer.
Downloading Your Content to a Smartphone or tablet
- Open the XDV app, and connect it to your camera.
- Tap the Media icon ▶ at the bottom of the screen.
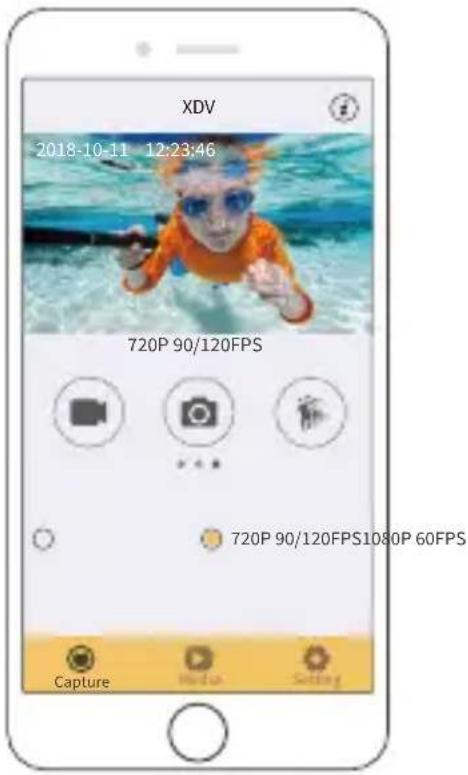
- Tap "Device" at the top of the screen to view all the video and photo files.
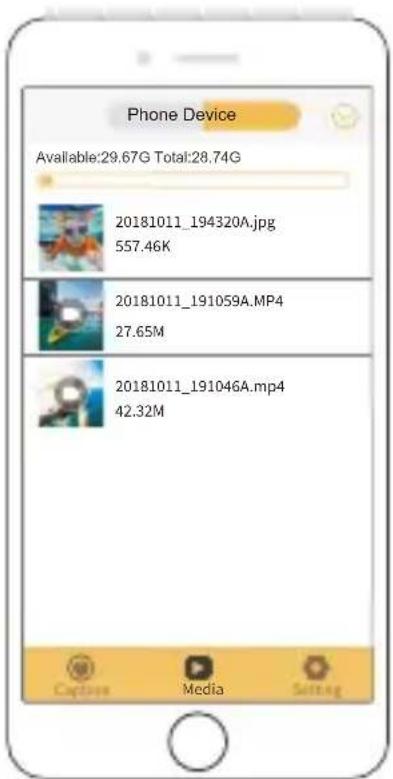
- Tap 🔗 followed by ↓ to select the file you want to download.
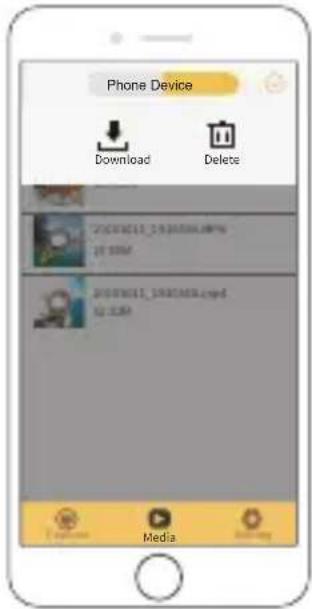
- Tap "Confirm" in the bottom right corner, and wait for the download process to finish. The file will be saved to the album of your phone or tablet.
Note:
- Please do not alter Wifi settings or disconnect from the app during the download progress.
- If you cannot download videos or photos to your iPhone via the app, please enter your phone's Settings page → Privacy→ Photos, find "XDV", and select "All photos".
- You cannot download 4K or 2.7K videos to an iPhone or iPad via the XDV App. Please transfer these videos via a card reader.
Adjusting the Zoom Level
The Zoom function enables you to adjust the proximity of the subject in your footage. The Vision 3 action camera supports up to 4X zoom. The zoom feature is available only in Video and Photo Mode. Please follow the steps below to zoom in or out.
- Turn on the Vision 3 action camera.
- Enter Video or Photo mode.
- Press the Up or Down button to adjust the zoom level.
Reformatting Your Memory Card
To keep your memory card in good condition, please reformat it on a regular basis. Reformatting deletes all of your content, so be sure to transfer your photos and videos first. Please follow the steps below to format the card.
- Turn on the Vision 3 action camera.
- Enter the system settings screen.
- Press the Down button to find the "Format" option.
- Press the OK button to confirm, and the screen will show "Format memory card? Confirm / Cancel".
- Press the Up button followed by the OK button. Your memory card will be formatted successfully.
Maintaining Your Camera
Follow these guidelines to get the best performance from your camera:
- For best audio performance, shake the camera or blow on the mic to remove dust or ash before use.
- To clean the lens, wipe it with a soft lint-free cloth. Do not clean the lens with anything else.
- Do not touch the front lens directly with your fingers.
- Keep the camera away from drops and bumps which may cause damage to the parts inside.
- Keep the camera away from high temperatures and strong sunlight to avoid damage.
Maximizing Battery Life
If battery power reaches 0% while recording, the camera will save the file and power off. To maximize battery life, please follow the guidelines where possible:
- Turn off wireless connections.
• Capture video at lower frame rates and resolutions.
- Use the Screen Saver setting.
Battery Handling and Storage
-
If storing for extended periods, maintain a battery charge of 50-60%. Charge every 3 months and discharge the battery every 6 months.
-
Do not store the battery with metal objects such as coins, keys, or necklaces. If the battery terminals come close to metal objects, a short circuit may cause fire.
-
Store the battery in dry areas, safe from potential physical damage caused by squeezing or collision.
-
Avoid using or storing the battery at high temperatures, such as in direct sunlight or a hot compartment. The battery will heat up, malfunction, or have its service life shortened in these conditions.
-
Avoid using or storing the battery in low-temperature environments, as this will shorten the battery life or cause it to malfunction.
-
Avoid environments with strong static or magnetic fields; these can compro-mise the battery's protective unit, posing safety risks.
-
If the battery emits an odor, overheats, changes color, gets distorted, or exhibits any anomalies, discontinue use and remove it immediately from the camera or the battery charger whether it is being used, charged, or stored.
-
Safely insulate used electrodes to prevent potential hazards.
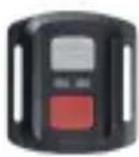
Note: The remote is splashproof only.
When the camera is turned on, it will be automatically connected to the remote within 10 meters of distance. You can control the camera to take photos or record videos using the remote.
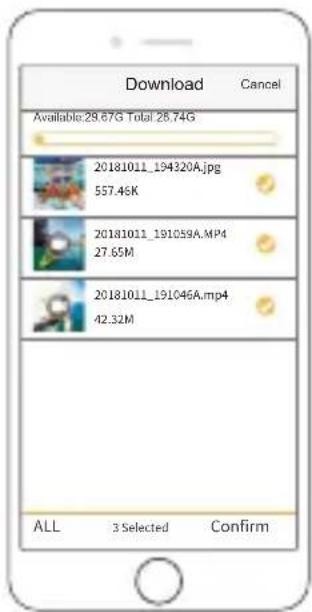
Video
To record video, first make sure the camera is in Video mode, then press the Video button. The camera's working indicator will be flashing during video recording. To stop recording, press the Video button again.
Photo
To capture a photo, first make sure the camera is in Photo mode, then press the Photo button. The camera will emit a shutter sound indicating the completion of the shot.
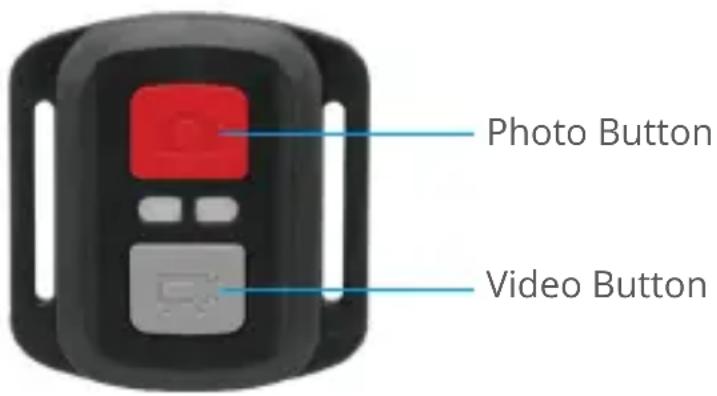
Replacing the CR2032 battery of the remote
- Use a screwdriver to remove the four screws on the back, cover of the remote allowing you to open it.
natural_image
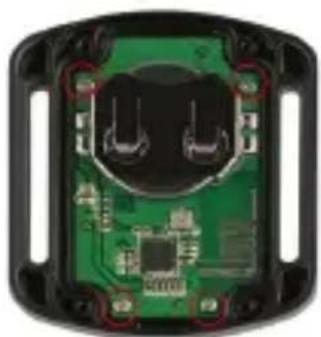
Three black electronic devices: a digital display, a black rectangular casing with red mounting holes, and a screwdriver (no text or symbols visible)- Remove another 4 screws on the remote's circuit board.
natural_image
Close-up of a green printed circuit board with visible traces and components, enclosed in a black plastic housing (no text or symbols)- Lift the circuit board and slide out the battery, as shown below.
Note: Avoid rotating the circuit board to prevent reversing the remote control buttons.
natural_image
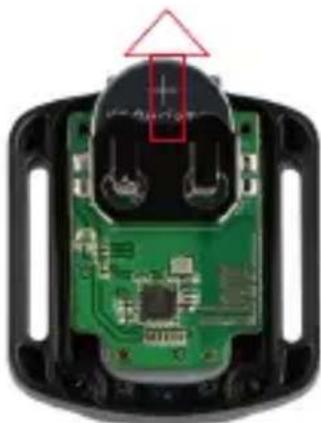
Close-up of a green printed circuit board with black plastic components and a red arrow pointing to a component (no visible text or symbols)-
Install the new battery, keeping the "+" pole facing up.
-
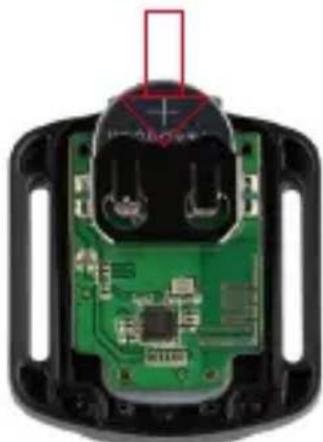
Install all the 4 screws back onto the circuit board.
natural_image
Close-up of a green electronic circuit board with exposed components and a red rectangular annotation (no readable text or symbols)- Install all the 4 screws back into the cover.
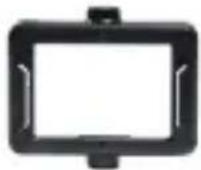
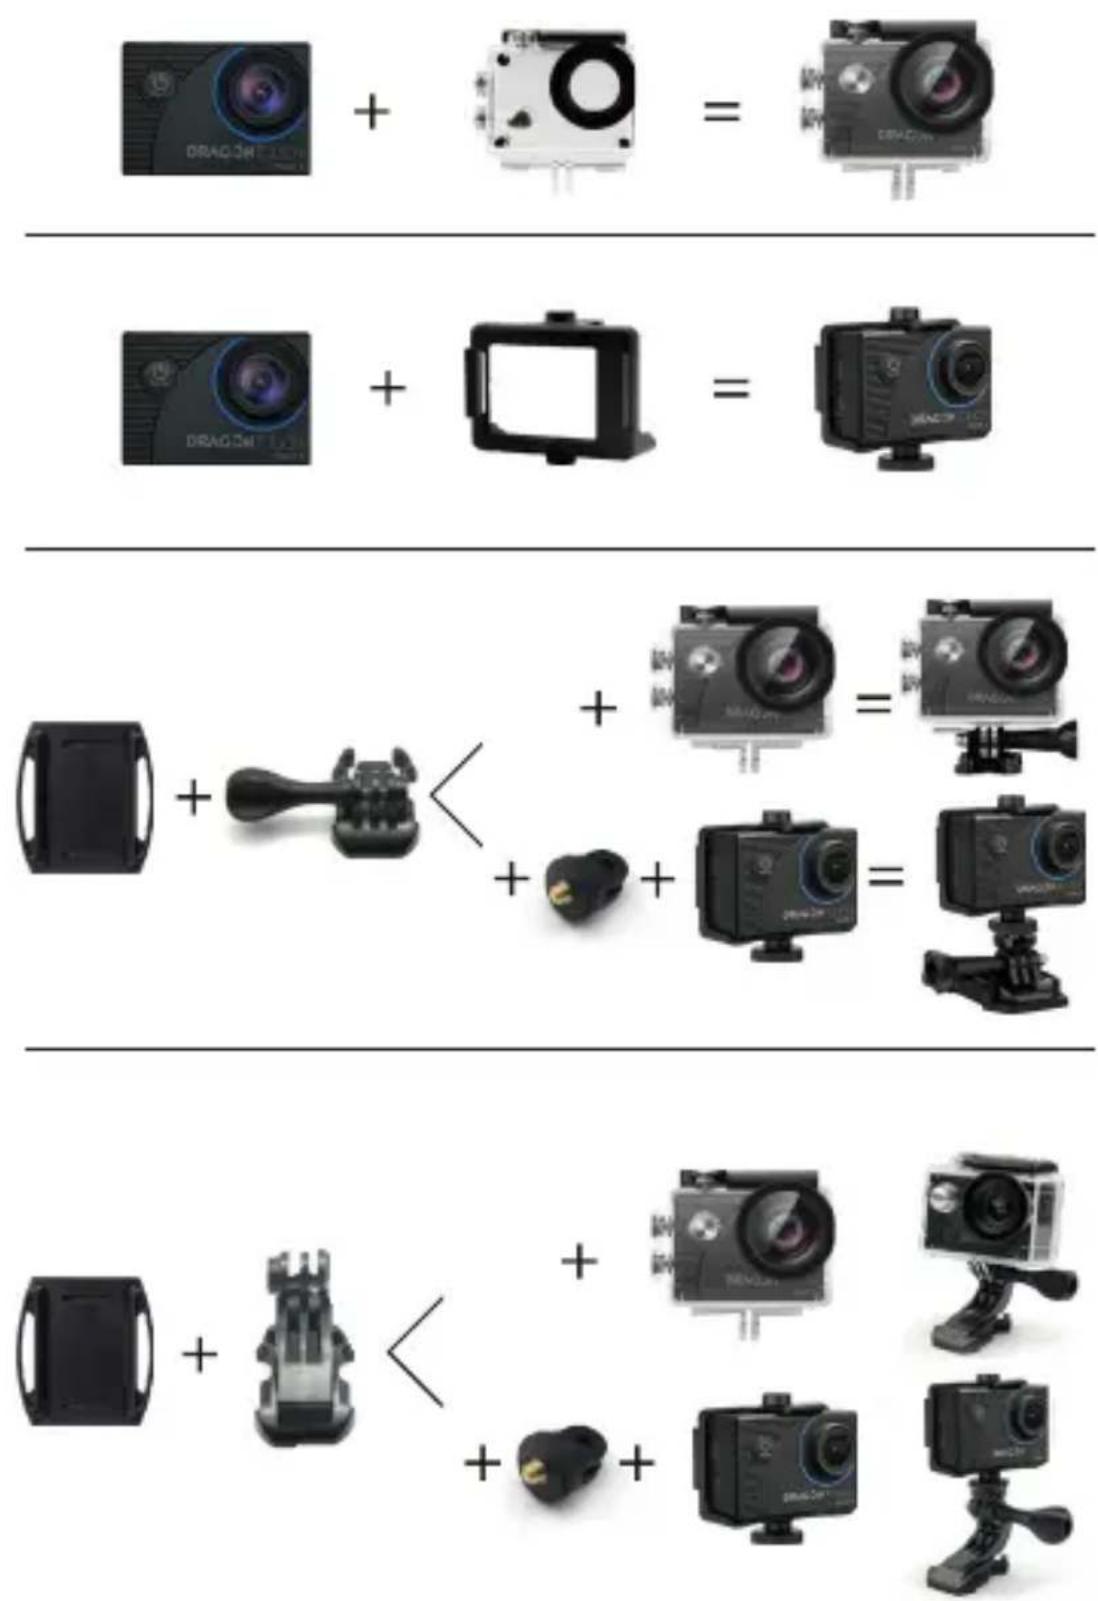
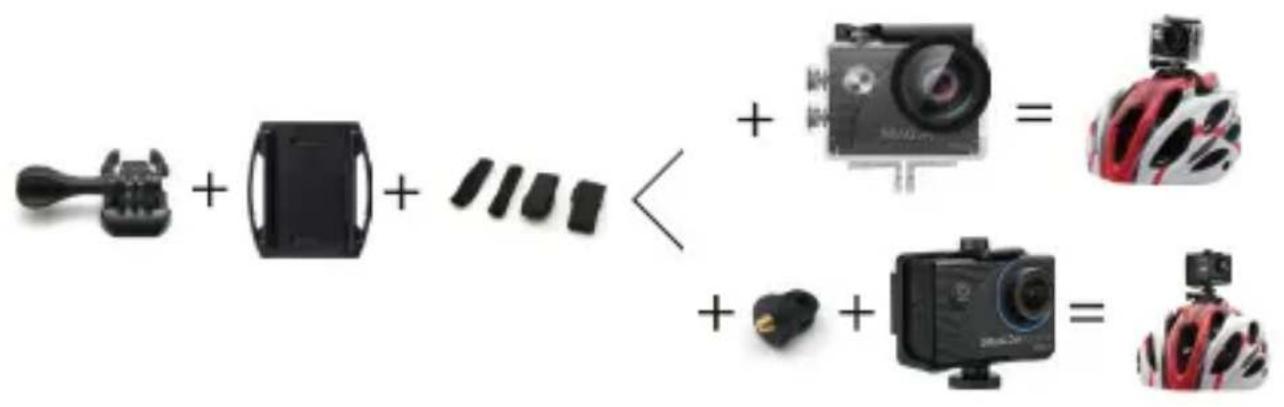
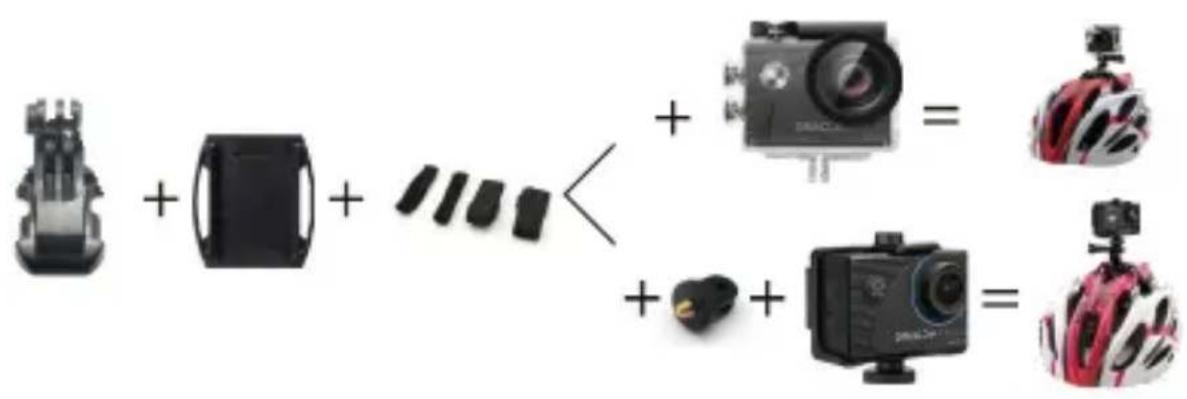
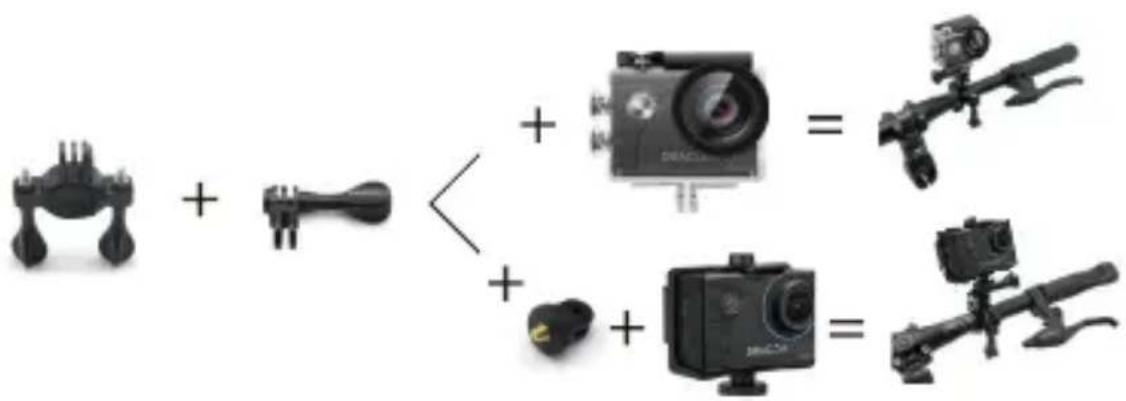
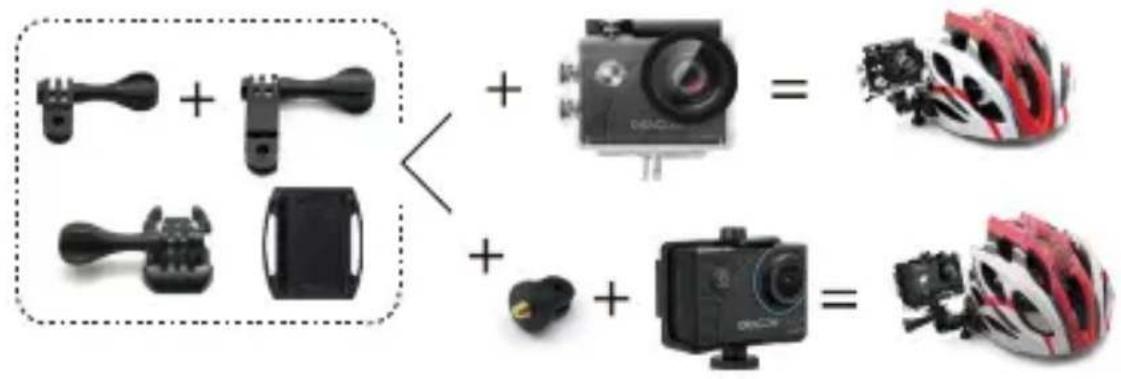
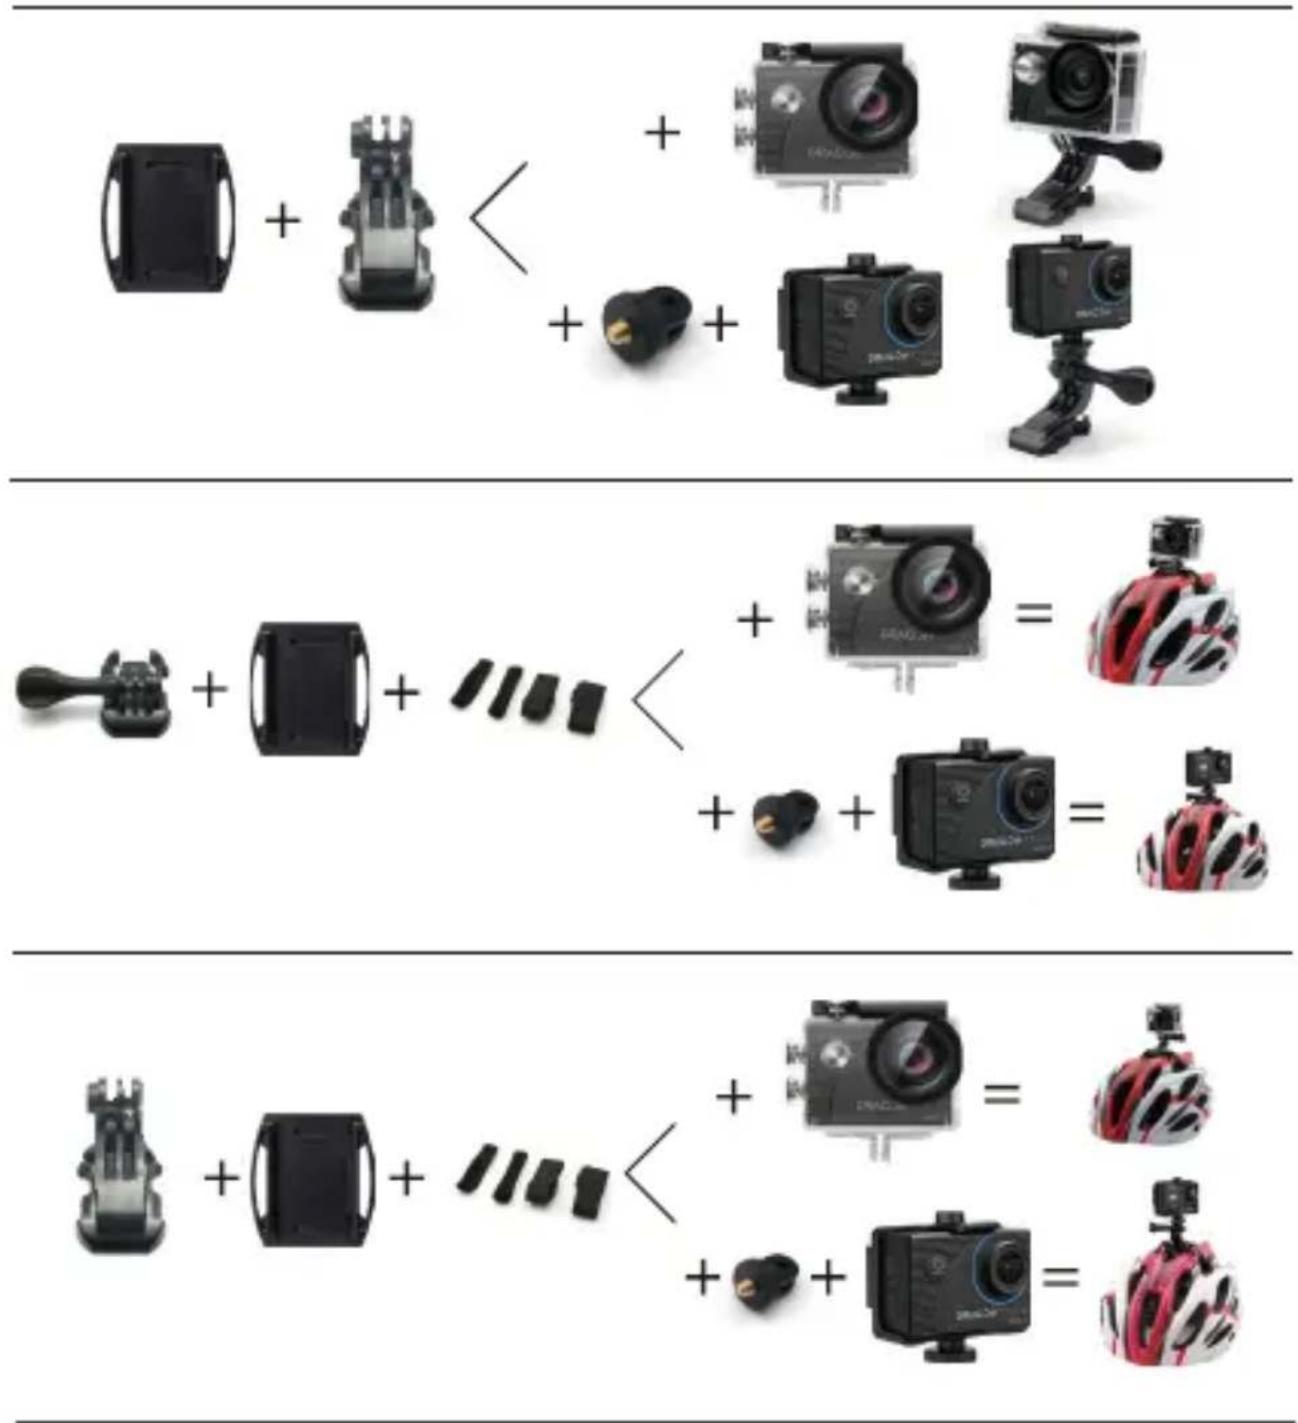
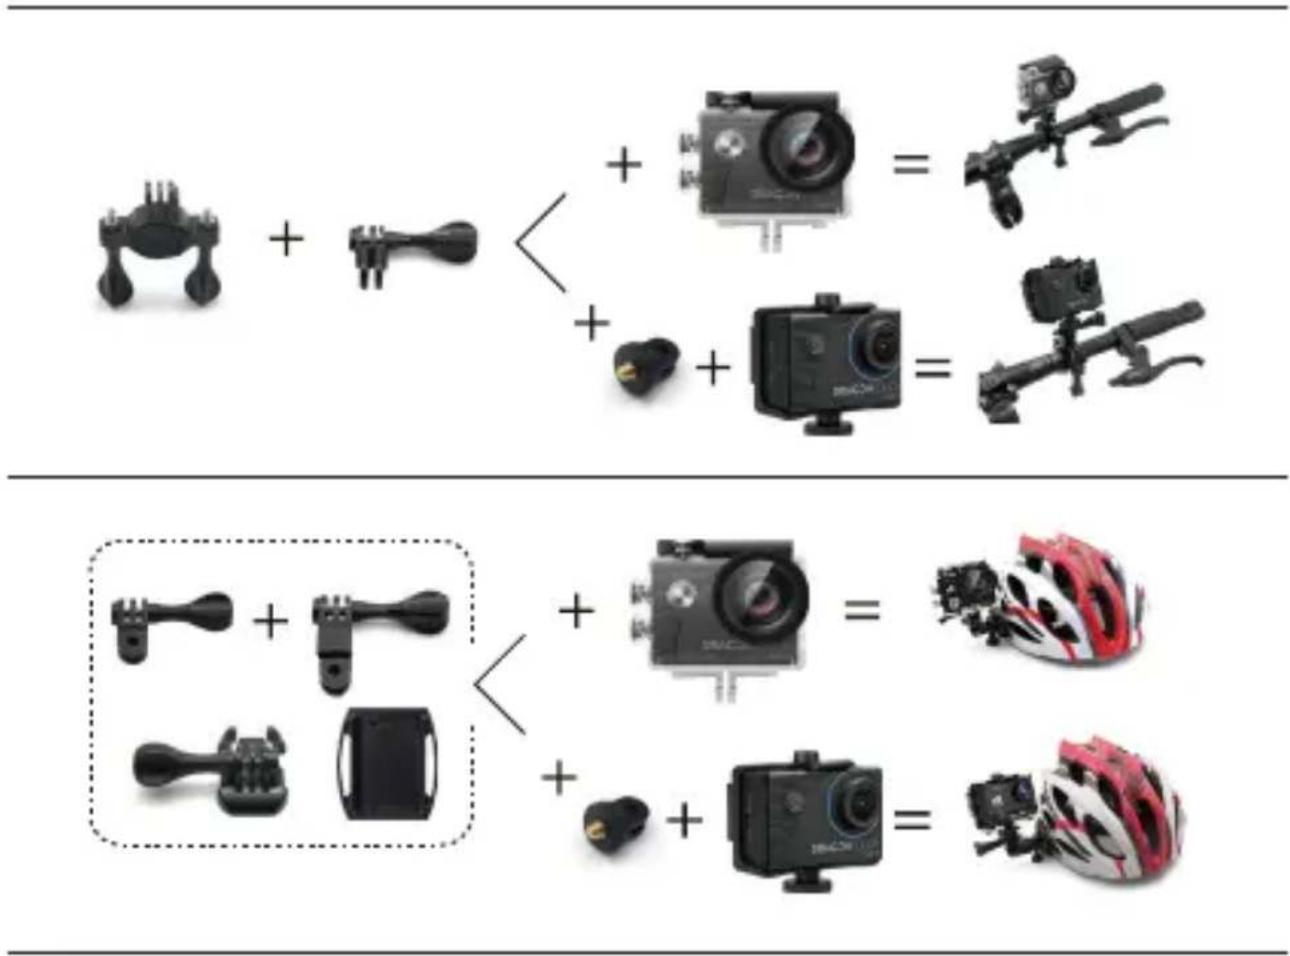
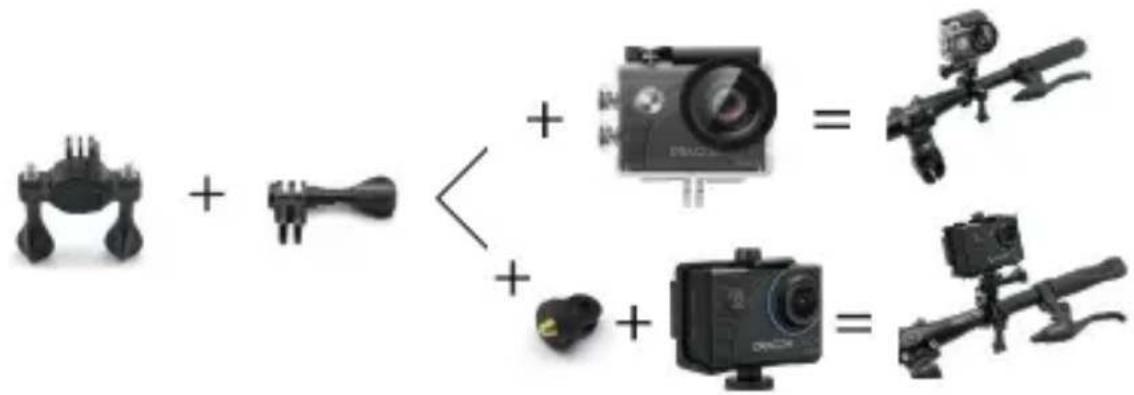
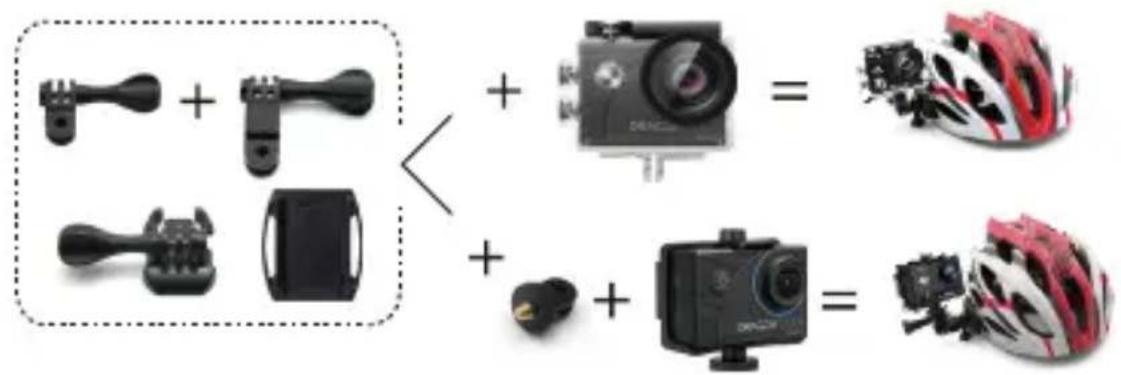
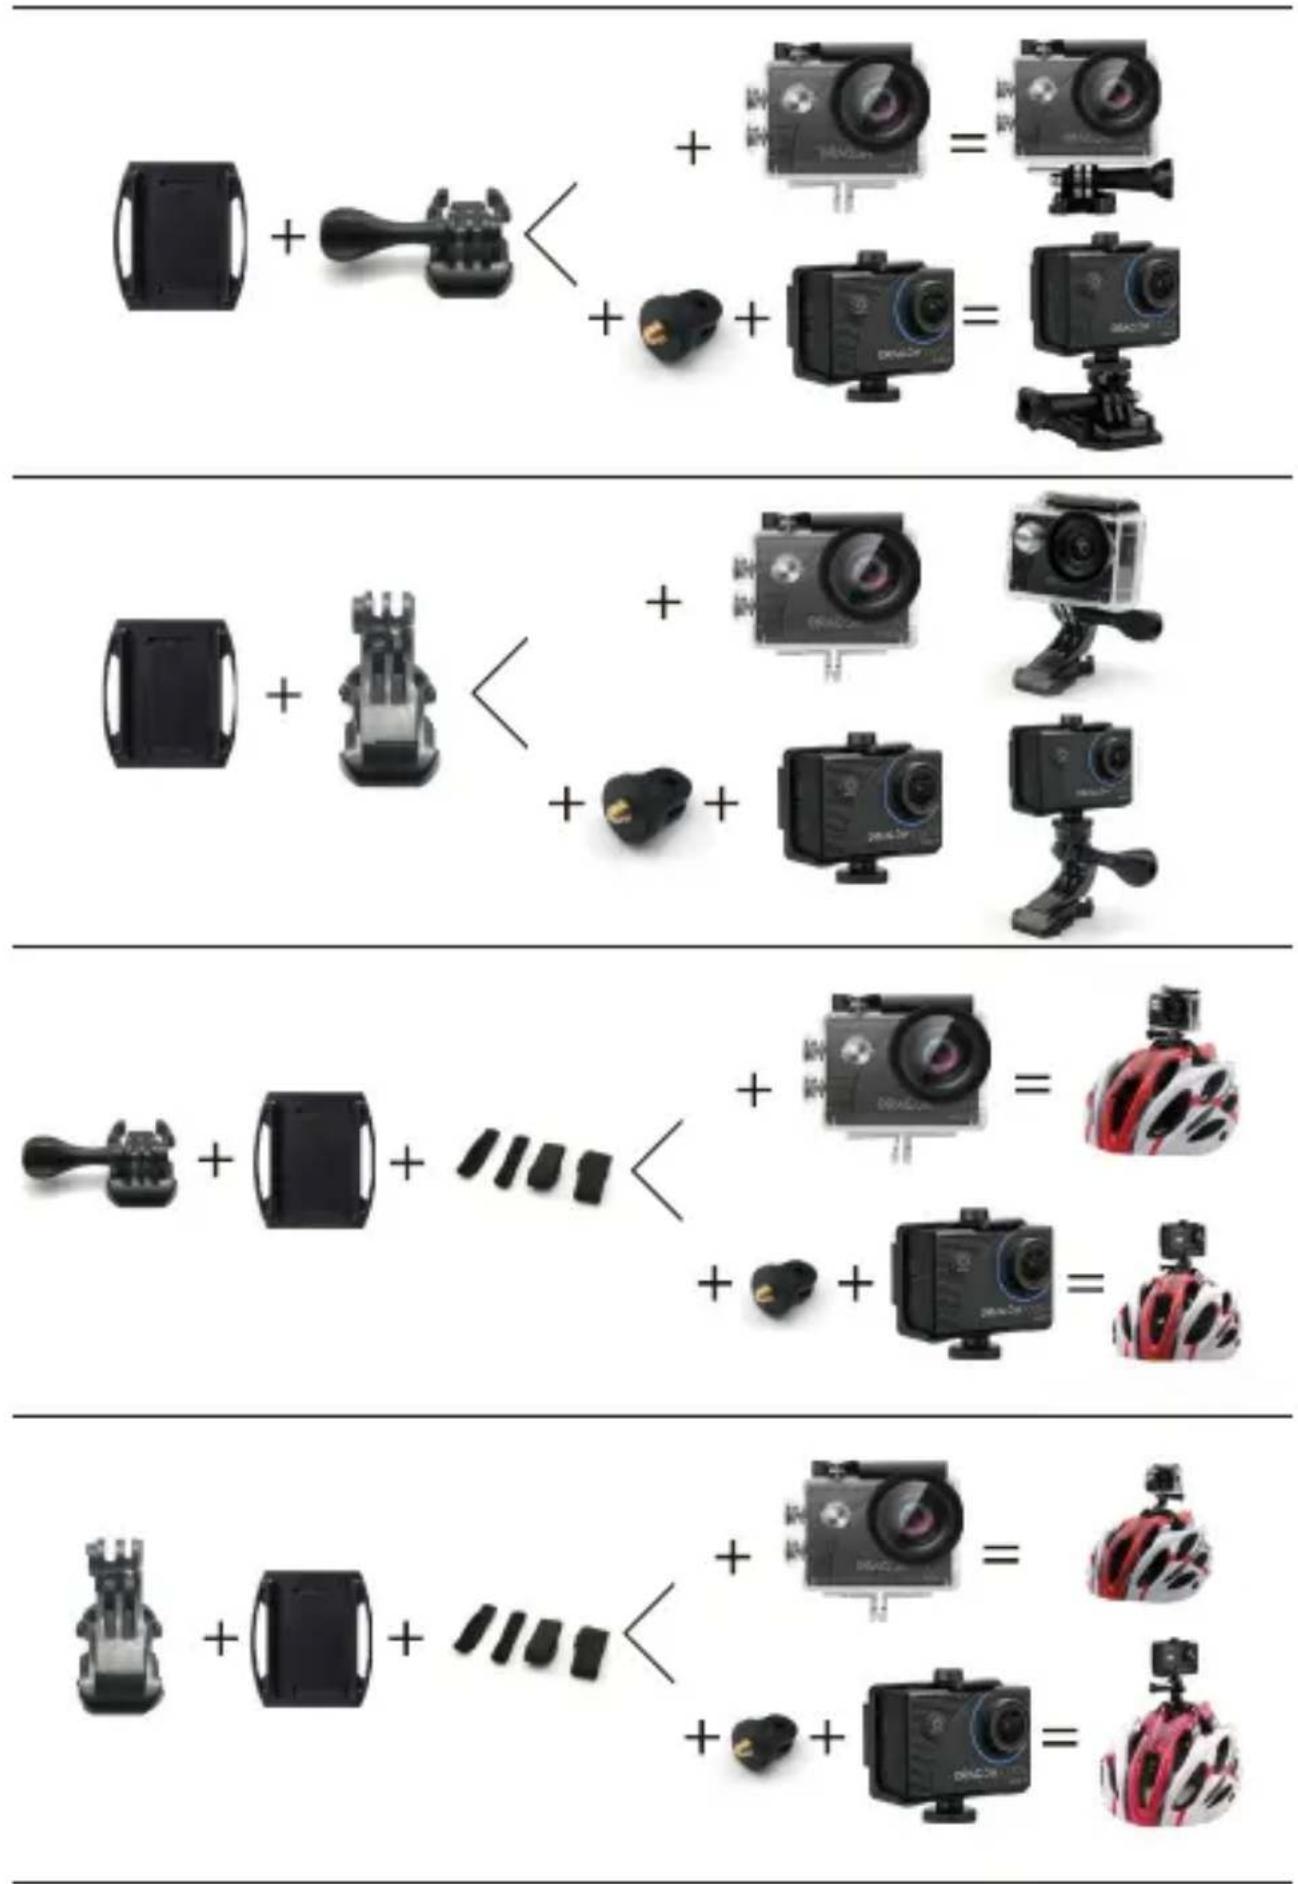
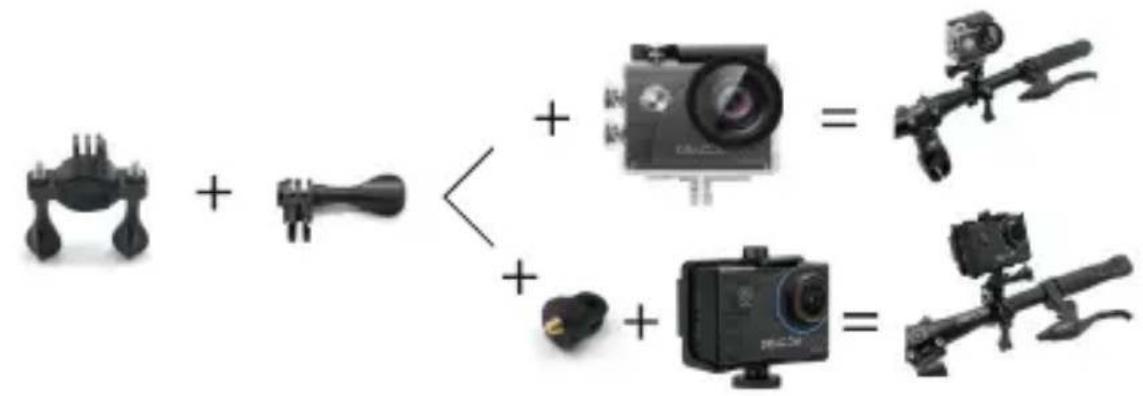
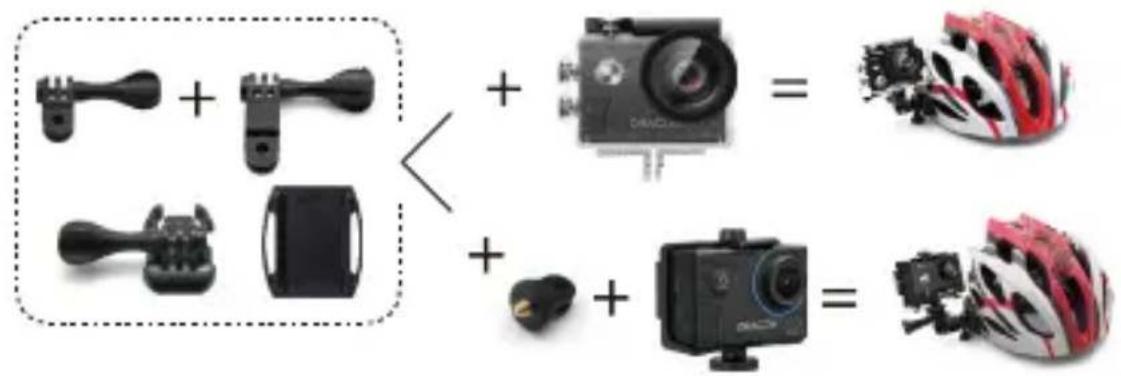
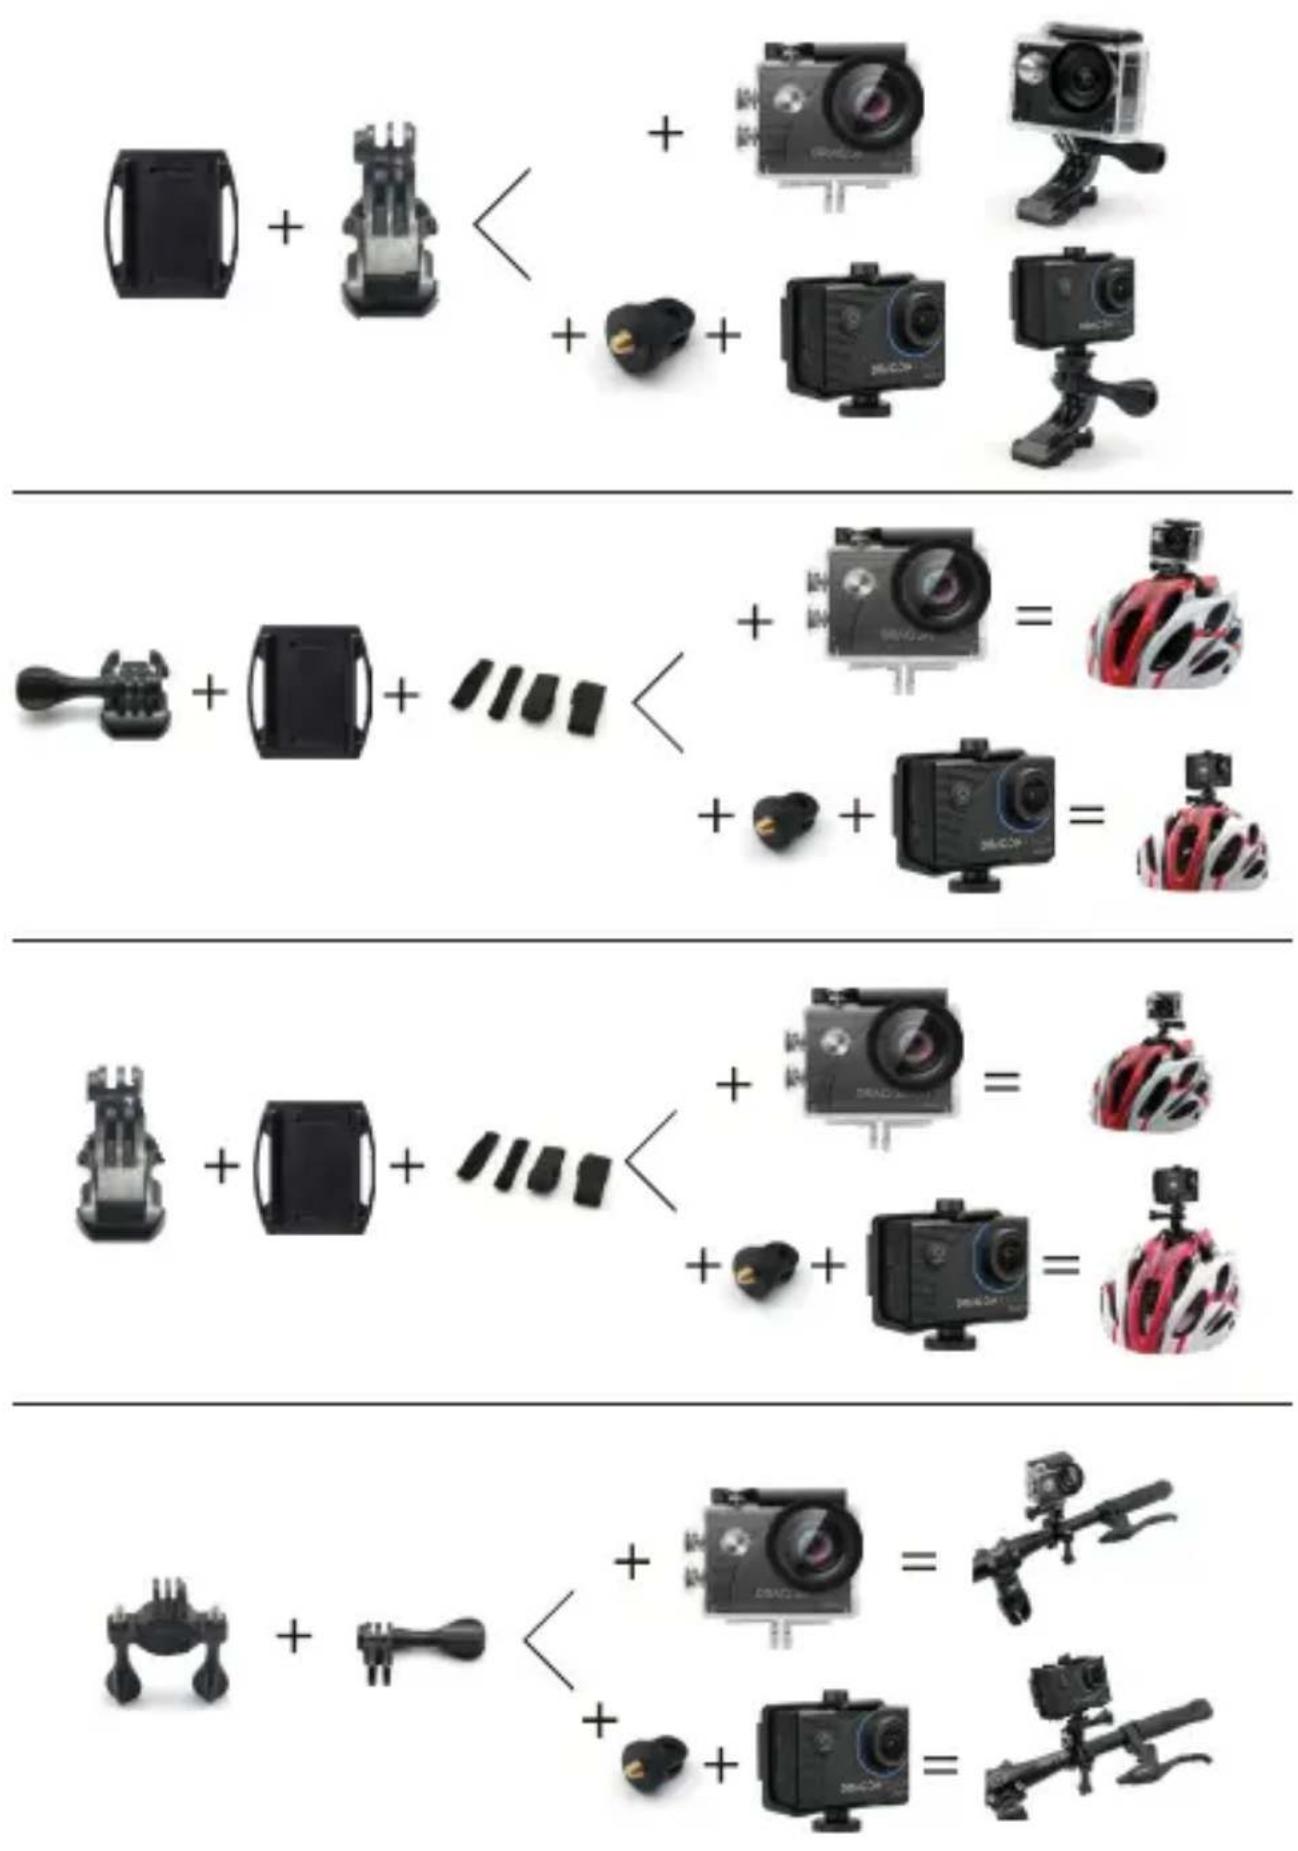
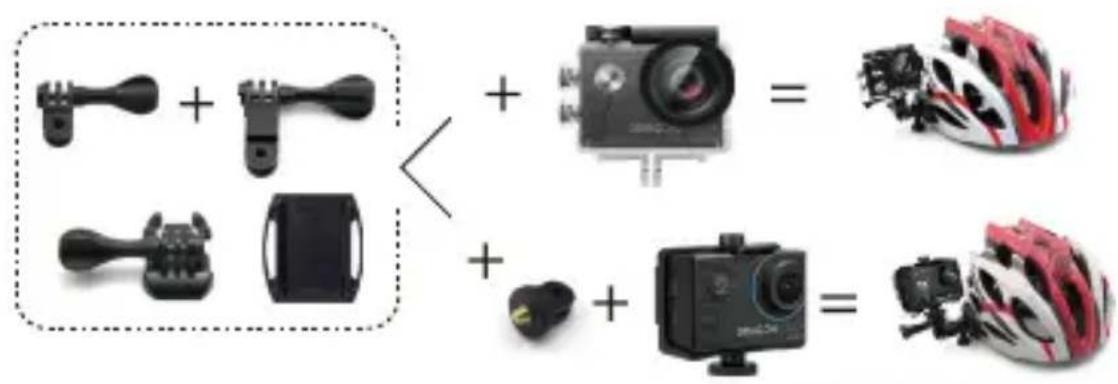
Mounting Your Camera
You can attach your camera to helmets, handlebars, and more to unlock more fun. Note: Before diving, ensure the USB cover is tightly closed to prevent it from getting soaked.
Contact Us
For any inquiries about DragonTouch products, please feel free to contact us.
We will respond within 24 hours.
Tel: 888-811-1140 (US)
Email: cs@dragontouch.com
Web: www.dragontouch.com
VISION 3
AKTION KAMERA

BENUTZERHANDBUCH
INHALTE
natural_image
Line drawing of a portable radio with circular and rectangular panels, no text or symbols presentAus/0,5s/1s/2s/5s/10s/30s/60s (Standard: Aus)
Aus/An (Standard: Aus)
Aus/3s/5s/10s/20s (Standard: Aus)
Aus/3s/10s/15s/20s/30s (Standard: Aus)
Aus, 3B/s, 5B/s, 10B/s (Standard: Aus)
Aus/10s/20s/30s (Standard: 30s)
natural_image
Three black electronic devices: a digital display, a black rectangular device with red mounting holes, and a small tool (no visible text or symbols)natural_image
Interior view of a black plastic electronic device showing green circuit board and internal components (no text or symbols visible)DE
natural_image
Close-up of a green printed circuit board with black plastic components and a red arrow pointing to a component (no visible text or symbols)natural_image
Close-up of a green printed circuit board with black plastic components and a red rectangular annotation highlighting a component (no readable text or symbols)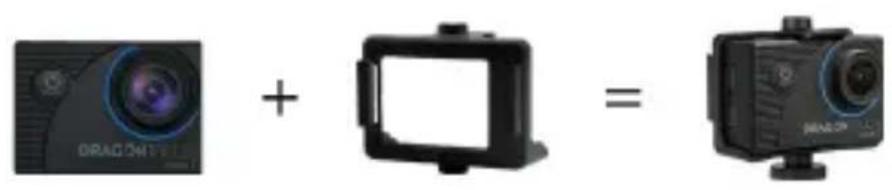

Kontaktiere uns
natural_image
Line drawing of a portable radio with circular buttons and ventilation slots (no text or symbols)Apagado/0.5s/1s/2s/5s /10s/30s/60s (Por defecto: Apagado)
Apagado/ 3s / 5s / 10s / 20s (Por defecto: Apagado)
Apagado / 3s / 10s / 15s / 20s / 30s (Por defecto: Apagado)
Apagado / 10s / 20s / 30s (Por defecto: 30s)
natural_image
Three black electronic devices: a digital display, a black rectangular casing with red mounting holes, and a tool tip (no visible text or symbols)natural_image
Close-up of a green printed circuit board with visible traces and components, enclosed in black plastic casing (no text or symbols)natural_image
Close-up of a green printed circuit board with exposed components and a red triangular annotation highlighting a component (no readable text or symbols)ES
natural_image
Close-up of a green printed circuit board with black plastic components and red annotation boxes (no readable text or symbols)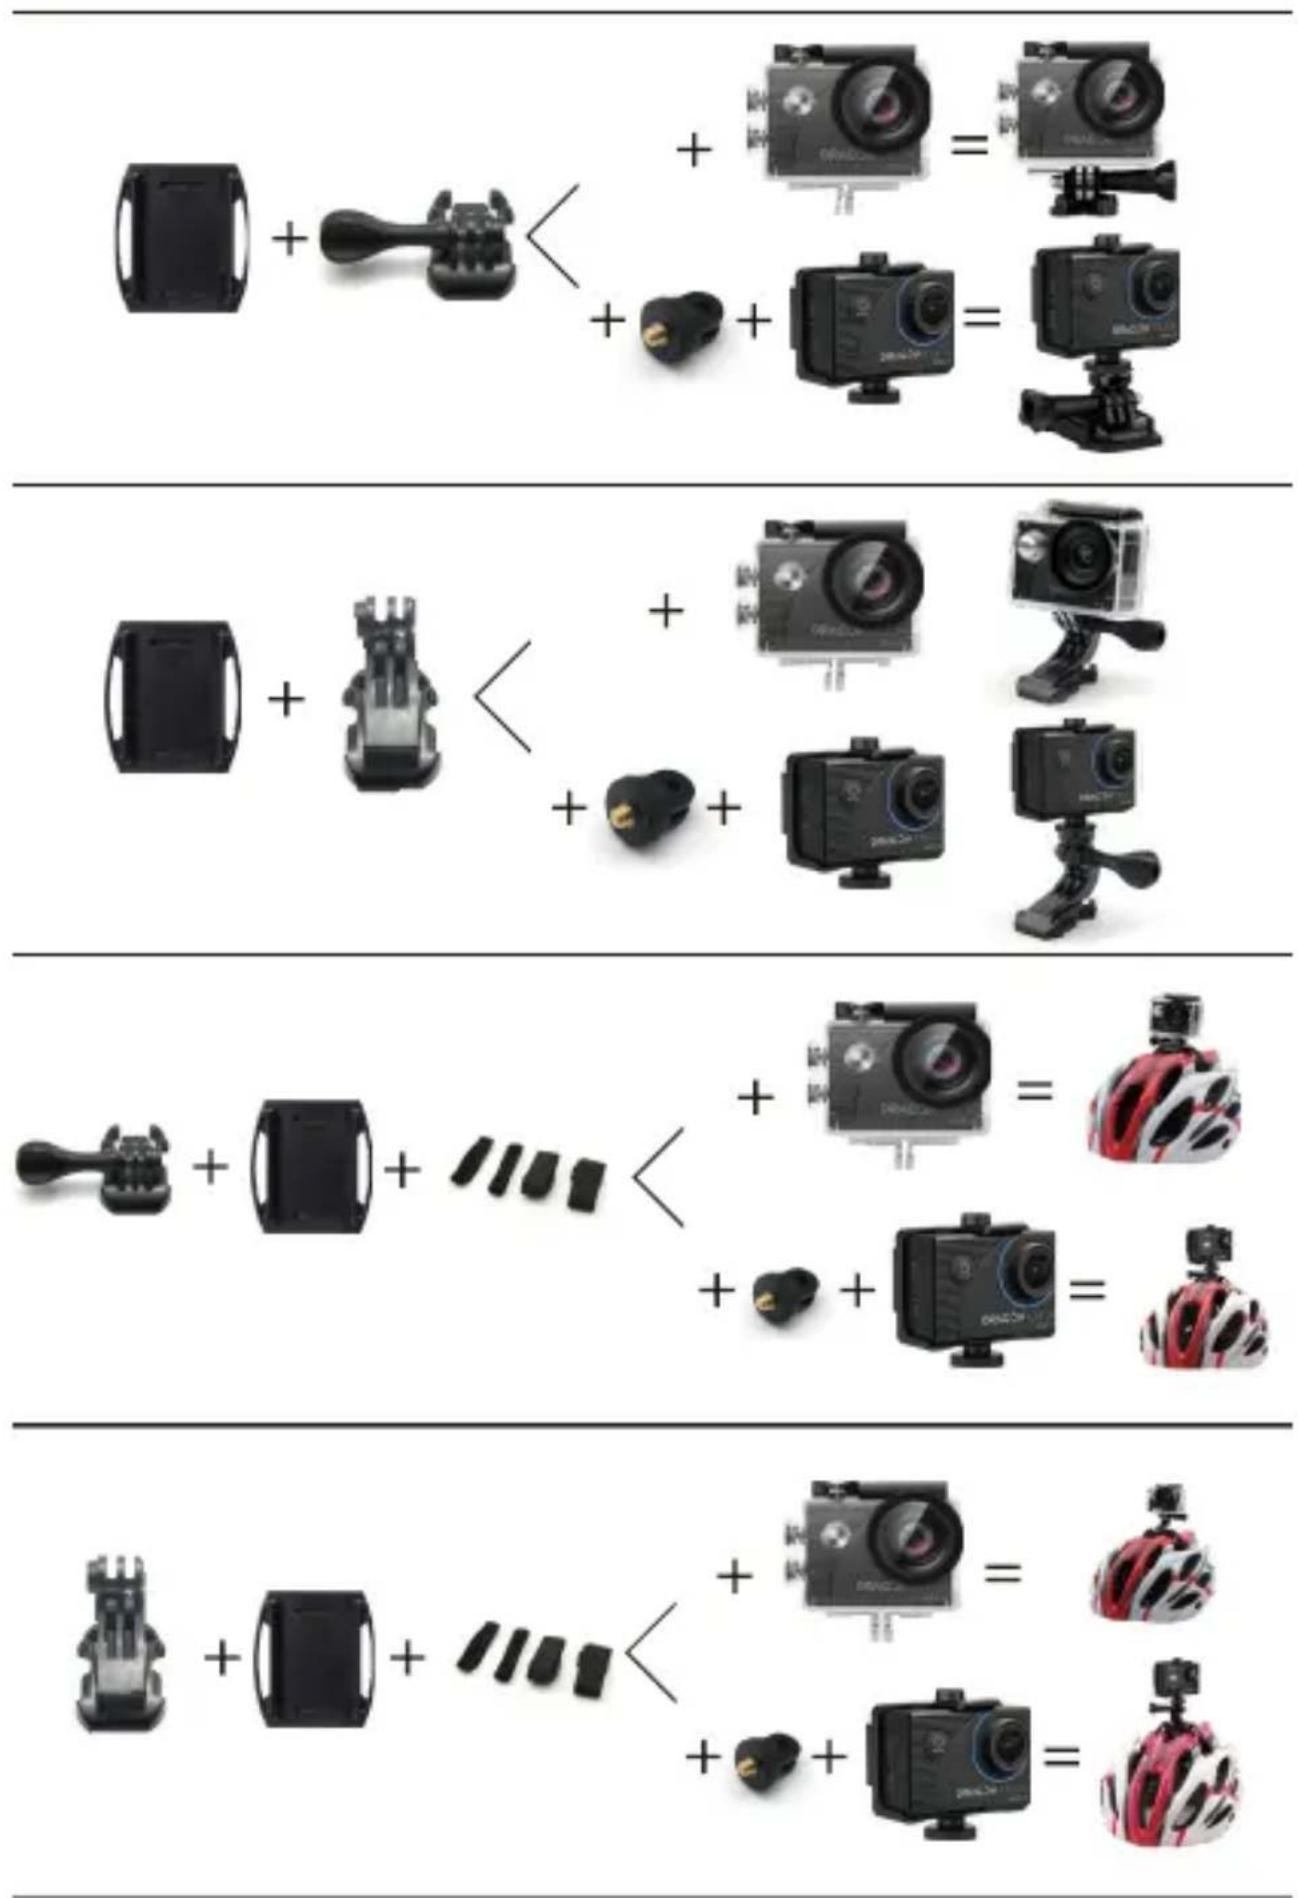
Contáctenos
Supports Pour
Casques 1 x 1
Supports Pour Casques 2 x 1
Pansements x 4

Attaches x 5
natural_image
Line drawing of a portable radio with circular and rectangular panels, no text or symbols present8 Écran D'affichage
12 Bouton Bas
natural_image
Three black electronic devices: a digital display, a black rectangular casing with red mounting holes, and a small tool (no visible text or symbols)natural_image
Close-up of a green printed circuit board with black plastic components and red mounting brackets (no visible text or symbols)natural_image
Close-up of a green printed circuit board with black plastic components and a red arrow pointing to a component (no visible text or symbols)natural_image
Close-up of a green printed circuit board with exposed components and a red rectangular annotation (no readable text or symbols)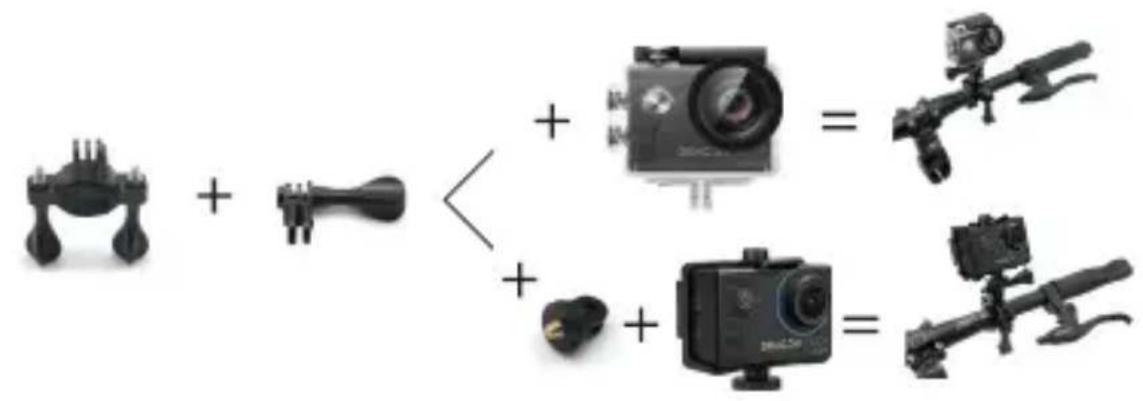

Contactez nous
Spento/0.5s/1s/2s/5s /10s/30s/60s (Impostazione predefinita: Spento)
natural_image
Three black electronic devices: a digital display, a black rectangular device with red buttons, and a small tool (no visible text or symbols)natural_image
Interior view of an electronic device showing green circuit board and internal components (no visible text or symbols)natural_image
Close-up of a green printed circuit board with black plastic components and a red arrow pointing to a component (no visible text or symbols)IT
natural_image
Close-up of a green electronic component with black connectors and internal circuitry (no visible text or symbols)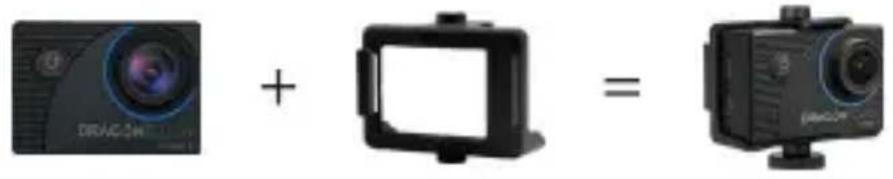
Contattaci
natural_image
Three black electronic devices: a digital display, a black rectangular casing with red buttons, and a handheld tool (no visible text or symbols)natural_image
Interior view of a green electronic device housing with visible circuit board and components (no text or symbols)natural_image
Close-up of a green electronic circuit board with exposed components and a blue arrow indicating upward motion (no text or symbols)日本語
natural_image
Close-up of a green printed circuit board with black plastic components and a blue arrow pointing to a component (no text or symbols visible)6.4つのネジをカバーに取り付けます。
カメラの取り付け方法
お問い合わせ
cs@dragontouch.comwww.dragontouch.com