HT2601E - Hedge trimmers EGO - Free user manual and instructions
Find the device manual for free HT2601E EGO in PDF.

| Product Type | Hedge Trimmer |
| Brand | EGO |
| Model | HT2601E |
| Rated Voltage | 56 V DC |
| No Load Speed | 1700 /min |
| Blade Length | 66 cm |
| Max Cutting Capacity | 30.5 mm |
| Weight (without battery) | 3.14 kg |
| Recommended Operating Temperature | 0 °C to 40 °C |
| Recommended Storage Temperature | -20 °C to 70 °C |
| Guaranteed Sound Power Level | 94 dB(A) |
| Sound Pressure Level | 84 dB(A) |
| Front Handle Vibration | 2.49 m/s² |
| Rear Handle Vibration | 1.65 m/s² |
| Adjustable Rear Handle | 5 positions (0°, ±45°, ±90°) |
| Power Source | 56 V lithium-ion battery (compatible with EGO batteries) |
| Protection | Hand guard, blade sheath |
| Recommended Use | Trimming hedges, shrubs, bushes |
| Safety | Dual trigger with lock-off, quick stop |
| Maintenance | Regular blade lubrication and sharpening |
Frequently Asked Questions - HT2601E EGO
User questions about HT2601E EGO
0 question about this device. Answer the ones you know or ask your own.
Ask a new question about this device
Download the instructions for your Hedge trimmers in PDF format for free! Find your manual HT2601E - EGO and take your electronic device back in hand. On this page are published all the documents necessary for the use of your device. HT2601E by EGO.
USER MANUAL HT2601E EGO
EN 56 Volt lithium-ion cordless hedge trimmer
DE 56 Volt lithium-ionen kabellose heckenschere 9
FR Taille-haie sans fil lithium-ion 56 v 15
natural_image
Line drawing of a cylindrical electronic device with internal components (no text or symbols)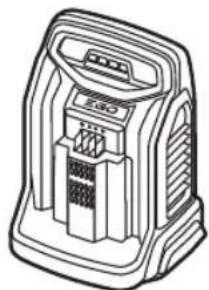
natural_image
Line drawing of a portable electronic device with control panel and buttons (no text or symbols)B

natural_image
Technical line drawing of a mechanical component with an arrow indicating direction (no text or symbols present)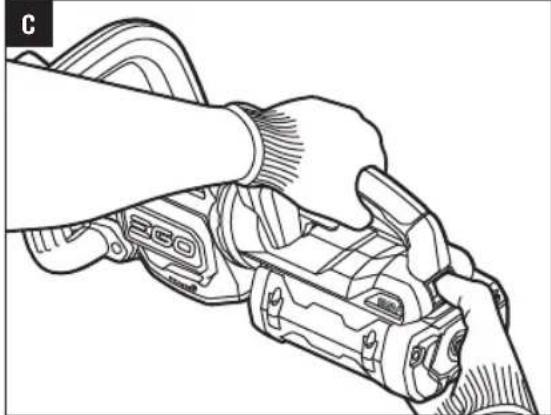
natural_image
Line drawing of a hand operating a mechanical device (no text or symbols visible)D1
natural_image
Technical line drawing of a mechanical tool or bracket assembly (no text or symbols visible)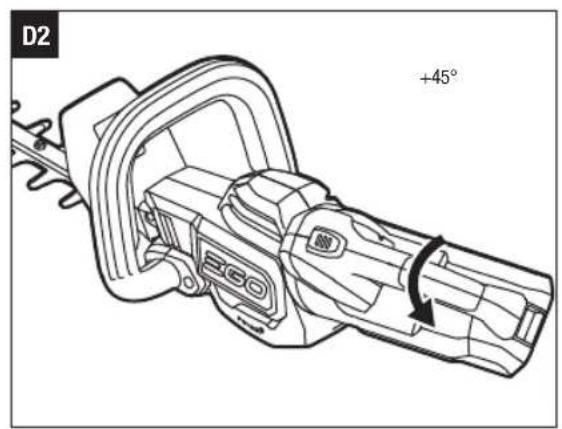
natural_image
Technical line drawing of a mechanical device with an angular annotation of -90° (no text or symbols on the diagram itself)
natural_image
Illustration of a hand using a tool to catch crops in a field, with no visible text or symbols.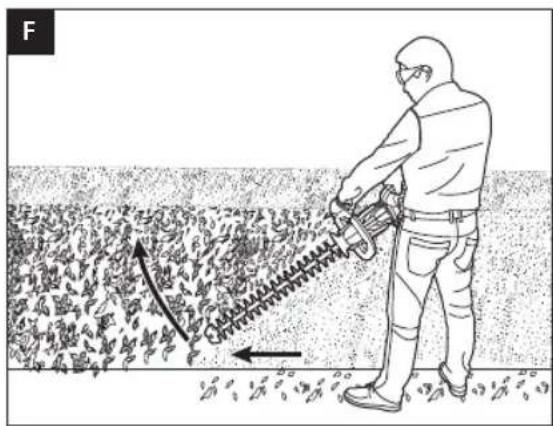
natural_image
Illustration of a person using a manual shoveling machine to brush through dense vegetation (no text or symbols)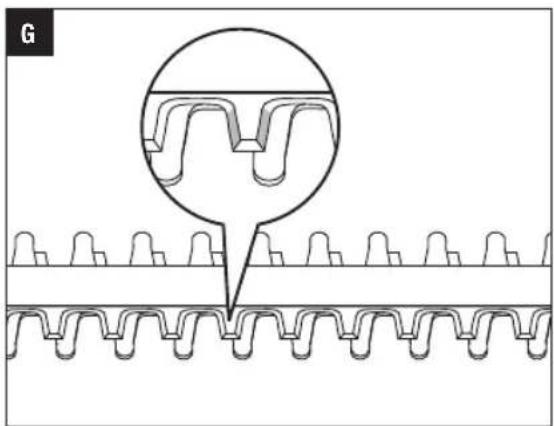
natural_image
Technical diagram showing gear teeth and a circular inset highlighting a specific tooth (no text or symbols present)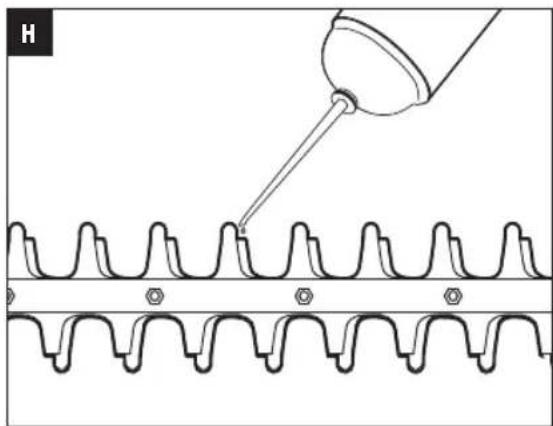
natural_image
Technical diagram showing a tool interacting with a gear-like mechanical component, with no visible text or symbols.EN READ ALL INSTRUCTIONS!

READ OPERATOR'S MANUAL
WARNING: Residual risk! People with electronic devices, such as pacemakers, should consult their physician(s) before using this product. Operation of electrical equipment in close proximity to a heart pacemaker could cause interference or failure of the pacemaker.
WARNING: To ensure safety and reliability, all repairs and replacements should be performed by a qualified service technician.
WARNING: Read all safety warnings, instructions, illustrations and specifications provided with this power tool. Failure to follow all instructions listed below may result in electric shock, fire and/or serious injury.
SAVE ALL WARNINGS AND INSTRUCTIONS FOR FUTURE REFERENCE.
SAFETY SYMBOLS
WARNING: The operation of any power tools can result in foreign objects being thrown into your eyes, which can result in severe eye damage. Before beginning power tool operation, always wear safety goggles or safety glasses with side shields and a full face shield when needed. We recommend a Wide Vision Safety Mask for use over eyeglasses or standard safety glasses with side shields.

Safety Alert

Do not use in the rain or leave outdoors while it is raining.

This product is in accordance with applicable EC directives.
Waste electrical products should not be disposed of with household waste. Take to an authorized recycler.

Keep hands and feet away from the cutting tool.

To reduce the risk of injury, user must read the operator's manual.

Guaranteed sound power level. Noise emission to the environment according to the European community's Directive.

This product is in accordance with applicable UK legislation.

Wear eye and head protection.

The length of the blade

Direct Current V Voltage
mm Millimeter .../min Per Minute
n
No Load Speed cm Centimeter
SPECIFICATIONS
| Model HT2600E | ||
| Voltage | 56 V --- | |
| No-Load Speed 1700 /min | ||
| Blade Length 66 cm | ||
| Cutting Capacity 30.5 mm | ||
| Weight (without battery pack,blade guard) | 3.14 kg | |
| Recommended Operating Temperature | 0°C-40°C | |
| Recommended Storage Temperature | -20°C-70°C | |
| Measured sound power level L_WA | 92 dB(A)K=1.7 dB(A) | |
| Sound pressure level at operator's position L_PA | 84 dB(A)K=3.0 dB(A) | |
| Guaranteed sound power level L_WA (according to 2000/14/EC) | 94 dB(A) | |
| Vibration a_n | Front Handle | 2.49 m/s2K=1.5 m/s2 |
| Rear Handle | 1.65 m/s2K=1.5 m/s2 | |
■ The declared vibration total value has been measured in accordance with a standard test method and may be used for comparing one tool with another;
■ The declared vibration total value may also be used in a preliminary assessment of exposure.
NOTICE: The vibration emission during actual use of the power tool can differ from the declared value in which the tool is used; In order to protect the operator, user should wear gloves and ear protectors in the actual conditions of use.
PACKING LIST (FIG. A1)
DESCRIPTION
KNOW YOUR HEDGE TRIMMER (Fig. A1)
- Hanging Hole
- Tip Protector
- Blade
- Hand Guard
-
Front Handle
-
Front Trigger
- Lock-off Button
- Rear Trigger
- Rear Handle
- Handle-release Lever
- Battery-release Button
- Latch
- Electric Contacts
- Battery-mounting Slot
- Battery Ejection
- Blade Guard
- Hanging Hole
WARNING: This product has been shipped completely assembled. The hand guard shall never be removed during use. Once damaged, replace it immediately by a qualified service technician.
WARNING: The safe use of this product requires an understanding of the information on the tool and in this operator's manual, as well as knowledge of the project you are attempting. Before use of this product, familiarize yourself with all operating features and safety rules.
OPERATION
WARNING: Do not allow familiarity with this product to make you careless. Remember that a careless fraction of a second is sufficient to inflict serious injury.
WARNING: Always wear eye protection with side shields, along with hearing protection. Failure to do so could result in objects being thrown into your eyes and other possible serious injuries.
WARNING: To prevent accidental starting that could cause serious personal injury, always remove the battery pack from the tool when assembling parts, making adjustments, cleaning, or when not in use.
⚠ WARNING: Do not use any attachments or accessories not recommended by EGO™. The use of attachments or accessories not recommended can result in serious personal injury.
Before each use, inspect the entire product for damaged, missing, or loose parts, such as screws, nuts, bolts, caps, etc. Tighten securely all fasteners and caps and do not operate this product until all missing or damaged parts are replaced.
EN
APPLICATION
You may use this product for trimming the hedges, shrubs and bushes with a branch diameter of less than 30.5mm .
NOTICE: The tool is to be used only for its prescribed purpose. Any other use is deemed to be a case of misuse.
INSTALLING/REMOVING THE BATTERY PACK
Use only with battery packs and chargers listed in fig.A2.
Charge before first use.
To Install (Fig. B)
Align the battery ribs with the mounting slots and press the battery pack down until you hear a "click".
To Remove (Fig. C)
Depress the battery-release button and pull the battery pack out.
WARNING: Always be aware for the location of your feet, children, or pets when pressing the battery-release button. Serious injury could result if the battery pack falls. NEVER remove the battery pack at a high location.
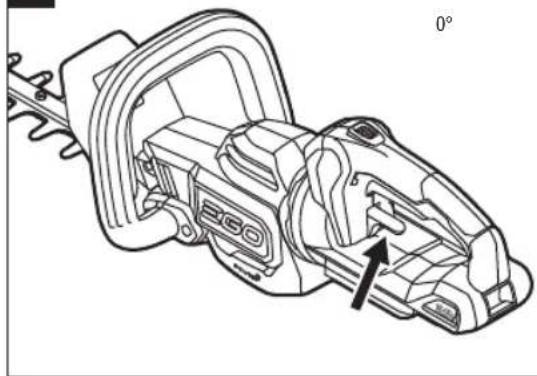
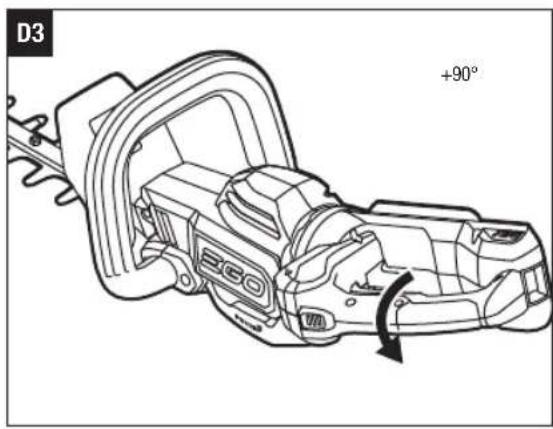
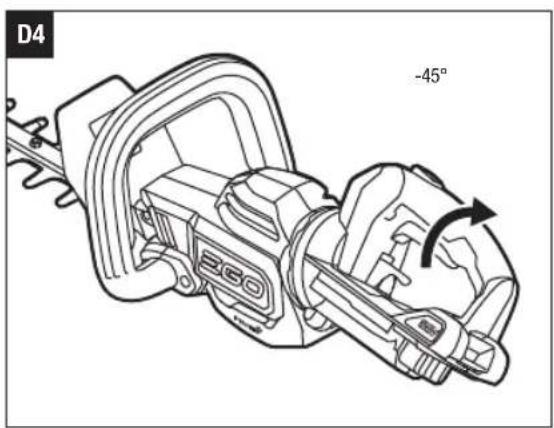
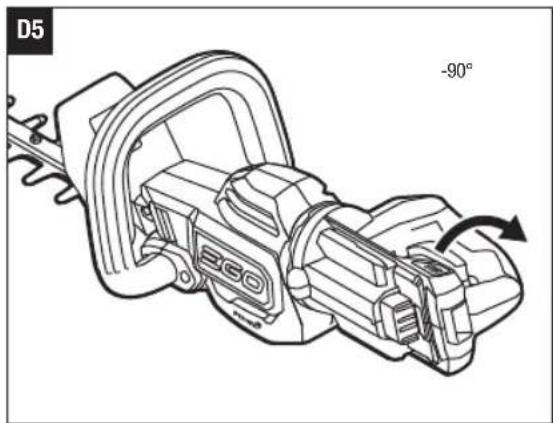
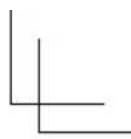
HOLDING THE HEDGE TRIMMER (Fig. D1-D5)
The unit has both a front and rear handle. With the blade directed away from you, hold the unit by both handles.
The rear handle can be set in five positions (0°/±45°/±90°) by raising up the handle-release lever (Fig. D1 to Fig.D5), giving you many choices for a comfortable grip when performing cutting operations.
WARNING: Do not adjust the handle while the tool is running. Stop the tool and remove the battery first.
STARTING/STOPPING THE HEDGE TRIMMER
Before operating, remove the blade guard and hold the trimmer with both hands, one hand on the rear handle and the other on the front handle. Then check for stable footing, upright standing and a proper cutting distance.
To Start
- Install the battery pack.
- Squeeze and hold the front trigger with one hand.
- Press and hold the lock-off button with the thumb of your other hand, then squeeze the rear trigger with your fingers to start the hedge trimmer. Release the lock-off button but continue to squeeze the trigger for continued operation.
To Stop
Move the hedge trimmer away from the cutting area and release either of the trigger to stop the hedge trimmer.
WARNING: Always remove the battery pack from the hedge trimmer during work breaks and after finishing work.
USING THE HEDGE TRIMMER
DANGER: If the blade jams on any electrical cord or line, DO NOT TOUCH THE BLADE! IT CAN BECOME ELECTRICALLY LIVE AND VERY DANGEROUS. Continue to hold the hedge trimmer by the insulated rear handle or lay it down and away from you in a safe manner. Disconnect the electrical service to the damaged line or cord before attempting to free the blade from the line or cord. Failure to heed this warning will result in serious personal injury or possible death.
WARNING: Avoid trimming too much at one time or through the heavy shrubbery. This can cause the blades to bind and slow, reducing the cutting efficiency.
NOTICE: The trimmer shall be used to cut stems less than (30.5mm) thick.
NOTICE: For new growth, a wide sweeping is suitable for the stems fed directly into the cutting blade. For older growth, a sawing movement is good for trimming the thicker stems. A non-powered hand saw or pruning saw is suggested for trimming the large stems first.
Top Cutting
Use a wide sweeping motion. A slight downward tilt of the cutting blades in the direction of motion gives the best cutting results. For better cutting effect, you might as well use the string to guide the hedge level as Fig. E shown.
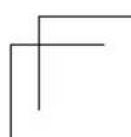
Side Cutting
When trimming the sides of the hedge, begin at the bottom and cut upwards as Fig. F shown. Trim the side of a hedge so that it will be slightly narrower at the top. This shape will expose more of the hedge to sunlight, resulting in a more uniform growth.
MAINTENANCE
WARNING: When servicing, use only identical replacement parts. Use of any other parts may create a hazard or cause product damage. To ensure safety and reliability, all repairs should be performed by a qualified service technician.
WARNING: To avoid serious personal injury, always remove the battery pack from the product when cleaning or performing any maintenance.
CLEANING
■ Use a soft brush to remove debris from all air intakes and cutting blade.
■ To remove pitch and other sticky residue, spray the blades with resin solvent. Run the motor briefly so that the solvent is evenly distributed.
■ Wipe the surface with a dry cloth.
WARNING: Never use water for cleaning your trimmer. Avoid using solvents when cleaning plastic parts. Most plastics are susceptible to damage from various types of commercial solvents. Use clean clothes to remove dirt, dust, oil, grease, etc.
SHARPENING THE CUTTING BLADE
- Start and stop your hedge trimmer until the cutter blade and the guard are slightly offset, as shown in Fig. G. This will allow clearance for the file between cutter teeth and guard teeth.
- Remove the battery pack from your hedge trimmer.
- Clamp the blade assembly in a vise and file the exposed cutting surface of each blade tooth. Remove as little material as possible. Be sure to retain the original angle of each tooth when filing.
- Remove the hedge trimmer from the vise; restart it and stop it to expose the unsharpened edges of the blade teeth.
- Remove the battery pack and repeat the sharpening procedure above.
NOTICE: Do not operate your hedge trimmer with dull or damaged cutting blades. This may cause overload and will give unsatisfactory cutting results.
LUBRICATING THE BLADE (Fig. H)
For best operation and longer blade life, lubricate the hedge trimmer blade with light weight machine oil before and after each use.
Remove the battery pack and lay the trimmer onto a flat surface. Apply the oil along the edge of the top blade.
NOTICE: For extended using period, oil the blade during cutting operation.
WARNING: Do not oil while the hedge trimmer is running.
TRANSPORTING AND STORING
■ Always place the blade guard on the blade before storing or transporting the hedge trimmer. Use caution to avoid the sharp teeth of the blade.
■ Clean the hedge trimmer thoroughly before storing.
■ Store the hedge trimmer indoors, in a dry place that is inaccessible to children.
- Keep away from corrosive agents such as garden chemicals and deicing salts.
WARNING: Blades are sharp. When handling the blade assembly, wear non-slip, heavy-duty protective gloves. Do not place your hand or fingers between blades or in any position where they could get pinched or cut. NEVER touch blades or service the unit with battery pack installed.
Protecting the environment
Do not dispose of electrical equipment, used battery and charger into household waste! Take this product to an authorized recycler and make it available for separate collection. Electric tools must be returned to an environmentally compatible recycling facility.
EN TROUBLESHOOTING
| PROBLEM CAUSE SOLUTION | ||
| Hedge trimmer doesn’t work. | The battery pack is not attached to the hedge trimmer.No electrical contact between the trimmer and batteryThe battery pack is depleted.The battery pack is too hot.The hedge trimmer is too hot.The front and rear triggers are not depressed simultaneously.The blade is jammed. | Attach the battery pack to the hedge trimmer.Remove battery, check contacts and reinstall the battery pack.Charge the battery pack.Remove the battery pack from the tool and allow it to cool until the temperature drops below 67°C.Release both triggers; allow the trimmer to cool until the temperature drops to normal temperature.Press the lock-off button first and then press the triggers in the front and rear handle simultaneously.Remove the battery pack from the tool, remove the obstruction carefully, then reinsert the battery and restart the tool. |
| Excessive vibration or noise. | Dry or corroded blades.Blades or blade support is bent.Bent or damaged teeth.Loose blade bolts. | Lubricate the blades, following the section “LUBRICATING THE BLADE” in this manual.Replace with a new blade or support. Contact EGO service center for blade or support replacement service.Replace with a new blade. Contact EGO service center for blade replacement service.Tighten the blade bolts. Using a wrench, turn the bolt clockwise to tighten. |
WARRANTY
EGO WARRANTY POLICY
Please visit the website egopowerplus.com for full terms and conditions of the EGO Warranty policy.
LISTA DE PEÇAS (IMAGEM A1)
DESCRIÇÃO
TRANSPORT OCH FÖRVARING
POLITYKA GWARANCYJNA EGO
POUŽÍVANIE NOŽNÍC NA ŽIVÉ PLOTY
A CSOMAG TARTALMA (A1 ÁBRA)
LEÍRÁS
ISMERJE MEG A SÖVÉNYNYÍRÓT (A1 ábra)
CITIȚI MANUALUL DE INSTRUCTIUNI
LUGEGE KASUTUSJUHENDIT
The Ground Truth image displays a single, solid horizontal line. According to Rule 2 (UNDERSCORE & LINE RULES), this is a stylistic or background line, not a placeholder underscore. Therefore, the OCR result must ignore it and output nothing or only meaningful text. The provided OCR content is "____", which consists of four underscores. This is an incorrect interpretation of the line as a placeholder, violating the rule that stylistic lines must be ignored. The OCR has hallucinated underscores where none should exist based on the GT's visual context. Hence, the OCR result is inconsistent with the Ground Truth.
Električnu opremu, iskorištenu bateriju i punjač ne odlažite u kućni otpad! Ovaj proizvod odnesite u ovlašteni centar za reciklažu i time omogućite odvojeno sakupljanje. Električne alate potrebno je vratiti u ekološki prihvatljiv pogon za reciklažu.
OTKLANJANJE PROBLEMA
| PROBLEM UZROK RJEŠENJE | ||
| Makaze za živicu ne rade. | Komplet baterija nije pričvršćen na makaze za živicu.Nema električnog kontakta između makaza i baterije.Komplet baterija je ispražnjen.Komplet baterija je previše vruć.Makaze za živicu su previše vruće.Prednji i stražnji okidač ne pritišću se istovremeno.Nož se zaglavio. | Pričvrstite komplet baterija na makaze za živicu.Izvadite bateriju, provjerite kontakte i ponovo stavi komplet baterija.Napunite komplet baterija.Izvadite komplet baterija iz alata i pričekajte da se ohladi na temperaturu ispod 67°C.Otpustite oba okidača. Pričekajte da se makaze za živicu ohlade dok se temperatura ne spusti na normalnu temperaturu.Prvo pritisnite dugme za deblokadu, a zatim istovremeno pritisnite okidače na prednjem i stražnjem rukohvatu.Izvadite komplet baterija iz alata. Pažljivo uklonite zapreku, a zatim ponovo stavite bateriju i pokrenite alat. |
| Prevelike vibracije ili buka. | Suhi ili korodirani noževi.Noževi su savijeni ili je držač noževa savijen.Savijeni ili oštećeni zupci.Otpušteni vijci noža. | Podmažite noževe prema uputstvima u odjeljku „PODMAZIVANJE NOŽA“ u ovom priručniku.Stavite novi nož ili držač noža. Za zamjenu noža ili držača noža obratite se servisnom centru proizvođača EGO.Stavite novi nož. Za zamjenu noža obratite se servisnom centru proizvođača EGO.Pritegnite vijke noža. Za pritezanje, ključem okrenite vijak u smjeru kretanja kazaljki na satu. |
GARANCIJA
POLITIKA GARANCIJE PROIZVOĐAČA EGO
Za sve odredbe i uslove politike garancije proizvođača EGO posjetite internetsku stranicu egopowerplus.com.


.הכלההוּרָהוּרָהוּרָהוּרָהוּרָהוּרָהוּרָהוּרָהוּרָהוּרָהוּרָהוּרָהוּרָהוּרָהוּרָה