
MG 10 - Water dispenser TAURUS - Free user manual and instructions
Find the device manual for free MG 10 TAURUS in PDF.
| Product type | Water dispenser and ice maker |
| Brand | Taurus |
| Model | MG 10 |
| Functions | Hot water, cold water, ice cubes |
| Power supply | 220-240 V ~ 50 Hz |
| Recommended water pressure | 0.14 - 0.6 MPa |
| Water tank capacity | Not specified |
| Ice production | Approximately 7 to 20 minutes per cycle |
| Refrigerant type | Flammable |
| Control panel | LED display with touch buttons |
| Child lock | Yes |
| Programmable timer | Yes (for ice and hot water) |
| Transport handle | At the back |
| Thermal protection | Yes |
| Included accessories | Ice basket, ice scoop, drip tray |
| Recommended cleaning | Damp cloth with mild detergent |
| Water maintenance | Change water every 24 hours |
| Recommended water type | Bottled mineral water or potable tap water |
| Safety | Automatic shut-off in case of overheating, warning indicators |
| After-sales service | Original spare parts, authorized technical service |
Frequently Asked Questions - MG 10 TAURUS
User questions about MG 10 TAURUS
0 question about this device. Answer the ones you know or ask your own.
Ask a new question about this device
Download the instructions for your Water dispenser in PDF format for free! Find your manual MG 10 - TAURUS and take your electronic device back in hand. On this page are published all the documents necessary for the use of your device. MG 10 by TAURUS.
USER MANUAL MG 10 TAURUS
natural_image
Line drawing of a mechanical device with control panel and base plate (no text or symbols)
Fig.1
natural_image
Line drawing of a water dispenser with a downward arrow indicating flow or movement (no text or symbols)Fig.2
natural_image
Line drawing of a server unit with a downward arrow and control panel (no text or symbols)Español
Ice maker / water fountain
MG10
Dear customer,
Many thanks for choosing to purchase a TAURUS ALPATEC brand product.
Thanks to its technology, design and operation and the fact that it exceeds the strictest quality standards, a fully satisfactory use and long product life can be assured.
- Read these instructions carefully before switching on the appliance and keep them for future reference. Failure to follow and observe these instructions could lead to an accident.
- Clean all the parts of the product that will be in contact with food, as indicated in the cleaning section, before use.
SAFETY ADVICE AND WARN- INGS
- This appliance can be used by children aged from 8 years and above and persons with reduced physical, sensory or mental capabilities or lack of experience and knowledge if they have been given supervision or instruction concerning use of the appliance in a safe way and understand the hazards involved.
- This appliance is not a toy. Children should be supervised to ensure that they do not play with the appliance.
- Cleaning and user maintenance shall not be made by children unless they are supervised.
- Do not store explosive substan-
ces such as aerosol cans with a flammable propellant in this appliance.
- This appliance is only for domestic use, not for industrial or professional use. It is not intended to be used by guests in hospitality environments such as bed and breakfast, hotels, motels, and other types of residential environments, even in farm houses, areas of the kitchen staff in shops, offices and other work environments.
- If the connection to the mains has been damaged, it must be replaced, take the appliance to an authorised technical support service. Do not attempt to disassemble or repair the appliance by yourself in order to avoid a hazard.
- Do not store explosive substances such as aerosol cans with a flammable propellant in this appliance.
- WARNING: fill with potable water only.
- WARNING: Connect to potable water supply only.
- WARNING: Keep ventilation openings, in the appliance enclosure or in the built-in structure, clear of obstruction.
- WARNING: Do not use mechanical devices or other means to accelerate the defrosting pro-
cess, other than those recommended by the manufacturer.
- WARNING: Do not damage the refrigerant circuit.
- WARNING: Do not use electrical appliances inside the food storage compartments of the appliance, unless they are of the type recommended by the manufacturer.
- Ensure that the voltage indicated on the rating label matches the mains voltage before plugging in the appliance.
- Connect the appliance to a base with an earth socket withstanding a minimum of 10 amperes.
- The appliance's plug must fit into the mains socket properly. Do not alter the plug. Do not use plug adaptors.
- Do not force the power cord. Never use the power cord to lift up, carry or unplug the appliance.
- Do not wrap the power cord around the appliance.
- Do not clip or crease the power cord.
- Check the state of the power cord. Damaged or tangled cables increase the risk of electric shock.
- Do not touch the plug with wet hands.
- Do not use the appliance if the cable or plug is damaged.
- If any of the appliance casings breaks, immediately disconnect the appliance from the mains to prevent the possibility of an electric shock.
- Do not use the appliance if it has fallen on the floor, if there are visible signs of damage or if it has a leak.
- Do not place the appliance on hot surfaces, such as cooking plates, gas burners, ovens or similar.
- Do not place the appliance where it can reach the sunlight.
- The appliance must be used and placed on a flat, stable surface.
- Place the appliance on a horizontal, flat, stable surface and away from other heat sources and contact with water.
- Do not use or store the appliance outdoors.
- Do not leave the appliance out in the rain or exposed to moisture. If water gets into the appliance, this will increase the risk of electric shock.
USE AND CARE:
- Fully unroll the appliance's power cable before each use.
- Do not use the appliance if its accessories are not properly fitted.
- Do not use the appliance if the accessories attached to it are defective. Replace them immediately.
- Do not switch the appliance on without water.
- Do not use the appliance if the on/off switch does not work.
- Do not move the appliance while in use.
- Use the appliance handle/s, to catch it or move it.
- Do not use the appliance if it is tipped up and do not turn it over.
- Do not turn the appliance over while it is in use or connected to the mains.
- Disconnect the appliance from the mains when not in use and before undertaking any cleaning task.
- Unplug the appliance from the mains before refilling the water tank.
- This appliance is for household use only, not professional, industrial use.
- Store this appliance out of reach of children and/or persons with physical, sensory or reduced mental or lack of experience and knowledge.
- Use the appliance and its accessories and tools in accordance with these instructions, taking into account the working conditions and the work to be performed. Use the appliance for operations different from those intended could result in a hazardous situation.
- Only use water with the appliance.
- The use of bottled mineral water adapted for human consumption is recommended.
SERVICE:
- Make sure that the appliance is serviced only by specialist personnel, and that only original spare parts or accessories are used to replace existing parts/accessories.
- Any misuse or failure to follow the instructions for use renders the guarantee and the manufacturer's liability null and void.
DESCRIPTION
1 (Front Shell) Parte frontal
2 (Indicator) Pantalla
3 (control panel) Panel de control
4 (Power) Boton encendido / apagado
5 (Hot wáter faucet) Grifo de agua caliente
6 (Ice drawer) Cajon de hielo
7 (Clever seat) Reposa botellas
8 (Top cover) Tapa superior
9 (Side Shell) Tapa lateral
10 (Cold wáter faucet) Grigo de agua fría
11 (fan cover) tapa del ventilador
12( Drip tray) bandeja antigoteo
Warning, low water indicator
08:48 Time Display, first two digital is for hour, last two is for minute

Ice level indicator
TIME Clock display
ON Setting the timer to turn "On" the Ice Making or Hot Water
OFF Setting the timer to turn "Off" the Ice Making or Stop making Hot Water
ICE Informs you that you are now setting the time for ice making
HOT Informs you that you are now setting the time for hot water
Once illuminated, it means the water is up to temperature and ready for use

Child Lock Display is on or off, if indicator this means unit is Locked.
Means the machine is on Ice Making.
Cold water function, once illuminated, cold and ready for use
Button Area
press this button to Start or Stop ice and set time
press this button to Start or Stop making
press this button to Start or Stop mak- water
press this button to set time or active clock
press this button to dispense cold
water
press this button to dispense hot water
Note: Please do not touch hot water as the temperature may be too high
POWER press this button to power on the machine
INSTALLATION
- Make sure you have removed all packing material. In order to prevent possible risk of accidents, do not leave items such as plastic bags, polystyrene or cables within the reach of children.
- During transportation, the tilt angle of the appliance must not exceed 45^ . Do not locate the appliance upside down as this may damage the compressor.
- Place the appliance on a flat, stable surface and away from any heat source.
- The appliance requires proper ventilation in order to operate correctly. Leave a free space of 15 cm around the appliance.
- Do not obstruct the opening of the door of the appliance.
- The socket should be easily accessible in order to be able to quickly disconnect the appliance in case of an emergency.
INSTRUCTIONS FOR USE
BEFORE USE:
- Make sure that all products' packaging has been removed.
- Before using the product for the first time, clean the parts that will come into contact with food in the manner described in the cleaning section.
- It is recommended that you wait for a minimum of 2 hours after having installed the appliance before you use it for the first time, leaving the front cover open.
- Prepare the appliance according to the function you wish to use:
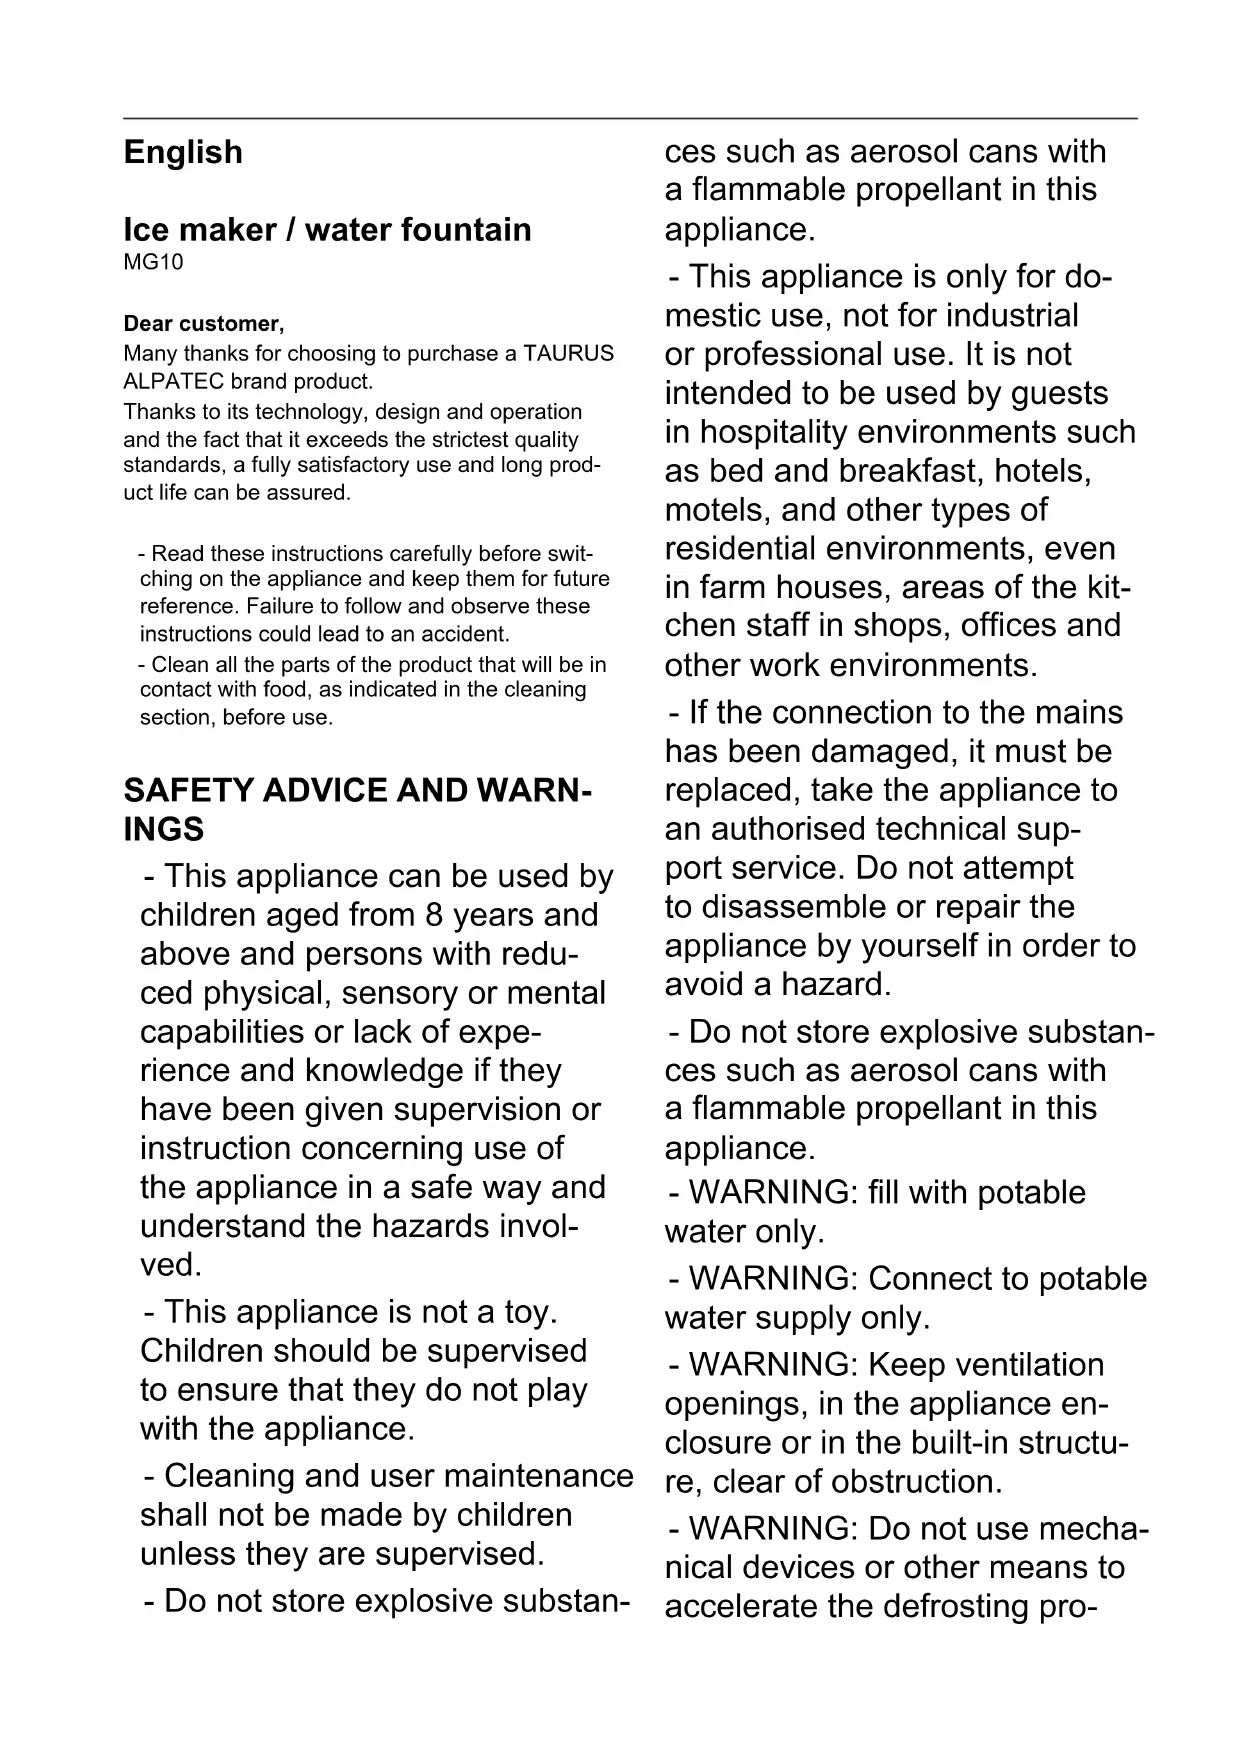
STEP 1:ADD WATER
- If bottled water is used, remove the paper seal and plastic, then tip bottle onto the cleaver seat, water will release into the machine automatically if pipe is used,
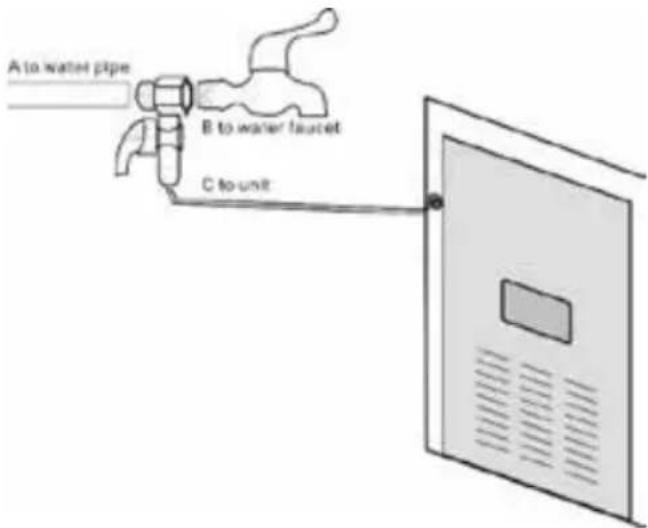
- Note: Inlet water pressure should be within 0.1-0.4Mpa
USE:
- Unroll the cable completely before plugging it in.
- Fill the appliance with water (Fig 1) Do not place any liquid other than drinking water in the tank.
- Connect the appliance to the mains..
POWER
- Step 2: Connect to power and press POWER to start the machine.
- Step 3: Press the right buttons to start the function you want.
- Note: After the water is filled, press

the water faucet lastly press ____ for making hot water so as to avoid the heater going into automatic protection.
- Note: For the first three cycles, the ice may be small and irregular in size.
- If no water is pumped up to the water tray over two cycles, then please open the drain cap and let several drops water runs out.
GETTING HOT /COLD WATER / ICE
- 4.1 Hot water: Press button then
to get hot water.
- 4.2 Cold water: Press button directly
- 4.3 Ice: Pull the ice drawer out and take ice with the ice scoop
SET TIMER:
- You can set the clock to automatically turn on and turn off time via following steps:
SETTING THE CLOCK:
- Long press on the button till the figures at the indicator area is illuminated ICE+/+ then press the button to change the LOCK/SET and ,to change the minute,after the right time is set,the time will flash for 5seconds,then locate.
SETTING THE TIMER FOR THE ICE MAKING FUNCTION:
- A1, Long press on the ☐ button till the clock is illuminated,
- A2. then short presses on the button till the indicator ICE and appear,
- A3. when the first two digits are illuminated,
ICE/+ press the button to change the hour, - A4 after it is set, with a short push on the LOCK/SET button again, the last two digits will
ICE/10 illuminate, press the button again to change the minutes. - A5. When you are finished and the figures are not illuminated, long press on the button till indicator ON is on.
UNSETTING THE TIMER FOR THE ICE MAKER FUNCTION:
- B1, Long press on the button till the clock is illuminated, - B2, then short press on the button till the indicator and appear,
- B3. when the first two digits are illuminated, press the ☐ button to change the hour, - B4. After it is set, with a short push on the LOCK/SET button again, the last two digits will illuminate, press the ☐ button again to change the minute. - B5. After the setting is finished and the figures are not illuminated, long press on the ☐ button till indicator OFF is on.
SETTING THE TIMER FOR THE HOT WATER FUNCTION,
- C1. Long press on the button till the clock is illuminated.
- C2. Short press on the button until the indicator HOT and ON appear.
- C3. When the first two digits are illuminated, press the ICE/+ button to change the hour
- C4. When it is set, short push the button again, the last two digits will shine, press the ICE/- the button again to change the minute.
- C5. After the settings are finished and the figures stop are not illuminated, long press on the HEAT button till indicator is on
UNSETTING THE TIMER FOR THE HOT WATER FUNCTION:
- D1, Long press on the button till the clock is illuminated, - D2. Short press on the button till the indicator HOT and appear, - D3. When the first two digits are illuminated, press the ICE/+ button to change the hour,
- D4. After it is set, short push on the button again, the last two digits illuminate, press
ICE/+ the button again to change the minute.
- D5. After the settings are finished and the fig-
ures stop shining, long press on the button till indicator OFF is on.

TIME SETTING FOR TURNING HOT WATER FUNCTION ON AND OFF,
- follow step: A1, A2, A3, A4, B2, B3, B4, C1, C2, C3, C4, D1, D2, D3, D4 after the setting is finished and the figures stop shining, long
press on button ON OFF are on. till indicator and
MAKE ICE CUBES:
- Press the start/stop button (4) and the green operating button will remain lit. The appliance starts to operate.
- The processing time is approximately 7-20 minutes (depending on water temperature and room temperature). Caution: The ice cubes produced may be small and irregular during the first cycles.
- Once the ice cubes have been processed, the excess water will drain into the water tank and the cubes will fall onto the ice tray
- Caution: the cubes may not be fully transparent, due to the air entering during processing development but this does not alter the quality of the cubes.
- When the water tank is empty, the «Tank empty» icon will light.
- Turn off the appliance.
- Wait few minutes before running the appliance again.
- When the ice cube tray is full, the «Tray full» light icon will light up and several beeps will sound.
- Drain the ice cube tray with the help of the spoon supplied with the appliance.
ONCE YOU HAVE FINISHED USING THE APPLIANCE:
- After use, press the start/stop button to turn off the appliance.
- Unplug the appliance from the mains.
- Clean the appliance.
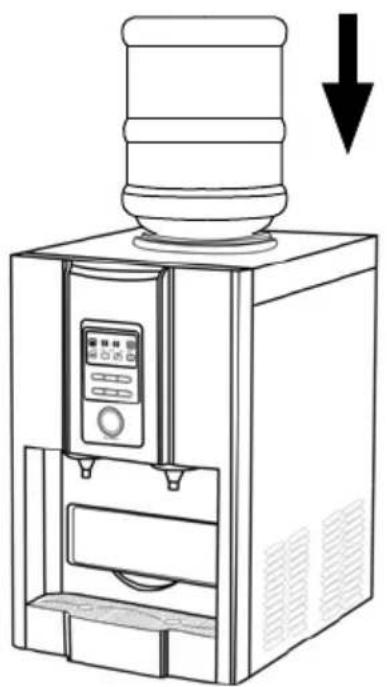
CARRY HANDLE/S:
- This appliance has a handle on the back to make it easy and convenient to transport. (Fig 2).
SAFETY THERMAL PROTECTOR:
- The appliance has a safety device, which protects the appliance from overheating.
CLEANING
- Disconnect the appliance from the mains and allow it to cool before undertaking any cleaning task.
- Clean the equipment with a damp cloth with a few drops of washing-up liquid and then dry.
- Do not use solvents, or products with an acid or base pH such as bleach, or abrasive products, for cleaning the appliance.
- Do not let water or any other liquid get into the air vents to avoid damage to the inner parts of the appliance.
- Never submerge the appliance in water or any other liquid or place it under running water.
- Never submerge the connector in water or any other liquid or place it under running water.
- and storage.
- In order to ensure optimum quality of the cubes, it is recommended that you change the water every 24 hours.
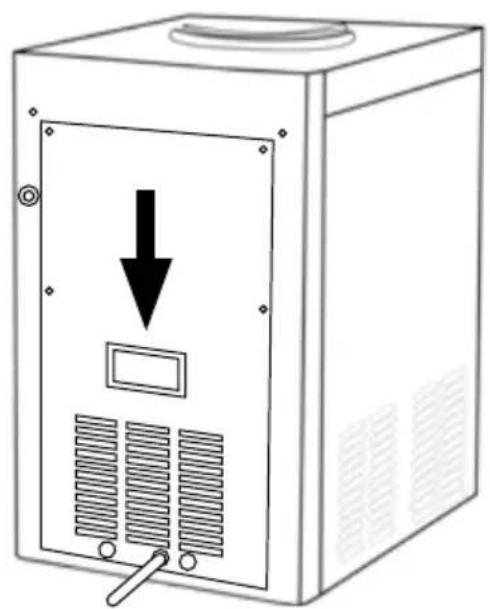
DRAIN WATER
- Take off the cap at back of the units to drain the water, Blue for cold water, Red for hot water
ANOMALIES AND REPAIR
- Take the appliance to an authorised technical support service if product is damaged or other problems arise. Do not attempt to disassemble or repair the appliance yourself as this may be dangerous.
- If any anomaly is detected, check the following table:
| Problem Possible causes | Possible Solutions | |
| The compressor is operating abnormally and makes a humming sound. | The voltage is lower than recommended. | Do not connect the appliance to the mains supply if the voltage indicated on the rating plate does not correspond with that of the mains voltage. |
| The «Tank empty» indicator light lights up. | The water tank is empty.There is air in the water pump. | Turn off the appliance, fill the tank and wait 3 minutes before restarting the appliance.Remove the silicone plug and leave a few drops of water. |
| One/several indicator lights do not light up. | The LEDS are blown. Contact your dealer or after sales service to replace them. | |
| Despite having observed all indications, no cubes are forming. | Lack of coolant in the freezer or the fan motor is damaged. | Contact your dealer or after sales service. |
| The «Tank empty» and «Tray full» indicator lights light up at same time. | If all conditions are being followed, the cube ejector may be blocked. | Turn off and disconnect the appliance, in order to remove the ice cubes. Turn the appliance back on. |
CHARACTERISITICS:
- Max. Inlet Water Pressure: 0.6 M Pa
- Min. Inlet Water Pressure: 0.14 M Pa
FOR EU PRODUCT VERSIONS AND/OR IN CASE THAT IT IS REQUESTED IN YOUR COUNTRY:
ECOLOGY AND RECYCLABILITY OF THE PRODUCT
- The materials of which the packaging of this appliance consists are included in a collection, classification and recycling system. Should you wish to dispose of them, use the appropriate public recycling bins for each type of material.
- The product does not contain concentrations of substances that could be considered harmful to the environment.
This symbol means that in case you wish to dispose of the product once its working life has ended; take it to an authorised waste agent for the selective collection of Waste from Electric and Electronic Equipment (WEEE).
This appliance complies with Directive 2014/35/EU on Low Voltage, Directive 2014/30/EU on Electromagnetic Compatibility, Directive 2011/65/EU on the restrictions of the use of certain hazardous substances in electrical and electronic equipment and Directive 2009/125/EC on the ecodesign requirements for energy-related products.
The appliance contains flammable refrigerant
Français
STAP 1 VULLEN MET WATER
warm water te produceren
HANDGREEP VOOR TRANSPORT:
VOOR PRODUCTEN AFKOMSTIG UIT DE EUROPESE UNIE EN/OF INDIEN DE WETGEVING VAN HET LAND WAARUIT HET PRODUCT AFKOMSTIG IS DIT VEREIST:
MILIEUVRIENDELIJKHEID EN HERGEBRUIK VAN HET PRODUCT
| -pinkklll -pinkklll -pinkklll -pinkklll -pinkklll -pinkklll -pinkklll -pinkklll -pinkklll -pinkklll -pinkklll -pinkklll -pinkklll -pinkklll -pinkklll -pinkklll -pinkklll -pinkklll -pinkklll -pinkklll -pinkklll |
| -pinkklll -pinkklll -pinkklll -pinkklll -pinkklll -pinkklll -pinkklll -pinkklll -pinkklll -pinkklll -pinkklll -pinkklll -pinkklll -pinkklll -pinkklll -pinkklll -pinkklll -pinkklll -pinkklll -pinkkall |
- المواصفات:
ICE/+ LOCK/SET - ED. Combined Retention from the Environnement, as it's a minimum level of the maximum level of the minimum level of the minimum level of the minimum level of the minimum level of the minimum level of the minimum level of the minimum level of the minimum level of the minimum level of the minimum level of the minimum level of the minimum level of the minimum level of the minimum level of the minimum level of the minimum level of the minimum level of the minimum level of the minimum level of the minimum level of the minimum level of the minimum level of the minimum level of the minimum level of the minimum level of the maximum
- Español
- Ice maker / water fountain
- Dear customer,
- SAFETY ADVICE AND WARN- INGS
- USE AND CARE:
- SERVICE:
- DESCRIPTION
- INSTALLATION
- INSTRUCTIONS FOR USE
- BEFORE USE:
- STEP 1:ADD WATER
- USE:
- GETTING HOT /COLD WATER / ICE
- SET TIMER:
- SETTING THE CLOCK:
- SETTING THE TIMER FOR THE ICE MAKING FUNCTION:
- UNSETTING THE TIMER FOR THE ICE MAKER FUNCTION:
- SETTING THE TIMER FOR THE HOT WATER FUNCTION,
- UNSETTING THE TIMER FOR THE HOT WATER FUNCTION:
- TIME SETTING FOR TURNING HOT WATER FUNCTION ON AND OFF,
- MAKE ICE CUBES:
- ONCE YOU HAVE FINISHED USING THE APPLIANCE:
- CARRY HANDLE/S:
- SAFETY THERMAL PROTECTOR:
- CLEANING
- DRAIN WATER
- ANOMALIES AND REPAIR
- CHARACTERISITICS:
- FOR EU PRODUCT VERSIONS AND/OR IN CASE THAT IT IS REQUESTED IN YOUR COUNTRY:
- ECOLOGY AND RECYCLABILITY OF THE PRODUCT
- Français
- STAP 1 VULLEN MET WATER
- HANDGREEP VOOR TRANSPORT:
- VOOR PRODUCTEN AFKOMSTIG UIT DE EUROPESE UNIE EN/OF INDIEN DE WETGEVING VAN HET LAND WAARUIT HET PRODUCT AFKOMSTIG IS DIT VEREIST:
- MILIEUVRIENDELIJKHEID EN HERGEBRUIK VAN HET PRODUCT
Brand : TAURUS
Model : MG 10
Category : Water dispenser